Hybrid Deployment
You must have an Enterprise or Business Critical plan to use the Hybrid Deployment model.
Fivetran's Hybrid Deployment model enables organizations to sync data sources using Fivetran while ensuring the data never leaves the secure perimeter of the cloud or on-premises network. This architecture grants you complete control over your data's flow, allowing you to meet specific business needs concerning data security.
With the Hybrid Deployment model, you decide where to host the data pipelines while still enjoying the advantages of an automated SaaS model. Your data remains within your private network, with Fivetran serving as a unified control plane for all your data movements. This setup not only supports Hybrid and multi-cloud deployments but also offers an extensible solution complete with APIs, metadata sharing, and more. Additionally, it simplifies troubleshooting, provides a straightforward setup, and is easy to configure and support.
When setting up a new data pipeline, you have the option to run it locally. When you install a Hybrid Deployment Agent within your environment, it communicates outbound with Fivetran. This agent manages the data pipeline processing in your network, with configuration and monitoring still performed through the Fivetran dashboard or API. Only metadata (including MAR information) and logs are sent to Fivetran, which allows Fivetran to understand how the pipeline is running and to display the details in the dashboard.
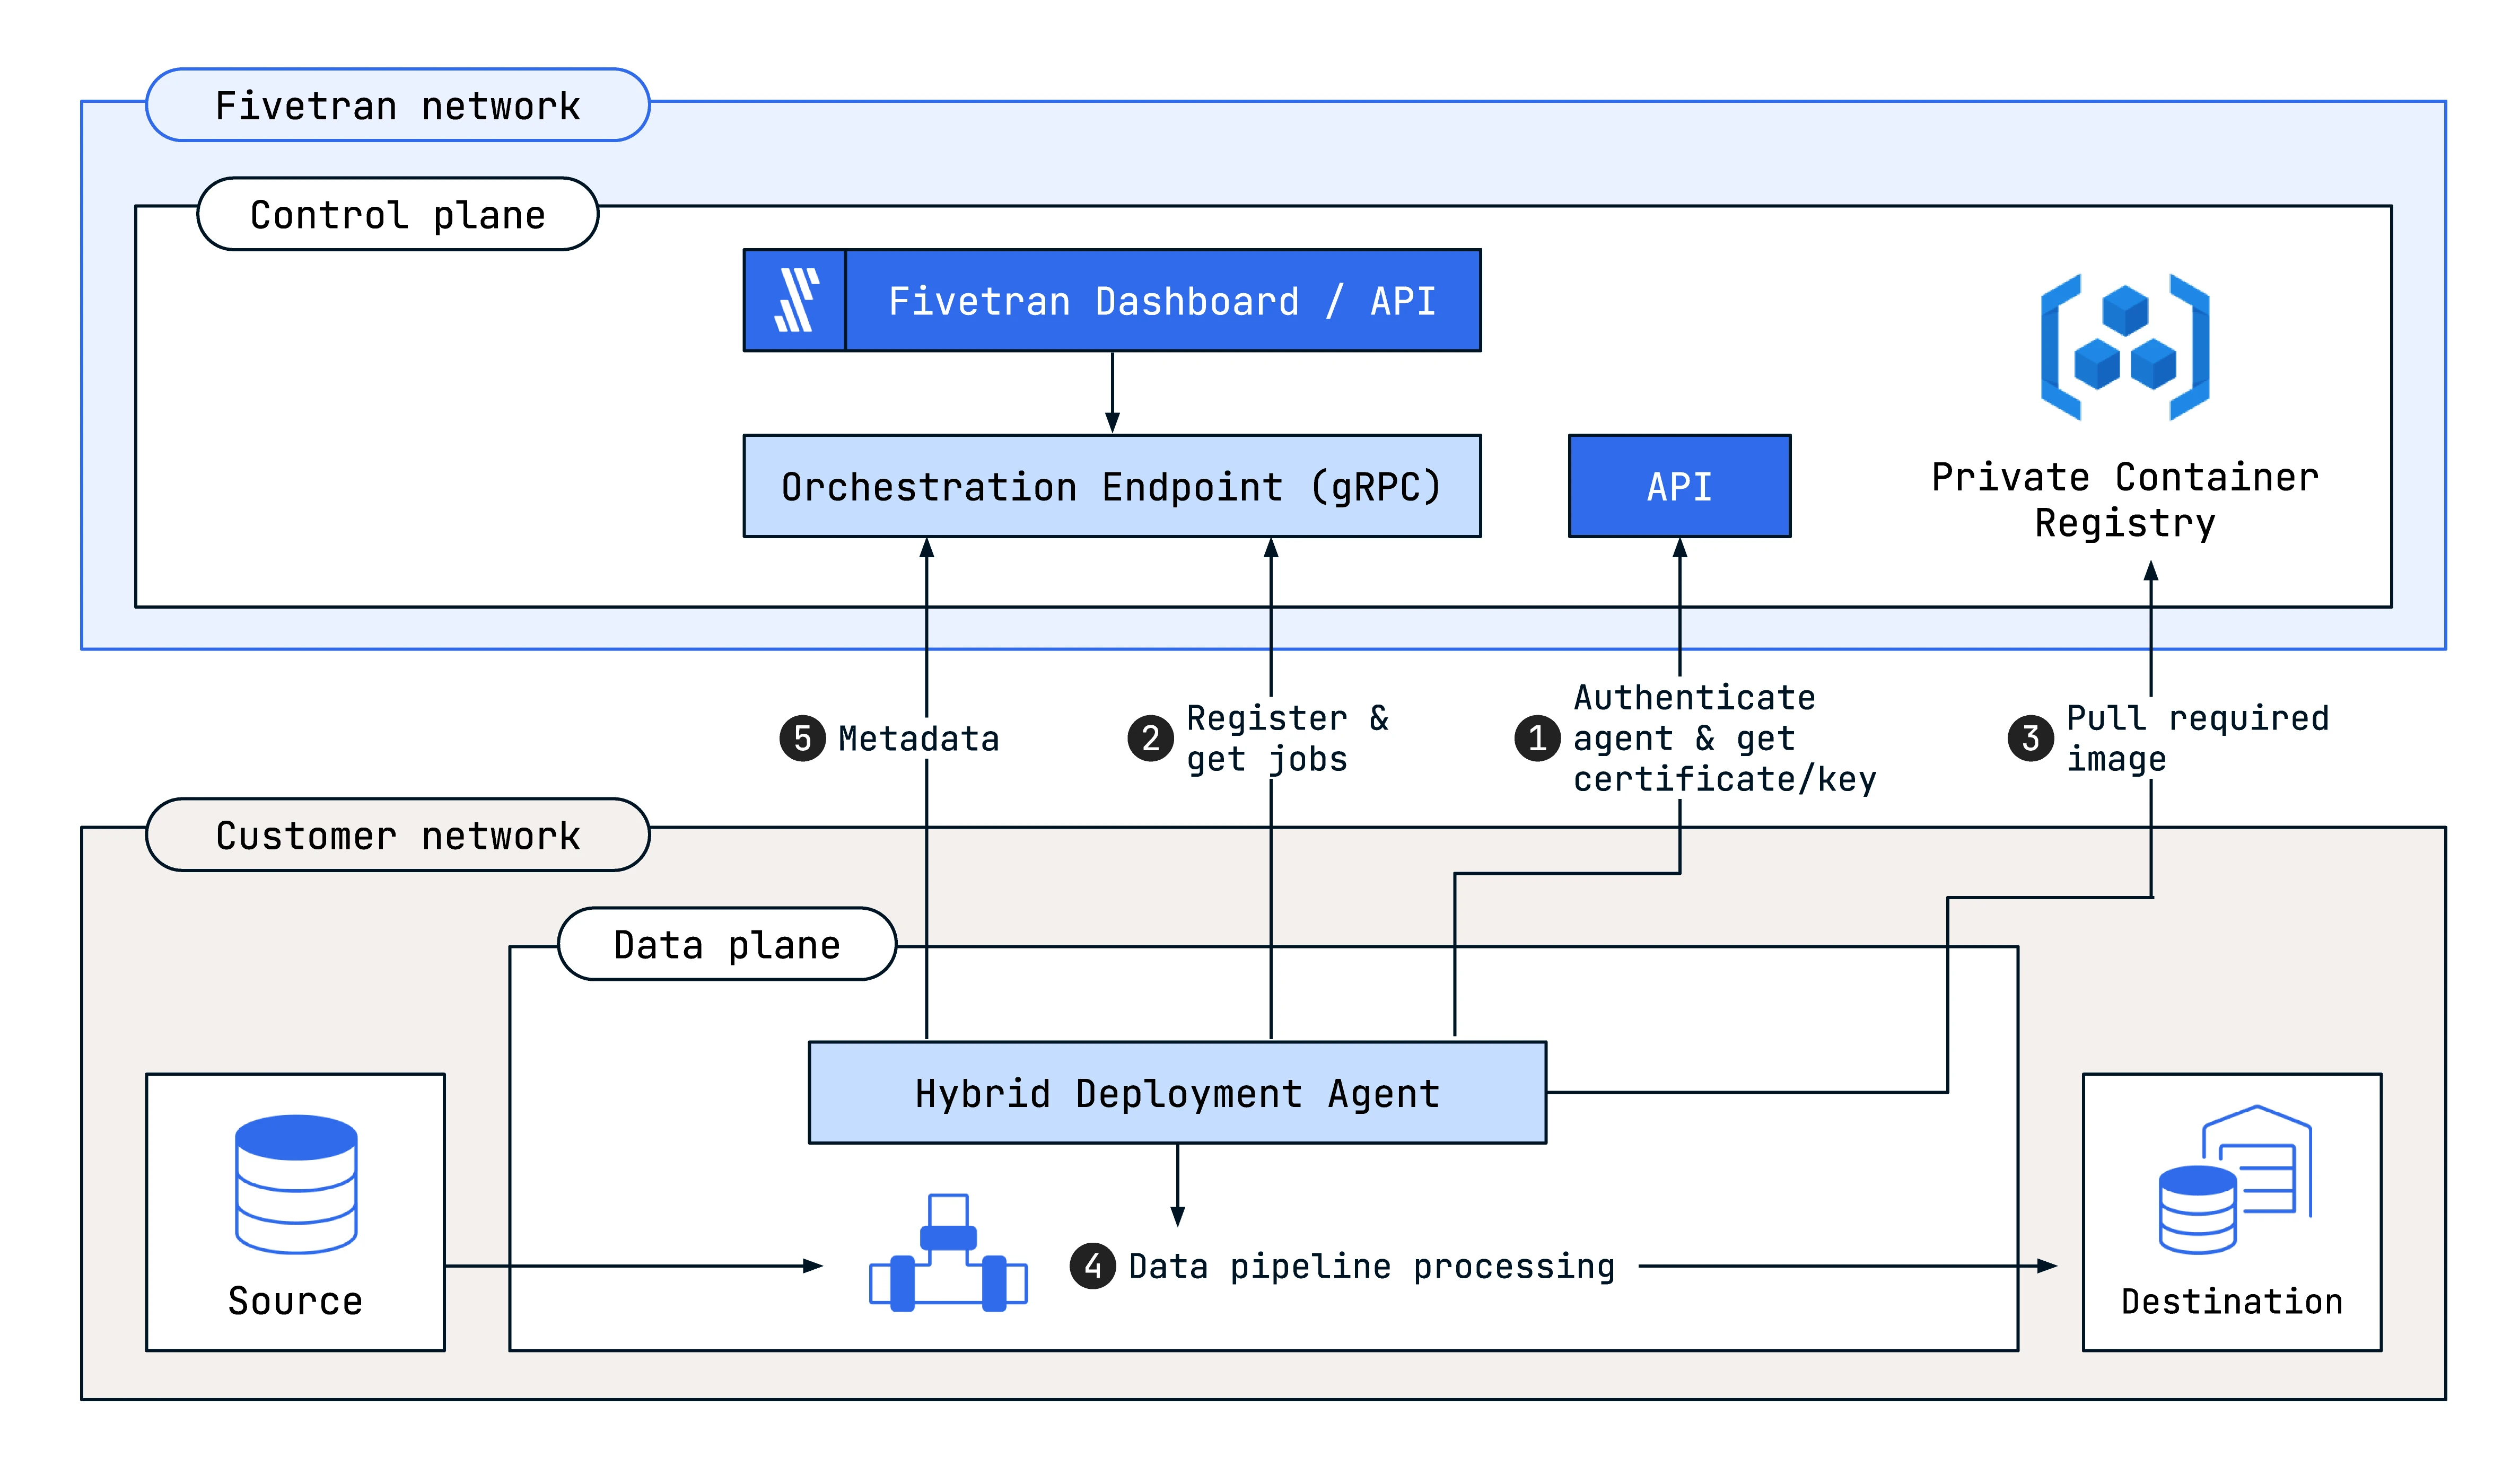
Architecture
The following diagram outlines the high-level architecture of our Hybrid Deployment model:
Key capabilities
The key capabilities of the SaaS Deployment model:
- Data ingestion and preparation
- Parallel processing
- Temporary data storage: you own and manage the temporary data storage (buckets)
- Data load into a destination
Data privacy and security: Our Hybrid Deployment model processes data within your infrastructure, keeping your actual data within the secure boundaries of your network.
Hybrid Deployment Agent: You host this agent on your infrastructure. It connects your local environment to Fivetran's Managed SaaS, maintaining constant communication with Fivetran to determine when the data pipeline needs to run. The local agent picks up those details from Fivetran's orchestration layer to perform the sync.
Deployment and operation: To use the Hybrid Deployment model, start the agent container on Kubernetes or on a Linux machine equipped with Docker or Podman. After setting up the agent on your network, the agent manages data pipeline processing within that network. Configuration and monitoring of the data pipeline still occur within the Fivetran environment, using the Fivetran dashboard or API. The agent only sends metadata, including sync metrics, MAR information, and logs to the Fivetran cloud for tracking and monitoring, accessible using the Fivetran dashboard.
Network Security: The agent creates a secure outbound connection to Fivetran using modern encryption standards like mTLS. You have the option to limit the outbound traffic to the Fivetran Orchestration and API endpoints.
Resilience: The control plane is a fully managed, cloud-based component of Hybrid Deployment. Our Core Services SLA supports the configuration and monitoring of your data pipeline processing.
Capacity and limitations: Each agent can support up to 10 connections. We recommend that you plan the deployment strategy with this limitation in mind.
Setup guide
Follow our step-by-step setup guides to set up the Hybrid Deployment model for secure data integration in your local environment:
Supported connectors and destinations
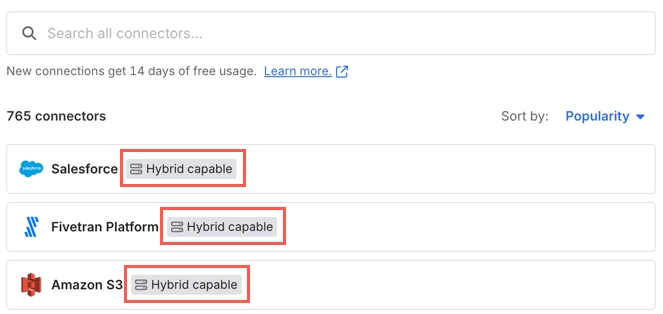
Fivetran supports the Hybrid Deployment model for a subset of its connectors and destinations.
On the Fivetran dashboard, you can identify the connectors and destinations that support the Hybrid Deployment model by the Hybrid capable icon next to their names.
Supported connectors
Fivetran supports Hybrid Deployment for the following connectors:
Application connectors
- 15Five
- 360Learning
- 6sense
- 7shifts
- Absorb LMS
- AccuLynx
- ActiveCampaign
- Acumatica
- Ada
- Adform
- Adobe Analytics Data Feed
- Adobe Commerce
- Adobe Workfront
- Afterpay
- Aha!
- Akamai
- Akeneo
- Alation
- Alchemer
- Algolia
- Alida
- Amazon Ads
- Amazon Attribution
- Amazon DSP
- Anvyl
- Apollo
- Appcues
- Appfigures
- AppLovin
- Ascend by Partnerize
- Ashby
- Assembled
- Asset Panda
- Atlassian Compass
- Attio
- Aumni
- Aura from Unity
- Auth0
- Autodesk BIM 360 & Construction Cloud
- AvantLink
- Awin
- Azure DevOps
- Backbone PLM
- BallotReady
- Bazaarvoice
- Betterworks
- Bigin by Zoho CRM
- BigMarker
- BillingPlatform
- Bing Webmaster Tools
- Birdeye
- Bitly
- Bizzabo
- Boostr
- Brave Ads
- Breathe HR
- Brevo
- Brex
- Brightcove
- Brightflag
- Brightpearl
- Brivo
- Buildium
- Buildkite
- Buzzsprout
- Bynder
- Cabcharge
- Cal.com
- Calabrio
- Calendly
- CallRail
- Campaign Monitor
- Campfire
- Canny
- Canvas by Instructure
- Canvas Data 2 by Instructure
- CaptivateIQ
- Care Quality Commission
- Castor EDC
- Centra
- Ceridian Dayforce
- Chameleon
- Chargebee Product Catalog 1.0
- Chargebee Product Catalog 2.0
- ChargeDesk
- Charthop
- ChartMogul
- Checkout.com
- Chorus
- Churnkey
- ChurnZero
- Cimis
- Cin7 Core
- Cin7
- CircleCI
- Circle Community Platform
- CJ Commission Detail
- Clari
- Claude
- Claude Compliance
- Clazar
- ClickUp
- Clockify
- Clockodo
- Cloudbeds
- Cloudflare Analytics
- CloudTalk
- Clubspeed
- Coalesce
- Coassemble
- Coda
- Codefresh
- Collibra
- Column
- commercetools
- Compliance Checkpoint
- Concord
- Confluence
- Consensus Demo Automation Platform
- Constant Contact
- Contrast Security
- Copper
- Cornerstone
- Coupa
- Credly
- Criteo Retail Media
- Crossbeam
- crowd.dev
- Cube Software
- Crunchbase
- Culture Amp
- Cvent
- D2L Brightspace
- Datadog
- dbt Cloud
- DCL Logistics
- Deel
- Deposco
- Destini
- Device Magic
- Dialpad
- Discourse
- Dixa
- Docebo
- Donus
- DoorLoop
- Drata
- Drift
- Drip
- Dropbox Sign
- DSV
- Duoplane
- Dutchie
- e-conomic
- EasyPost
- eBay
- Electronic Tenant Solutions
- Employment Hero
- Eventbrite
- Eventsforce
- Everflow
- Everhour
- Exact Online
- ExpenseIn
- Expensify
- EZOfficeInventory
- Facebook Ads
- Factbird
- Factorial
- Fathom
- Fillout
- Fireflies
- FireHydrant
- Fivetran Platform connector
- Flexport
- Float
- Fone Dynamics
- Forethought
- Forj Community
- Formstack
- Fortnox
- Fountain
- FourKites
- Freightview
- FreshBooks
- Freshchat
- Freshdesk Contact Center
- Freshsales
- Freshsuccess
- FreshTeam
- Friendbuy
- Fulfil
- FullStory
- G2
- Gainsight Customer Success
- Gainsight Product Experience
- Gem
- Genesys
- GetFeedback
- GitHub
- GitLab
- Gladly
- GlobalMeet
- Gmail
- GoCardless
- GoFundMe Pro
- Goldcast
- Gong
- Google Ads
- Google Analytics 4
- Google Business Profile
- Google Calendar
- Google Classroom
- Google Display and Video 360
- Google Play
- Google Search Ads 360
- Google Tag Manager
- Google Tasks
- Gorgias
- GreenPowerMonitor
- Grepsr
- GRIN
- Guru
- HappyFox
- Harvest
- Healthie
- Heartland Retail POS
- Helpdesk
- Helpjuice
- Helpshift
- Hex
- HiBob
- Higher Logic Vanilla
- HighLevel
- Hilti On!Track
- Hopin
- IBACOS
- iLevel
- Impact Brand
- Impact Partner
- Incident.io
- Infobip
- Insightly
- Integral Ad Science
- Integrate
- Ironclad
- Ironclad Clickwrap
- ironSource
- Ivanti
- Jama Software
- Jamf
- Jibble
- Jira Align
- JobNimbus
- Jotform
- JustCall
- Kandji
- Katana
- Kevel
- KeyPay
- Khoros Care
- Khoros Communities
- Khoros Marketing
- Kisi
- Kissmetrics
- Klarna
- Konnect Insights
- Lattice
- LaunchDarkly
- Leap CRM
- Leapsome
- LearnUpon
- Learn Amp
- Leave Dates
- Lemlist
- Lessonly
- Lever
- Liftoff
- Lightspeed Retail X-Series
- LINE Ads
- Linear
- LinkSquares
- LinkedIn Ads
- Listen360
- LiveChat Partner
- Livestorm
- Lob
- Looker
- Loop
- Loopio
- Lucca
- Luma
- Magento
- Maileon
- Mailgun
- Mailjet
- MaintainX
- Malomo
- Mambu
- Marketo
- Matomo
- Maxio Chargify
- Maxio SaaSOptics
- Medallia
- Medallia Agile Research
- Megaphone
- Mention
- Microsoft Dynamics 365 Business Central
- Microsoft Dynamics 365 CRM
- Microsoft Dynamics 365 Finance and Operations
- Microsoft Entra ID
- Microsoft Lists
- Microsoft Power BI
- Microsoft Teams
- Missive
- Mixmax
- Mixpanel
- MNTN
- Mode
- Mollie
- Moloco
- Monday.com
- Mux
- myosh
- Namely
- National Heavy Vehicle Regulator
- Navan
- NetSuite SuiteProjects Pro
- NetSuite SuiteAnalytics
- NICE
- Notion
- Nylas
- Odoo
- Okendo
- Okta
- Ometria
- ON24
- OnceHub
- OneTrust
- OpenAI
- OpenAI Compliance Platform
- Open Data DC
- Open Exchange Rates
- Opsgenie
- Oracle Business Intelligence Publisher
- Oracle E-Business Suite (EBS)
- Oracle Fusion Cloud Applications - CRM
- Oracle Fusion Cloud Applications - FSCM (ERP & SCM)
- Oracle Fusion Cloud Applications - HCM
- Oracle Fusion Field Service
- Oracle Moat Analytics
- Orbit
- Ordergroove
- Ortto
- Packiyo
- Paddle
- PagerDuty
- Papershift
- parcelLab
- Partnerize
- PartnerStack Vendor
- Paychex
- Paylocity
- PayPal
- PayPal Sandbox
- PeopleForce
- Persona
- Personio
- Phoenix Ads
- Picqer
- Pigment
- Pingdom
- Pinpoint
- Pinterest Organic
- Pipe17
- Pivotal Tracker
- Piwik PRO
- Placer.ai
- Planful
- Planhat
- Playvox Workforce Management
- Playvox
- Podio
- Poplar
- PostHog
- Postmark
- PowerReviews Enterprise
- Prisma Cloud
- Prive
- Procore
- Productboard
- Productive
- Profound
- Proofpoint Security Awareness
- ProsperStack
- Purple Dot
- Pylon Support Platform
- Qmatic Data Connect
- Qualaroo
- Qualtrics
- Quora Ads
- Quorum
- Rakuten Advertising
- Ramp
- Rarible
- ReBound Returns
- Recurly
- ReferralHero
- Refiner
- Resource Management by Smartsheet
- RetailNext
- Retently
- Revel Systems
- RevenueCat
- REVIEWS.ai
- REVIEWS.io
- RevOps
- RevX
- Ricochet360
- Ringover
- Rippling
- Rithum
- Rivo
- Rocketlane
- Rokt
- Rollbar
- Rootly
- RTB House
- Ruddr
- Rundeck
- SafeBase
- SafetyCulture
- Sage HR
- Salesforce
- Salesforce Marketing Cloud
- Salesforce Sandbox
- Salsify
- Samsara
- Sana
- SAP SuccessFactors
- SCORM
- Security Journey
- Sentry
- ServiceNow
- ServiceTitan
- ServiceTrade
- sevdesk
- Shareasale
- Sharetribe
- ShipHero
- ShipMonk
- ShipNetwork
- ShipStation
- Shopware
- Short.io
- Shortcut
- Showpad
- Siemens Building X Openness
- Sigma Computing
- Simplecast
- Simplesat
- SISTRIX
- SkillsTX
- Skimlinks
- SkuVault
- Slack
- Smadex
- SmartHR
- SmartRecruiters
- Smartwaiver
- Snyk
- SolarWinds Service Desk
- SonarQube
- SparkPost
- Splash
- Split
- Sprout Social
- Squarespace
- StackAdapt
- Standard Metrics
- StarRez
- Statistics Netherlands CBS
- Statuspage
- sticky.io
- Stripe
- Stylight
- Subscript
- SugarCRM
- Survicate
- Swoogo
- Tableau
- Talkdesk
- Talkwalker
- Teads
- Teamtailor
- Teamwork
- Tempo
- TestRail
- TextUs
- The Movie Database
- Thinkific
- Ticket Tailor
- TikTok Ads
- TikTok Organic
- Tive
- Toggl Track
- Totango
- Transcend
- Trelica
- Trello
- Tremendous
- Triple Whale
- Trisolute
- Trustpilot
- Tymeshift
- Udemy Business
- UKG Pro
- UKG Pro Workforce Management
- Unicommerce
- Upland Software
- UpPromote
- Uptempo
- Uservoice
- Validio
- Veeqo
- Veeva Vault
- Venminder
- Vimeo
- Visit by GES
- Visma
- Vitally
- Vonage Contact Center
- VTS
- VWO
- Walmart DSP
- Walmart Marketplace
- Web Scraper
- Webconnex
- When I Work
- Wherefour
- Wicked Reports
- WooCommerce
- WordPress
- Workable
- Workday HCM
- Workday Financial Management
- Workday RaaS
- Workday Strategic Sourcing
- Workleap Officevibe
- WorkRamp
- Wrike
- Writesonic
- Xactly
- Xandr
- Xray
- Xsolla
- Yahoo Display Ads on Yahoo Japan
- Yahoo Search Ads on Yahoo Japan
- Yext
- Yotpo
- YouGov BrandIndex
- YouGov Sport
- Younium
- Zendesk Chat
- Zendesk Support
- Zendesk Workforce Management
- Zenefits
- Zingtree
- Zip
- Zoho Books
- Zoho Campaigns
- Zoho Desk
- Zoho Inventory
- Zoho People
- Zoho Recruit
- Zonka Feedback
- Zoom
- Zuora
Database connectors
File connectors
Supported destinations
Fivetran supports Hybrid Deployment for the following destinations:
Security
Fivetran implements robust security measures to ensure the security and integrity of your data throughout the Hybrid Deployment architecture. This includes secure communication between components and strict protection of credentials. The following sections outline the key security practices Fivetran follows for the Hybrid Deployment model.
Communication between agent and Fivetran cloud
In the Hybrid Deployment model, Fivetran never initiates inbound connections to your local environment. Instead, the Hybrid Deployment Agent establishes a secure outbound connection to the Fivetran cloud endpoint using mutual TLS (mTLS). This ensures that both the agent and Fivetran authenticate each other before exchanging data.
To further enhance security, you can configure your environment to restrict outbound traffic only to the secured Fivetran endpoint. You need not open any firewall ports for inbound access.
When you register a Hybrid Deployment Agent, Fivetran generates and provides the mTLS certificates specific to your account and agent. These credentials enable secure communication, and the agent uses them to authenticate with Fivetran.
Credentials security
By default, Fivetran encrypts all source and destination connections using SSL. We store your credentials securely using a key management system backed by a hardware security module (HSM) managed by Fivetran’s cloud service provider. To further enhance security, we allow you to use your encryption keys for added control.
Container image security
Fivetran regularly scans all Hybrid Deployment container images to detect potential vulnerabilities and uses Static Application Security Testing (SAST) and Software Composition Analysis (SCA) tools to identify and remediate security issues.
Fivetran dashboard
We encrypt all communication with the Fivetran dashboard using TLS v1.2 or above. The dashboard does not directly connect to your Hybrid Deployment Agent, containers, or any processes running in your local environment. This separation ensures that the dashboard remains securely isolated from your local infrastructure.
Compliance and certifications
Fivetran maintains industry-standard compliance practices. You can review our security certifications, policies, and compliance reports in Fivetran Trust Center.
The Hybrid Deployment Agent is not FIPS 140-2 certified, as we have not yet tested it on a FIPS 140-2-enabled machine.
Sizing guidelines
To successfully deploy and operate the Hybrid Deployment Agent, it is essential to allocate sufficient system resources based on the type and number of connections you plan to run. The following sections provide conceptual guidance to help you estimate and plan your resource requirements.
Base resource requirements
Each Hybrid Deployment Agent requires at least 2 vCPUs and 2 GB of RAM, and each connection requires at least 2 vCPUs and 4 GB of RAM to start processing data. These baseline requirements apply to non–High-Volume Agent (non-HVA) connectors. For container platform–specific sizing recommendations based on the number of concurrently running data pipelines, see the Prerequisites section in our Setup Guides.
If you want to run multiple data pipelines concurrently on a single host, you must scale the CPU and memory resources proportionally. For more information about the resources required for multiple concurrent pipelines, see the Prerequisites section of our setup guides.
Additional requirements for HVA connectors
High-Volume Agent (HVA) connectors are optimized for large-scale data movement and require more resources per connection. For each HVA connection, we recommend 4 vCPUs and 8 GB of RAM.
Disk space considerations
Disk space usage depends on the volume of the source data. Data pipelines that process large datasets require more storage.
We recommend provisioning disk space based on the expected maximum volume of data in your source, and allocating additional buffer space for temporary files and retries. For Docker and Podman, ensure that the base directory where containers and images are stored, typically /var/lib/docker (for rootful) or $HOME/.local (for rootless), has at least 50 GB of available disk space.
Private networking
Private networking services (such as AWS PrivateLink, Azure Private Link, and Google Cloud Private Service Connect) allow you to sync data from your source into your destination without exposing traffic to the public internet.
Hybrid Deployment works with the private networking service in your local environment to securely connect to your source and destination. You do not have to perform any additional setup to enable private networking in Hybrid Deployment.