NetSuite SuiteAnalytics Setup Guide
Our NetSuite SuiteAnalytics connector supports both the NetSuite.com and NetSuite2.com data sources. To set up your NetSuite SuiteAnalytics connection using the NetSuite2.com data source, do the following steps as shown in the tutorial below:
Follow our setup guide to connect NetSuite SuiteAnalytics to Fivetran.
Prerequisites
To connect NetSuite SuiteAnalytics to Fivetran, you need the following:
- A NetSuite administrative account
- The SuiteAnalytics Connect Service enabled with access to either the NetSuite.com or NetSuite2.com data source
- If you choose the NetSuite.com data source:
- A NetSuite login email
- A NetSuite password
- A list of permissions required for the NetSuite tables you want to sync
Gathering these permissions is often complex. We recommend that you work with your NetSuite administrator to determine which ones are relevant for your needs. Alternatively, you can use the Excel spreadsheet found in the NetSuite Permission Documentation to generate this list yourself.
NetSuite2.com - Setup instructions
Learn how to set up your connection for the NetSuite2.com data source.
Expand for instructions
Find service host, port, and account ID
- Log in to your NetSuite account.
- In the homepage of your NetSuite account, find the Settings module and select Set Up SuiteAnalytics Connect.
- Click Your Configuration. Your service host, port, and account ID information appear.
- Make a note of your host, port, and account ID. You will need them to configure Fivetran.
Copy the account ID exactly as it appears on the Set Up SuiteAnalytics Connect > Your Configuration page. Fivetran requires the account ID format with hyphens instead of underscores and a lowercase suffix. Do not enter the account ID from Setup > Company > Company Information in the setup form, which displays a different format, such as 1234567_SB1, as this causes the connection to fail.
| Account type | Displayed in NetSuite | Required by Fivetran (and OAuth endpoint) |
|---|---|---|
| Production | 1234567 | 1234567 |
| Sandbox | 1234567_SB1 | 1234567-sb1 |
| Sandbox | 1234567_SB2 | 1234567-sb2 |
| Release Preview | 1234567_RP | 1234567-rp |
For more information, see NetSuite documentation.
You can use one of the following authentication methods.
Token-based authentication
Enable token-based authentication
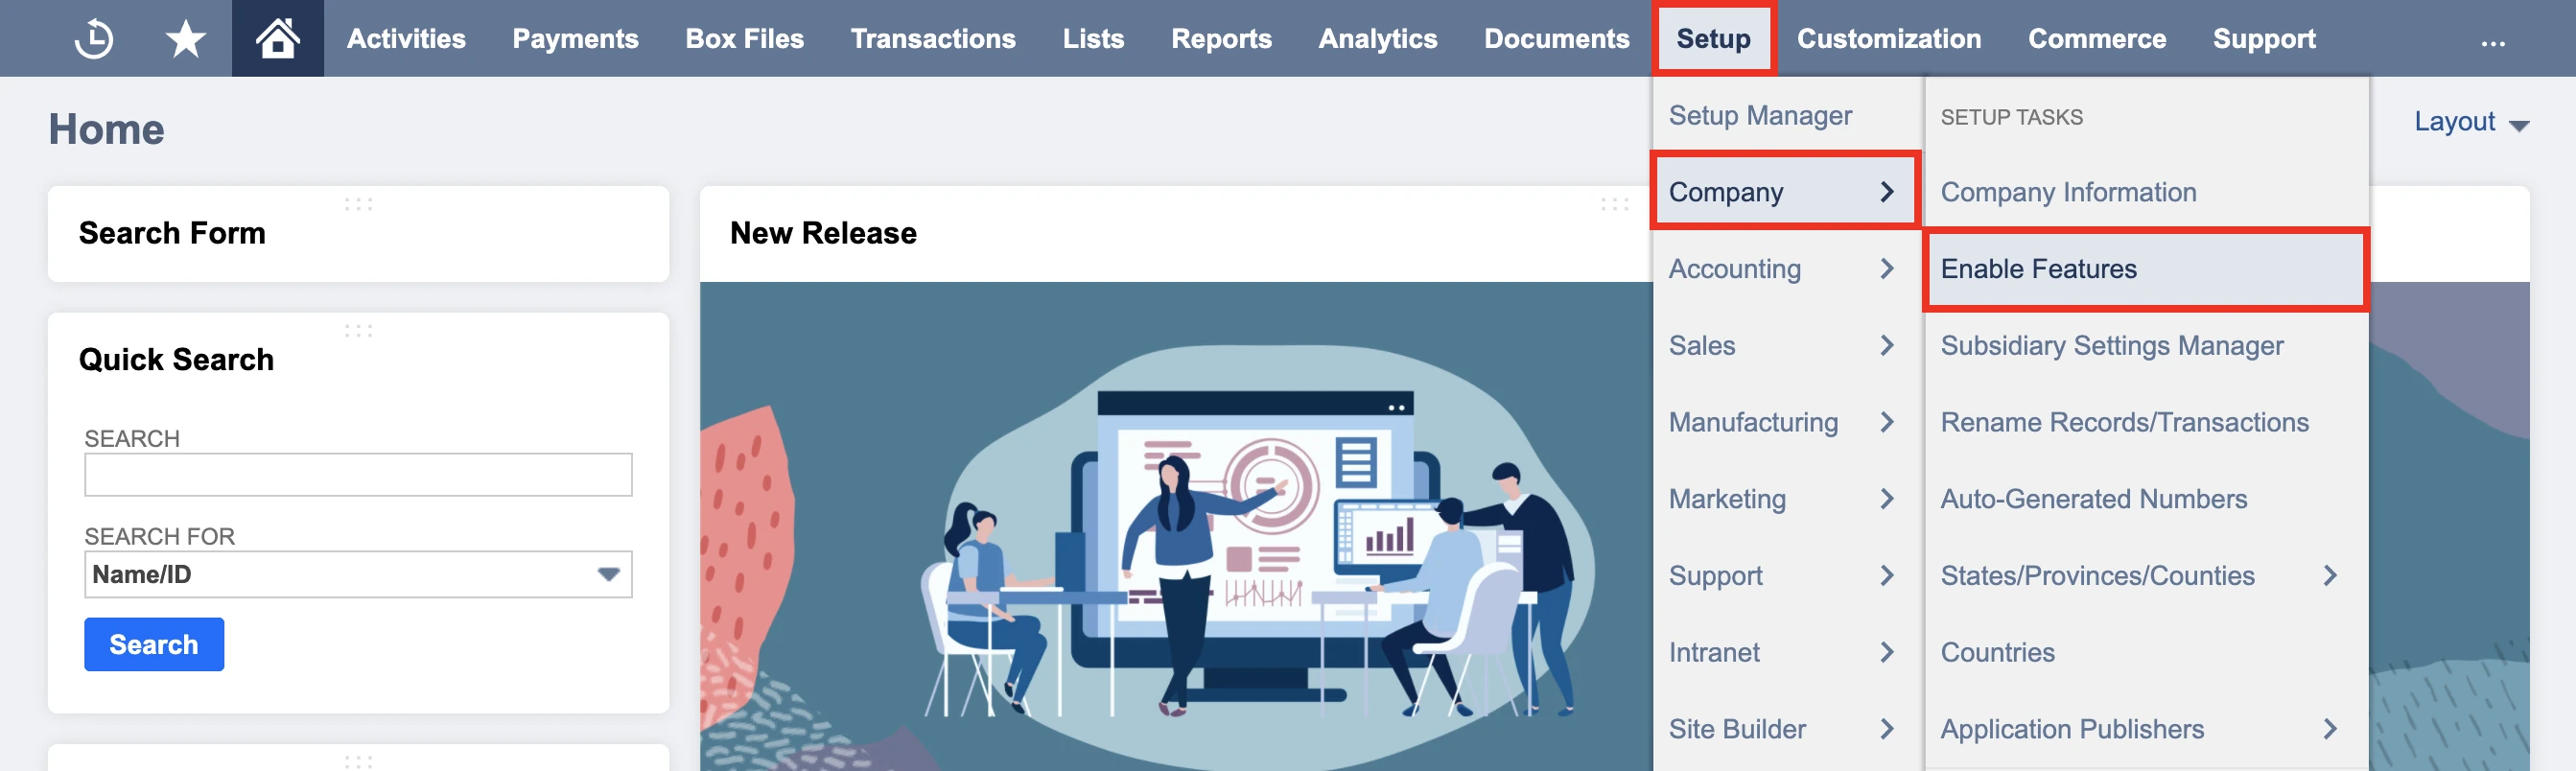
In your NetSuite dashboard, go to Setup > Company > Enable Features.
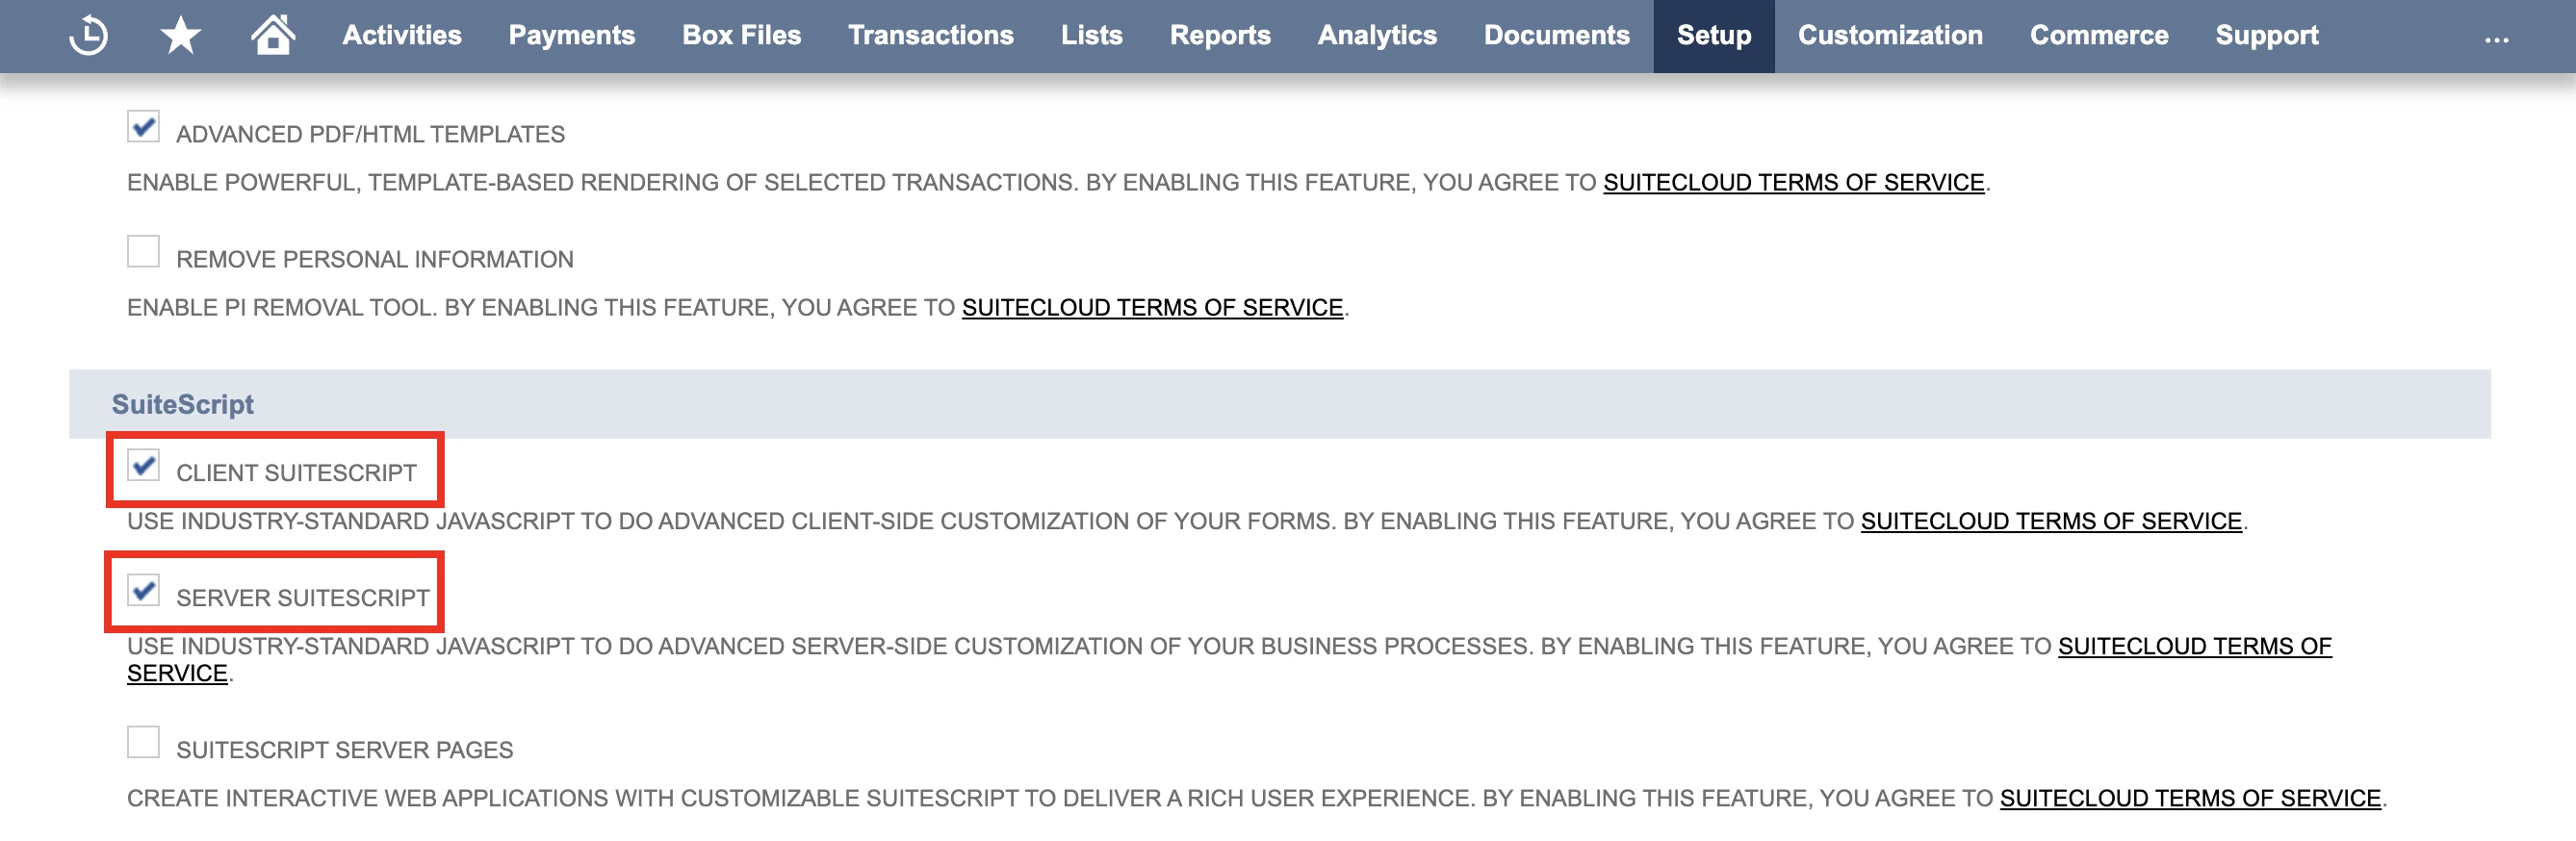
On the SuiteCloud tab of the Enable Features page, check Client SuiteScript in the SuiteScript section.
Click I Agree to accept the SuiteCloud Terms of Service displayed in a new tab.
On the SuiteCloud tab of the Enable Features page, check Server SuiteScript in the SuiteScript section.
Click I Agree to accept the SuiteCloud Terms of Service displayed in a new tab.
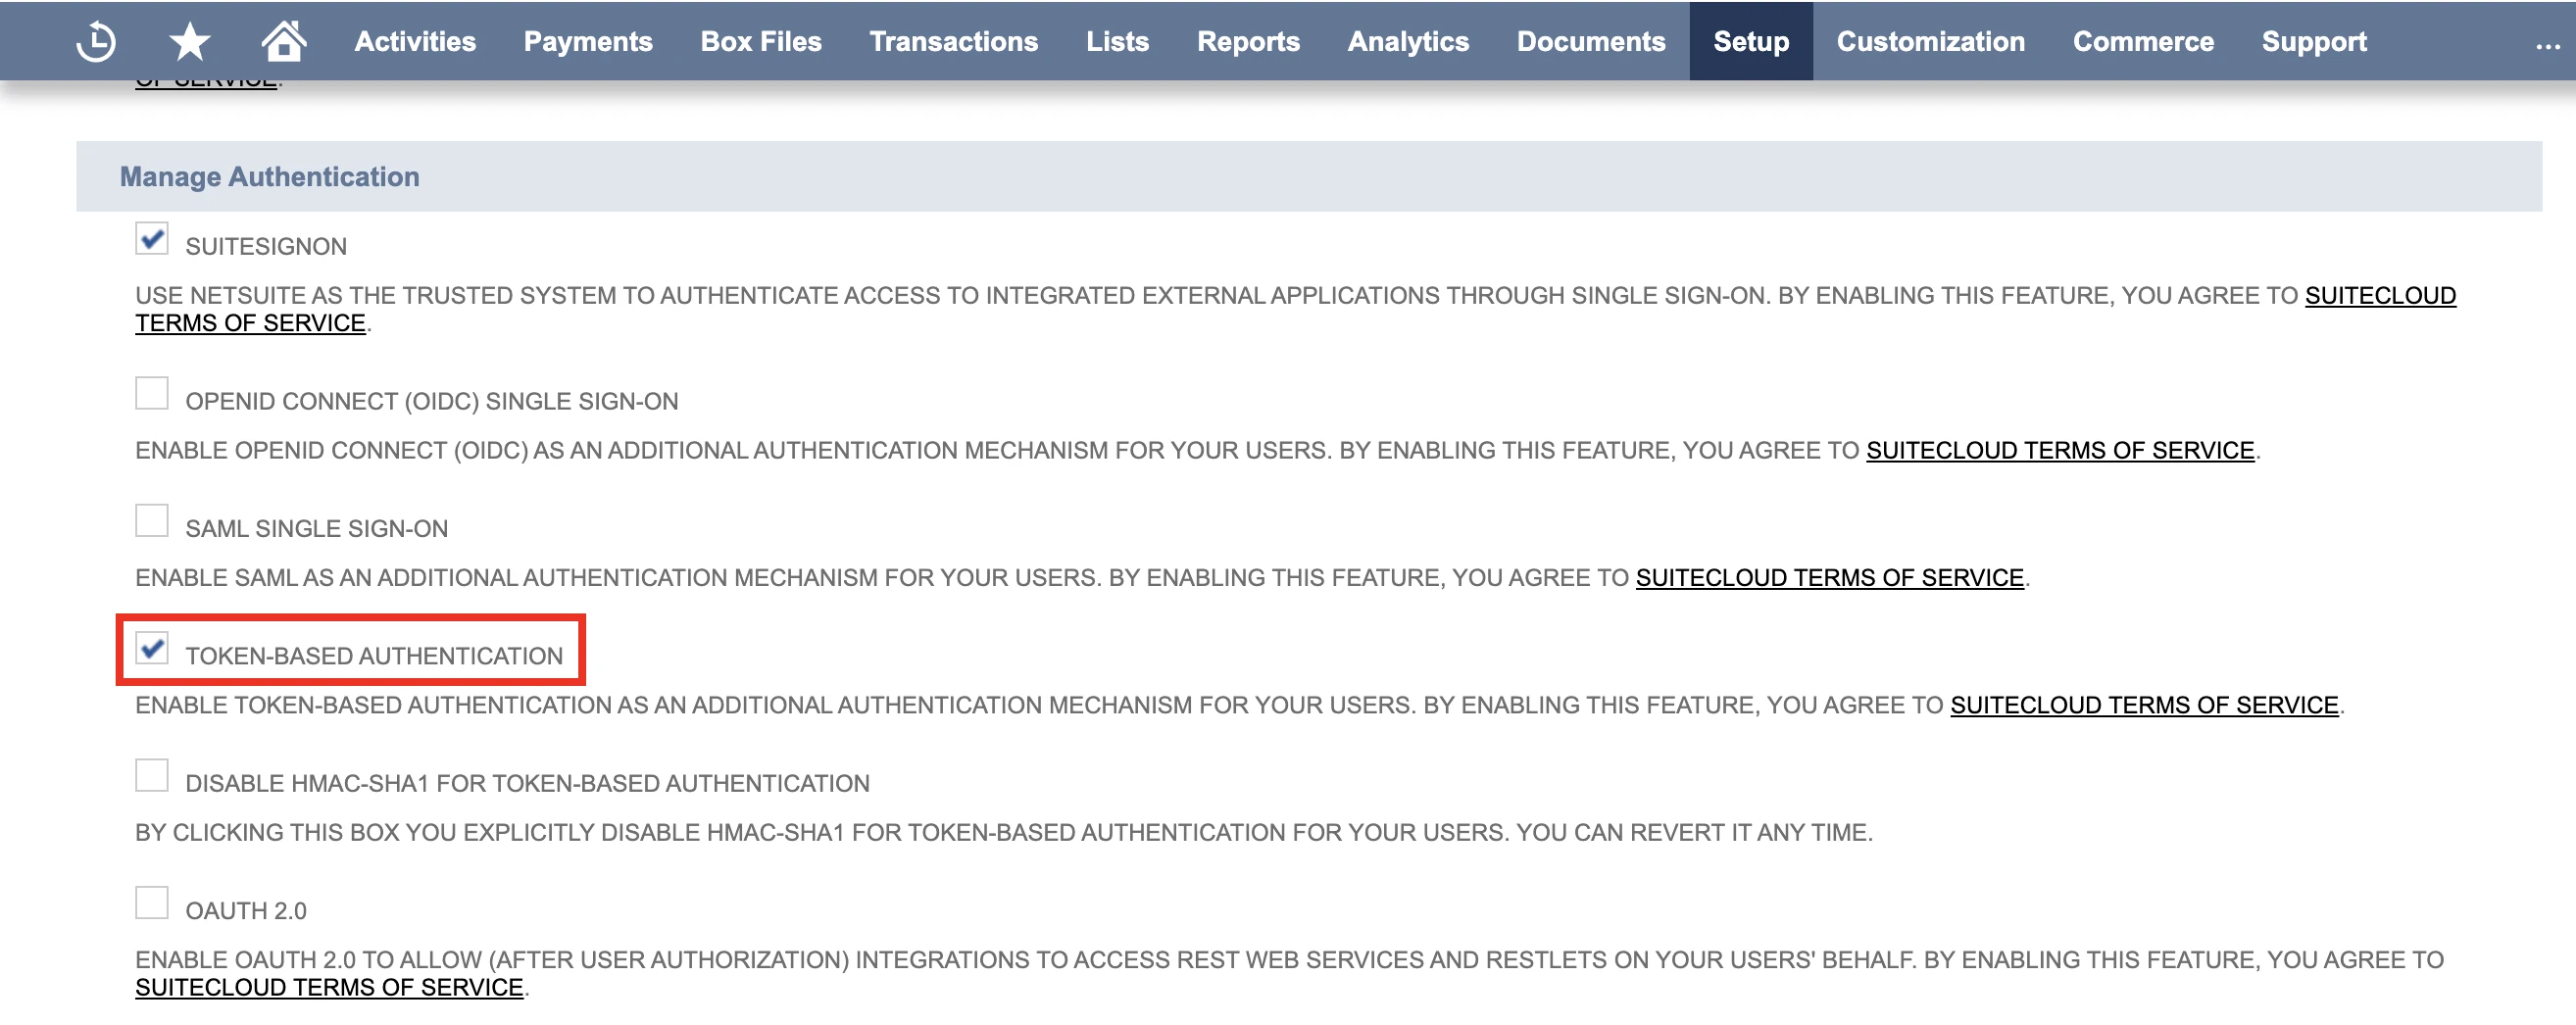
On the SuiteCloud tab of the Enable Features page, check the Token-Based Authentication in the Manage Authentication section.
Click I Agree to accept the SuiteCloud Terms of Service displayed in a new tab.
Click Save.
For more information on enabling token-based authentication, see NetSuite documentation.
Create Integration record with token-based authentication permissions
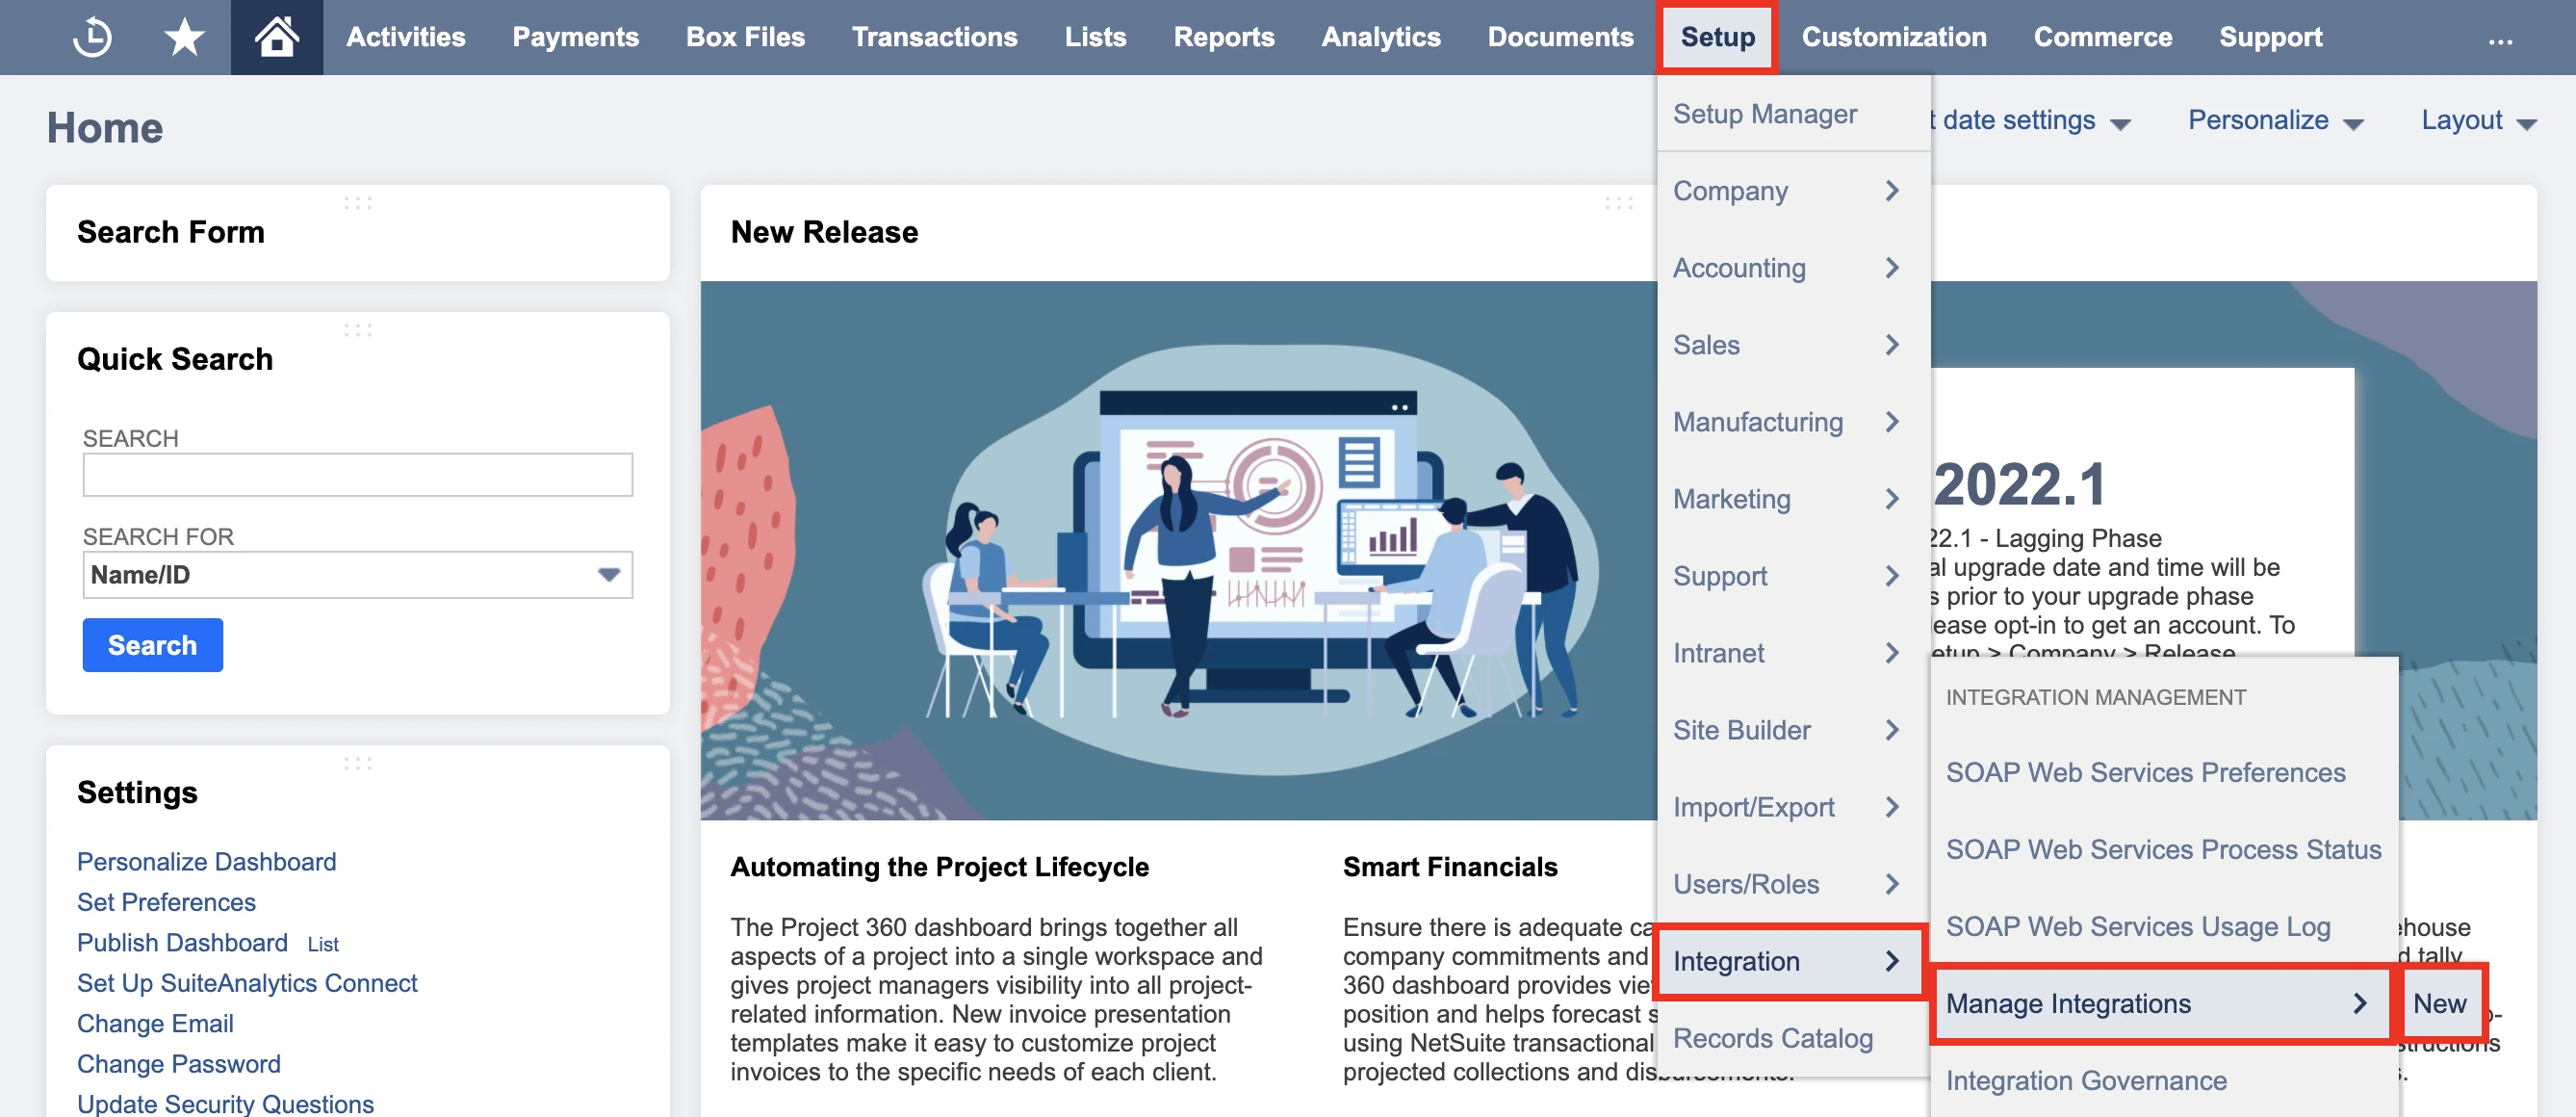
Go to Setup > Integration > Manage Integrations > New.
Enter the name and optional description. (We recommend "FivetranIntegration").
Ensure State is Enabled.
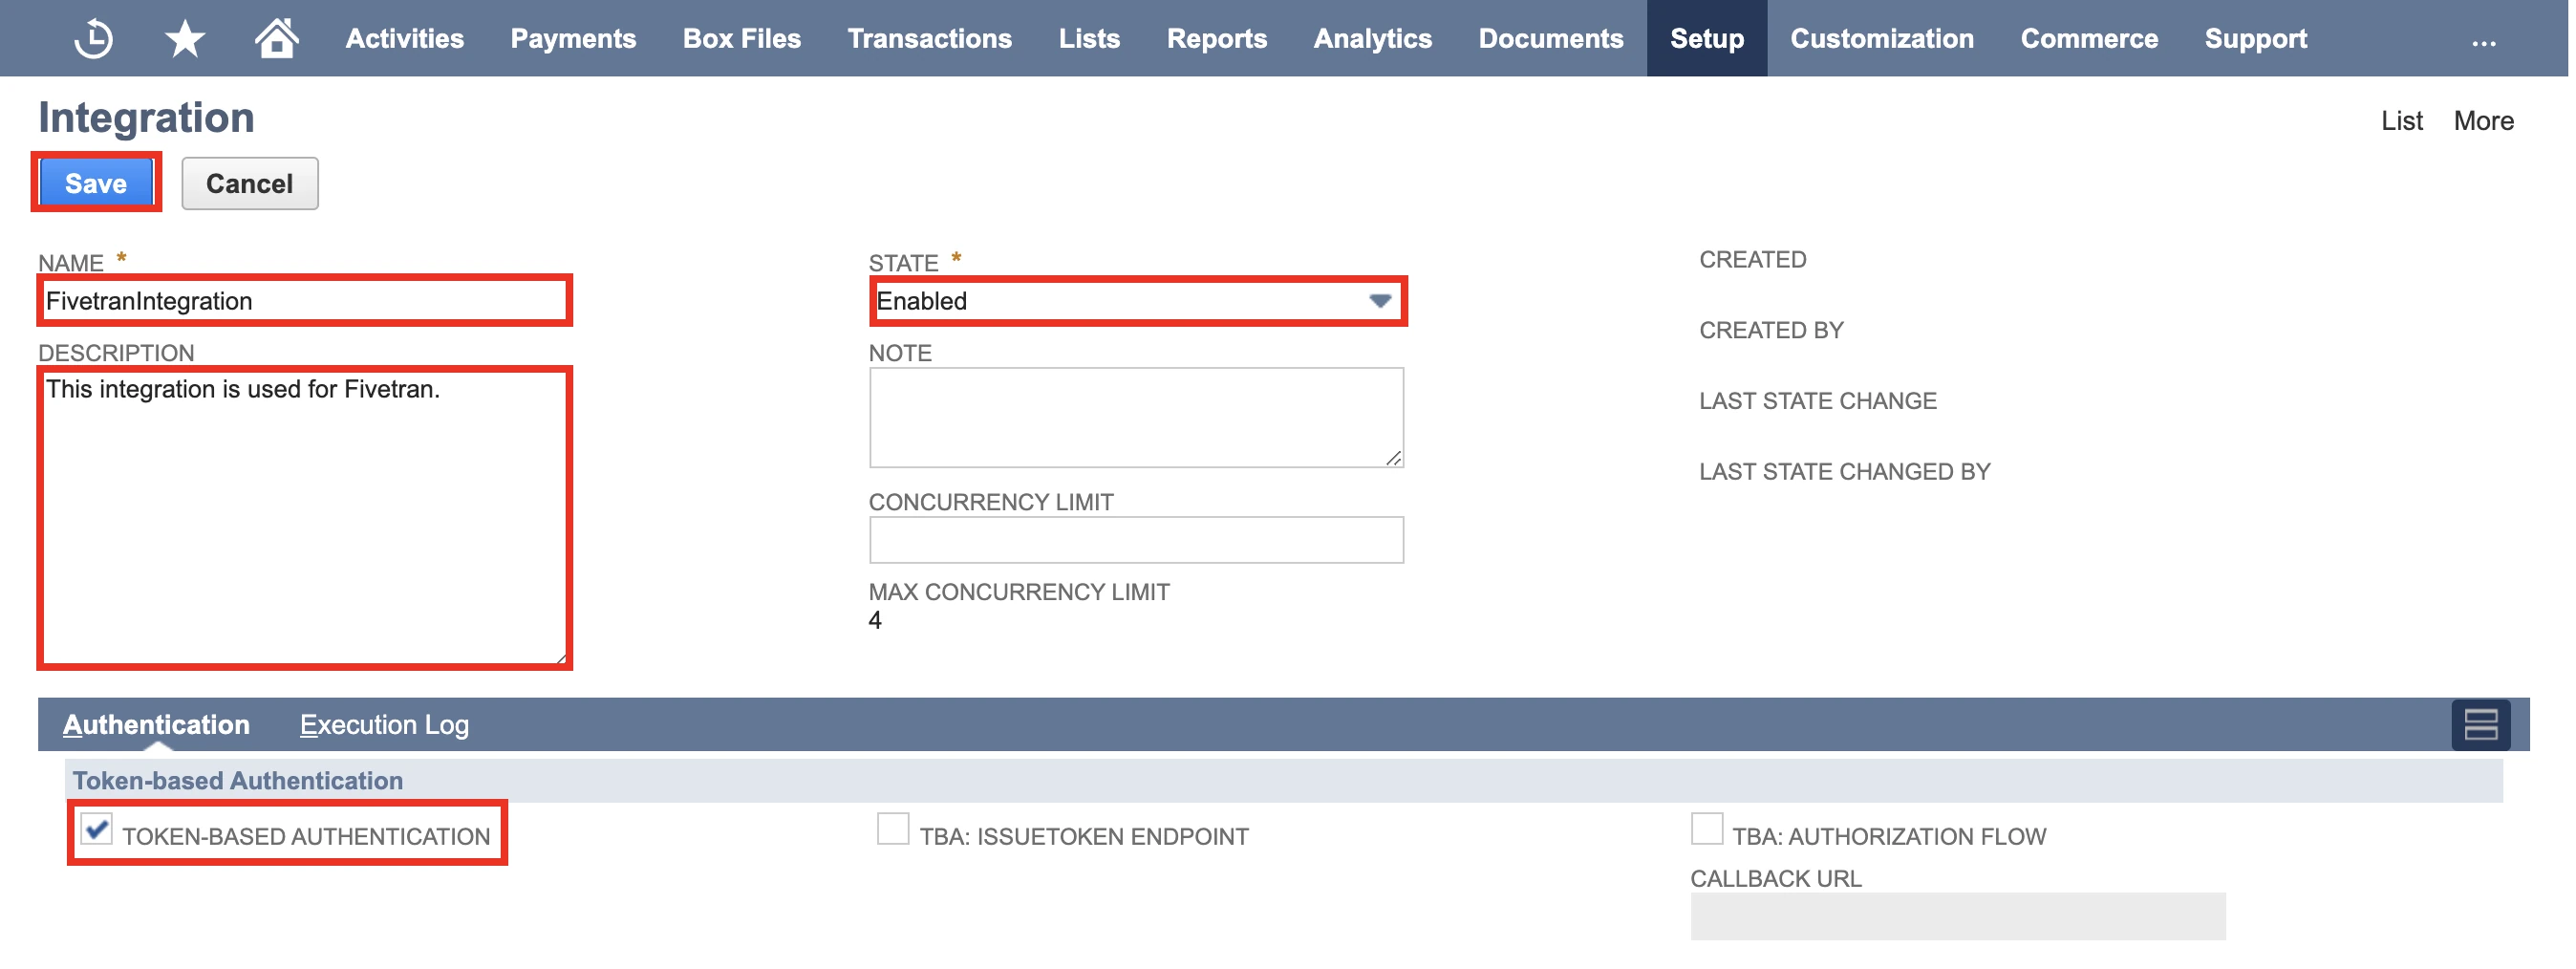
Under the Authentication tab, check Token-based Authentication and uncheck all other options.
Click Save.
The system will display Consumer Key and Consumer Secret. Make a note of them. You will need them to configure Fivetran.
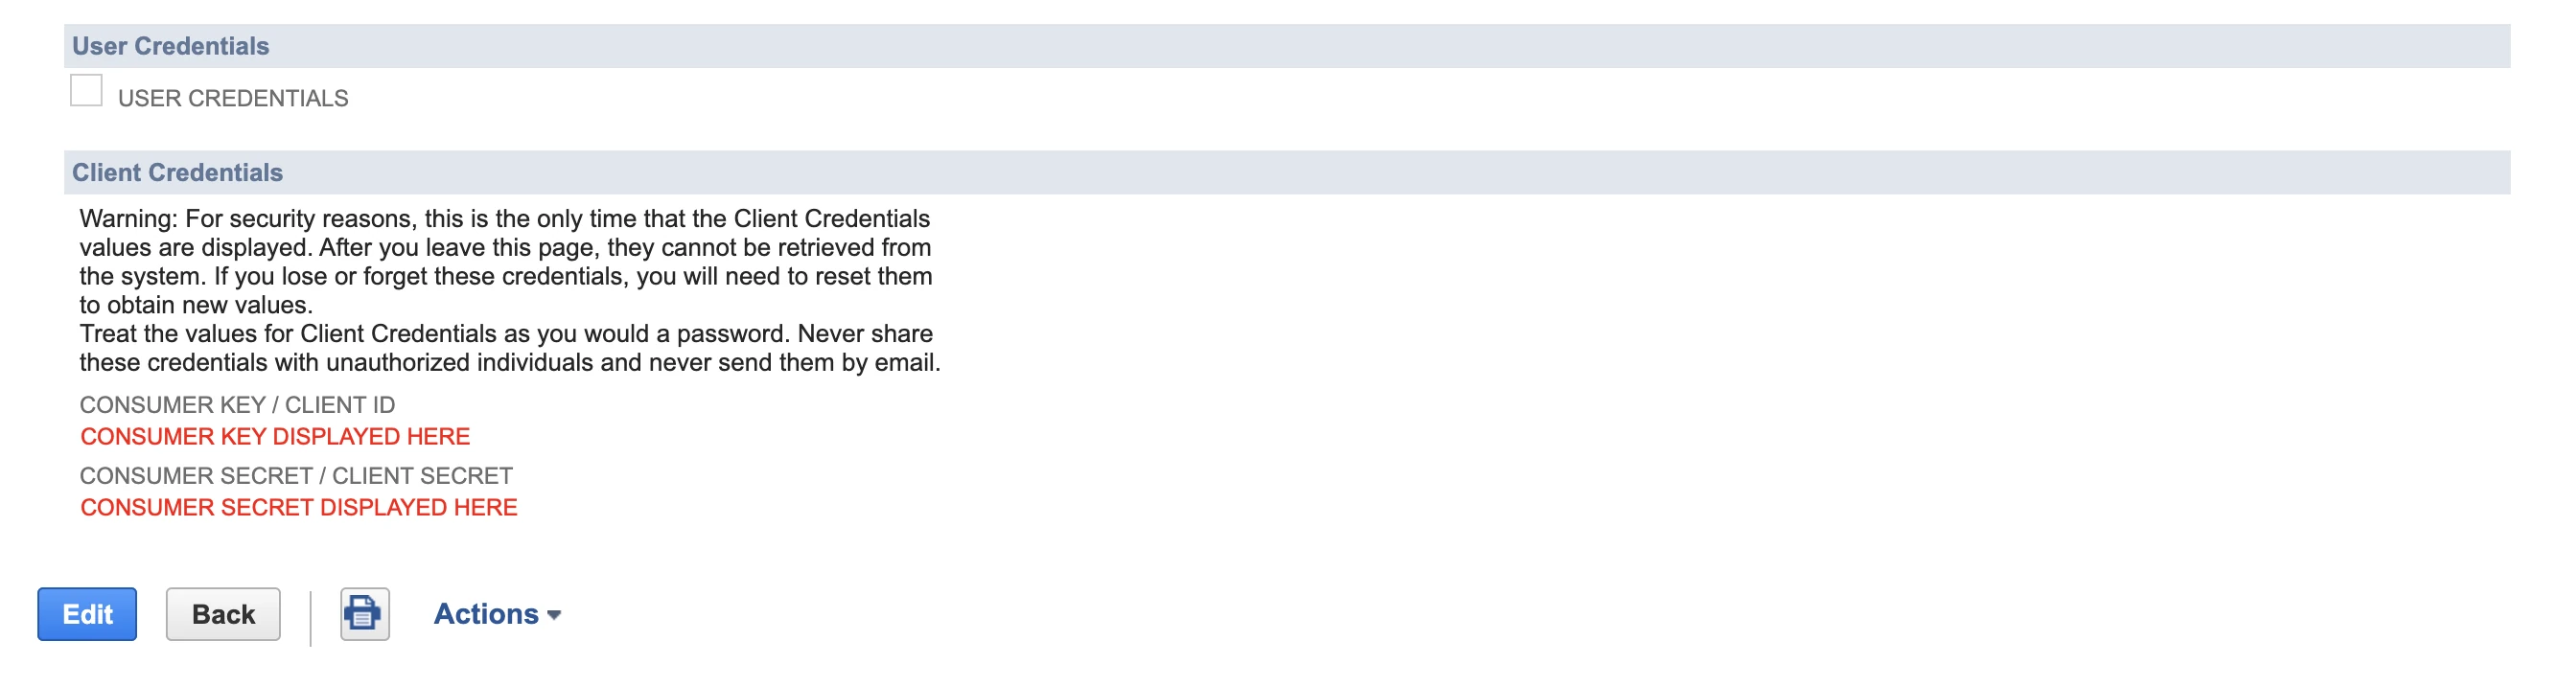
Safely store these details. After you leave this page, they cannot be retrieved from the system. If you lose or forget these credentials, you will need to reset them to obtain new values.
For more information on creating integration records, see NetSuite documentation.
Assign permissions to user
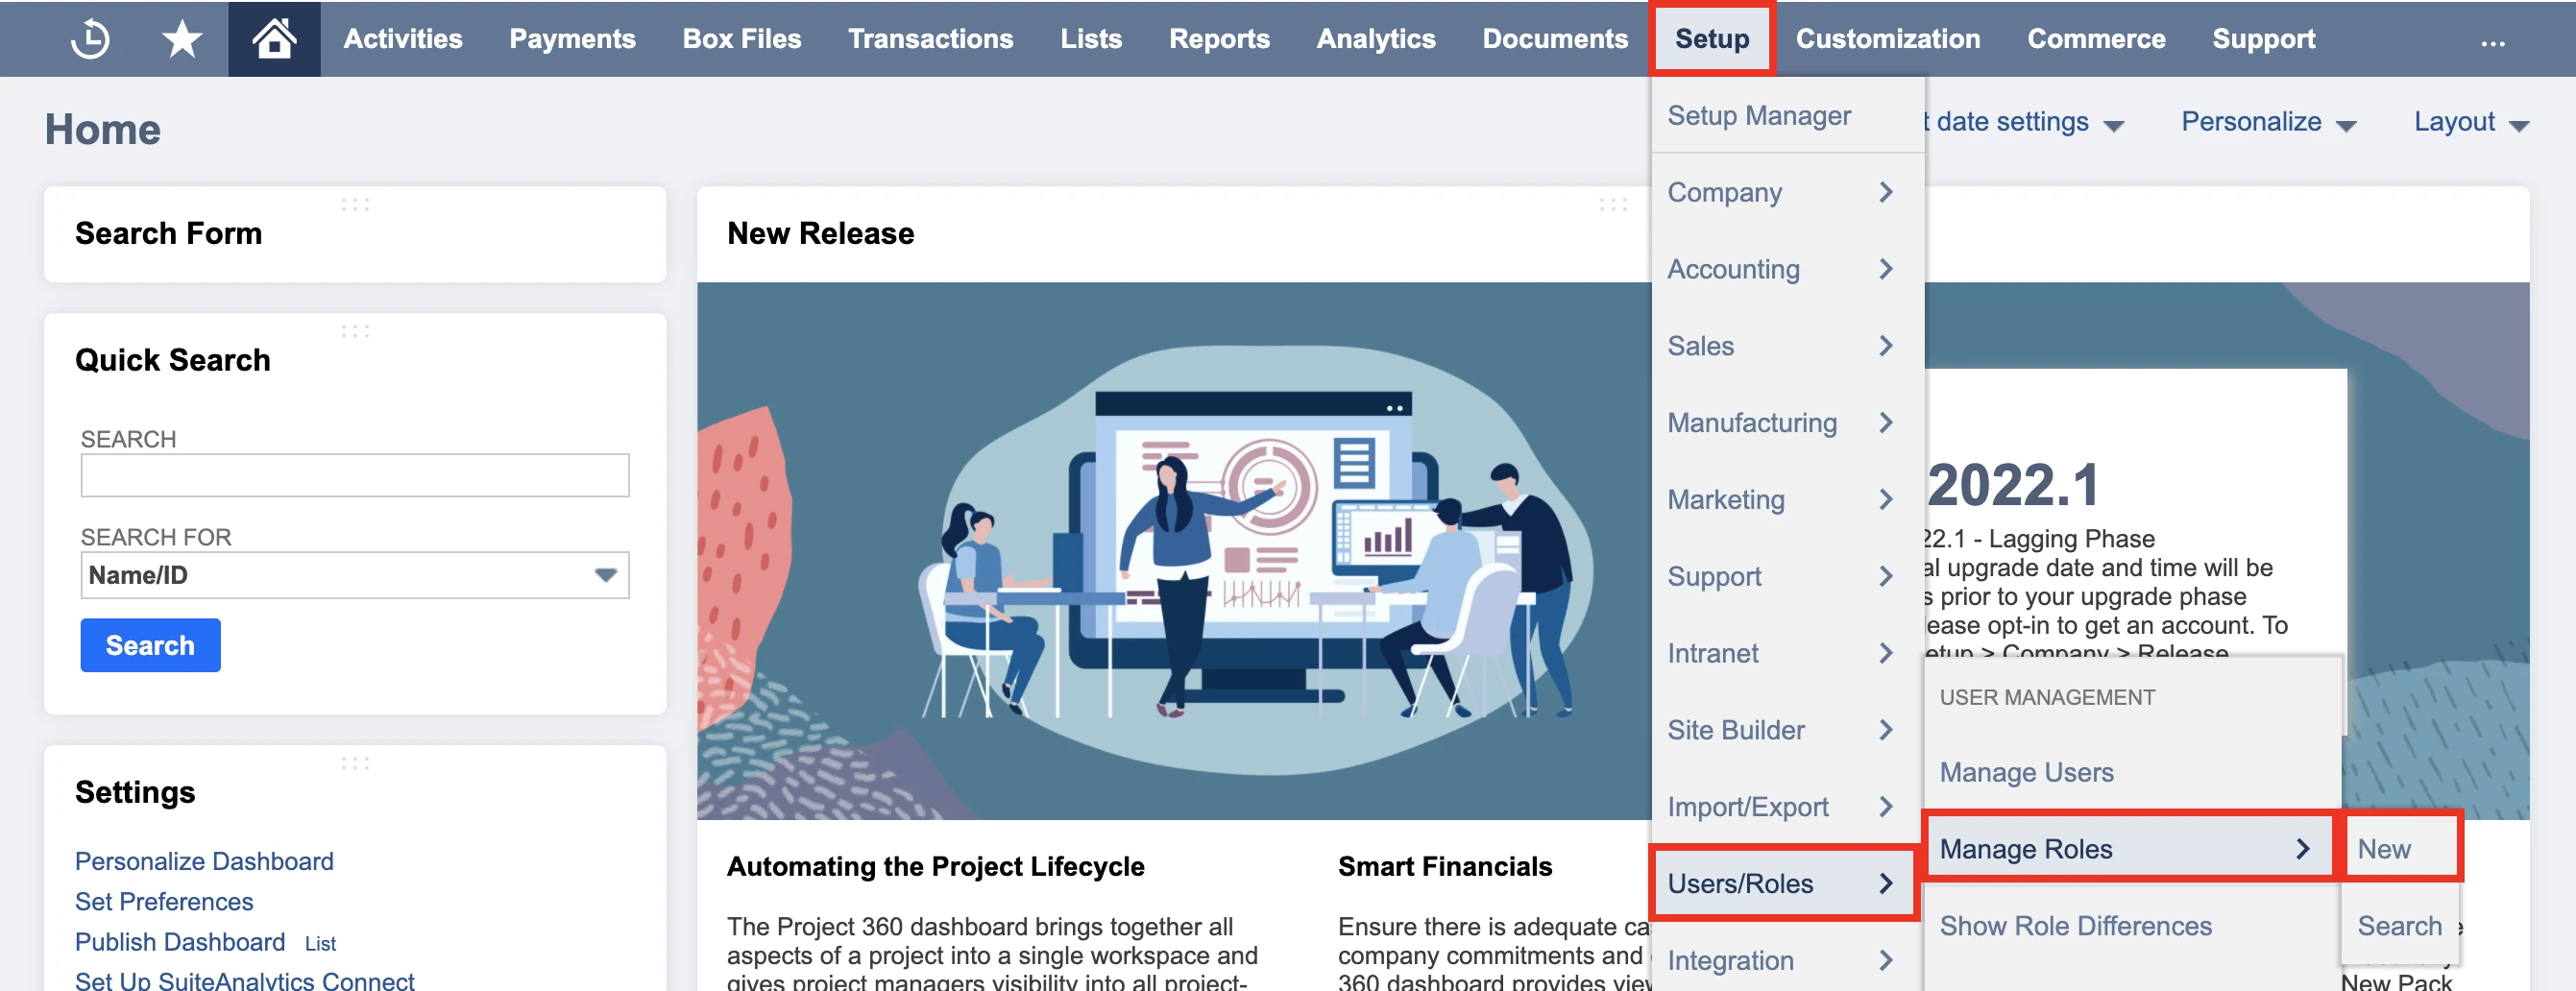
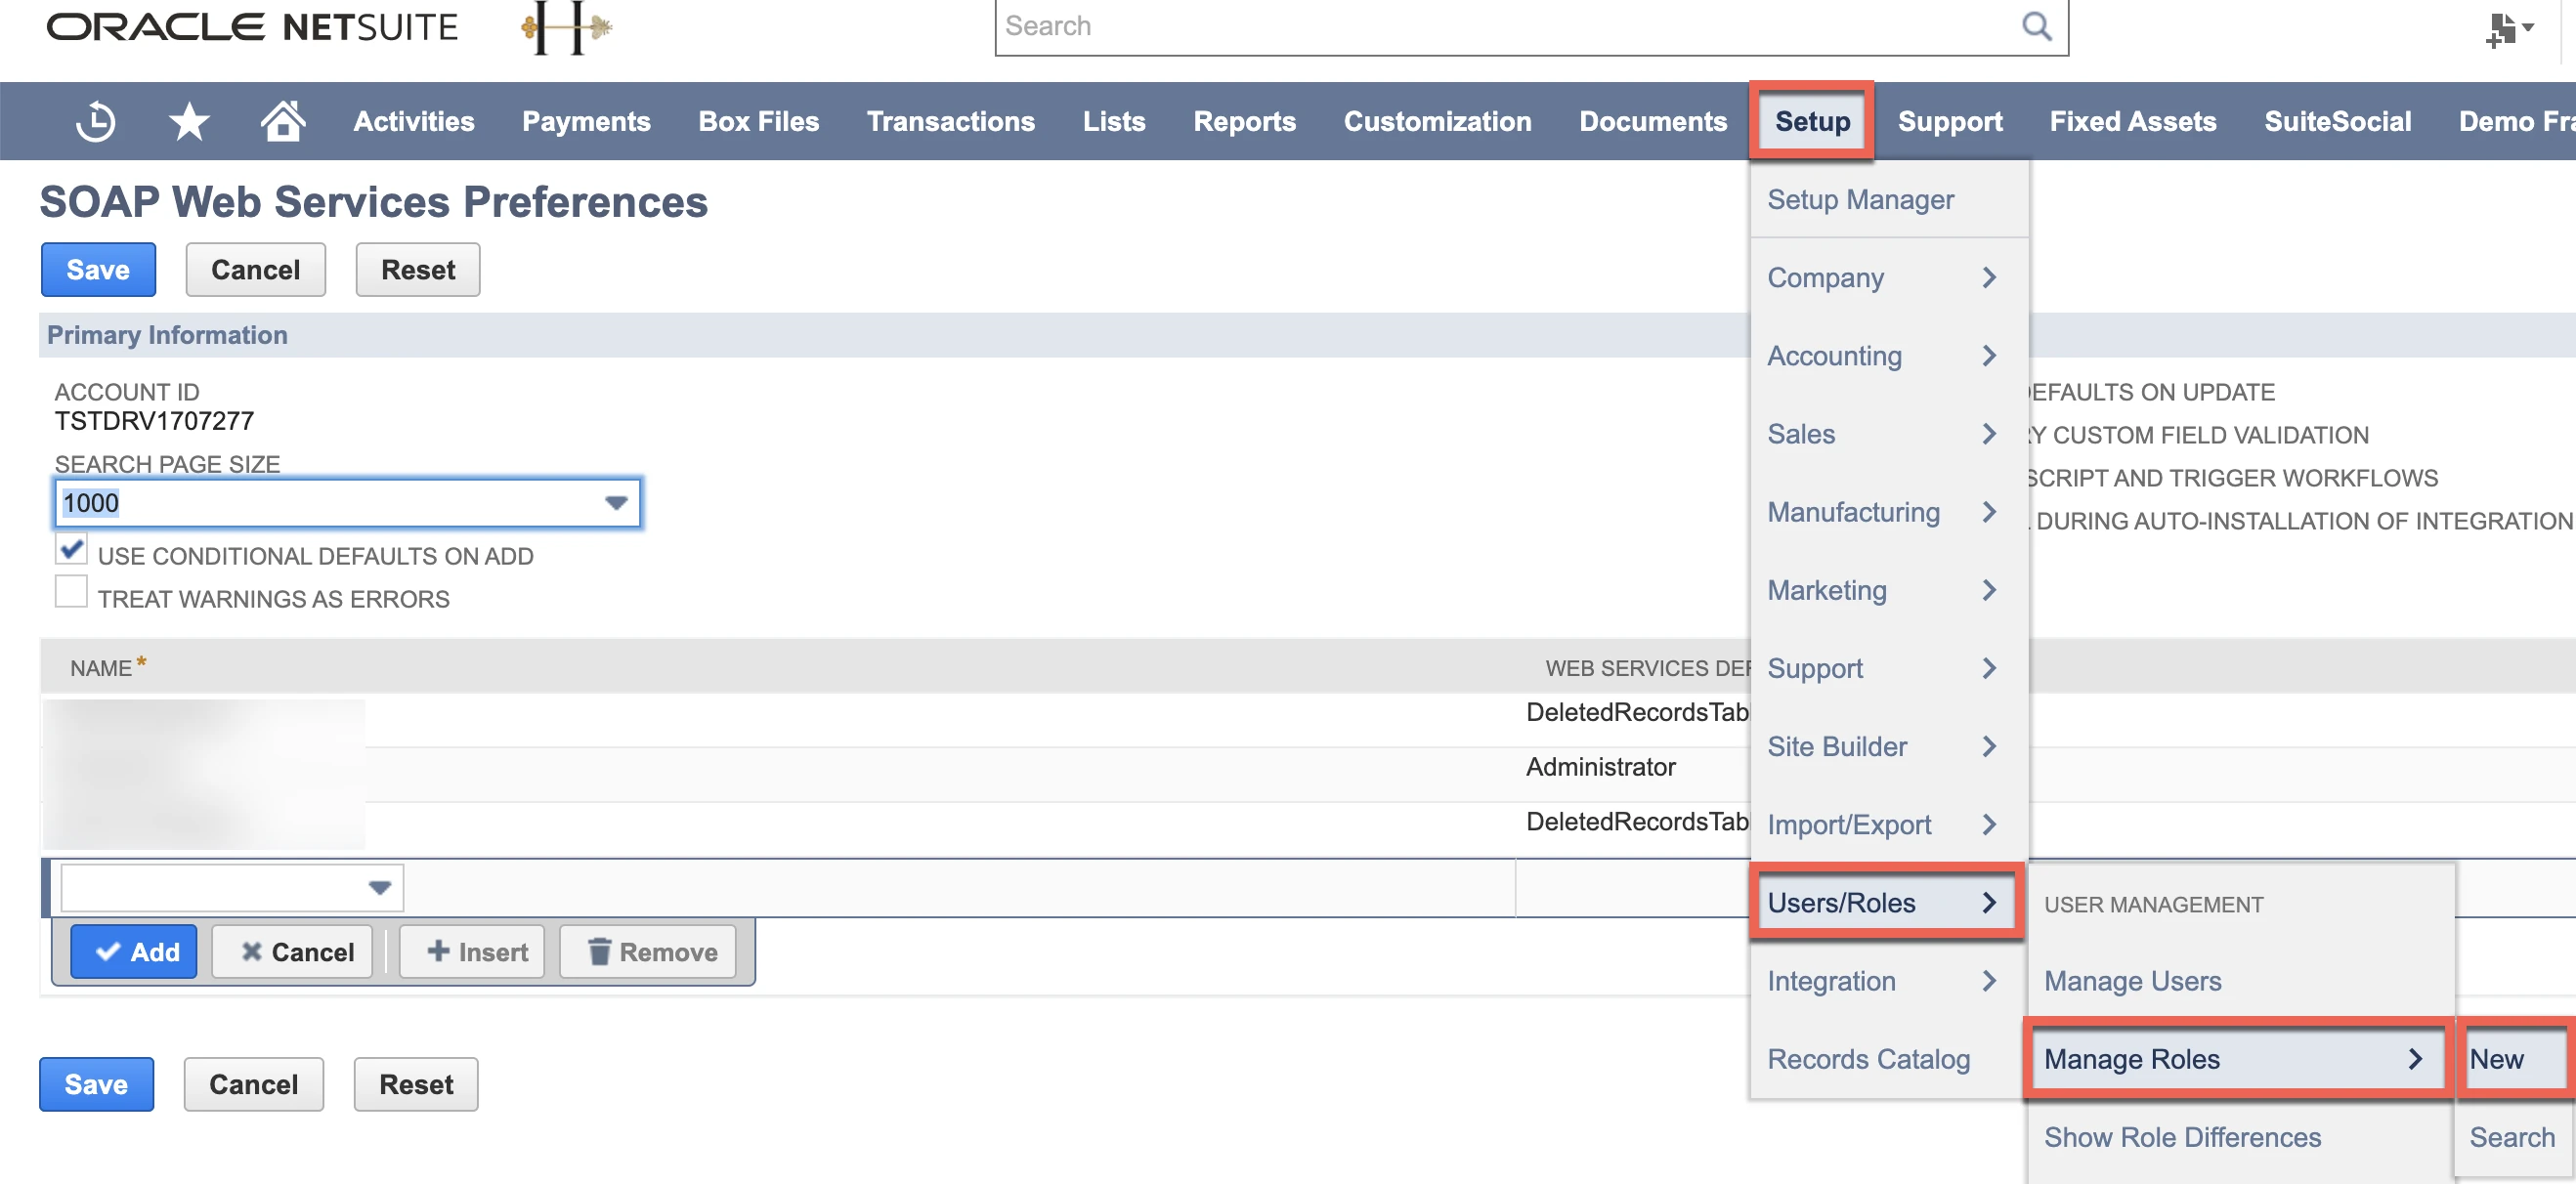
Navigate to Setup > Users/Roles > Manage Roles > New.
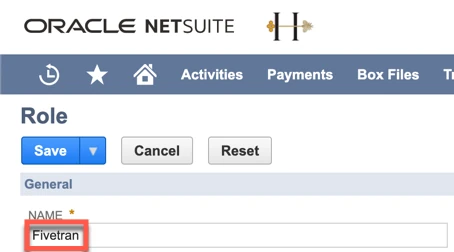
Enter a memorable name in the Name input field for the role. (We recommend "FivetranRole").
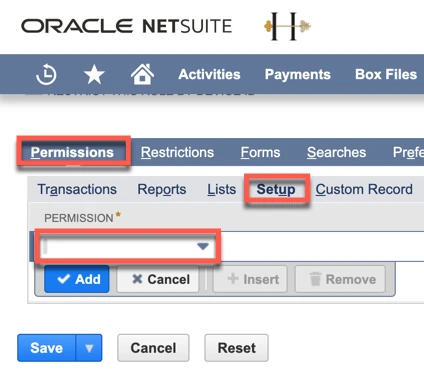
Go to the Permissions tab, click the Setup tab and add the following permissions:
- Log in using Access Tokens
- SuiteAnalytics Connect
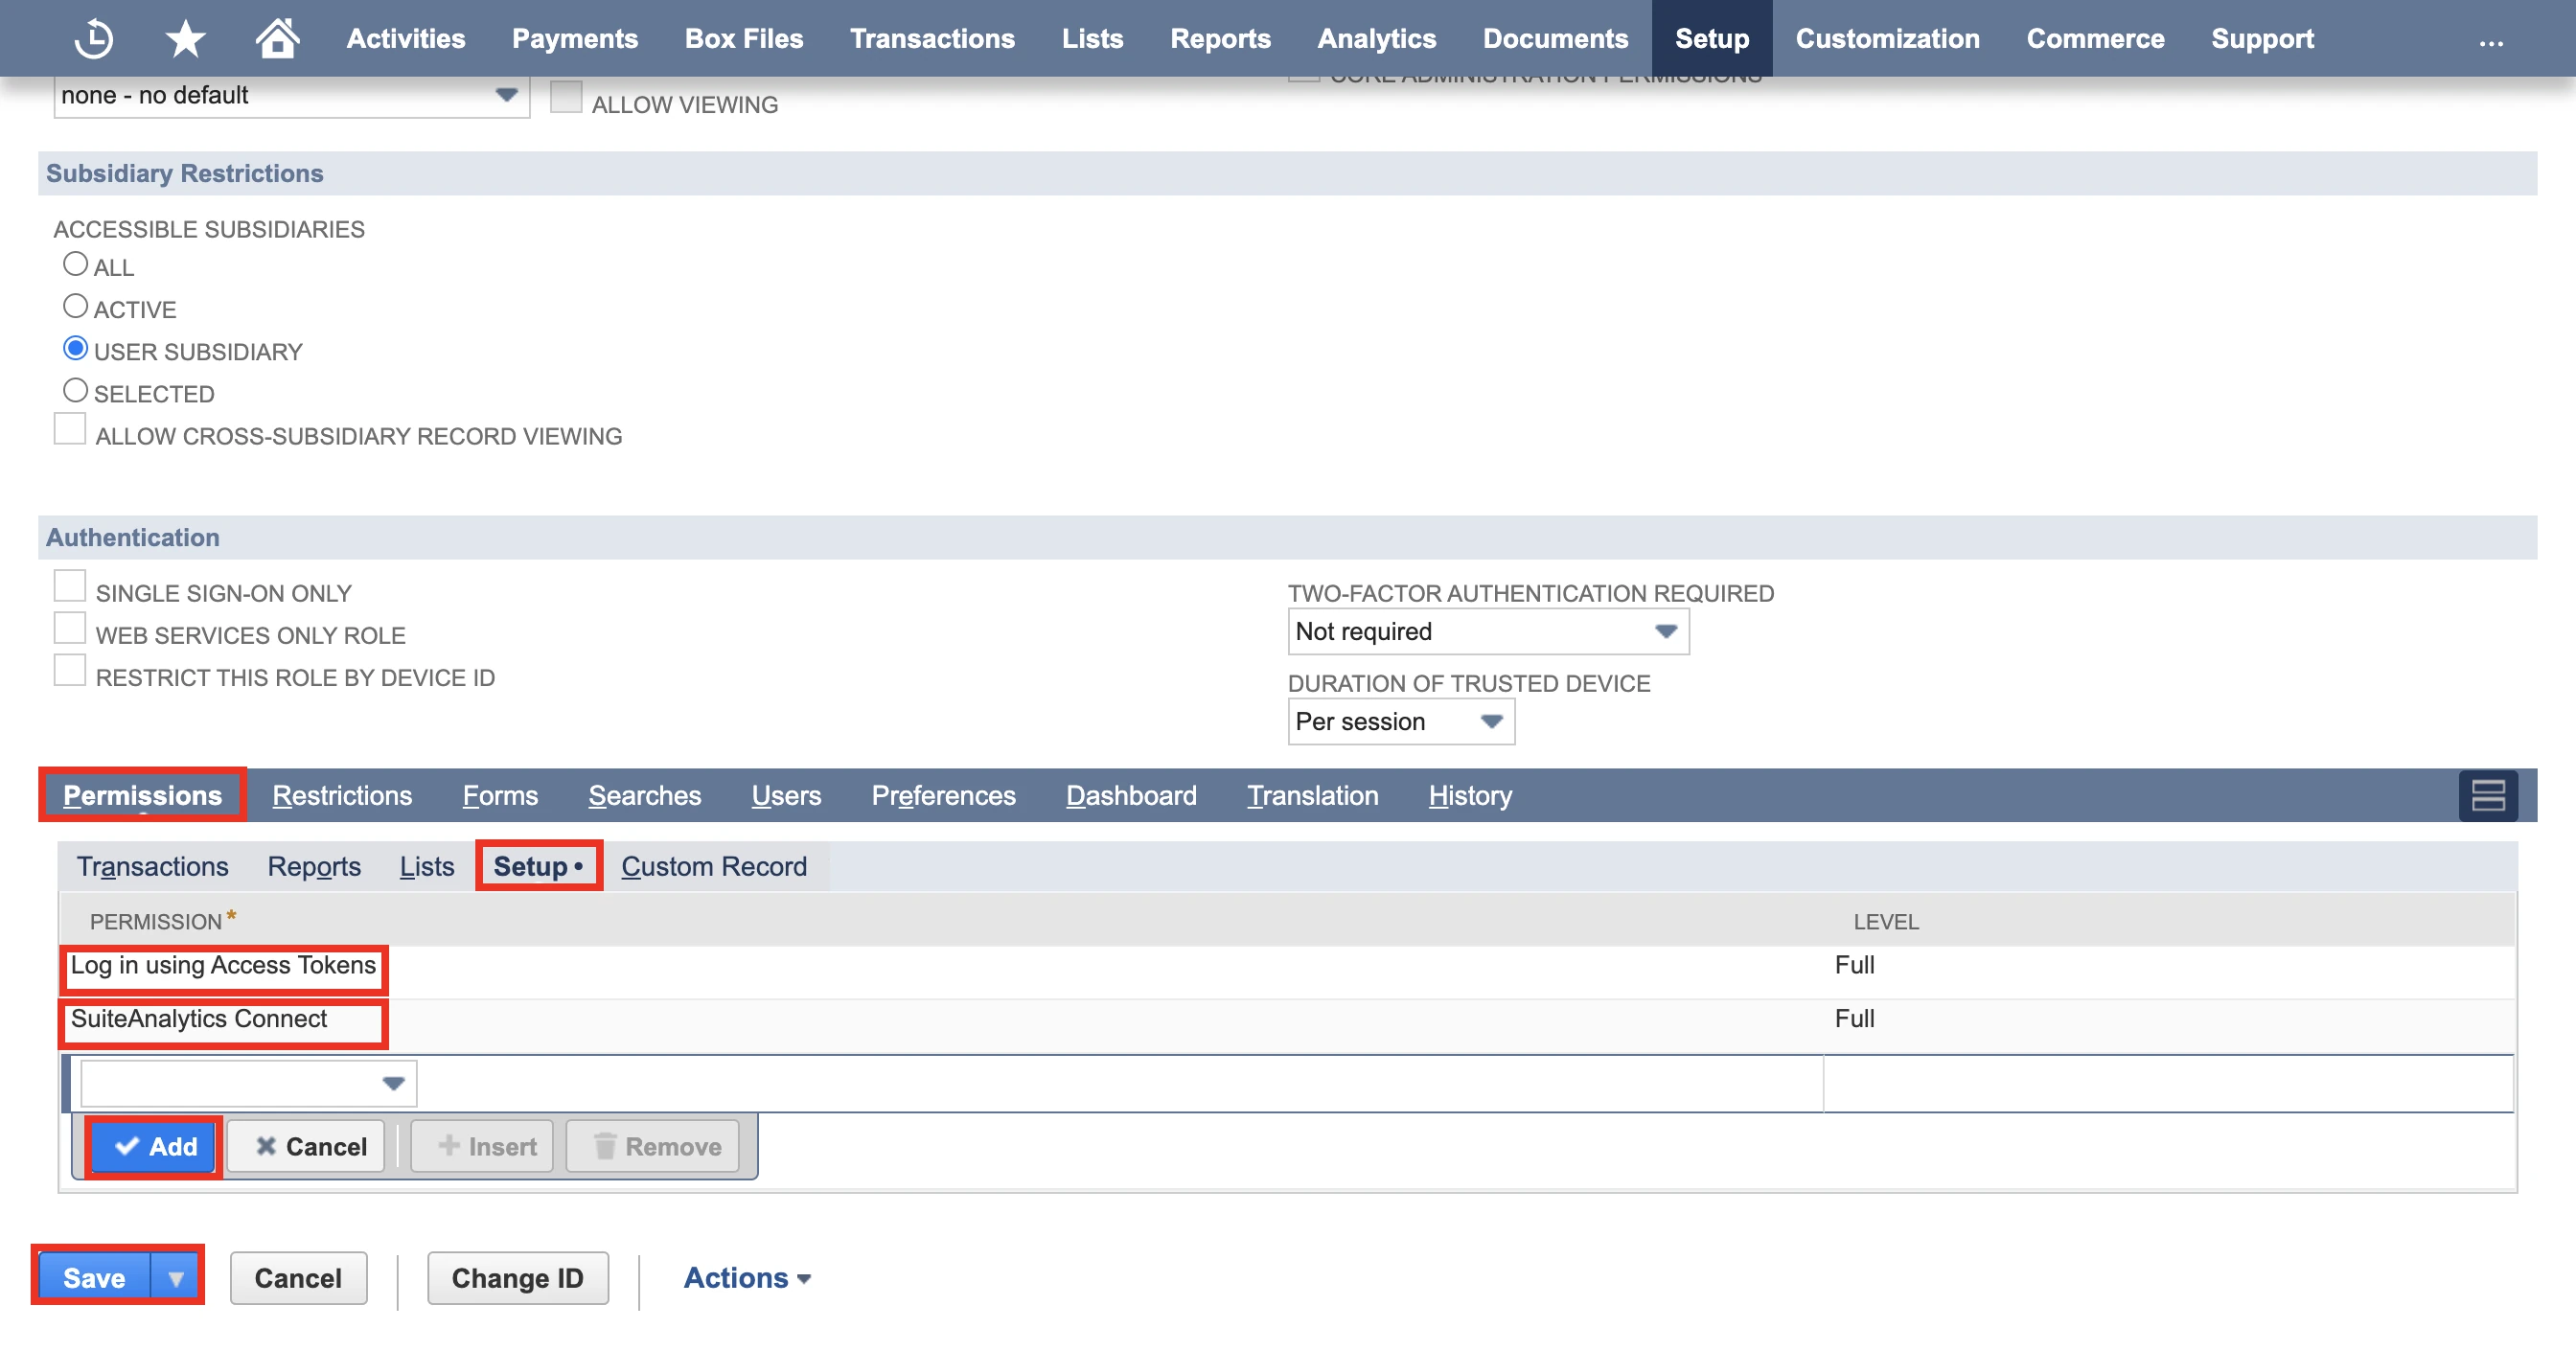
Click Save.
Navigate to Setup > Users/Roles > Manage Users.
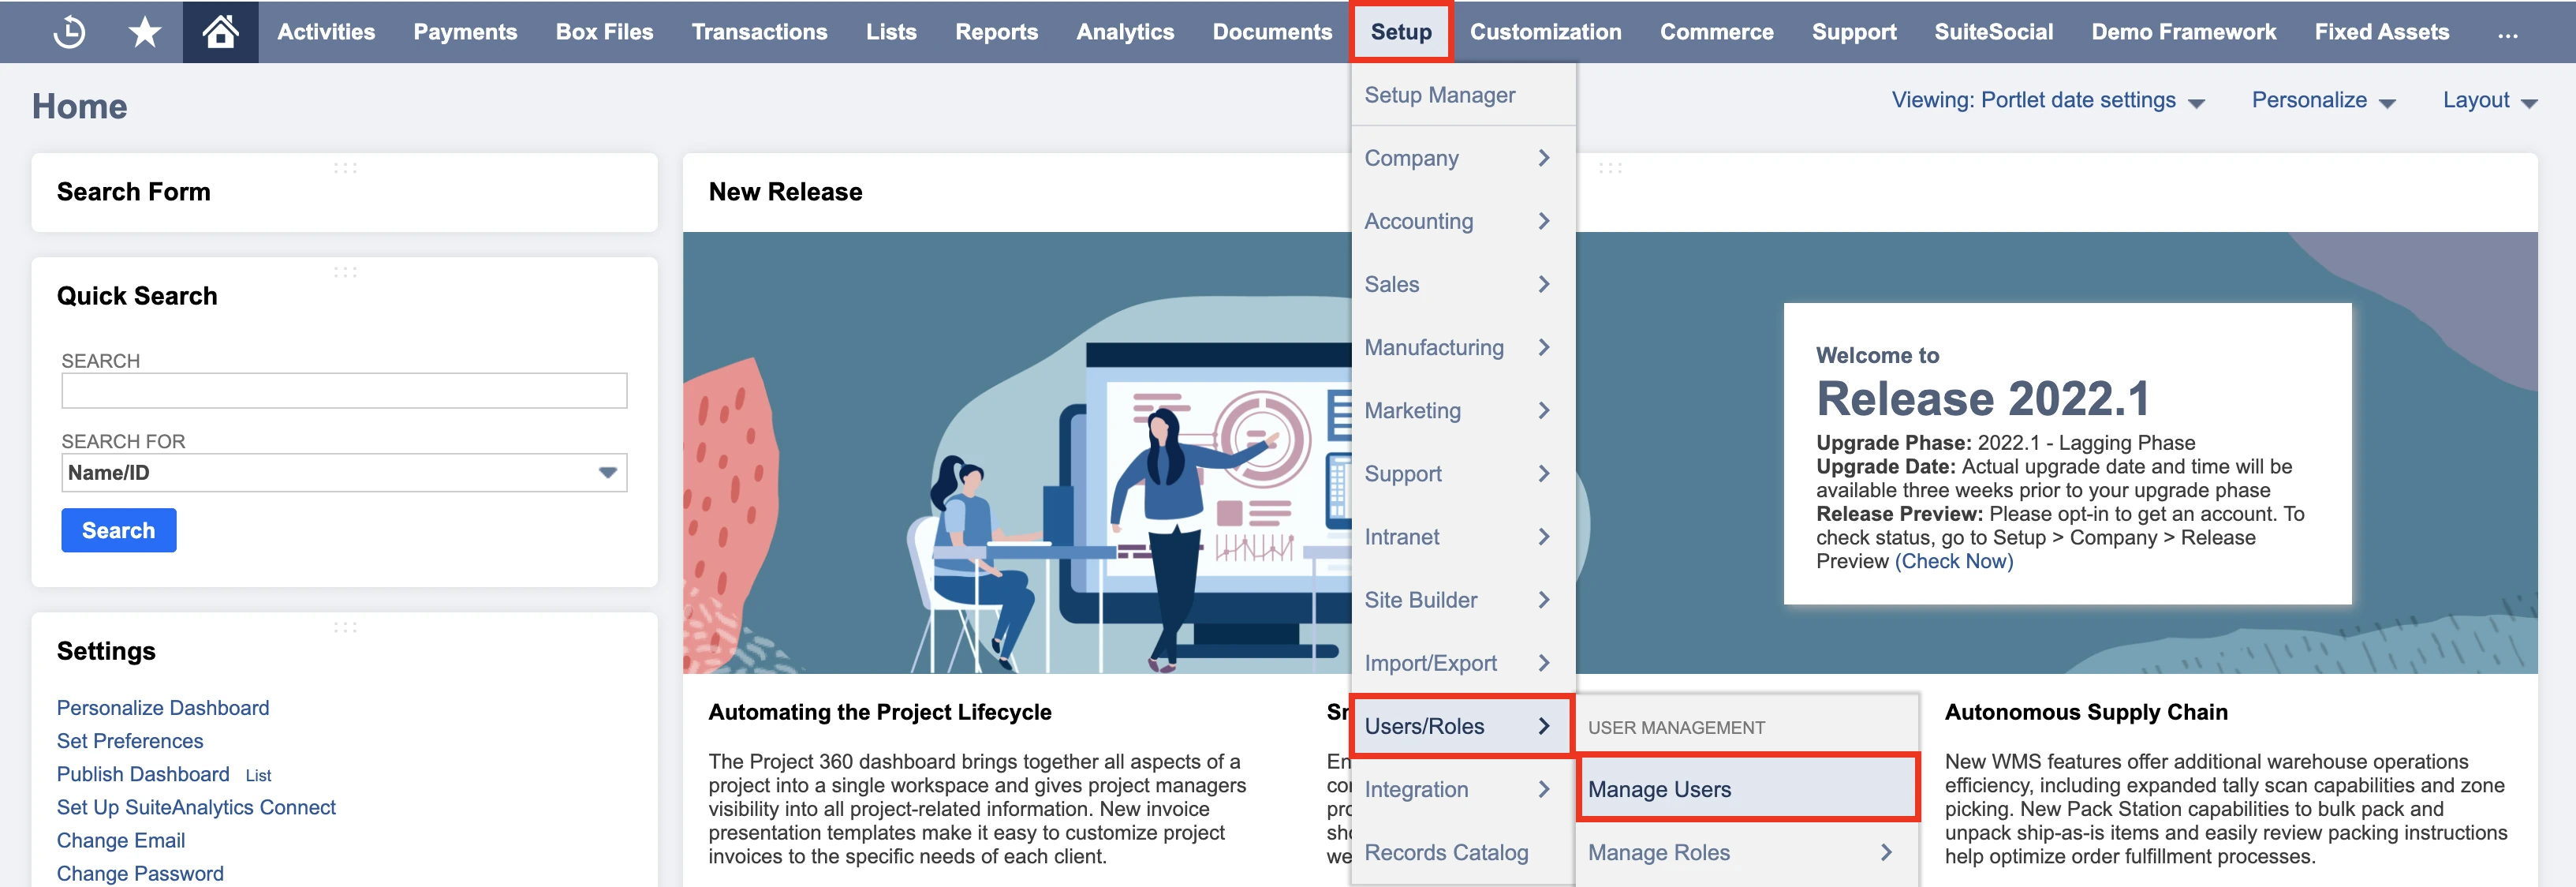
Decide which NetSuite user you want to connect to Fivetran.
You can use a NetSuite user that has two-factor authentication (2FA) enabled or disabled.
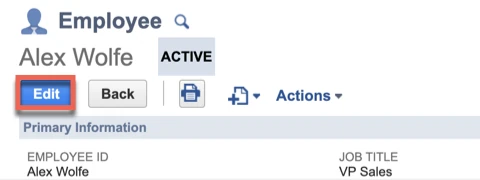
Click on the username to open the user details page.
Click Edit.
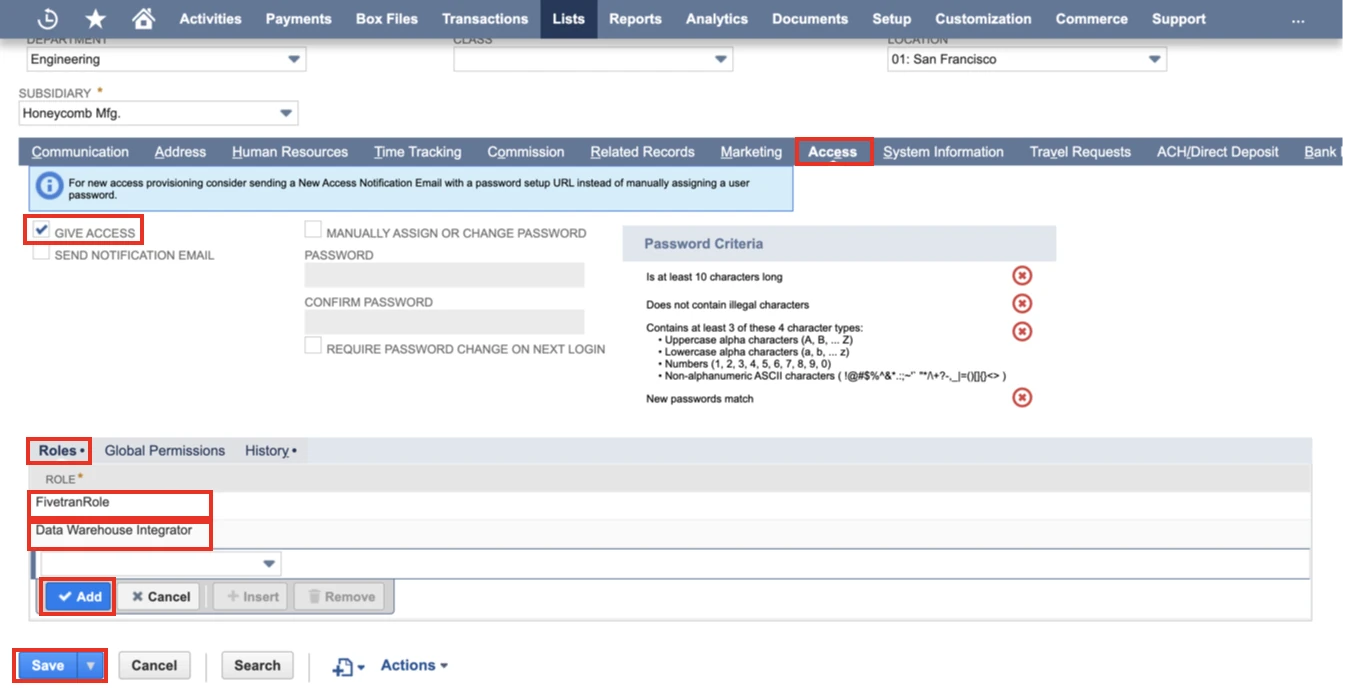
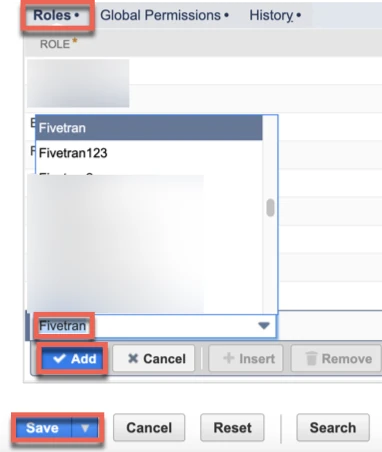
Go to the Access tab and click it. Ensure the Give Access box is checked. Add the following roles under the Roles tab:
- the created dedicated Fivetran role ("FivetranRole" in the example)
- the system Data Warehouse Integrator role
Click Save.
Create access token
Log in as an administrator or a user with the Access Token Management permission.
Go to Setup > Users/Roles > Access Tokens and click New.
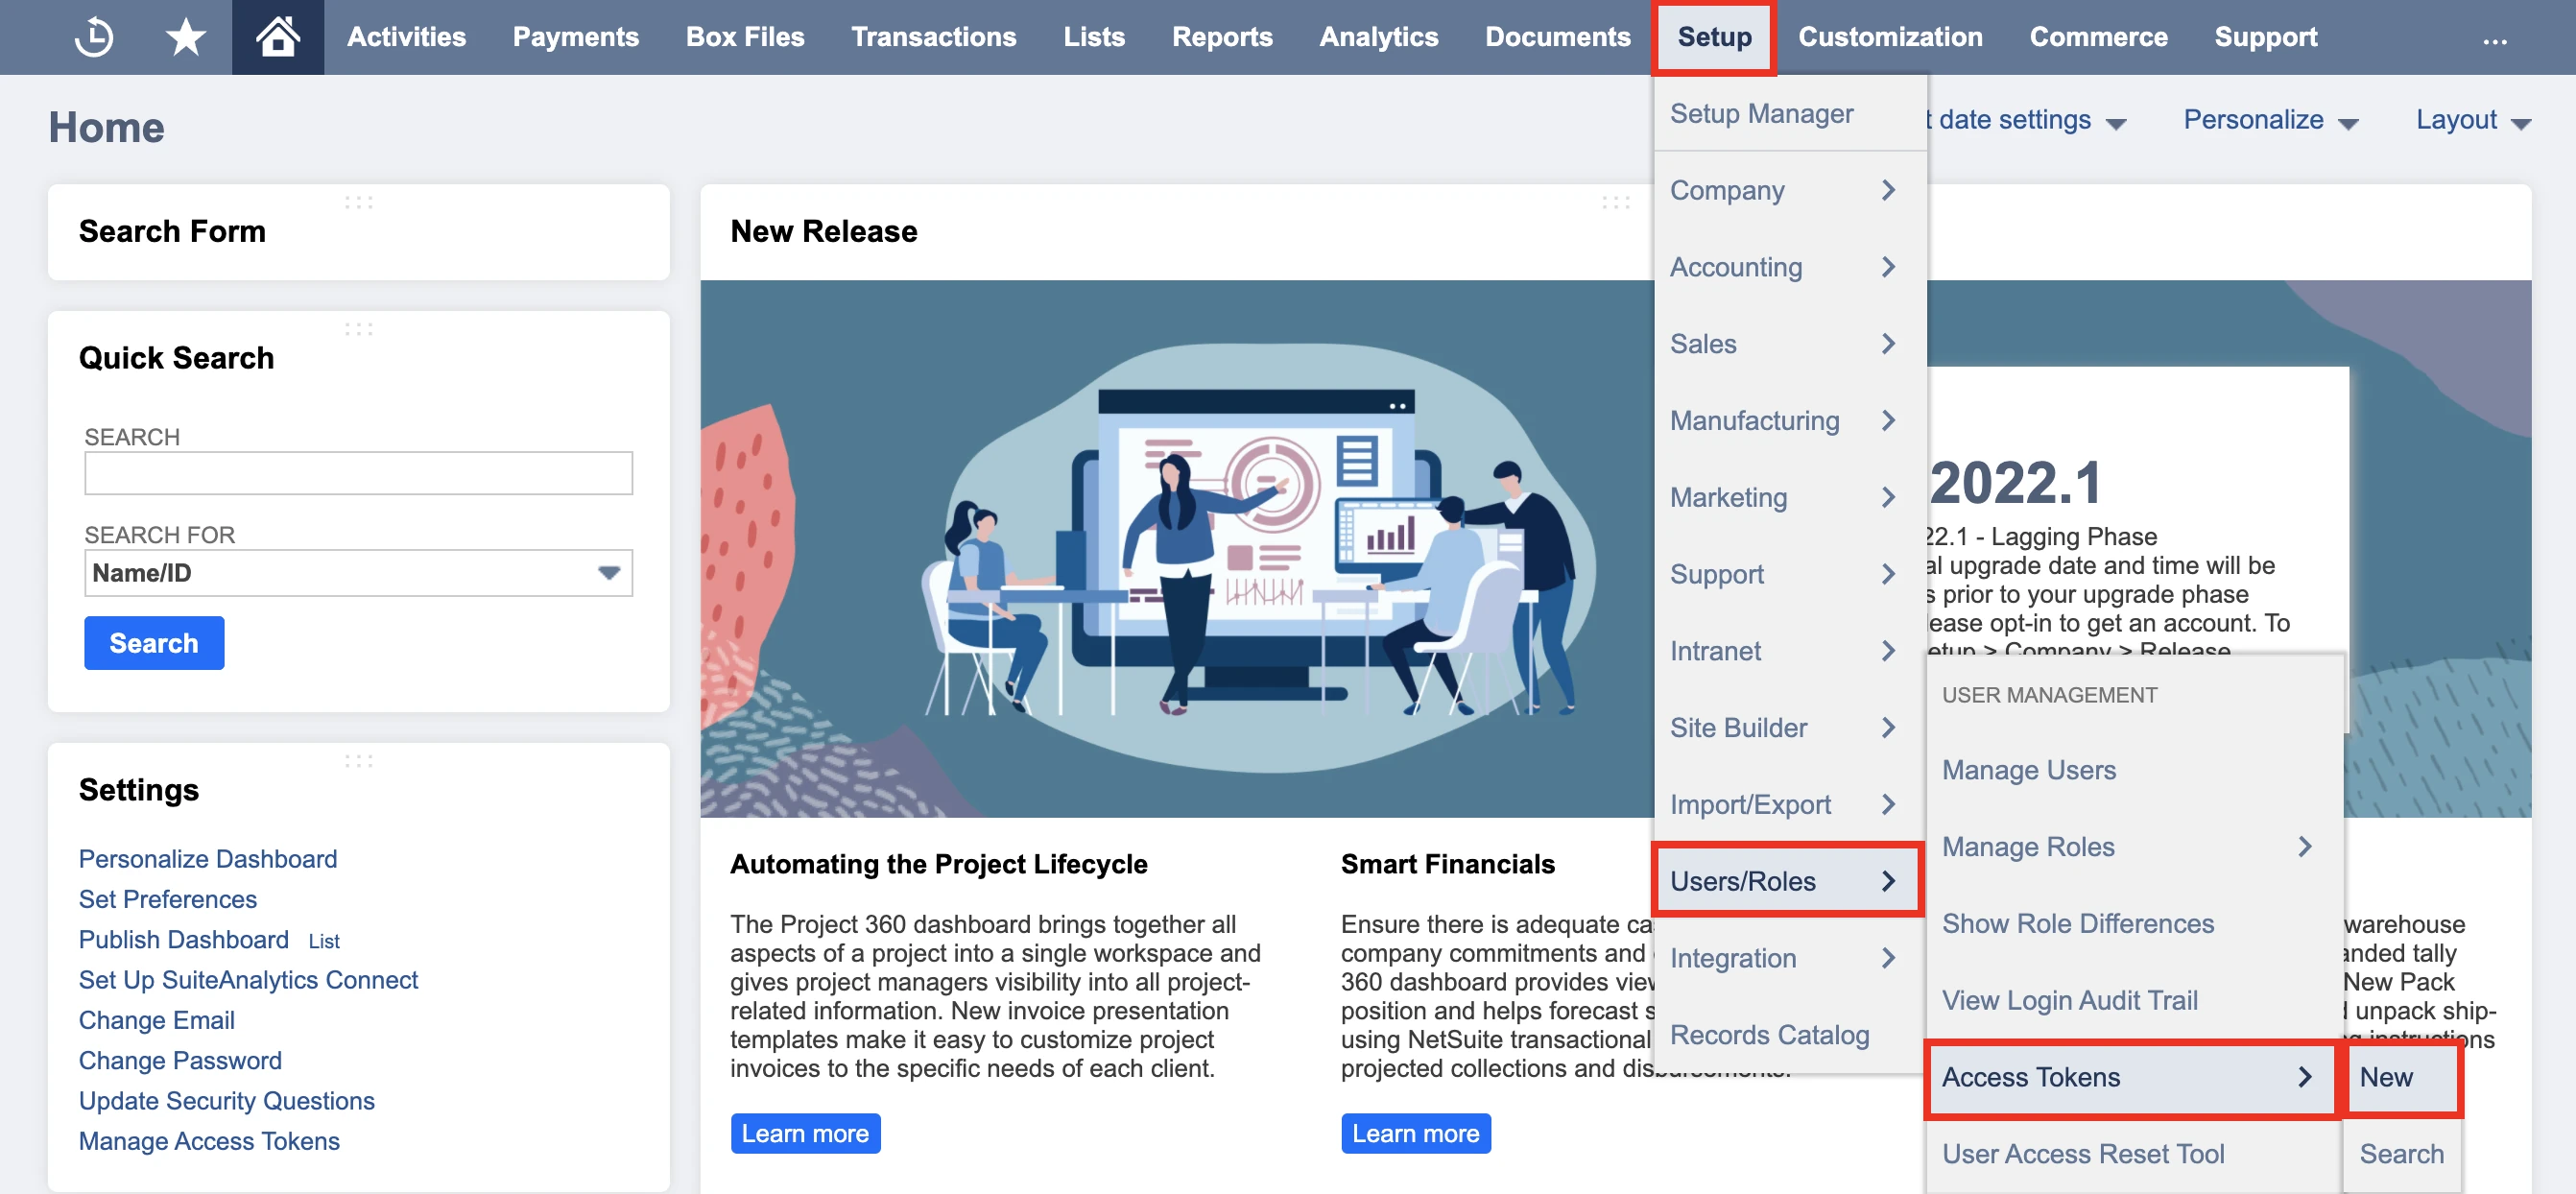
Select the Application Name you specified when creating the Integration record ("FivetranIntegration" in the example).
Select the User you have assigned the created role.
Select Data Warehouse Integrator from the Role menu.
Click Save and make a note of the Token ID and Token Secret displayed. You will need them to configure Fivetran.
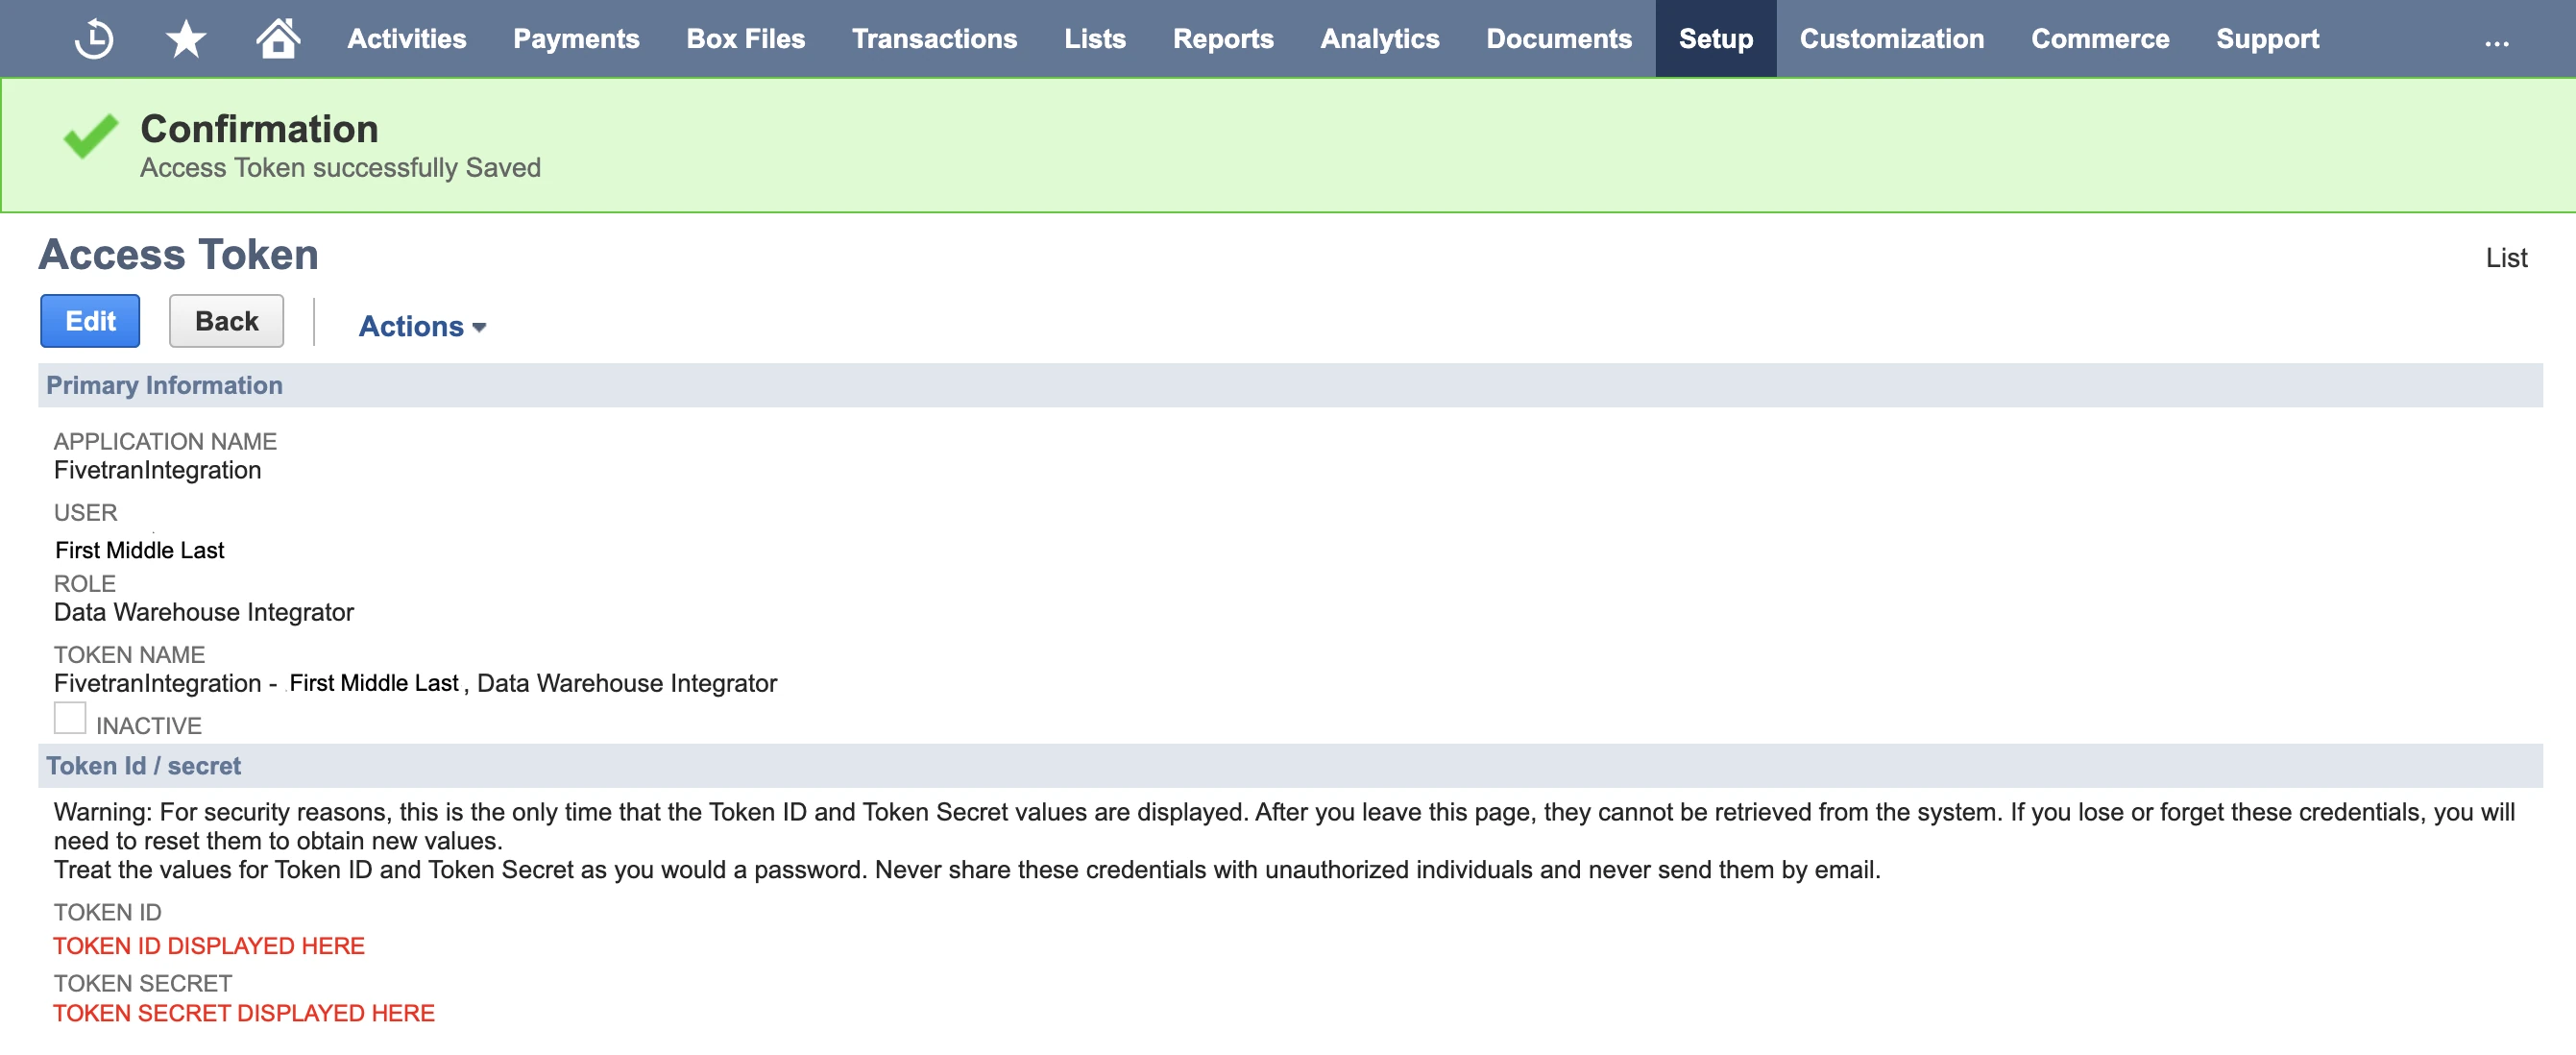
For more information on creating access tokens, see NetSuite documentation
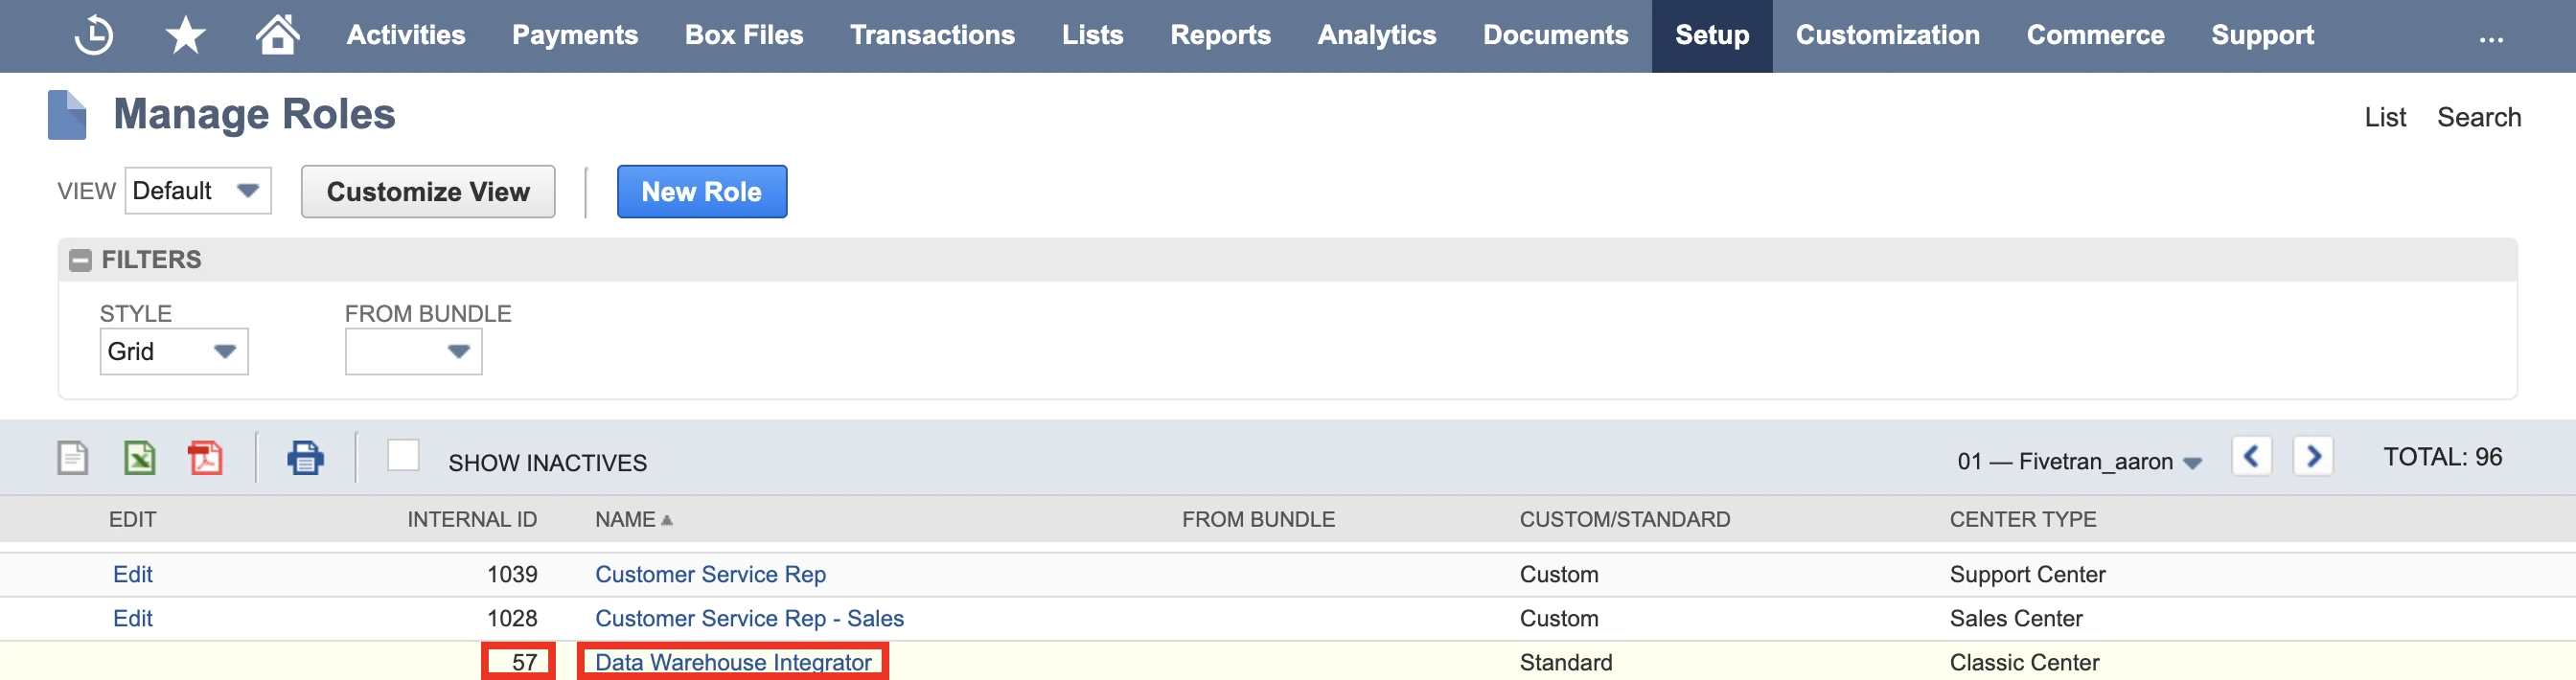
Find Data Warehouse Integrator Role ID
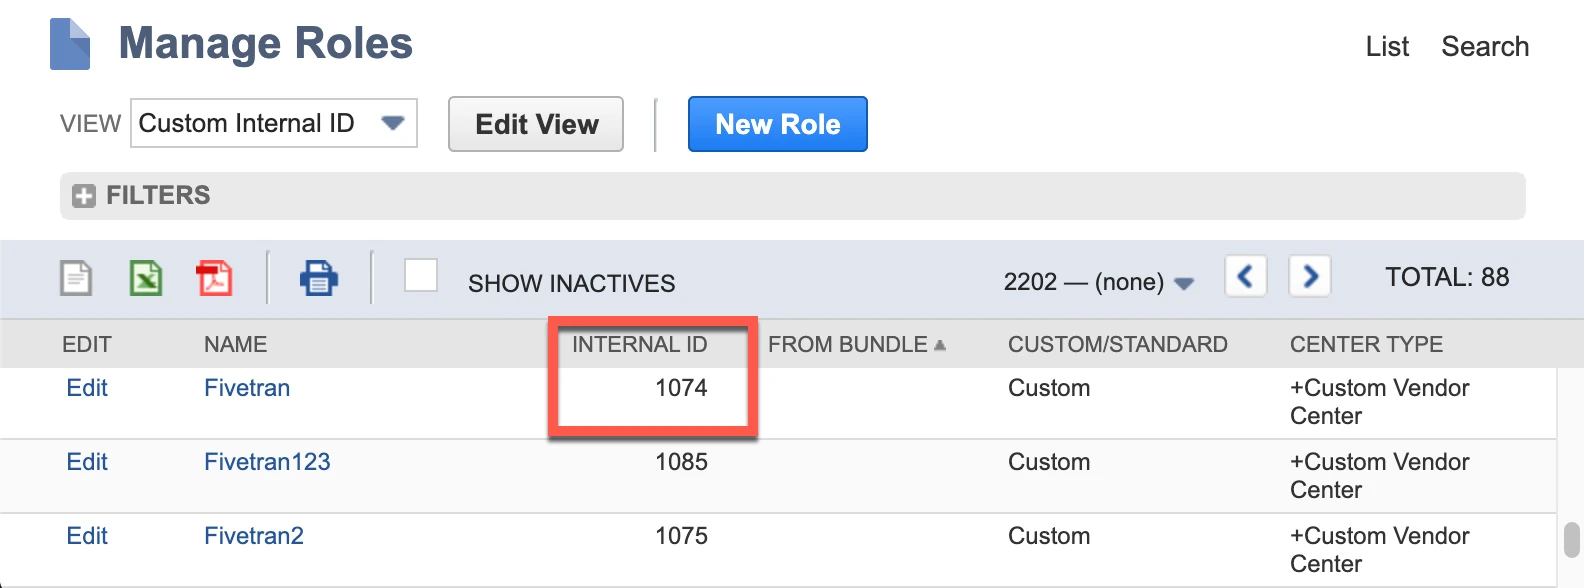
In the menu bar at the top of the NetSuite dashboard, select Setup > Users/Roles > Manage Roles.
Find the Internal ID of the Data Warehouse Integrator role in the role list table on the Manage Roles page and make a note of it. You will need it to configure Fivetran.
Finish Fivetran configuration
- Enter your chosen destination schema name in the connection setup form.
In the Destination schema names field, choose the naming convention you want Fivetran to use for the schemas, tables, and columns in your destination:
- Fivetran naming: Standardizes the schema, table, and column names in your destination according to the Fivetran naming conventions.
- Source naming: Preserves the original schema, table, and column names from the source system in your destination.
- The Source naming feature is not compatible with Quickstart transformations. To ensure successful syncs, we automatically disable Quickstart transformations for connections configured with Source naming.
- If you want to modify your selection, make sure you do it before you start the initial sync.
(Hybrid Deployment only) If your destination is configured for Hybrid Deployment, the Hybrid Deployment Agent associated with your destination is pre-selected for the connection. To assign a different agent, click Replace agent, select the agent you want to use, and click Use Agent.
- Enter the Service Host, Service Port, and Account ID you found.
- Select the NetSuite2.com as the Data Source.
- Select Use Token Based Authentication as the Authentication Method.
- Enter the Consumer key and Consumer secret you found.
- Enter the Token ID and Token secret you found.
- Enter the Role ID you found.
- Enable the Re-sync re-import tables during every sync if you want to sync reimport tables in every sync.
- Click Save & Test. Fivetran will take it from here and sync your data from your NetSuite SuiteAnalytics account.
OAuth 2.0 authentication
Enable OAuth 2.0
In your NetSuite dashboard, go to Setup > Company > Enable Features.
On the SuiteCloud tab of the Enable Features page, check Client SuiteScript in the SuiteScript section.
Click I Agree to accept the SuiteCloud Terms of Service displayed in a new tab.
On the SuiteCloud tab of the Enable Features page, check Server SuiteScript in the SuiteScript section.
Click I Agree to accept the SuiteCloud Terms of Service displayed in a new tab.
On the SuiteCloud tab of the Enable Features page, check the OAUTH 2.0 in the Manage Authentication section.
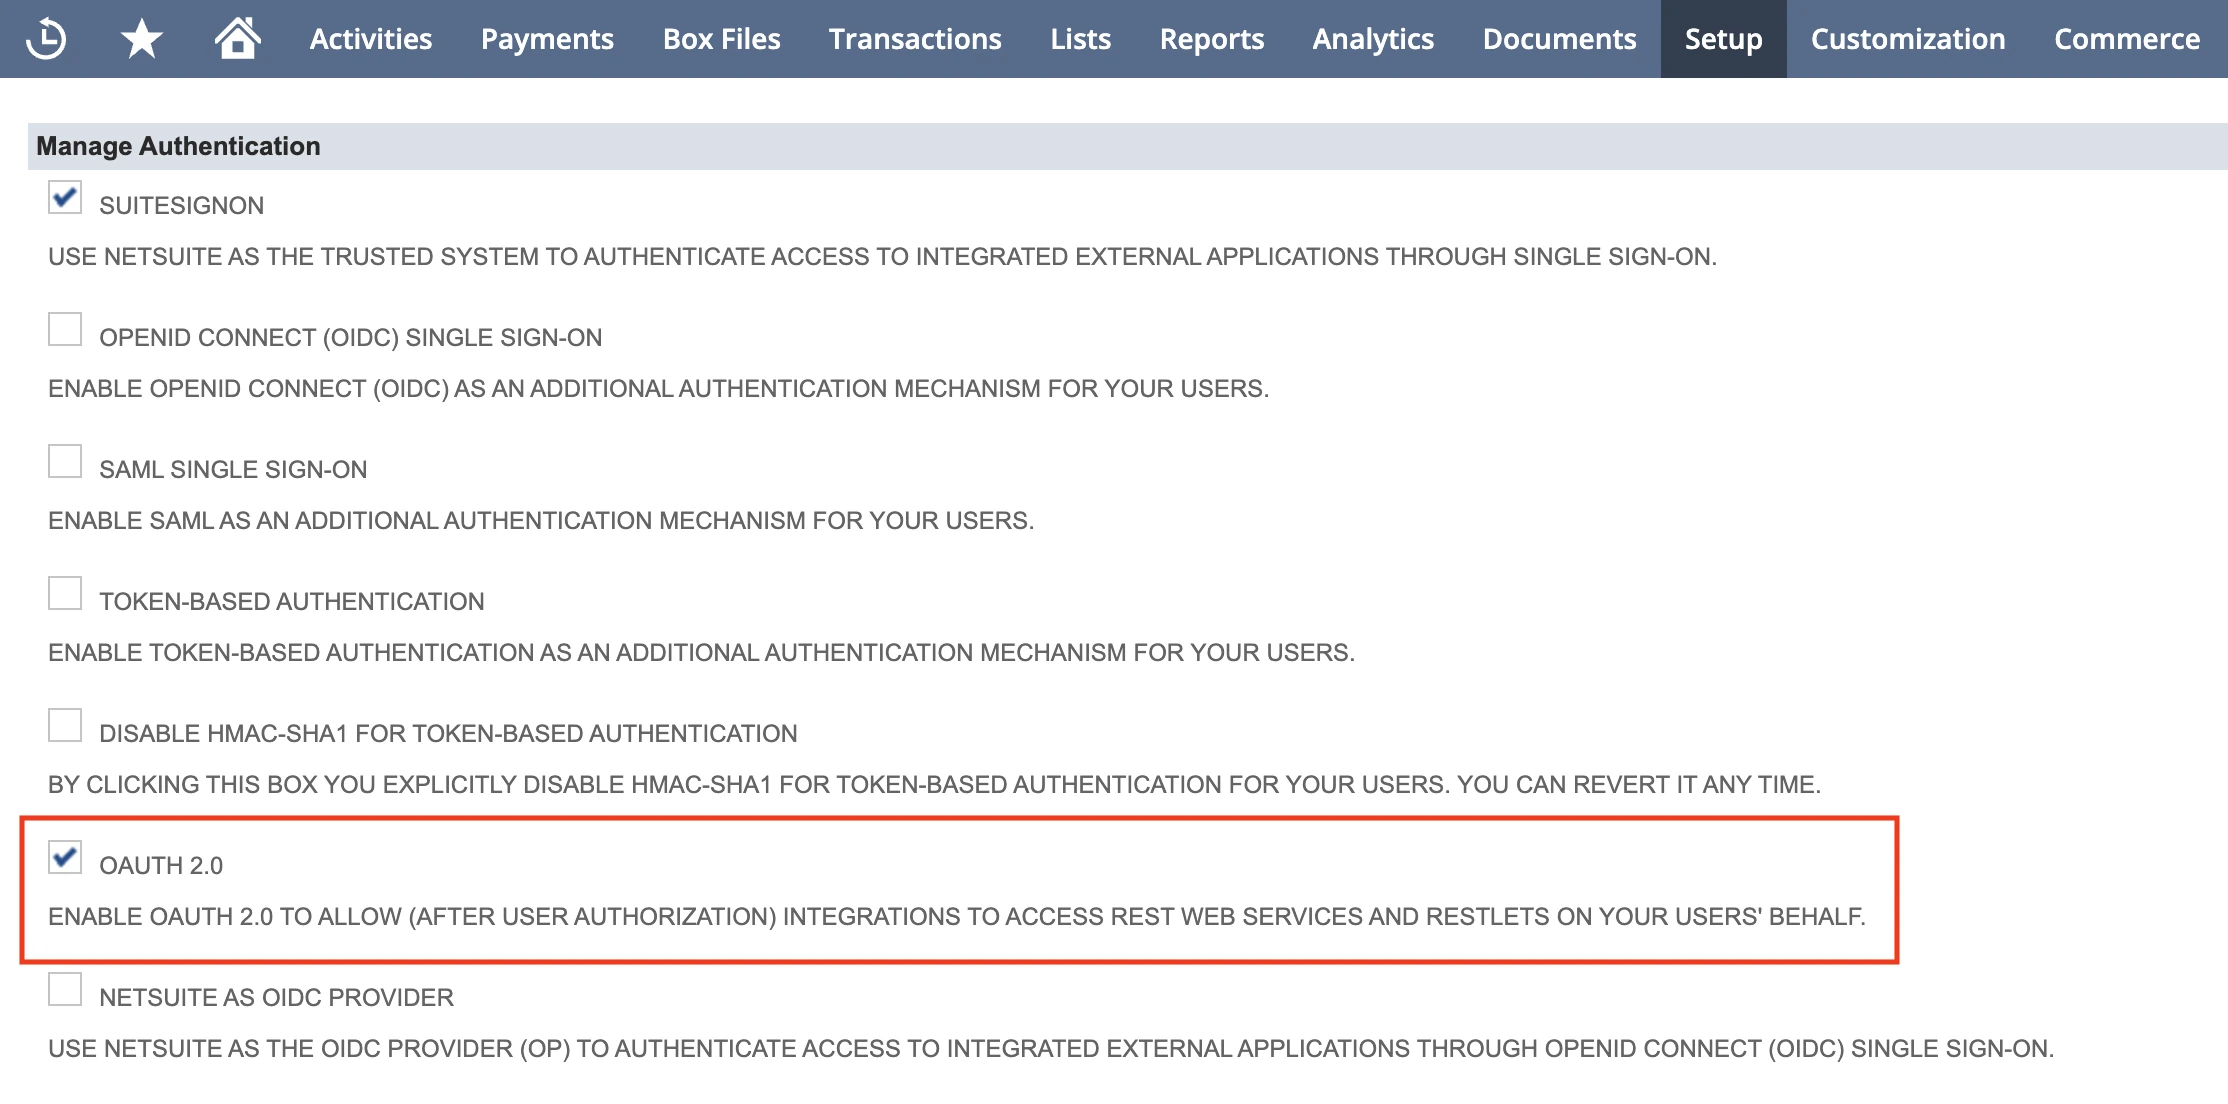
Click I Agree to accept the SuiteCloud Terms of Service displayed in a new tab.
Click Save.
For more information on enabling OAuth 2.0 authentication, see NetSuite documentation.
Create Integration record with OAuth2 permissions
Go to Setup > Integration > Manage Integrations > New.
Enter the name and optional description. (We recommend "FivetranIntegration").
Ensure State is Enabled.
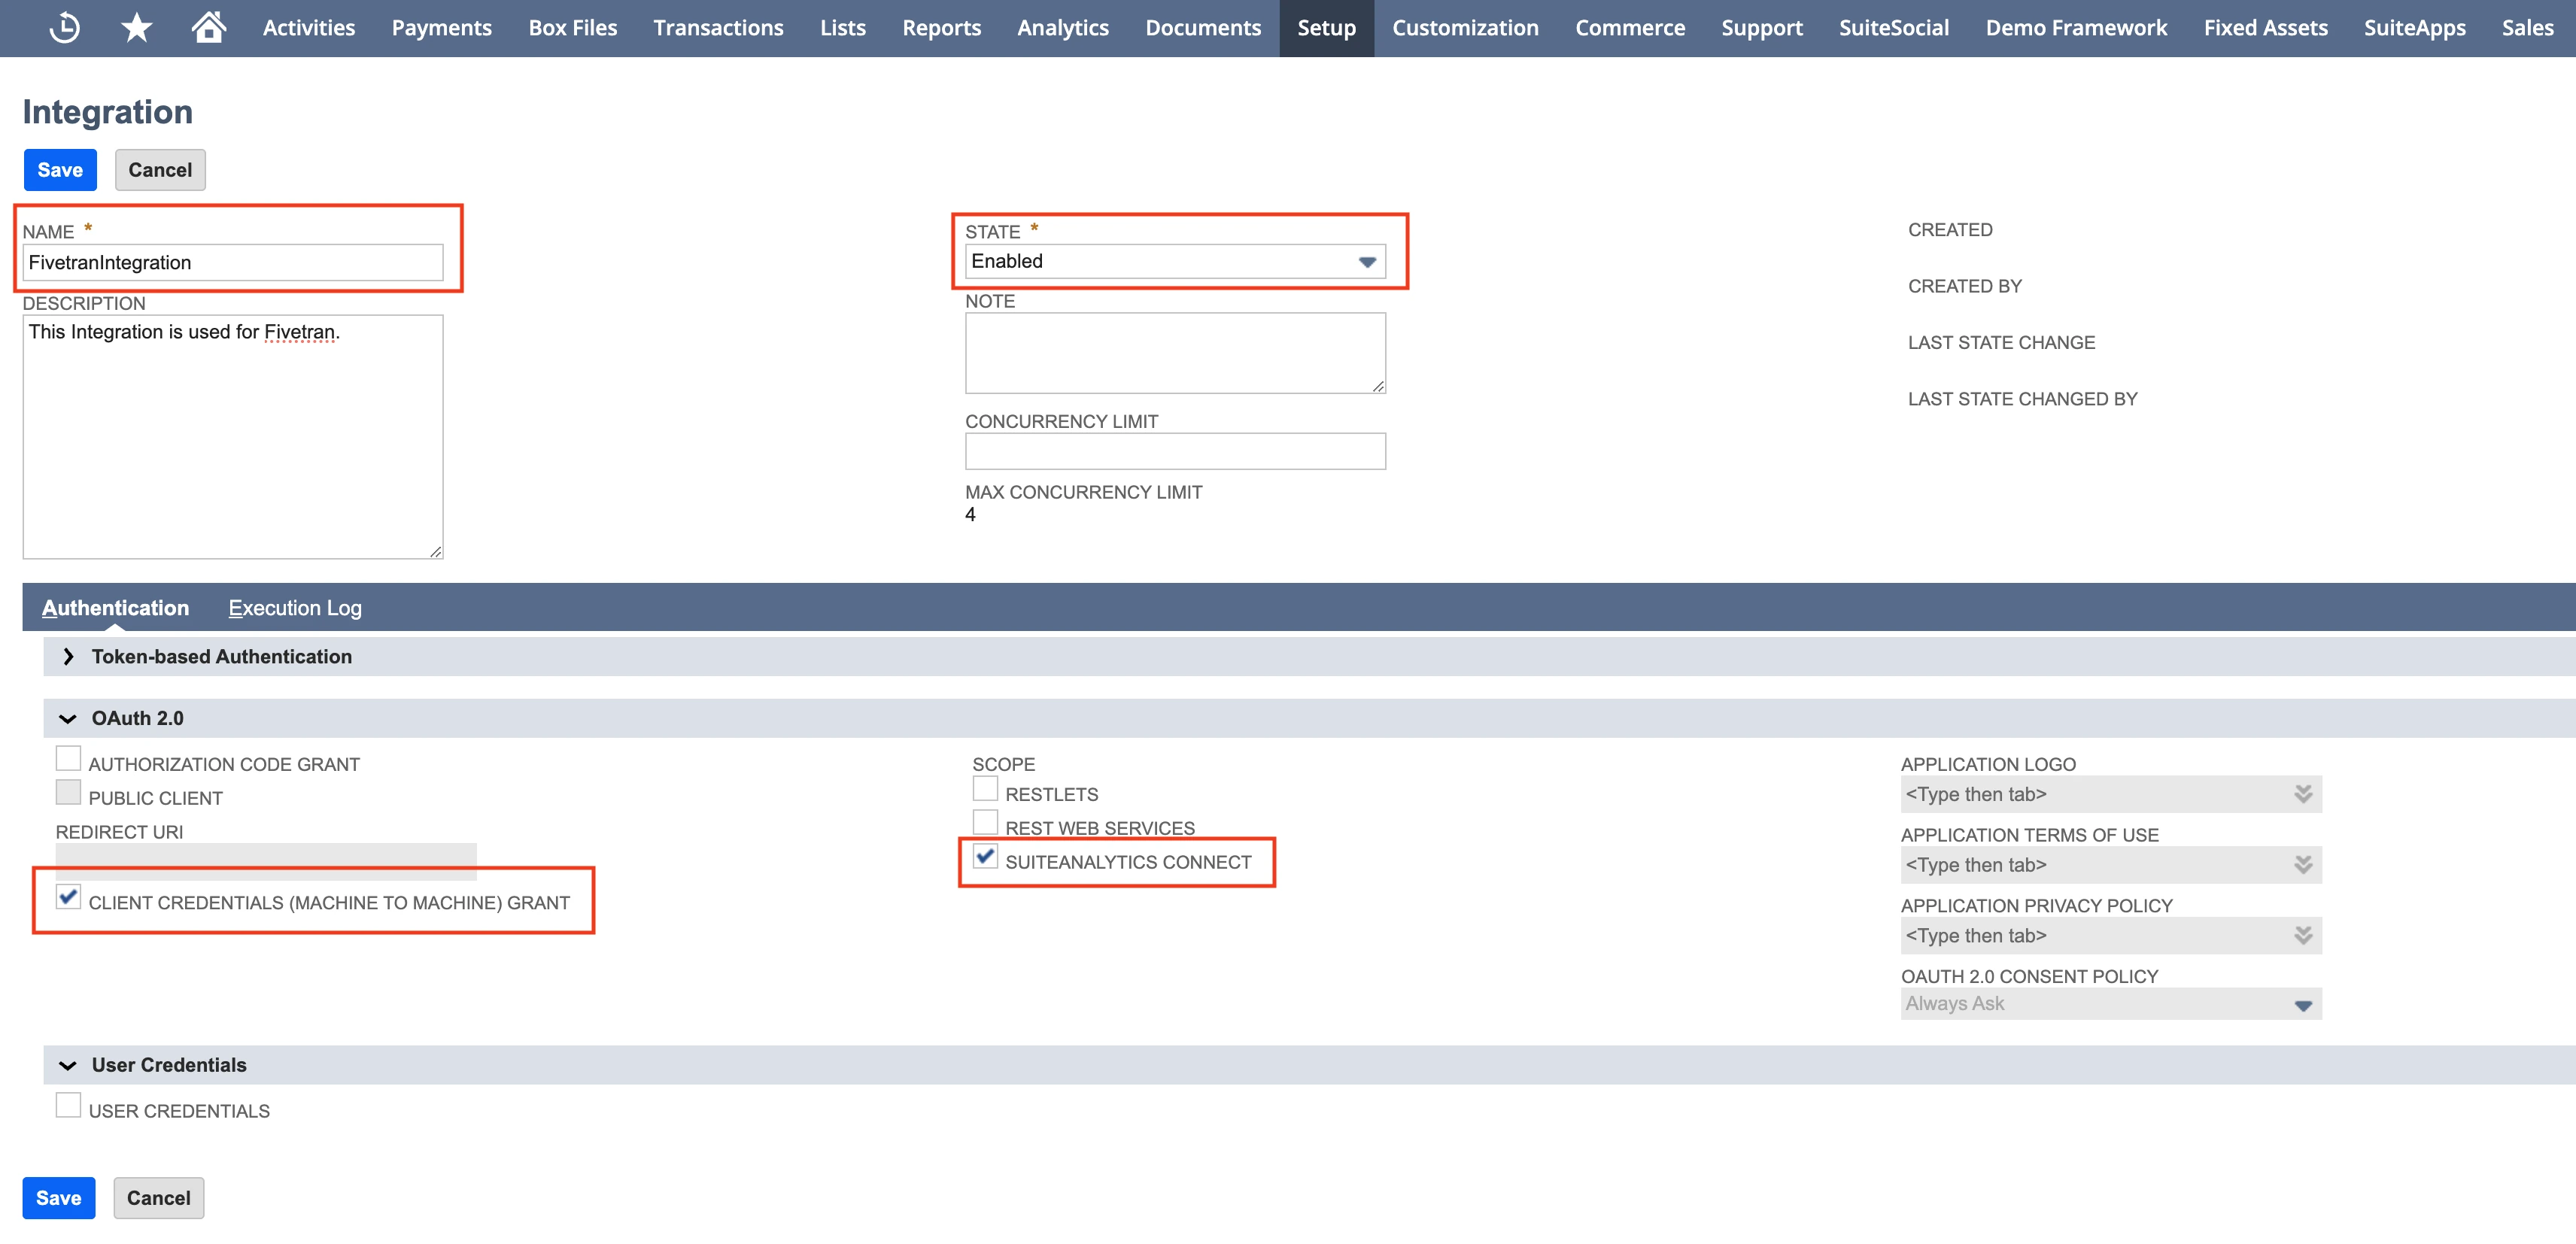
Under the Authentication tab, check Client Credentials (Machine To Machine) Grant and SuiteAnalytics Connect and uncheck all other options.
Click Save.
The system will display Consumer Key. Make a note of it. You will need it to configure Fivetran.
Safely store these details. After you leave this page, they cannot be retrieved from the system. If you lose or forget these credentials, you will need to reset them to obtain new values.
For more information on creating integration records, see NetSuite documentation.
Assign permissions to user
Navigate to Setup > Users/Roles > Manage Roles > New.
Enter a memorable name in the Name input field for the role. (We recommend "FivetranRole").
Go to the Permissions tab, click the Setup tab and add the following permissions:
- Log in using OAuth 2.0 Access Tokens
- SuiteAnalytics Connect
Click Save.
Navigate to Setup > Users/Roles > Manage Users.
Decide which NetSuite user you want to connect to Fivetran.
You can use a NetSuite user that has two-factor authentication (2FA) enabled or disabled.
Click on the username to open the user details page.
Click Edit.
Go to the Access tab. Ensure the Give Access box is checked.
Add the following roles under the Roles tab:
- the created dedicated Fivetran role ("FivetranRole" in the example)
- the system Data Warehouse Integrator role
Click Save.
Find authentication certificate
Open a terminal on your computer and run the following command to generate a private key (private.pem) and a public key (public.pem). The generated key files will be saved in the directory where you run the command.
openssl req -new -x509 -newkey rsa:4096 -keyout private.pem -sigopt rsa_padding_mode:pss -sha256 -sigopt rsa_pss_saltlen:64 -out public.pem -nodes -days 730Navigate to Setup > Integration > Manage Authentication > OAuth 2.0 Client Credentials (M2M) Setup.
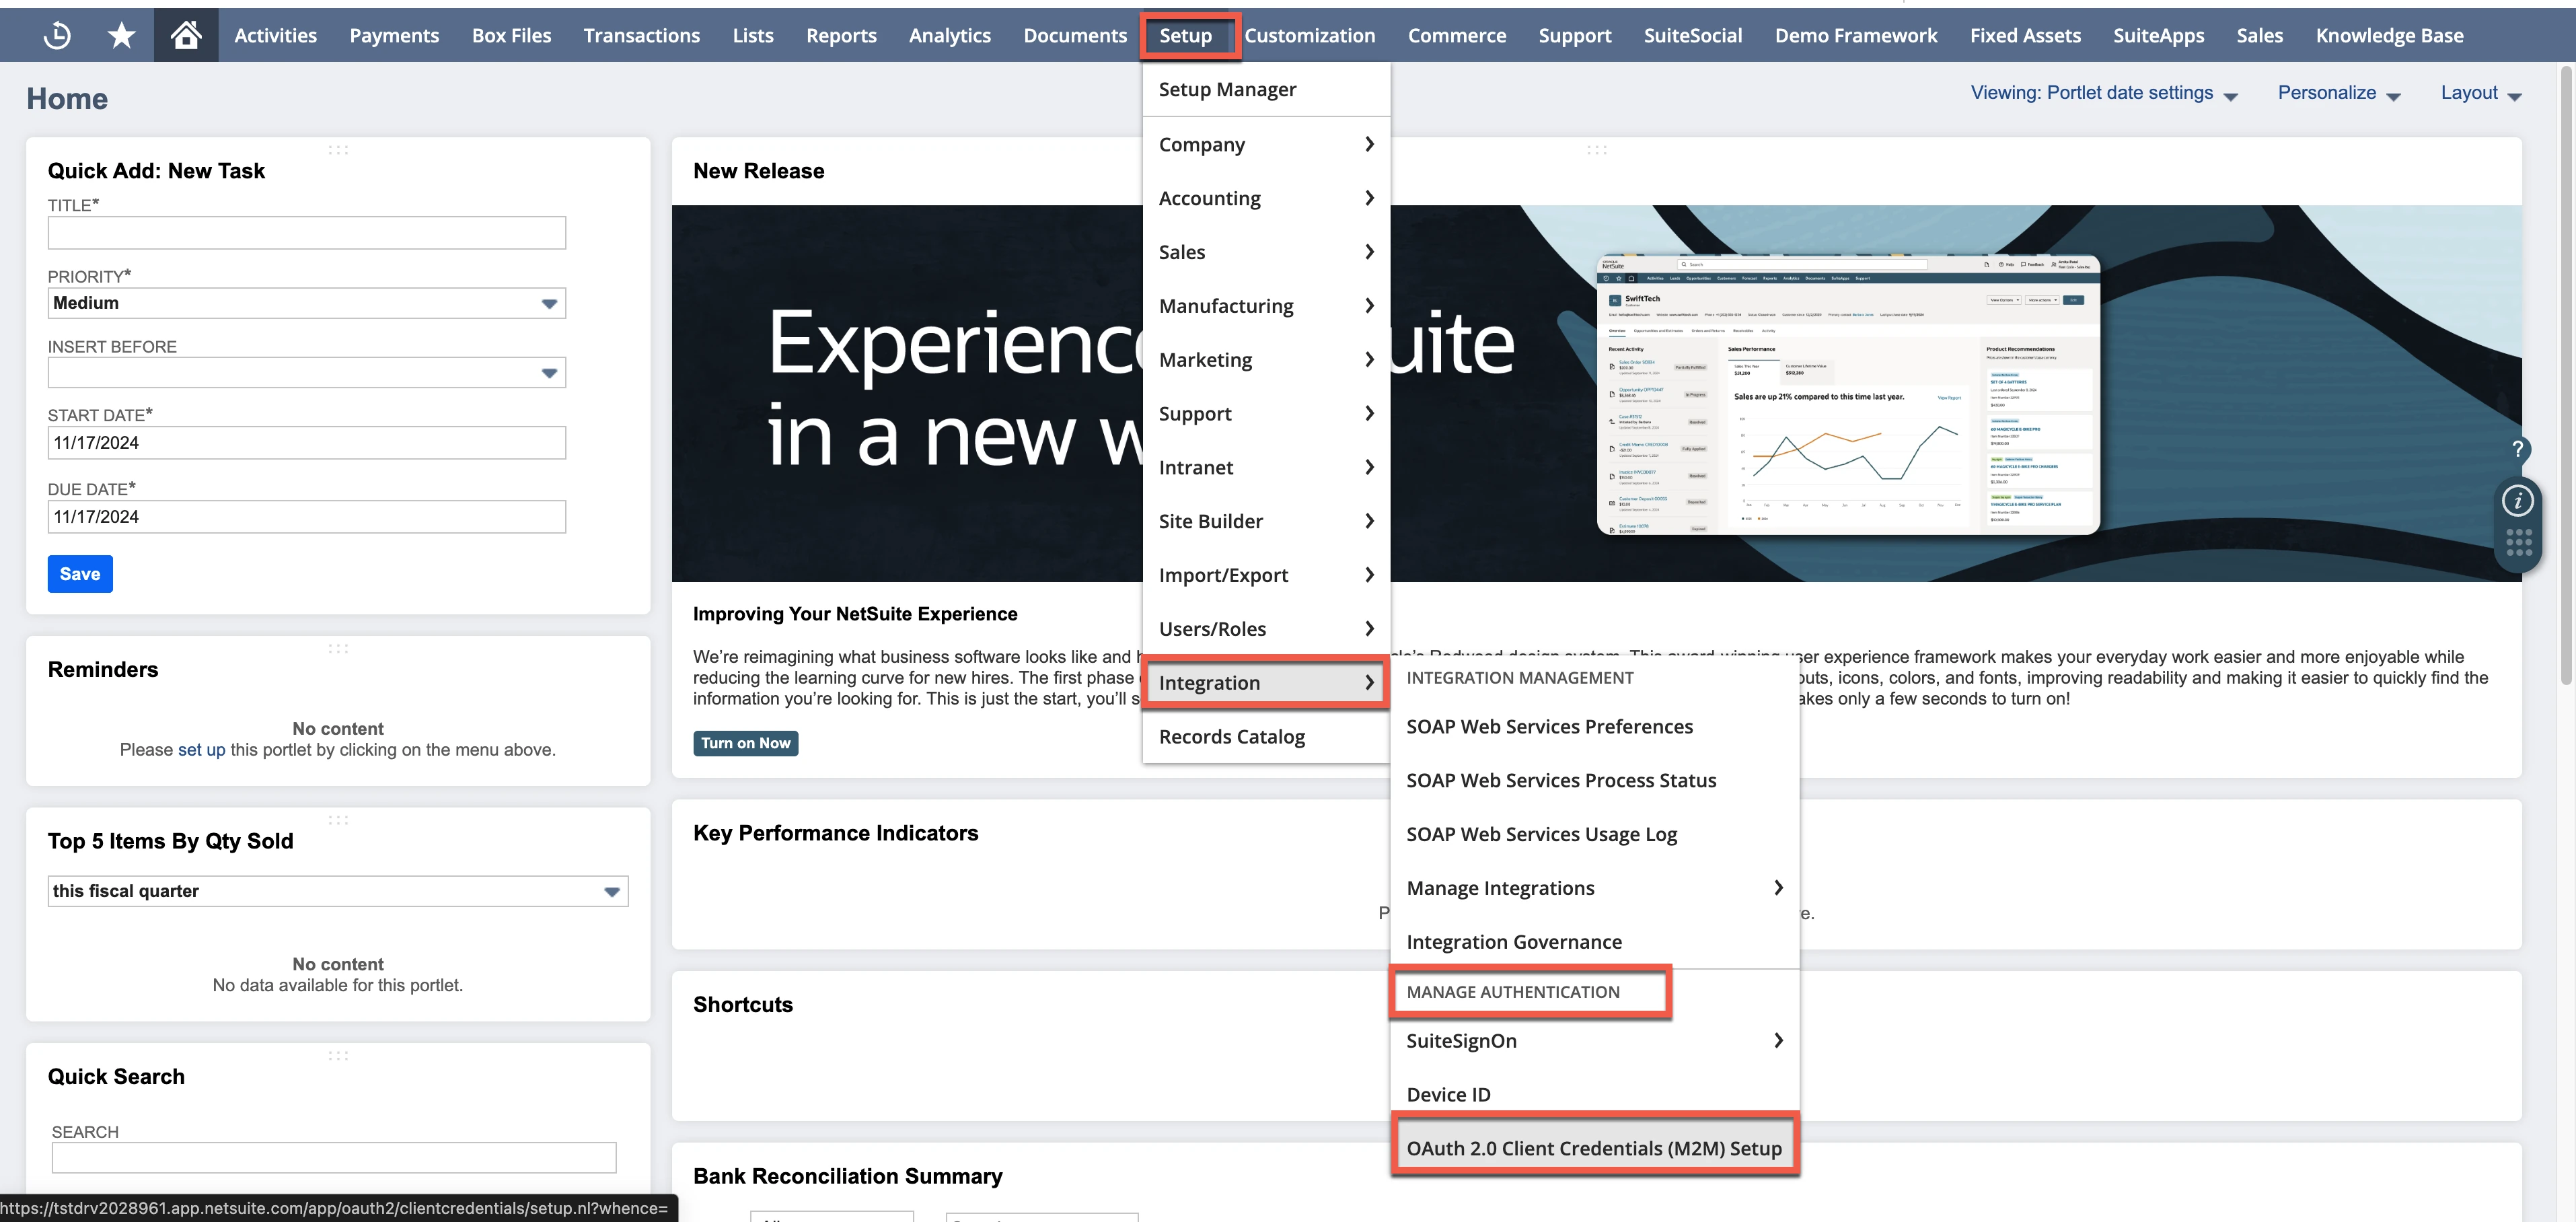
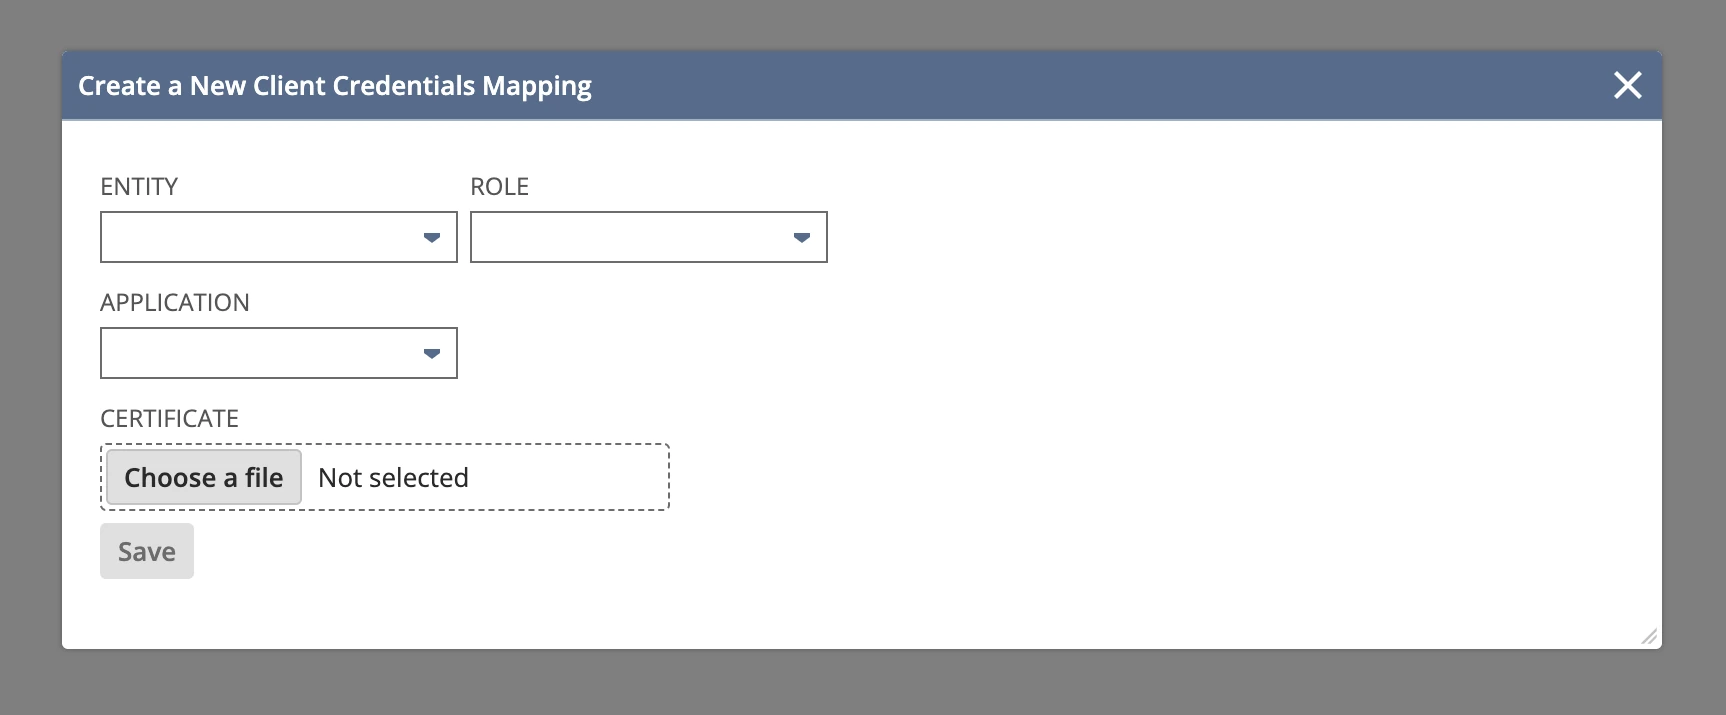
Click Create New.
In the pop-up window, select the following:
- Entity: The user you attached the role to in the previous step.
- Role: Data Warehouse Integrator.
- Application: The integration you created in Step 2.
Upload the public part of the certificate from your computer and click Save.
Make a note of the Certificate ID. You will need it to configure Fivetran.

Find Data Warehouse Integrator Role ID
In the menu bar at the top of the NetSuite dashboard, select Setup > Users/Roles > Manage Roles.
Find the Internal ID of the Data Warehouse Integrator role in the role list table on the Manage Roles page and make a note of it. You will need it to configure Fivetran.
Finish Fivetran configuration
- Enter your chosen destination schema name in the connection setup form.
In the Destination schema names field, choose the naming convention you want Fivetran to use for the schemas, tables, and columns in your destination:
- Fivetran naming: Standardizes the schema, table, and column names in your destination according to the Fivetran naming conventions.
- Source naming: Preserves the original schema, table, and column names from the source system in your destination.
- The Source naming feature is not compatible with Quickstart transformations. To ensure successful syncs, we automatically disable Quickstart transformations for connections configured with Source naming.
- If you want to modify your selection, make sure you do it before you start the initial sync.
- Enter the Service Host, Service Port, and Account ID you found.
- Select NetSuite2.com as the Data Source.
- Select Use OAuth 2.0 Authentication as the Authentication Method.
- Enter the Consumer key you found.
- Enter the Certificate ID you found.
- Upload the Private Key file you created.
- Enter the Role ID you found.
- Enable the Re-sync re-import tables during every sync if you want to sync re-import tables in every sync.
- Click Save & Test. Fivetran will take it from here and sync your data from your NetSuite SuiteAnalytics account.
NetSuite.com - Setup instructions
Learn how to set up your connection for the NetSuite.com data source.
Expand for instructions
NetSuite has announced end of support for the NetSuite.com data source. Fivetran will continue to support the new and existing NetSuite.com connections until Netsuite.com is no longer available. However, to ensure uninterrupted access to your data, we recommend that you set up your connection for the NetSuite2.com data source.
Find service host, port, and account ID
- Log in to your NetSuite account.
- In the homepage of your NetSuite account, find the Settings module and select Set Up SuiteAnalytics Connect.
- Click Your Configuration. Your service host, port, and account ID information appear.
- Make a note of your host, port, and account ID. You will need them to configure Fivetran.
Copy the account ID exactly as it appears on the Set Up SuiteAnalytics Connect > Your Configuration page. Fivetran requires the account ID format with hyphens instead of underscores and a lowercase suffix. Do not enter the account ID from Setup > Company > Company Information in the setup form, which displays a different format, such as 1234567_SB1, as this causes the connection to fail.
| Account type | Displayed in NetSuite | Required by Fivetran (and OAuth endpoint) |
|---|---|---|
| Production | 1234567 | 1234567 |
| Sandbox | 1234567_SB1 | 1234567-sb1 |
| Sandbox | 1234567_SB2 | 1234567-sb2 |
| Release Preview | 1234567_RP | 1234567-rp |
For more information, see NetSuite documentation.
Create role
In the menu bar at the top of your NetSuite dashboard, select Setup > Users/Roles > Manage Roles > New to create a new role for Fivetran.
Enter a memorable name in the Name input field for the role. (We recommend "Fivetran").
After you have named the role, go to the bottom of the page to set permissions for the role. You must first set system-wide permissions.
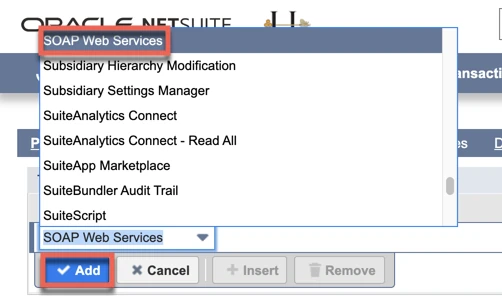
Select Permissions > Setup near the bottom of the page and expand the drop-down menu to set system-wide permissions.
To add the required system-level permissions, select each of the following permissions from the drop-down menu and click Add:
- Custom Body Fields
- Custom Column Fields
- Custom Entity Fields
- Custom Event Fields
- Custom Item Fields
- Custom Record Types
- Deleted Records
- SOAP Web Services
- SuiteAnalytics Connect
Click Save.
Set table permissions
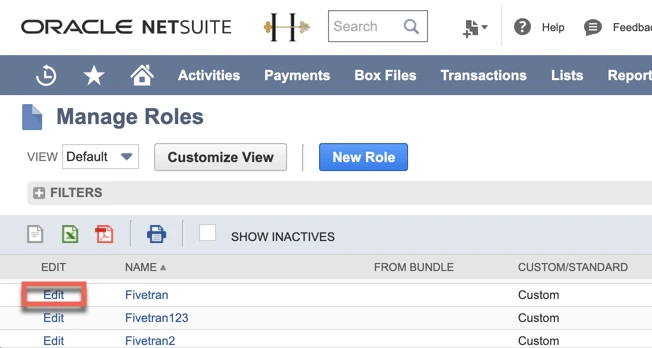
In your NetSuite dashboard, select Setup > Users/Roles > Manage Roles, and then click Edit beside the relevant role's name on the Manage Roles page displayed.
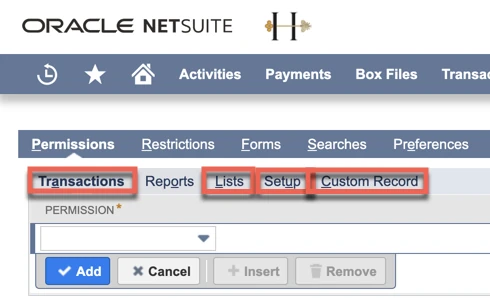
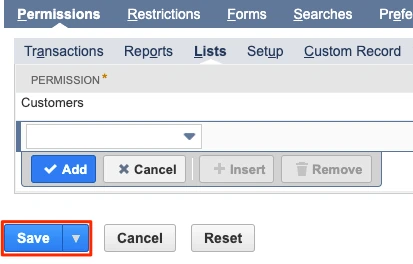
Select the permissions for the tables you wish to add. You will find these permissions under either the Transactions, Lists, Setup or Custom Record subcategories, depending on the types of tables.
Select the required permissions and click Add. By default, table permissions should have the View permission level, that is, be read-only.
After you have added the permissions, click Save.
After Fivetran completes the initial sync, look under your NetSuite connection's Status tab in your Fivetran dashboard. It will list all the available tables. It will display the name of the required permission for any table that it could not access. Add the required permissions.
(Optional) Set additional table permissions
Some tables, such as Accounts, are tied to multiple permissions. You must add these additional permissions for the role to see all the content in the table. As an example, you can do the following to determine the additional permissions you need for Accounts:
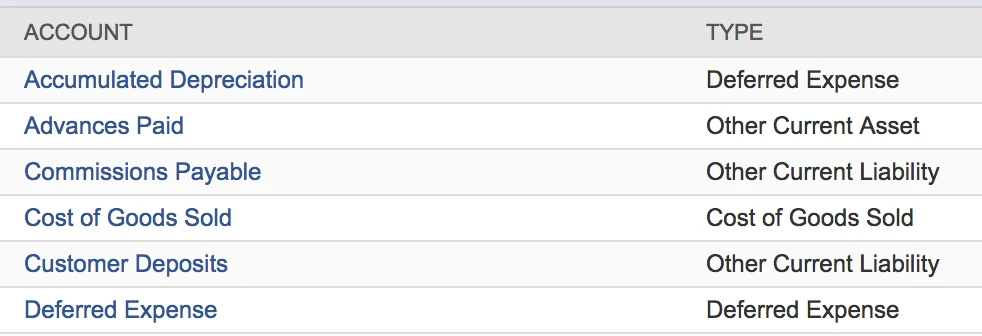
In your NetSuite dashboard, go to the Chart of Accounts page by selecting Lists > Accounting > Accounts.
Find the Account you want to add and note its Type. In the example screenshot, Accumulated Depreciation has a type of Deferred Expense.
Select Setup > Users/Roles > Manage Roles, and then click Edit beside the relevant role's name on the Manage Roles page displayed.
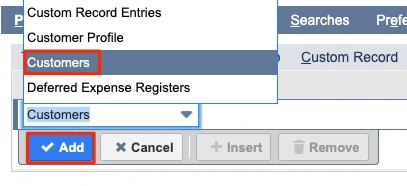
Select Deferred Expense Registers from the Lists drop-down menu of the Permissions tab.
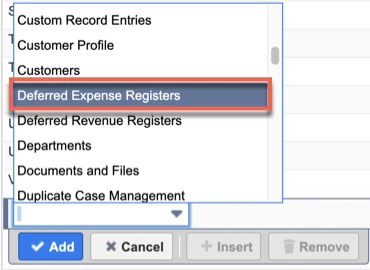
Click Add to add the permission.
You can check if you added the right permissions by logging in as a user with the new role and checking if you see all the data that you want.
Connect role to user
Decide which NetSuite user you want to connect to Fivetran. It is best to create a dedicated user for the Fivetran role because only one connection at a time is allowed by a given user. A connection conflict will cause your Fivetran sync to fail.
You can use a NetSuite user that has two-factor authentication (2FA) enabled or disabled.
In the menu bar at the top of the NetSuite dashboard, select Setup > Users/Roles > Manage Users.
Select the user you would like Fivetran to use.
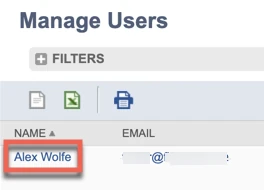
Click Edit.
Go to the Access tab.
Make sure the Give Access box is checked.
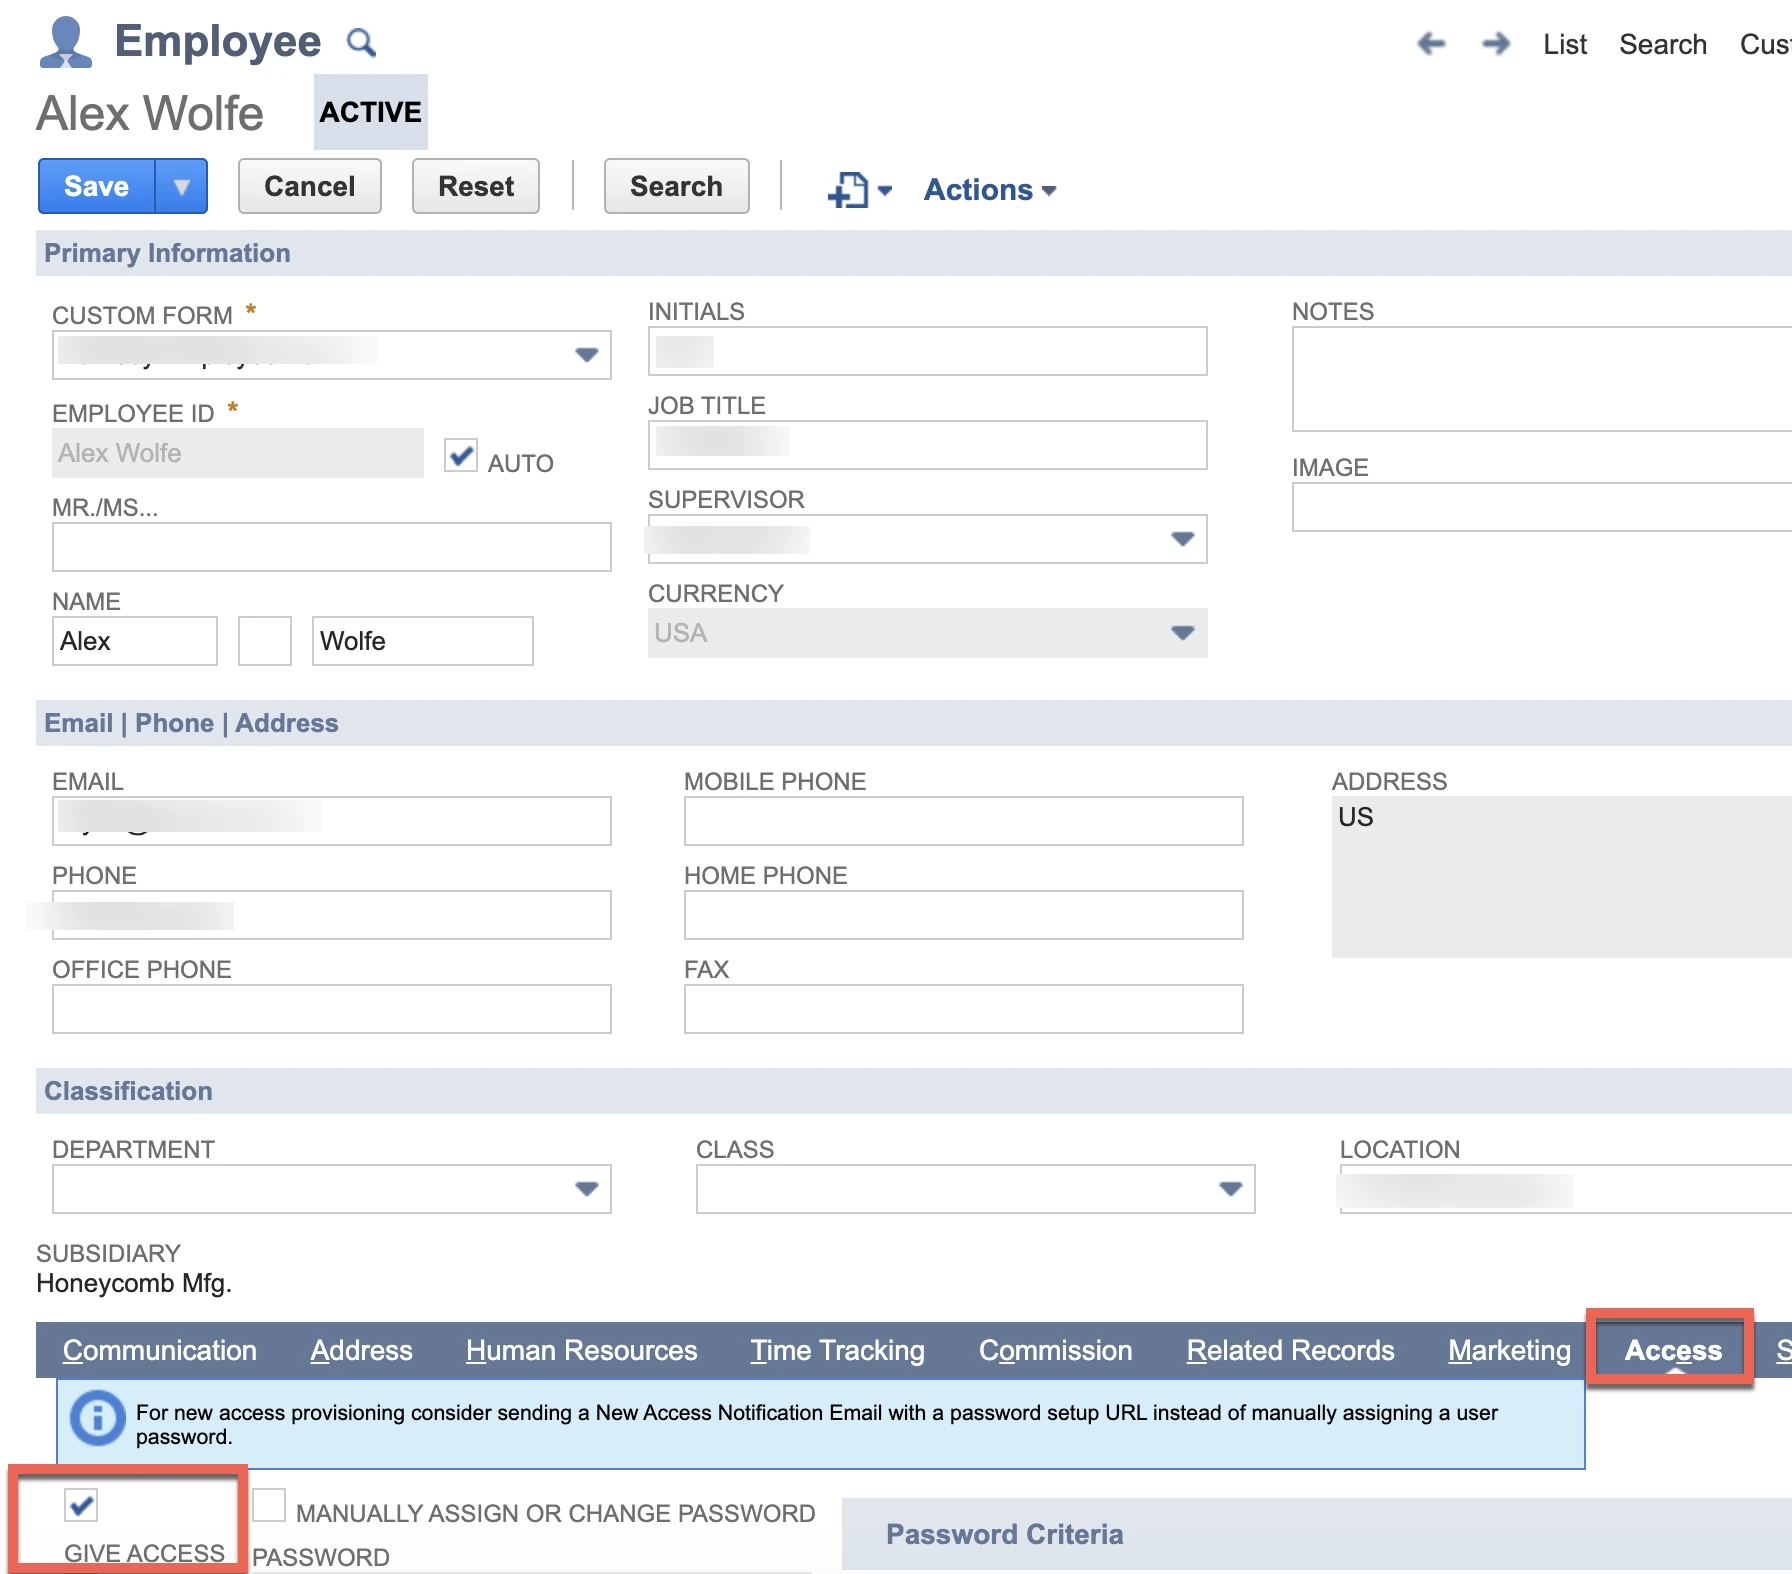
Expand the Role drop-down list on the Roles tab and select the Fivetran role. Then click Add and Save.
Find Role ID
In the menu bar at the top of the NetSuite dashboard, select Setup > Users/Roles > Manage Roles.
Find the Internal ID of the role in the role list table on the Manage Roles page and make a note of it. You will need it to configure Fivetran.
Finish Fivetran configuration
- Enter your chosen destination schema name in the connection setup form.
In the Destination schema names field, choose the naming convention you want Fivetran to use for the schemas, tables, and columns in your destination:
- Fivetran naming: Standardizes the schema, table, and column names in your destination according to the Fivetran naming conventions.
- Source naming: Preserves the original schema, table, and column names from the source system in your destination.
- The Source naming feature is not compatible with Quickstart transformations. To ensure successful syncs, we automatically disable Quickstart transformations for connections configured with Source naming.
- If you want to modify your selection, make sure you do it before you start the initial sync.
(Hybrid Deployment only) If your destination is configured for Hybrid Deployment, the Hybrid Deployment Agent associated with your destination is pre-selected for the connection. To assign a different agent, click Replace agent, select the agent you want to use, and click Use Agent.
- Enter the Service Host, Service Port, and Account ID you found.
- Select NetSuite.com as the Data Source.
- Enter the Email and Password.
- Enter the Role ID you found.
- Enable the Re-sync re-import tables during every sync if you want to sync re-import tables in every sync.
- Click Save & Test. Fivetran will take it from here and sync your data from your NetSuite SuiteAnalytics account.
Fivetran tests and validates the NetSuite SuiteAnalytics connection. On successful completion of the setup tests, you can sync your NetSuite SuiteAnalytics data to your destination.
Setup tests
Fivetran performs the Connecting to API test to verify whether we can connect to your NetSuite SuiteAnalytics account using the credentials and host details you provided.
This test may take a couple of minutes to complete.