Redshift Setup Guide
Follow our setup guide to connect your Redshift destination to Fivetran.
Prerequisites
To connect Redshift to Fivetran, you need the following:
- Access to the AWS console to safelist Fivetran's IP address
- Redshift Superuser. Redshift user accounts can only be created and removed by a database superuser.
- A Fivetran user account with permissions to create or manage destinations
- CREATE permissions for Redshift limited user
- The
enable_case_sensitive_identifierparameter should be set totruein your Redshift cluster before enabling source naming for your database connection. By default, Redshift usesfalse, which folds all identifiers to lowercase. If source naming is enabled on a cluster whereenable_case_sensitive_identifierisfalse, we cannot match mixed-case source column names to their lowercase destination equivalents, and syncs fail with schema migration errors.Changing this parameter on an existing cluster affects all queries and applications using that cluster.
Redshift provisioned destination - Setup instructions
Choose your deployment model
Before setting up your destination, decide which deployment model best suits your organization's requirements. This destination supports both SaaS and Hybrid deployment models, offering flexibility to meet diverse compliance and data governance needs.
See our Deployment Models documentation to understand the use cases of each model and choose the model that aligns with your security and operational requirements.
You must have an Enterprise or Business Critical plan to use the Hybrid Deployment model.
Choose connection method
Decide whether to connect to your Redshift destination directly, using an SSH tunnel, through AWS PrivateLink, or using Proxy Agent. For more information, see our destination connection options documentation.
You must connect through SSH if your Redshift cluster is not publicly accessible.
Connect directly
If you connect directly, you must create a rule in a security group that allows Fivetran access to your Redshift instance and port.
Configure your firewall and/or other access control systems to allow incoming connections to your host and port from Fivetran's IPs for your region.
Connect using an SSH tunnel
If you connect using an SSH tunnel, Fivetran connects to a separate server in your network that provides an SSH tunnel to your Redshift destination. You must then configure your tunnel server's security group to allow Fivetran access and configure the instance's security to allow access from the tunnel.
You must connect through SSH if your destination is contained within an inaccessible subnet.
To connect using SSH, do the following:
In the destination setup form, select the Connect via an SSH tunnel option.
Copy Fivetran's public SSH key.
Add the public key to the
authorized_keysfile of your SSH server. The key must be all on one line, so make sure that you don't introduce any line breaks when cutting and pasting.
Connect using PrivateLink
You must have a Business Critical plan to use AWS PrivateLink.
If you select PrivateLink as a connection method, Fivetran uses AWS PrivateLink to move your data securely between our system and your destination.
To set up PrivateLink for your Redshift destination, follow the instructions in the AWS PrivateLink section.
Connect using Proxy Agent
Fivetran connects to your destination host through the Proxy Agent, providing secure communication between Fivetran processes and your destination. The Proxy Agent is installed in your network and creates an outbound network connection to the Fivetran-managed SaaS.
To learn more about the Proxy Agent, its installation, and configuration, see our Proxy Agent documentation.
Find endpoint details
If you selected PrivateLink as a connection method, skip this step and follow our instructions on how to obtain the Endpoint URL for PrivateLink.
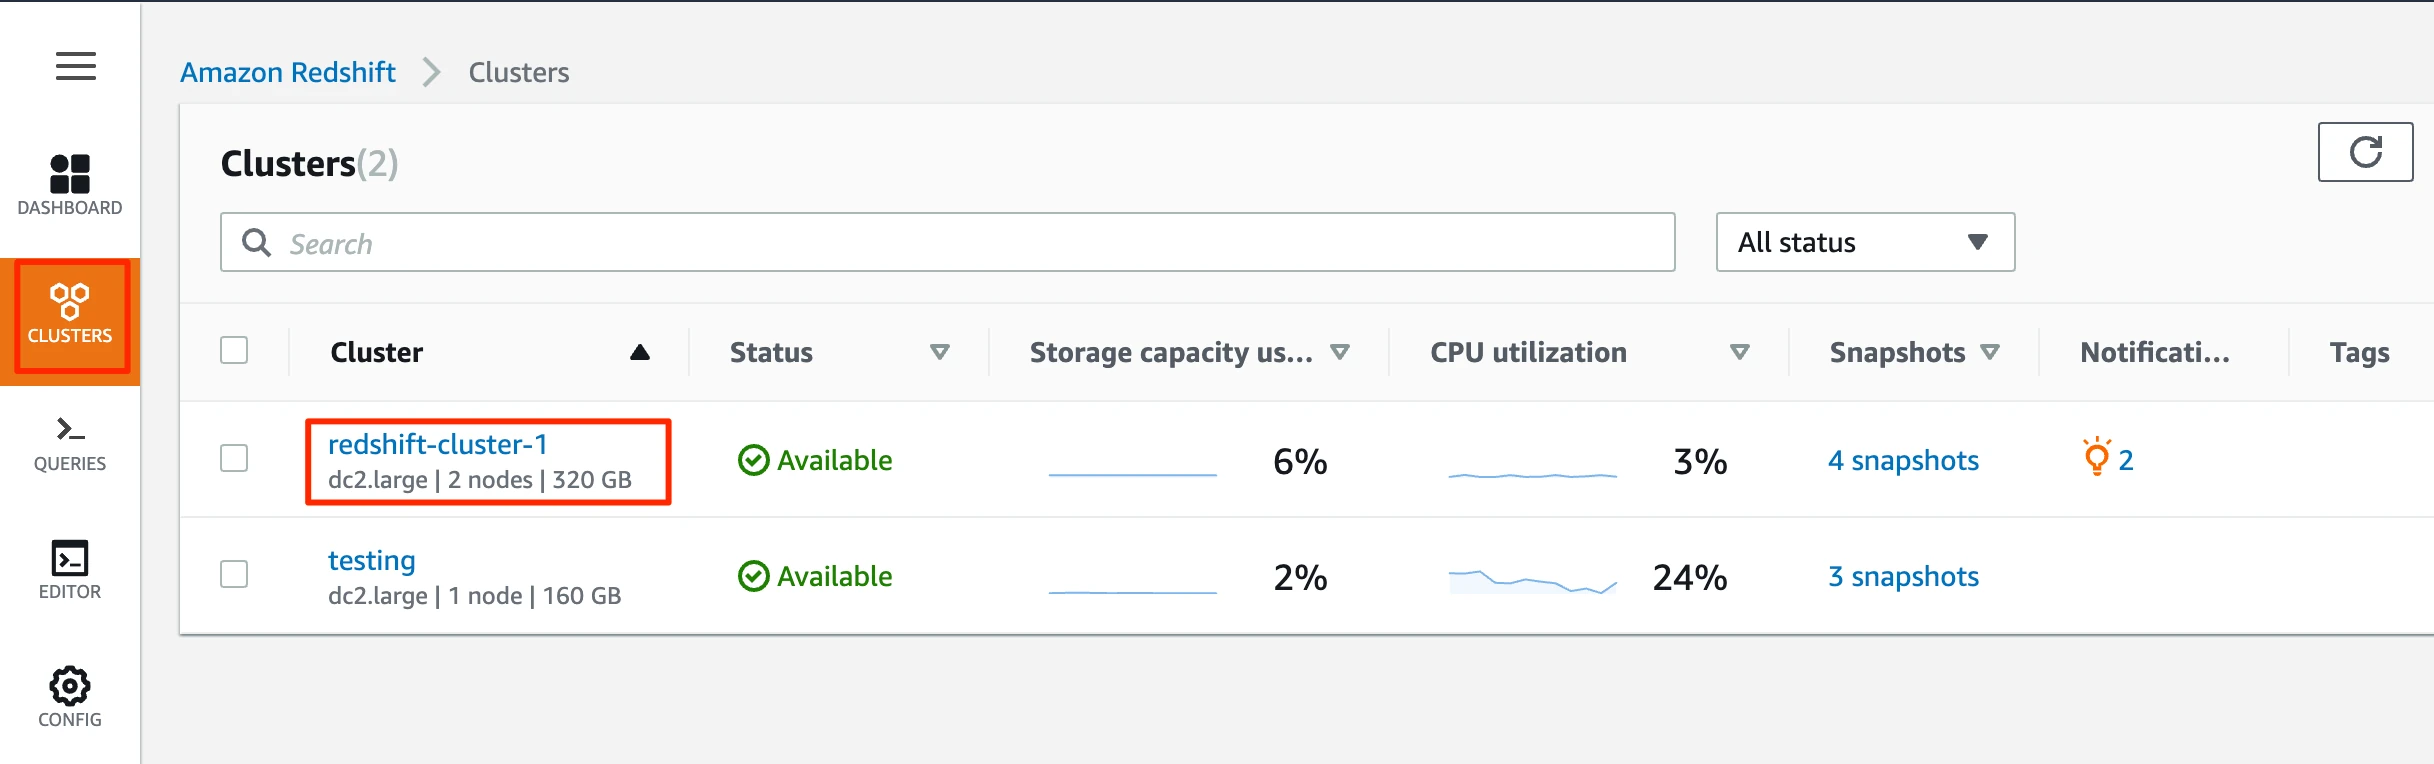
In the left menu, click Clusters.
Select the cluster you want Fivetran to connect to.
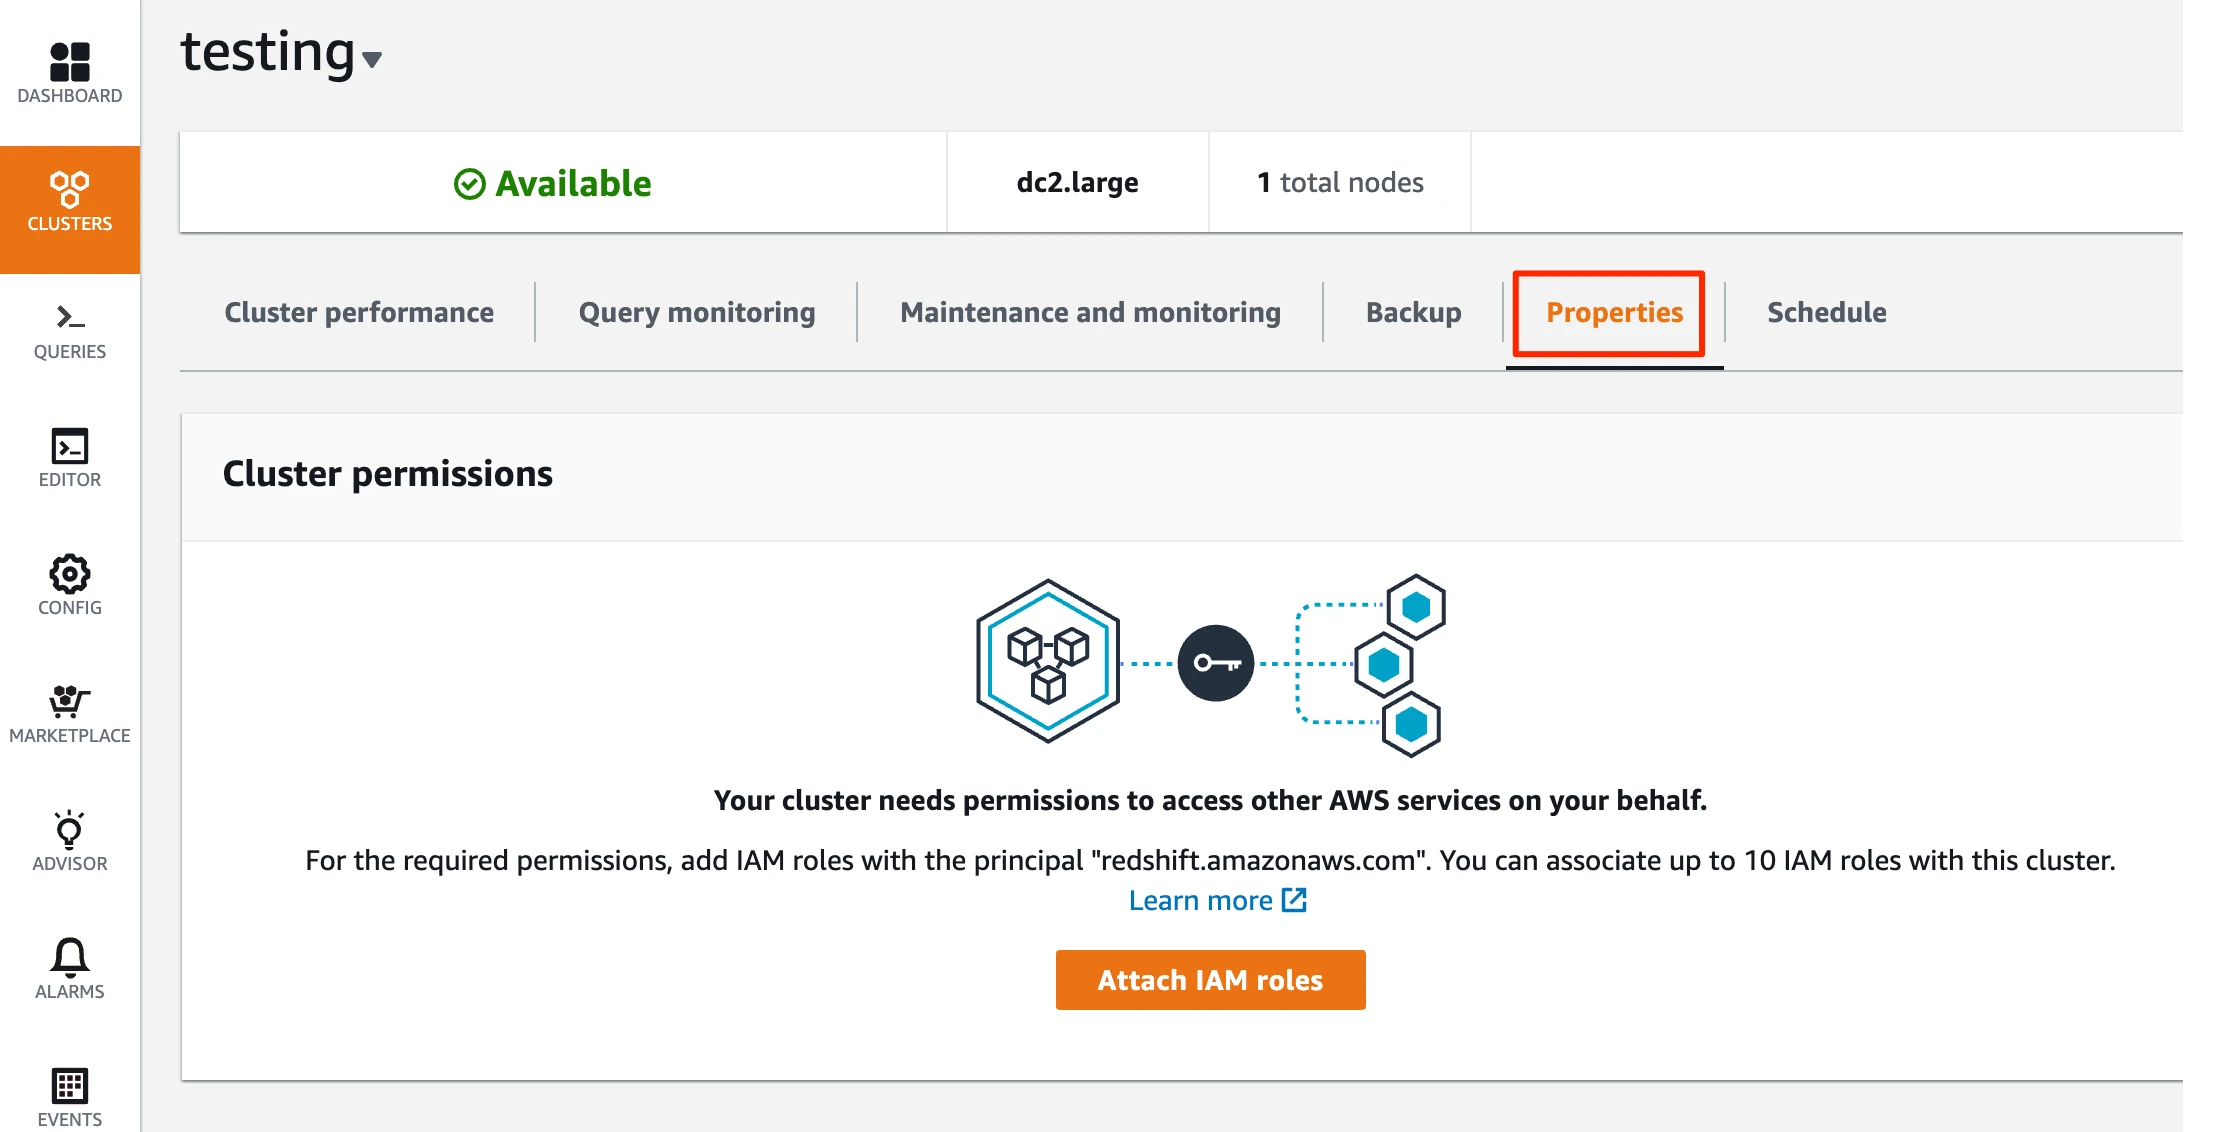
Click Properties.
In the Connection details pane's Endpoint field, click Copy to copy the endpoint details. You will need them to complete the destination setup in Fivetran.
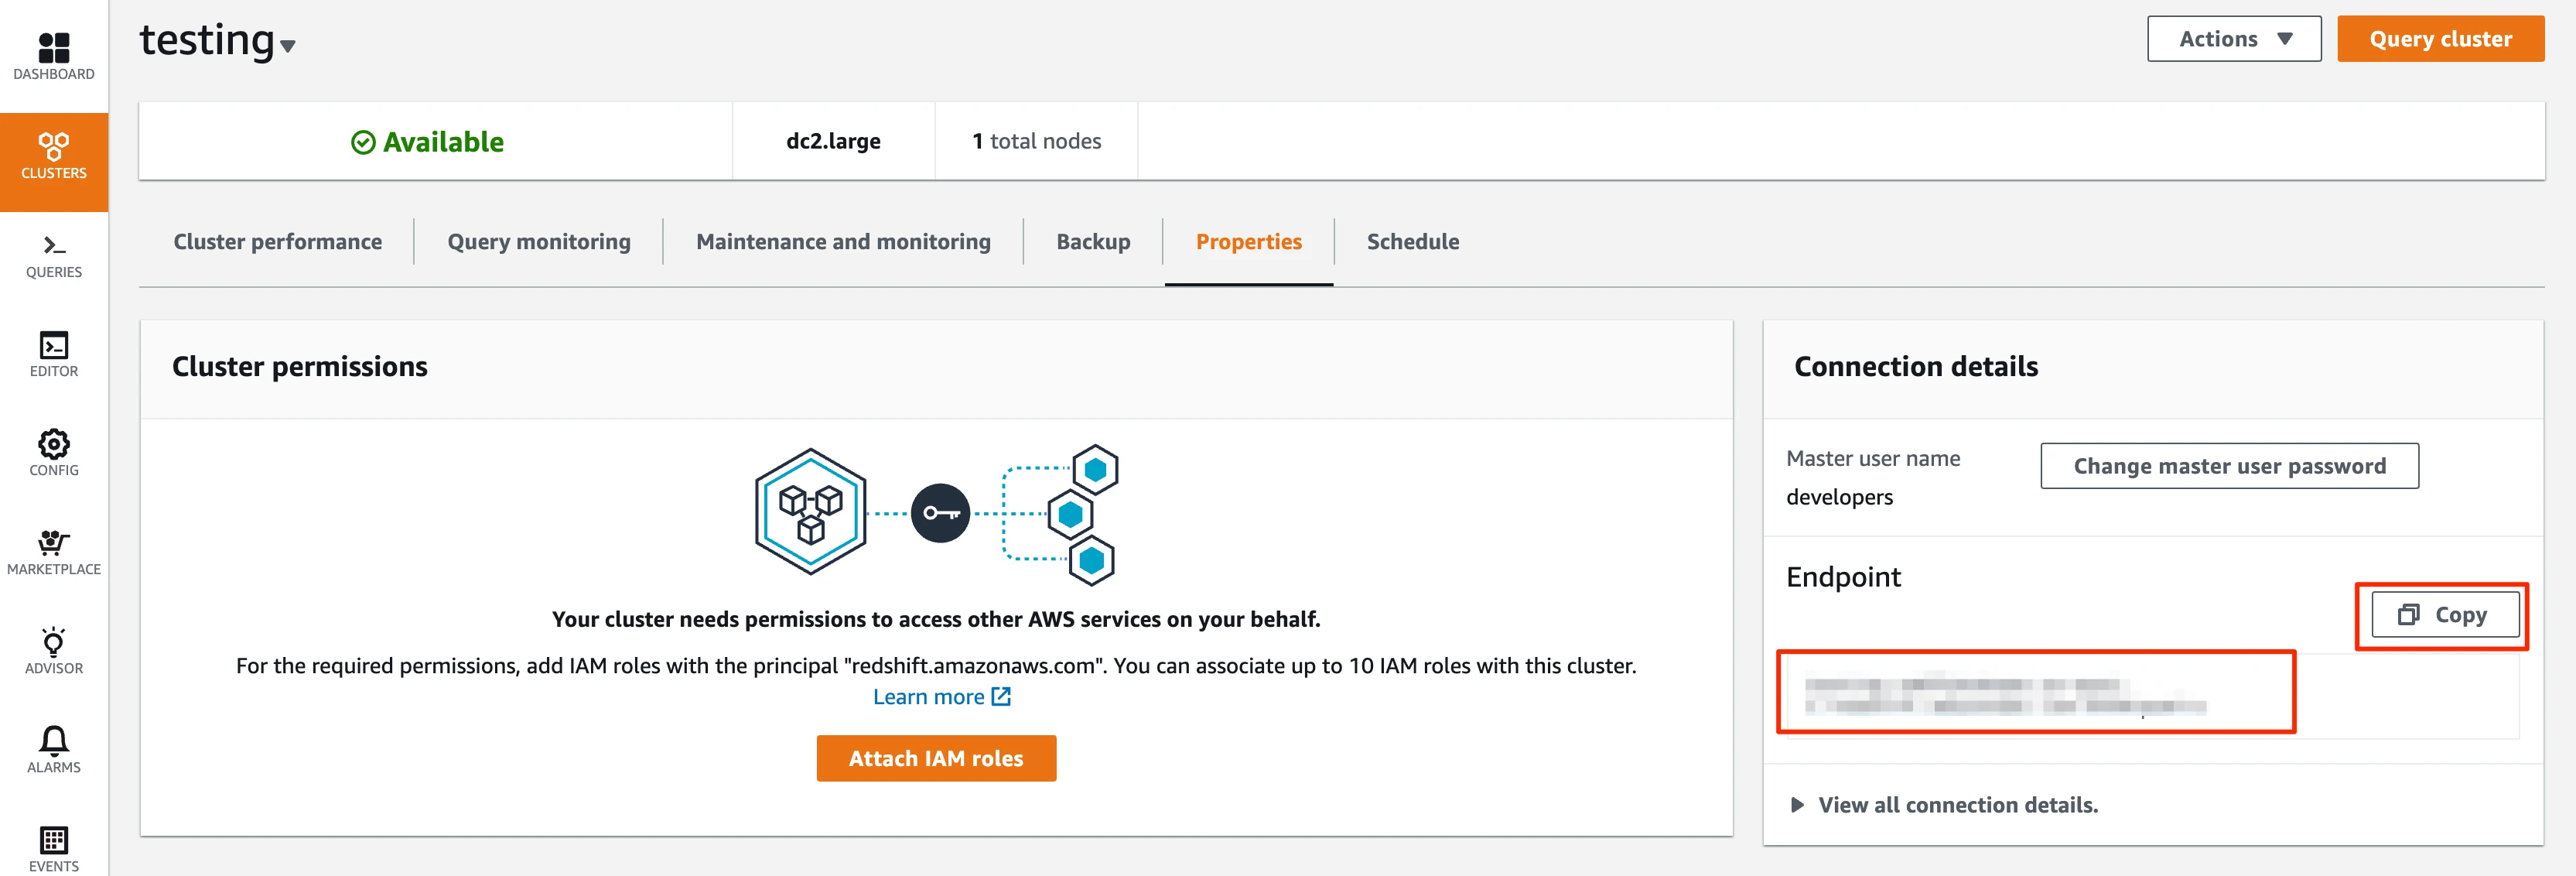
Be sure to separate the port and remove the preceding colon (:) from the host string.
Allow Fivetran to connect
In the Redshift console, click Clusters.
Select the cluster you want Fivetran to connect to.
Click Properties.
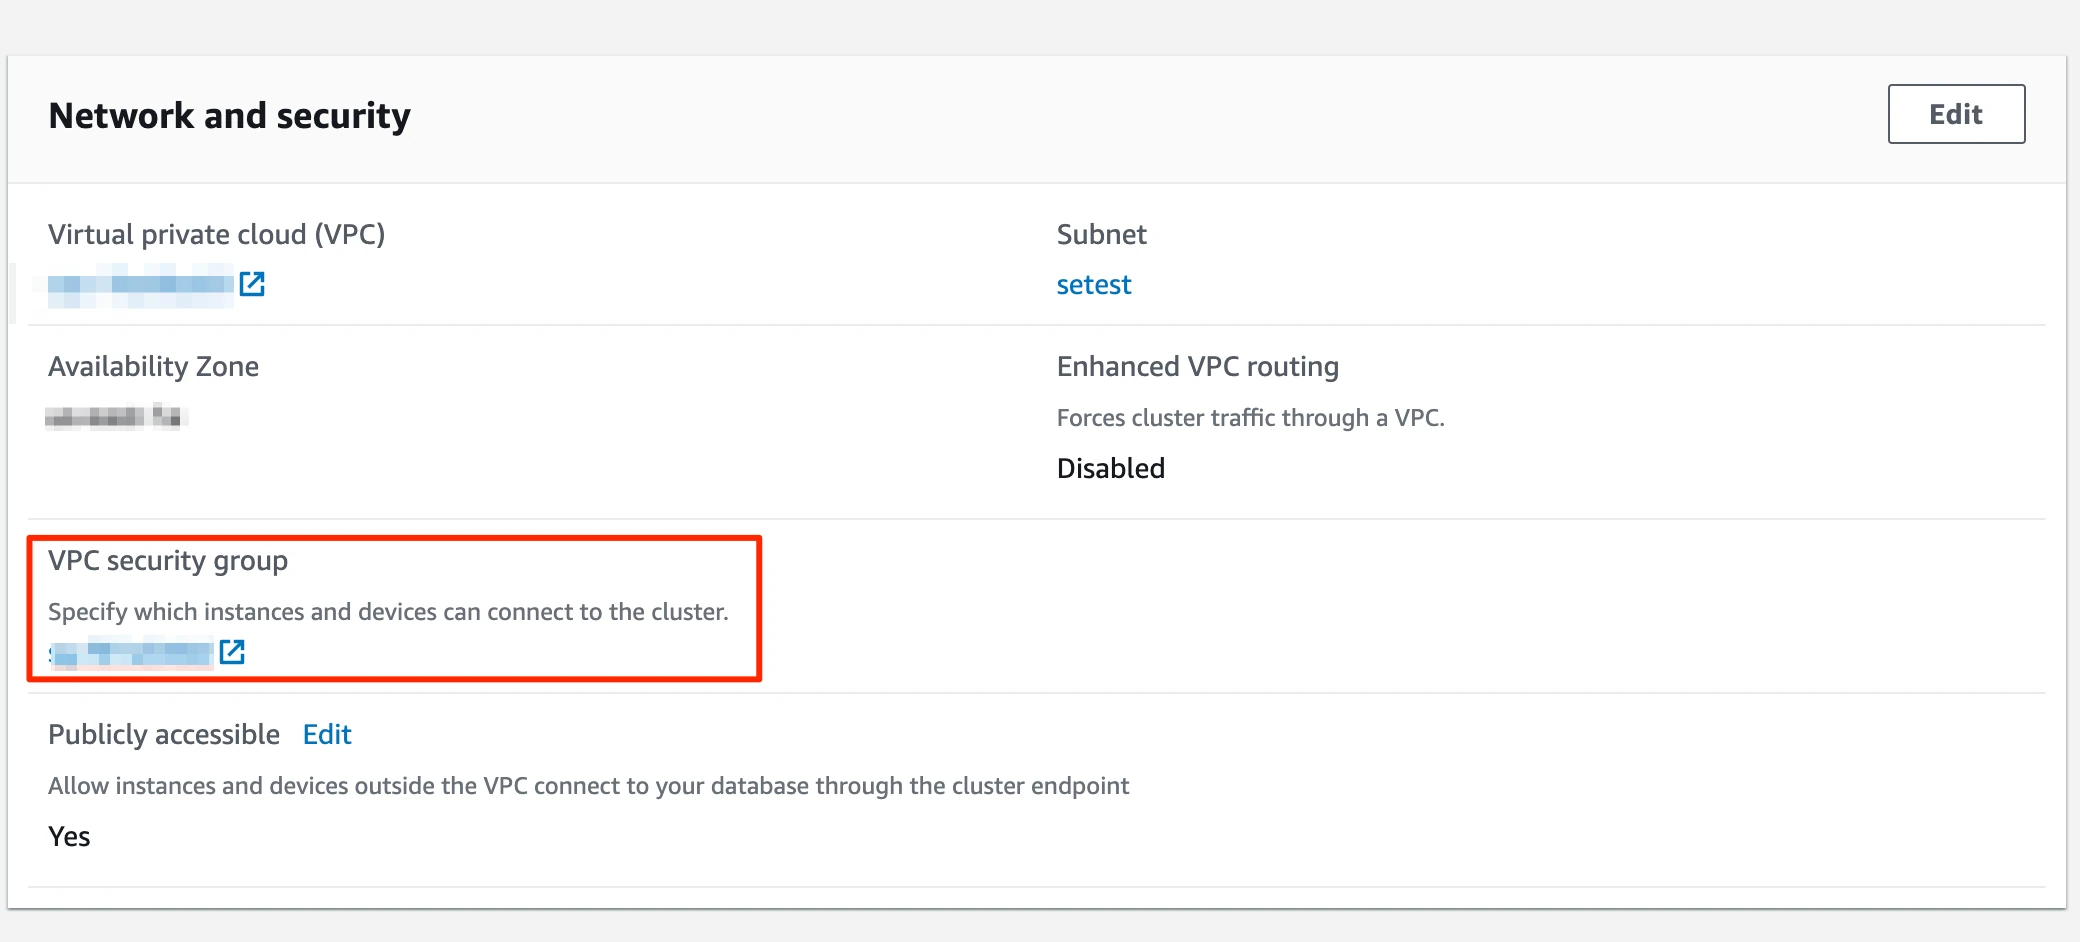
Scroll down to the Network and security section.
In the VPC security group field, click the security group to open it. Make a note of the security group ID.
In the Security Groups window, click Inbound rules.
The security group you clicked in the previous view should be pre-selected here. Ensure that you selected the same security group from the previous screen.
Click Edit inbound rules.
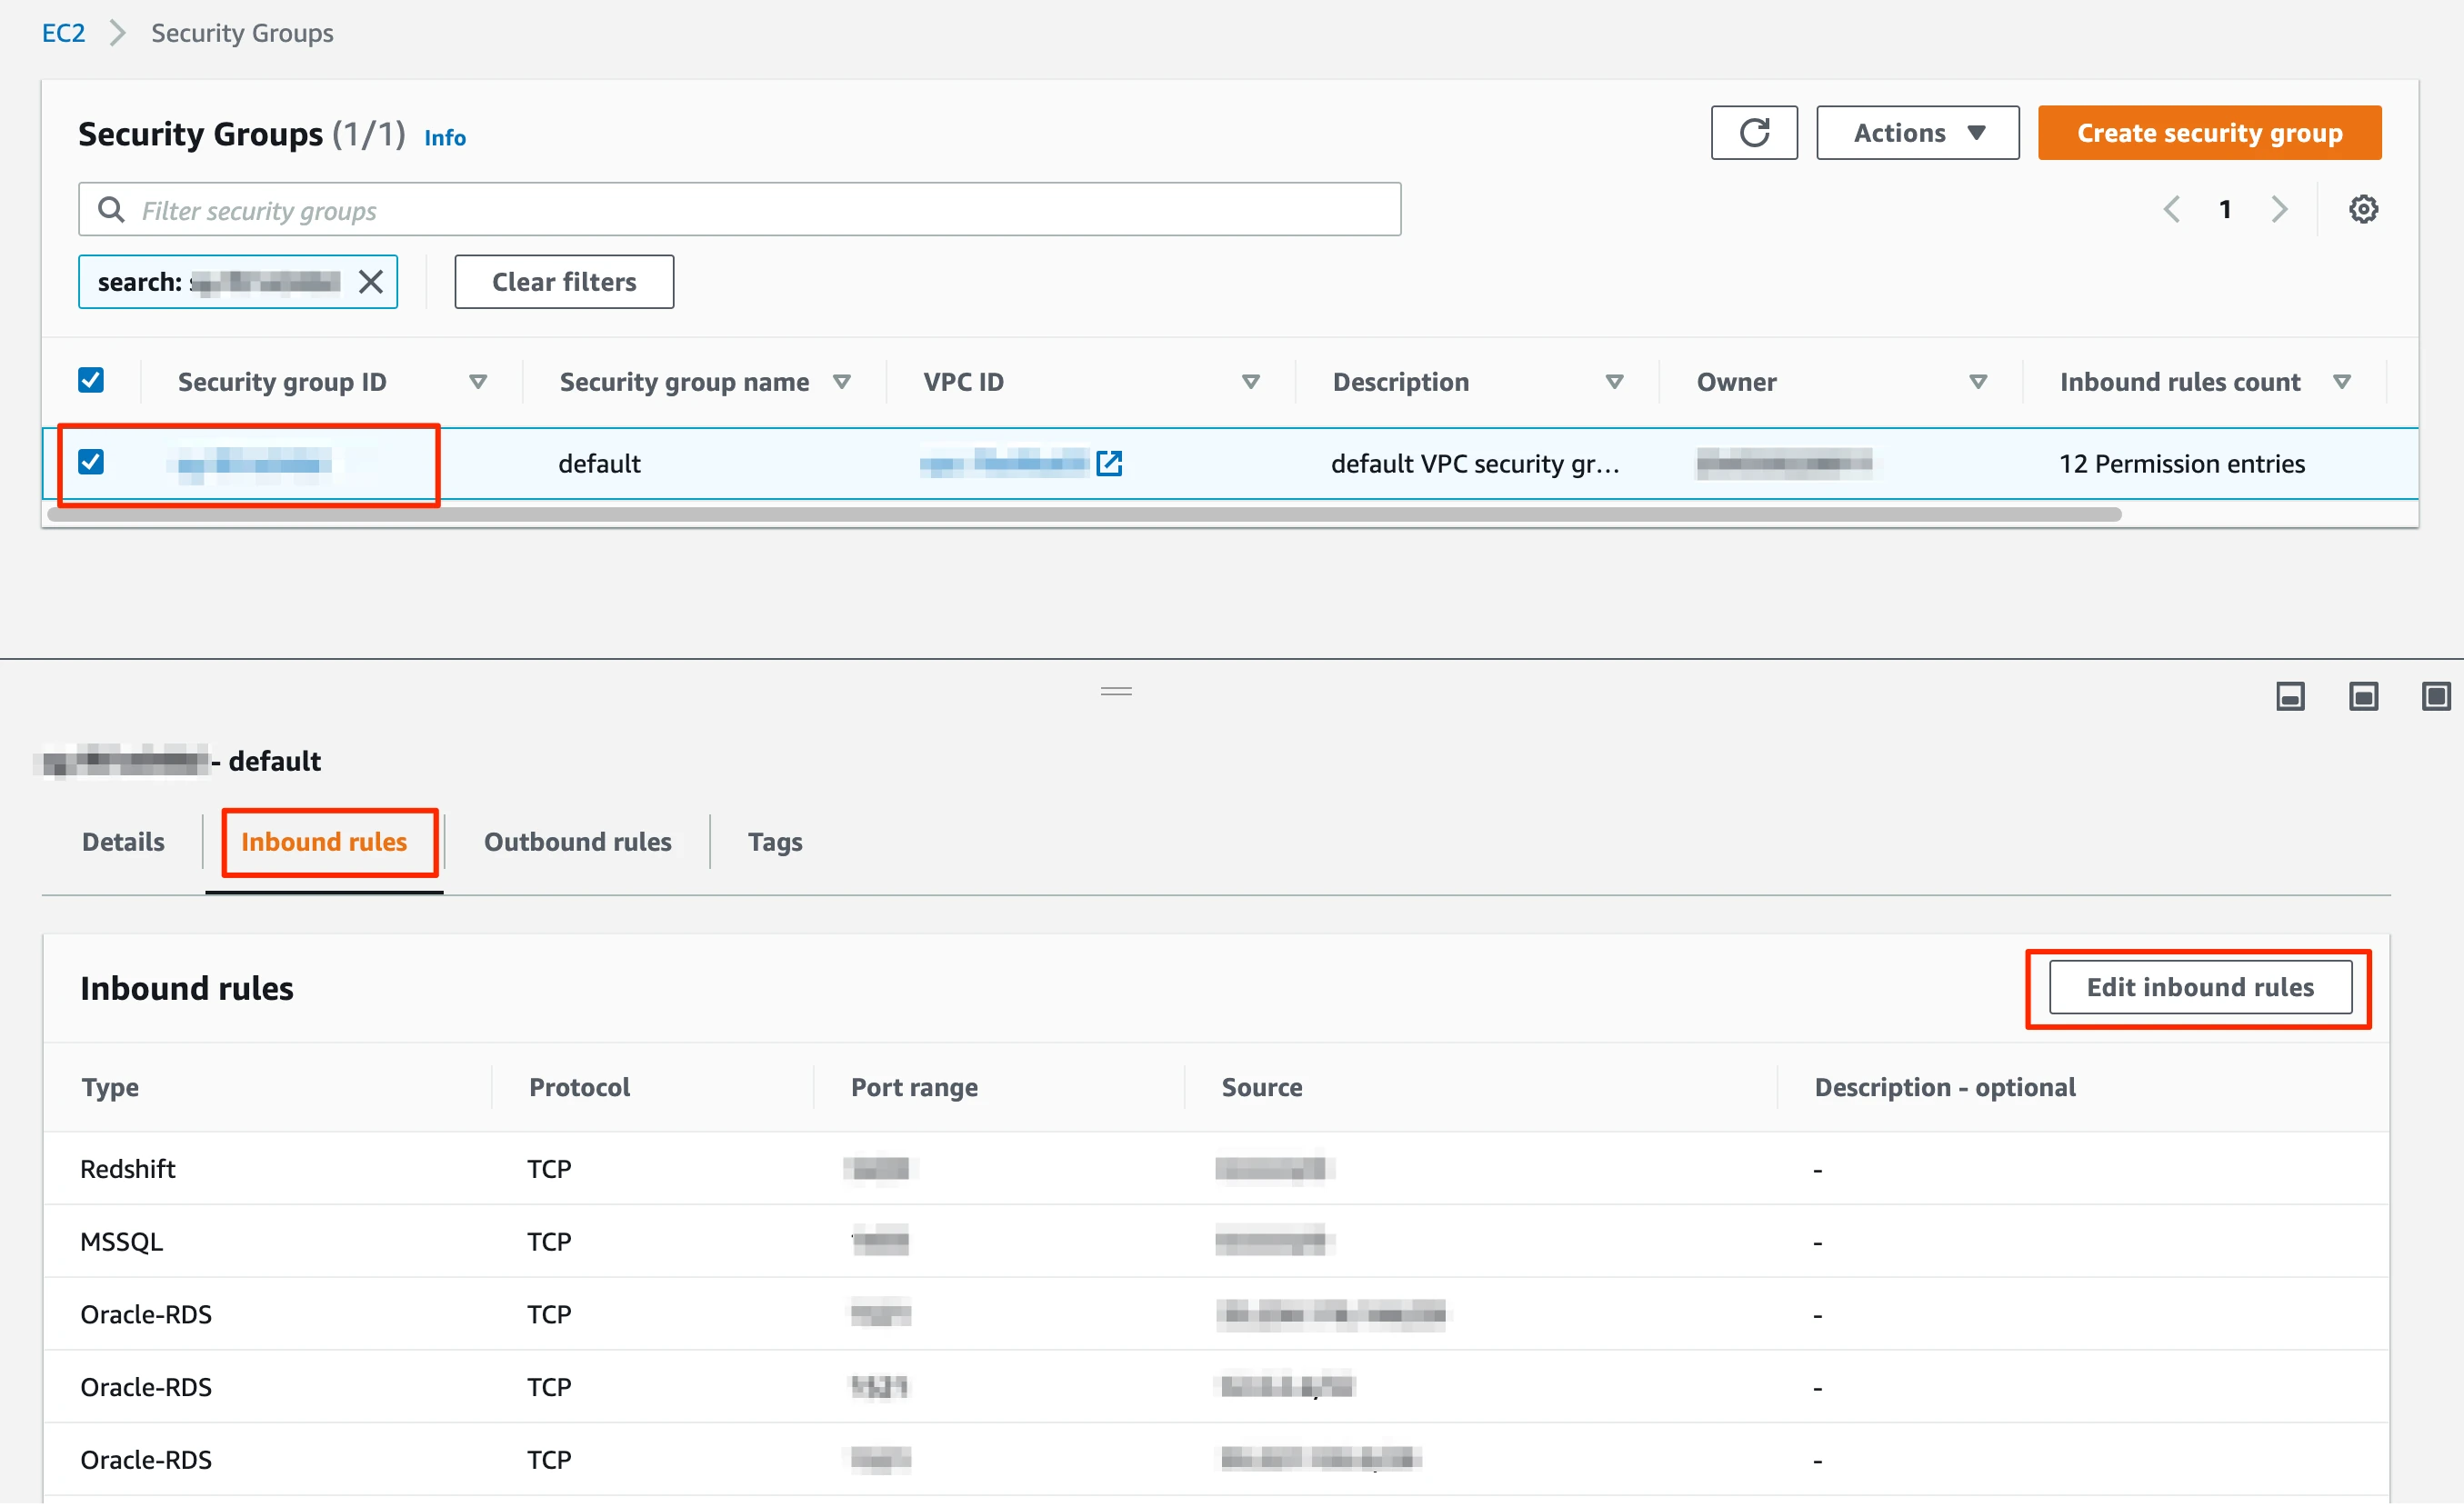
In the Edit Inbound rules window, follow the steps below to create custom TCP rules for each of Fivetran's IPs in your region:
- Select Custom TCP in the drop-down menu.
- Enter your Redshift port number.
- Enter the Fivetran IP address.
If you are connecting through a reverse SSH or VPN tunnel, you must safelist the Fivetran SSH IP address. Create a Fivetran support ticket to request this IP address.
- Click Add rule.

Enable Automatic WLM
In Automatic WLM, the system calculates the optimal memory and concurrency of your queues. To enable automatic WLM, do the following:
In the Redshift console, click Configurations > Workload management.
In the Workload management window, select the parameter group.
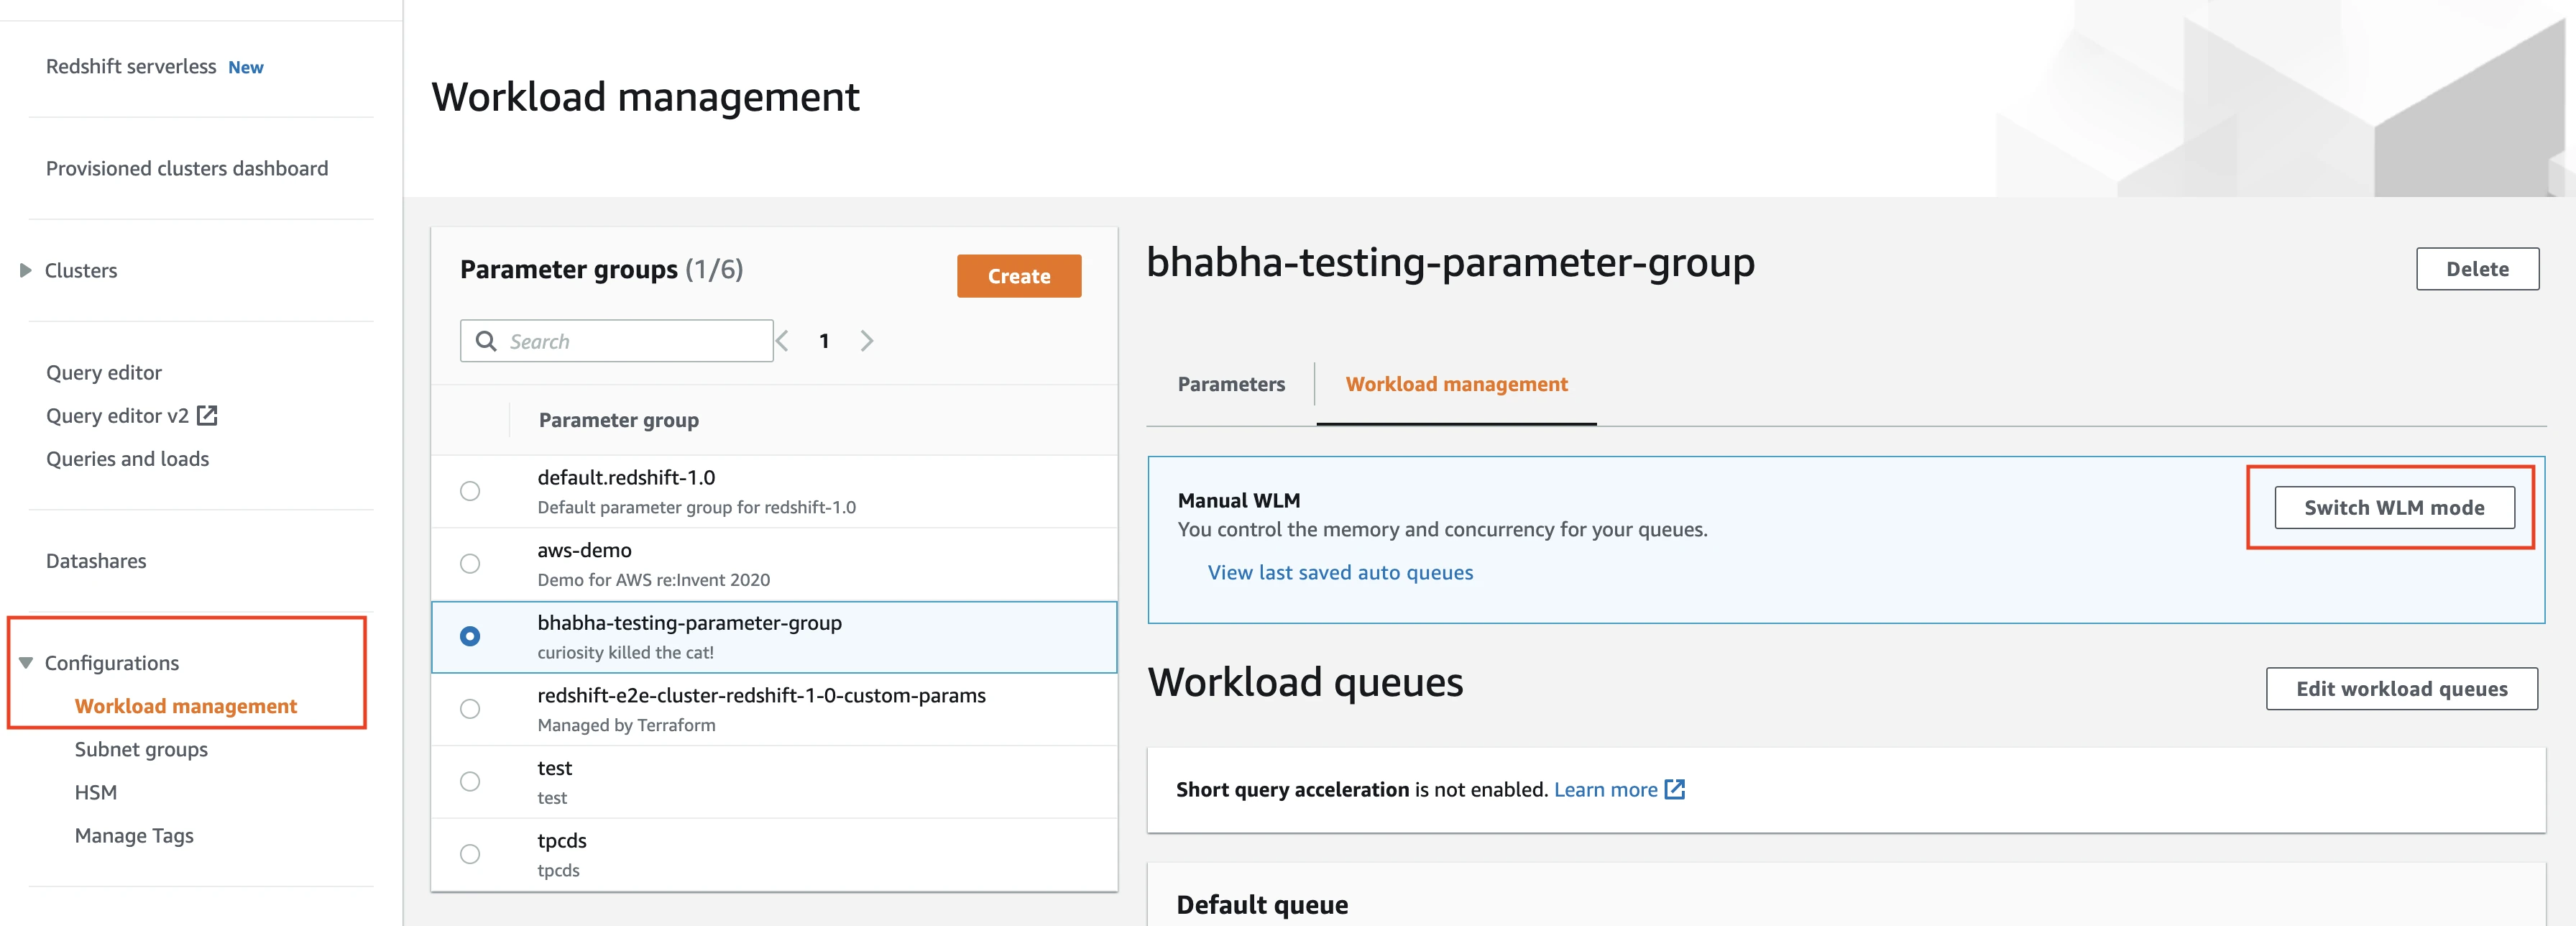
In the Workload management tab, verify the WLM mode. Click Switch WLM mode.
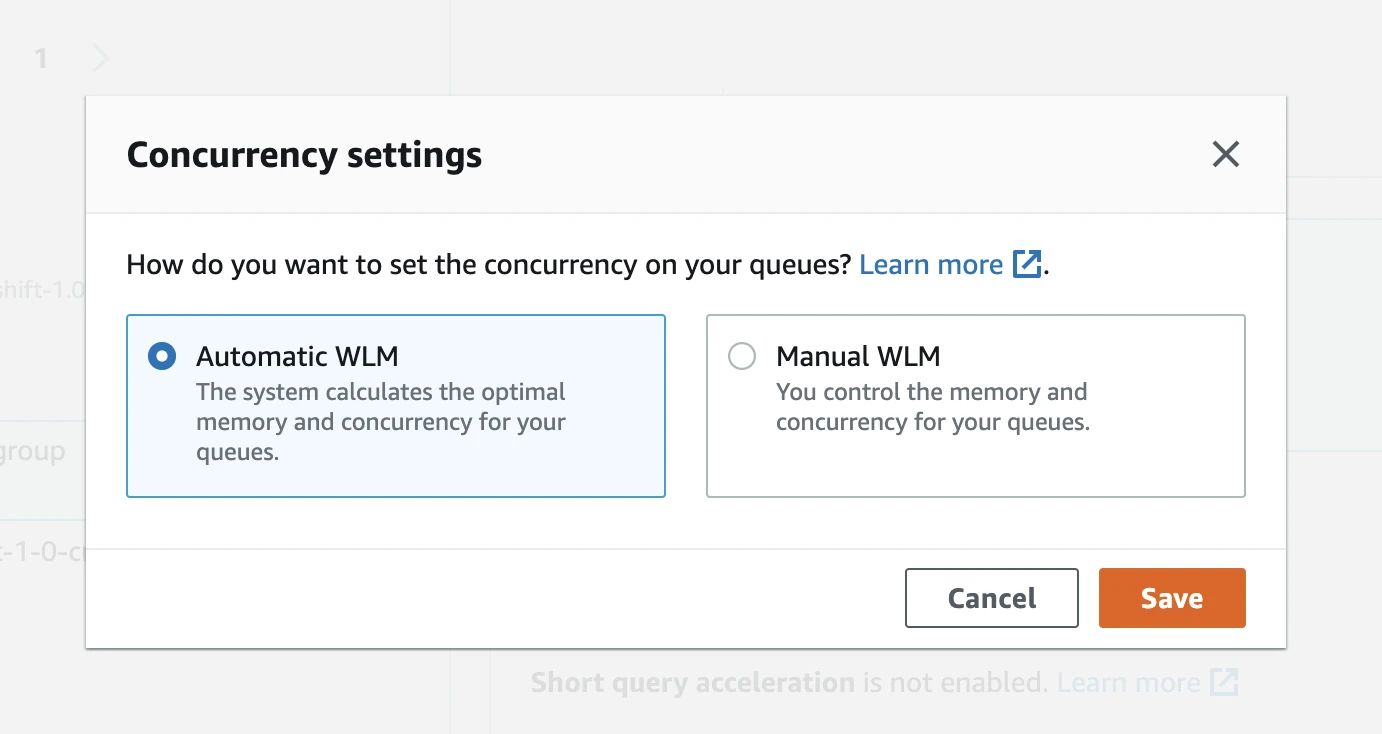
In the Concurrency settings window, select Automatic WLM and click Save.
If you want to use Manual WLM, you must allocate a query concurrency of 4 or above to Fivetran. To modify the query concurrency of an existing queue, do the following:
In the Workload management tab, go to the Workload queues pane.
Click Edit workload queues to change the query concurrency.
Use one of the following methods:
Modify the Concurrency on main column value for the queue.
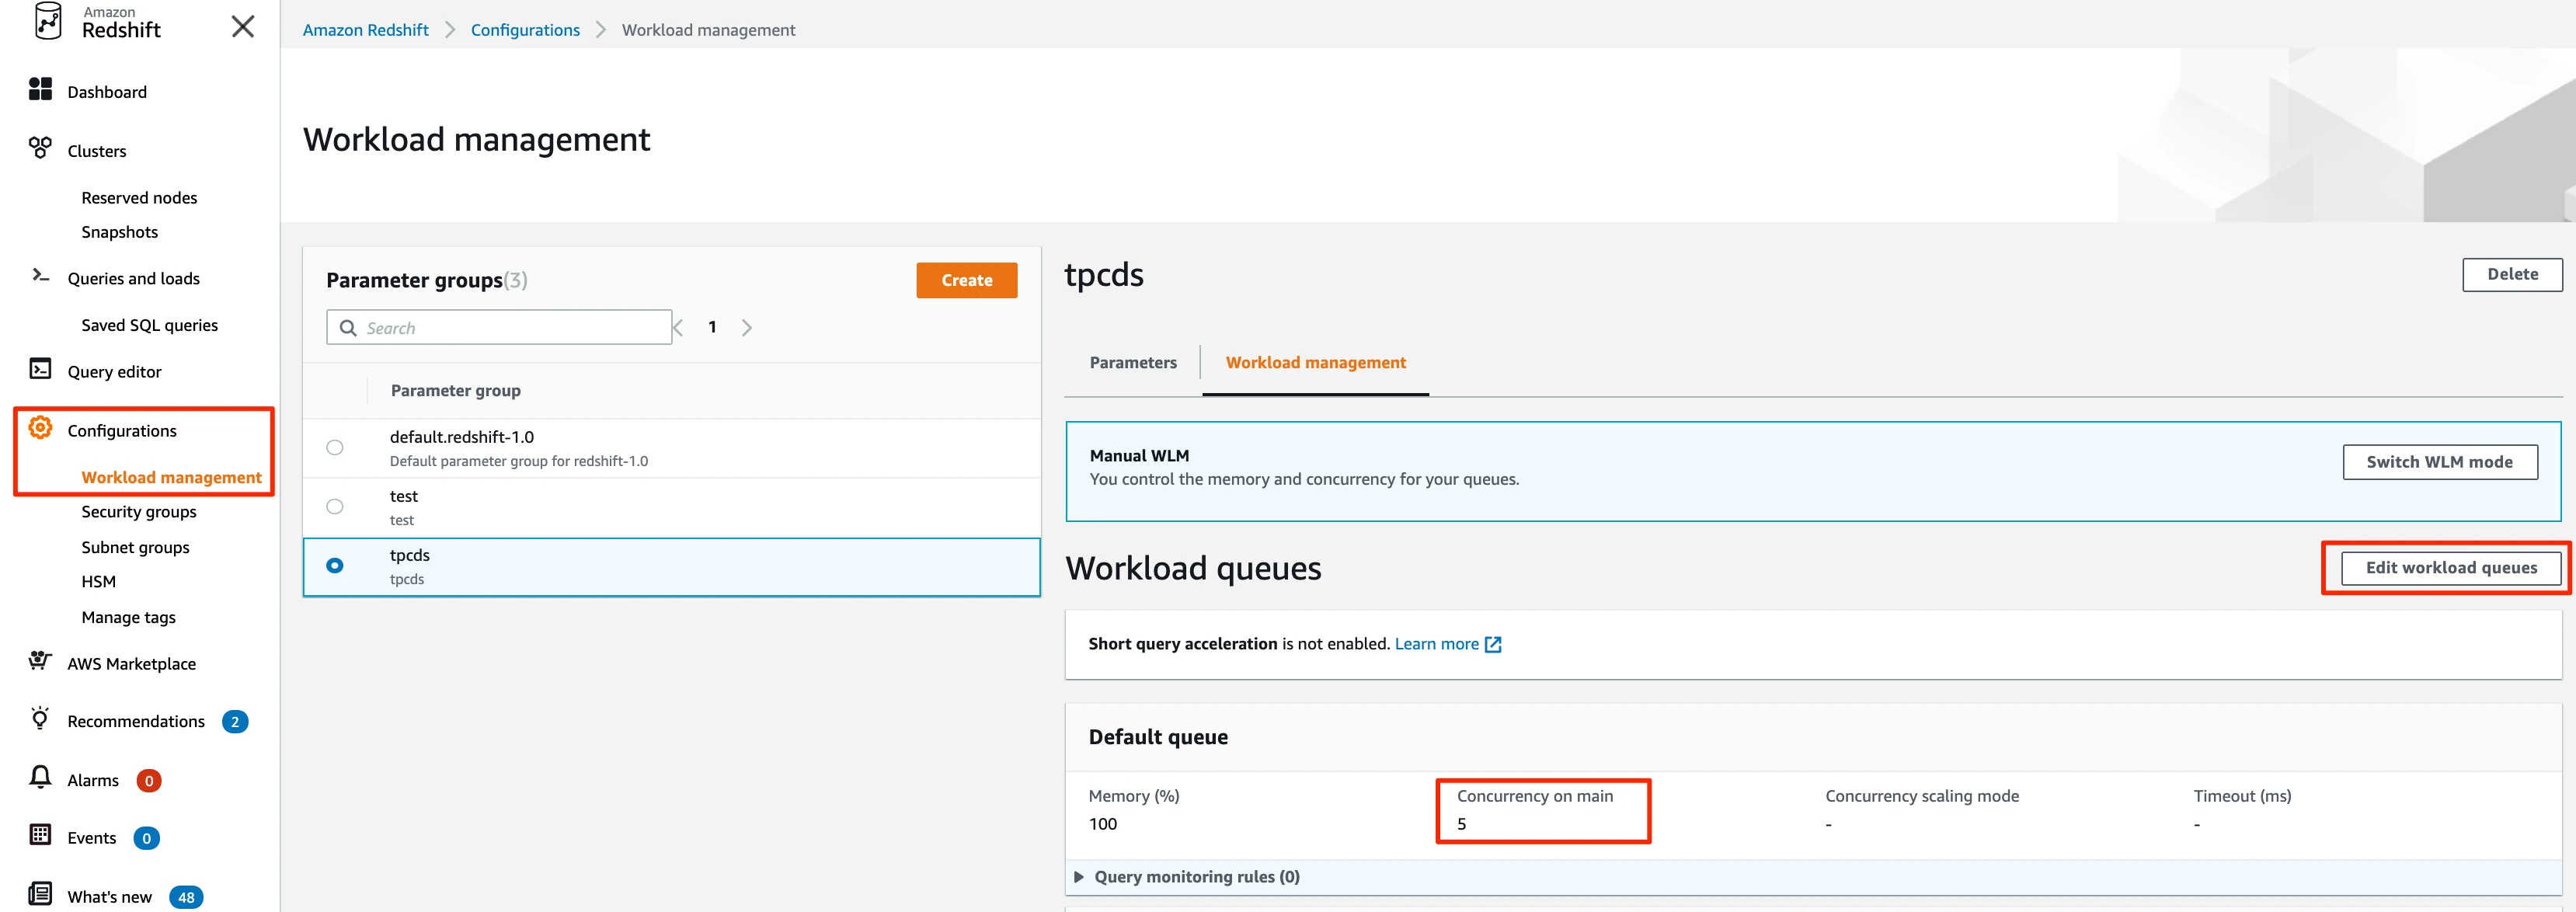
In the JSON section, edit the configuration and modify the
query_concurrencyparameter for the queue.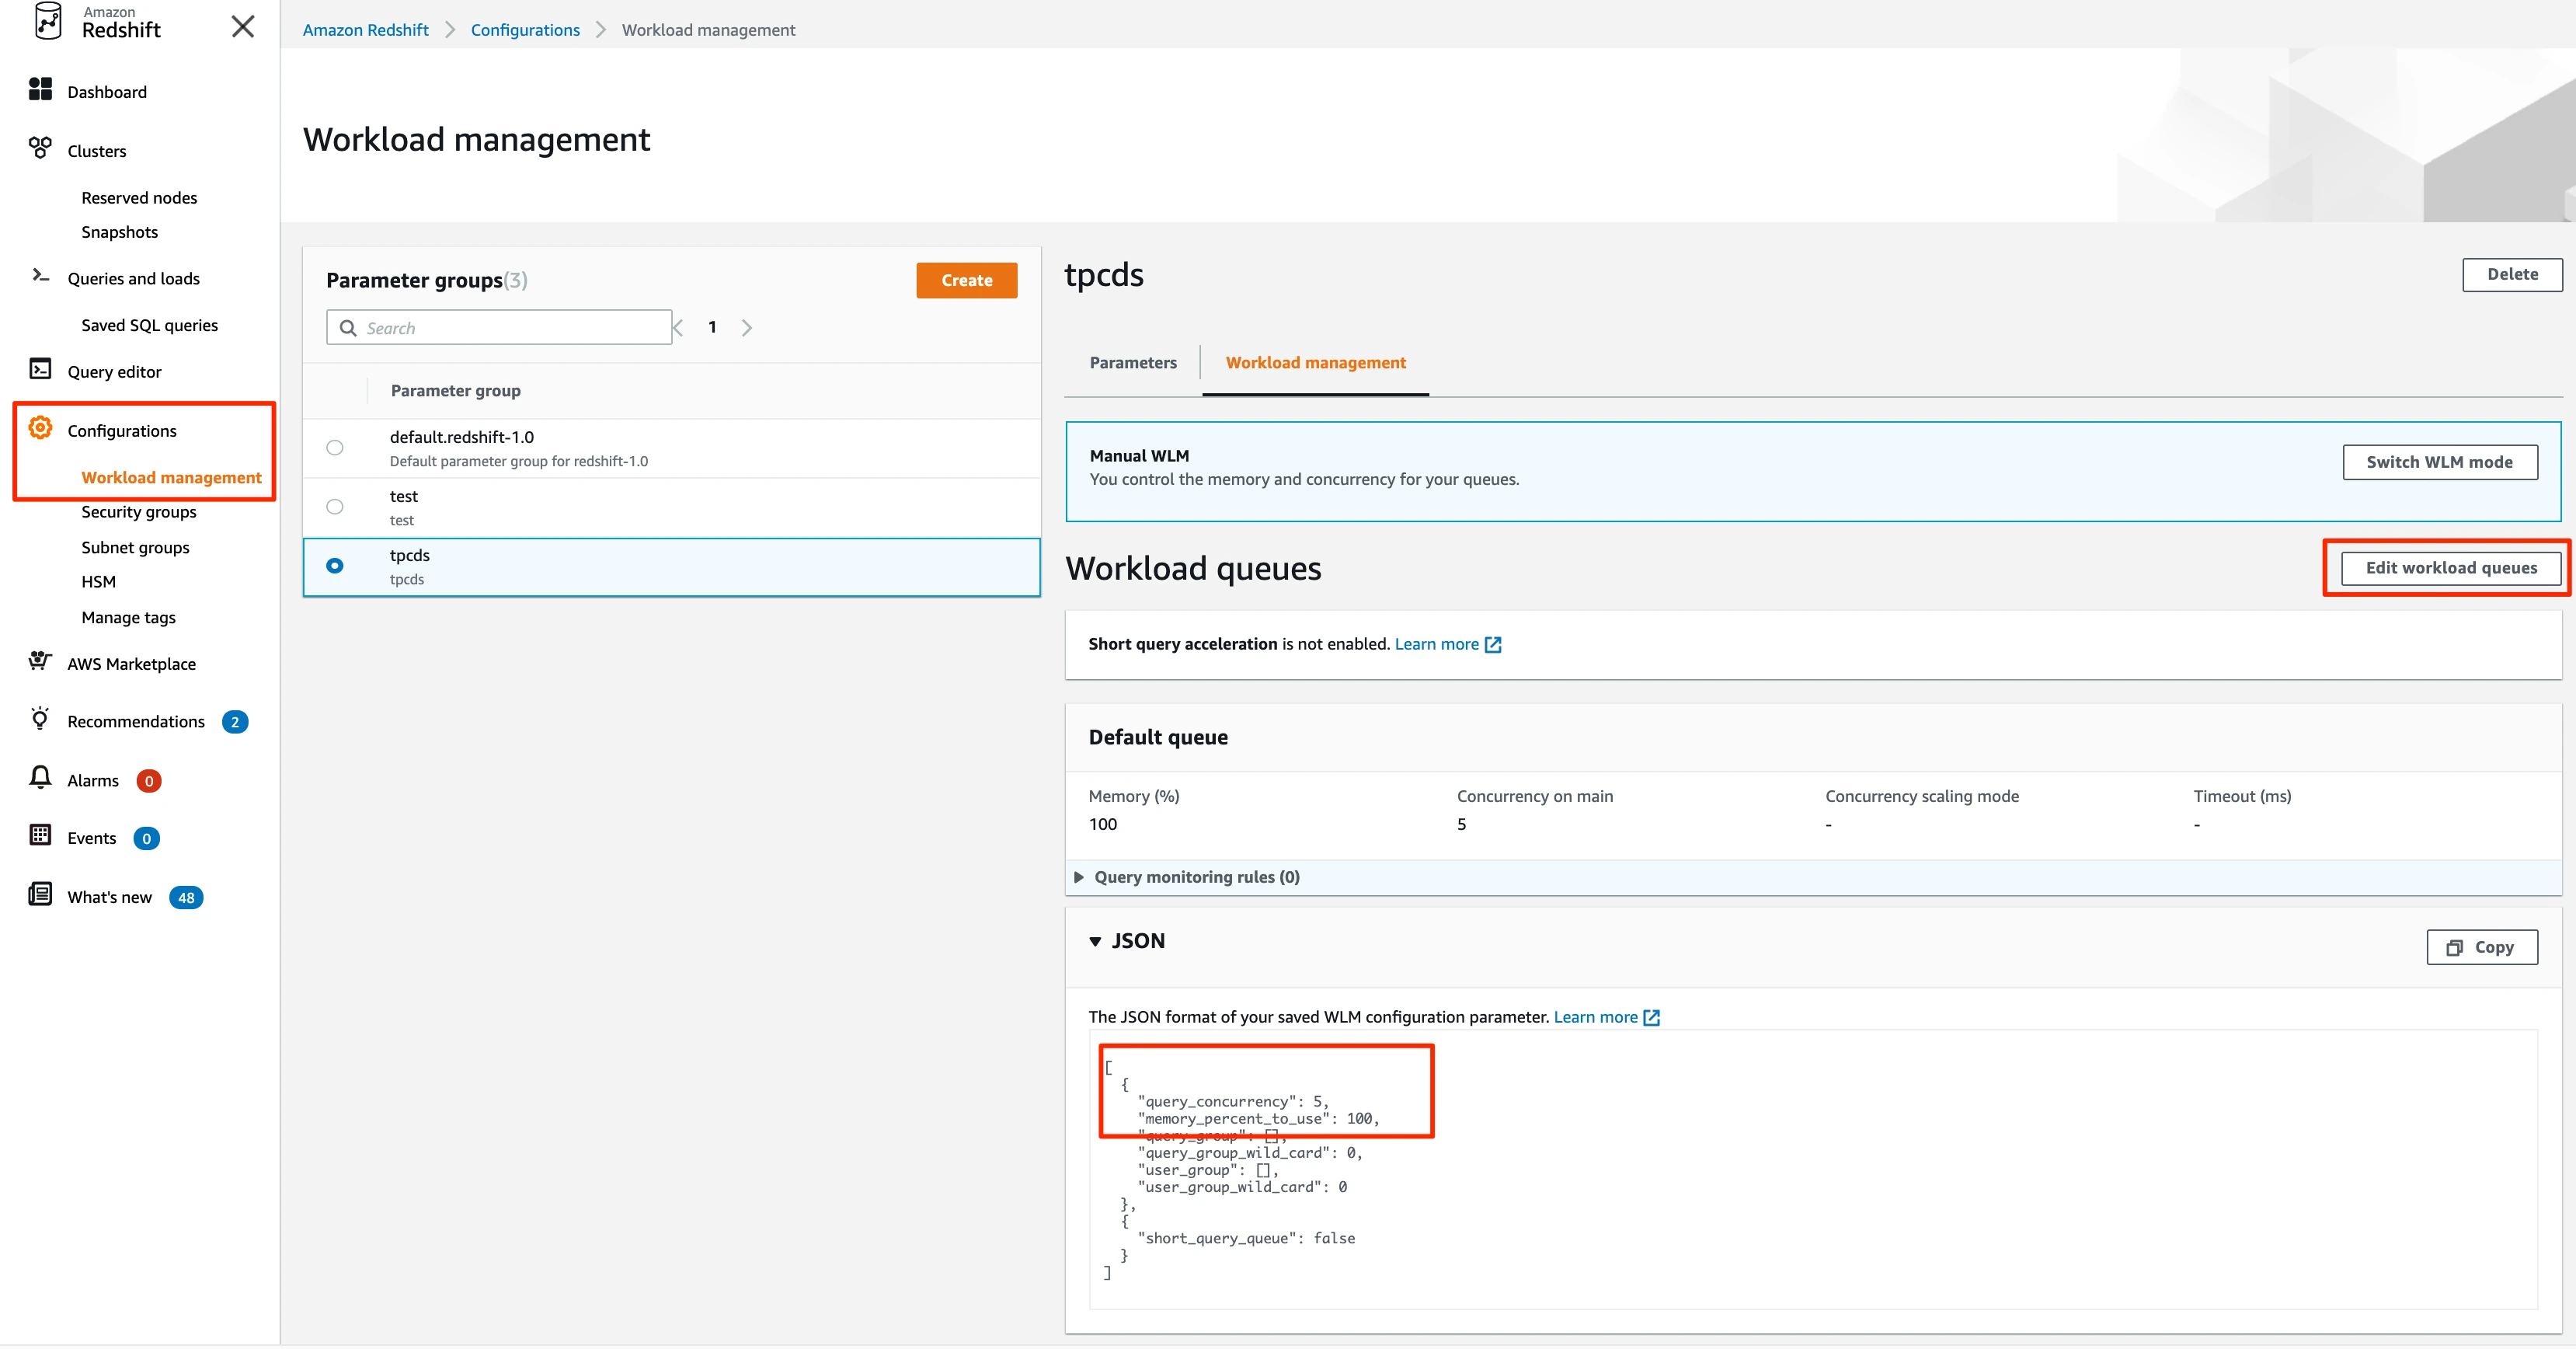
(Optional) Authenticate using IAM
Expand for instructions
By default, Fivetran uses the database user's credentials to authenticate the requests in the Redshift cluster. You can opt to authenticate using AWS IAM.
In the destination setup form, find the automatically-generated External ID and make a note of it. You will need it to create an IAM role in AWS.
The automatically-generated External ID is tied to your account. If you close and re-open the setup form, the ID will remain the same.
Create an IAM Policy for Fivetran:
i. Open your Amazon IAM console.
ii. Go to Access management > Policies, and then select Create policy.
iii. In the Create policy window, go to the JSON tab.
iv. Copy the following policy and paste it in the JSON tab:
      {
      "Version": "2012-10-17",
      "Statement": [
            {
                  "Sid": "VisualEditor0",
                  "Effect": "Allow",
                  "Action": "redshift:GetClusterCredentials",
                  "Resource": [
                  "arn:aws:redshift:{region}:{account-id}:dbuser:{cluster-name}/{dbuser-name}",
                  "arn:aws:redshift:{region}:{account-id}:dbname:{cluster-name}/{database-name}"
                  ]
            }
      ]
      }
v. Replace {region}, {account-id}, and {cluster-name} with the values for your AWS Region, account, and cluster.
vi. Replace {dbuser-name} with the user name used to log in to the cluster database.
vii. Replace {database-name} with the name of the database that the user will log in to.
viii. Click Review Policy.
ix. Name the policy "Fivetran-Redshift-Access".
x. Click Create Policy.
Create an IAM role for Fivetran:
i. Go to Access management > Roles and then select Create role.
ii. In the Create role window, select Another AWS account.
iii. In the Account ID field, enter Fivetran's account ID, 834469178297.
iv. In Options, select the Require external ID checkbox.
v. Enter the External ID you found in your destination setup form.
vi. Click Next: Permissions.
vii. Select the "Fivetran-Redshift-Access" policy that you created.
viii. Click Next: Tags. Entering tags is optional, but you must click through the step.
ix. Click Next: Review.
x. Name your new role "Fivetran", then click Create Role.
xi. Select the Fivetran role you just created.
xii. Click Edit trust relationship.
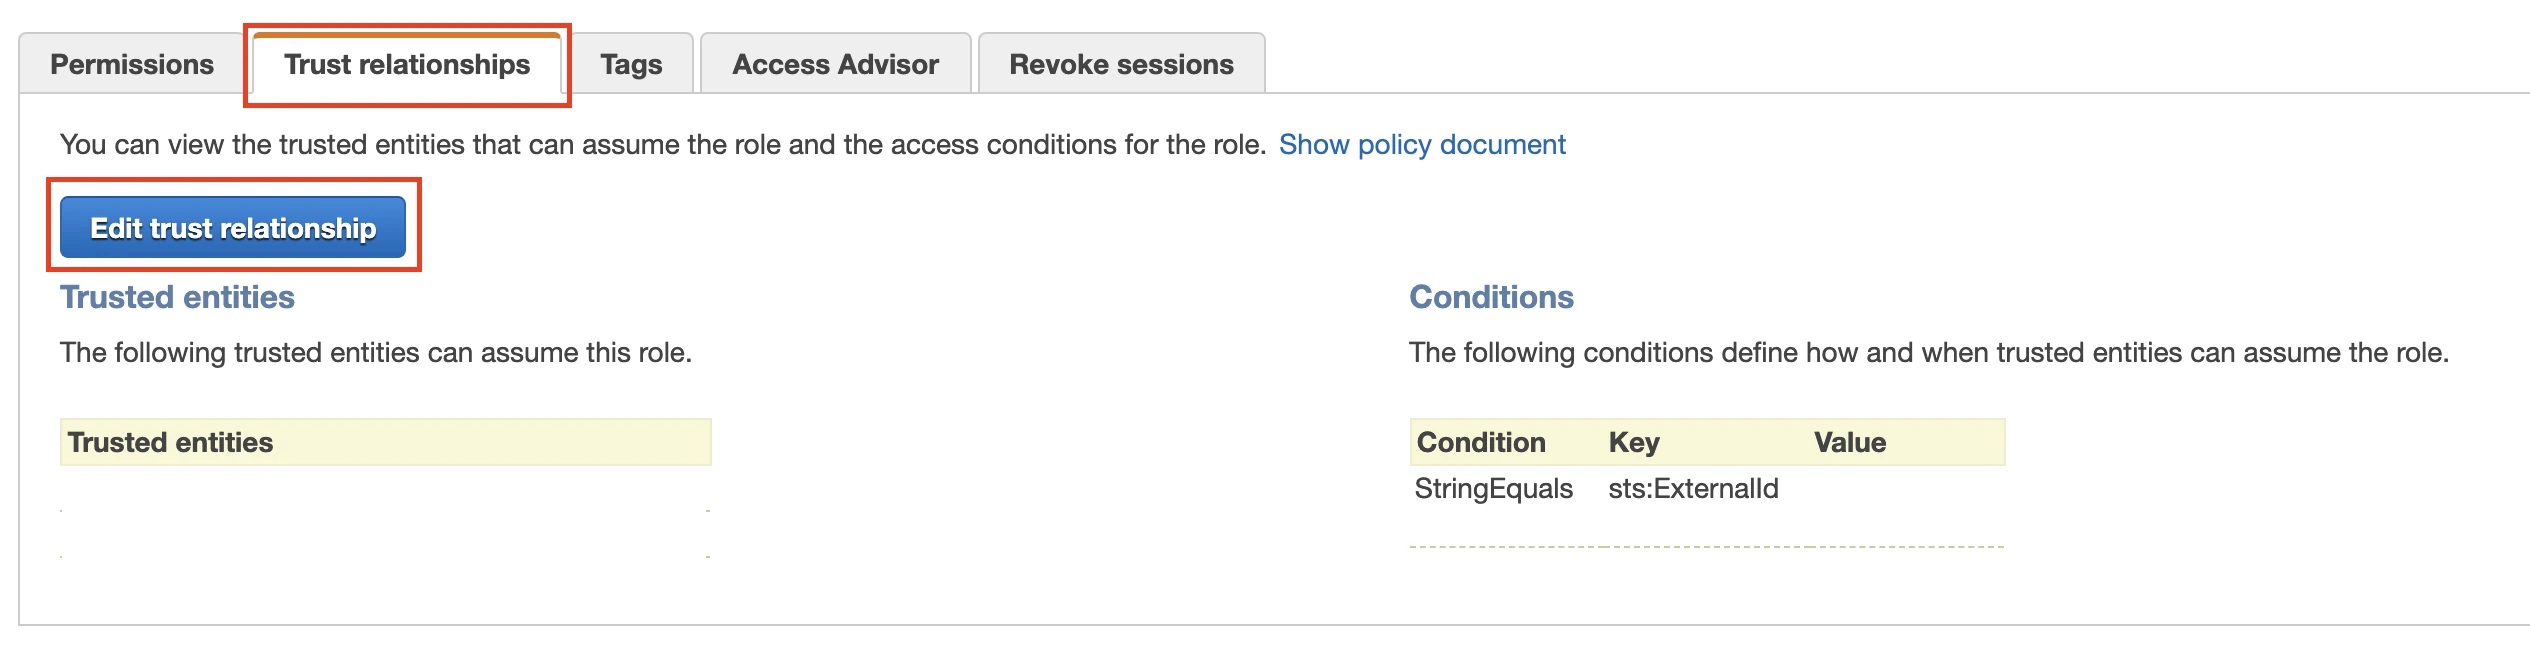
xiii. Copy the following policy and paste it in the JSON tab:
{
"Version":"2012-10-17",
"Statement":[
{
   "Effect":"Allow",
   "Principal":{
      "AWS":[
         "arn:aws:iam::834469178297:root"
      ]
   },
   "Action":"sts:AssumeRole",
   "Condition":{
      "StringEquals":{
         "sts:ExternalId": "{externalId}"
      },
      "StringLike":{
         "aws:PrincipalArn":[
            "arn:aws:iam::834469178297:user/gcp_donkey"
         ]
      }
   }
}
]
}
xiv. Replace {externalId} with your External ID. You can find the External ID in the destination setup form.
xv. Click Update Trust Policy.
xvi. In the Summary section, make a note of the Role ARN.
You can specify permissions for the Role ARN that you designate for Fivetran. Giving selective permissions to this Role will allow Fivetran to only sync what it has permissions to see.
If you use an SSH Tunnel to connect, you must enter the Cluster ID and Cluster region details in the destination setup form.
Connect as Master or Limited user
You can connect as either a "Master" or "Limited" user. The master username inherently has the CREATE permissions that Fivetran needs to function, so we recommend connecting as a master user. If you don't want to connect as a master user, you must create a new limited user for Fivetran.
Master User
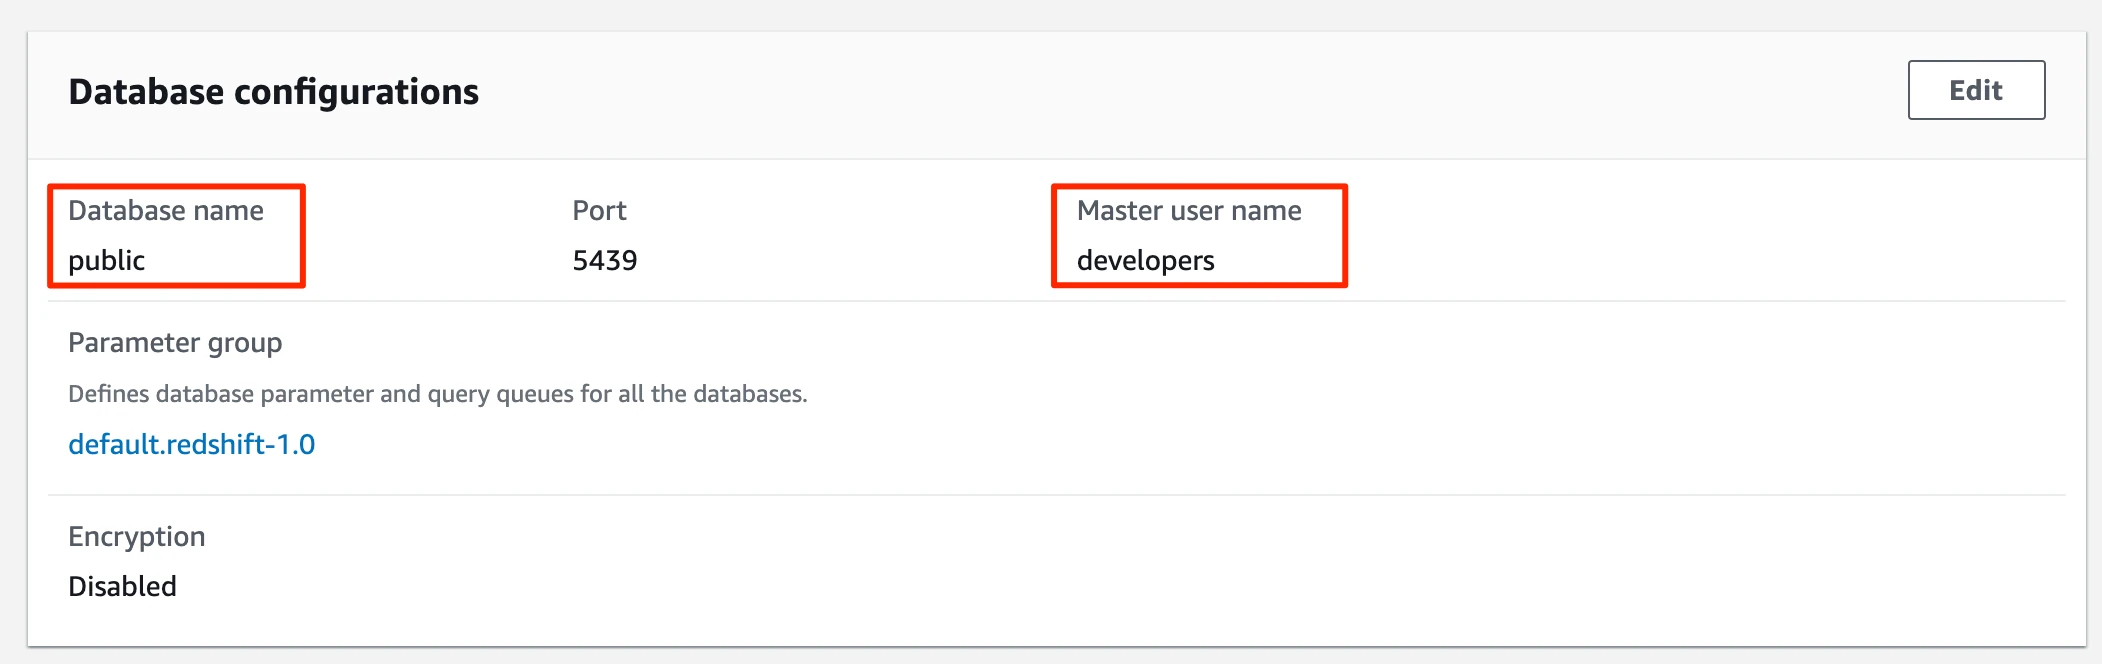
In the Redshift console, select the cluster you want Fivetran to connect to.
Click Properties.
In the Properties tab, scroll down to the Database configurations section.
Copy Database name and the Master user name values. You will need them to complete the destination setup in Fivetran.
Limited User
To connect as a limited user, you must create a Redshift user for Fivetran.
Depending on your authentication type, do the following:
Password authentication: Execute the following query to create a user (replace
<password>with a password of your choice):CREATE USER fivetran PASSWORD <password>;IAM authentication: We recommend that you create a user without any password. Execute the following query:
CREATE USER fivetran PASSWORD disable;
Execute the following query to grant the
fivetranuser the following privileges (replace<database>with your database name):- CREATE: Allows the user to create new schemas in the database
- TEMPORARY: Allows the user to create temporary tables while using the database
GRANT CREATE, TEMPORARY ON DATABASE <database> TO fivetran;
You will need the limited user's credentials to complete the destination setup in Fivetran.
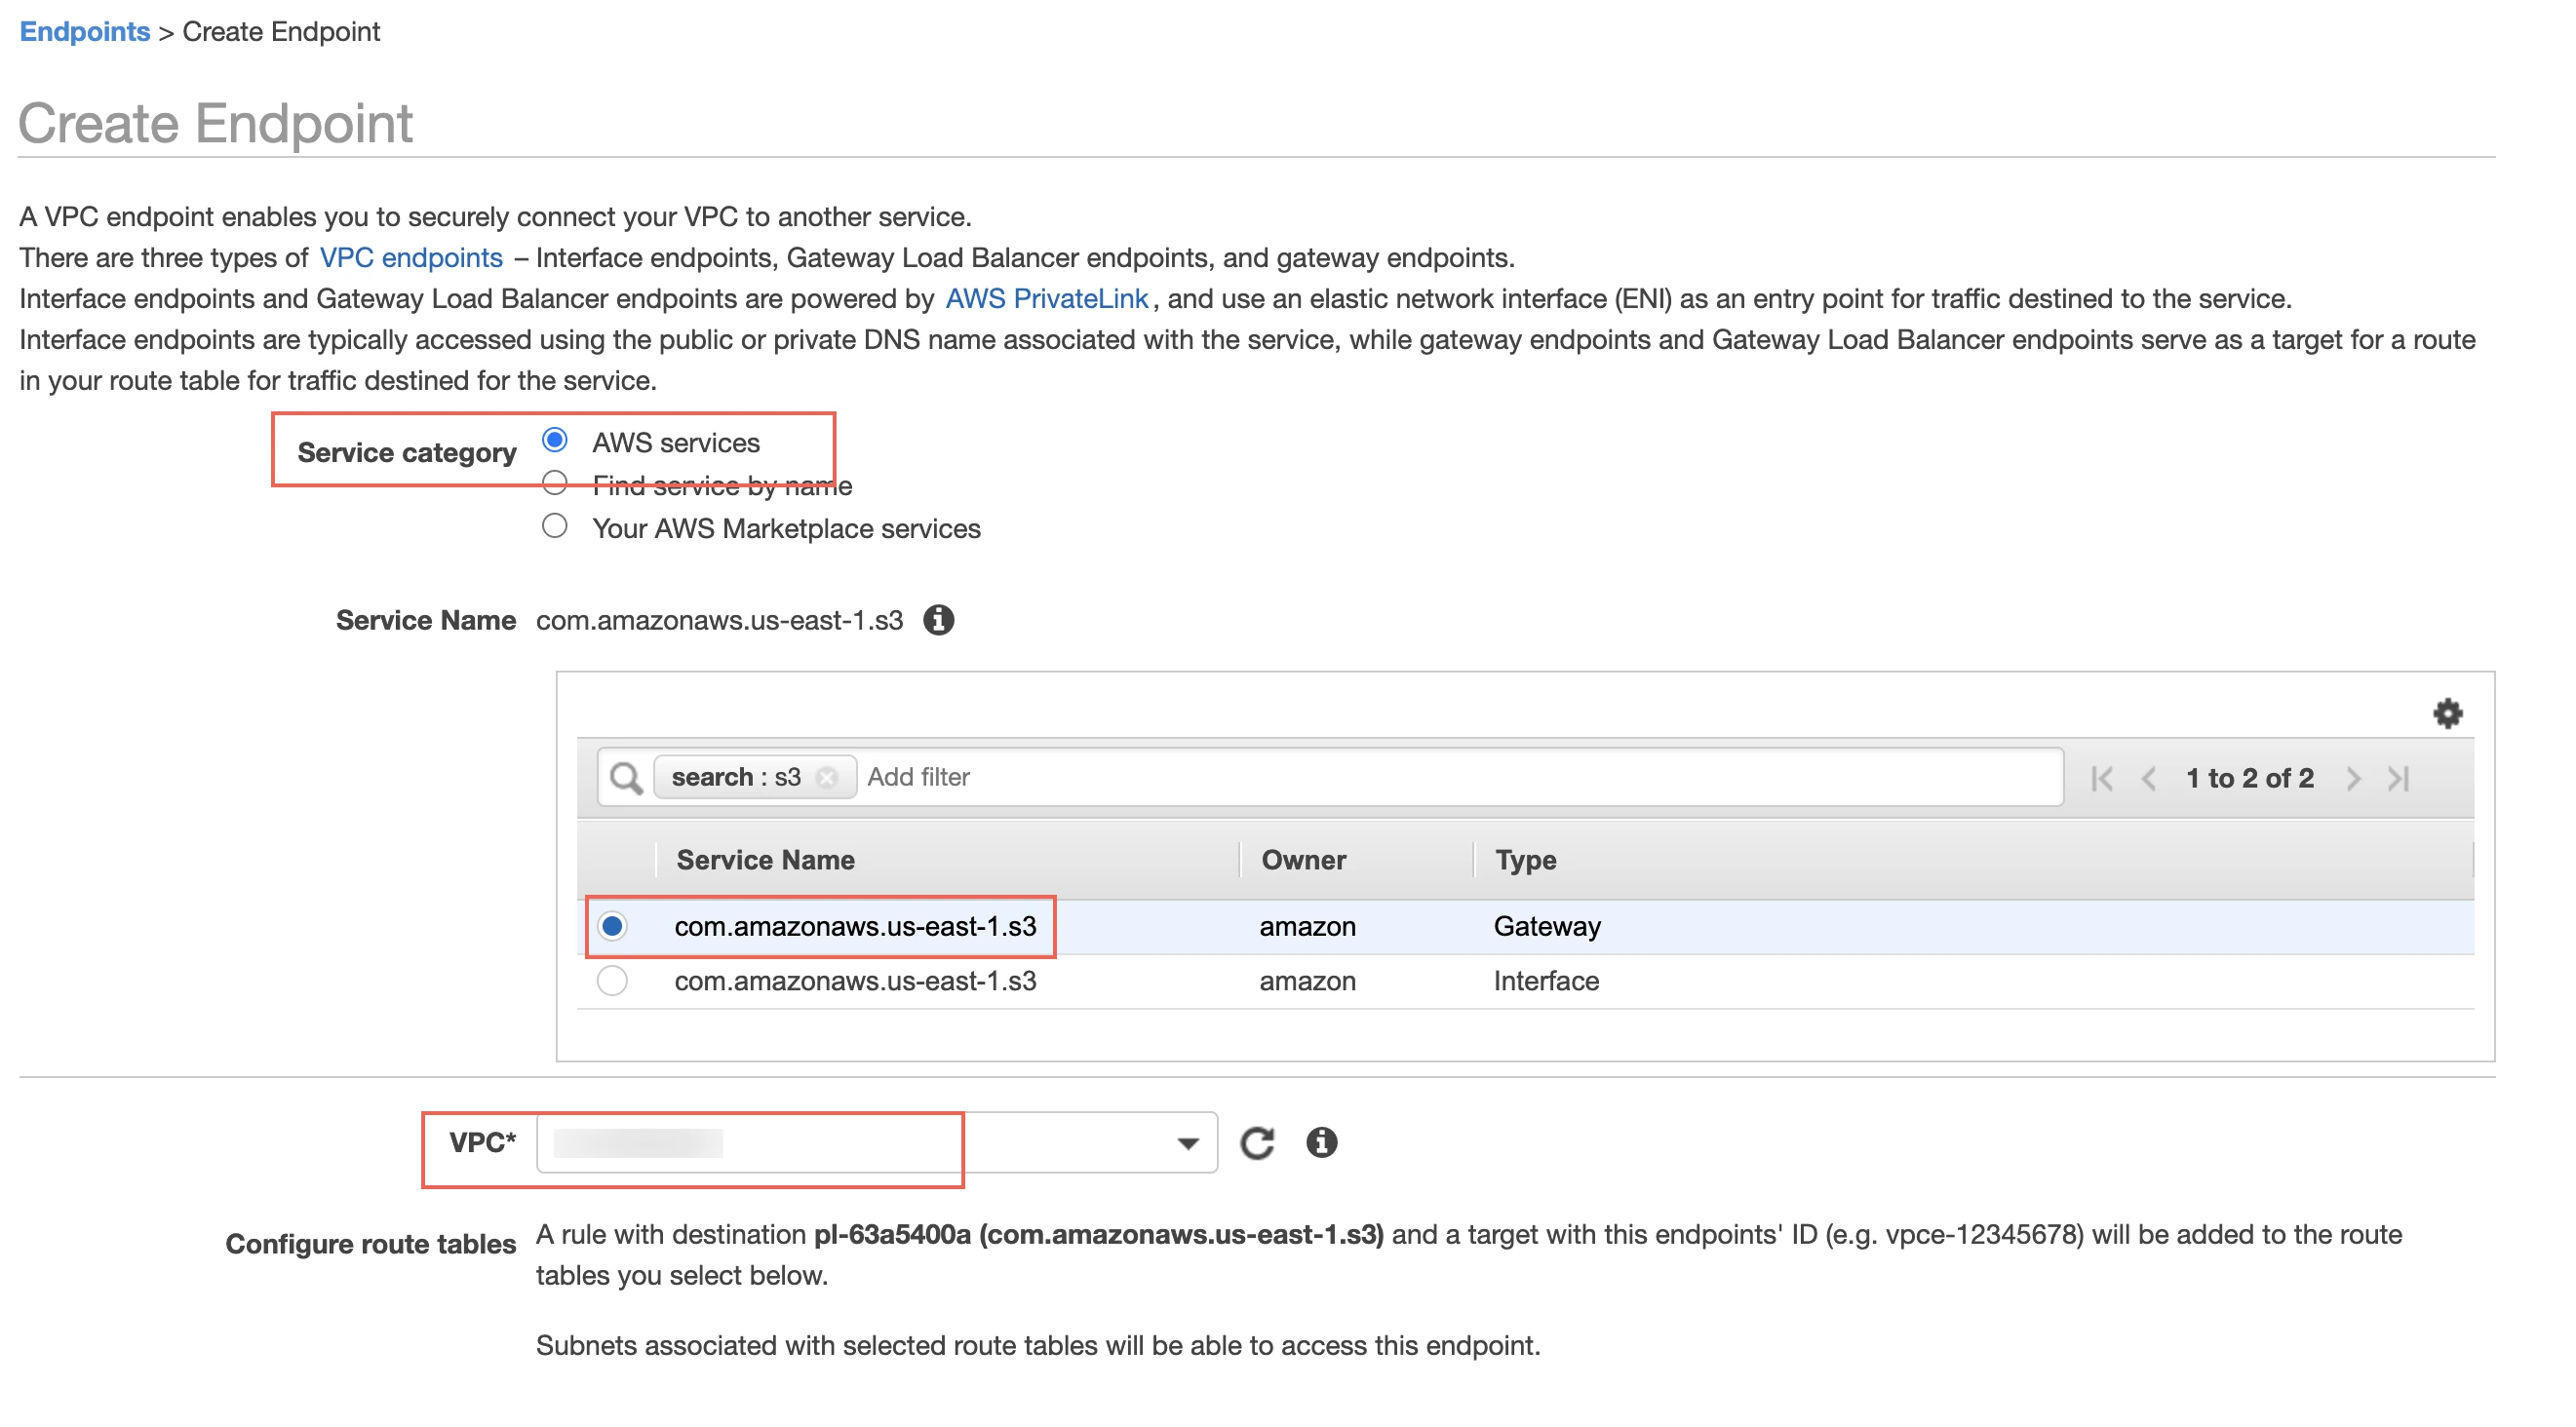
(Optional) Create VPC endpoint
Expand for instructions
If you use Enhanced VPC routing, you must create a VPC endpoint to allow access to the S3 buckets and copy data into the tables.
To create a VPC endpoint, do the following:
Sign in to the AWS Management Console and open the Amazon VPC console.
Click Endpoints.
Click Create Endpoint.
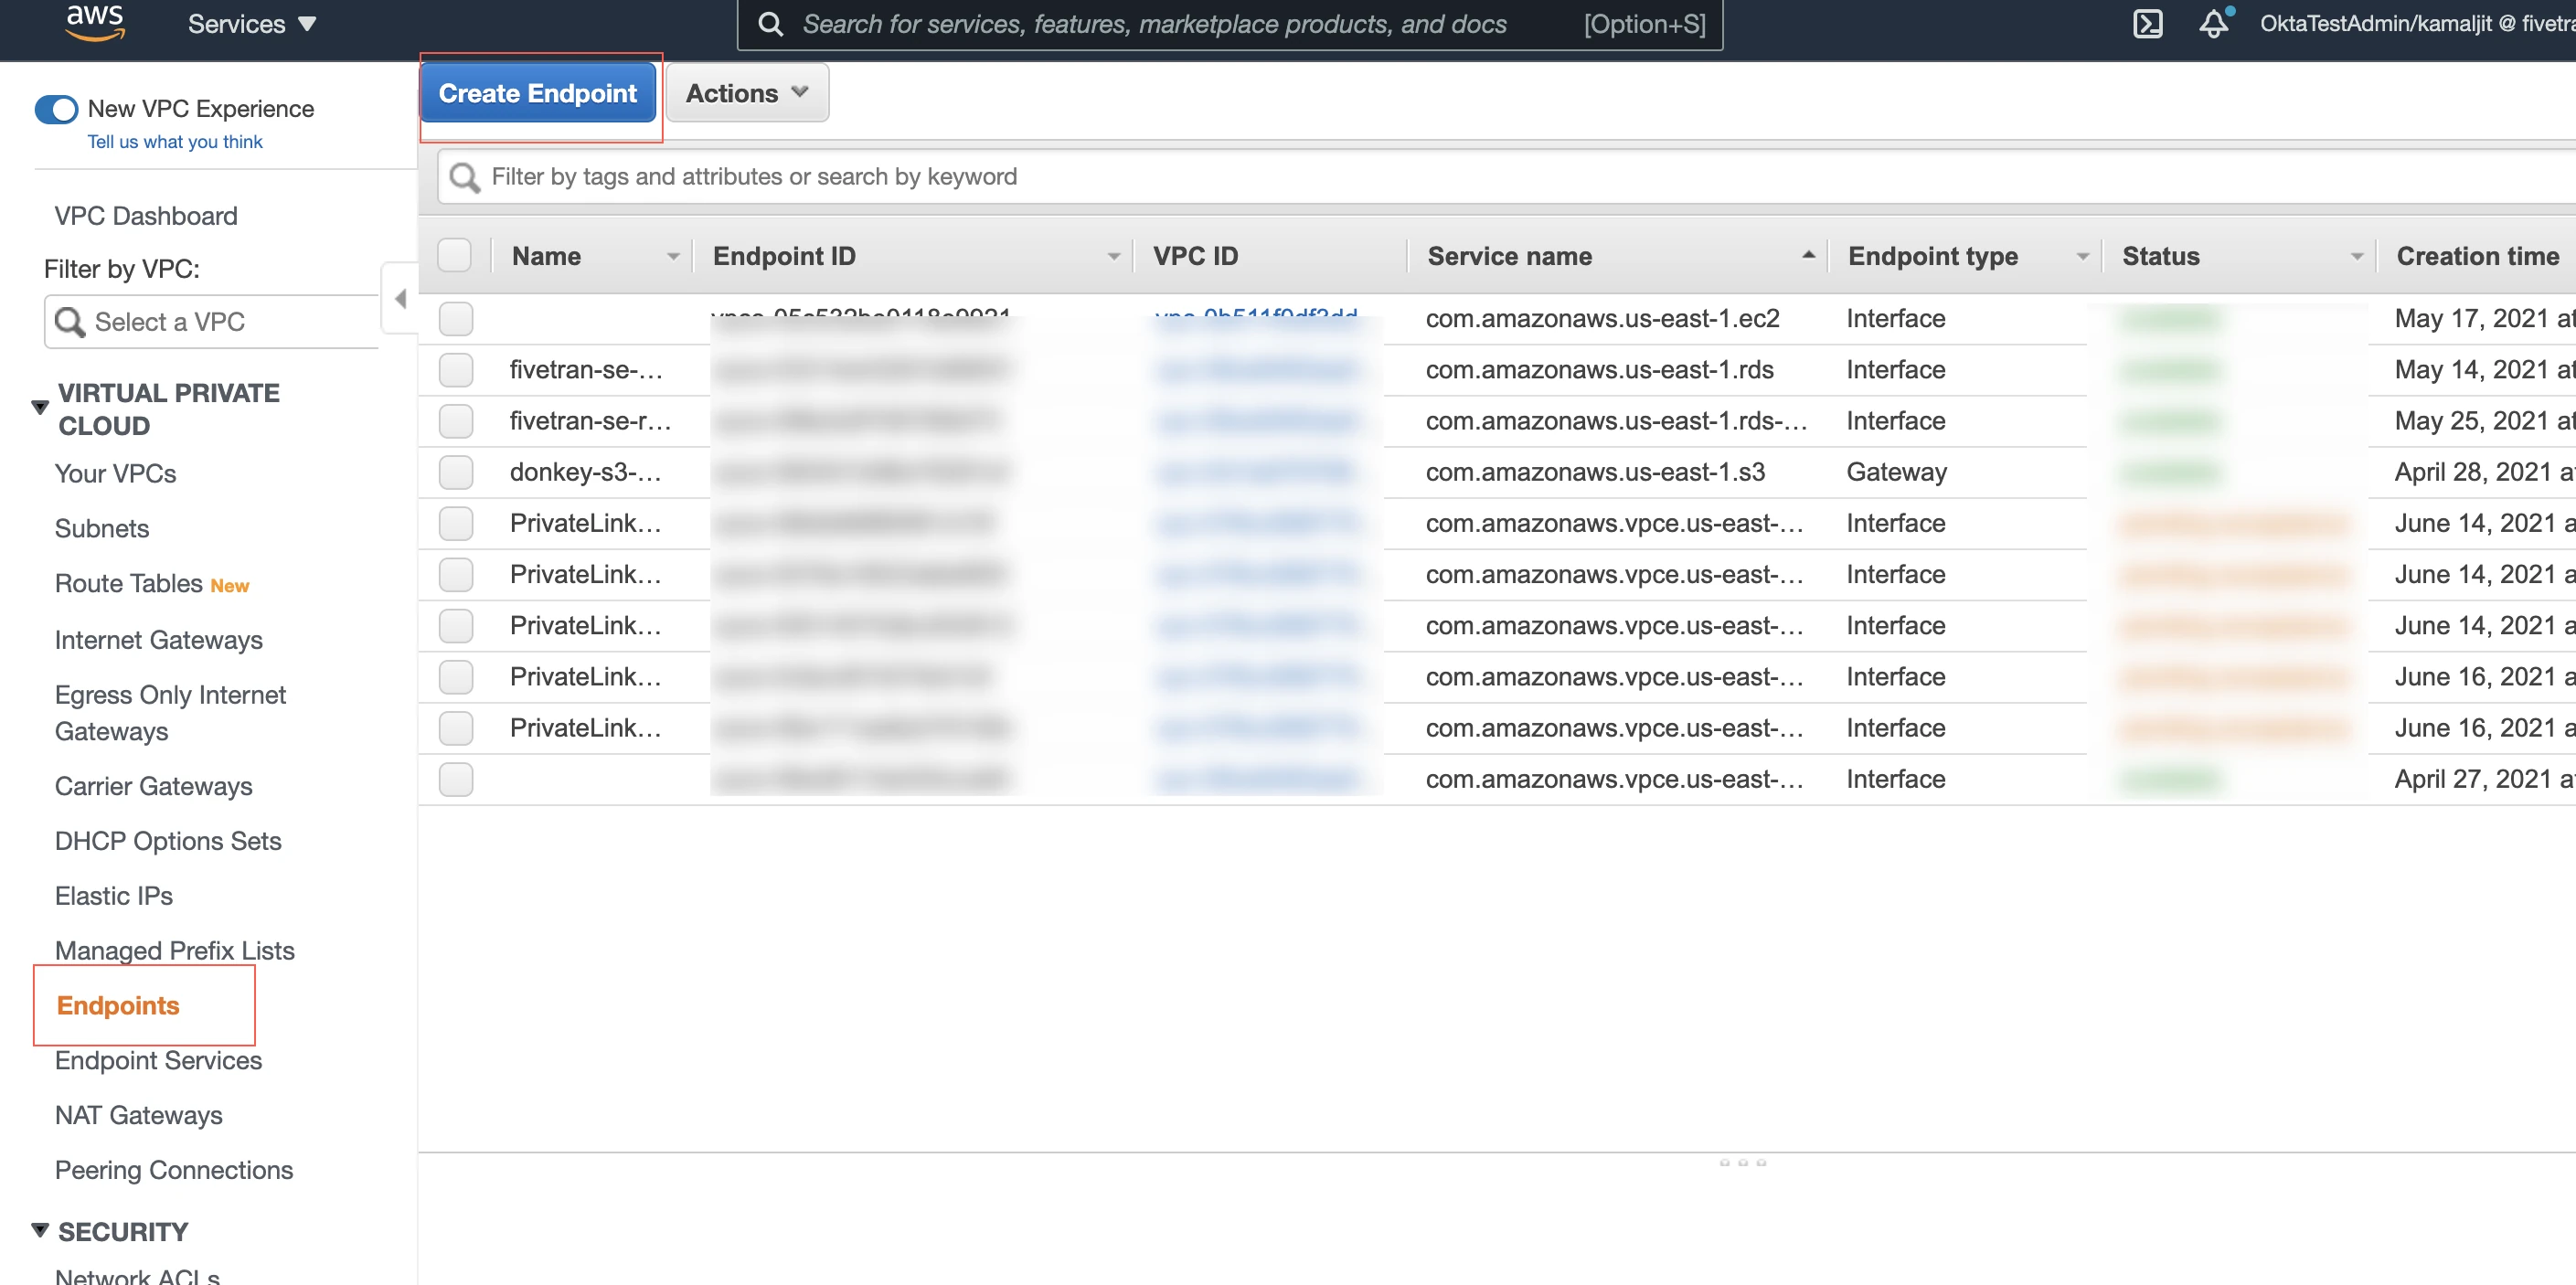
In the Service category options, select AWS services.
In the Service Name section, select your S3 service to grant access.
In the VPC drop-down menu, select the VPC you use in the Redshift cluster.
In the Configure route tables section, select the Route Table ID associated with the VPC.
In the Policy section, select Full Access to allow access to S3 services.
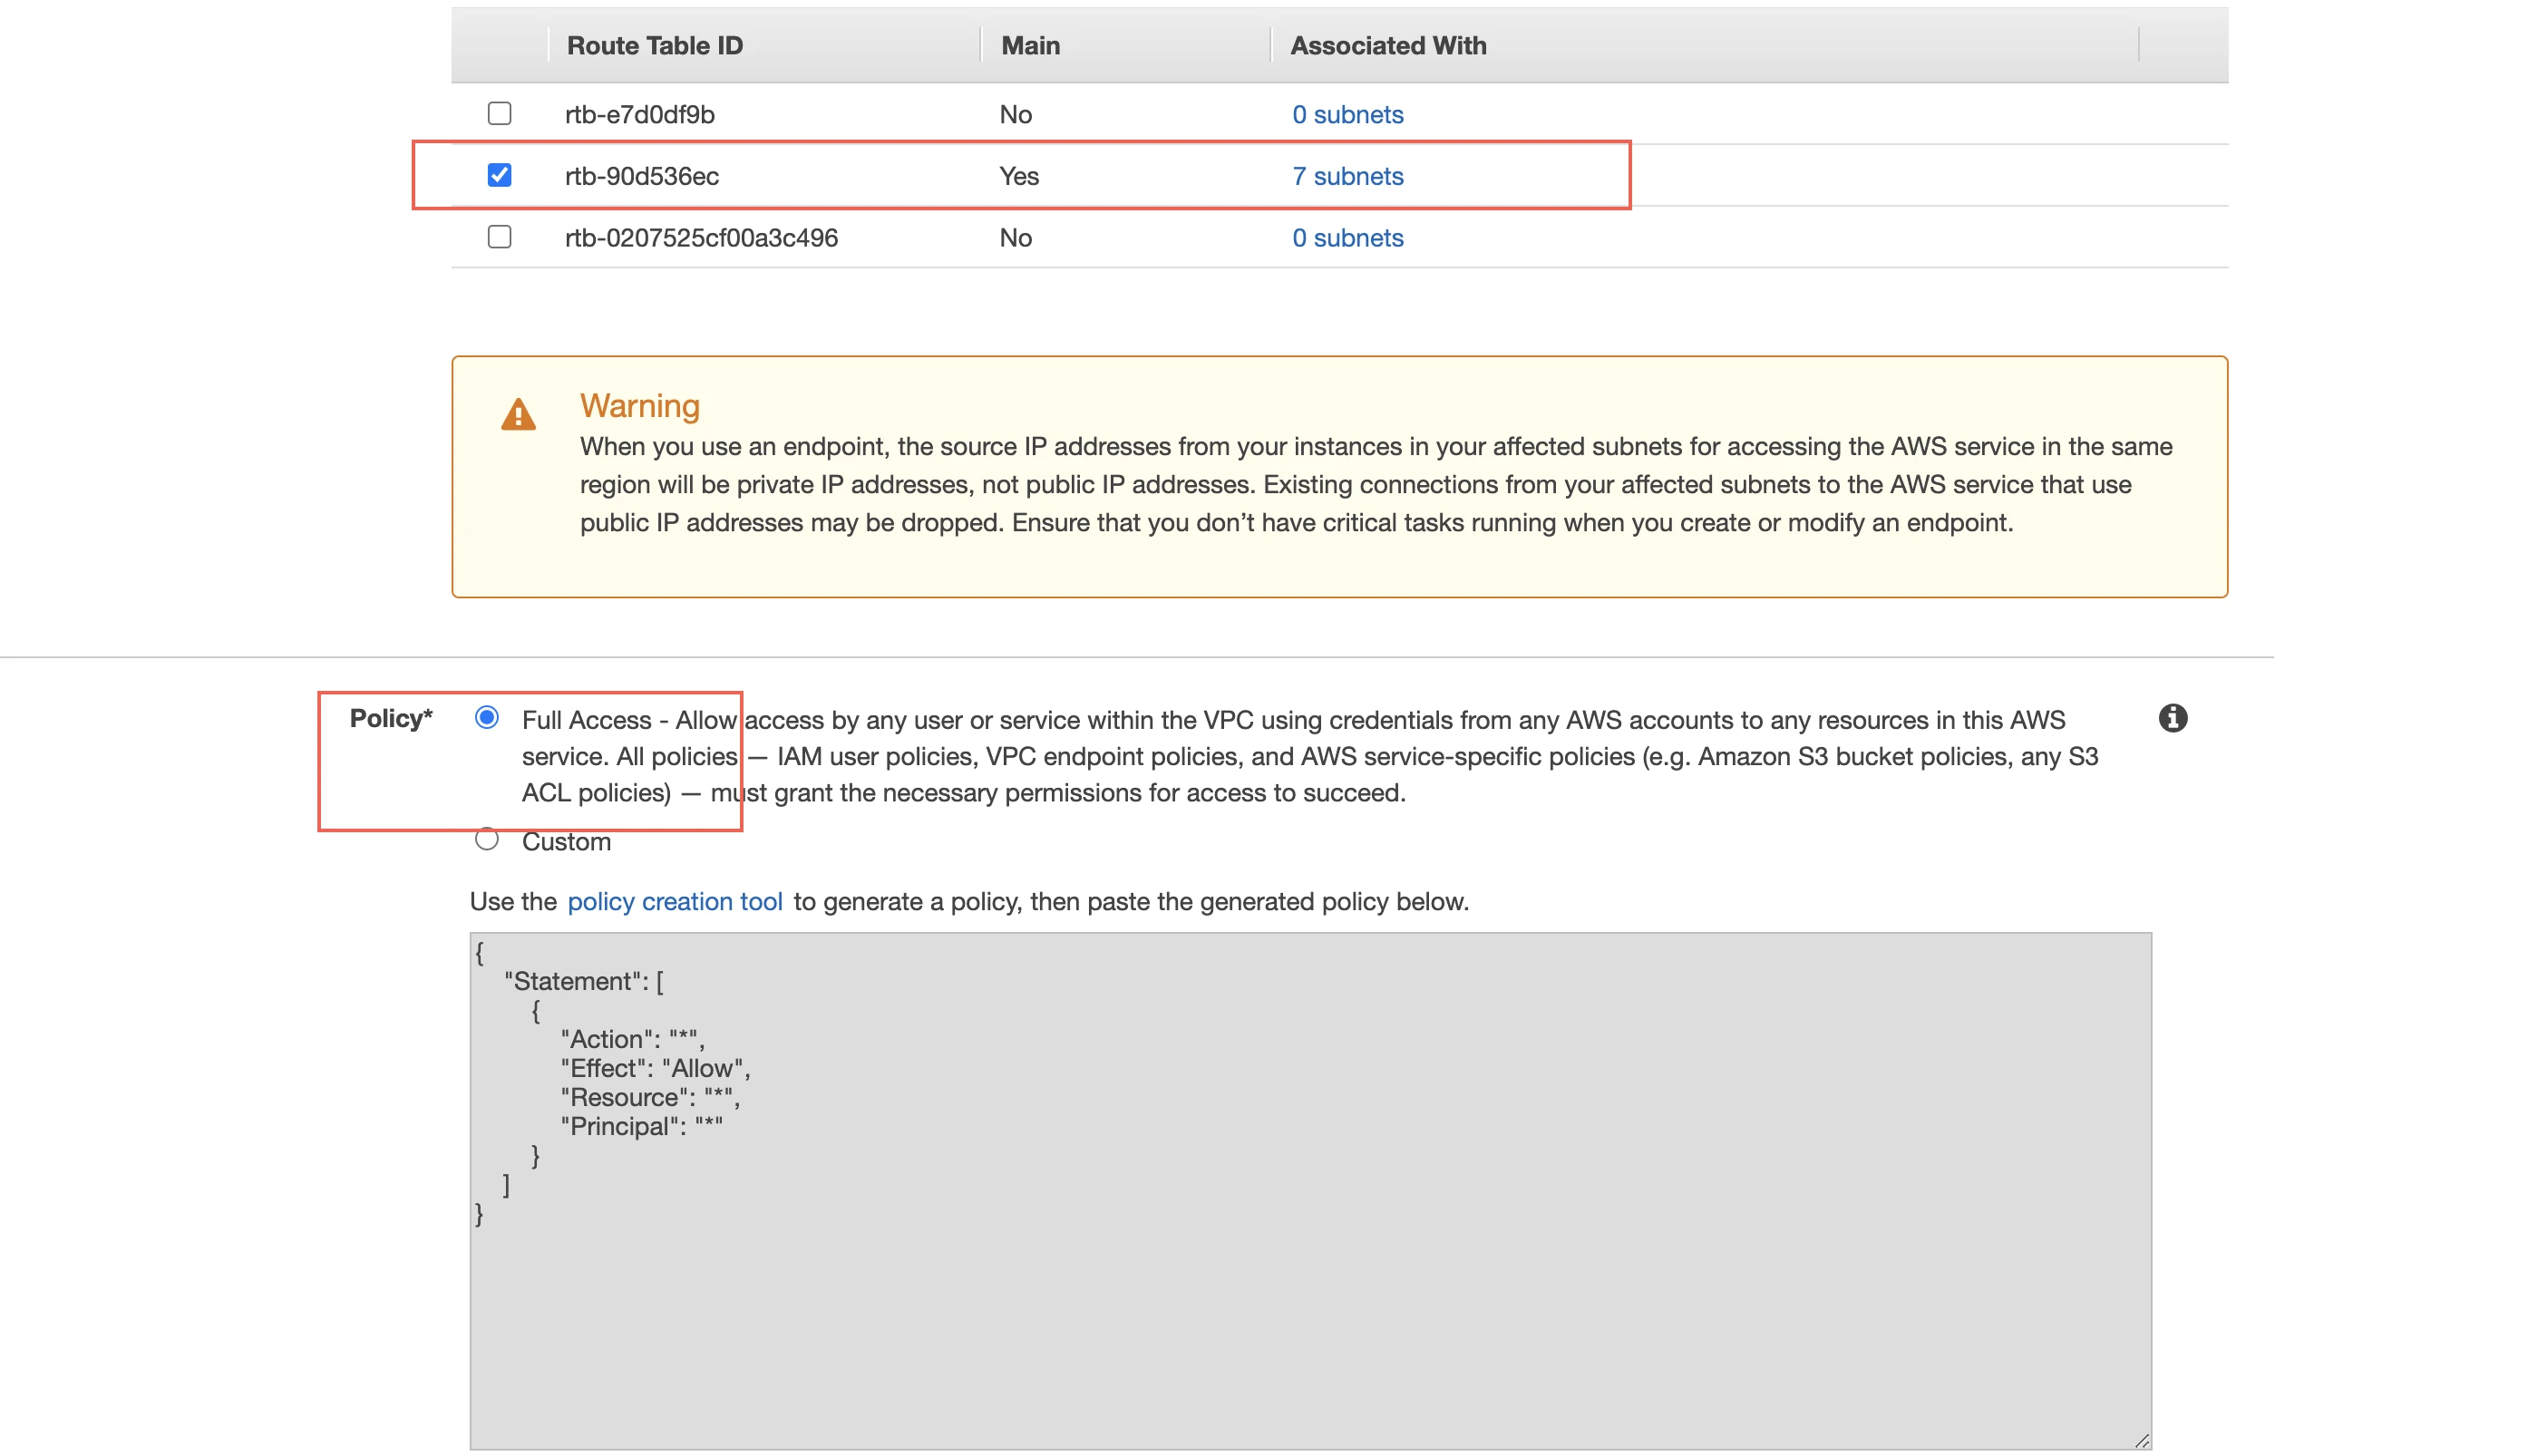
Click Create endpoint.
For more information about VPC endpoints, see Working with VPC endpoints.
(Additional) AWS PrivateLink
Expand for instructions
You must have a Business Critical plan to use AWS PrivateLink.
AWS PrivateLink allows VPCs and AWS-hosted or on-premises services to communicate with one another without exposing traffic to the public internet. PrivateLink is the most secure connection method. Learn more in AWS’ PrivateLink documentation.
Fivetran uses PrivateLink to move your data securely between our system and your Redshift destination.
Prerequisites
To set up AWS PrivateLink, you need:
- A Fivetran instance configured to run in AWS
- A Redshift destination in one of our supported regions
Perform the following steps to obtain the Endpoint URL that you need to configure Fivetran.
Set up Amazon Redshift-managed VPC endpoint and grant Fivetran cluster access
Follow the steps in the Amazon Big Data article to set up an Amazon Redshift-managed VPC endpoint.
When authorizing access to additional AWS accounts in the Amazon Redshift console, go to Clusters and enter
834469178297in the AWS account ID field to grant Fivetran cluster access.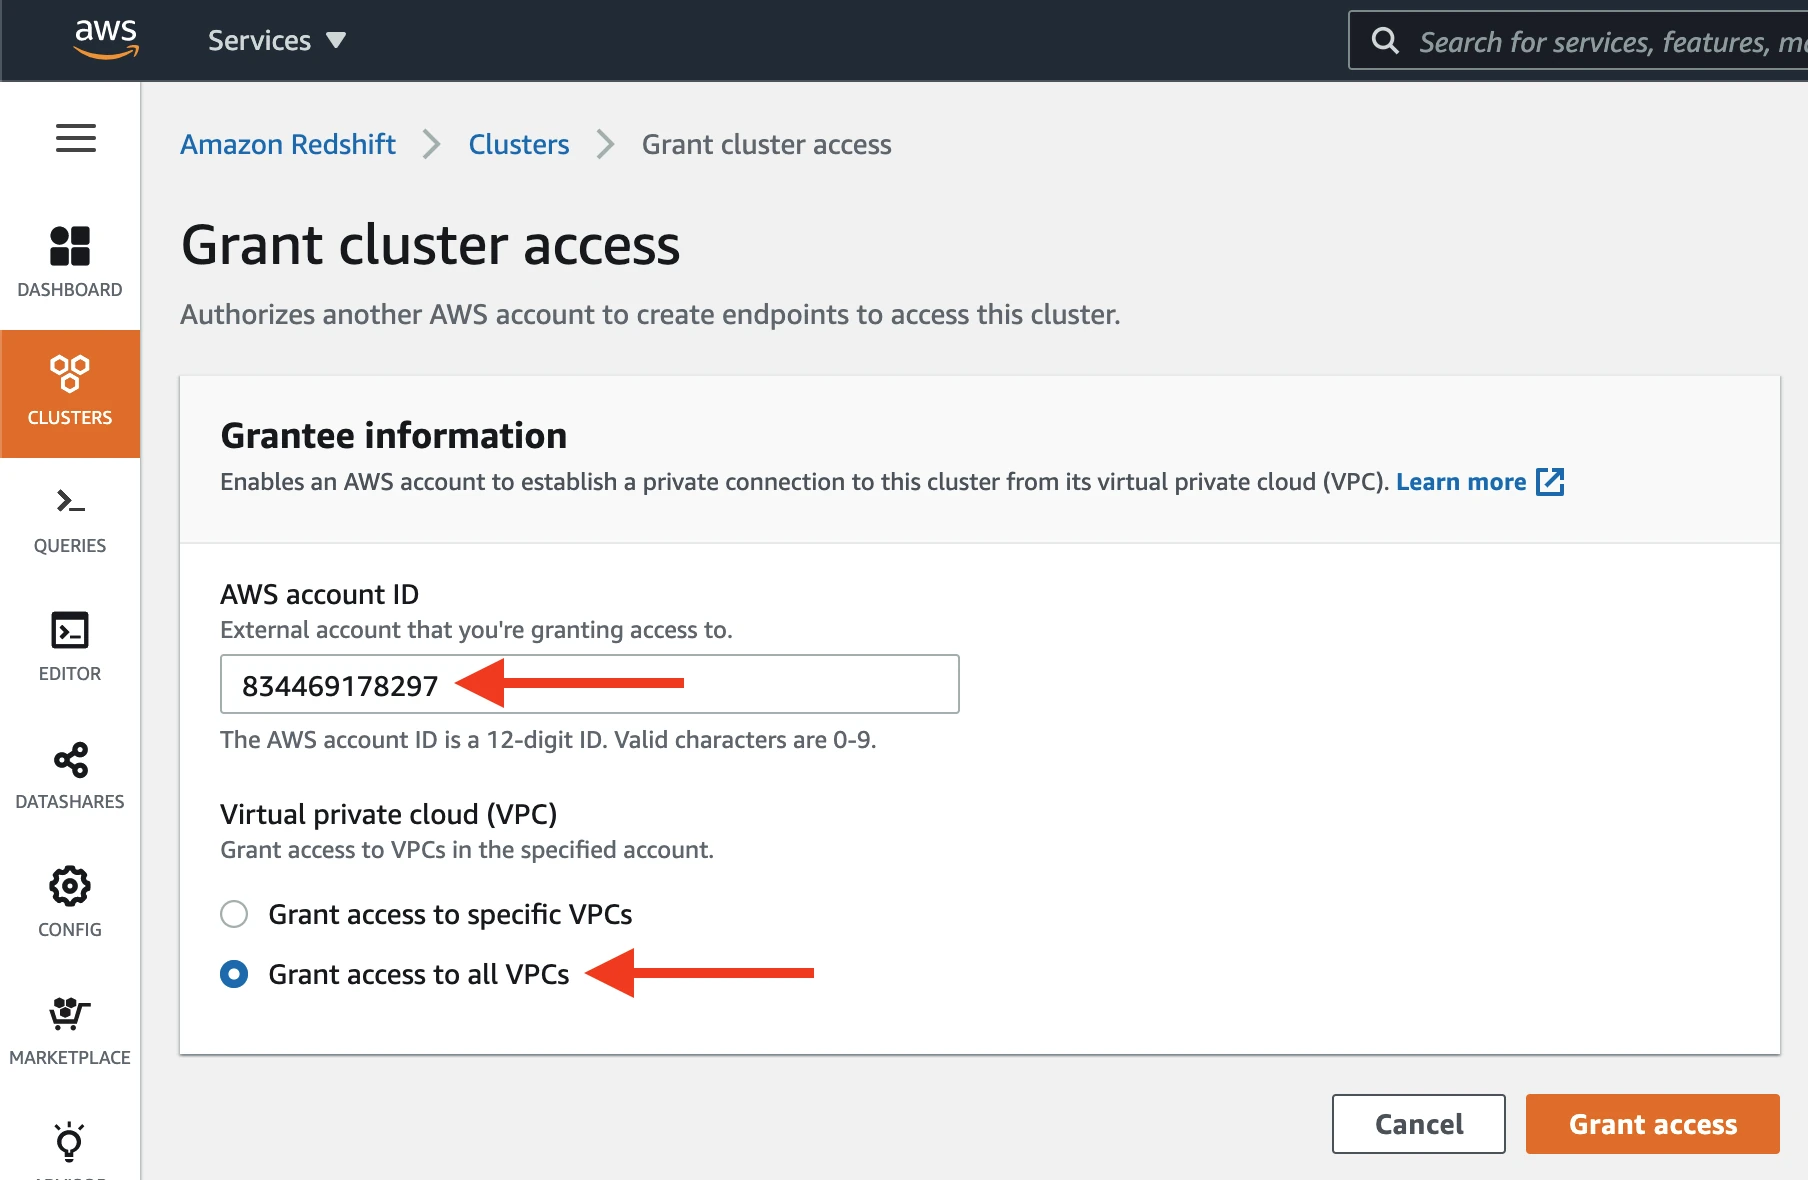
Select Grant access to all VPCs.
Click Grant Access.
Provide credentials to Fivetran Support
Create a Fivetran support ticket with the following information:
- your AWS account ID
- your cluster identifier
Specify endpoint URL in setup form
Once we provide you with an endpoint URL, you should specify it in the Host field of the setup form when completing Fivetran configuration.
Configure external storage for Hybrid Deployment
Expand for instructions
Skip to the next step if you want to use Fivetrtan's cloud environment to sync your data. Perform this step only if you want to use Hybrid Deployment for your data pipeline.
Create S3 bucket
Create an S3 bucket by following the instructions in AWS's documentation.
Your S3 bucket and Redshift cluster must be in the same region.
Create IAM policy for S3 bucket
Open your Amazon IAM console.
Go to Policies, and then click Create policy.

Go to the JSON tab.
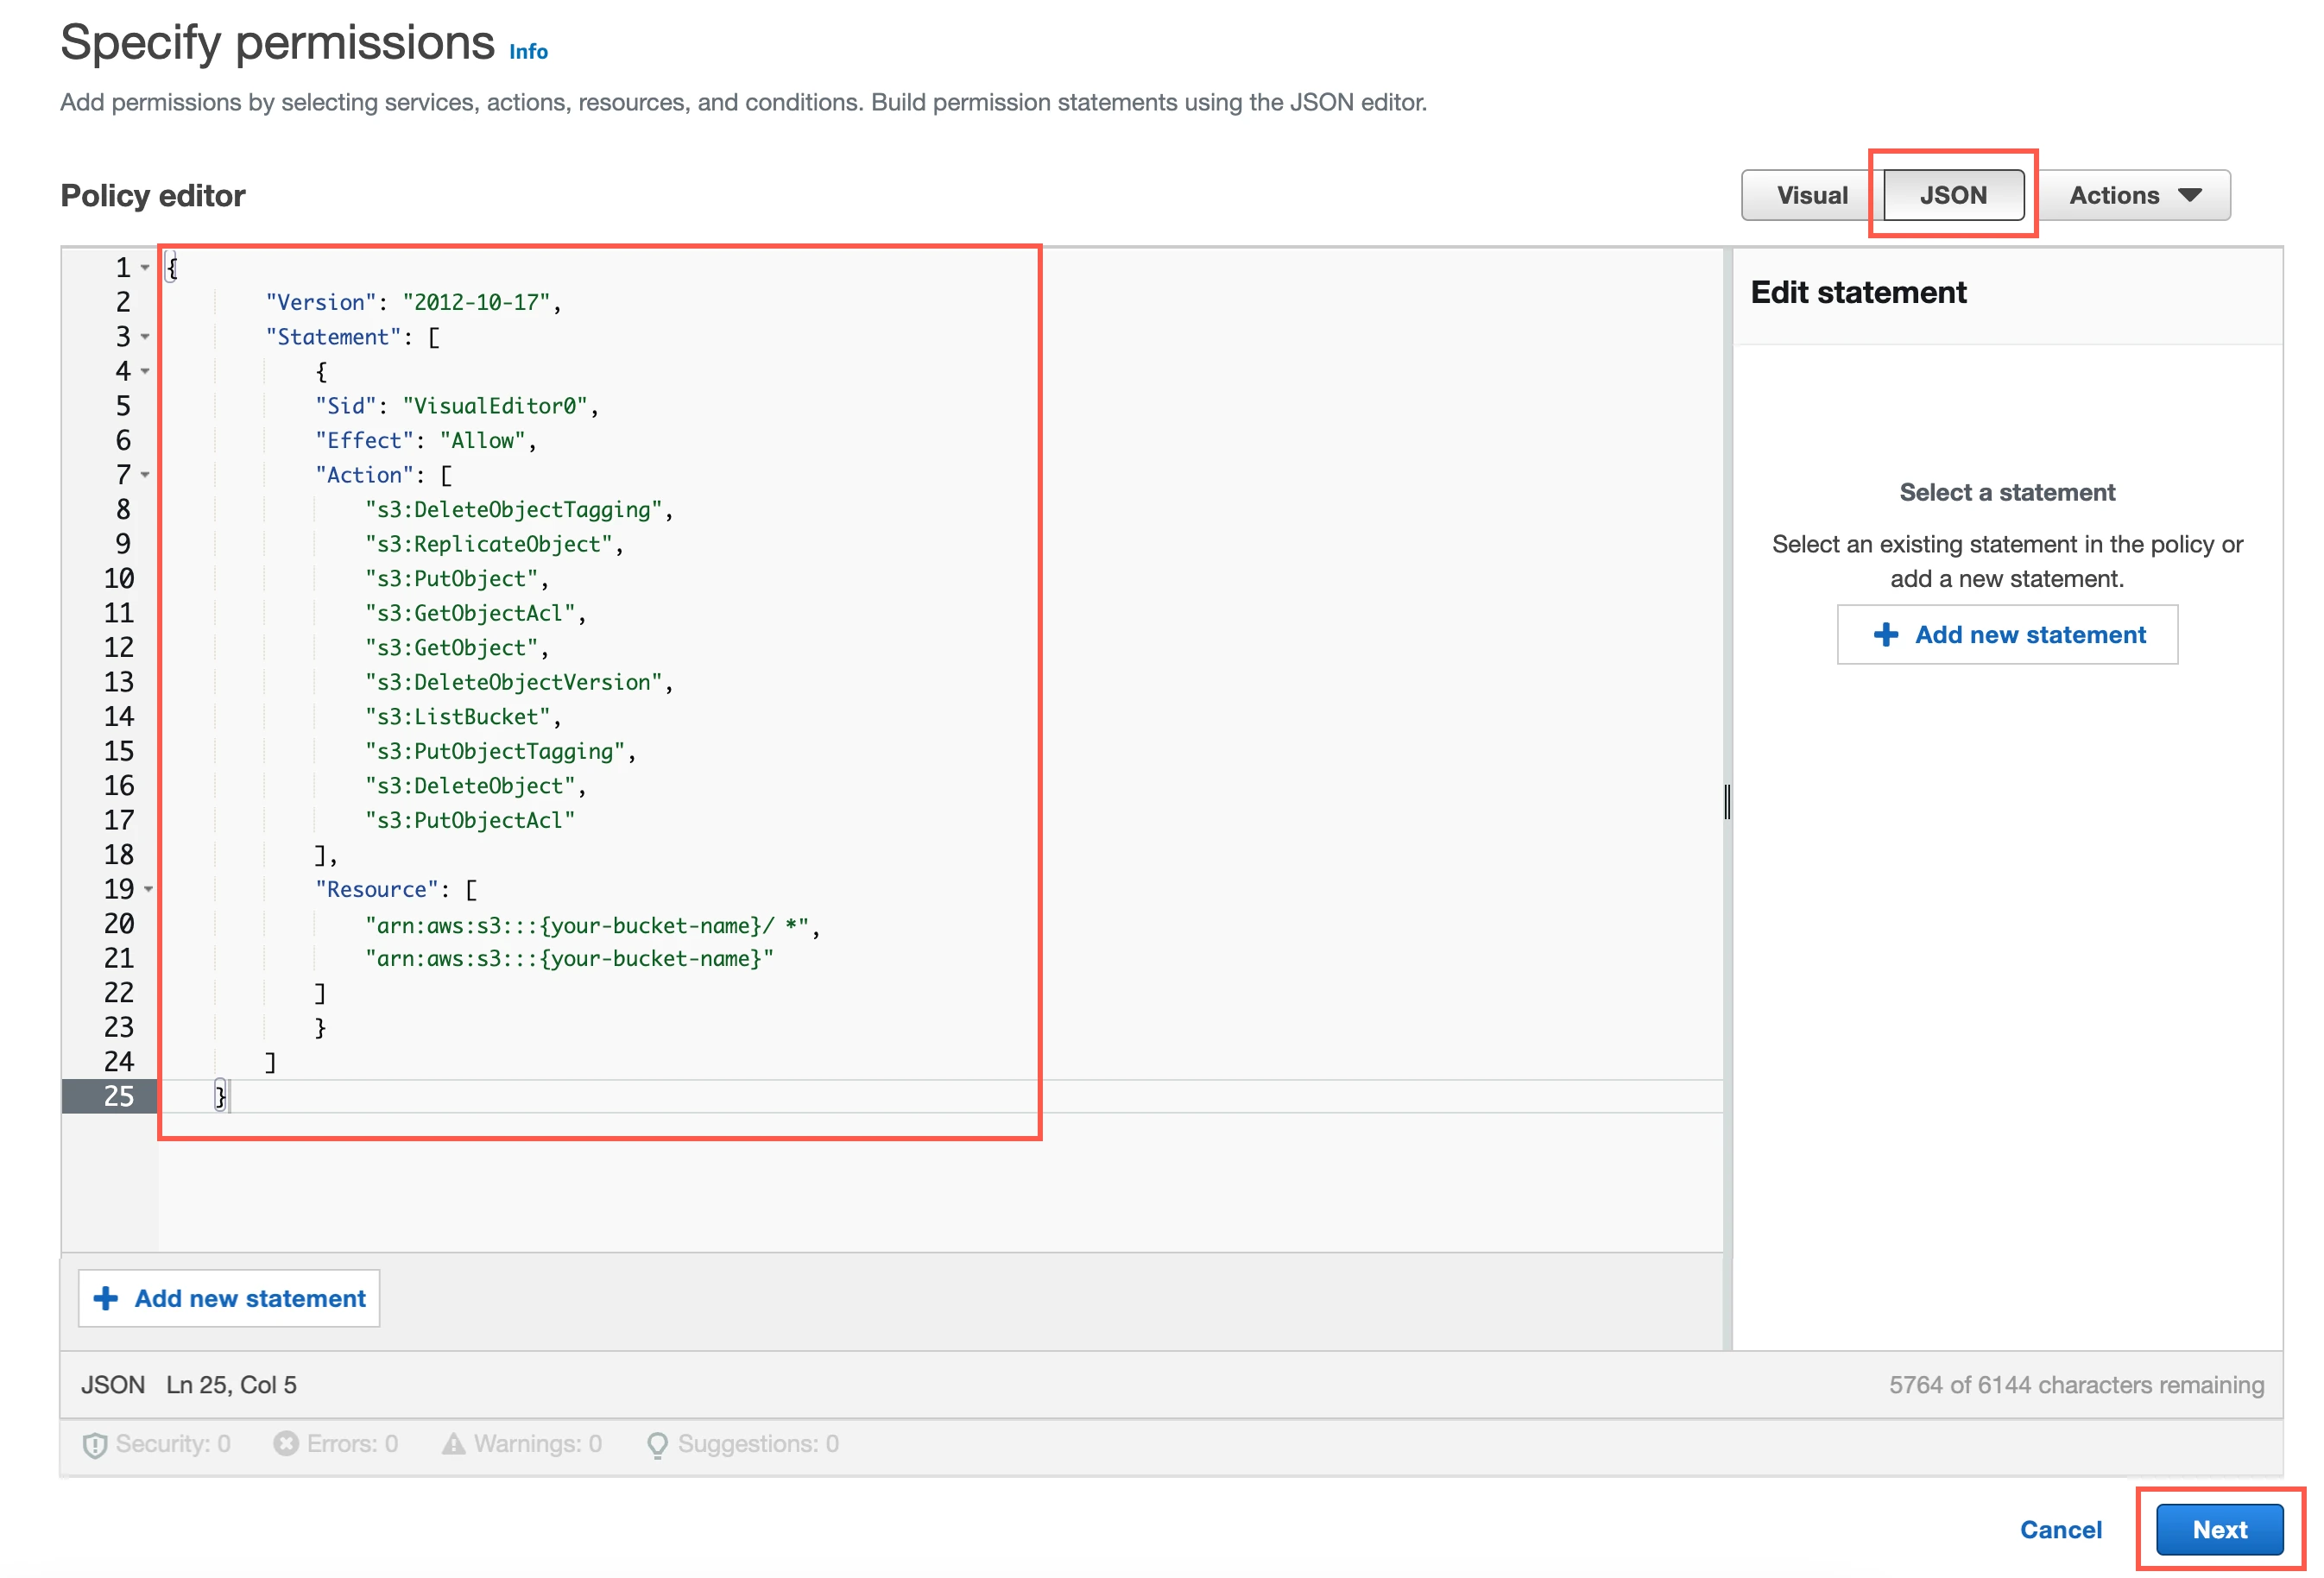
Copy the following policy and paste it in the JSON editor.
{
    "Version": "2012-10-17",
    "Statement": [
        {
        "Sid": "VisualEditor0",
        "Effect": "Allow",
        "Action": [
            "s3:DeleteObjectTagging",
            "s3:ReplicateObject",
            "s3:PutObject",
            "s3:GetObjectAcl",
            "s3:GetObject",
            "s3:DeleteObjectVersion",
            "s3:ListBucket",
            "s3:PutObjectTagging",
            "s3:DeleteObject",
            "s3:PutObjectAcl"
        ],
        "Resource": [
            "arn:aws:s3:::{your-bucket-name}/*",
            "arn:aws:s3:::{your-bucket-name}"
        ]
        }
    ]
}
In the policy, replace
{your-bucket-name}with the name of your S3 bucket.Click Next.
Enter a Policy name.
Click Create policy.
Set up authentication method
You can authenticate requests to your S3 bucket using either an AWS Identity and Access Management (IAM) role or IAM user credentials.
Set up IAM role authentication
To authenticate using an IAM role, your Hybrid Deployment Agent must run on an EC2 instance in the same AWS account as your S3 bucket.
In the Amazon IAM console, go to Roles, and then click Create role.
Select AWS service.
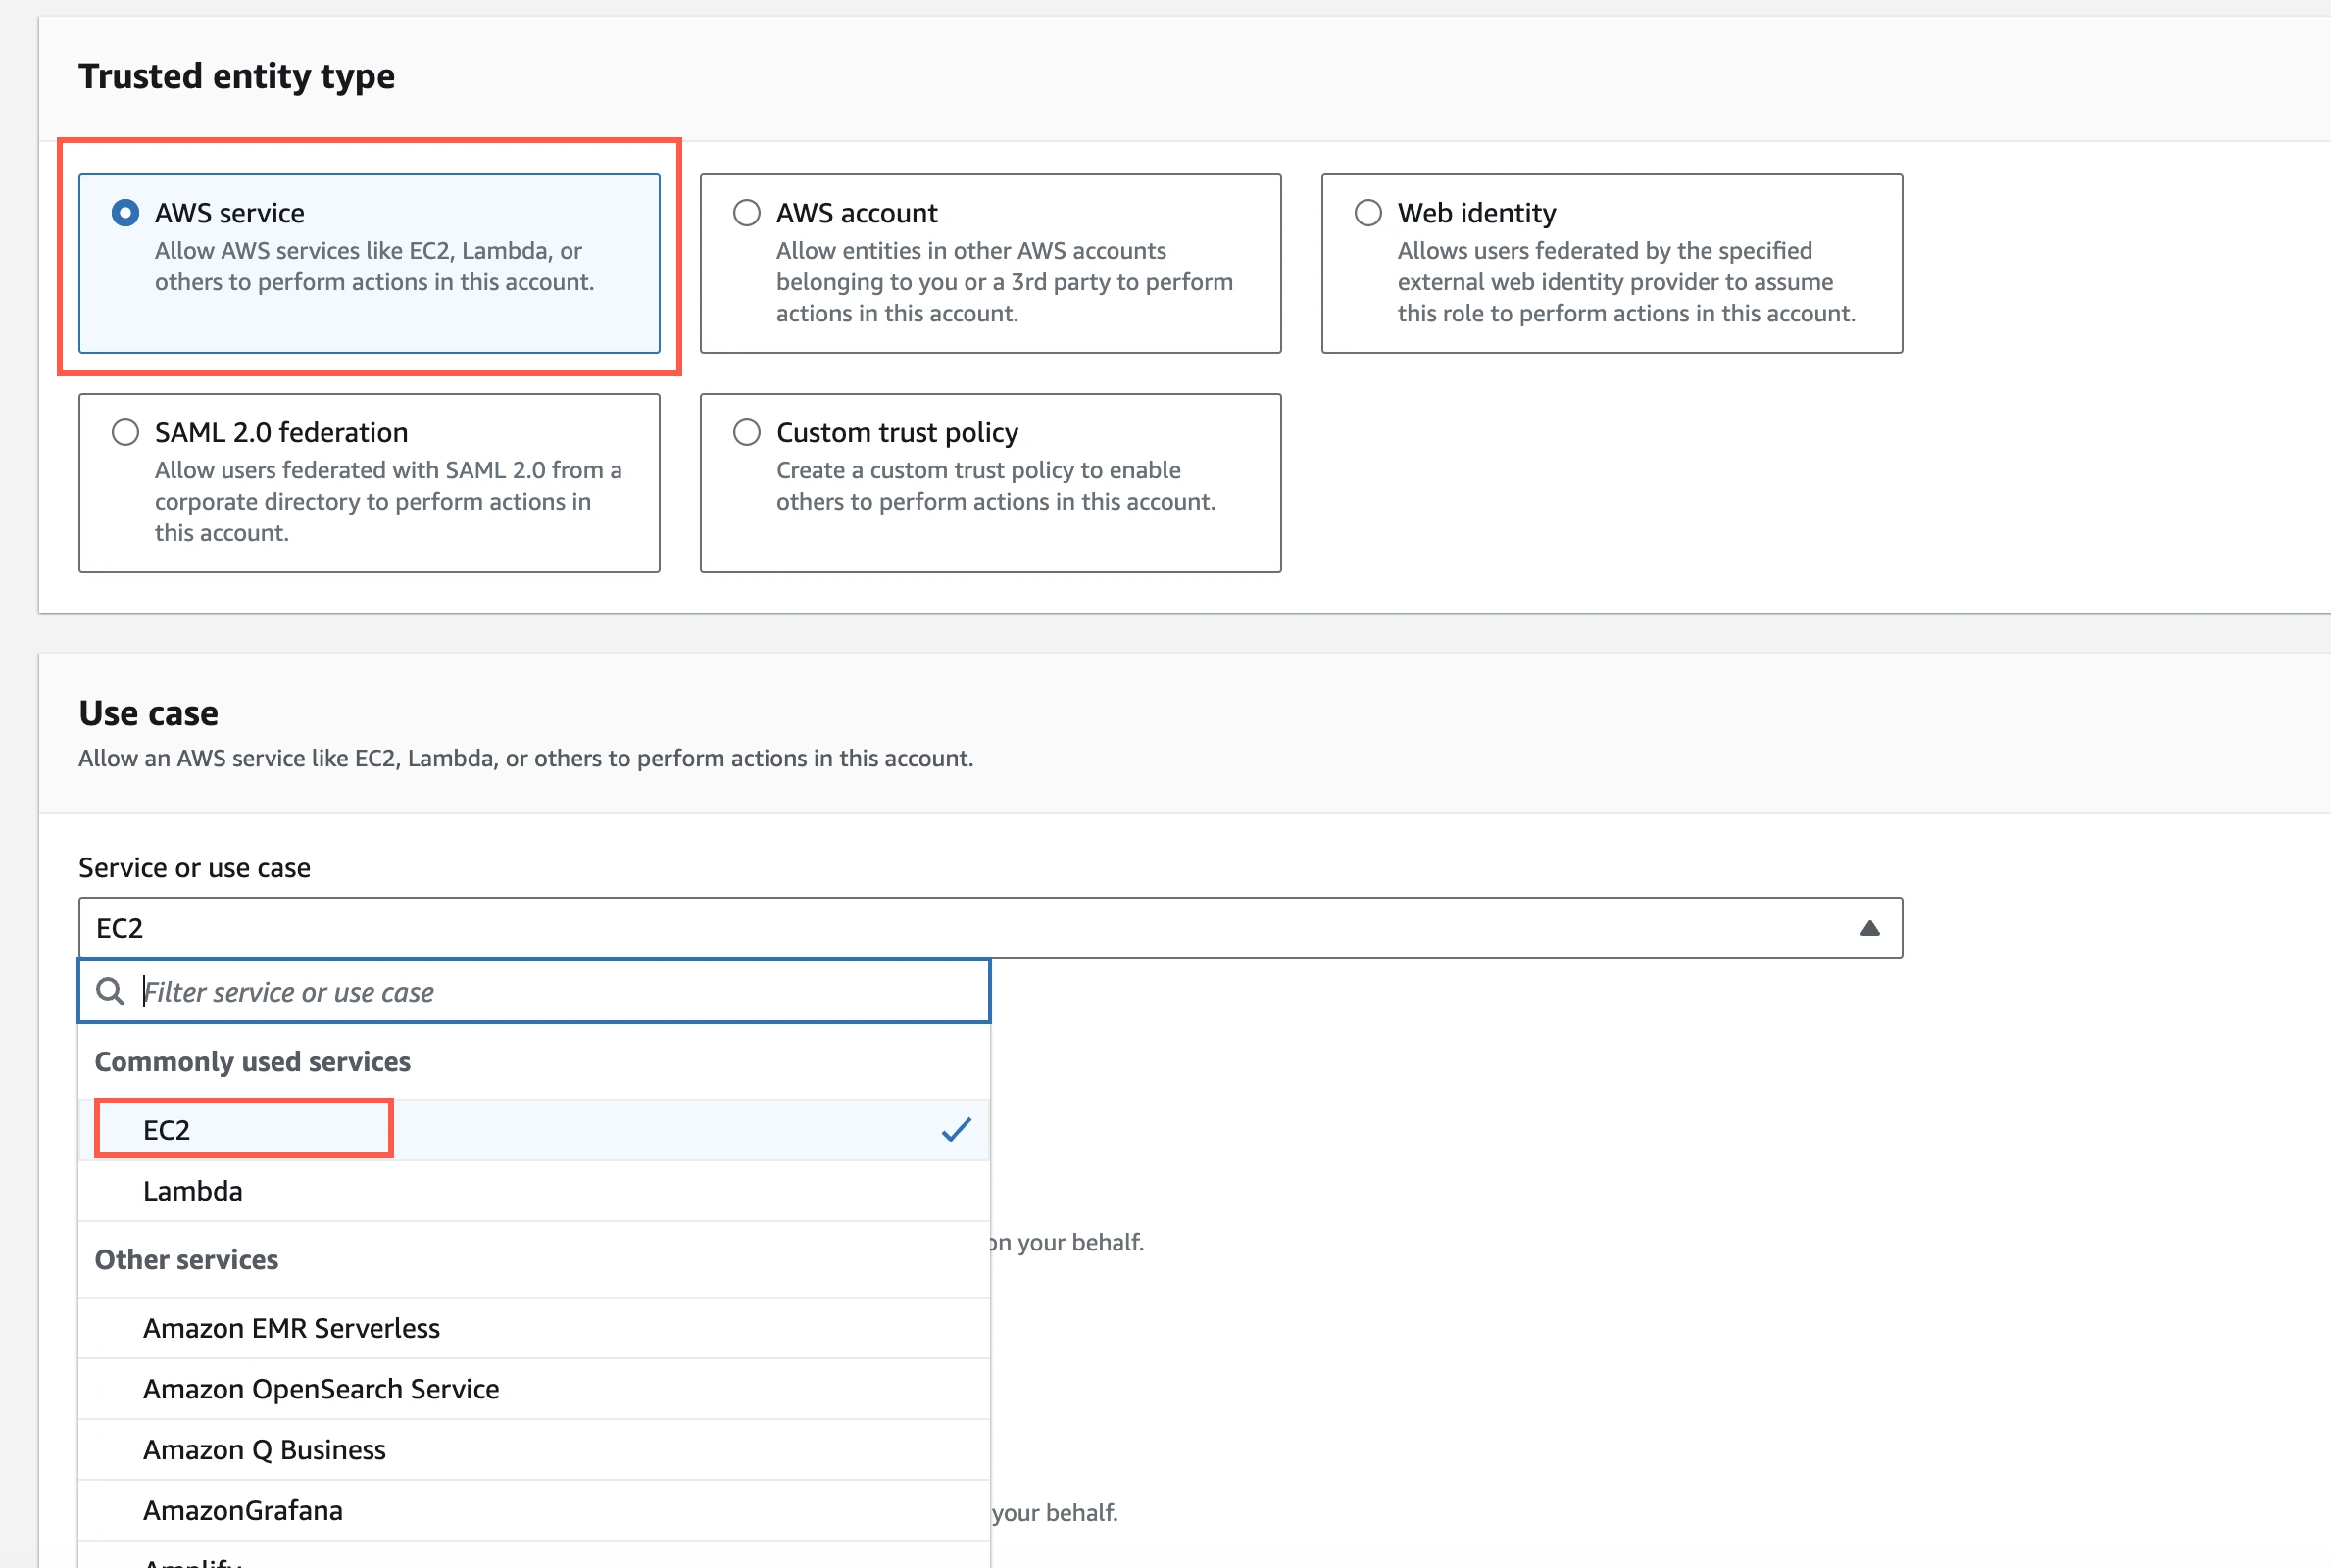
In Service or use case drop-down menu, select EC2.
Click Next.
Select the checkbox for the IAM policy you created for your S3 bucket.
Click Next.
Enter the Role name and click Create role.
In the Amazon IAM console, go to the EC2 service.
Go to Instances, and then select the EC2 instance hosting your Hybrid Deployment Agent.
In the top right corner, click Actions and go to Security > Modify IAM role.

In the IAM role drop-down menu, select the new IAM role you created and click Update IAM role.
Set up IAM user authentication
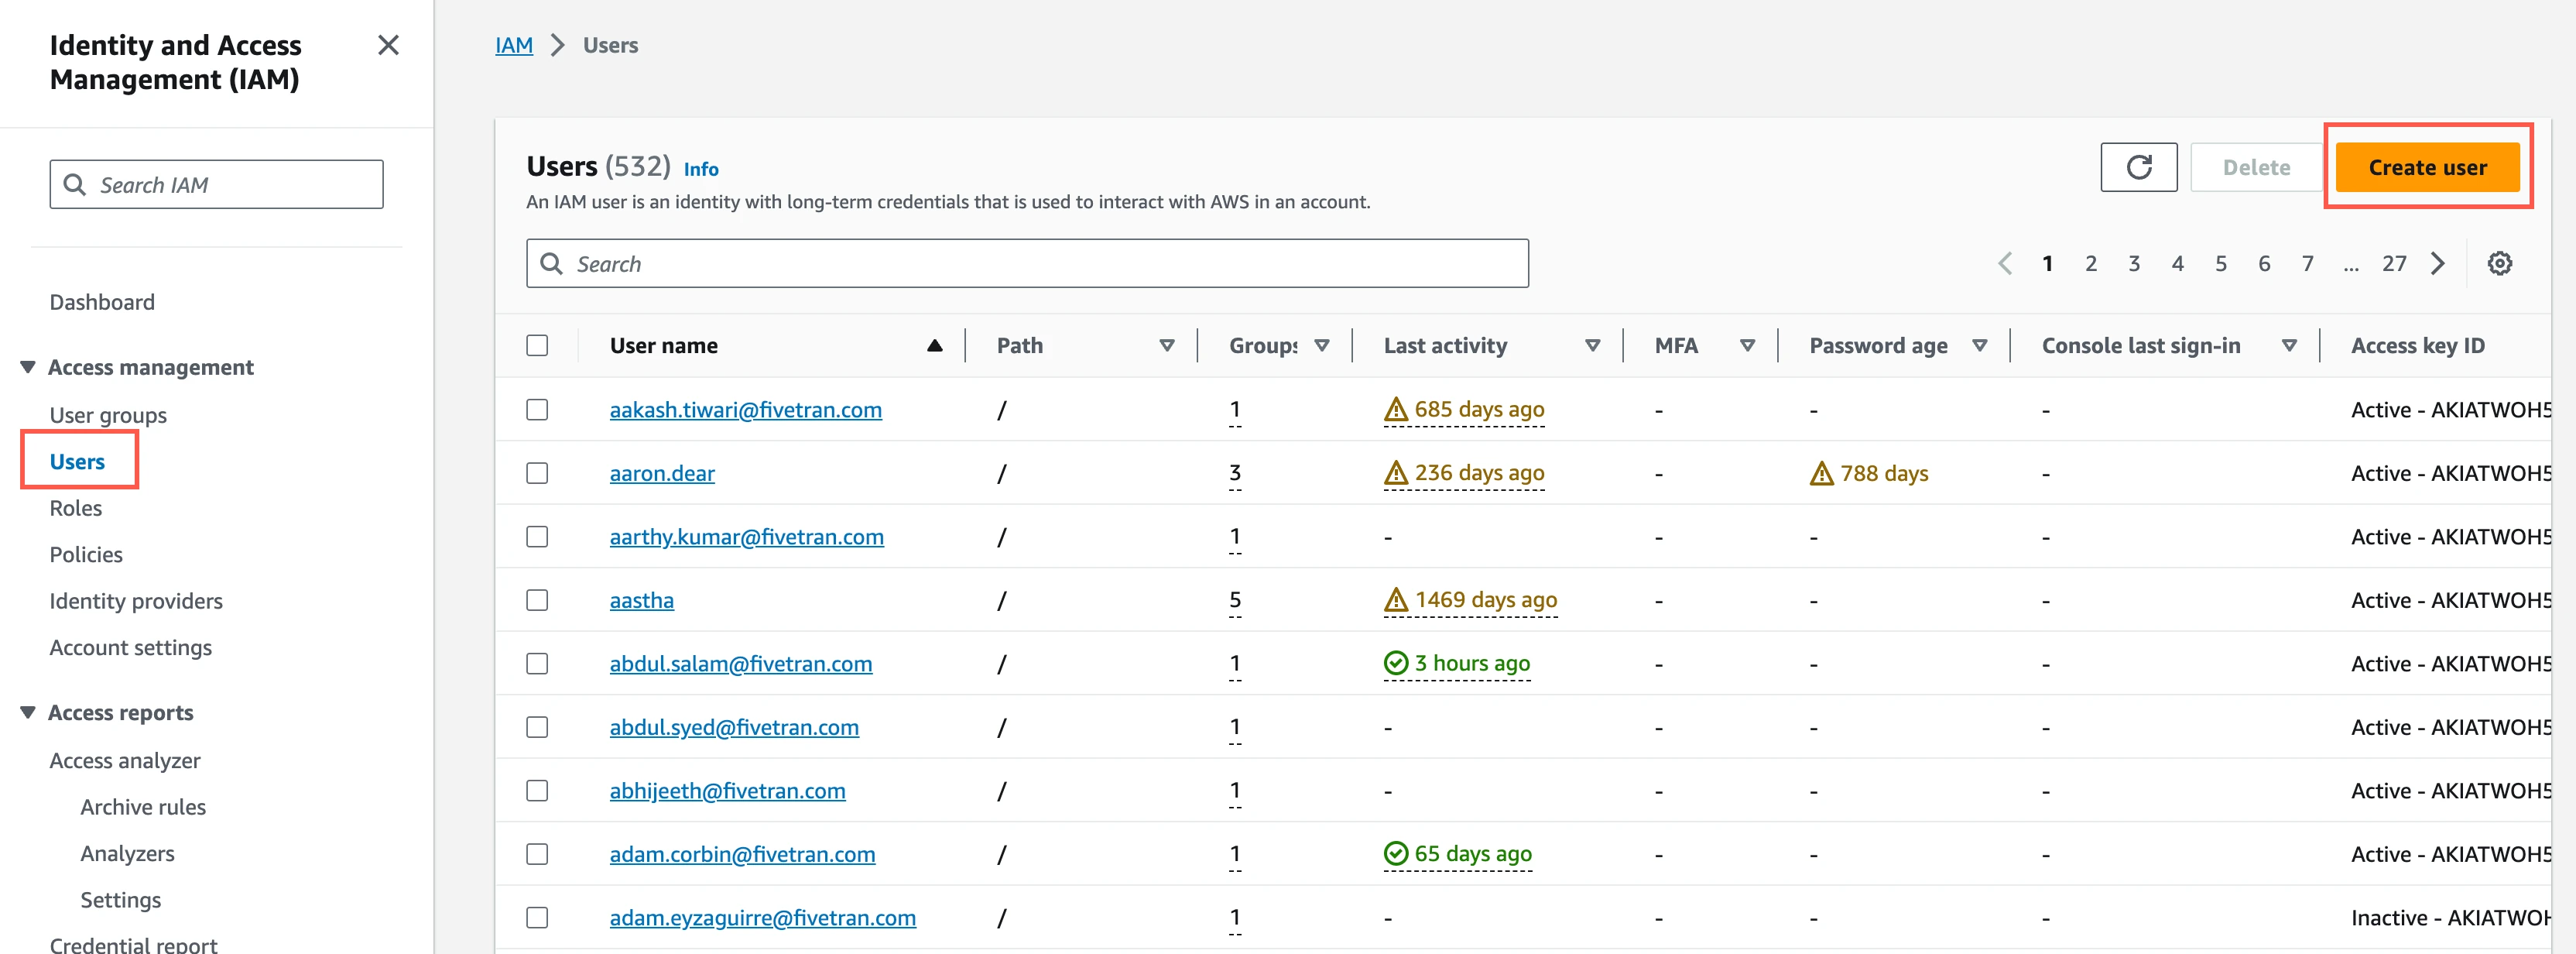
In the Amazon IAM console, go to Users, and then click Create user.
Enter a User name, and then click Next.
Select Attach policies directly.
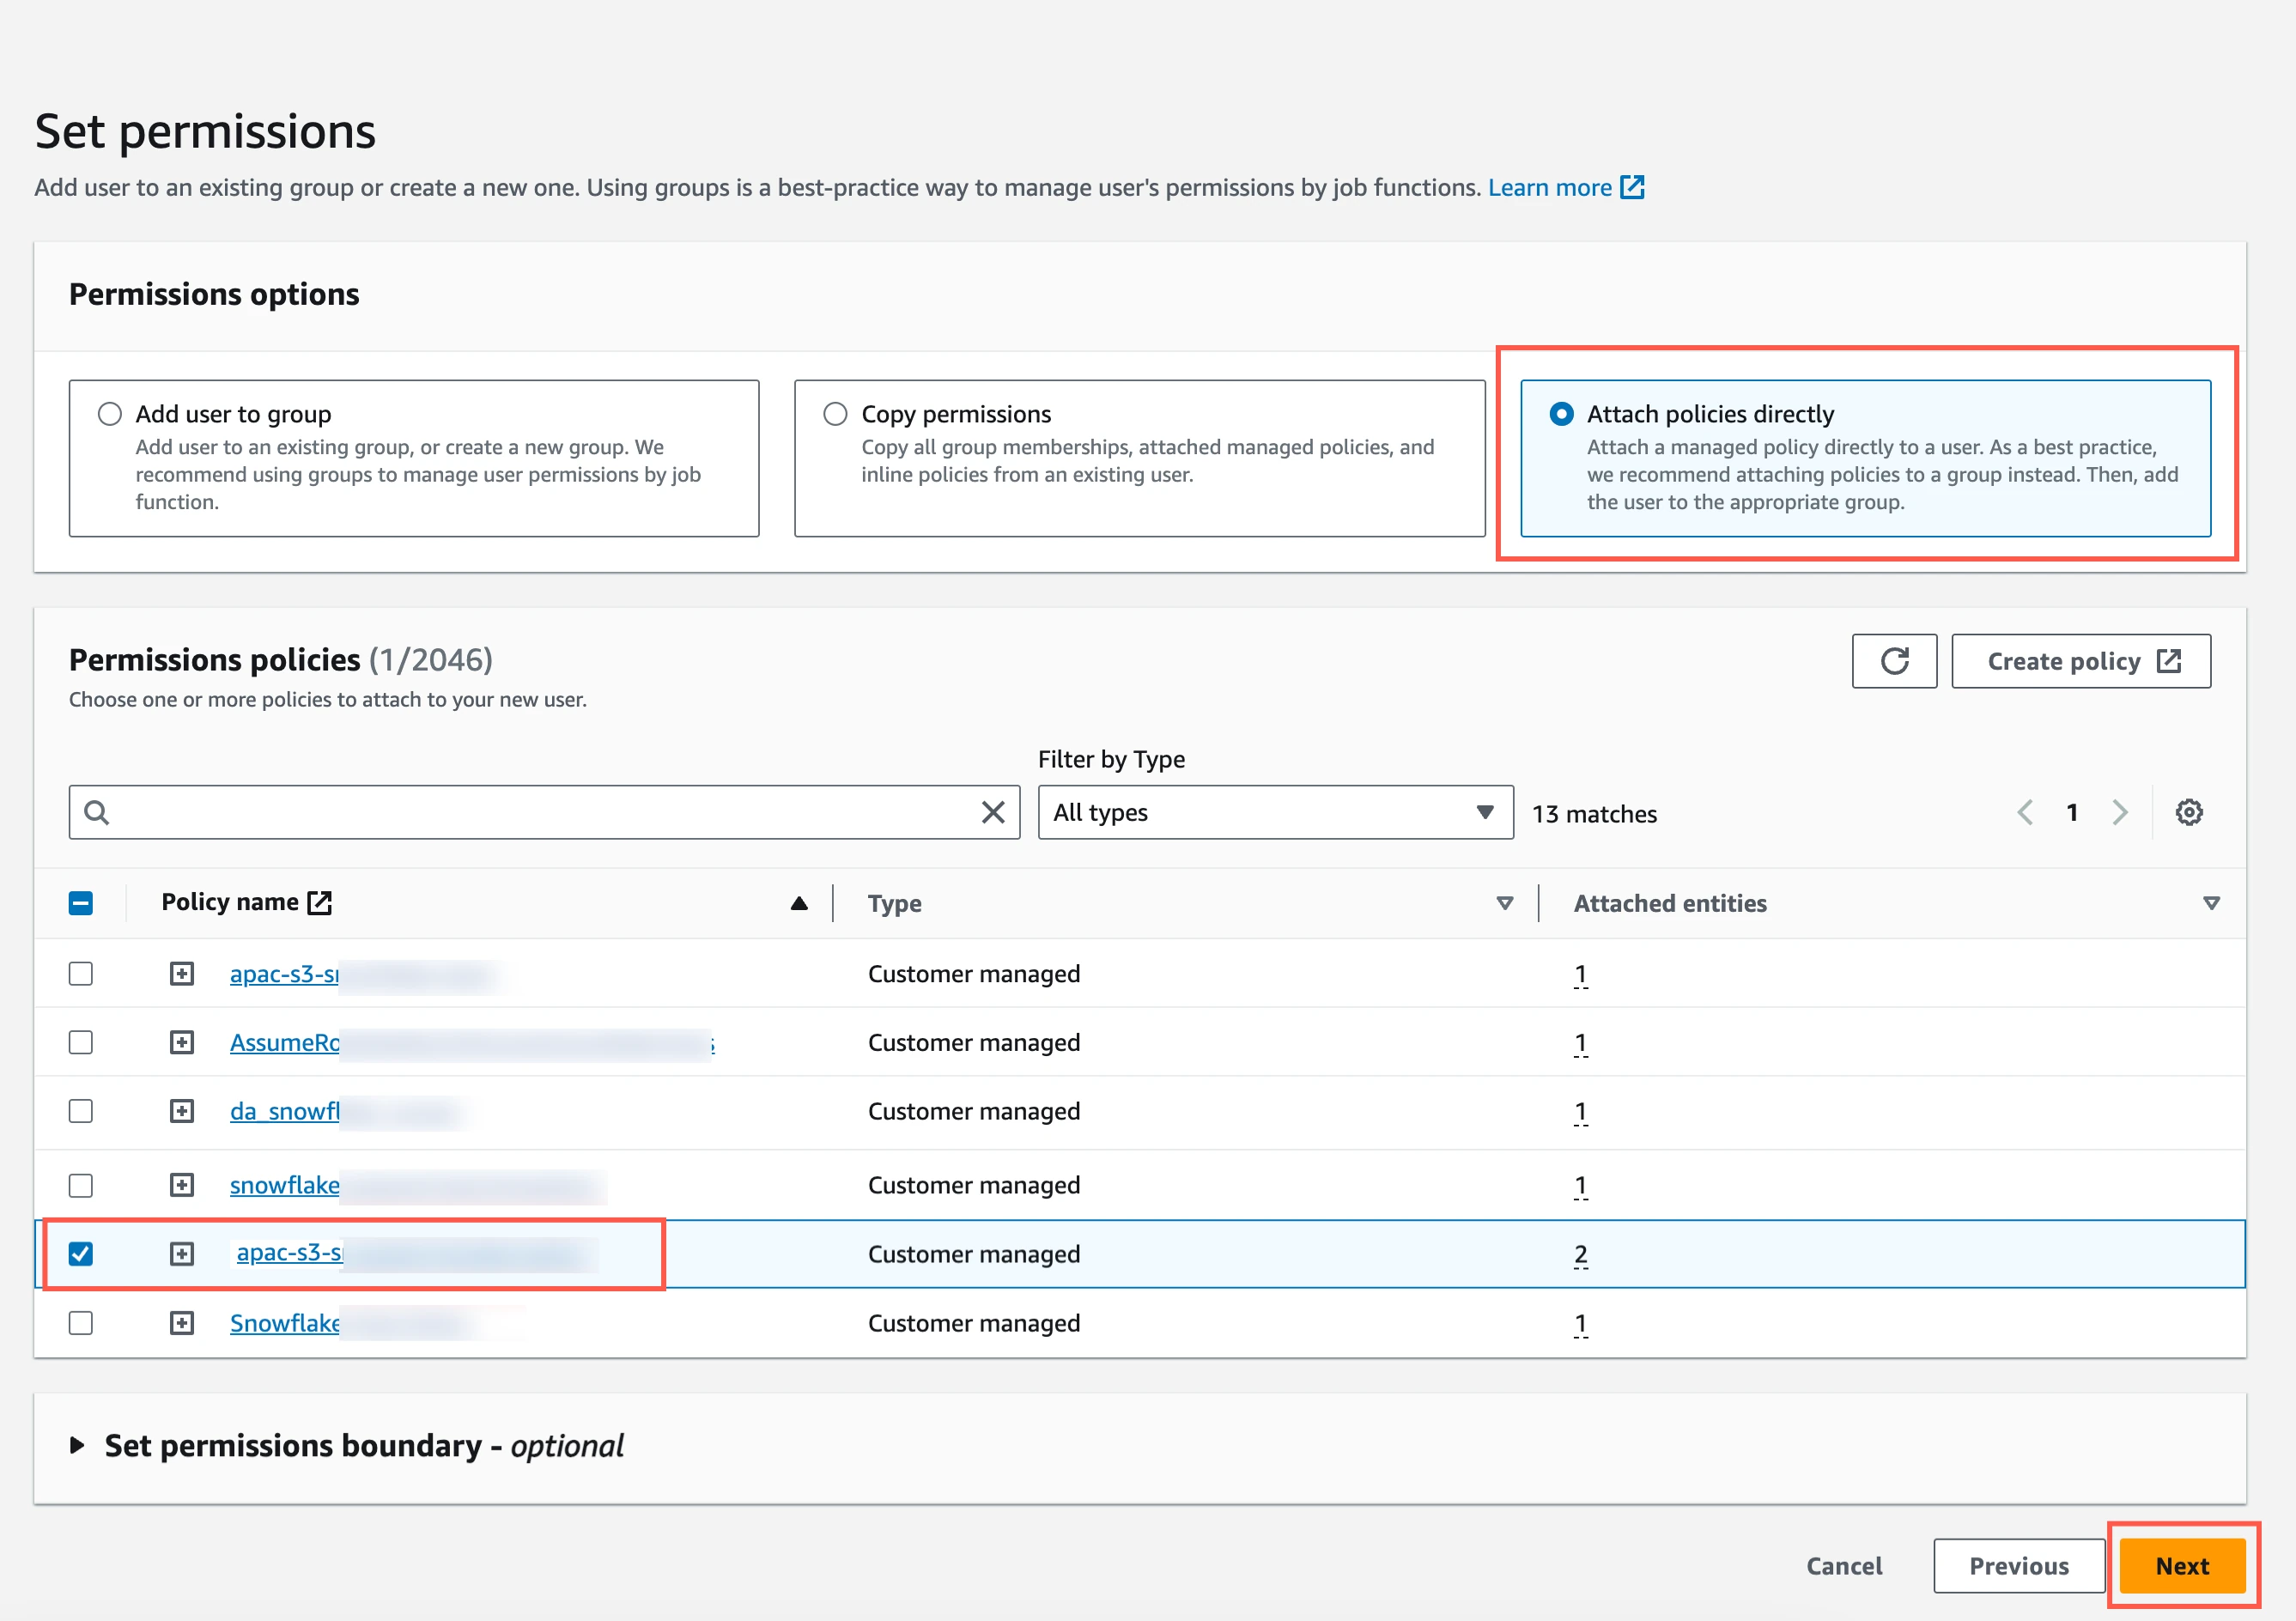
Select the checkbox next to the policy you created in the Create IAM policy for S3 bucket step, and then click Next.
In the Review and create page, click Create user.
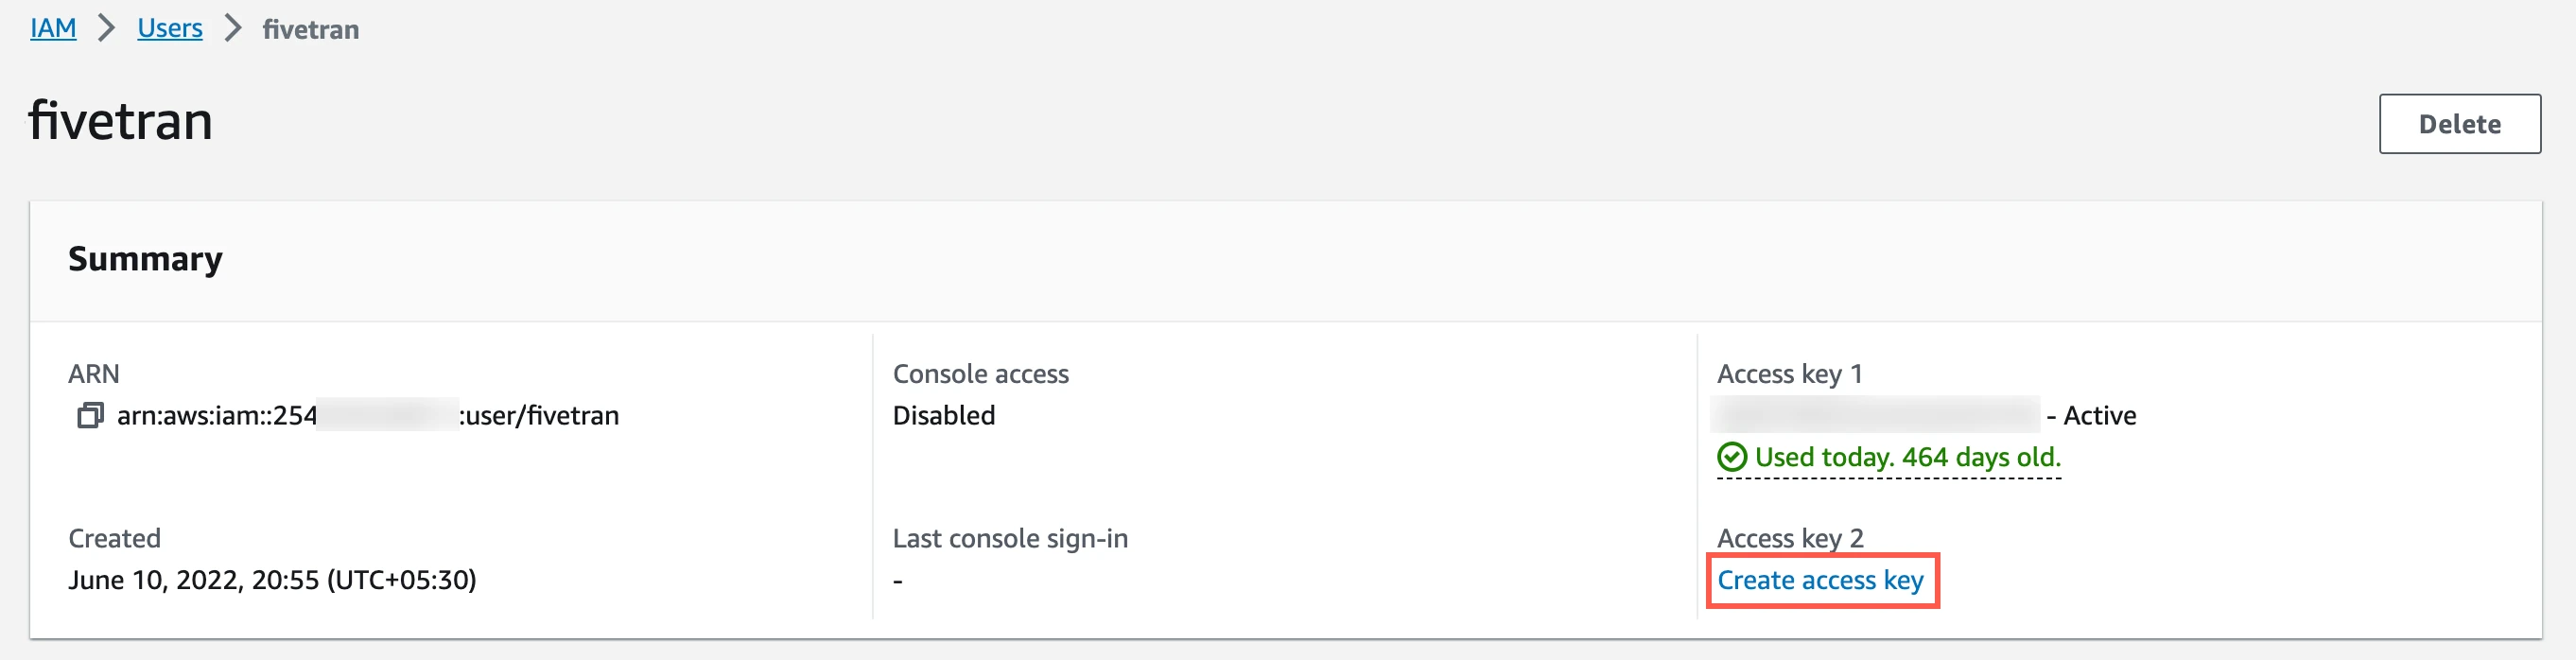
In the Users page, open the user you created.
Click Create access key.
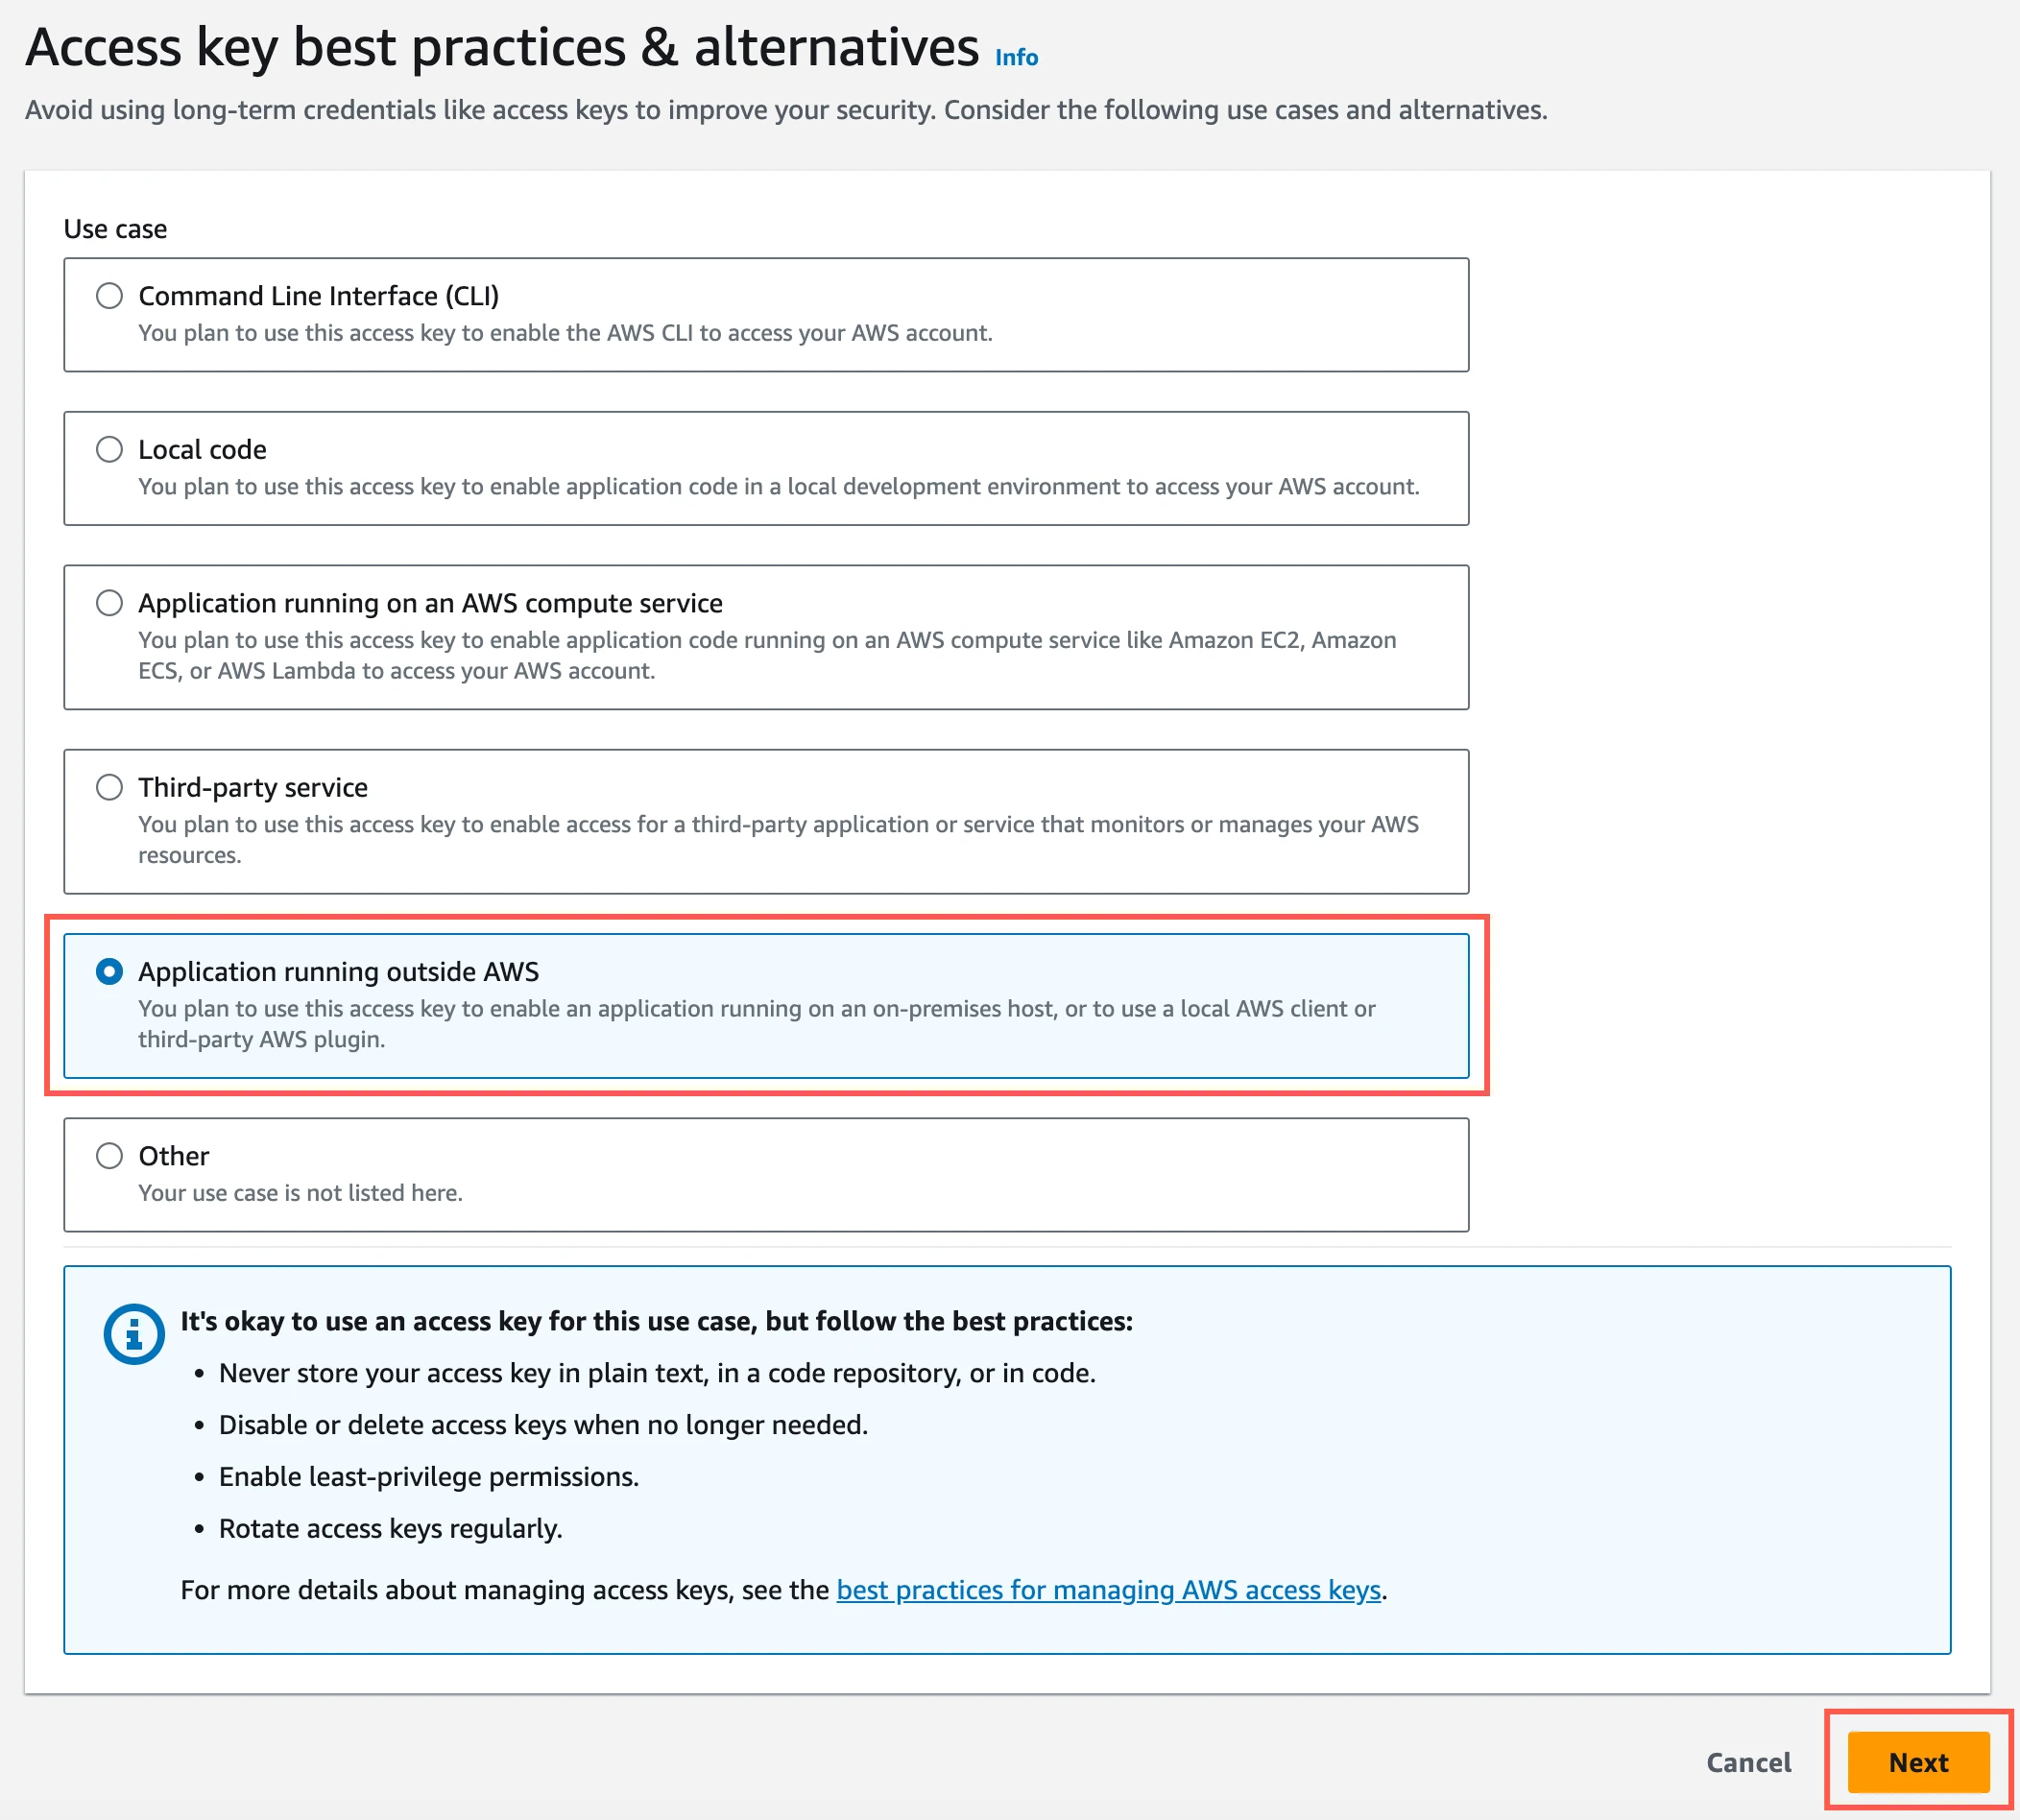
Select Application running outside AWS, and then click Next.
Click Create access key.
Click Download .csv file to download the Access key ID and Secret access key securely to your local drive and delete after use. You will need them to configure Fivetran.
Complete Fivetran configuration
Log in to your Fivetran account.
Go to the Destinations page and click Add destination.
Enter a Destination name of your choice and then click Add.
Select Redshift as the destination type.
(Enterprise and Business Critical accounts only) Select the deployment model of your choice:
- SaaS Deployment
- Hybrid Deployment
If you selected Hybrid Deployment, do the following:
i. Click Select Hybrid Deployment Agent, select the agent you want to use, and click Use Agent. If you want to create a new agent, click Create new agent and follow the setup instructions specific to your container platform.
ii. Enter the name and region of the S3 bucket you created.
iii. In the Authentication Type drop-down menu, select the authentication method you configured for your S3 bucket.
- If you selected IAM USER, enter the access key ID and secret access key you downloaded while setting up IAM user authentication for your bucket.
(Not applicable to Hybrid Deployment) Choose your Connection method:
- Connect directly
- Connect via an SSH
- Connect via Private Link
- Connect via Proxy Agent
The Connect via Private Link option is only available for Business Critical accounts.
If you choose Connect via an SSH tunnel, enter the following details:
- SSH Host
- SSH Port
- SSH User
(Optional) If you choose Connect via an SSH tunnel or Connect via Private Link, enable the Require TLS through tunnel toggle if you want to use TLS.
In the Host field, enter one of the following values:
- the host name you found in Step 3 - if you select Connect directly or Connect via an SSH as a connection method
- the endpoint URL we provided to you - if you select Connect via Private Link as a connection method
In the Port field, enter one of the following values:
- the host name you found in Step 3 - if you select Connect directly or Connect via an SSH as a connection method
- the default Redshift port
5439- if you select Connect via Private Link as a connection method
Enter the Database name you found in Step 7.
Enter the User name you found in Step 7.
Choose the Authentication Type: PASSWORD or IAM. The default type is PASSWORD.
If you choose PASSWORD, then enter the Password you created for your Redshift cluster.
This password is not the same as your AWS password.
If you choose IAM, then enter the Role ARN you created for your Redshift cluster in Step 6.
(Optional, Private Preview only) If you want to manage your credentials outside of Fivetran, enable the Use External Secrets Manager toggle. For some connectors and destinations, this toggle only appears after you select a credential-based authentication method. See the External Secret Managers documentation for more information.
- If you have already configured External Secret Managers for your account, select one from the drop-down menu. Note that the list is filtered by the deployment model of the destination: if the destination uses SaaS Deployment, External Secret Managers configured for Hybrid Deployment won't be available, and vice versa.
- To edit the details of the selected External Secret Manager, click Edit manager details in Account Settings.
- To set up a new External Secret Manager, click Configure a new secrets manager. See the Create New External Secret Manager documentation for prerequisites and setup instructions.
- You can manage all your External Secret Managers at any time under Account Settings. See the External Secret Managers documentation for more information.
- When ESM is enabled, credential fields are replaced by ESM key fields. In each ESM key field, enter the name of the secret stored in your external secrets manager that corresponds to that credential — not the credential value itself. For more information, see External Secret Managers.
(Optional) If you use IAM authentication and an SSH tunnel to connect, enter your Cluster ID and then choose your Cluster region.
If we auto-detect the cluster region, the Cluster region field won't be visible in the setup form.
(Optional) Choose the Cluster region. Fivetran uses the data staging bucket in the cluster region you select.
If you use VPC security policies, select the same region as the Redshift cluster. If you do not select the cluster region, we will use your data processing location as the cluster region.
(Not applicable to Hybrid Deployment) Choose the Data processing location. Depending on the plan you are on and your selected cloud service provider, you may also need to choose a Cloud service provider and cloud region as described in our Destinations documentation.
Choose your Time zone.
(Optional for Business Critical accounts and SaaS Deployment) To enable regional failover, set the Use Failover toggle to ON, and then select your Failover Location and Failover Region. Make a note of the IP addresses of the secondary region and safelist these addresses in your firewall.
Click Save and Test. Your Redshift cluster is now connected.
Fivetran tests and validates the Redshift connection. On successful completion of the setup tests, you can sync your data using Fivetran connectors to the Redshift provisioned destination.
In addition, Fivetran automatically configures a Fivetran Platform connection to transfer the connection logs and account metadata to a schema in this destination. The Fivetran Platform Connector enables you to monitor your connections, track your usage, and audit changes. The Fivetran Platform connection sends all these details at the destination level.
If you are an Account Administrator, you can manually add the Fivetran Platform connection on an account level so that it syncs all the metadata and logs for all the destinations in your account to a single destination. If an account-level Fivetran Platform connection is already configured in a destination in your Fivetran account, then we don't add destination-level Fivetran Platform connections to the new destinations you create.
Redshift Serverless - Setup instructions
Choose your deployment model
Before setting up your destination, decide which deployment model best suits your organization's requirements. This destination supports both SaaS and Hybrid deployment models, offering flexibility to meet diverse compliance and data governance needs.
See our Deployment Models documentation to understand the use cases of each model and choose the model that aligns with your security and operational requirements.
You must have an Enterprise or Business Critical plan to use the Hybrid Deployment model.
Choose connection method
Decide whether to connect to your Redshift data warehouse directly, using an SSH tunnel, through AWS PrivateLink, or using Proxy Agent. For more information, see our destination connection options documentation.
You must connect through SSH if your Redshift cluster is not publicly accessible.
Connect directly
If you connect directly, you must create a rule in a security group that allows Fivetran access to your Redshift instance and port.
Configure your firewall and/or other access control systems to allow incoming connections to your host and port from Fivetran's IPs for your region.
For more information, see Redshift Serverless' documentation.
Connect using an SSH tunnel
If you connect using an SSH tunnel, Fivetran connects to a separate server in your network that provides an SSH tunnel to your Redshift destination. You must then configure your tunnel server's security group to allow Fivetran access and configure the instance's security to allow access from the tunnel. You must have three subnets associated to your workgroup.
You must connect through SSH if your destination is contained within an inaccessible subnet.
To connect using SSH, do the following:
In the destination setup form, select the Connect via an SSH tunnel option.
Copy Fivetran's public SSH key.
Add the public key to the
authorized_keysfile of your SSH server. The key must be all on one line, so make sure that you don't introduce any line breaks when cutting and pasting.
Connect using PrivateLink
You must have a Business Critical plan to use AWS PrivateLink.
Unlike Redshift provisioned clusters, Redshift Serverless does not support Redshift-managed VPC endpoints for cross-account Private Link connections. Instead, you must manually create a Network Load Balancer (NLB), Target Group, and VPC Endpoint Service to establish a secure private connection between Fivetran and your Redshift Serverless workgroup.
Prerequisites
To set up a cross-account AWS PrivateLink for Redshift Serverless, you need:
- a Redshift Serverless workgroup in one of our supported regions
- access to the AWS Console with permissions to create:
- Target Groups
- Network Load Balancers
- VPC Endpoint Services
- your Redshift Serverless workgroup's private IP addresses
Step 1: Identify Redshift Serverless IP addresses
Open the Redshift Serverless console.
Select your workgroup.
In the Data Access tab, scroll to the Network and security section.
Note the VPC ID where your Redshift Serverless workgroup resides.
Identify the IP addresses of your Redshift Serverless endpoints:
Redshift Serverless workgroups use private IP addresses from your VPC subnets. You'll need to identify these IPs to register them with the Target Group.
Run the following command (replace
<endpoint>with your workgroup endpoint) in your AWS CLI.nslookup <endpoint>Make a note of all IP addresses returned. You will need them in the next step.
Redshift Serverless may have multiple IP addresses (typically 2-3) for high availability. You must register all of them with your target group.
Step 2: Create Target Group and register Serverless IPs
Open the EC2 Console.
In the left navigation menu, under Load Balancing, click Target Groups.
Click Create target group.
In the Basic configuration section, do the following:
Choose a target type: Select IP addresses
Target group name: Enter a name, for example,
fivetran-redshift-serverless-tg.In the Protocol drop-dpwn menu, select TCP.
In the Port field, enter your Redshift Serverless port (default:
5439)VPC: Select the VPC where your Redshift Serverless workgroup resides
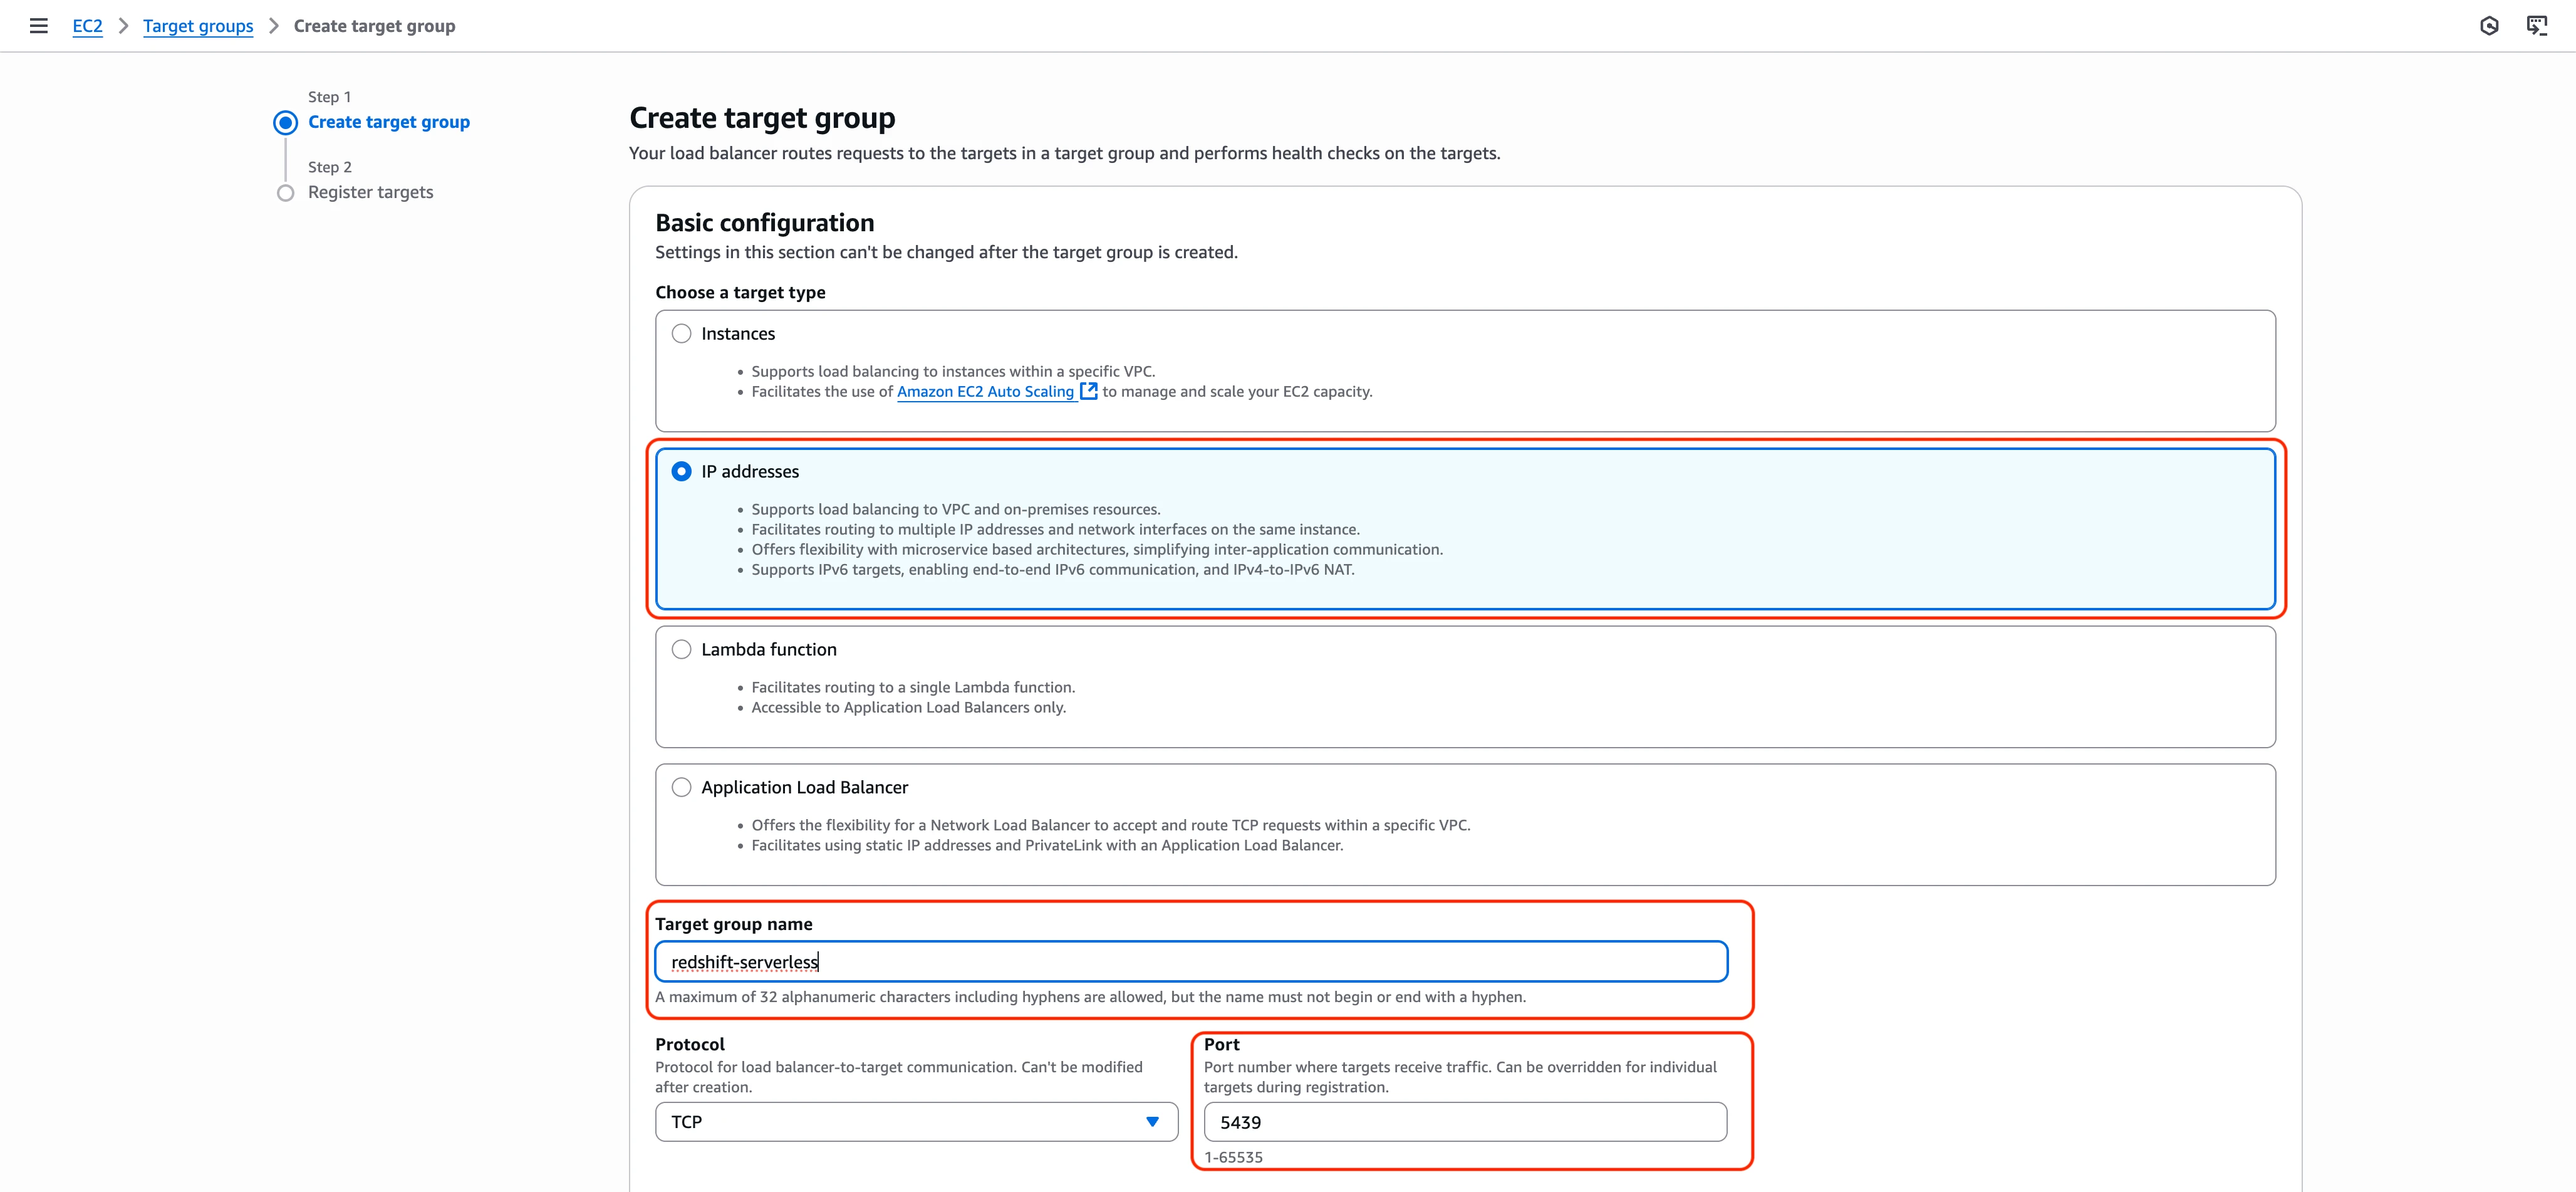
Scroll down to Health checks section and select TCP as the Health check protocol.
TCP health checks ensure your Redshift Serverless endpoints are reachable.
Click Next.
In the IP addresses section, for each IP address you identified in Step 1, do the following:
i. In the Enter an IPv4 address from a VPC subnet field, enter one of the Redshift Serverless IP addresses.
ii. In the Ports field, enter
5439(or your custom port).iii. Click Include as pending below.
iv. Repeat for all IP addresses.
In the Targets section, verify that all IP addresses you entered are listed and click Create target group.
Wait for the target group to be created. The initial status will be unused.
Step 3: Create Network Load Balancer
In the EC2 Console, under Load Balancing, click Load Balancers.
Click Create load balancer.
Under Load balancer types, select Network Load Balancer, then click Create.
In the Basic configuration section, do the following:
Enter a Load balancer name, for example,
fivetran-redshift-serverless-nlb.Select Internal as your Scheme.
You must select Internal for the NLB to work with PrivateLink. Public-facing load balancers cannot be used with VPC Endpoint Services.
Select IPv4 as the IP address type.
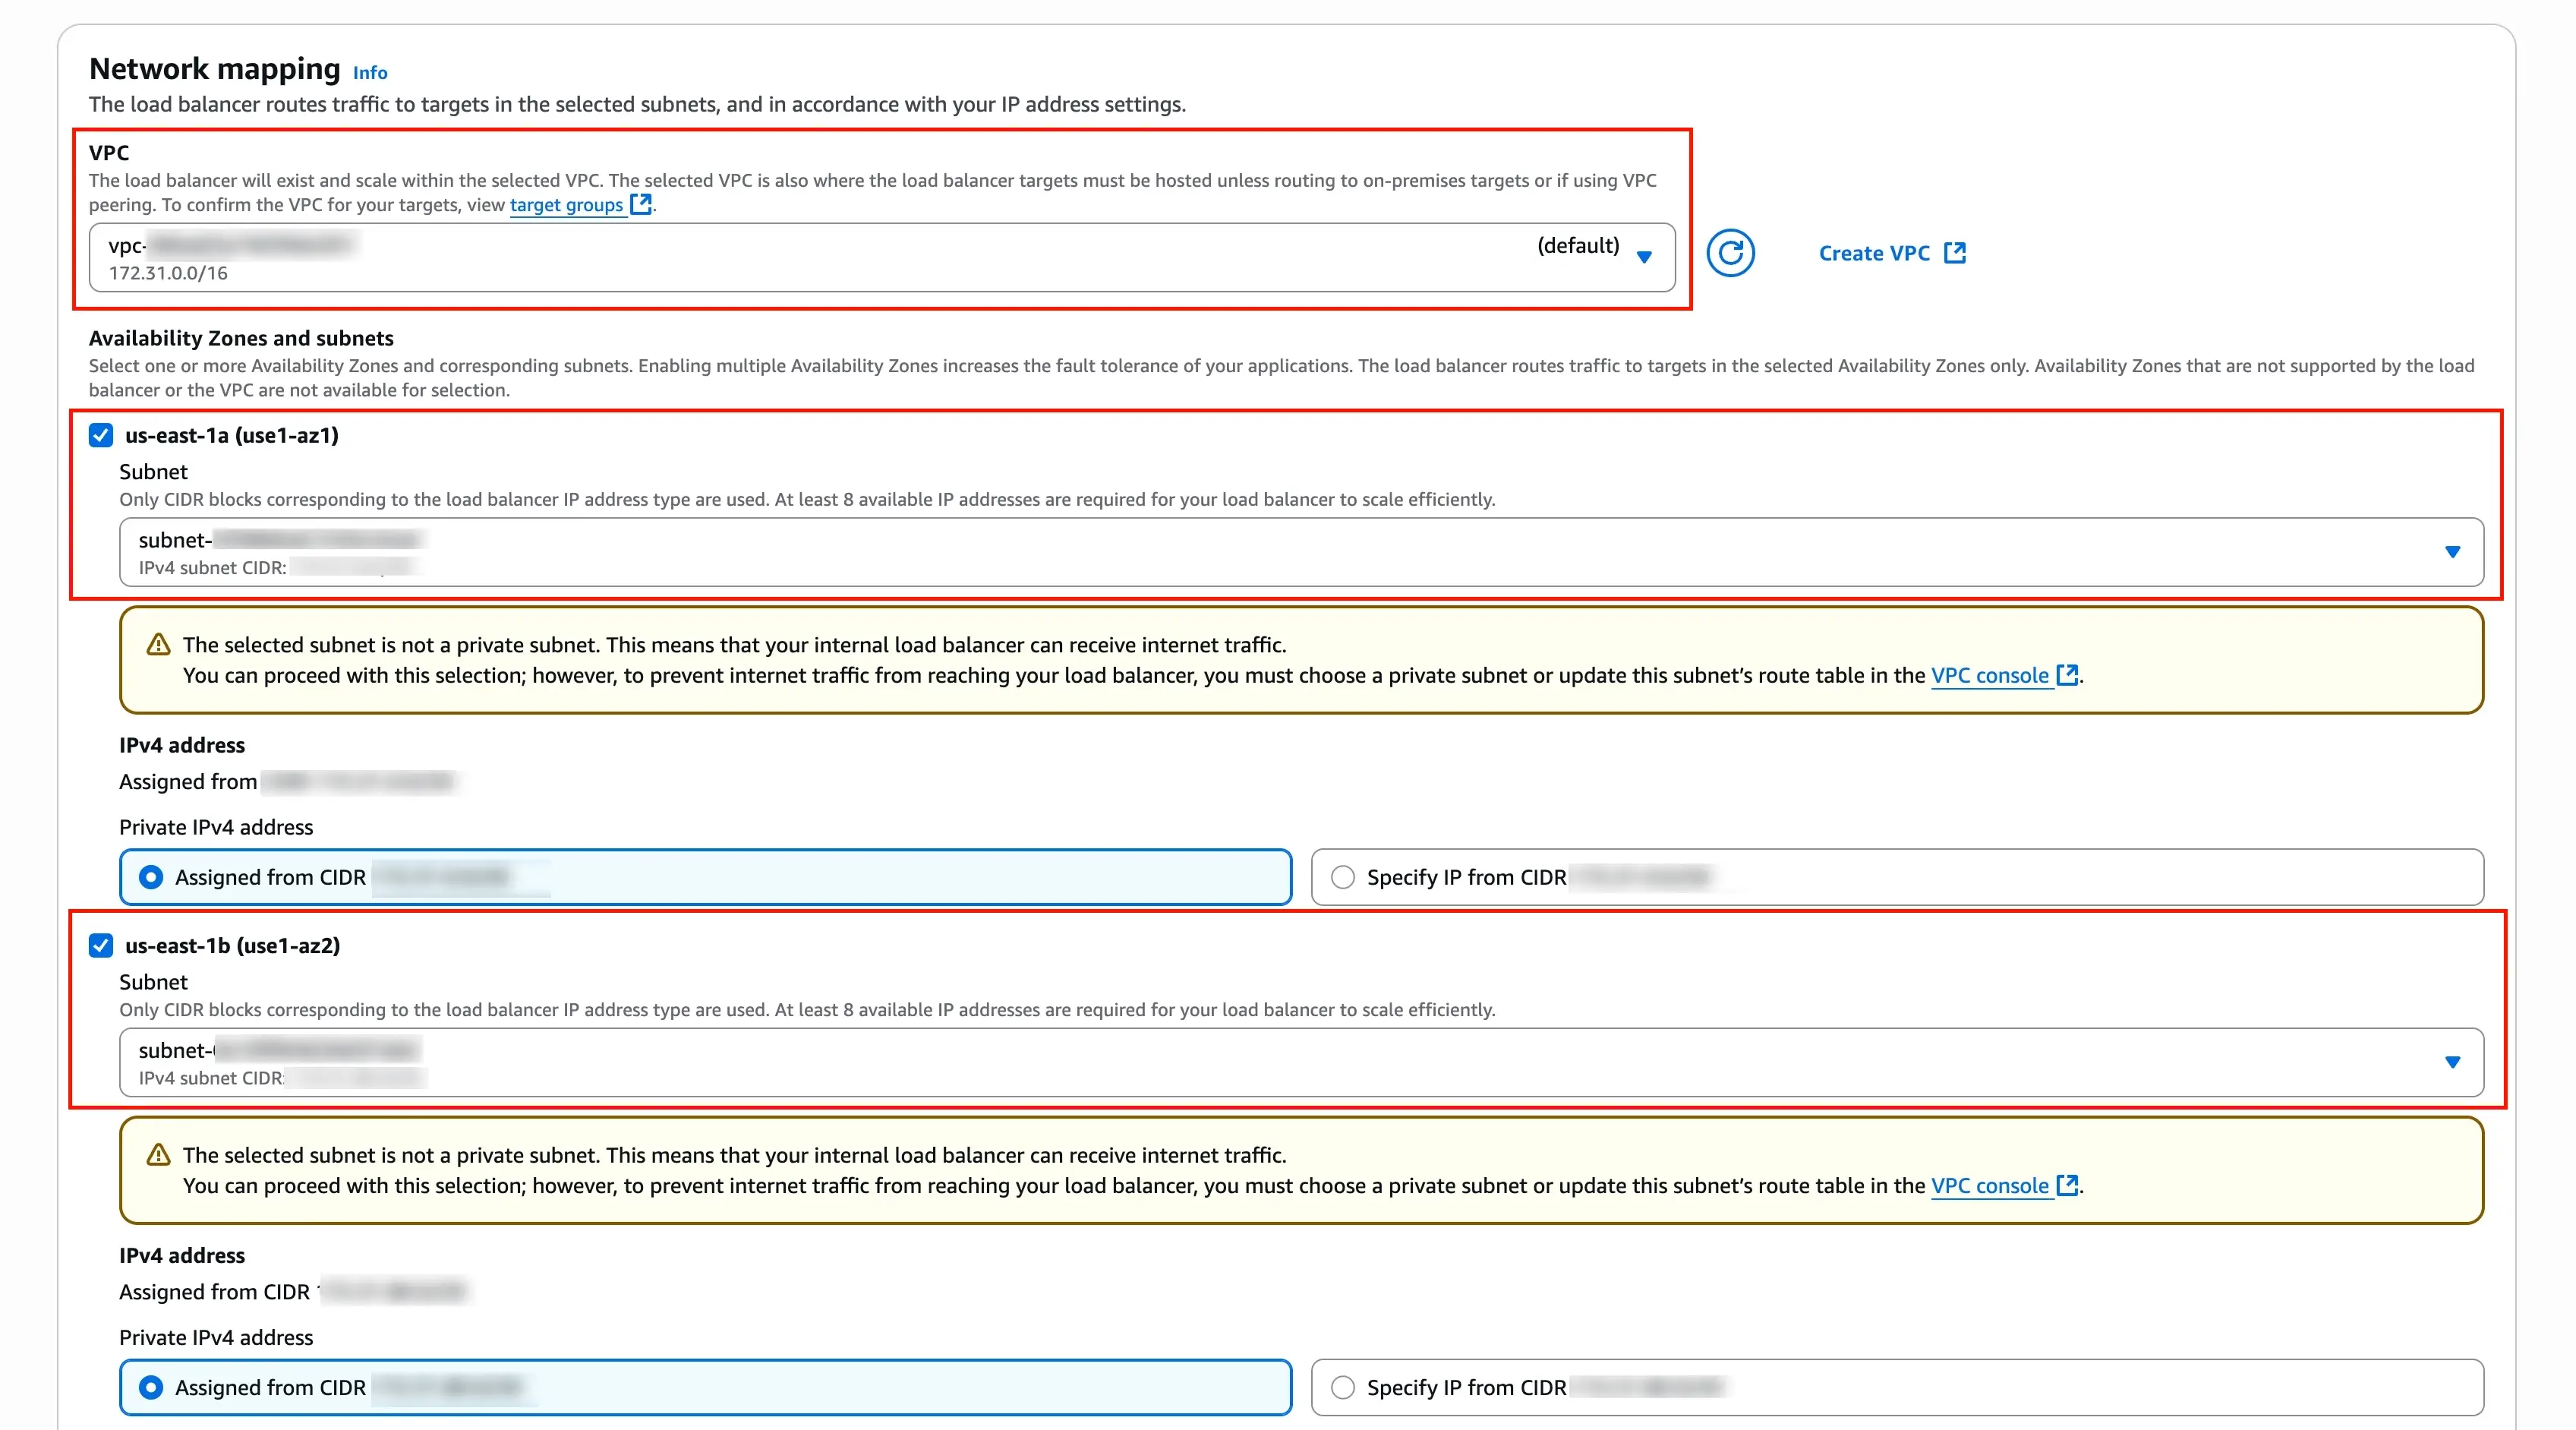
In the Network mapping section, do the following:
i. VPC: Select the same VPC where your Redshift Serverless workgroup resides.
ii. Availability Zones and subnets: Select at least two Availability Zones where your Redshift Serverless workgroup has subnets.
iii. Select a private Subnet for each availability zone you select.
The NLB needs to be in the same VPC as your Redshift Serverless workgroup but can be in different subnets.
In the Security groups section, do the following:
i. Click Create new security group or select an existing security group.
ii. If creating new, configure the security group to allow:
- Inbound: TCP port
5439(or your custom port) from your VPC CIDR - Outbound: All traffic
iii. Make a note of the security group ID.
- Inbound: TCP port
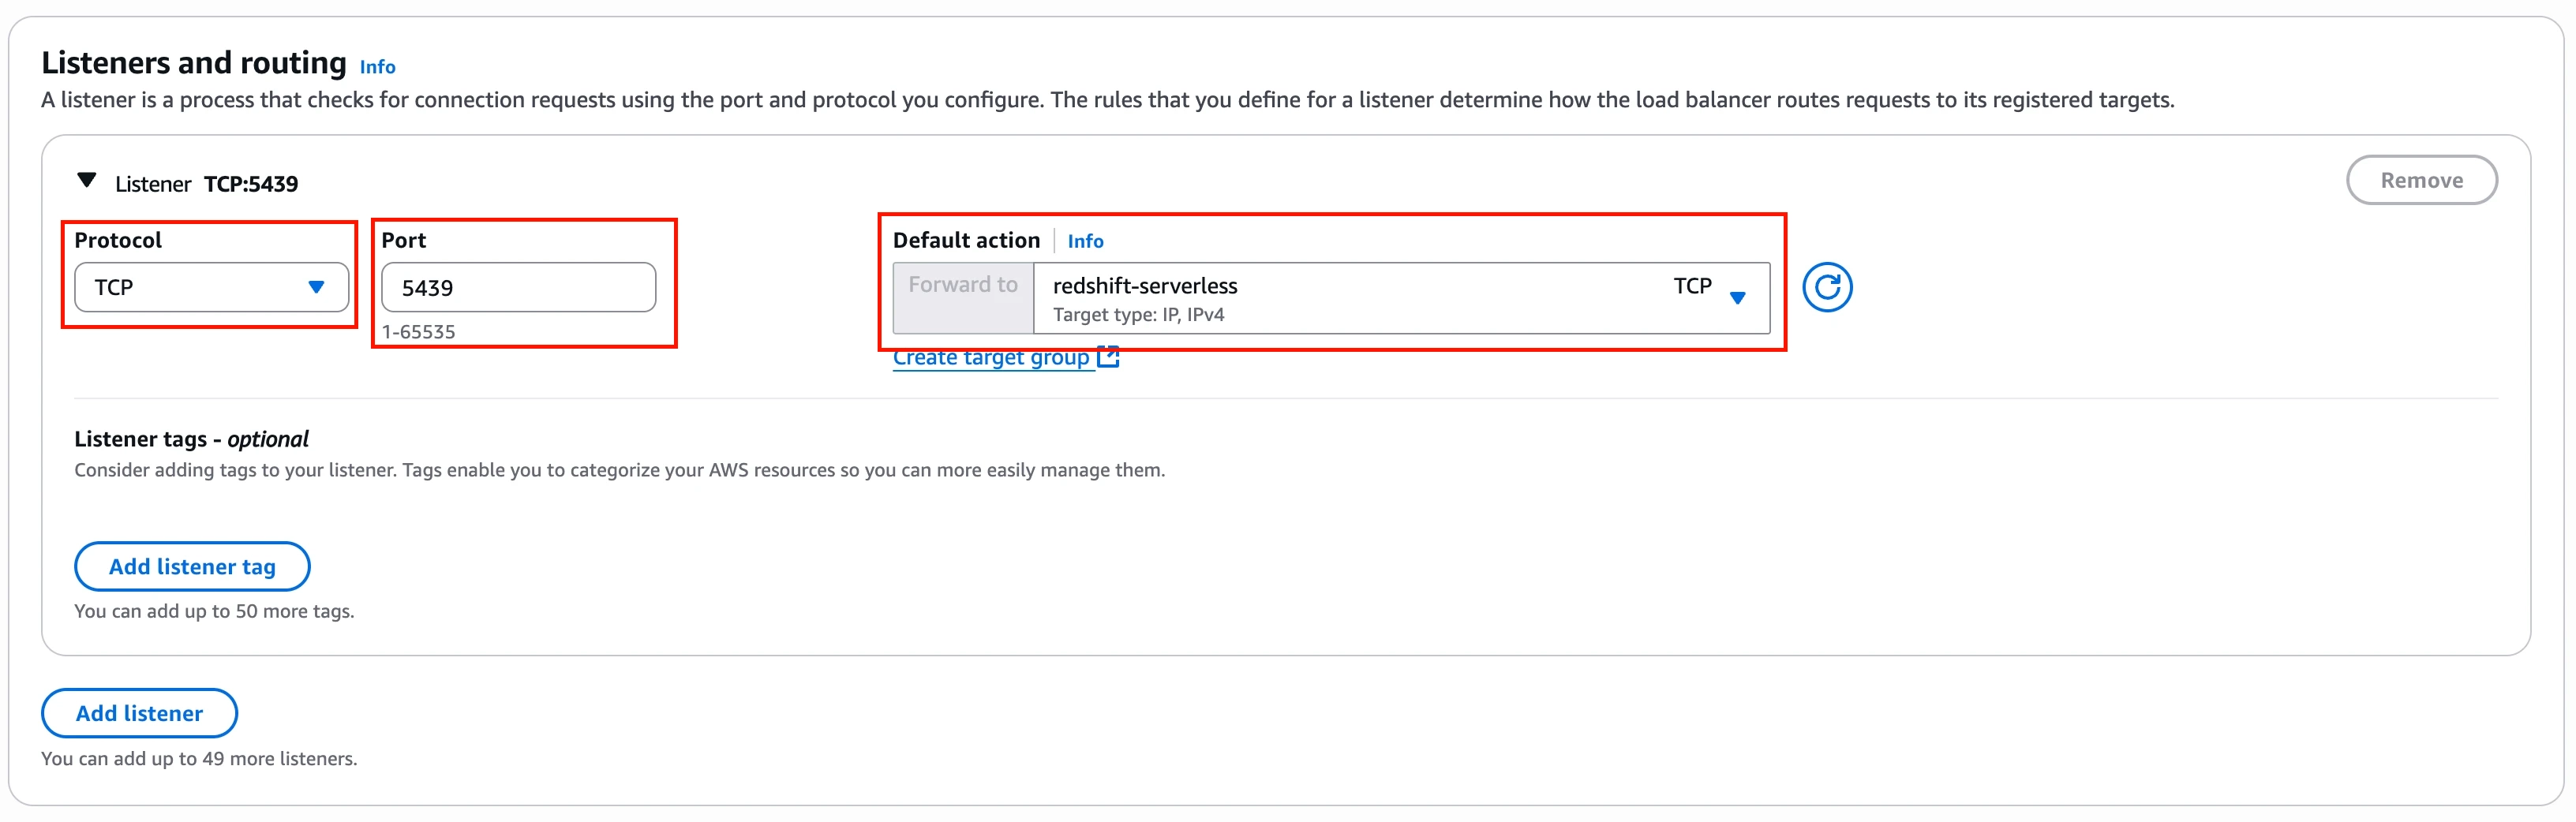
In the Listeners and routing section, do the following:
i. In the Protocol drop-down menu, select TCP.
ii. In the Ports field, enter
5439(or your custom port).iii. In the Default action drop-down menu, select Forward to and then choose the target group you created in Step 2.
Scroll down and click Create load balancer.
Wait for the load balancer to become Active (this may take 2-3 minutes).
Once active, click on the load balancer name and note the ARN. You will need it for the next step.
Step 4: Verify Target Group health
Before proceeding, ensure your Redshift Serverless IPs are healthy in the Target Group.
In the EC2 Console, go to Target Groups.
Select the target group you created in Step 2.
Click the Targets tab.
Verify that all registered IP addresses show a status of healthy.
If targets show as unhealthy, verify:
- The security group attached to your Redshift Serverless workgroup allows traffic from the NLB's security group on port 5439
- The IP addresses are correct
- Your Redshift Serverless workgroup is running
Step 5: Create VPC Endpoint Service
Open the VPC Console.
In the left navigation pane, click Endpoint Services (under Virtual private cloud).
Click Create endpoint service.
In the Endpoint service settings section, select Network as the Load balancer type:.
In the Available load balancers section, select the Network Load Balancer you created in Step 3.
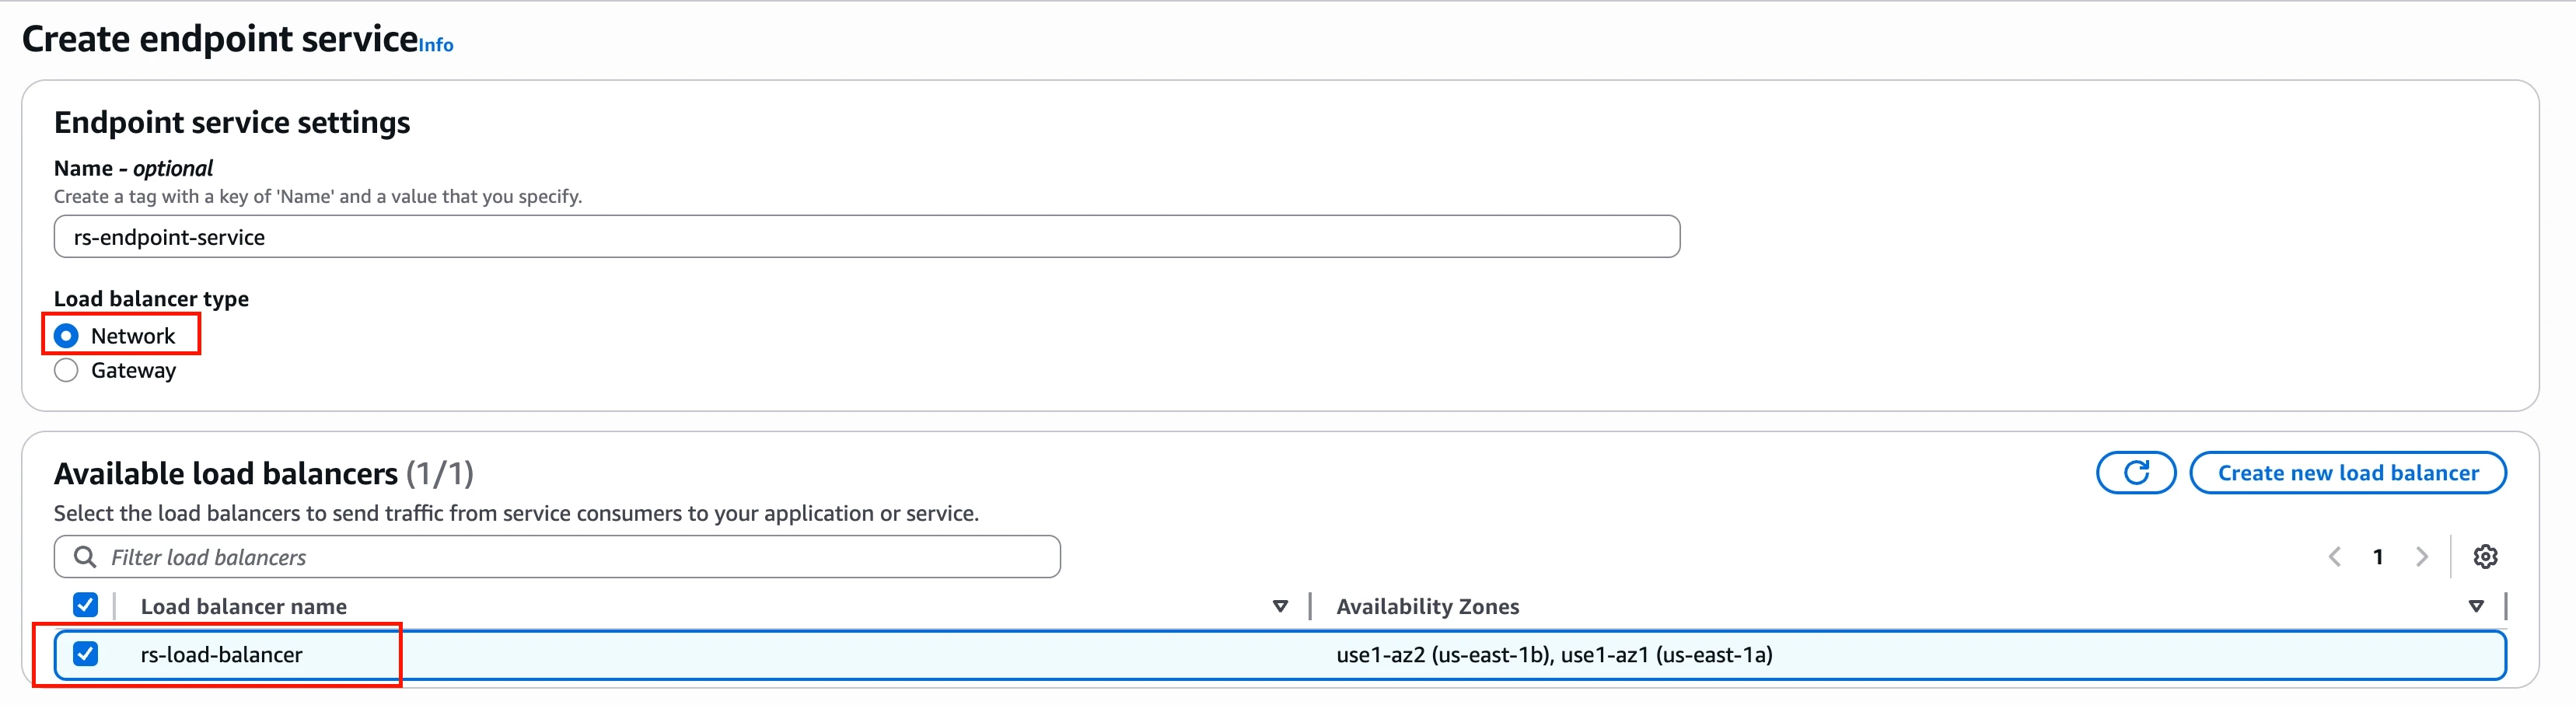
In the Additional settings section, select the Require acceptance for endpoint checkbox.
This ensures you must manually approve connection requests from Fivetran's AWS account, providing an additional security layer.
Click Create.
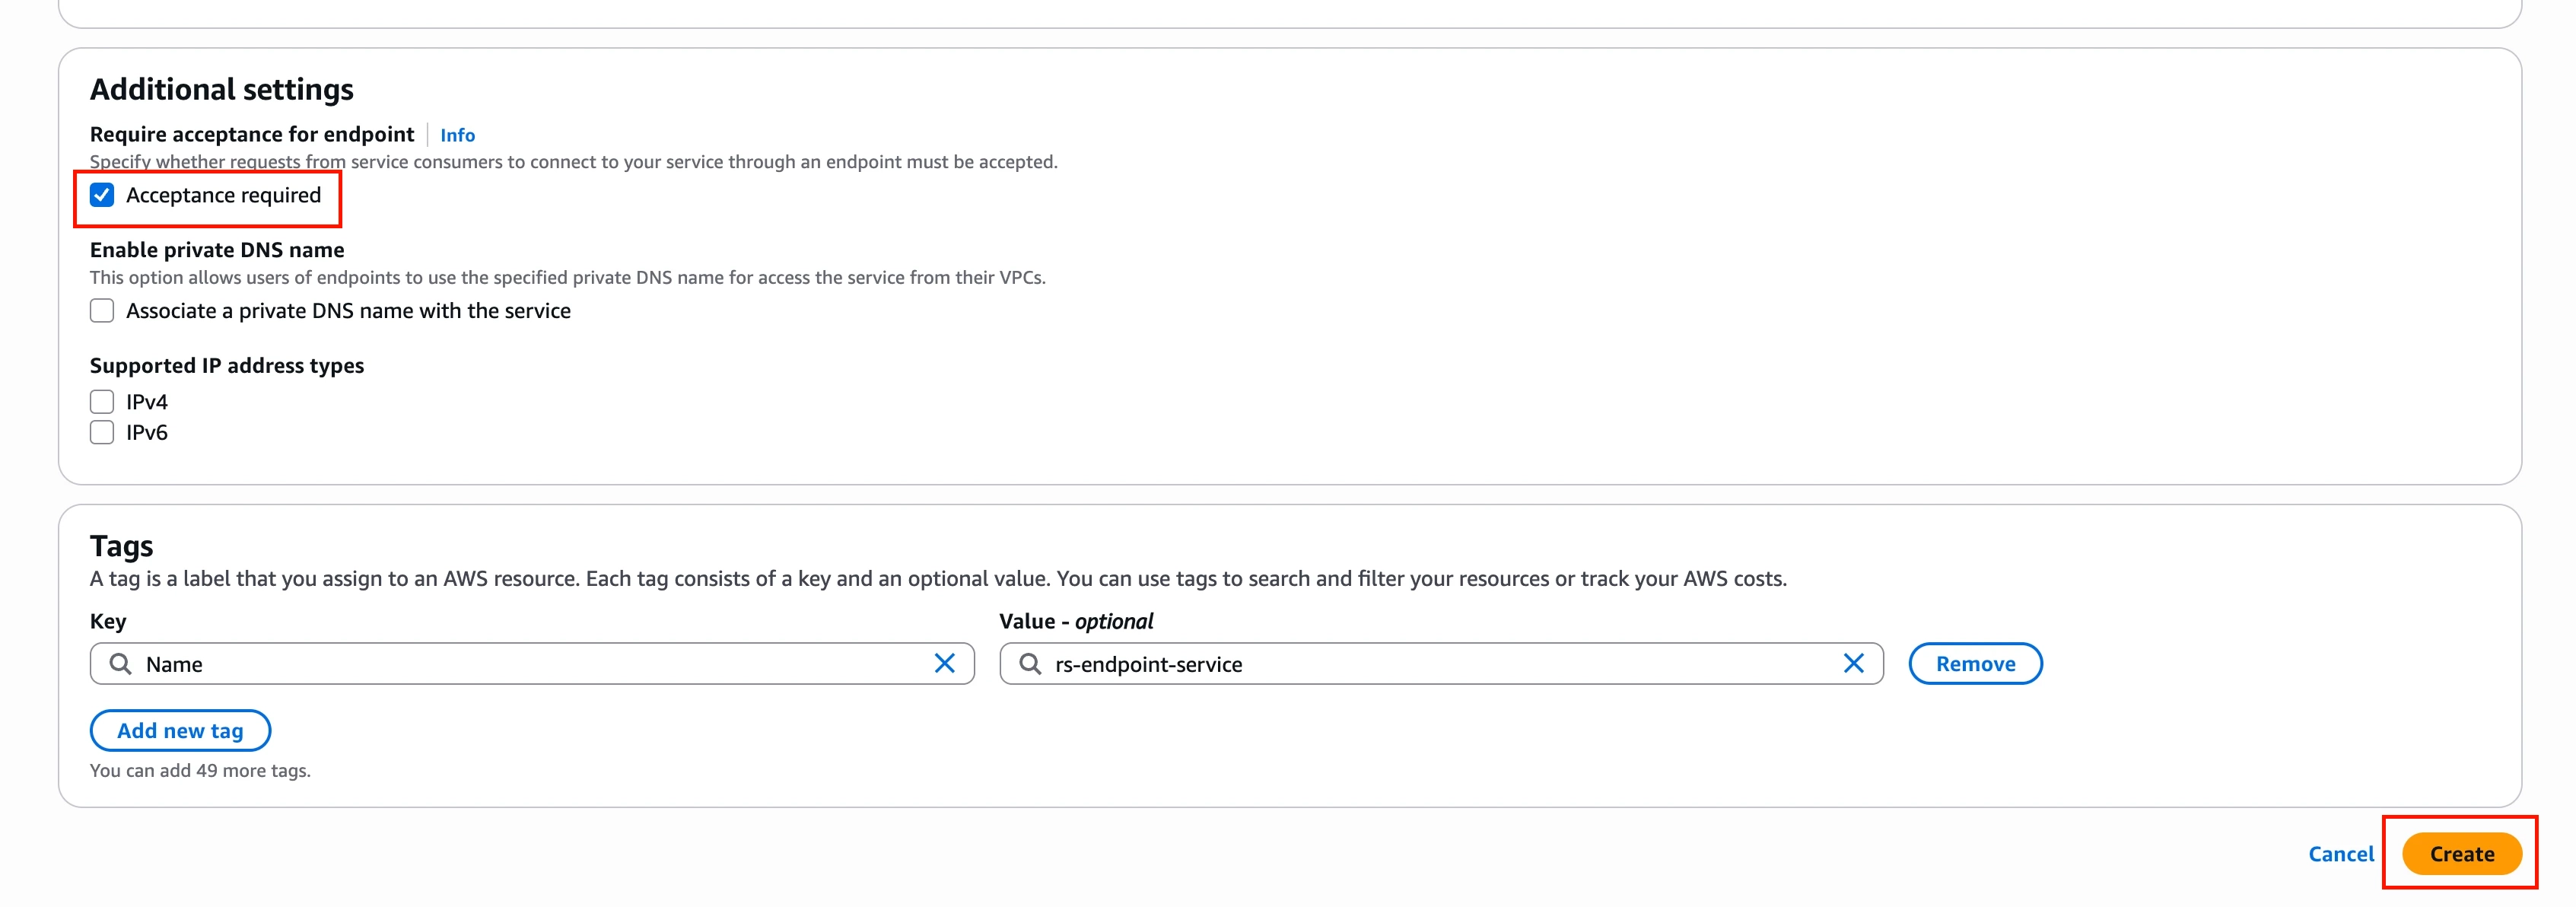
Once created, make a note of the Service name. It follows the format:
com.amazonaws.vpce.<region>.vpce-svc-xxxxxxxxx. You will need to share this with Fivetran Support.
Step 6: Allow Fivetran's AWS account access
In the VPC Console, select the Endpoint Service you just created.
Click the Allow principals tab.
Click Allow principals.
In the ARN field, enter Fivetran's AWS IAM principal ARN:
arn:aws:iam::834469178297:rootThis ARN represents Fivetran's service account that will create the VPC endpoint connection to your Endpoint Service. The account ID
834469178297is Fivetran's AWS account.Click Allow principals.
Verify that the principal appears in the Allowed principals list.
Step 7: Provide credentials to Fivetran Support
To complete the Private Link setup, create a Fivetran support ticket with the following information:
- VPC Endpoint Service Name: The service name you noted in Step 5 (format:
com.amazonaws.vpce.<region>.vpce-svc-xxxxxxxxx). - AWS Region: The region where your Redshift Serverless workgroup is located.
Step 8: Accept endpoint connection request
After Fivetran creates the VPC endpoint in their AWS account, you must accept the connection request.
Fivetran Support will notify you when they have created the VPC endpoint.
Go to the VPC Console and select Endpoint Services.
Select your endpoint service.
Select the Endpoint connections tab.
You should see a connection request with status Pending acceptance.
Select the connection request.
Click Actions > Accept endpoint connection request.
Confirm the acceptance.
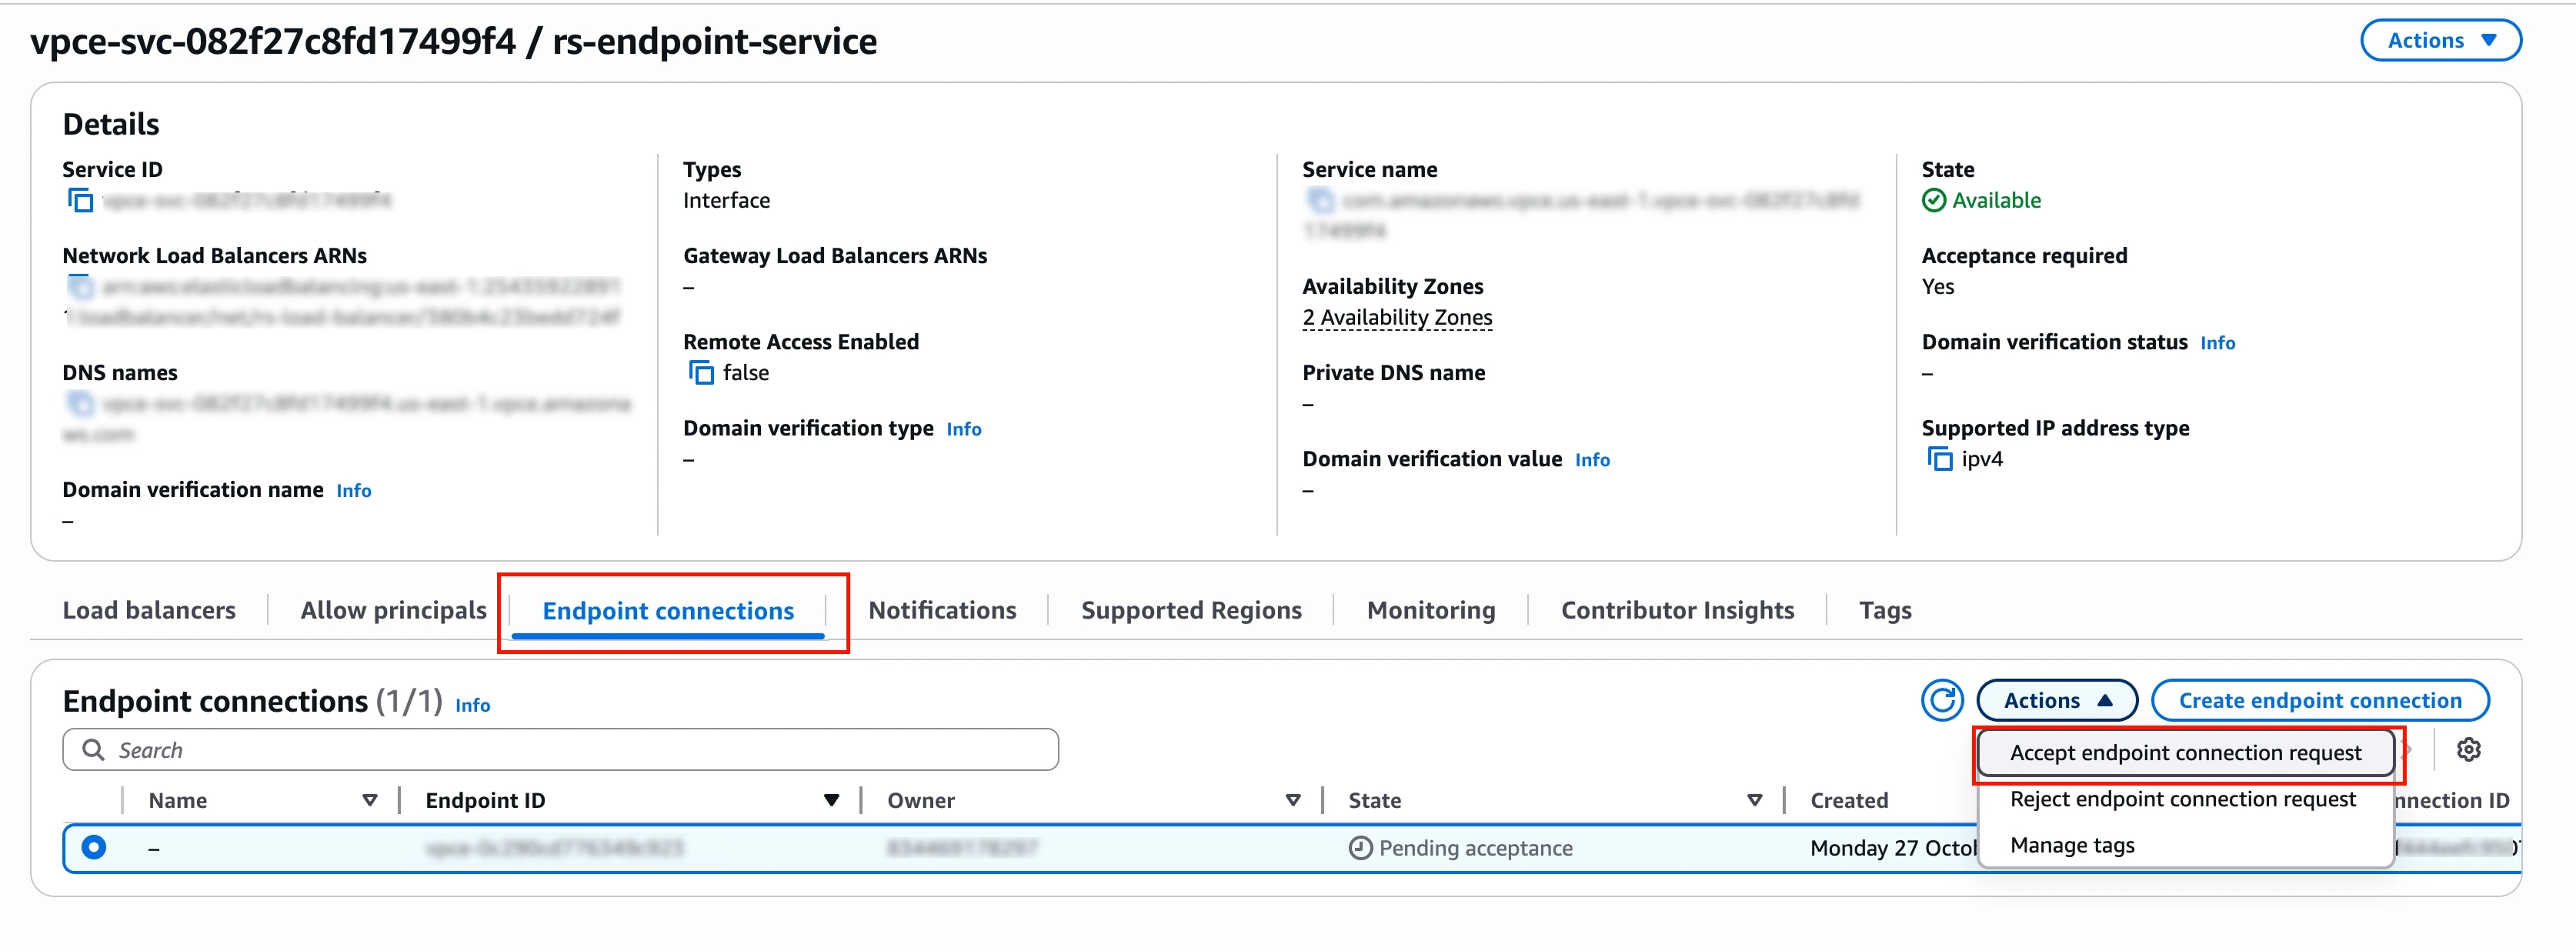
Wait for the connection status to change to Available (this may take 1-2 minutes).
Once accepted, notify Fivetran Support that you have approved the connection.
Step 9: Obtain endpoint URL from Fivetran
Once you accept the endpoint connection, Fivetran Support will provide you with a Private DNS hostname (endpoint URL).
The endpoint URL will be in the format:
vpce-xxxxxxxxx.vpce-svc-xxxxxxxxx.<region>.vpce.amazonaws.comMake a note of this endpoint URL. You will need it to configure your Fivetran destination.
Connect using Proxy Agent
Fivetran connects to your destination host through the Proxy Agent, providing secure communication between Fivetran processes and your destination. The Proxy Agent is installed in your network and creates an outbound network connection to the Fivetran-managed SaaS.
To learn more about the Proxy Agent, its installation, and configuration, see our Proxy Agent documentation.
Find endpoint details
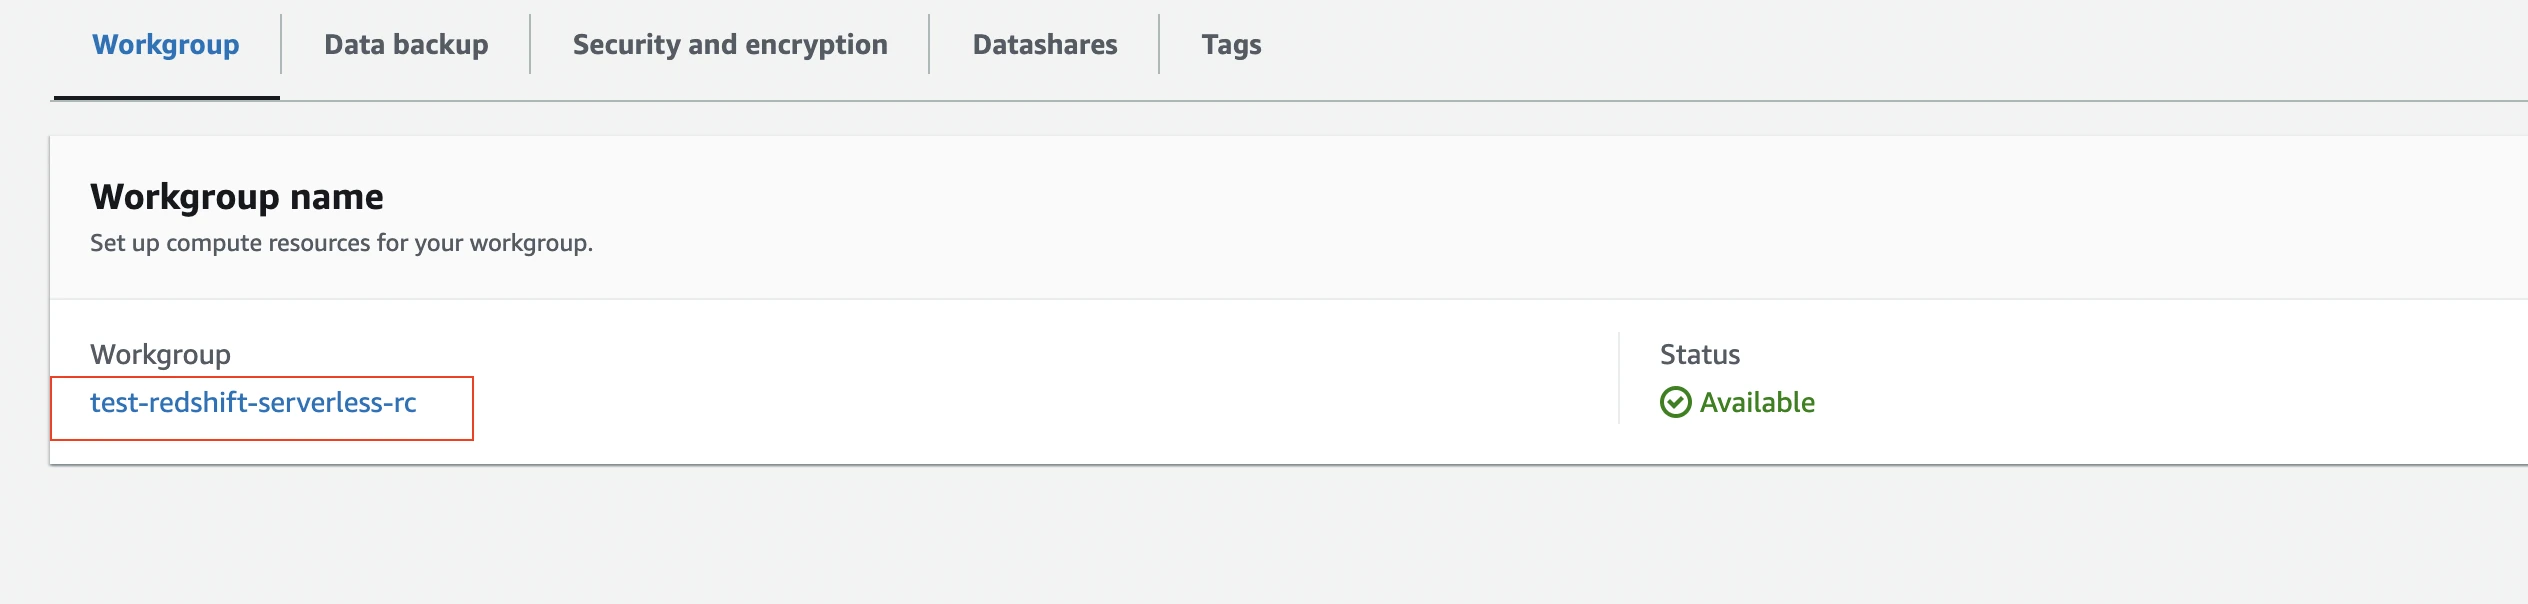
Open the Redshift Serverless console.
Select the namespace you want Fivetran to connect to.
Select your workgroup.
In the General Information pane's Endpoint field, click the Copy icon to copy the endpoint details. You will need them to complete the destination setup in Fivetran.
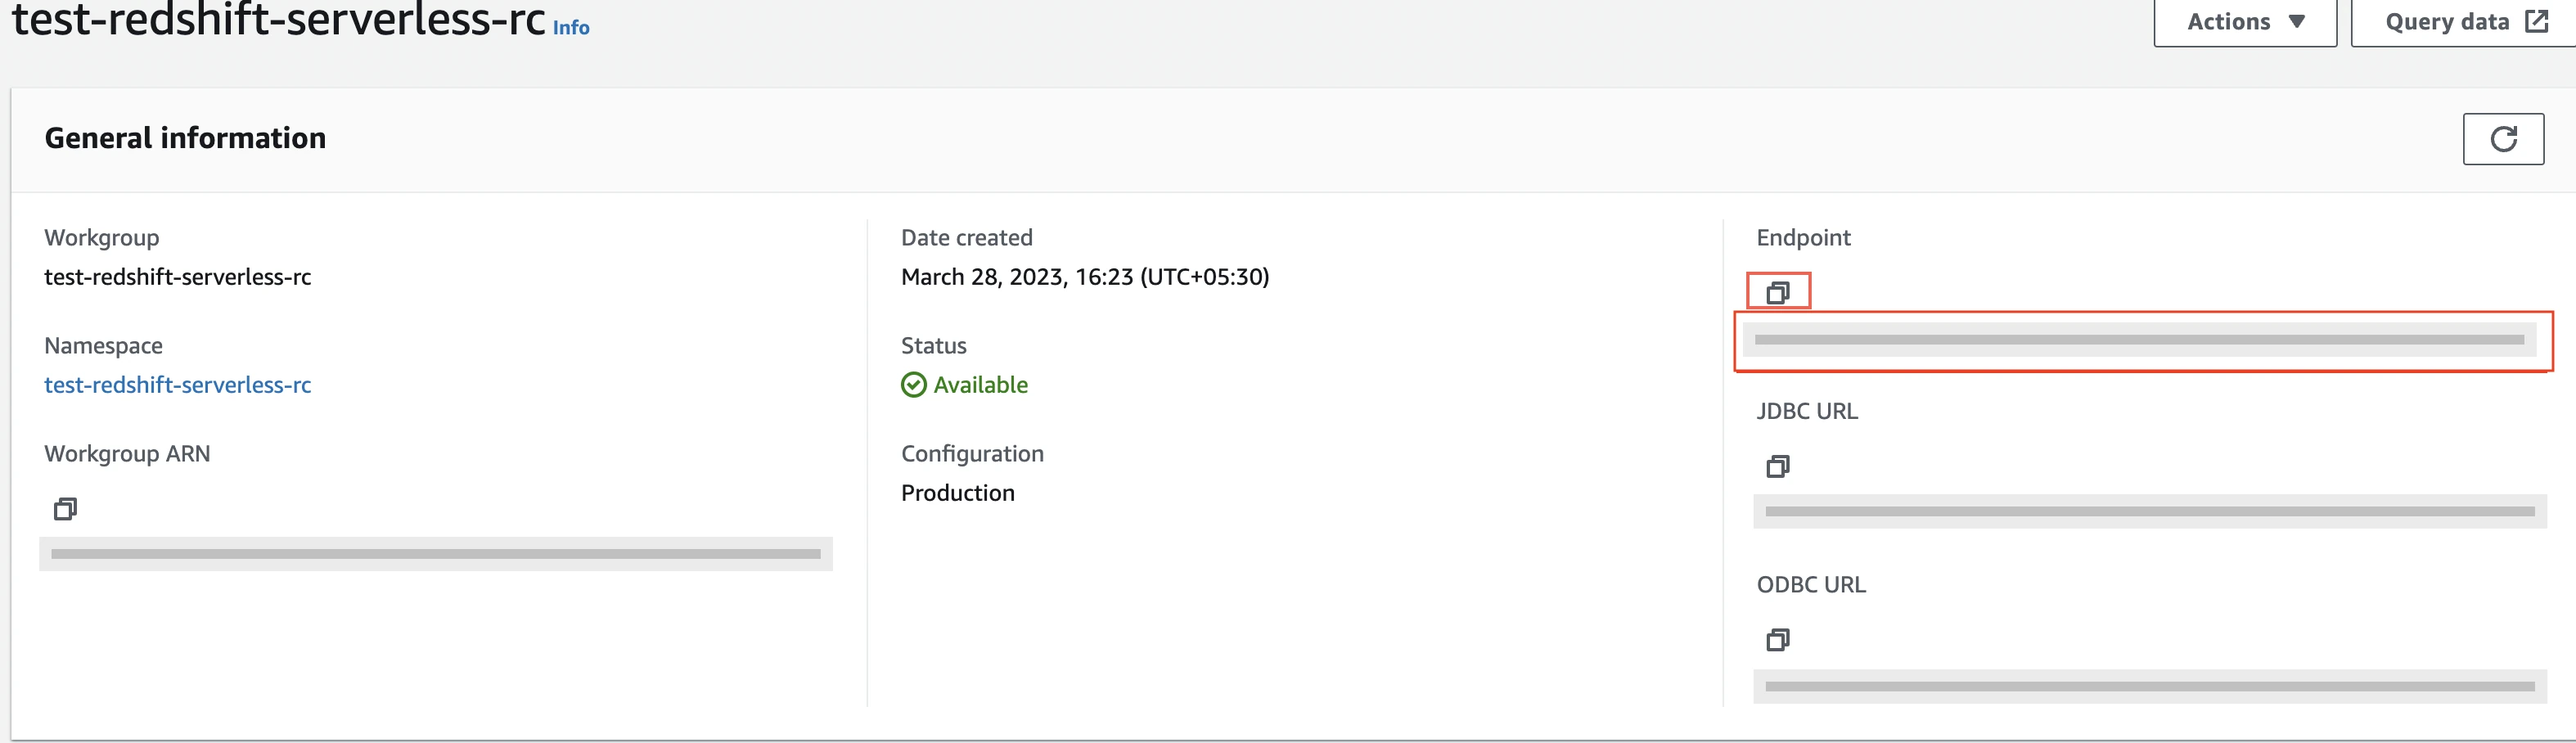
Be sure to separate the port and database and remove the preceding colon (:) from the host string.
Allow Fivetran to connect
Select the namespace you want Fivetran to connect to.
Select your workgroup.
In the Data Access tab, scroll down to the Network and security section.
In the VPC security group field, click the security group to open it and make a note of the security group ID.

In the Security Groups window, click Inbound rules.
The security group you clicked in the previous view should be pre-selected here. Ensure that you selected the same security group from the previous screen.
Click Edit inbound rules.
In the Edit Inbound rules window, follow the steps below to create custom TCP rules for each of Fivetran's IPs in your region:
- Select Custom TCP in the drop-down menu.
- Enter your Redshift port number.
- Enter the Fivetran IP address.
- Click Add rule.
(Optional) Authenticate using IAM
IAM AUTHENTICATION FOR REDSHIFT SERVERLESS IS NOT SUPPORTED AS OF NOW
If you use an SSH Tunnel to connect, you must enter the Cluster ID and Cluster region details in the destination setup form.
Connect as Master or Limited user
You can connect as either a "Master" or "Limited" user. The master username inherently has the CREATE permissions that Fivetran needs to function, so we recommend connecting as a master user. If you don't want to connect as a master user, you must create a new limited user for Fivetran.
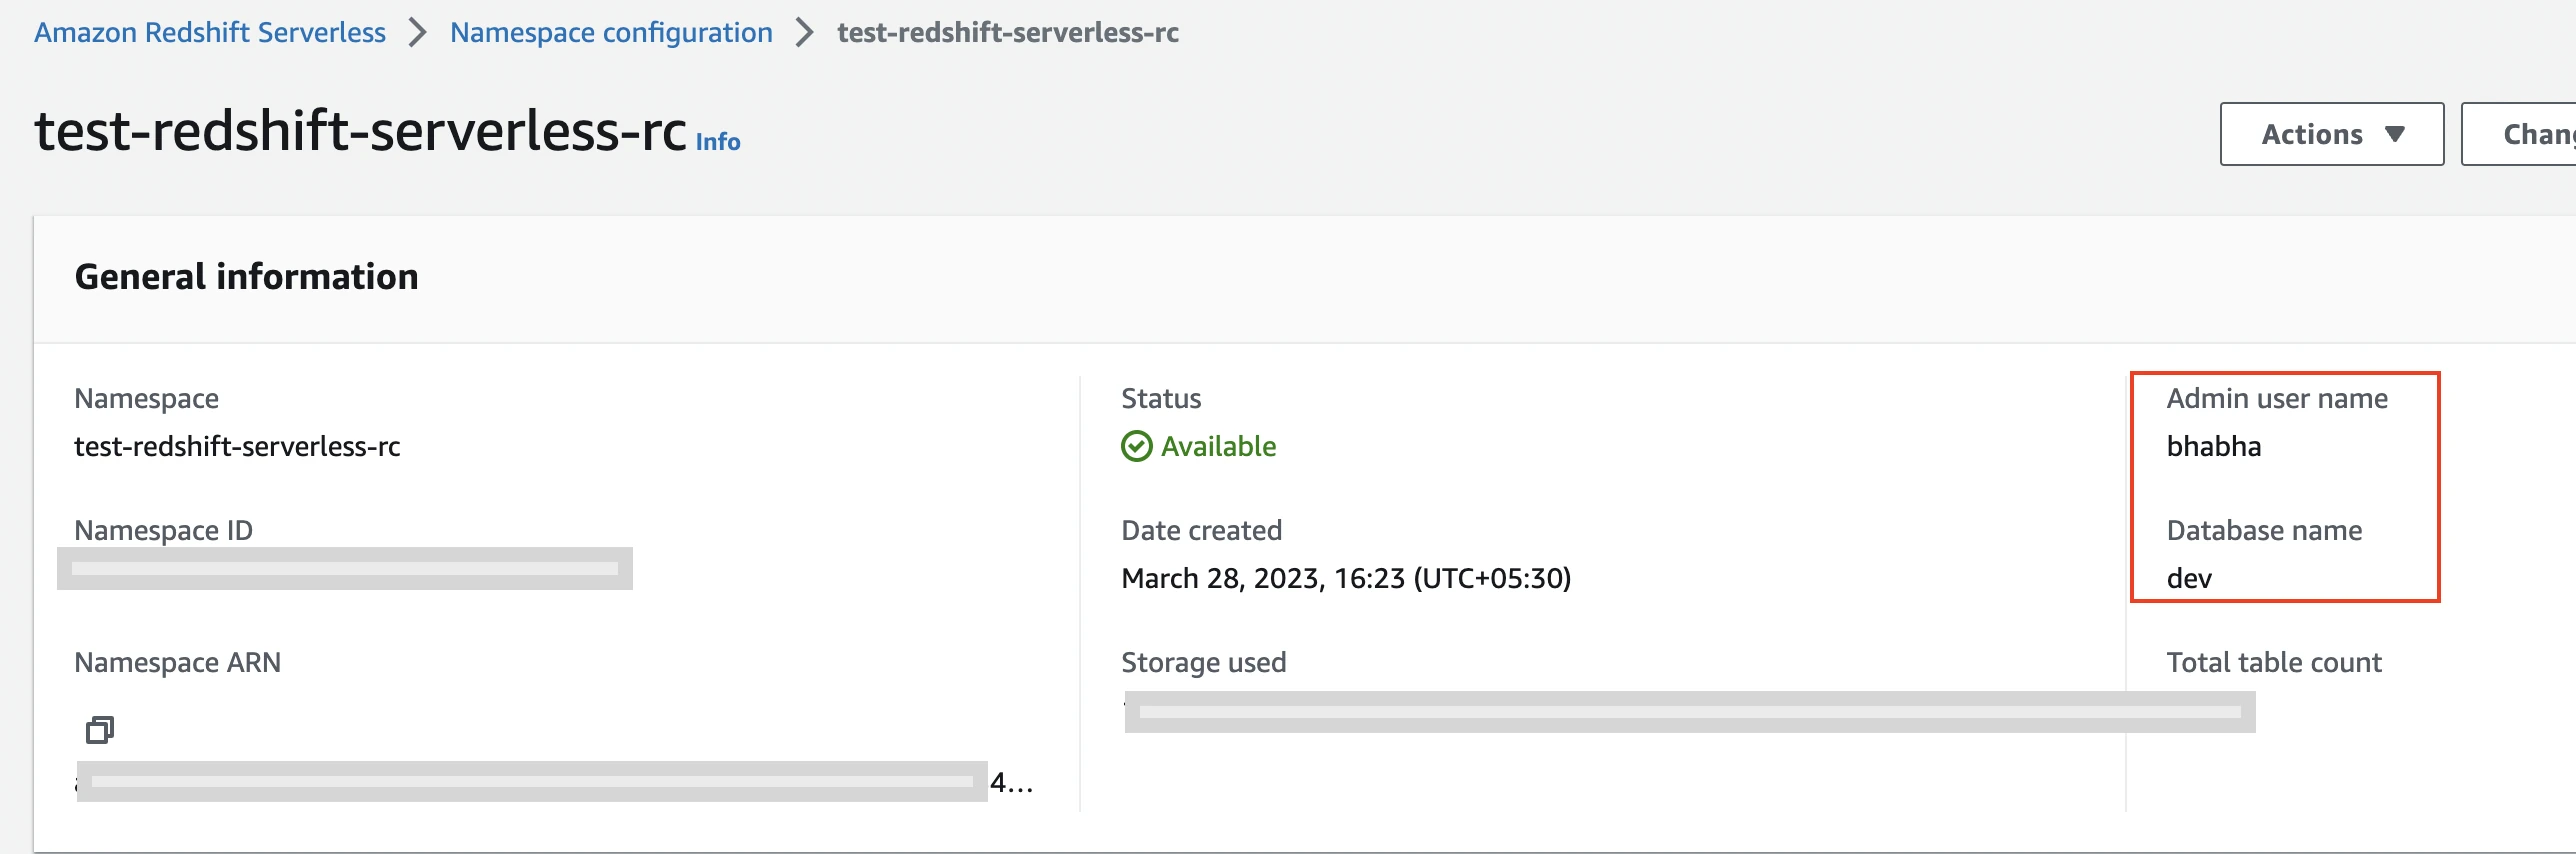
Master User
Select the namespace you want Fivetran to connect to.
Copy Database name and the Admin user name values. You will need them to complete the destination setup in Fivetran.
Limited User
To connect as a limited user, you must create a Redshift user for Fivetran.
Depending on your authentication type, do the following:
Password authentication: Execute the following query to create a user (replace
<password>with a password of your choice):CREATE USER fivetran PASSWORD <password>;IAM authentication: Execute the following query to create a user (replace
<rolename>with the role you created in Step 5) without any password:CREATE USER IAMR:<rolename> PASSWORD disable;
Execute the following query to grant the
fivetranuser the following privileges (replace<database>with your database name):- CREATE: Allows the user to create new schemas in the database
- TEMPORARY: Allows the user to create temporary tables while using the database
GRANT CREATE, TEMPORARY ON DATABASE <database> TO IAMR:<rolename>;
You will need the limited user's credentials to complete the destination setup in Fivetran.
(Optional) Create VPC endpoint
Expand for instructions
If you use Enhanced VPC routing, you must create a VPC endpoint to allow access to the S3 buckets and copy data into the tables.
To create a VPC endpoint, do the following:
Sign in to the AWS Management Console and open the Amazon VPC console.
Click Endpoints.
Click Create Endpoint.
In the Service category options, select AWS services.
In the Service Name section, select your S3 service to grant access.
In the VPC dropdown menu, select the VPC you use in the Redshift cluster.
In the Configure route tables section, select the Route Table ID associated with the VPC.
In the Policy section, select Full Access to allow access to S3 services.
Click Create endpoint.
For more information about VPC endpoints, see Working with VPC endpoints.
Configure external storage for Hybrid Deployment
Expand for instructions
Skip to the next step if you want to use Fivetrtan's cloud environment to sync your data. Perform this step only if you want to use Hybrid Deployment for your data pipeline.
Create S3 bucket
Create an S3 bucket by following the instructions in AWS's documentation.
Your S3 bucket and Redshift cluster must be in the same region.
Create IAM policy for S3 bucket
Open your Amazon IAM console.
Go to Policies, and then click Create policy.
Go to the JSON tab.
Copy the following policy and paste it in the JSON editor.
{
    "Version": "2012-10-17",
    "Statement": [
        {
        "Sid": "VisualEditor0",
        "Effect": "Allow",
        "Action": [
            "s3:DeleteObjectTagging",
            "s3:ReplicateObject",
            "s3:PutObject",
            "s3:GetObjectAcl",
            "s3:GetObject",
            "s3:DeleteObjectVersion",
            "s3:ListBucket",
            "s3:PutObjectTagging",
            "s3:DeleteObject",
            "s3:PutObjectAcl"
        ],
        "Resource": [
            "arn:aws:s3:::{your-bucket-name}/*",
            "arn:aws:s3:::{your-bucket-name}"
        ]
        }
    ]
}
In the policy, replace
{your-bucket-name}with the name of your S3 bucket.Click Next.
Enter a Policy name.
Click Create policy.
Set up authentication method
You can authenticate requests to your S3 bucket using either an AWS Identity and Access Management (IAM) role or IAM user credentials.
Set up IAM role authentication
To authenticate using an IAM role, your Hybrid Deployment Agent must run on an EC2 instance in the same AWS account as your S3 bucket.
In the Amazon IAM console, go to Roles, and then click Create role.
Select AWS service.
In Service or use case drop-down menu, select EC2.
Click Next.
Select the checkbox for the IAM policy you created for your S3 bucket.
Click Next.
Enter the Role name and click Create role.
In the Amazon IAM console, go to the EC2 service.
Go to Instances, and then select the EC2 instance hosting your Hybrid Deployment Agent.
In the top right corner, click Actions and go to Security > Modify IAM role.
In the IAM role drop-down menu, select the new IAM role you created and click Update IAM role.
Set up IAM user authentication
In the Amazon IAM console, go to Users, and then click Create user.
Enter a User name, and then click Next.
Select Attach policies directly.
Select the checkbox next to the policy you created in the Create IAM policy for S3 bucket step, and then click Next.
In the Review and create page, click Create user.
In the Users page, open the user you created.
Click Create access key.
Select Application running outside AWS, and then click Next.
Click Create access key.
Click Download .csv file to download the Access key ID and Secret access key securely to your local drive and delete after use. You will need them to configure Fivetran.
Complete Fivetran configuration
Log in to your Fivetran account.
Go to the Destinations page and click Add destination.
Enter a Destination name of your choice and then click Add.
Select Redshift as the destination type.
(Enterprise and Business Critical accounts only) Select the deployment model of your choice:
- SaaS Deployment
- Hybrid Deployment
If you selected Hybrid Deployment, do the following:
i. Click Select Hybrid Deployment Agent, select the agent you want to use, and click Use Agent. If you want to create a new agent, click Create new agent and follow the setup instructions specific to your container platform.
ii. Enter the name and region of the S3 bucket you created.
iii. In the Authentication Type drop-down menu, select the authentication method you configured for your S3 bucket.
- If you selected IAM USER, enter the access key ID and secret access key you downloaded while setting up IAM user authentication for your bucket.
Enter the Host name you found in Step 3.
In the Port field, enter the host name you found in Step 3.
Enter the Database name you found in Step 6.
Enter the User name you found in Step 6.
Choose the Authentication Type: PASSWORD or IAM. The default type is PASSWORD.
If you choose PASSWORD, then enter the Password you created for your Redshift cluster.
This password is not the same as your AWS password.
If you choose IAM, then enter the Role ARN you created for your Redshift cluster in Step 5.
(Optional, Private Preview only) If you want to manage your credentials outside of Fivetran, enable the Use External Secrets Manager toggle. For some connectors and destinations, this toggle only appears after you select a credential-based authentication method. See the External Secret Managers documentation for more information.
- If you have already configured External Secret Managers for your account, select one from the drop-down menu. Note that the list is filtered by the deployment model of the destination: if the destination uses SaaS Deployment, External Secret Managers configured for Hybrid Deployment won't be available, and vice versa.
- To edit the details of the selected External Secret Manager, click Edit manager details in Account Settings.
- To set up a new External Secret Manager, click Configure a new secrets manager. See the Create New External Secret Manager documentation for prerequisites and setup instructions.
- You can manage all your External Secret Managers at any time under Account Settings. See the External Secret Managers documentation for more information.
- When ESM is enabled, credential fields are replaced by ESM key fields. In each ESM key field, enter the name of the secret stored in your external secrets manager that corresponds to that credential — not the credential value itself. For more information, see External Secret Managers.
(Not applicable to Hybrid Deployment) Choose your Connection method:
- Connect directly
- Connect via an SSH
- Connect via Private Link
- Connect via Proxy Agent
If you choose Connect via an SSH tunnel, enter the following details:
- SSH Host
- SSH Port
- SSH User
(Optional) If you enabled TLS on your database in Step 2, make sure to keep the Require TLS through Tunnel toggle turned ON.
(Optional) If you use IAM authentication and an SSH tunnel to connect, enter your Cluster ID and then choose your Cluster region.
If we auto-detect the cluster region, the Cluster region field won't be visible in the setup form.
(Optional) Choose the Cluster region. Fivetran uses the data staging bucket in the cluster region you select.
If you use VPC security policies, select the same region as the Redshift cluster. If you do not select the cluster region, we will use your data processing location as the cluster region.
Set the Connect to Redshift Serverless toggle to ON.
(Not applicable to Hybrid Deployment) Choose the Data processing location. Depending on the plan you are on and your selected cloud service provider, you may also need to choose a Cloud service provider and cloud region as described in our Destinations documentation.
Choose your Time zone.
(Optional for Business Critical accounts and SaaS Deployment) To enable regional failover, set the Use Failover toggle to ON, and then select your Failover Location and Failover Region. Make a note of the IP addresses of the secondary region and safelist these addresses in your firewall.
Click Save and Test. Your Redshift cluster is now connected.
Fivetran tests and validates the Redshift connection. On successful completion of the setup tests, you can sync your data using Fivetran connectors to the Redshift Serverless destination.
In addition, Fivetran automatically configures a Fivetran Platform connection to transfer the connection logs and account metadata to a schema in this destination. The Fivetran Platform Connector enables you to monitor your connections, track your usage, and audit changes. The Fivetran Platform connection sends all these details at the destination level.
If you are an Account Administrator, you can manually add the Fivetran Platform connection on an account level so that it syncs all the metadata and logs for all the destinations in your account to a single destination. If an account-level Fivetran Platform connection is already configured in a destination in your Fivetran account, then we don't add destination-level Fivetran Platform connections to the new destinations you create.
Setup tests
Fivetran performs the following Redshift connection tests:
- The Validate Cluster Region Test validates the cluster region you provided in the setup form. We skip this test if you don't specify the cluster region.
- The Verify Host/Cluster Details Test validates the cluster details you provided in the setup form. We perform this test only if you use IAM authentication and an SSH tunnel to connect.
- The Database Host Connection Test validates the database credentials you provided in the setup form. The test verifies that the host is not private and then checks the connectivity to the host.
- The SSH Tunnel Test validates the SSH tunnel details you provided in the setup form and then checks the connectivity to the instance using the SSH Tunnel if you are connecting using an SSH tunnel.
- The Connection Test connects to your database instance and executes queries to check if we have the permissions to access the
information_schemaandpg_catalogschemas. - The Permission Test checks if we have permissions to create schemas and temporary tables on your Redshift database.
- The Writeability Test verifies that Fivetran can write data to your Redshift tables.
The tests may take a couple of minutes to finish running.