Amazon Aurora MySQL Setup Guide
Follow these instructions to replicate your Amazon Aurora MySQL database to your destination using Fivetran.
Prerequisites
To connect your Amazon Aurora MySQL database to Fivetran, you need:
- MySQL version 5.6.13 or above.
We recommend using an upgraded version of Aurora MySQL. For versions older than 1.22.5, there is a known issue with intermittent connection loss that can affect your connection's performance. Learn how Aurora MySQL versions compare to MySQL versions in Aurora's major versions documentation.
- Your database host's IP (e.g.,
1.2.3.4) or domain (your.server.com) - A unique replica ID for Fivetran. We need this ID because we connect to your database as a replica. We provide a random replica ID in your setup form, but you can provide your own if you'd prefer or if the form's replica ID conflicts with one of your existing replica IDs.
The replica ID is a unique ID within the MySQL replica set. By default, the replica ID is a random integer greater than 1000.
- For IAM-based authentication, IAM authentication must be enabled on your Amazon Aurora MySQL cluster. For instructions, see Enabling IAM Database Authentication.
Setup instructions
Do not perform the Choose connection method step if you want to use Hybrid Deployment for your data pipeline.
Choose connection method
First, decide whether to connect Fivetran to your Amazon Aurora MySQL database directly, using an SSH tunnel, using AWS PrivateLink, or using Proxy Agent. How you configure your security groups in later steps will differ depending on this decision.
Connect directly (TLS required)
You must have TLS enabled on your database to connect directly to Fivetran. Follow Amazon's Aurora MySQL TLS setup instructions to enable TLS on your database.
Fivetran connects directly to your Amazon Aurora MySQL database. This is the simplest method.
If you connect directly, you will create a rule in a security group that allows Fivetran access to your database instance.
Connect using SSH (TLS optional)
Fivetran connects to a separate server in your network that provides an SSH tunnel to your database. You must connect through SSH if your database is in an inaccessible subnet.
If you connect using SSH, you will configure your tunnel server's security group to allow Fivetran access and configure your database's security to allow access from the tunnel.
Before you proceed to the next step, you must follow our SSH connection instructions. If you want Fivetran to tunnel SSH over TLS, follow Amazon's Aurora MySQL TLS setup instructions to enable TLS on your database.
Connect using AWS PrivateLink
You must have a Business Critical plan to use AWS PrivateLink.
AWS PrivateLink allows VPCs and AWS-hosted or on-premises services to communicate with one another without exposing traffic to the public internet. PrivateLink is the most secure connection method. Learn more in AWS’ PrivateLink documentation.
Follow our AWS PrivateLink setup guide to configure PrivateLink for your database.
Connect using Proxy Agent
Fivetran connects to your database through the Proxy Agent, providing secure communication between Fivetran processes and your database host. The Proxy Agent is installed in your network and creates an outbound network connection to the Fivetran-managed SaaS.
To learn more about the Proxy Agent, how to install it, and how to configure it, see our Proxy Agent documentation.
We only use PrivateLink or SSH tunnel to connect to your database with Aurora serverless v1.
Authenticate using IAM (optional)
Fivetran supports AWS IAM database authentication as an alternative to a password-based login. IAM authentication offers enhanced security and centralized access control.
- IAM authentication must be enabled on your Amazon Aurora MySQL cluster.
- IAM authentication is not available for connections using AWS PrivateLink.
You can use IAM database authentication when your connection runs in either SaaS Deployment or Hybrid Deployment mode.
Expand for SaaS Deployment instructions
Retrieve external ID
Open your Fivetran connection setup form.
In the Authentication Method drop-down menu, select IAM.
Copy the External ID shown in the form. You will need it when creating an IAM role in AWS.
The External ID is unique to your Fivetran account but remains the same even if you close and reopen the form.
Create IAM policy for Fivetran
In your AWS IAM console, go to Access management > Policies, then click Create policy.
In the Create policy window, switch to the JSON tab and paste the following policy:
{
      "Version": "2012-10-17",
      "Statement": [
            {
                  "Effect": "Allow",
                  "Action": [
                      "rds-db:connect"
                  ],
                  "Resource": [
                      "arn:aws:rds-db:{region}:{account-id}:dbuser:{DbClusterResourceId}/{db-user-name}"
                  ]
            }
      ]
}
Replace the placeholders:
{region} – your DB instance’s AWS region (for example,
us-east-1){account-id} – your AWS account number
{DbClusterResourceId} – your DB cluster’s Resource ID (You can find it in the AWS RDS console under Configuration for the DB cluster.)
{db-user-name} – the name of the database user for authentication using IAM. You can choose any name now; you will create the user during the Create user and configure incremental updates step.
Click Next: Review Policy.
Name the policy (for example,
Fivetran-RDS-Access).Click Create policy.
Create IAM role for Fivetran
In your AWS IAM console, go to Access management > Roles, then click Create role.
In the Create role window, select AWS Account as the trusted entity type.
Select Another AWS account, then in the Account ID field, enter Fivetran's AWS account ID:
834469178297.In Options, select the Require external ID checkbox.
Enter the External ID you found in your connection setup form.
Click Next: Permissions.
Select the policy that you created earlier (for example,
Fivetran-RDS-Access).Click Next: Review.
Name the role (for example,
Fivetran), then click Create role.Select the Fivetran role you've just created.
Find the Role ARN and make a note of it. You will need it to configure Fivetran.
Expand for Hybrid Deployment instructions
Create IAM policy for Fivetran
In your AWS IAM console, go to Access management > Policies, then click Create policy.
In the Create policy window, switch to the JSON tab and paste the following policy:
{
      "Version": "2012-10-17",
      "Statement": [
            {
                  "Effect": "Allow",
                  "Action": [
                      "rds-db:connect"
                  ],
                  "Resource": [
                      "arn:aws:rds-db:{region}:{account-id}:dbuser:{DbClusterResourceId}/{db-user-name}"
                  ]
            }
      ]
}
Replace the placeholders:
{region} – your DB instance’s AWS region (for example,
us-east-1){account-id} – your AWS account number
{DbClusterResourceId} – your DB cluster’s Resource ID (You can find it in the AWS RDS console under Configuration for the DB cluster.)
{db-user-name} – the name of the database user for authentication using IAM. You can choose any name now; you will create the user during Step 6.
Click Next: Review Policy.
Name the policy (for example,
Fivetran-RDS-Access).Click Create policy.
Create IAM role and attach it to container host
These instructions assume that your Hybrid Deployment Agent container runs on an Amazon EC2 instance or in Amazon Elastic Kubernetes Service (EKS), in the same AWS account as your Amazon RDS instance.
Use the IAM policy you created earlier (Fivetran-RDS-Access) and assign it to the appropriate environment:
- For EC2: Follow the instructions in How to Use an IAM Role Assigned to an EC2 Instance in AWS with Hybrid Deployment, skipping the Create IAM Policy step since you have already created the required IAM policy (Fivetran-RDS-Access).
- For EKS: Follow the instructions in How to Use an IAM Role Assigned to a Kubernetes Service Account in AWS with Hybrid Deployment, skipping the Create IAM Policy step since you have already created the required IAM policy (Fivetran-RDS-Access).
Choose incremental sync method
To keep your data up to date after the initial sync, we use one of the following incremental sync methods:
- Binary log
- Fivetran Teleport Sync
Fivetran Teleport Sync disables large, rapidly changing tables if they fail to sync. Learn more in the Teleport general limitations documentation.
Each of these methods keeps a record of recent data changes, which allows Fivetran to update only the data that has changed since our last sync.
To learn the differences between the two methods, see our incremental sync documentation.
Fivetran Teleport Sync is the only method available for Amazon Aurora MySQL serverless v1.
Enable database access
Find endpoint and port
Find the endpoint and port for the database that you want to connect to Fivetran.
In your Amazon RDS dashboard, click on the Amazon Aurora MySQL database that you want to connect to Fivetran.
The database's role must be "writer."
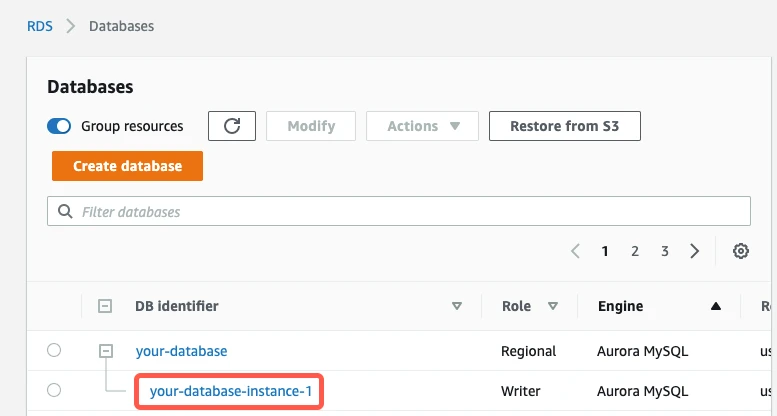
(If you're connecting directly) In the Connectivity & security section, ensure that the Publicly Accessibility setting is Yes.
If you're connecting using SSH, skip this step. You do not have to make your database publicly accessible.

Find the endpoint and port and make a note of them. You will need them to configure Fivetran.

Configure security group
Configure your Amazon Aurora MySQL cluster's VPC security group to allow Fivetran to access the cluster.
In the Security column, click the link to your database's security group.

On the Security Groups page, click on the security group ID.
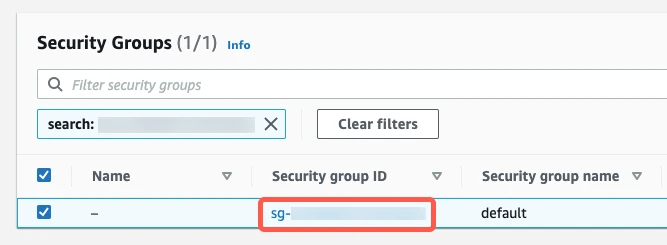
On the Inbound tab, click Edit inbound rules.

Click Add Rule. This creates a new Custom TCP Rule at the bottom of the list.
Fill in the new Custom TCP Rule.
- In the Port Range field, enter your database's port number that you copied in the previous section.
- What you enter in the Source Custom IP field depends on whether you're connecting directly or using SSH.
- If you're connecting directly, enter Fivetran's IPs for your database's region.
- If you're connecting using SSH, enter
{your-ssh-tunnel-server-ip-address}/32.
- (Optional) Enter a brief description in the Description field.

Click Save rules.
Configure Network ACLs (VPC only)
If your database is not in a VPC, skip ahead to Step 5.
Return to the instance details page.
In the Connectivity and security section, click the link to the VPC.

Click the VPC ID.

In the Details section, click the Network ACL link.

Click the Network ACL ID.
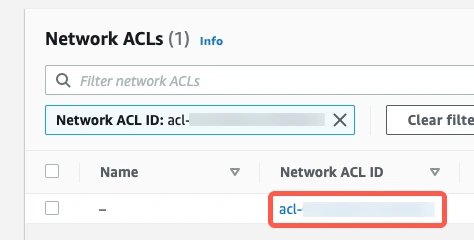
You will see tabs for Inbound Rules and Outbound Rules. You must edit both.
Edit inbound rules
Select Inbound Rules.
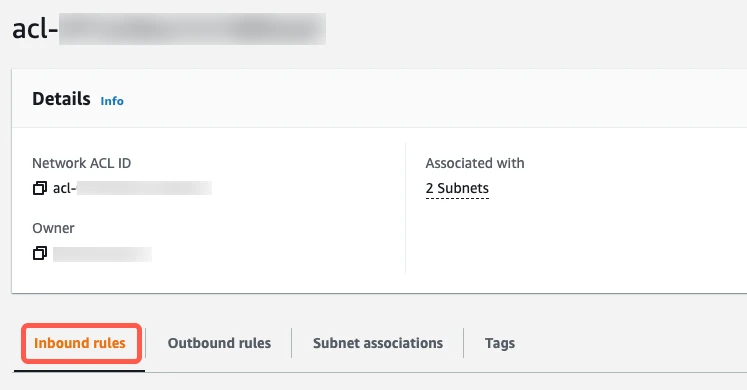
If you have a default VPC that was automatically created by AWS, the settings already allow all incoming traffic. To verify that the settings allow incoming traffic, confirm that the Source value is
0.0.0.0/0and that the ALLOW entry is listed above the DENY entry.
If your inbound rules don't include an
ALL - 0.0.0.0/0 - ALLOWentry, edit the rules to allow the Source to access the port number of your database instance. (The port will be3306for direct connections, unless you changed the default.) For additional help, see Amazon's Network ACL documentation.- If you're connecting directly, enter Fivetran's IPs for your database's region.
- If you're connecting using an SSH tunnel, enter
{your-ssh-tunnel-server-ip-address}/32.
Edit outbound rules
Select Outbound Rules.
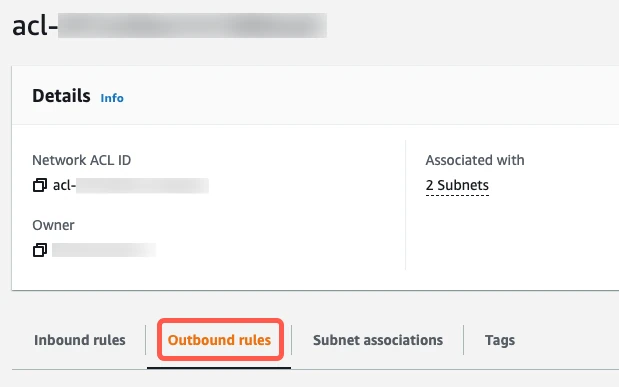
If you have a default VPC that was automatically created by AWS, the settings already allow all outbound traffic. To verify that the settings allow outbound traffic, confirm that the Destination value is
0.0.0.0/0and that the ALLOW entry is listed above the DENY entry.
If your outbound rules don't include an
ALL - 0.0.0.0/0 - ALLOWentry, edit the rules to allow outbound traffic to all ports1024-65535for the following Destination(s):- If you're connecting directly, enter Fivetran's IPs for your database's region.
- If you're connecting using an SSH tunnel, enter
{your-ssh-tunnel-server-ip-address}/32.
Create user and configure incremental updates
In your Amazon Aurora MySQL primary database, create a dedicated database user for Fivetran.
The user must be:
- Reserved for Fivetran use only
- Unique to your connection
How you create a user depends on which incremental sync method you've chosen in Step 3. Follow the instructions below for your chosen method.
Binary log
Create a Fivetran database user
Open a connection to your primary database using your preferred SQL client (for example, MySQL Workbench or the
mysqlcommand in your operating system's terminal window).Create a Fivetran user using one of the following commands, depending on your authentication method:
For password authentication, execute the following SQL command. Replace
<username>and<password>with a username and password of your choice:CREATE USER '<username>'@'%' IDENTIFIED WITH mysql_native_password BY 'password';For IAM authentication, execute the following SQL command. Replace
<username>with a username that matches the{db-user-name}from Step 2.CREATE USER '<username>'@'%' IDENTIFIED WITH AWSAuthenticationPlugin AS 'RDS';
Assign required permissions to the Fivetran user
Grant the following privileges to the Fivetran user you created in the previous step:
GRANT SELECT, REPLICATION CLIENT, REPLICATION SLAVE ON *.* TO '<username>'@'%';
GRANT SELECT ON mysql.rds_heartbeat2 TO '<username>'@'%';
GRANT SELECT ON mysql.rds_configuration TO '<username>'@'%';
GRANT EXECUTE ON PROCEDURE mysql.rds_kill TO '<username>'@'%';
Why these permissions are needed:
Fivetran requires
SELECTpermissions for all columns in the tables you want to sync. If we don’t have full column access, we trigger a full re-sync for that table, which can significantly slow down your sync process. If you prefer not to sync certain columns, you can exclude them directly in the Fivetran dashboard instead of limitingSELECTaccess at the database level.Granting access to
mysql.rds_heartbeat2allows Fivetran to verify that the connector is correctly configured for your RDS database. Access tomysql.rds_configurationis also required to read sync interval settings and ensure proper incremental sync behavior.Granting
EXECUTE ON PROCEDURE mysql.rds_killis optional but recommended. This privilege allows Fivetran to terminate idle or orphaned connections that it creates but no longer needs. If you omit this grant, syncs can still succeed; however, you may occasionally need to manually close unused connections on your database.
Make sure these commands complete without any errors. If there are errors, you may lack sufficient privileges and should contact your database administrator.
Configure binary logging
Configure the primary node in your Amazon Aurora cluster to output binary logs. We need binary logs to perform incremental updates.
Grant Fivetran's data processing servers access to your primary/writer database. You must connect Fivetran to your primary/writer database because AWS does not allow you to activate binary logging on an Aurora MySQL reader.
For the latest instructions to configure Aurora MySQL binary logging, see the AWS documentation: Configuring Aurora MySQL binary logging for Single-AZ databases.
In the AWS RDS Console, go to your Aurora cluster.
On the Configuration tab, note the name of the DB cluster parameter group. If the name begins with
default., it is a default parameter group. Otherwise, it is a custom group.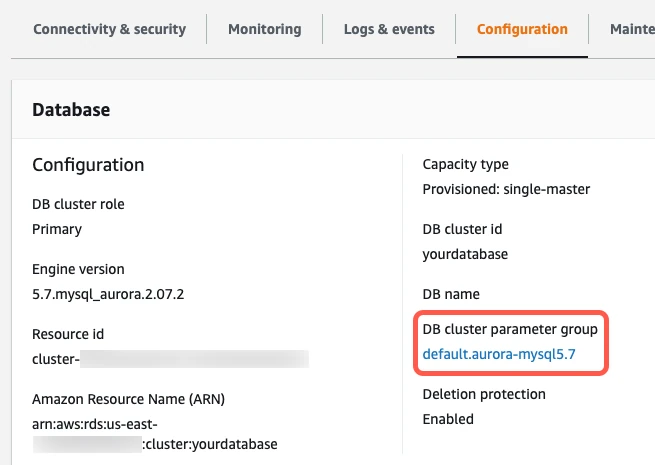
In the left menu, go to the Parameter groups tab.
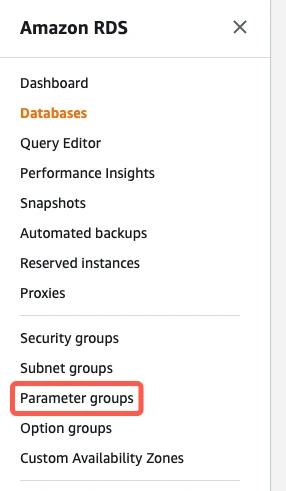
Choose one of the following methods to create a new parameter group:
Method 1: Create a new parameter group
Click Create parameter group.

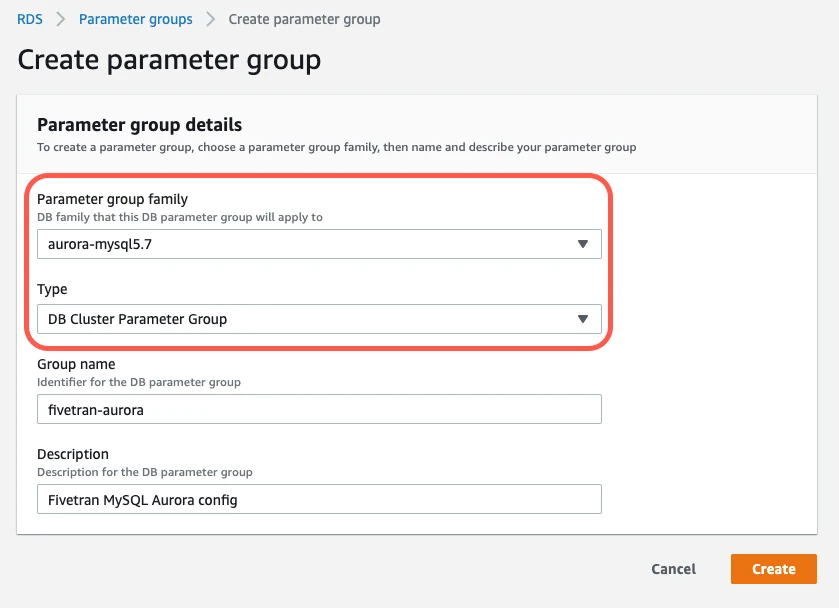
On the Create parameter group page, enter the following information:
- In the Parameter group family drop-down menu, select an Aurora MySQL family that matches your cluster’s engine version. For example, if your cluster runs Aurora MySQL 5.7, select aurora-mysql5.7. Only Aurora MySQL families are valid for Aurora MySQL clusters; MySQL Community families cannot be used.
- In the Type drop-down menu, select DB Cluster Parameter Group.
- In the Group name field, enter a name for your new parameter group.
- In the Description field, enter a brief description for your new parameter group.
- Click Create. This will create the new parameter group and redirect you to the Parameter groups page.
Method 2: Copy an existing parameter group
Select your existing cluster parameter group whose Type is DB Cluster Parameter Group.

In the Parameter group actions drop-down menu, select Copy.

On the Copy DB parameter group page, enter the following information:
- In the New DB parameter group identifier field, enter a name for your new parameter group.
- In the Description field, enter a description for your new parameter group.
- Click Copy. This will create the new parameter group using the settings from the existing group and redirect you to the Parameter groups page.
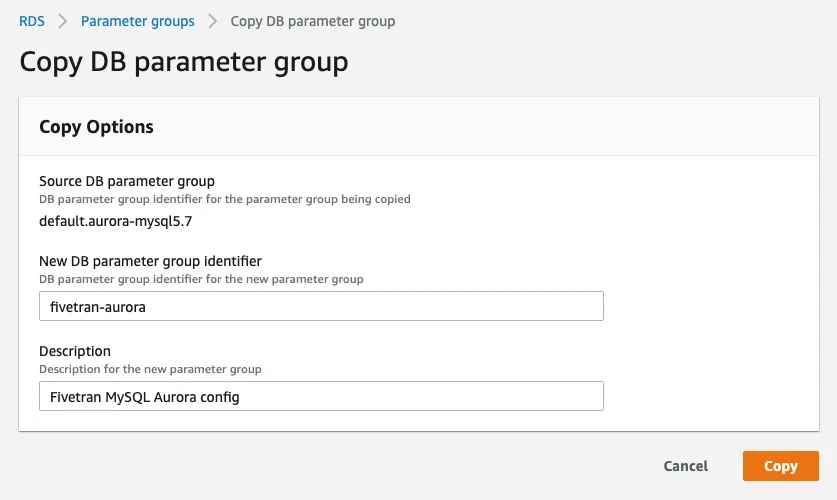
Click on the name of the new parameter group.
Set the binary logging format.
The
binlog_formatvariable is deprecated in MySQL 8.0.34 and will be removed in a future version. If the parameter is available in your version, ensure it is set toROWbecause Fivetran requires row-based binary logs to perform incremental updates.Select the binlog_format parameter, then click Edit parameters.

Change the binlog_format value to
ROW.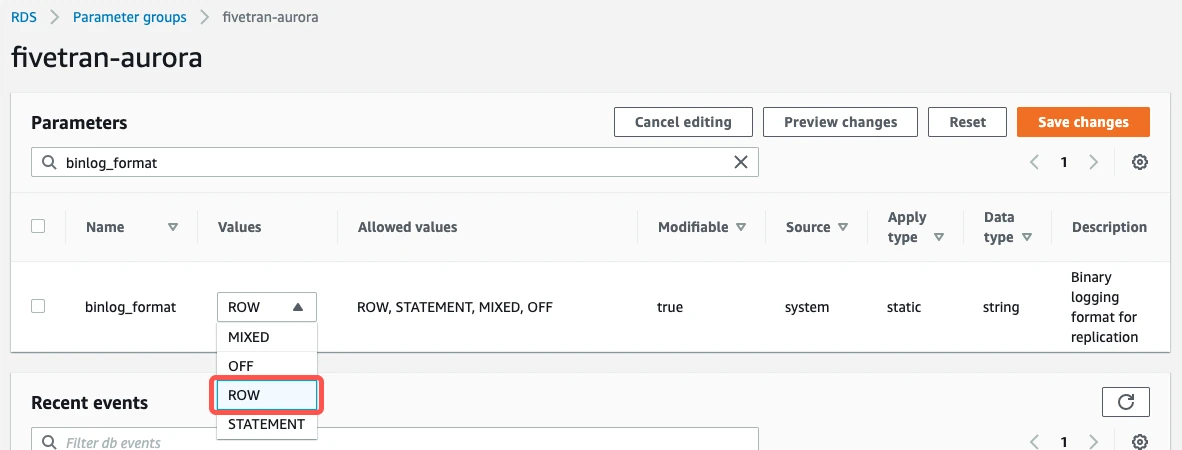
(Optional) Enable GTID mode by setting these additional parameters:
- gtid_mode to
ON - enforce_gtid_consistency to
ON
- gtid_mode to
Click Save changes.
In the left menu, go to the Databases tab.
Select your Amazon Aurora MySQL primary/writer database, then click Modify.

In the Modify DB Instance screen, scroll down to find the Database Option section. Change the DB cluster parameter group to the new group you created.
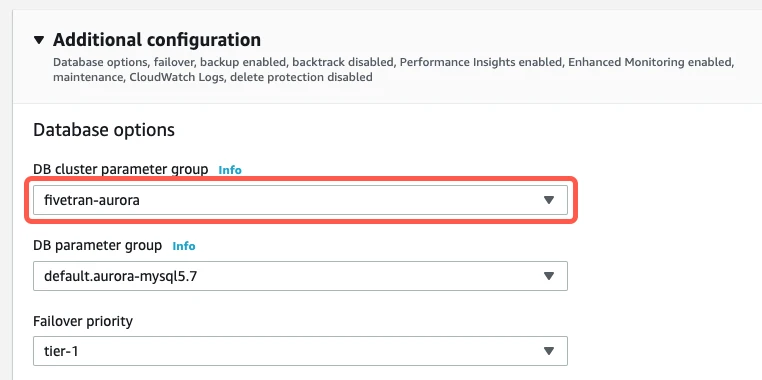
At the bottom of the page, click Continue.
Select Apply Immediately and click Modify DB Instance.
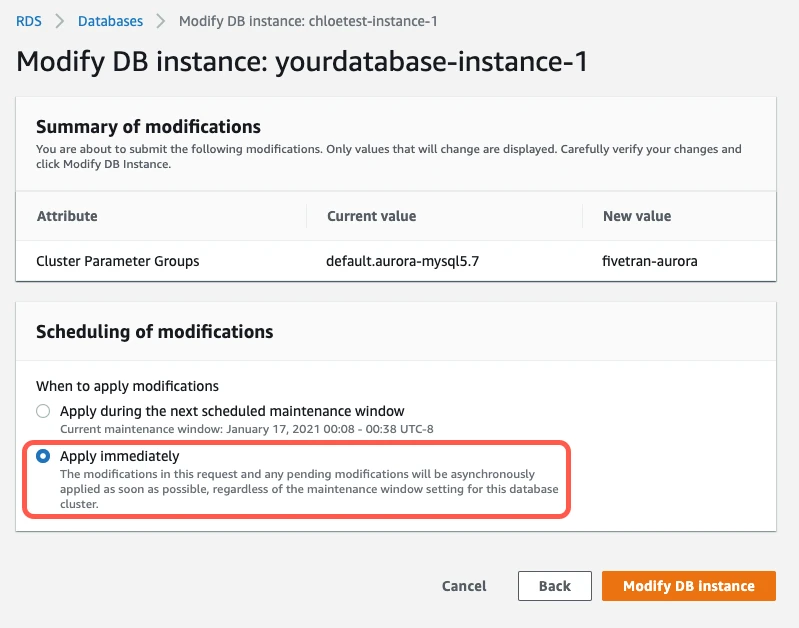
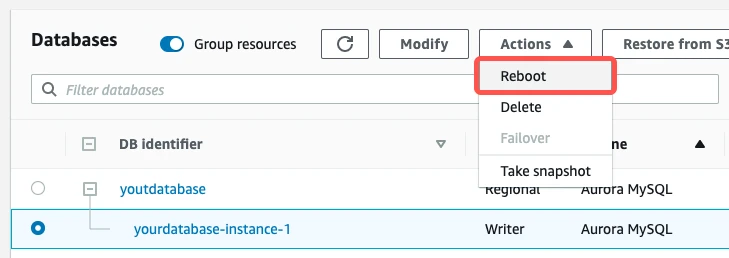
For the changes to take effect, reboot your instance by clicking Actions > Reboot.
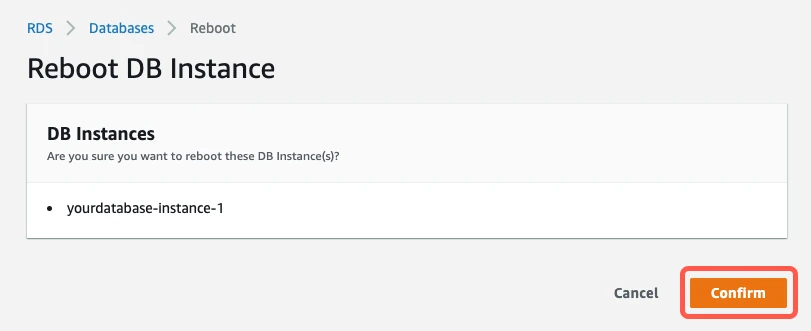
Click Confirm to confirm that you want to reboot the instance.
Wait for the primary node to reboot. The instance's Status will change from "rebooting" to "available" when it is done.

The configuration change will be complete when your database's DB Cluster Parameter Group reflects the new parameter group.
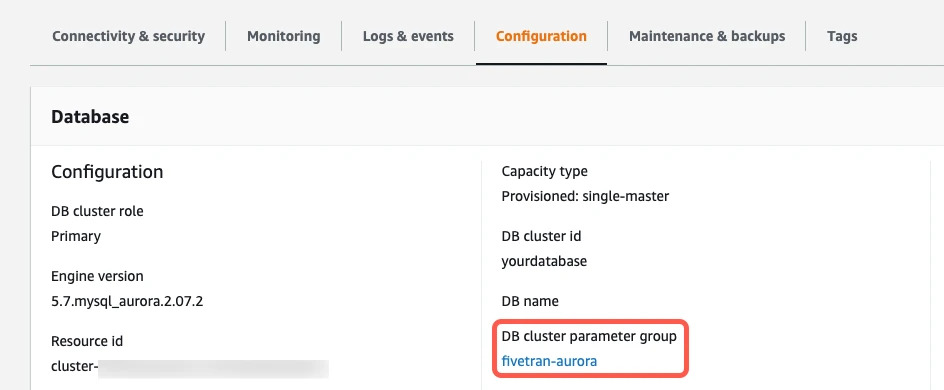
Set binary log retention period
Update your binary log retention period. By default, Amazon Aurora databases cull binary log files as quickly as possible. However, Fivetran cannot perform incremental updates unless your database retains binary logs for at least 24 hours.
Open a connection to your primary database using your preferred SQL client (for example, MySQL Workbench or the
mysqlcommand in your operating system's terminal window).Use the function below to view your current settings.
CALL mysql.rds_show_configuration;If your binlog retention period is less than 24 hours or if the result of this query is
NULL, proceed to the next step to increase your retention period.If the result of this query is
NULL, your database has Aurora's default behavior and your database culls binary log files as quickly as possible. If we cannot sync a log before it's deleted, we will need to re-sync your database in full, which can cause significant downtime.Increase your binary log retention period. Your retention period must be at least 24 hours, though we recommend a retention period of 7 days (168 hours). Use the sample query below to update your binary log retention period.
Increasing the binary log retention period requires additional disk space in your source Amazon Aurora MySQL database, since it increases how many log files are stored at one time.
Set your binary log retention period to 7 days (168 hours).
CALL mysql.rds_set_configuration('binlog retention hours', 168);
Create a daily event to rotate binary logs (optional)
Binary logs must be rotated at least once per retention period. Binary log rotation keeps the latest row changes from being written into an expired binary log file that is scheduled for deletion. Your Amazon Aurora MySQL database automatically rotates a binary log when it reaches the maximum size; however, the log does not rotate if it does not reach the maximum size because the database has had too little write activity.
To ensure that your logs rotate frequently enough, you can create an event that automatically rotates binary logs every 24 hours.
Execute the following SQL statement to turn on the event scheduler.
The event scheduler runs custom events on an automatic schedule.
SET GLOBAL event_scheduler = ON;Execute the following SQL statements to create a custom event that rotates (flushes) the binary logs and schedule it to run every 24 hours.
DROP EVENT IF EXISTS rotate_binlog_24_hrs_event;

CREATE EVENT rotate_binlog_24_hrs_event
    ON SCHEDULE EVERY 24 hour
    DO FLUSH BINARY LOGS;
If you have a low-activity database, you must have at least two binary log files at all times. Having two binary log files ensures that your binary log data isn't rotated before Fivetran can perform an incremental sync. Check your binary log files by looking at the output of
SHOW BINARY LOGSin your Amazon Aurora MySQL database.
Fivetran Teleport Sync
Open a connection to your primary database using your preferred SQL client (for example, MySQL Workbench or the
mysqlcommand in your operating system's terminal window).Create a Fivetran user using one of the following commands, depending on your authentication method:
For password authentication, execute the following SQL command. Replace
<username>and<password>with a username and password of your choice:CREATE USER '<username>'@'%' IDENTIFIED WITH mysql_native_password BY 'password';For IAM authentication, execute the following SQL command. Replace
<username>with a username that matches the {db-user-name} from Step 2.CREATE USER '<username>'@'%' IDENTIFIED WITH AWSAuthenticationPlugin AS 'RDS';
Grant permissions to the Fivetran user created in the previous step.
Option 1 - Grant
SELECTon all tables and columns:GRANT SELECT ON *.* TO '<username>'@'%';Option 2 - Grant
SELECTon specific tables or columns only:GRANT SELECT ON <your_database.your_table> TO '<username>'@'%';-- For column-level control GRANT SELECT (<column1>, <column2>) ON <your_database.your_table> TO '<username>'@'%';Optional - Allow Fivetran to terminate its own stale sessions:
GRANT EXECUTE ON PROCEDURE mysql.rds_kill TO '<username>'@'%';
Make sure these commands complete without any errors. If there are errors, you may lack sufficient privileges and should contact your database administrator.
Using Aurora Parallel Query (Aurora V1 and V2 only)
Fivetran Teleport Sync can utilize Aurora's Parallel Query feature to improve performance. Fivetran will enable it for the connection session when performing a sync, but we cannot guarantee it will be used because the Aurora query optimizer determines whether to invoke parallel query for a particular query. Review the AWS docs on Aurora Mysql Parallel Query Limitations for details.
Finish Fivetran configuration
In your connection setup form, enter a Destination schema prefix of your choice. This is used as the connection name and cannot be modified once the connection is created.
In the Destination schema names field, choose the naming convention you want Fivetran to use for the schemas, tables, and columns in your destination:
- Source naming: Preserves the original schema, table, and column names from the source system in your destination.
- Fivetran naming: Standardizes the schema, table, and column names in your destination according to the Fivetran naming conventions.
If you want to modify your selection, make sure you do it before you start the initial sync.
Depending on your selection, we will either prefix the connection name to each replicated schema or use the source schema names instead.
(Hybrid Deployment only) If your destination is configured for Hybrid Deployment, the Hybrid Deployment Agent associated with your destination is pre-selected for the connection. To assign a different agent, click Replace agent, select the agent you want to use, and click Use Agent.
(Not applicable to Hybrid Deployment) Choose your connection method. If you selected Connect via an SSH tunnel, copy or make a note of the Public Key and add it to the
authorized_keysfile while configuring the SSH tunnel, and provide the following information:- SSH hostname (do not use a load balancer's IP address/hostname)
- SSH port
- SSH user
- If you enabled TLS on your database in Step 1, make sure to keep the Require TLS through Tunnel toggle turned ON.
In the Host field, enter the endpoint you found in Step 4. Alternatively, you can enter your database host's IP (for example,
1.2.3.4).Enter your database instance's Port number that you found in Step 4. The port will be
3306, unless you changed the default.Choose your Authentication Method:
For PASSWORD authentication, enter the following details:
- User: The Fivetran-specific database user you created in Step 5.
- Password: The corresponding password for that user.
For IAM authentication, enter the following details:
- AWS region code: The region where your RDS instance is hosted.
- Role ARN (Not applicable to Hybrid Deployment): The ARN of the IAM role you created in Step 2.
- Database User: The Fivetran-specific IAM-enabled user from Step 5.
(Optional for Hybrid Deployment) If you want to use a TLS connection between your Hybrid Deployment Agent and Fivetran cloud, set the Require TLS toggle to ON.
Before you set this toggle to ON, you must first enable TLS on your database. Learn how in the Security section of the MySQL reference manual for your database version.
Under Update Method, choose how Fivetran will detect data changes in your source database:
- Read Changes via Binary Log - Reads directly from the MySQL binary log using Fivetran's Binary log incremental sync method.
- Detect Changes via Fivetran Teleport Sync - Detects changes by comparing source and snapshot data using Fivetran Teleport Sync incremental sync method.
(Binary log only) Enter a unique Replica ID for Fivetran. We provide a random replica ID, but you can provide your own if you'd prefer or if the setup form's replica ID conflicts with one of your existing replica IDs.
(Not applicable to Hybrid Deployment) Copy the Fivetran's IP addresses (or CIDR) that you must safelist in your firewall.
Click Save & Test. Fivetran tests and validates our connection to your Amazon Aurora MySQL database. Upon successful completion of the setup tests, you can sync your data using Fivetran.
Setup tests
Fivetran performs the following tests to ensure that we can connect to your Amazon Aurora MySQL database and that it is properly configured:
- The Connecting to SSH Tunnel Test validates the SSH tunnel details you provided in the setup form. It generates a pop-up window where you must verify the SSH fingerprint. It then checks that we can connect to your database using the SSH Tunnel. (We skip this test if you are connecting directly.)
- The Connecting to Host Test verifies that the database host is not private and checks that we can connect to the host.
- (IAM authentication only) The Generating IAM Authentication Token test verifies that Fivetran can use the provided IAM credentials to generate an authentication token for the database.
- The Validating TLS Connection to Source Database Test validates the server certificate and checks that we can connect to your database using TLS. An untrusted certificate generates a pop-up window where you must choose which certificate you want Fivetran to use. (We skip this test if you selected an indirect connection method and then disabled the Require TLS through Tunnel toggle.)
- The Validating Database User Test validates the database credentials you provided in the setup form.
- The Checking Database Configuration Test verifies that we can find your database's server ID. It then checks your binary log configuration and confirms that we can connect to the binary log.
- The Validating Database Type Test checks that your database type matches the connector type. For example, this test will generate a warning if you try to set up an Amazon Aurora MySQL connection with a Amazon RDS for MySQL database. To perform this test, the Fivetran user needs permission to access the
mysqlsystem database, though we do not sync any data from that DB. - The Checking Binlog Retention Period Test verifies that your binary log is set to retain at least 1 day's worth of changes.
The tests may take a few minutes to finish running.