Snowflake Setup Guide
Follow our setup guide to connect your Snowflake data warehouse to Fivetran.
Prerequisites
To connect Snowflake to Fivetran, you need the following:
Snowflake account: A Snowflake account with a user role that has the permissions to create a user, role, and warehouse for Fivetran (such as the
sysadminorsecurityadminroles).Fivetran account: A Fivetran user account with permissions to create or manage destinations
Collation requirements: The Snowflake data warehouse's collation must be capable of handling both case-sensitive and non-ASCII characters to ensure the integrity of your data.
Avoid applying custom collation to your account, database, schema, table, or column. Instead, use collation directly in your queries. Custom collation reduces the maximum column storage for strings from 128 MB to 64 MB, which can result in a String is too long to be compared using collation error if more than 64 MB of data is loaded into a column with collation enabled.
Snowflake configuration parameters:
- If you want to use AWS PrivateLink or Google Cloud Private Service Connect to connect Fivetran to your destination, set the
PREVENT_LOAD_FROM_INLINE_URLandREQUIRE_STORAGE_INTEGRATION_FOR_STAGE_OPERATIONparameters of your Snowflake data warehouse toFALSE. For these connection methods, we use Fivetran-managed buckets (Amazon S3 or Google Cloud Storage) as the staging location instead of a Snowflake internal stage. For more information, see our Troubleshooting documentation. - If your Snowflake connection is configured to preserve source naming, the
QUOTED_IDENTIFIERS_IGNORE_CASEparameter must be set toFALSEfor Fivetran users.
- If you want to use AWS PrivateLink or Google Cloud Private Service Connect to connect Fivetran to your destination, set the
- In Snowflake, if you use double quotes around an identifier name, it makes the identifier name case-sensitive. We recommend using the
create <identifier> <identifier_name>or thecreate <identifier> "IDENTIFIER_NAME"format. See Snowflake's documentation on identifiers for more information. - Snowflake is discontinuing username/password authentication. To continue using your Snowflake destination, switch to key-pair authentication according to the schedule in Snowflake documentation.
Setup instructions
Choose your deployment model
Before setting up your destination, decide which deployment model best suits your organization's requirements. This destination supports both SaaS and Hybrid deployment models, offering flexibility to meet diverse compliance and data governance needs.
See our Deployment Models documentation to understand the use cases of each model and choose the model that aligns with your security and operational requirements.
You must have an Enterprise or Business Critical plan to use the Hybrid Deployment model.
Choose Snowflake warehouse type
You can choose to create an exclusive warehouse for Fivetran or use an existing warehouse:
You can create and use an exclusive warehouse for Fivetran. Fivetran operations will never contend with your queries for resources. You will have to pay the cost of running the warehouse.
You can use a shared warehouse to reduce your warehouse running cost. Fivetran loads data incrementally and consumes very few compute resources. Fivetran operations may have to contend with your queries for the shared resources.
Snowflake provides several warehouse configuration options, including Adaptive Compute and Query Acceleration Service. Review Snowflake guidance to choose the best configuration for your workload. For more information, see Snowflake documentation.
Run script in Snowflake warehouse
Log in to your Snowflake data warehouse.
Copy the following script to a new worksheet:
begin;

   -- create variables for user / password / role / warehouse / database (needs to be uppercase for objects)
   set role_name = 'FIVETRAN_ROLE';
   set user_name = 'FIVETRAN_USER';

   -- we recommend removing the following line because Snowflake is planning to discontinue password-based authentication
   set user_password = 'password123';

   set warehouse_name = 'FIVETRAN_WAREHOUSE';
   set database_name = 'FIVETRAN_DATABASE';

   -- change role to securityadmin for user / role steps
   use role securityadmin;

   -- create role for fivetran
   create role if not exists identifier($role_name);
   grant role identifier($role_name) to role SYSADMIN;

   -- create a user for fivetran
   create user if not exists identifier($user_name)
   password = $user_password
   default_role = $role_name
   default_warehouse = $warehouse_name;

   grant role identifier($role_name) to user identifier($user_name);

   -- set binary_input_format to BASE64
   ALTER USER identifier($user_name) SET BINARY_INPUT_FORMAT = 'BASE64';

   -- set timestamp_input_format to AUTO for the user
   ALTER USER identifier($user_name) SET TIMESTAMP_INPUT_FORMAT = 'AUTO';

   -- change role to sysadmin for warehouse / database steps
   use role sysadmin;

   -- create a warehouse for fivetran
   create warehouse if not exists identifier($warehouse_name)
   warehouse_size = xsmall
   warehouse_type = standard
   auto_suspend = 60
   auto_resume = true
   initially_suspended = true;

   -- create database for fivetran
   create database if not exists identifier($database_name);

   -- grant fivetran role access to warehouse
   grant USAGE
   on warehouse identifier($warehouse_name)
   to role identifier($role_name);

   -- grant fivetran access to database
   grant CREATE SCHEMA, MONITOR, USAGE
   on database identifier($database_name)
   to role identifier($role_name);

   -- change role to ACCOUNTADMIN for STORAGE INTEGRATION support (only needed for Snowflake on GCP)
   use role ACCOUNTADMIN;
   grant CREATE INTEGRATION on account to role identifier($role_name);
   use role sysadmin;

 commit;
Depending on whether you want to create a new warehouse or use a shared warehouse do either:
- If you want to create a new exclusive warehouse, don't make any changes to the
FIVETRAN_WAREHOUSEvalue in the script. - If you want Fivetran to use a shared warehouse to ingest data, change the
FIVETRAN_WAREHOUSEvalue in the script to the name of the shared warehouse.
- If you want to create a new exclusive warehouse, don't make any changes to the
Replace the default
FIVETRAN_ROLE,FIVETRAN_DATABASE, andFIVETRAN_USERvalues with values that conform to your specific naming conventions for those resources.Do not use this username for any other purpose.
Make a note of the values that replace the default
FIVETRAN_DATABASEandFIVETRAN_USERvalues. You will need them to configure Fivetran.Depending on the type of Snowflake user you want to create for Fivetran, do one of the following:
If you want to create a PERSON or NULL user (default user), replace the default value of
user_password(password123) in the script with a value of your choice and make a note of the updated value.We recommend using key-pair authentication because Snowflake is planning to discontinue password-based authentication.
If you want to create a SERVICE user, delete
set user_password = 'password123';from the script and replacepassword = $user_passwordin the script withTYPE = SERVICE.You must configure key-pair authentication for SERVICE users.
Depending on the Snowflake interface you are using, do one of the following:
- Classic web interface: Select the All Queries checkbox.
- Snowsight: Select the text of all queries in the query editor.
Run the script.
Configure key-pair authentication
This step is mandatory if you modified the script to create a SERVICE user for Fivetran.
This step is only required if you plan to use key-pair authentication rather than password-based authentication.
Open the command line in a terminal window.
Generate a private key. You can generate an encrypted version of the private key or an unencrypted version of the private key.
To generate an unencrypted version, you can execute one of the following commands:
openssl genrsa -out rsa_key.pem 2048openssl genrsa 2048 | openssl pkcs8 -topk8 -inform PEM -out rsa_key.p8 -nocrypt
To generate an encrypted version, execute the command
openssl genrsa 2048 | openssl pkcs8 -topk8 -v1 <ALGORITHM> -inform PEM -out rsa_key.p8. You can use different algorithms with the-v1command line option. These algorithms use the PKCS#12 password-based encryption algorithm and allow you to use strong encryption algorithms like triple DES or 128-bit RC2. You can use the following encryption algorithms:- PBE-SHA1-RC2-40
- PBE-SHA1-RC4-40
- PBE-SHA1-RC2-128
- PBE-SHA1-RC4-128
- PBE-SHA1-3DES
- PBE-SHA1-2DES
To use stronger encryption algorithms, execute the command
openssl genrsa 2048 | openssl pkcs8 -topk8 -v2 <ALGORITHM> -inform PEM -out rsa_key.p8. You can use different algorithms with the-v2command line option. You can use the following encryption algorithms:- AES128
- AES256
- DES3
From the command line, generate the public key by referencing the correct version of your generated private key. You can execute one of the following commands:
If you used the
openssl genrsa -out rsa_key.pem 2048command to create the private key, run theopenssl rsa -in rsa_key.pem -pubout -out rsa_key.pubcommand to create the public key.If you used the
openssl genrsa 2048 | openssl pkcs8 -topk8 -inform PEM -out rsa_key.p8 -nocryptcommand to create the private key, then run theopenssl rsa -in rsa_key.p8 -pubout -out rsa_key.pubcommand to create the public key.
Assign the public key to the Snowflake user. In a Snowflake worksheet, execute the command
alter user <USERNAME> set rsa_public_key='<PUBLIC_KEY>';.You must have the
sysadminorsecurityadminrole to execute this command.
(Optional) Configure external storage for Hybrid Deployment
This is a mandatory step only for the Hybrid Deployment model. Skip to the next step if you want to use the SaaS Deployment model.
In the Hybrid Deployment model, we temporarily stage your data in an external storage location before writing it to your Snowflake destination.
We support the following storage services for staging your data:
- Snowflake internal stage: Stages your data in your Snowflake user stage. This is the default staging location and does not require additional configuration. If we cannot use Snowflake internal staging, we fall back to external staging, such as Fivetran-managed Amazon S3 or GCS buckets. For more information, see our Troubleshooting documentation.
- Amazon S3: Stores your data in an S3 bucket.
- Azure Blob Storage: Stores your data in an Azure Blob Storage container.
- Google Cloud Storage: Stores your data in a Google Cloud Storage bucket.
Configure Amazon S3 bucket
Create S3 bucket
Create an S3 bucket by following the instructions in AWS's documentation.
Your S3 bucket and Snowflake account must be in the same region.
Create IAM policy for S3 bucket
Open your Amazon IAM console.
Go to Policies, and then click Create policy.

Go to the JSON tab.
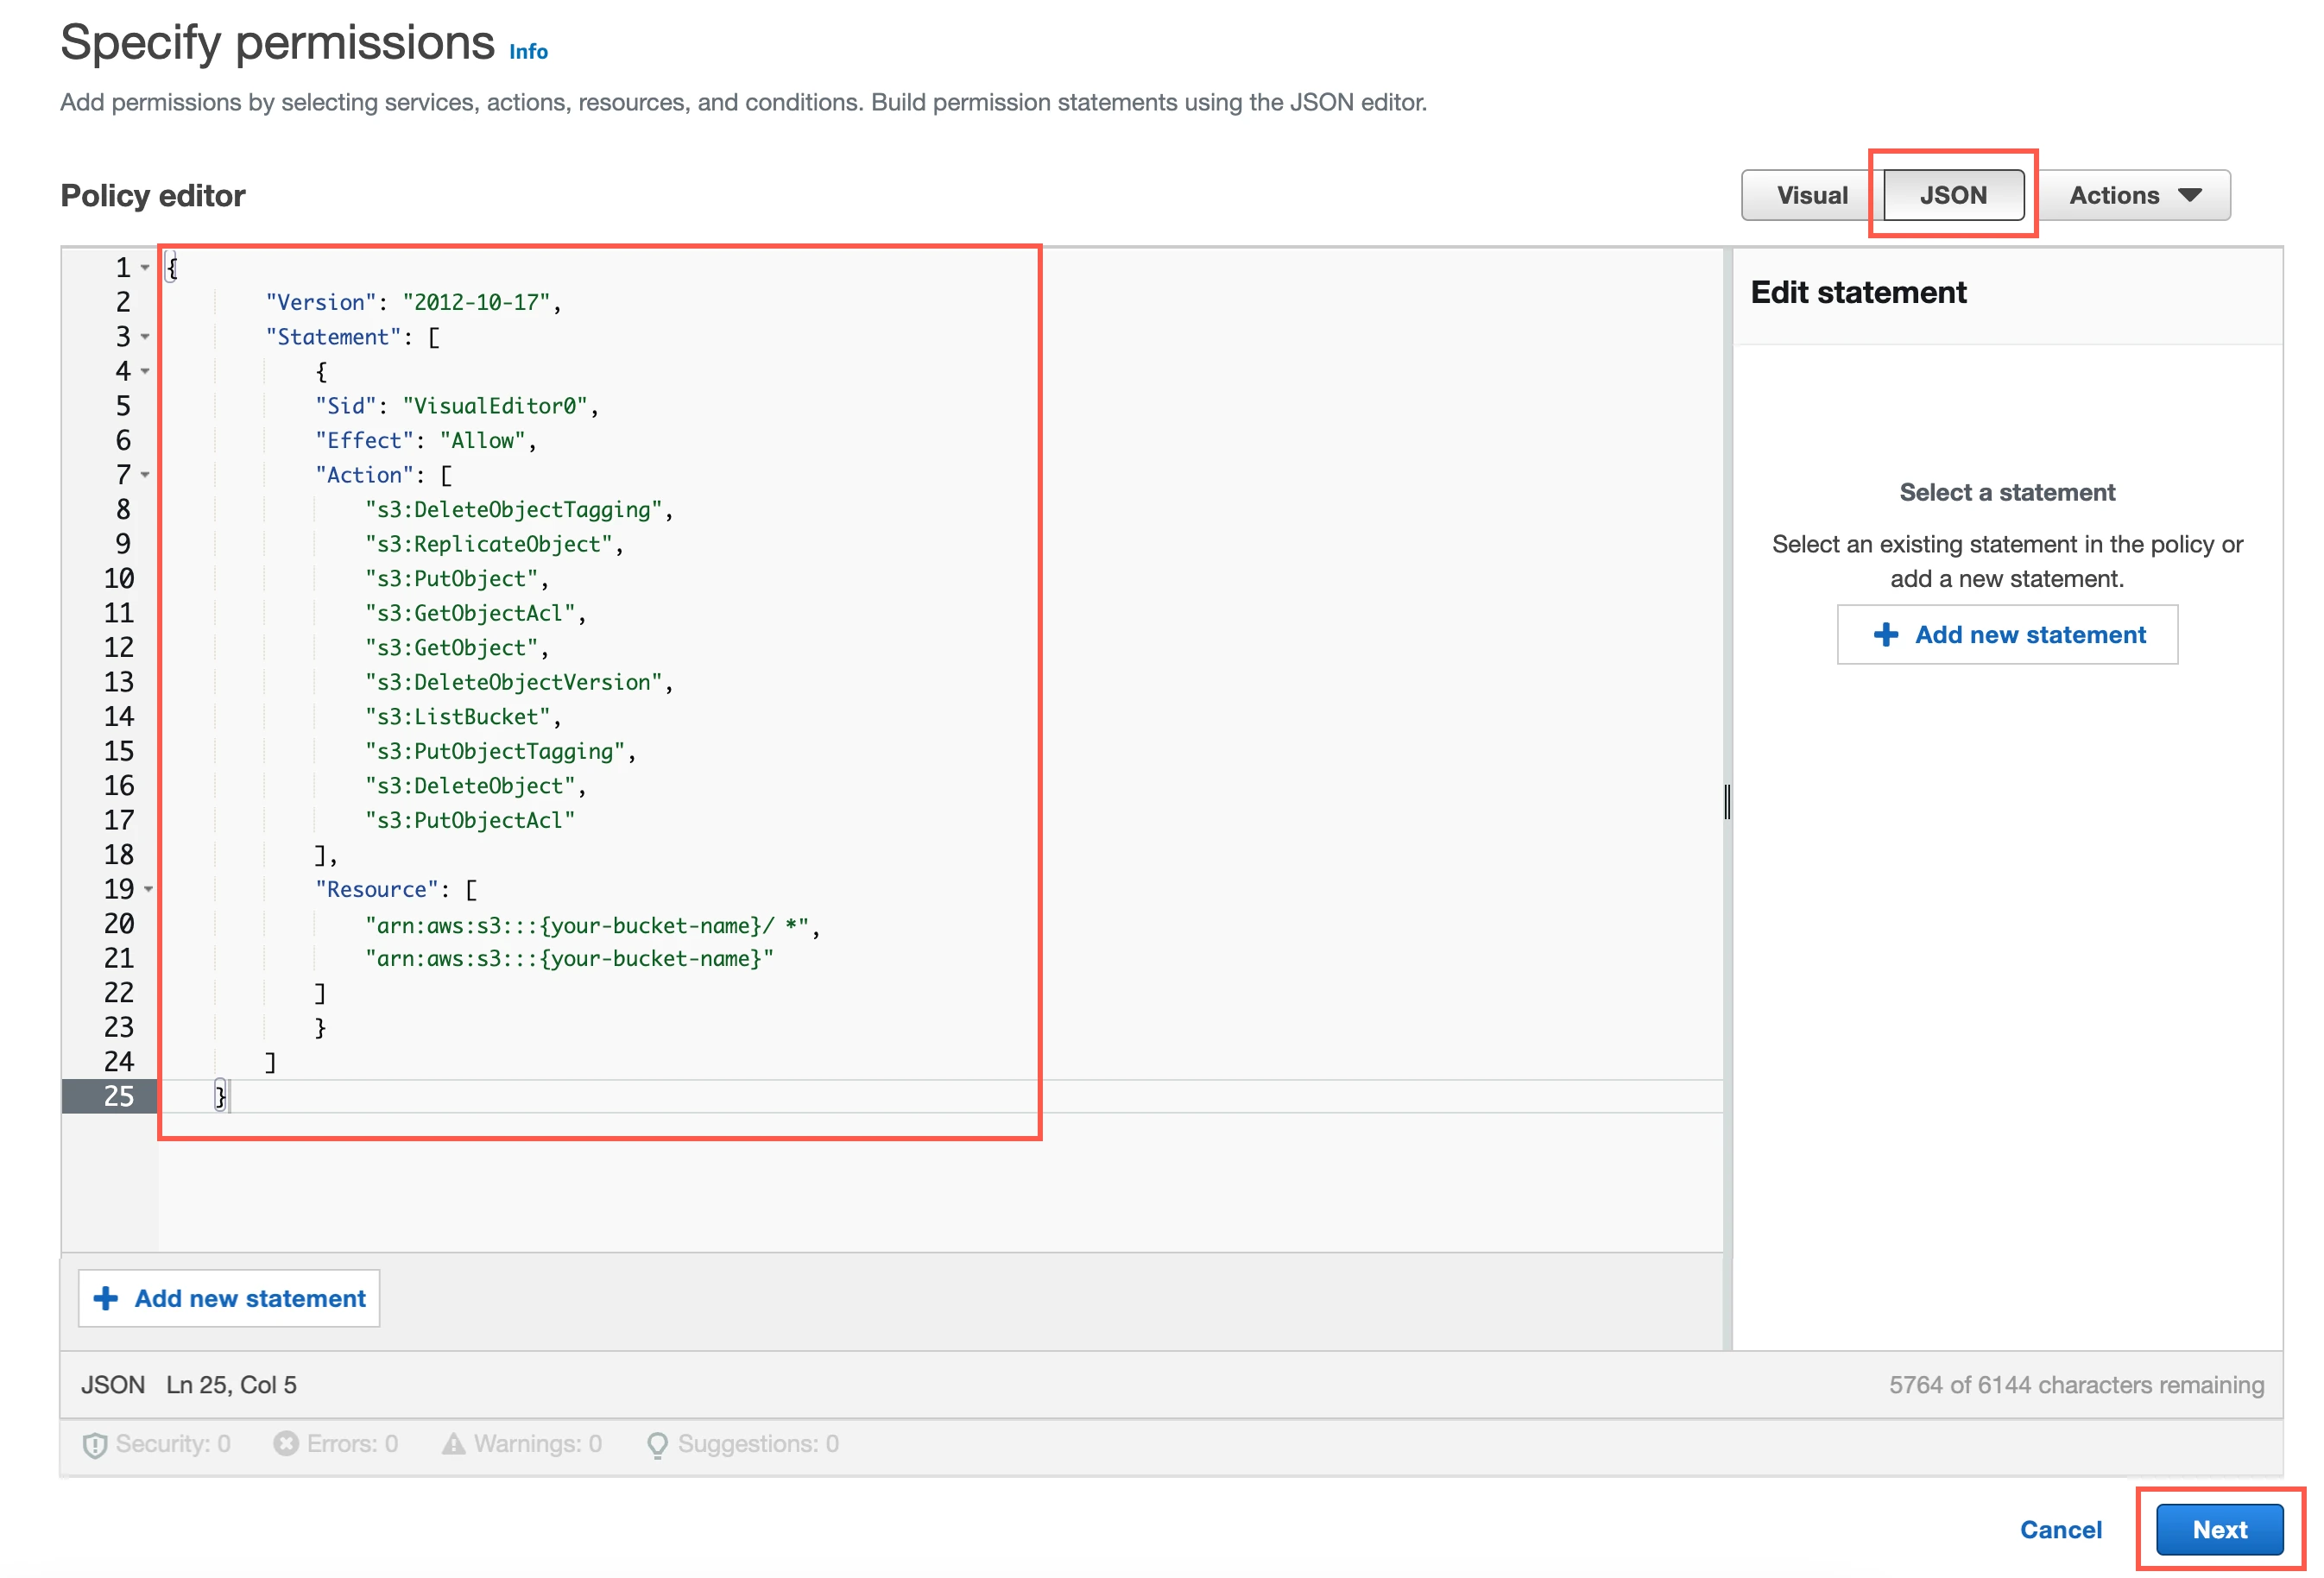
Copy the following policy and paste it in the JSON editor.
{
    "Version": "2012-10-17",
    "Statement": [
        {
        "Sid": "VisualEditor0",
        "Effect": "Allow",
        "Action": [
            "s3:DeleteObjectTagging",
            "s3:ReplicateObject",
            "s3:PutObject",
            "s3:GetObjectAcl",
            "s3:GetObject",
            "s3:DeleteObjectVersion",
            "s3:ListBucket",
            "s3:PutObjectTagging",
            "s3:DeleteObject",
            "s3:PutObjectAcl"
        ],
        "Resource": [
            "arn:aws:s3:::{your-bucket-name}/*",
            "arn:aws:s3:::{your-bucket-name}"
        ]
        }
    ]
}
In the policy, replace
{your-bucket-name}with the name of your S3 bucket.Click Next.
Enter a Policy name.
Click Create policy.
(Optional) Configure IAM role authentication
- Perform this step only if you want us to use AWS Identity and Access Management (IAM) to authenticate requests in your S3 bucket. Skip to the next step if you want to use IAM user credentials for authentication.
- To authenticate using IAM, your Hybrid Deployment Agent must run on an EC2 instance in the account associated with your S3 bucket.
In the Amazon IAM console, go to Roles, and then click Create role.
Select AWS service.
In Service or use case drop-down menu, select EC2.
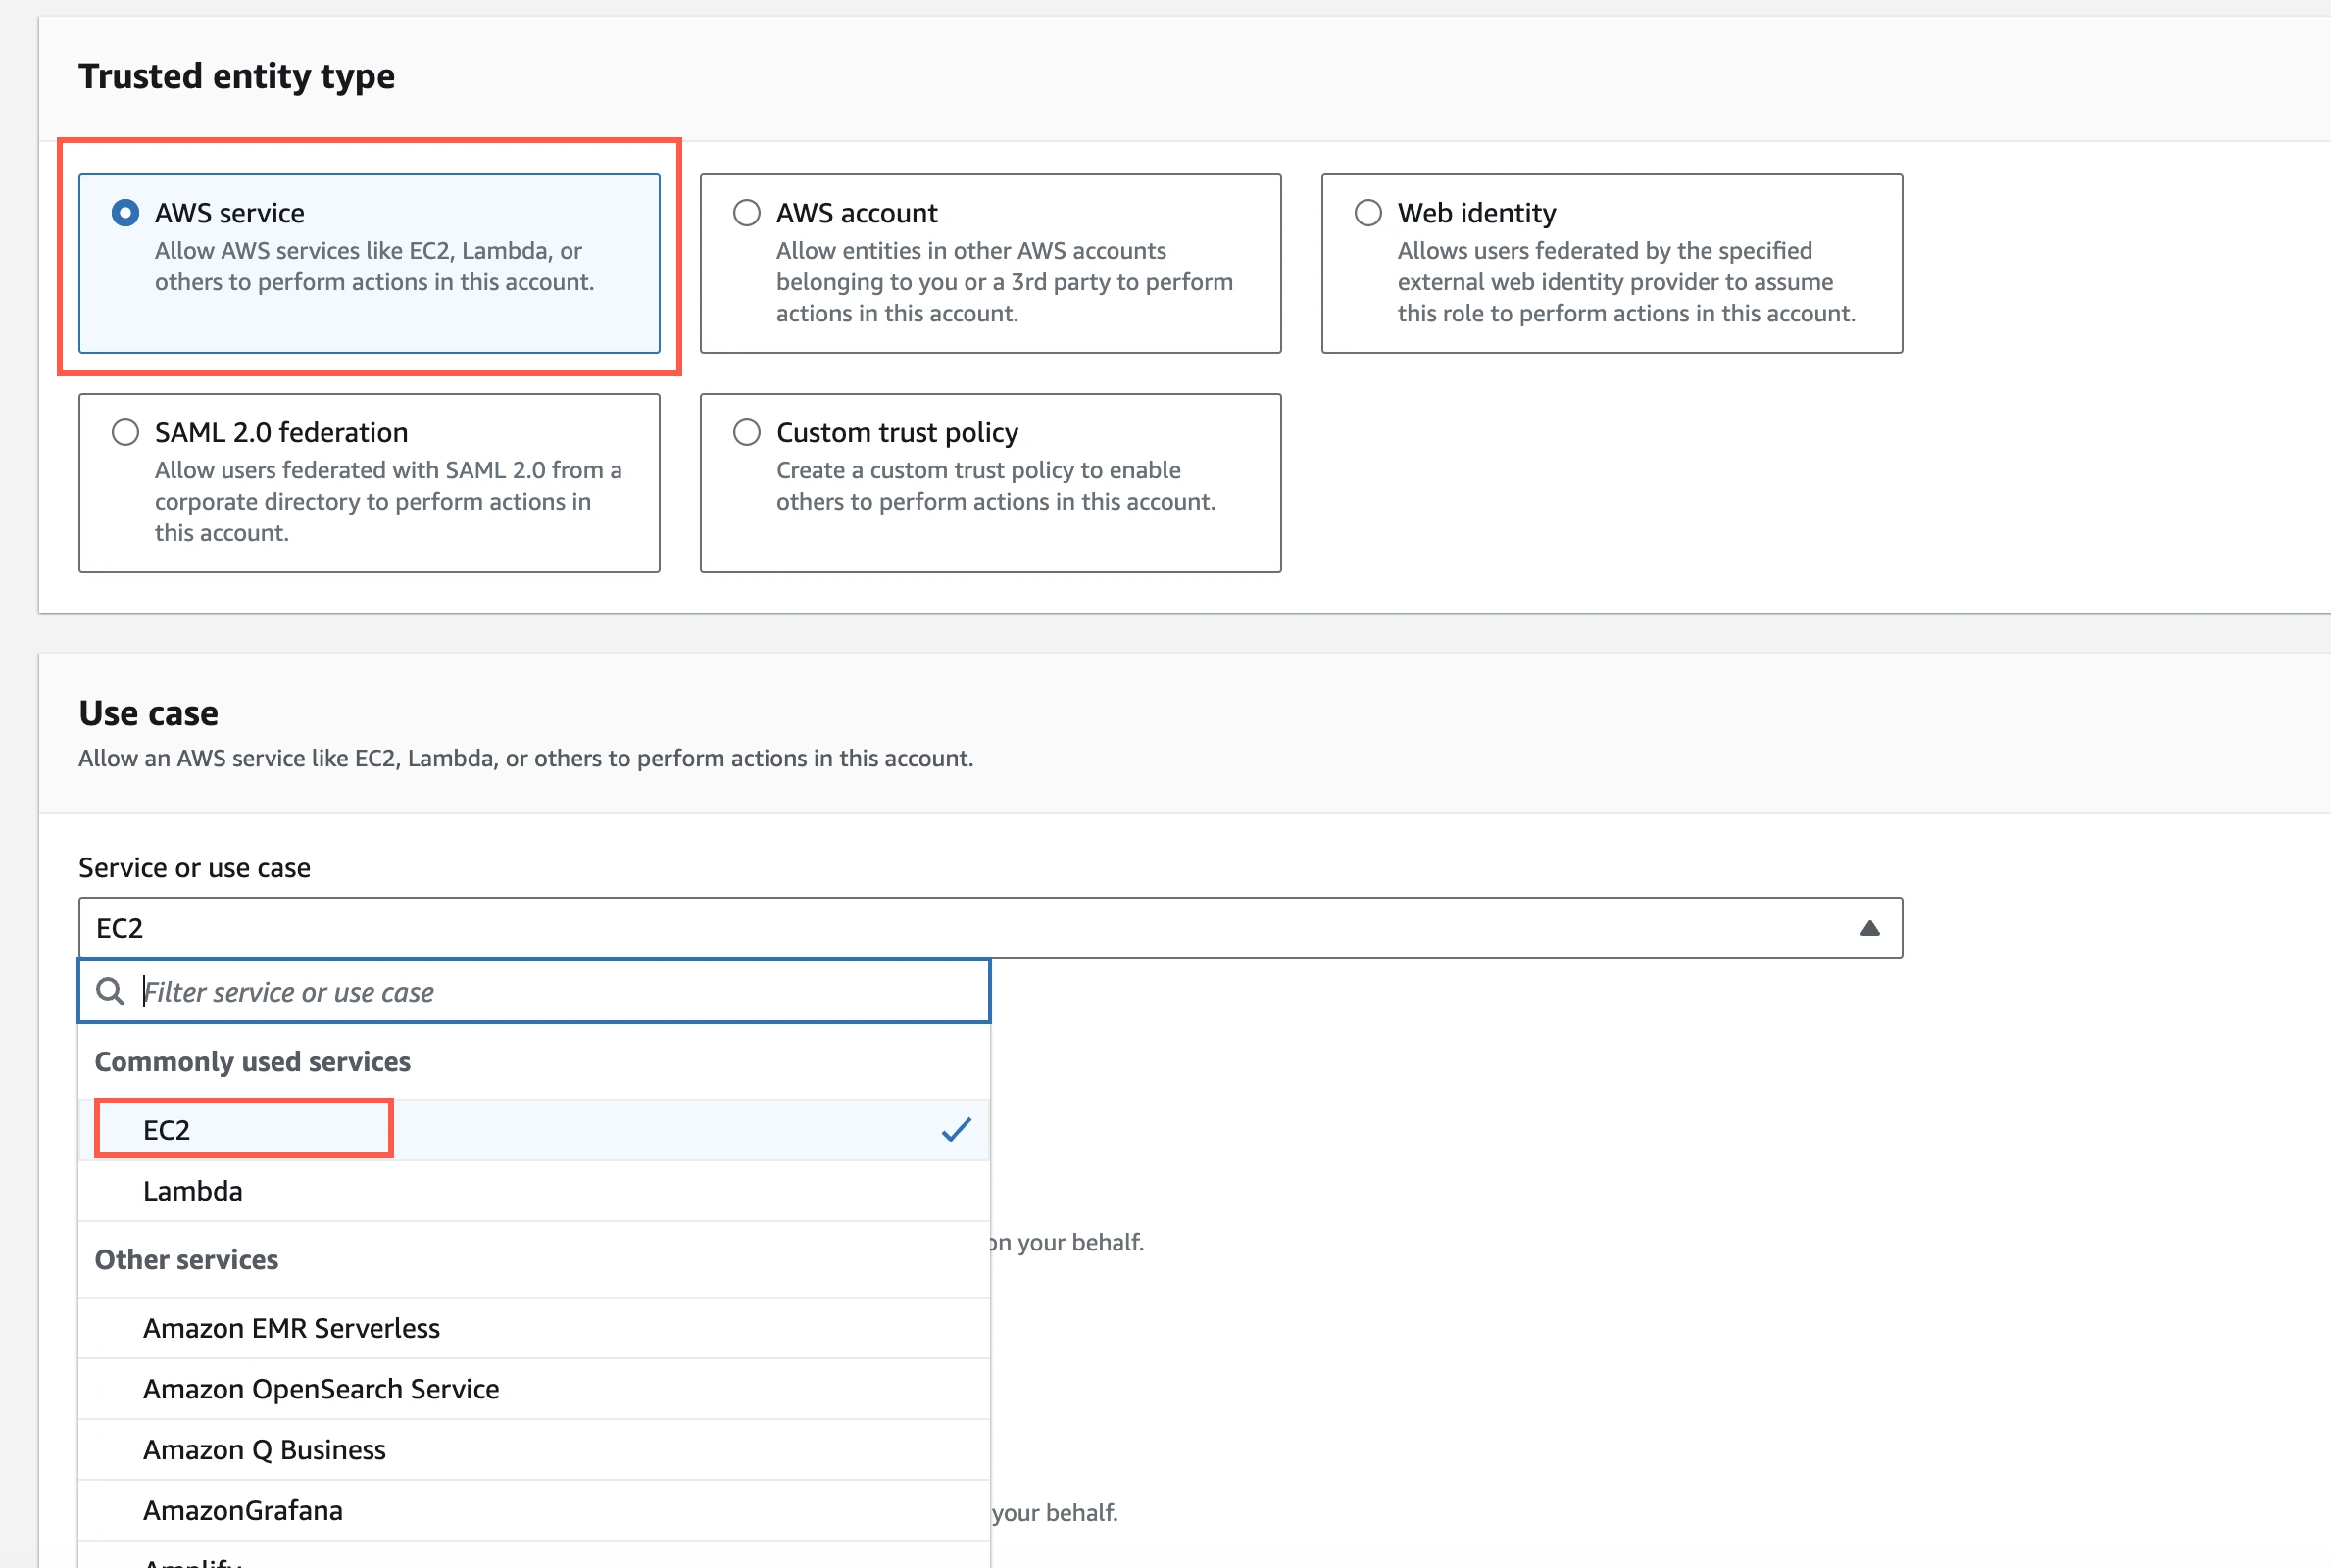
Click Next.
Select the checkbox for the IAM policy you created for your S3 bucket.
Click Next.
Enter the Role name and click Create role.
In the Amazon IAM console, go to the EC2 service.
Go to Instances, and then select the EC2 instance hosting your Hybrid Deployment Agent.
In the top right corner, click Actions and go to Security > Modify IAM role.

In the IAM role drop-down menu, select the new IAM role you created and click Update IAM role.
(Optional) Configure IAM user authentication
Perform this step only if you want us to use IAM user credentials to authenticate requests in your S3 bucket.
In the Amazon IAM console, go to Users, and then click Create user.
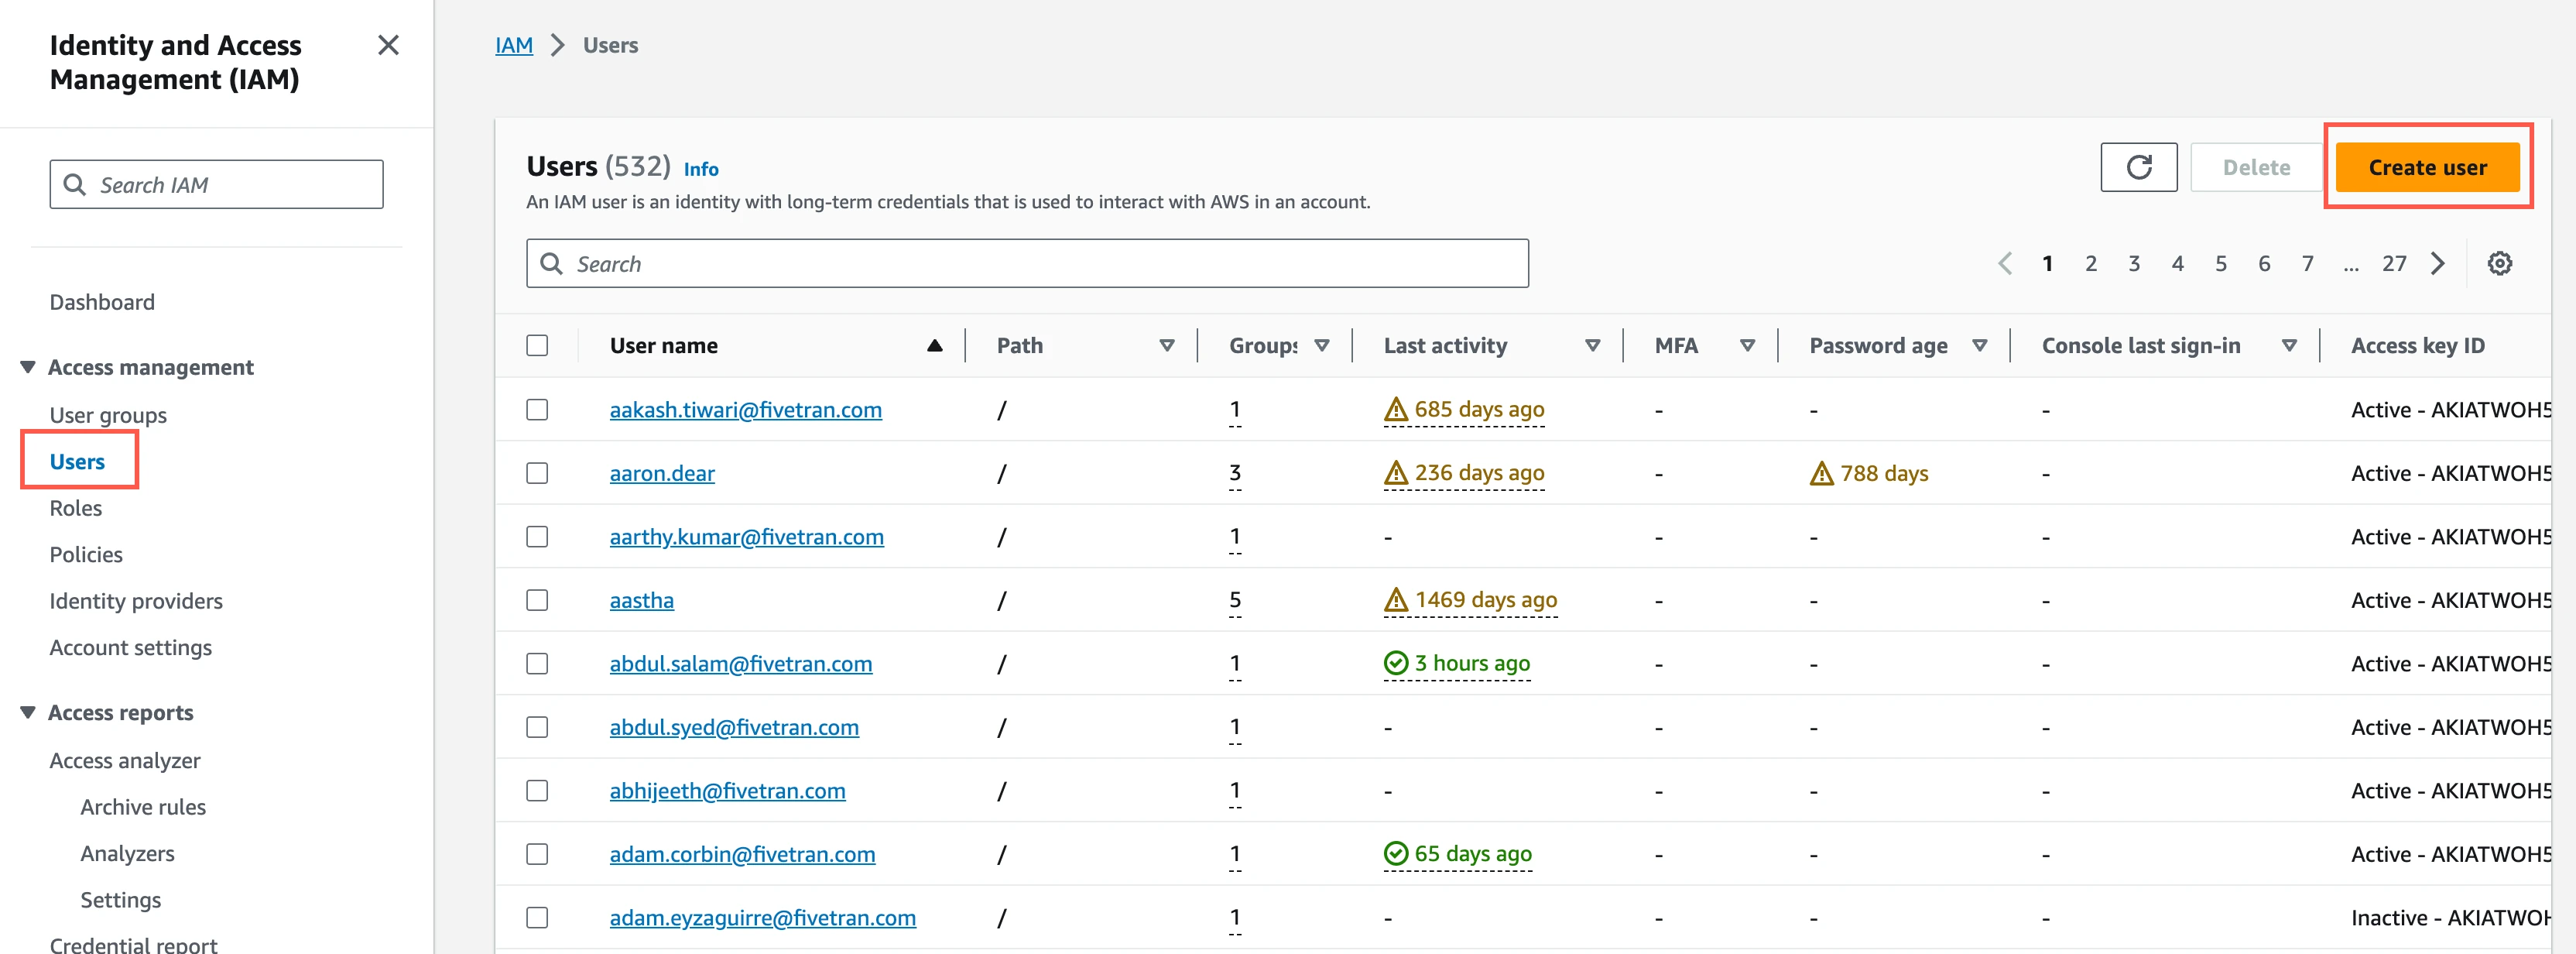
Enter a User name, and then click Next.
Select Attach policies directly.
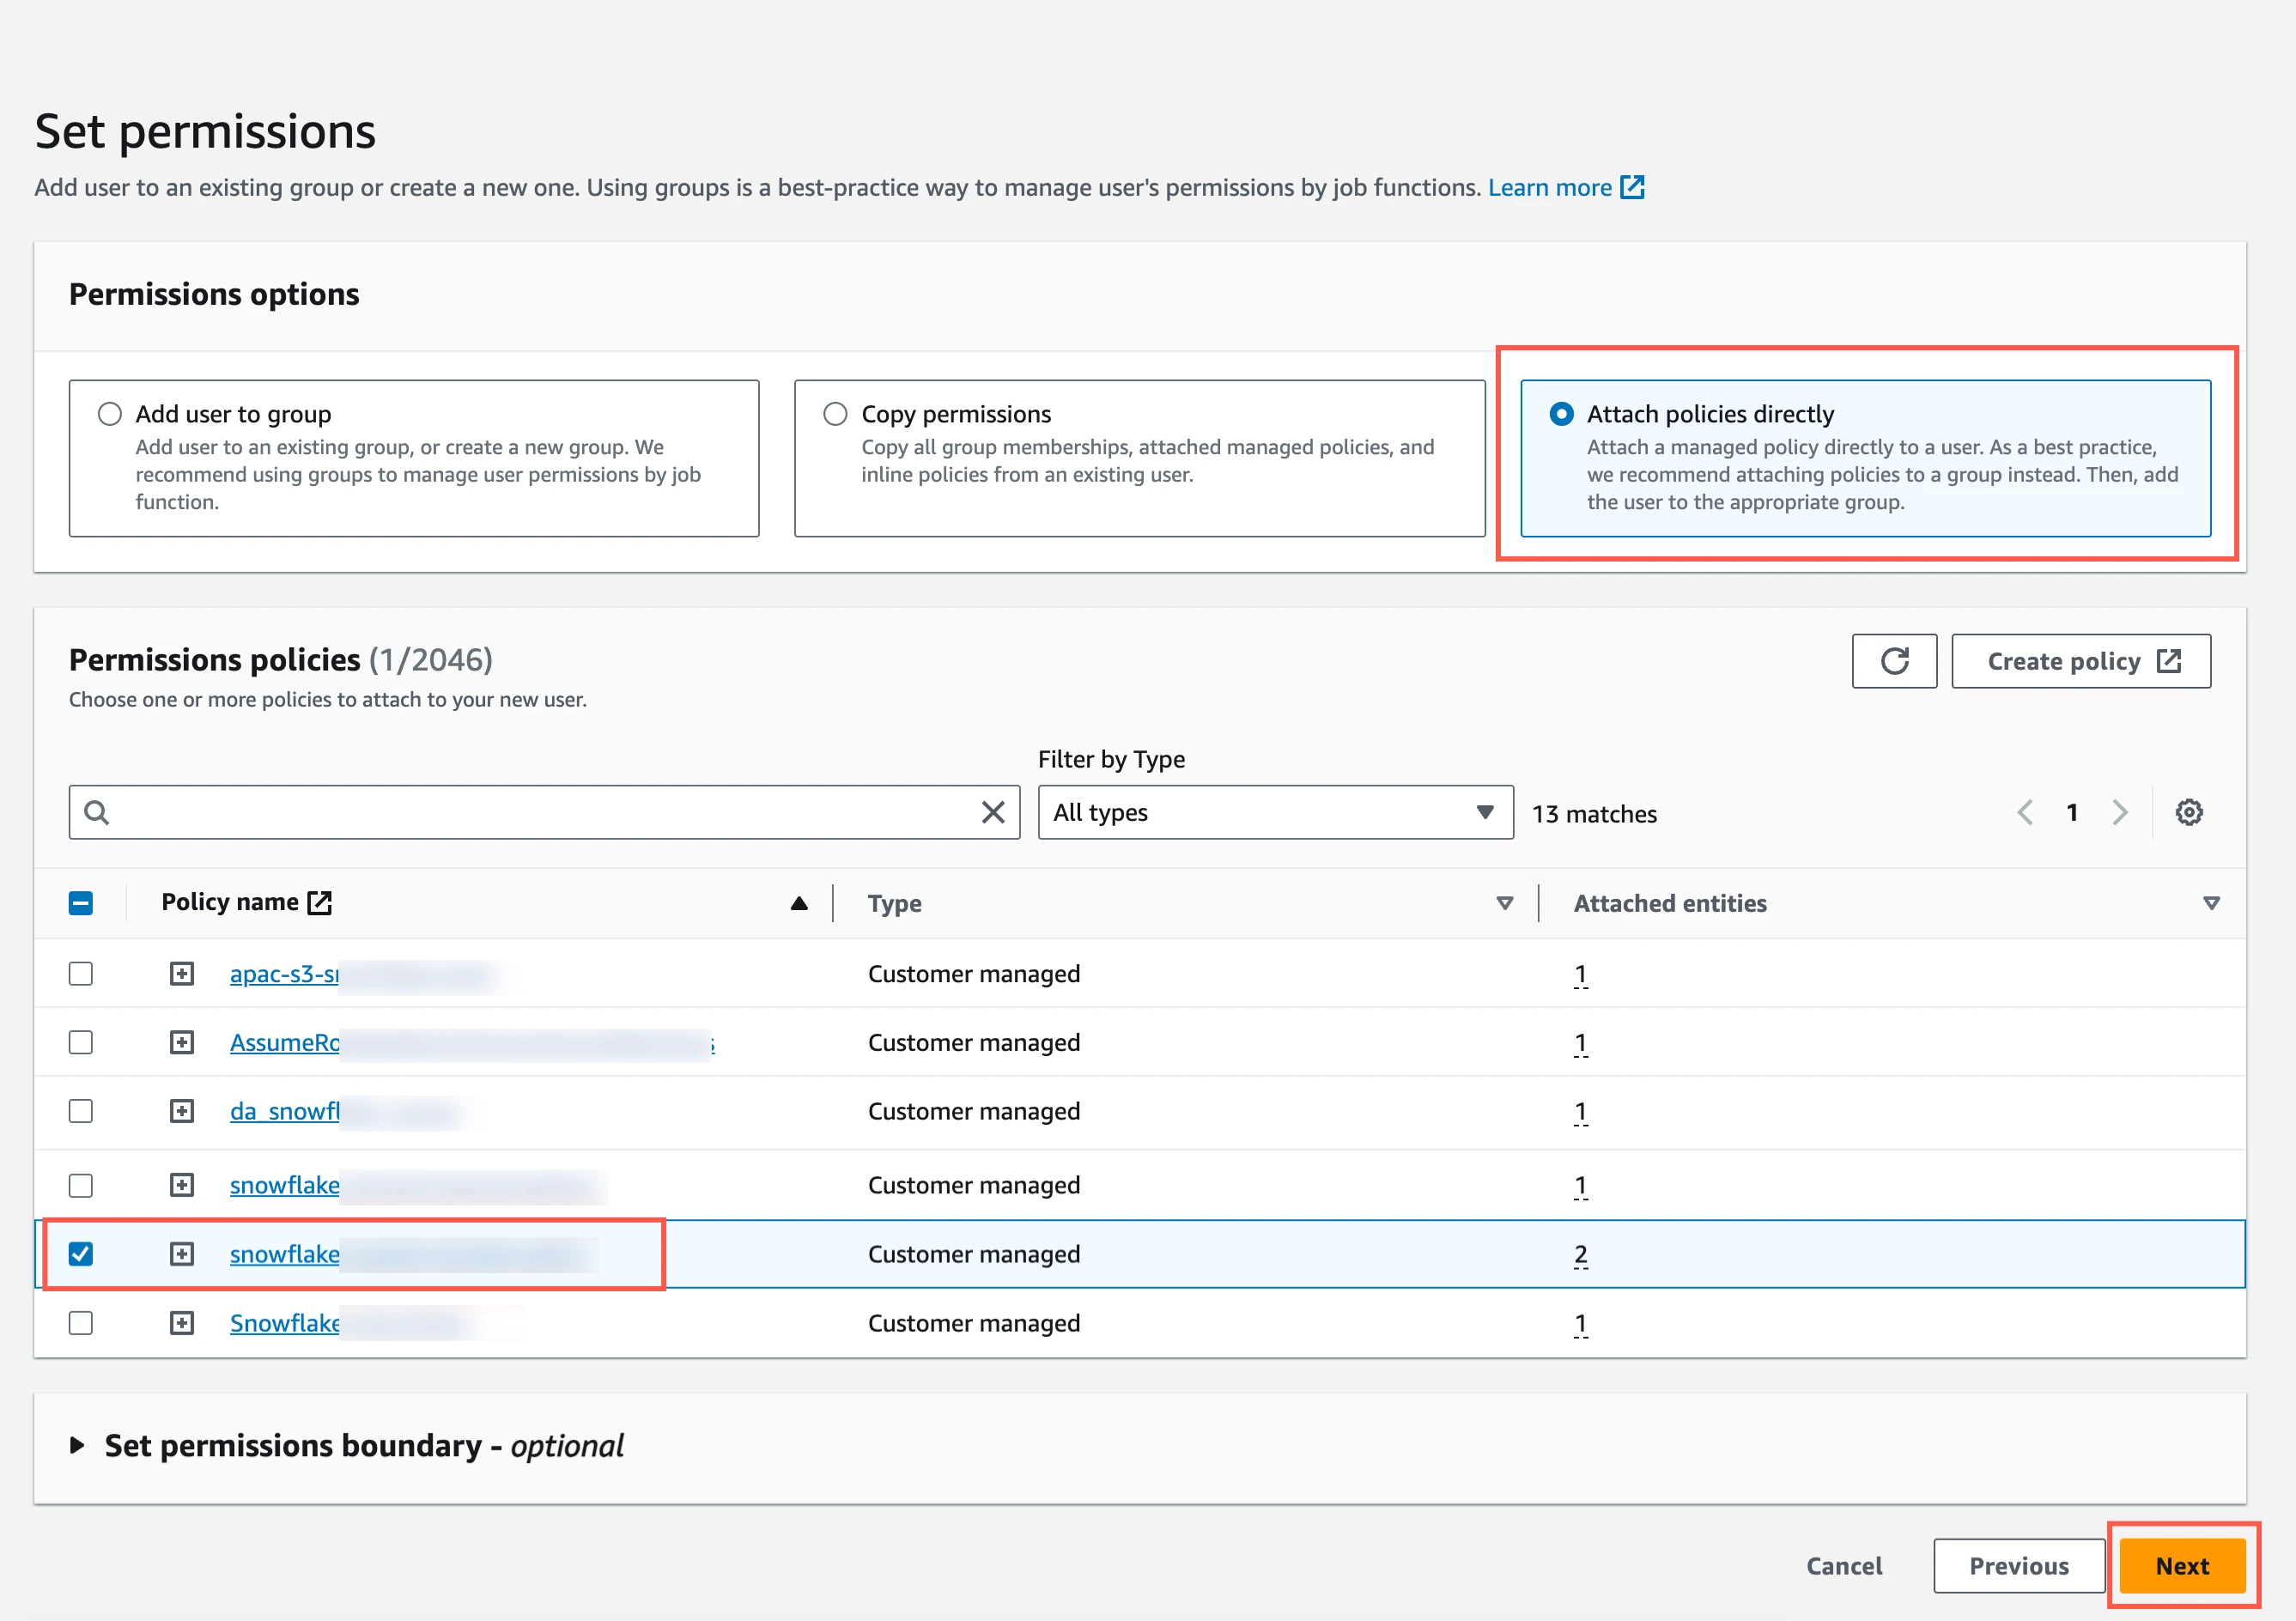
Select the checkbox next to the policy you created in the Create IAM policy for S3 bucket step, and then click Next.
In the Review and create page, click Create user.
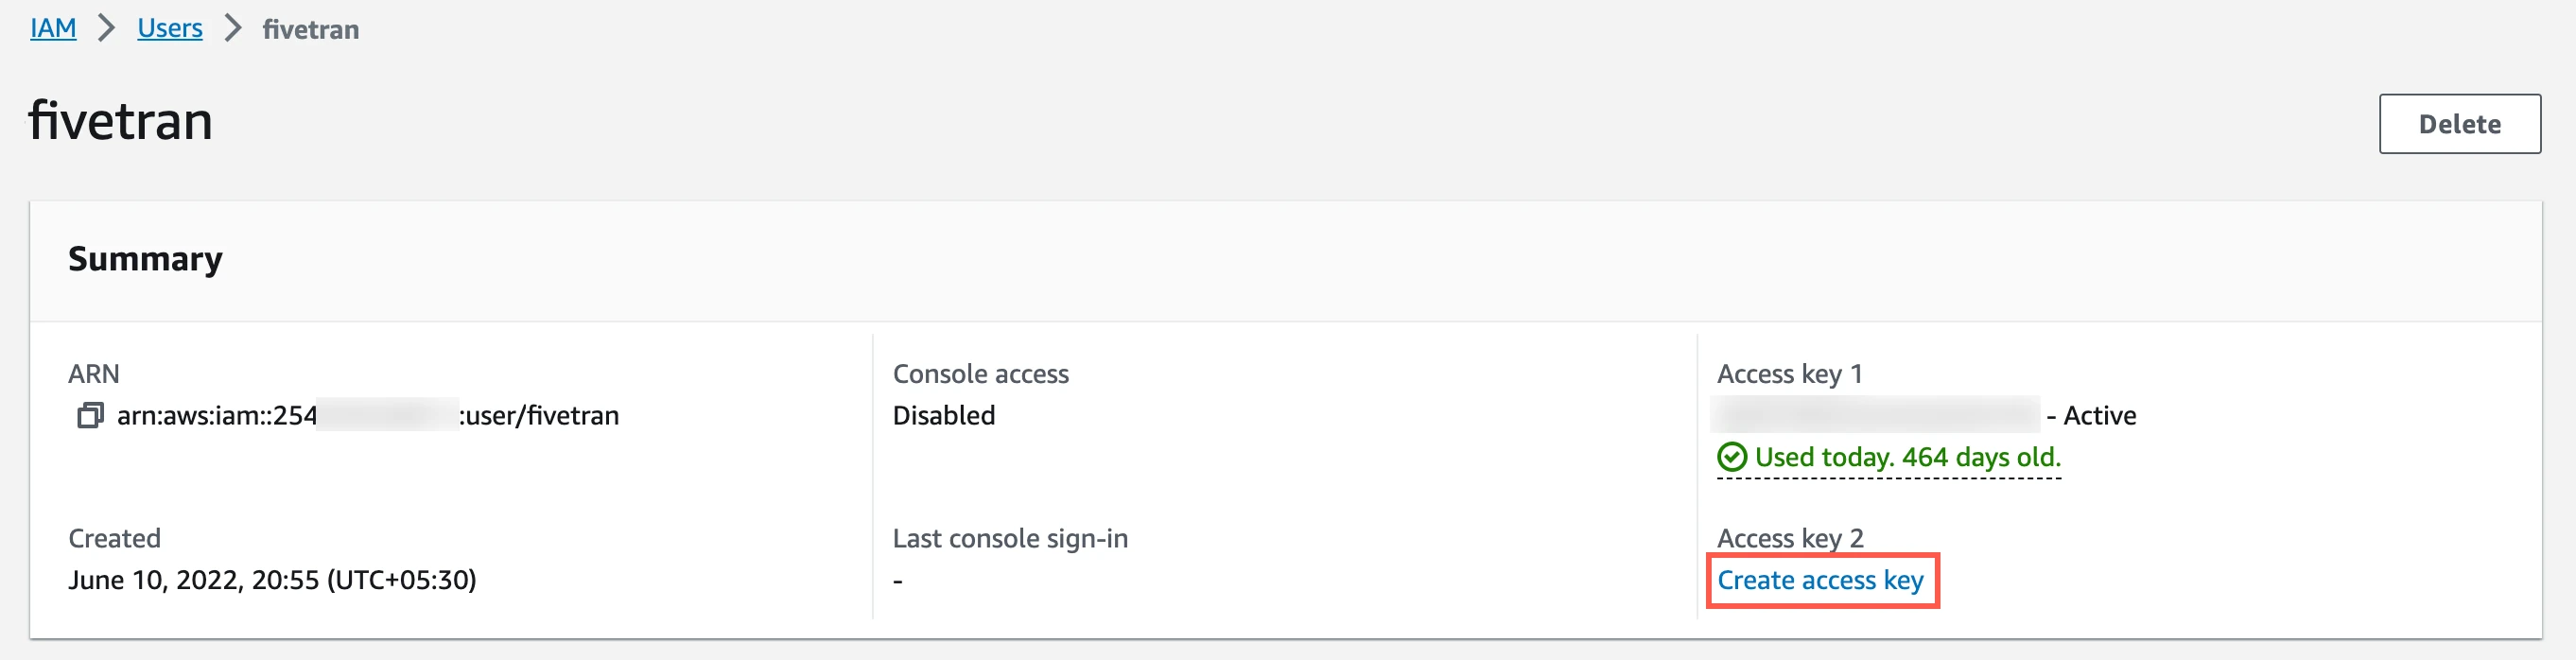
In the Users page, open the user you created.
Click Create access key.
Select Application running outside AWS, and then click Next.
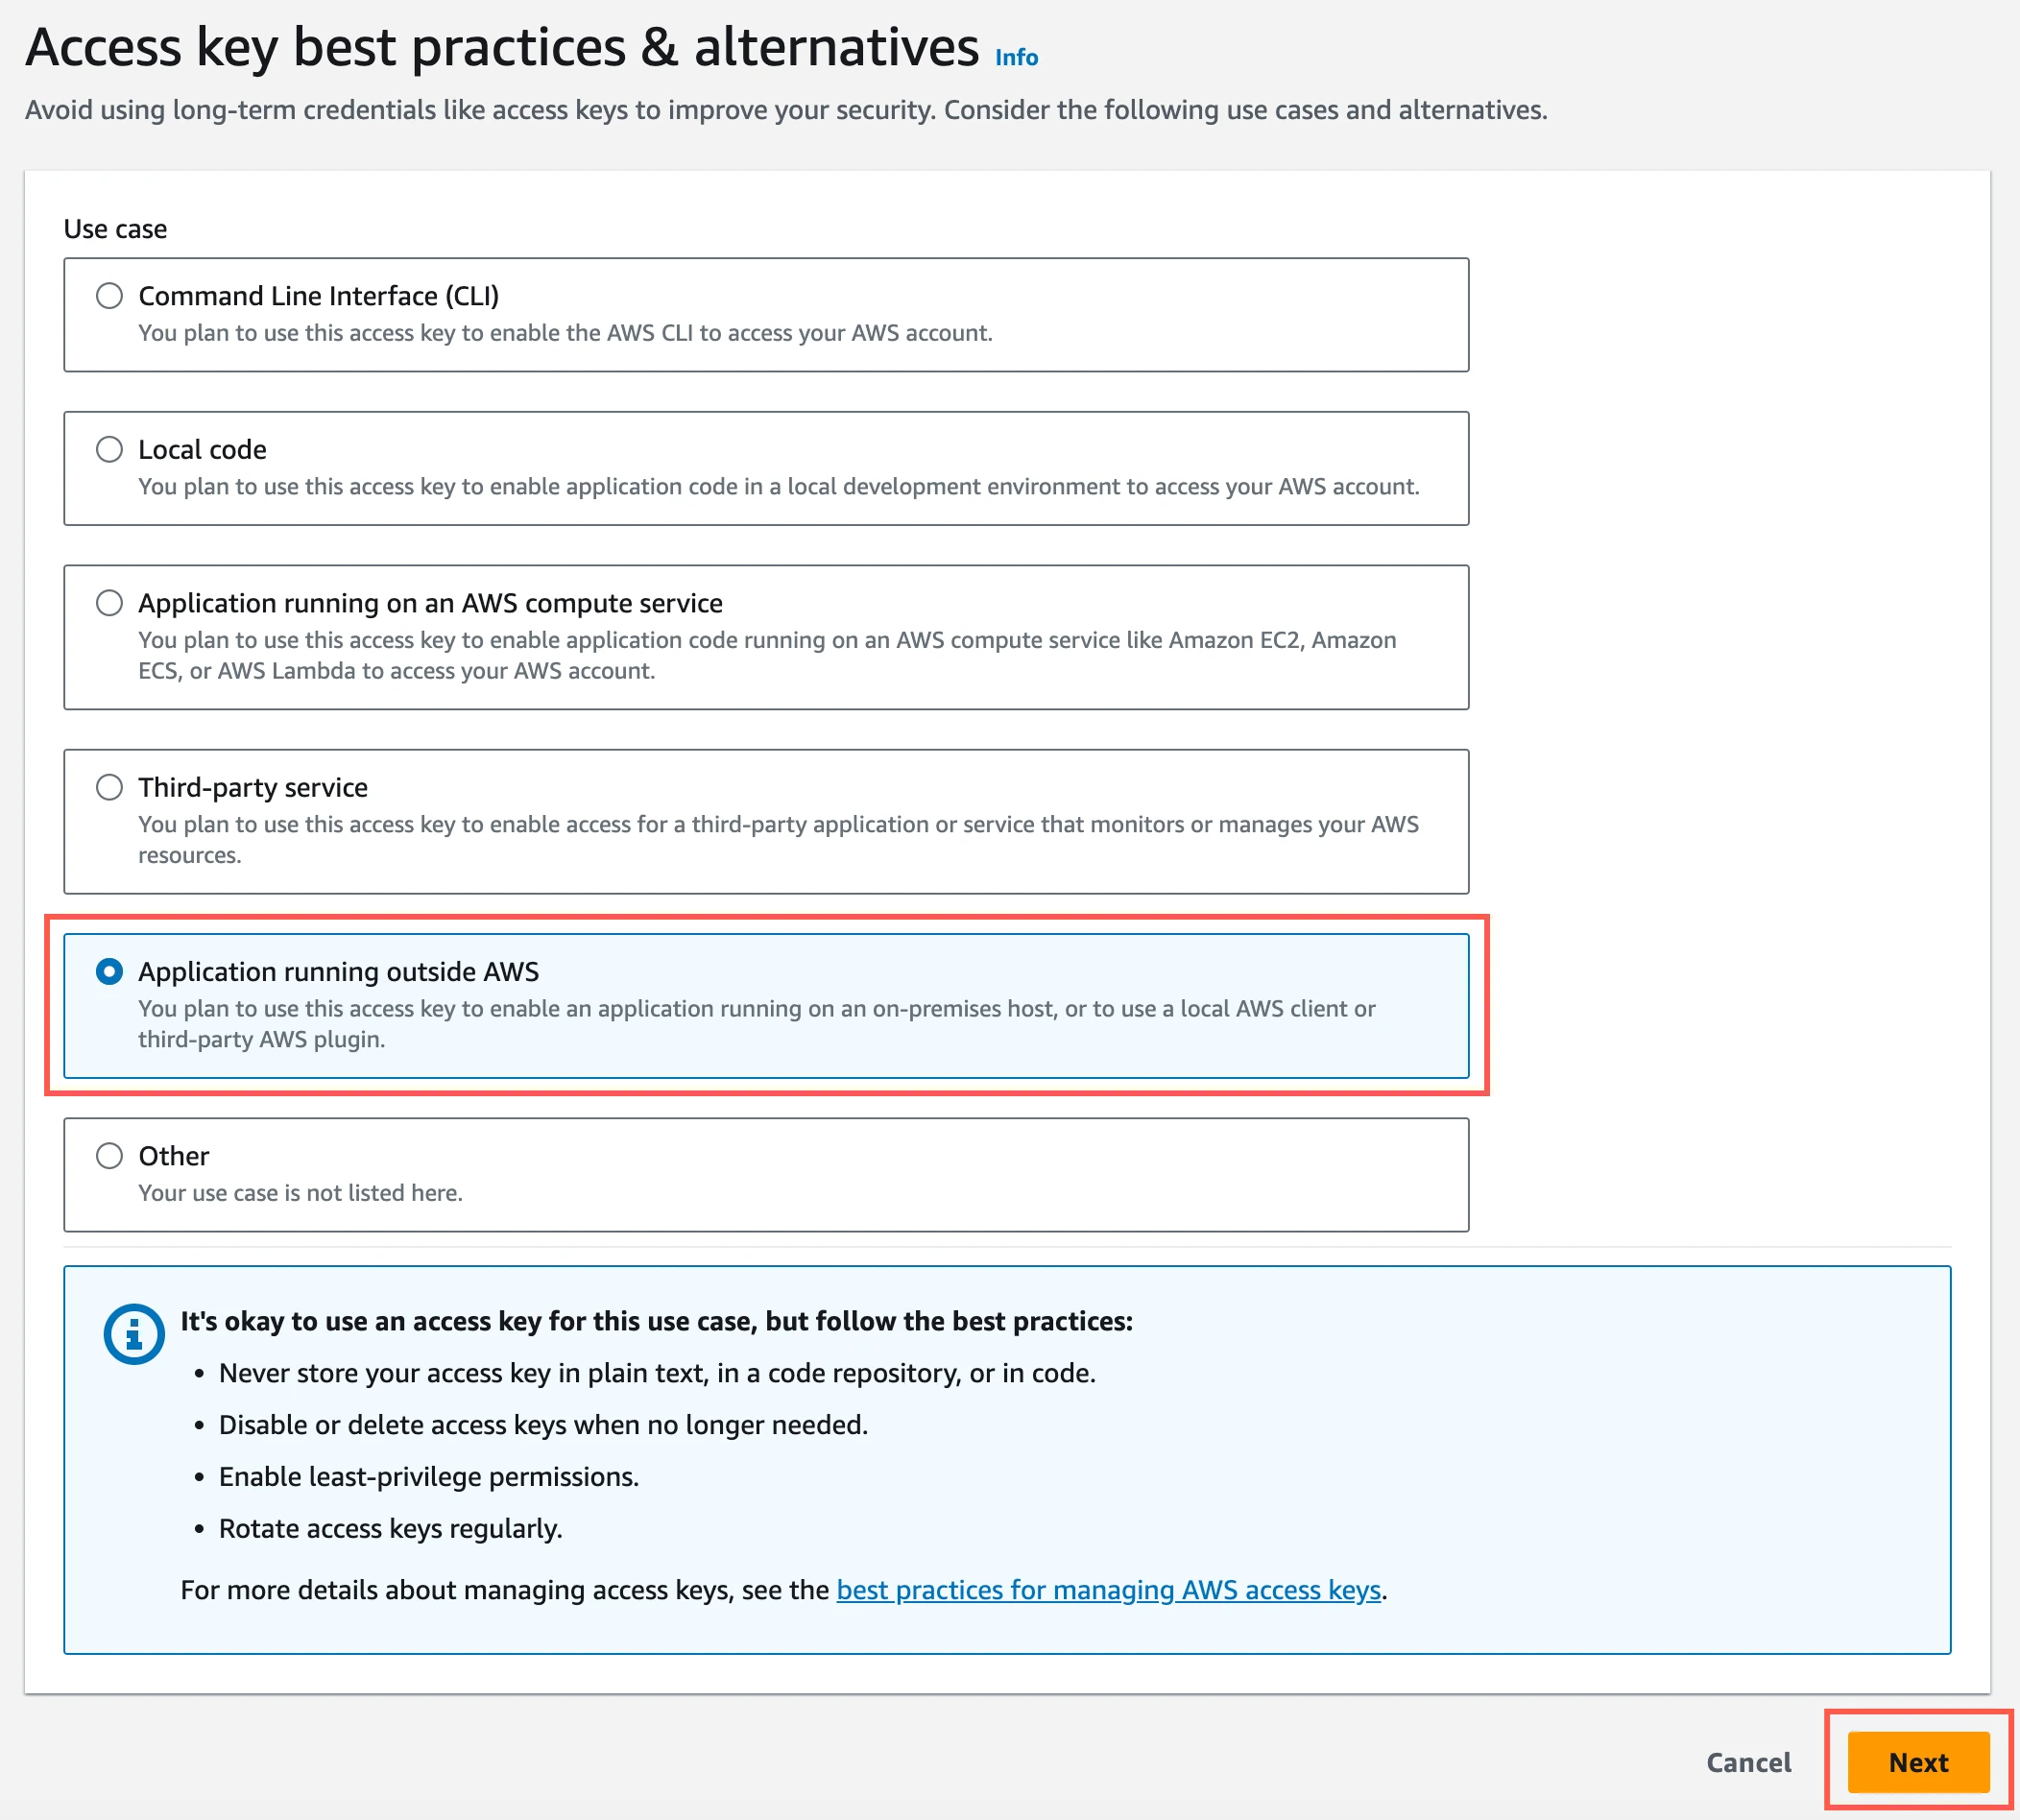
Click Create access key.
Click Download .csv file to download the Access key ID and Secret access key to your local drive. You will need them to configure Fivetran.
Configure Azure Blob storage container
Create Azure storage account
Create an Azure storage account by following the instructions in Azure Blob Storage's documentation. While creating the account, make sure you do the following:
In the Advanced tab:
- select the Require secure transfer for REST API operations and Enable storage account key access checkboxes.
- in the Permitted scope for copy operations drop-down menu, select From any storage account.
In the Networking tab, select one of the following Network access options:
- If your Snowflake destination is not hosted on Azure or if your storage container and destination are in different regions, select Enable public access from all networks.
- If your Snowflake destination is hosted on Azure and if it is in the same region as your storage container, select Enable public access from selected virtual networks and IP addresses.
In the Encryption tab, choose Microsoft-managed keys (MMK) as the Encryption type.
If you selected Enable public access from selected virtual networks and IP addresses as the Network access option in Step 1, do the following:
i. Log in to your Snowflake account and run the following commands to get your Snowflake VNet subnet ID:
USE ROLE ACCOUNTADMIN;
SELECT SYSTEM$GET_SNOWFLAKE_PLATFORM_INFO();
ii. Log in to your Azure account using Azure CLI and run the following command:
az storage account network-rule add --resource-group "<your_resource_group>" --account-name "<your_storage_account>" --subnet <your_snowflake_vnet_subnet_id>Before running the command, replace
<your_resource_group>with your Azure resource group name,<your_storage_account>with your Azure storage account name, and <your_snowflake_vnet_subnet_id> with your Snowflake VNet subnet ID.iii. Log in to the Azure portal.
iv. Go to your storage account.
v. On the navigation menu, click Networking under Security + networking.
vi. Go to the Firewall section.
vii. In the Address range field, enter the IP address of the machine that hosts your Hybrid Deployment Agent.
viii. Click Save.
Find storage account name and access key
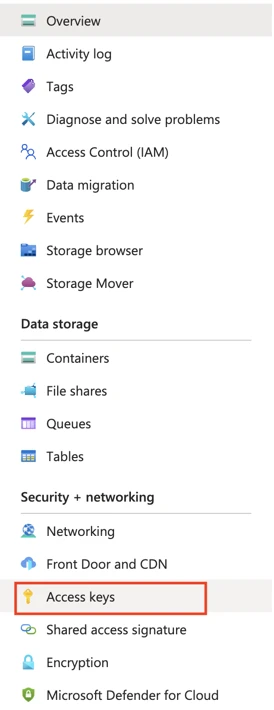
Log in to the Azure portal.
Go to your storage account.
On the navigation menu, click Access keys under Security + networking.
Make a note of the Storage account name and Key. You will need them to configure Fivetran.
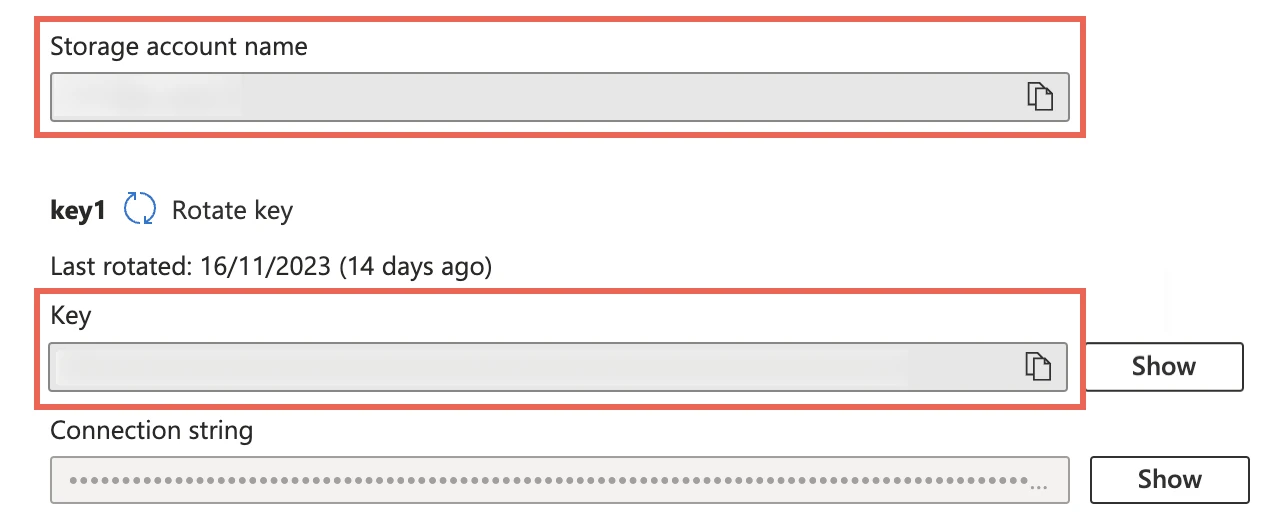
As a security best practice, do not save your access key and account name anywhere in plain text that is accessible to others.
Configure Google Cloud Storage bucket
Create Google Cloud Storage bucket
Create a Google Cloud Storage (GCS) bucket by following the instructions in GCS's documentation.
Your GCS bucket and Snowflake account must be in the same region.
Make a note of the bucket name. You will need it to configure Fivetran.
Create service account and private key
Create a service account to provide Fivetran access to the GCS bucket you created in the previous step.
Create a private service account key in JSON format for the new service account you created in Step 1. The private key must be in the following format:
{
  "type": "service_account",
  "project_id": "<project_id>",
  "private_key_id": "<key_id>",
  "private_key": "*****",
  "client_email": "name@project.iam.gserviceaccount.com",
  "client_id": "<client_id>",
  "auth_uri": "https://accounts.google.com/o/oauth2/auth",
  "token_uri": "https://oauth2.googleapis.com/token",
  "auth_provider_x509_cert_url": "https://www.googleapis.com/oauth2/v1/certs",
  "client_x509_cert_url": "https://www.googleapis.com/robot/v1/metadata/x509/name%40project.iam.gserviceaccount.com"
}
Keep the JSON file in a secure location. You will need it to configure Fivetran.
Assign permissions to service account
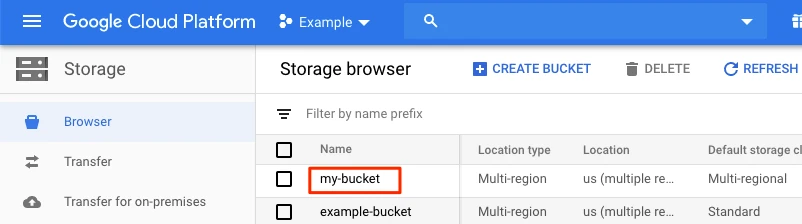
Log in to the Google Cloud console.
Go to Storage > Browser.
Select the bucket you want to use.
Go to the Permissions tab and then click Add Principals.
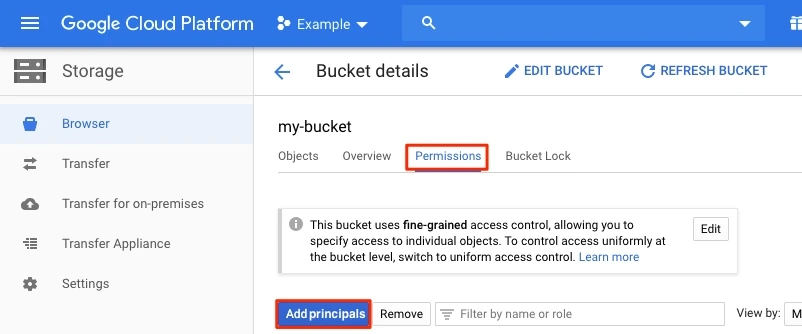
Specify the service account you created.
In the Select a role drop-down menu, select Storage Object Admin.

Click Save.
If you are configuring a new Snowflake destination for Hybrid Deployment, retrieve the Snowflake cloud storage service account and grant it permission to access the bucket objects.
Add object lifecycle rule
In your Google Cloud console, go to Storage > Browser.
Find and select the bucket you are using for Fivetran.
In the Lifecycle rules column, select its rules.
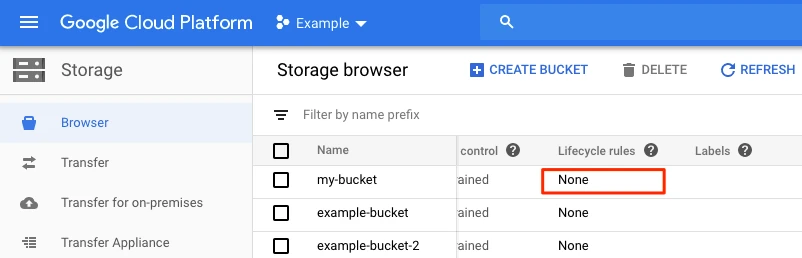
Click ADD A RULE. A detail view will open.
In the Select an action section, select Delete object.
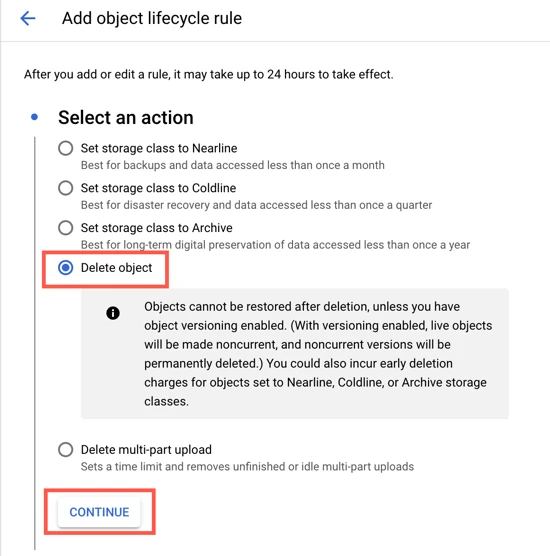
Click CONTINUE.
In the Select object conditions section, select the Age checkbox and then enter 1.
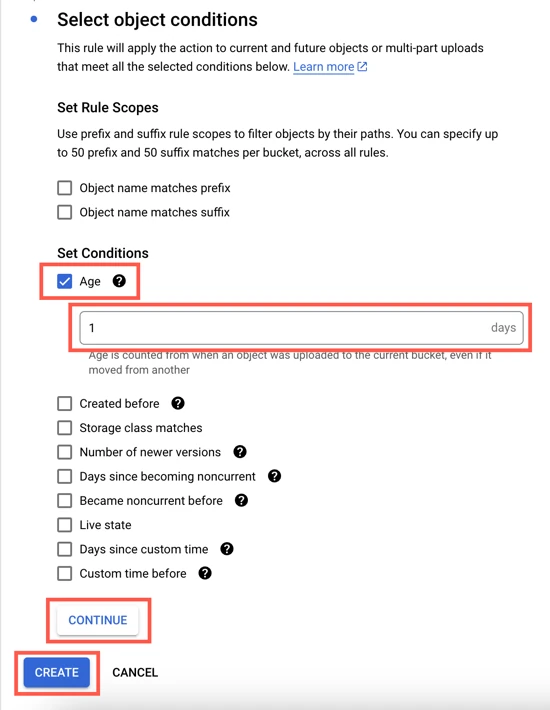
Click CONTINUE and then click CREATE.
(Optional) Configure external storage for unstructured files
By default, Fivetran lands unstructured files in a Snowflake Named internal stage.
Fivetran also supports Amazon S3, Google Cloud Storage, and Azure Storage as external stages to land unstructured files using a Snowflake storage integration.
Configure Amazon S3 bucket as external stage
Create S3 bucket
Create an S3 bucket by following the instructions in AWS's documentation.
Create IAM policy for S3 bucket
Open your Amazon IAM console.
Go to Policies, and then click Create policy.
Go to the JSON tab.
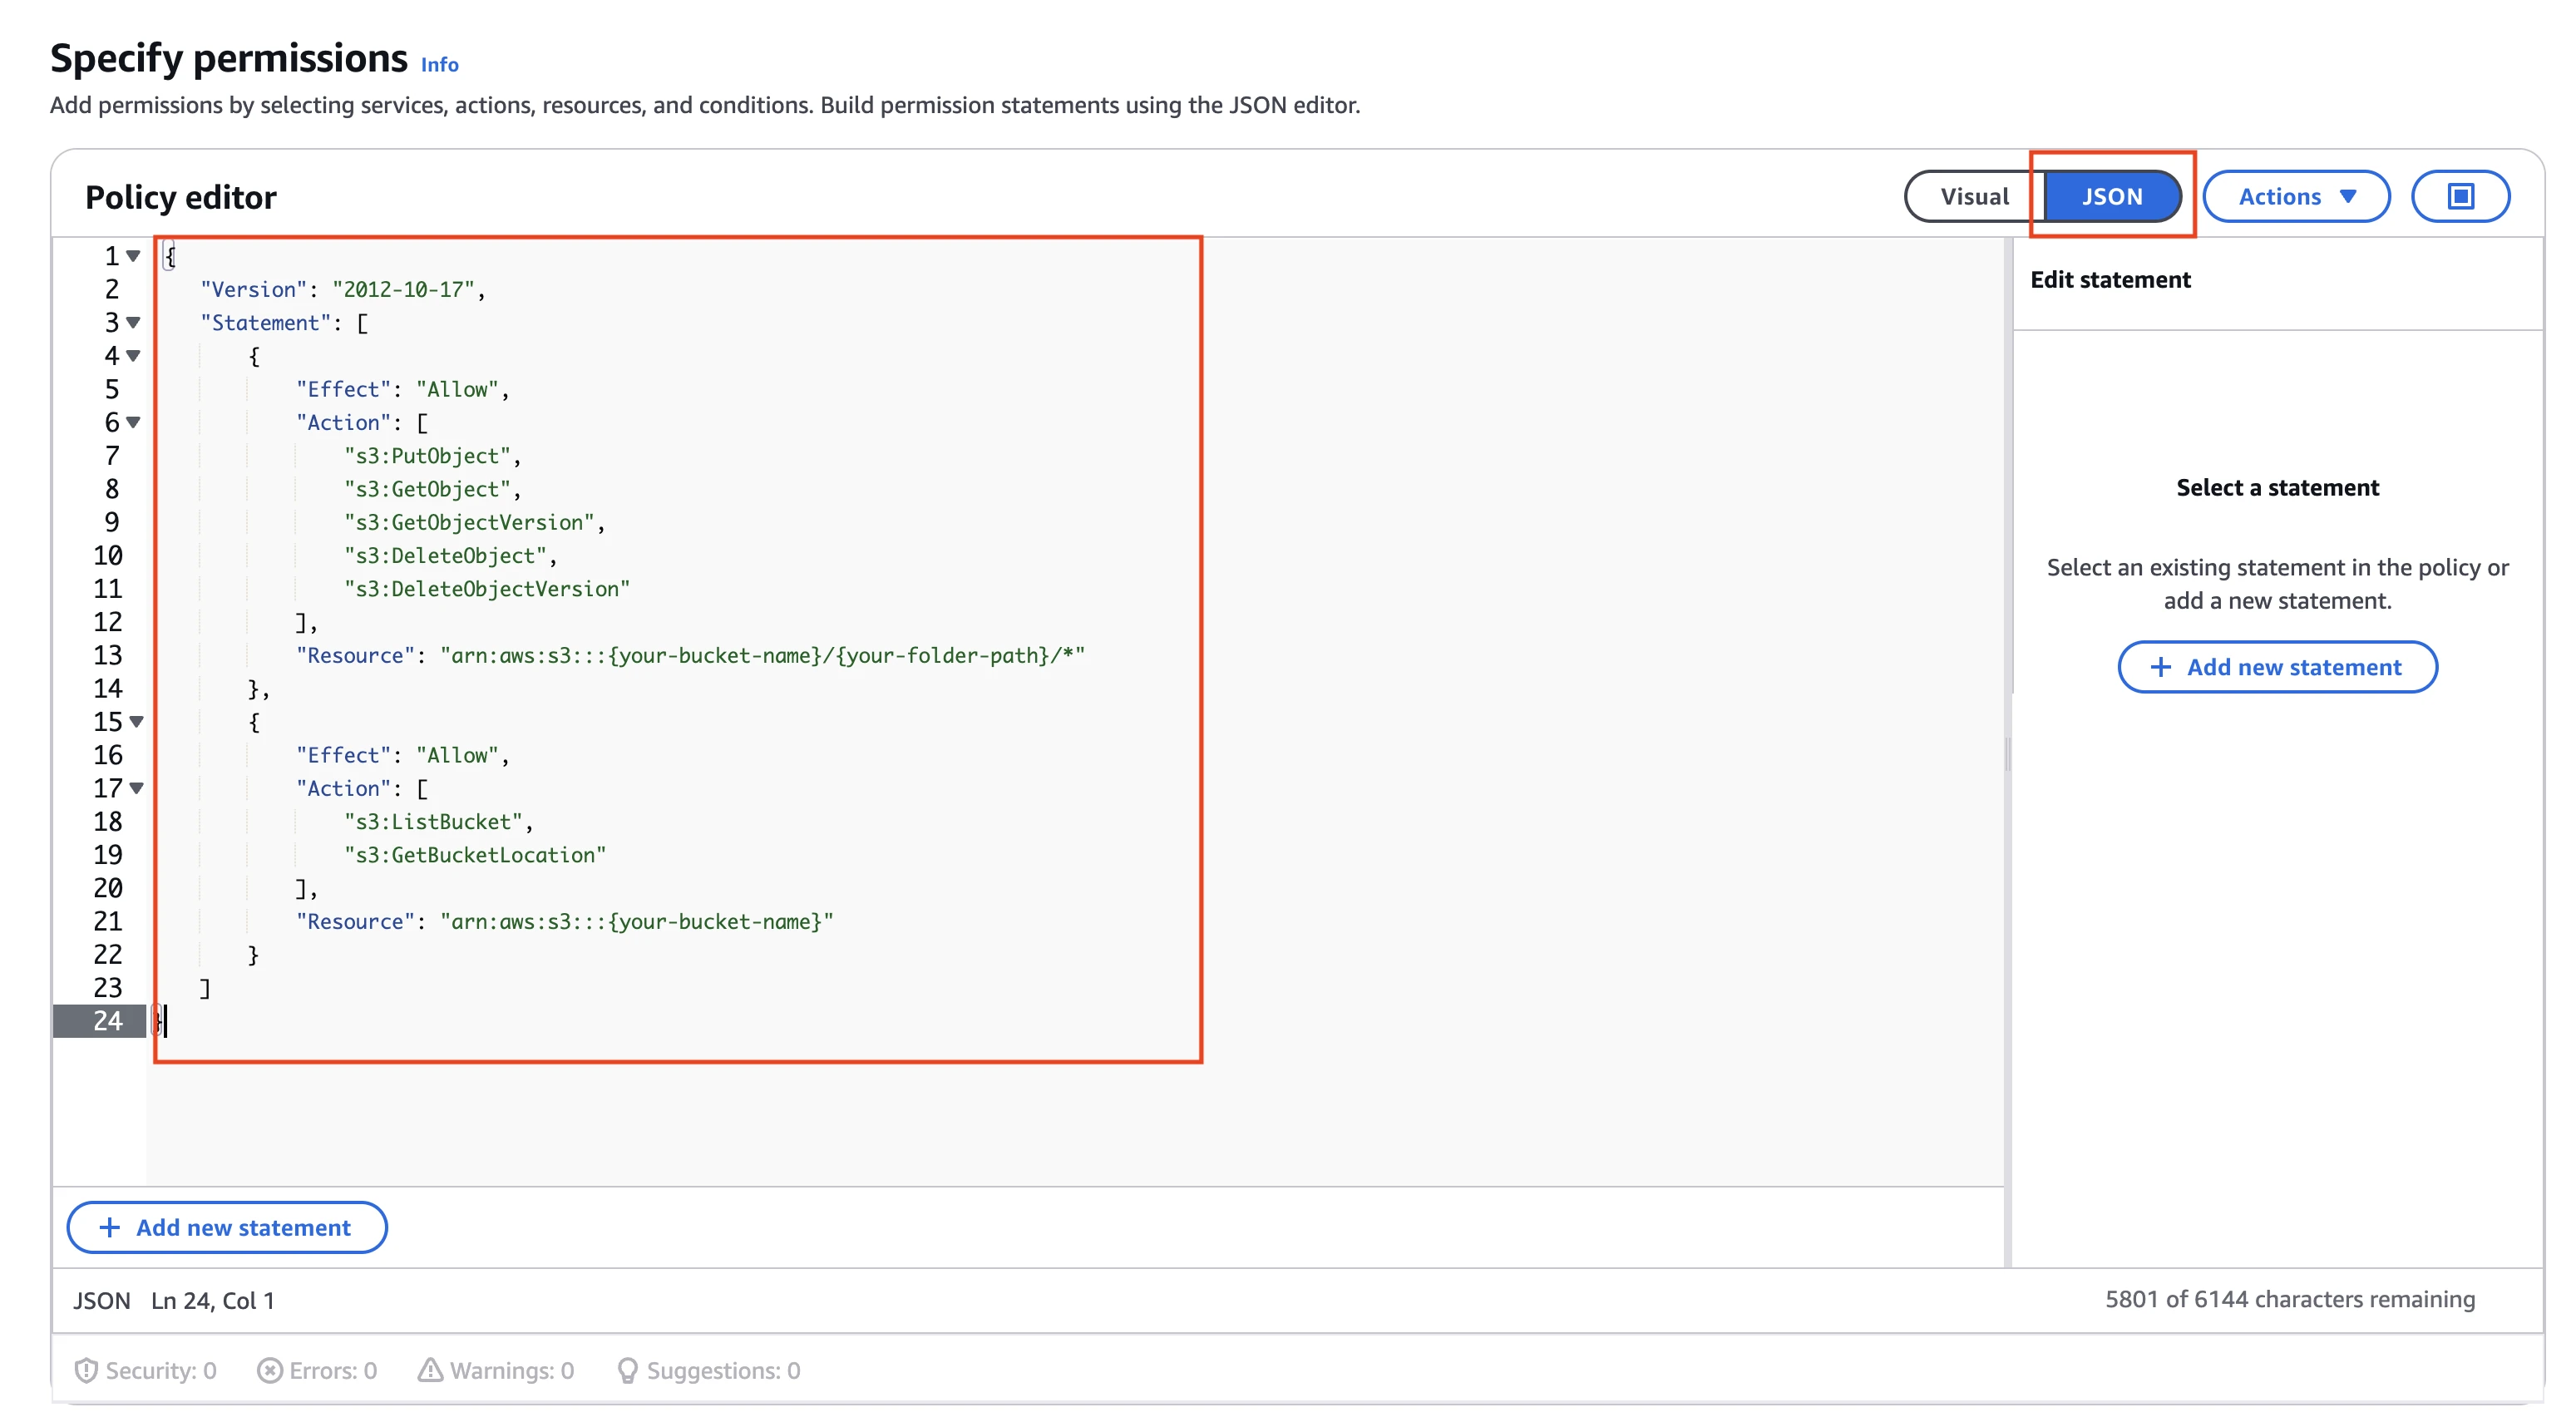
Copy the following policy and paste it in the JSON editor.
 {
    "Version": "2012-10-17",
    "Statement": [
        {
            "Effect": "Allow",
            "Action": [
                "s3:PutObject",
                "s3:GetObject",
                "s3:GetObjectVersion",
                "s3:DeleteObject",
                "s3:DeleteObjectVersion"
            ],
            "Resource": "arn:aws:s3:::{your-bucket-name}/{your-folder-path}/*"
        },
        {
            "Effect": "Allow",
            "Action": [
                "s3:ListBucket",
                "s3:GetBucketLocation"
            ],
            "Resource": "arn:aws:s3:::{your-bucket-name}"
        }
    ]
}
In the policy above, replace
{your-bucket-name}with the name of your S3 bucket and{your-folder-path}with path of the folder where you want to store External Stage files.Click Next.
Enter a Policy name.
Click Create policy.
Create IAM role
In the Amazon IAM console, go to Roles, and then click Create role.
Select AWS account.
In An AWS account section, select Another AWS account.
Specify your Fivetran Account ID
834469178297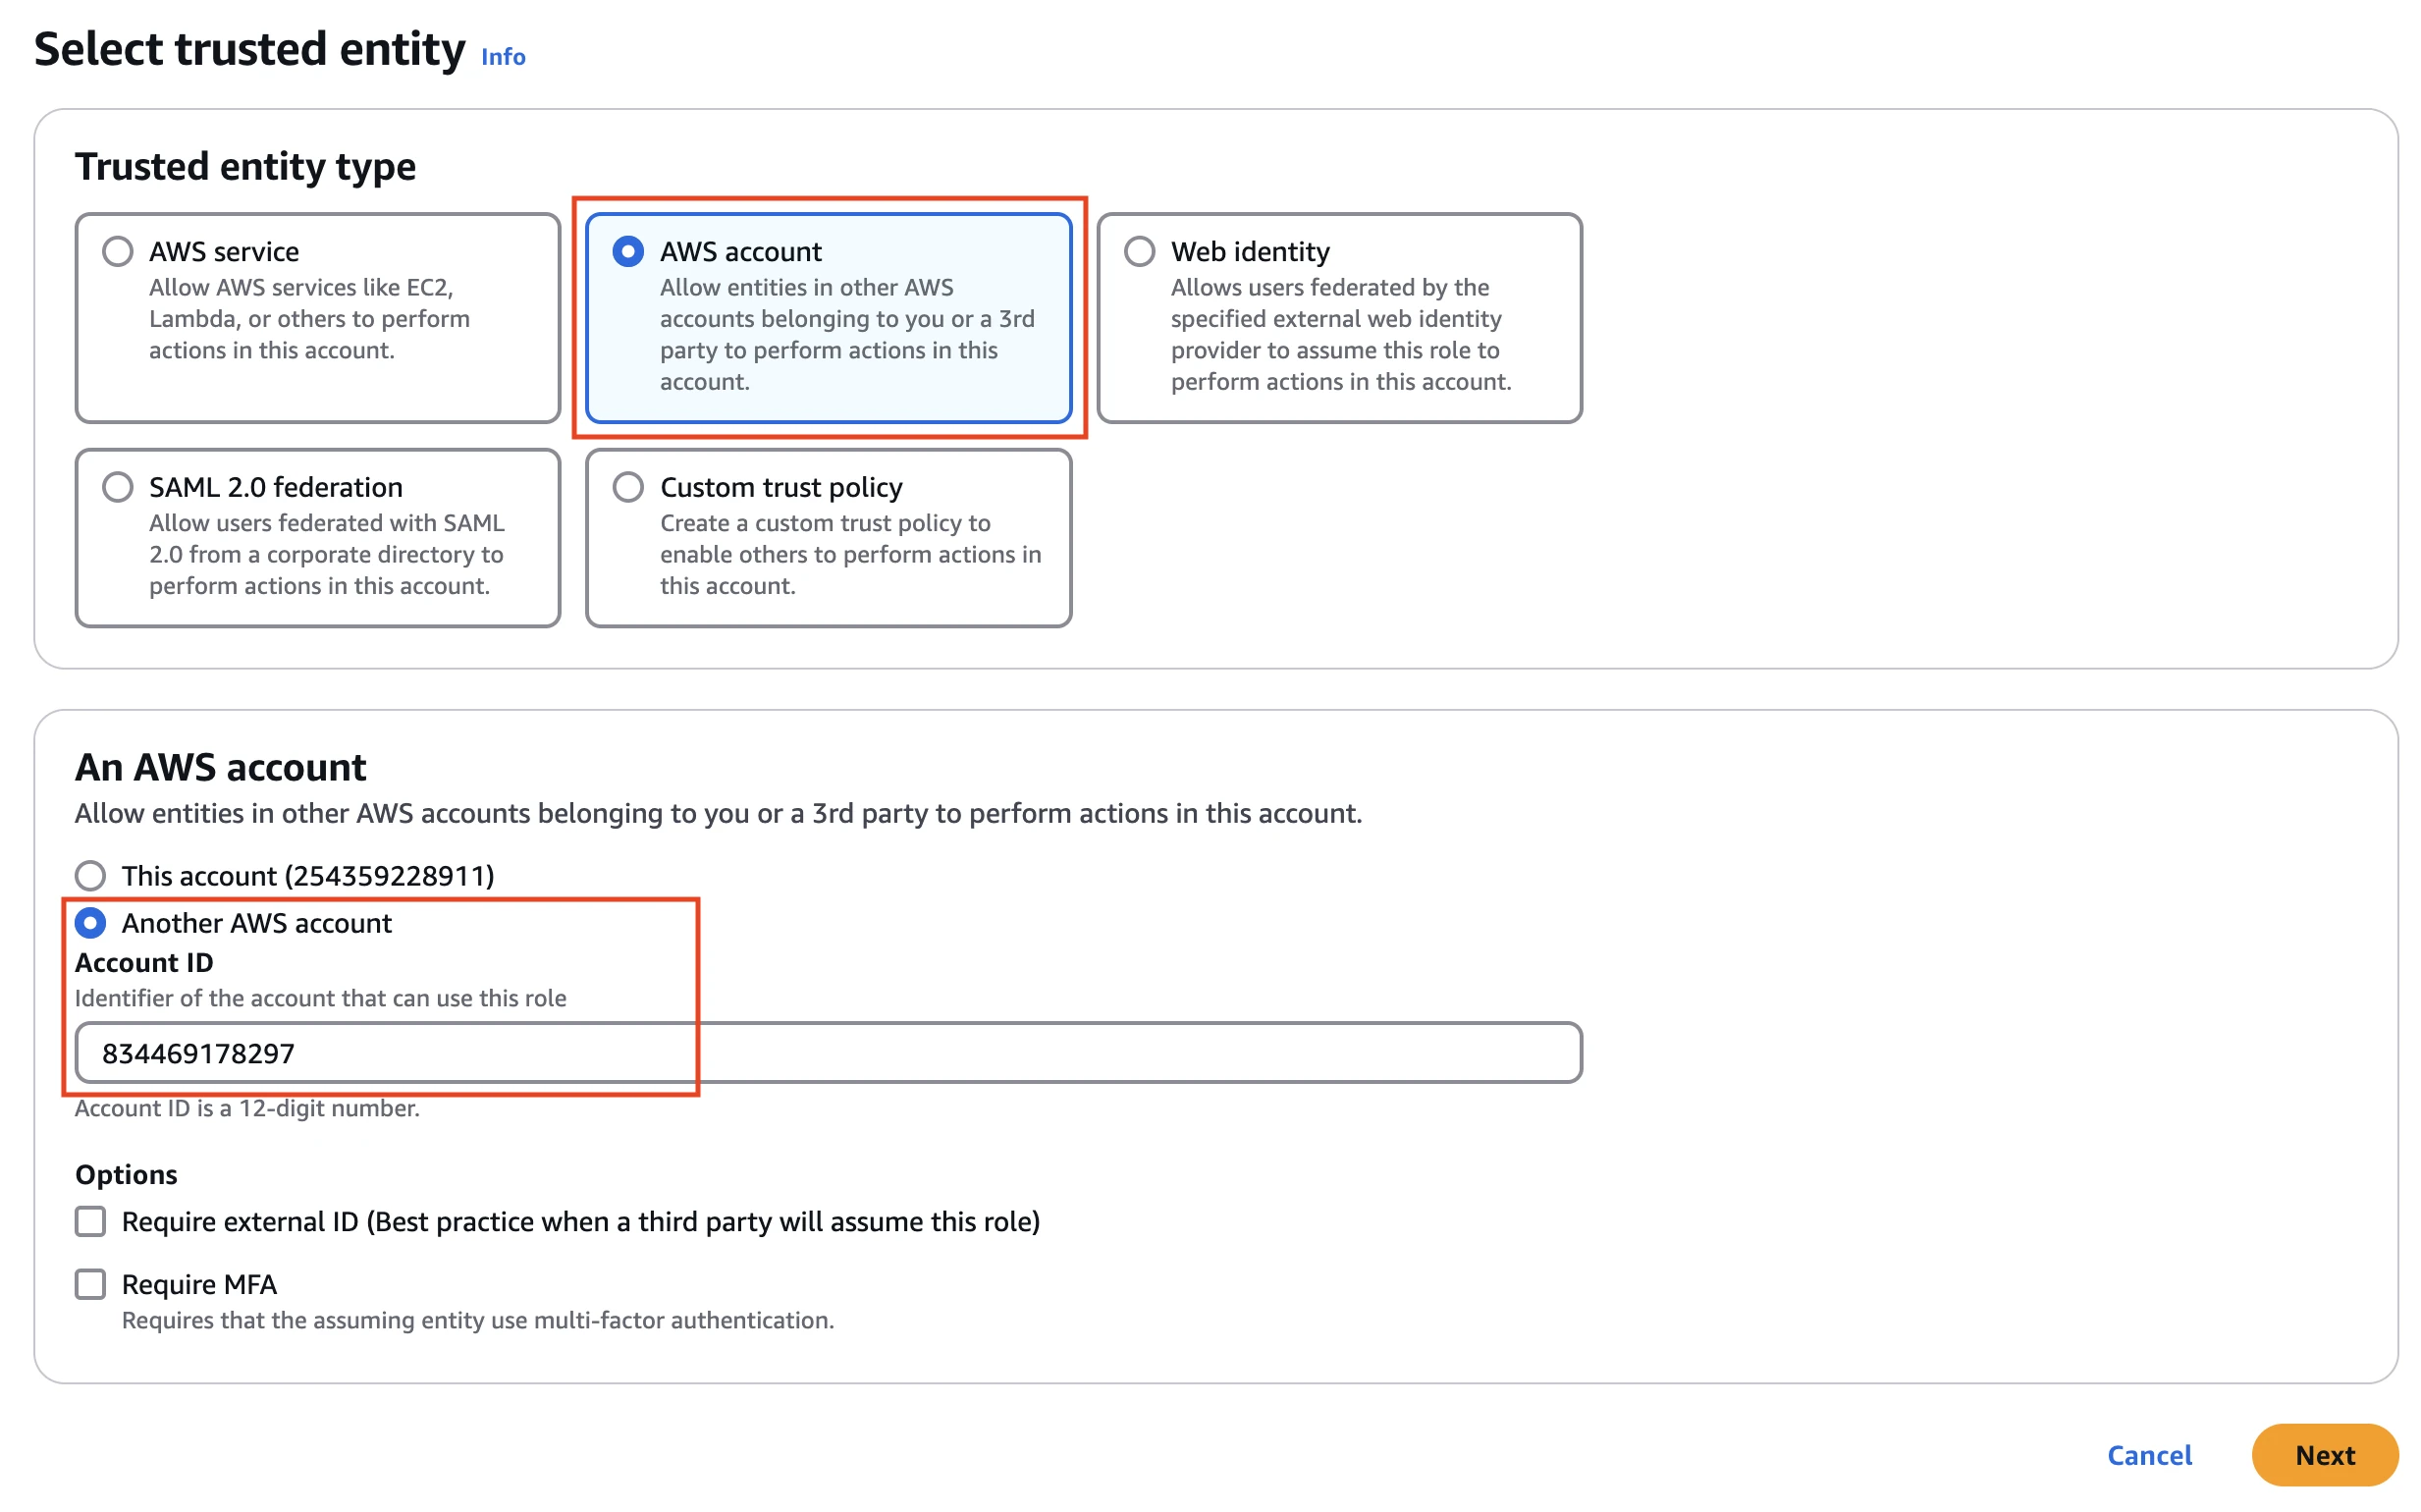
Click Next.
Select the checkbox for the IAM policy you created for your S3 bucket.
Click Next.
Enter the Role name and click Create role.
Create Amazon S3 storage integration
Log in to your Snowflake data warehouse.
Copy the following queries in a worksheet:
CREATE STORAGE INTEGRATION IF NOT EXISTS '{storage-integration-name}'
  TYPE = EXTERNAL_STAGE
  STORAGE_PROVIDER = 'S3'
  STORAGE_AWS_ROLE_ARN = '{your-role-arn}'
  STORAGE_AWS_EXTERNAL_ID = '{your-external-id}'
  ENABLED = TRUE
  STORAGE_ALLOWED_LOCATIONS = ('s3://{your-bucket-name}/{your-folder-path}/' );

GRANT USAGE ON INTEGRATION '{storage-integration-name}' TO ROLE '{role}';
DESC STORAGE INTEGRATION '{storage-integration-name}';
In the queries, replace following placeholders:
{storage-integration-name}with the name of your Storage Integration{your-role-arn}with the ARN of the IAM role you created in the Create IAM role step.{your-external-id}with a custom External ID. Generate a random External ID.{your-bucket-name}with the name of your S3 bucket{your-folder-path}with path of the folder where you want to store External Stage files.{role}with the role you created in the Run script in Snowflake warehouse step.
Execute the query and make a note of the
STORAGE_AWS_IAM_USER_ARN&STORAGE_AWS_EXTERNAL_ID. You will need them to create a trusted policy.
Configure trust policy
In the Amazon IAM console, go to Roles, and then open role created in the Create IAM role step.
Go to the Trust relationships tab.
Click Edit trust policy.
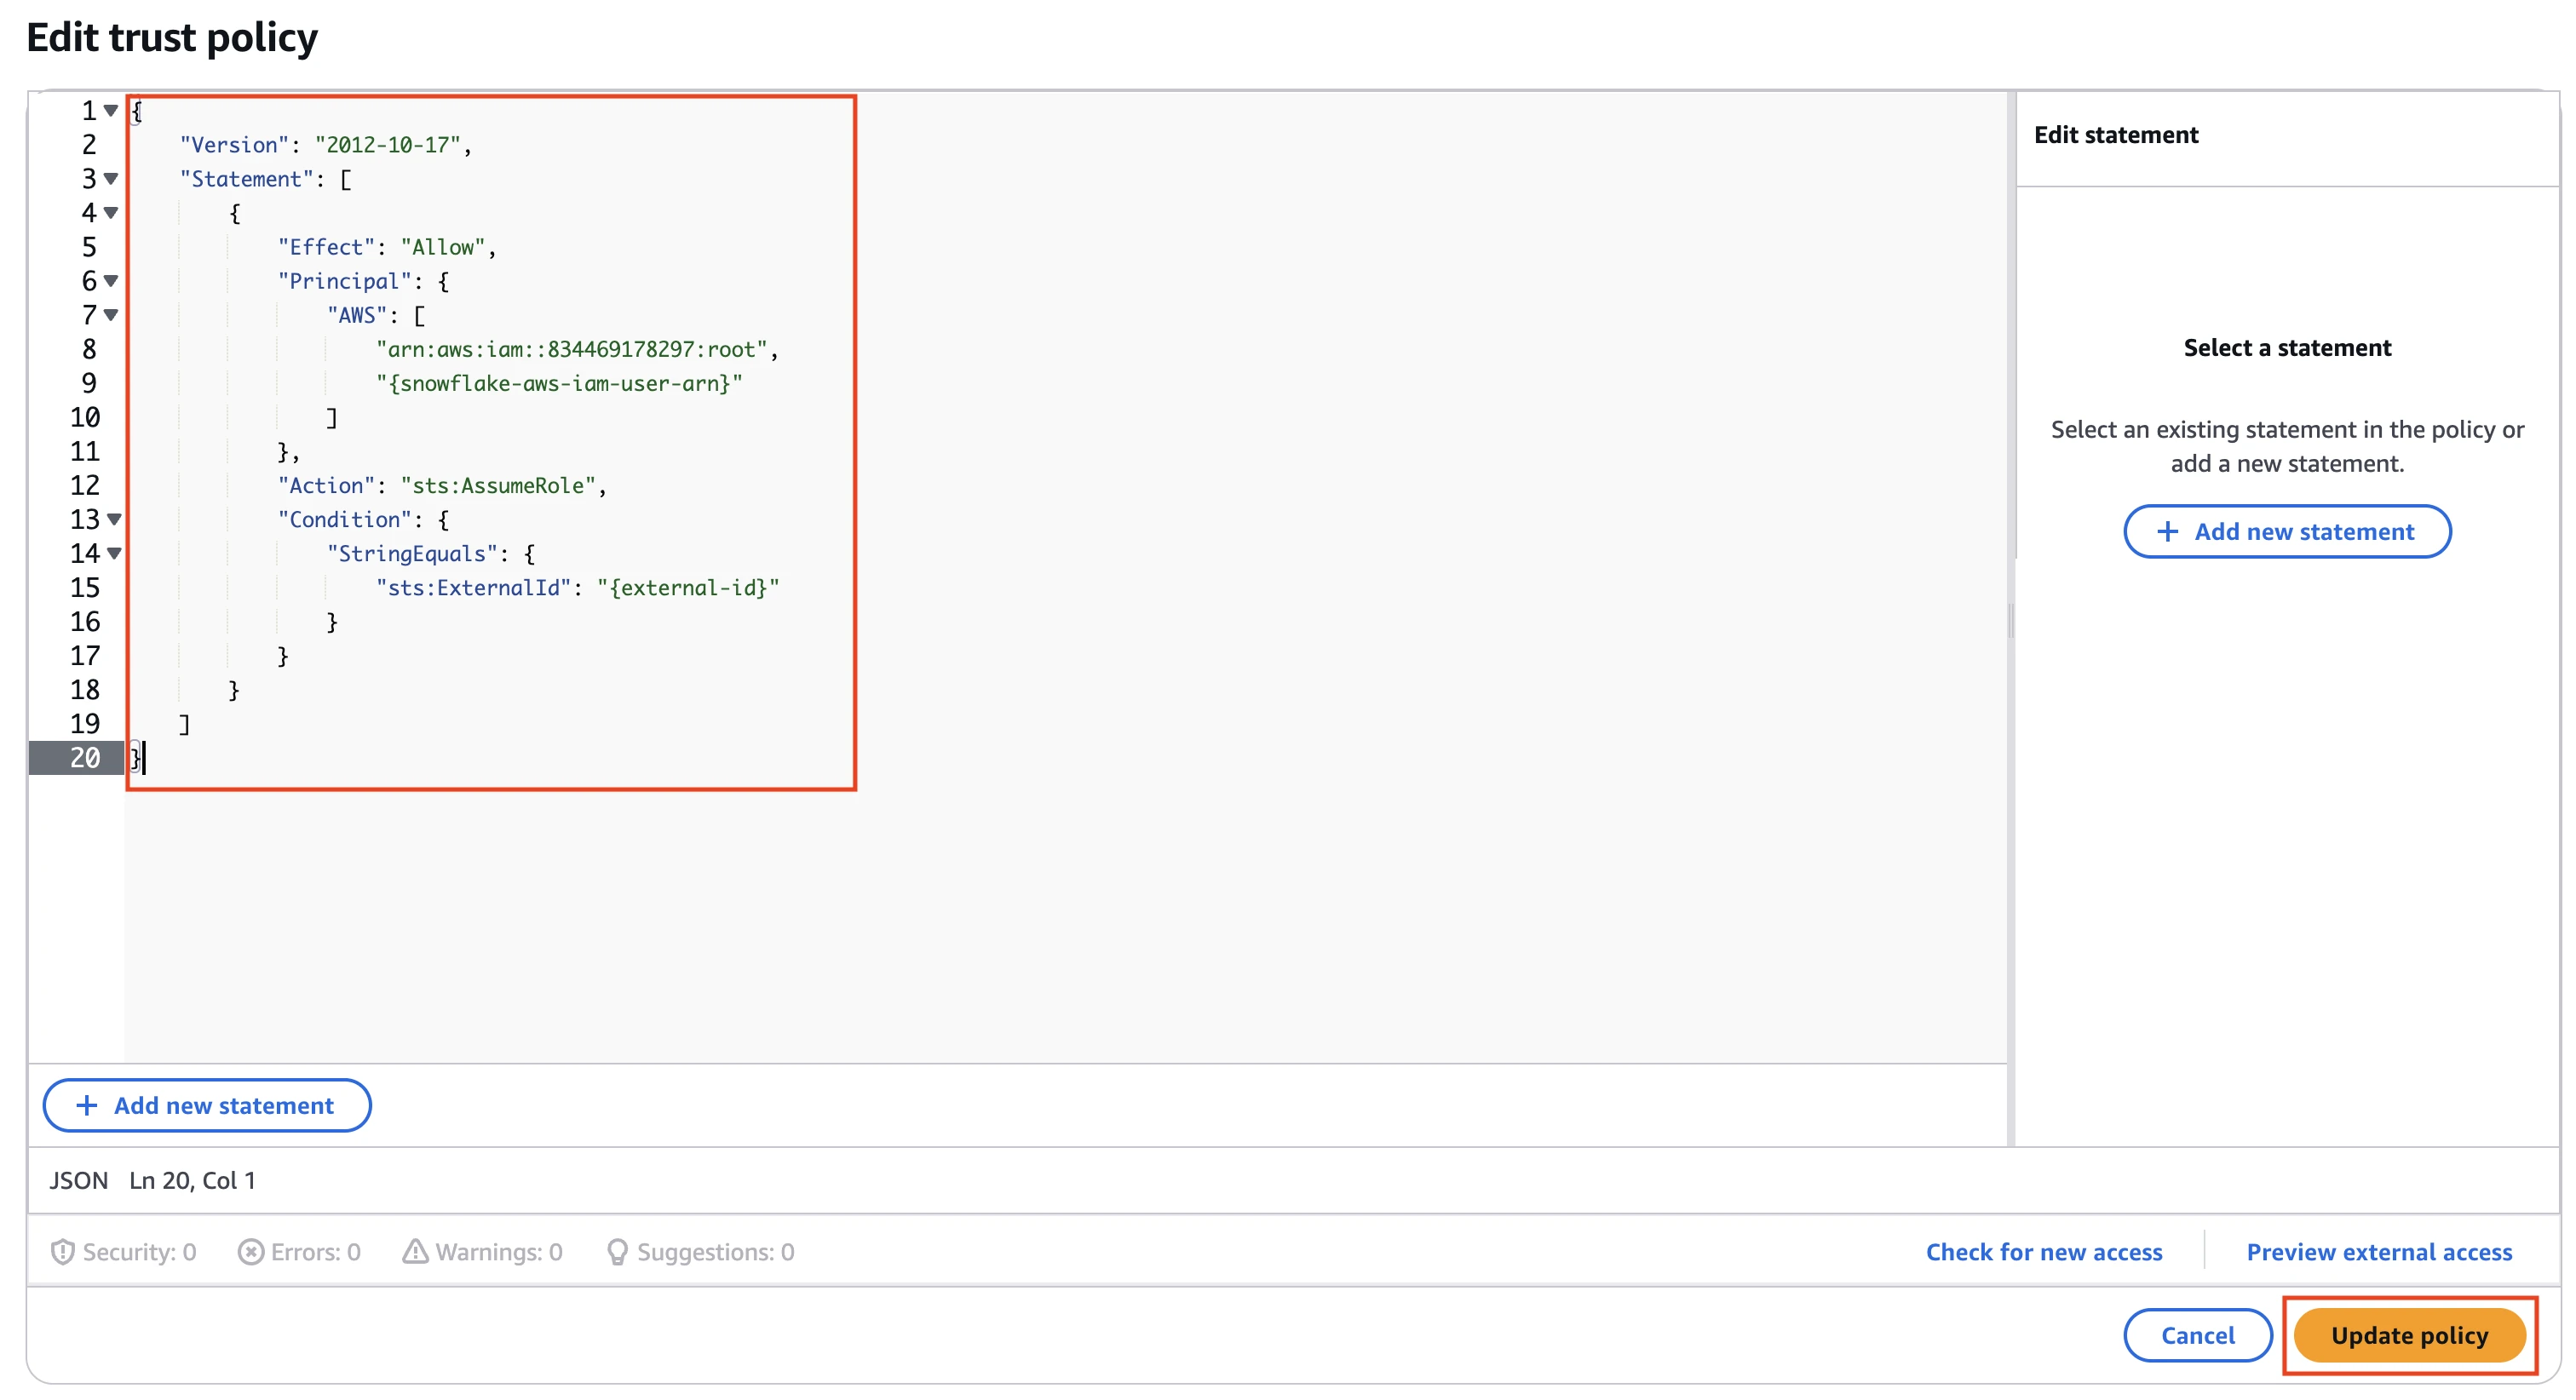
Copy the following policy and paste it in the JSON editor.
{
    "Version": "2012-10-17",
    "Statement": [
        {
            "Effect": "Allow",
            "Principal": {
                "AWS": [
                    "arn:aws:iam::834469178297:root",
                    "{snowflake-aws-iam-user-arn}"
                ]
            },
            "Action": "sts:AssumeRole",
            "Condition": {
                "StringEquals": {
                    "sts:ExternalId": "{external-id}"
                }
            }
        }
    ]
}
In the policy above, replace
{snowflake-aws-iam-user-arn}and{external-id}with the values ofSTORAGE_AWS_IAM_USER_ARNandSTORAGE_AWS_EXTERNAL_IDyou noted earlier.Click Update policy.
Configure GCS bucket as external stage
- Create a GCS bucket.
- Create a GCS storage integration.
- Execute the following command:
DESC STORAGE INTEGRATION <integration_name>. - Give permissions for the Snowflake service account to access the GCS bucket.
- Give the Storage Object Admin permission to the Fivetran service account (you found in the setup form) to access the GCS bucket. We need this permission to access the bucket to add and delete objects to match the source data.
Configure Azure Storage as external stage
- Create an Azure Storage account and a container where you want to store the data.
- Create an Azure storage integration.
- Give permissions for the Snowflake service principal to access the Azure container.
- Make a note of the Storage integration name and STORAGE_ALLOWED_LOCATIONS. You will need them to configure Fivetran.
- You will need to register an application and create a service principal in Microsoft Entra ID (formerly Azure Active Directory).
Register an application and add a service principal
In the navigation menu, select Microsoft Entra ID (formerly Azure Active Directory).
Go to App registrations and click + New registration.
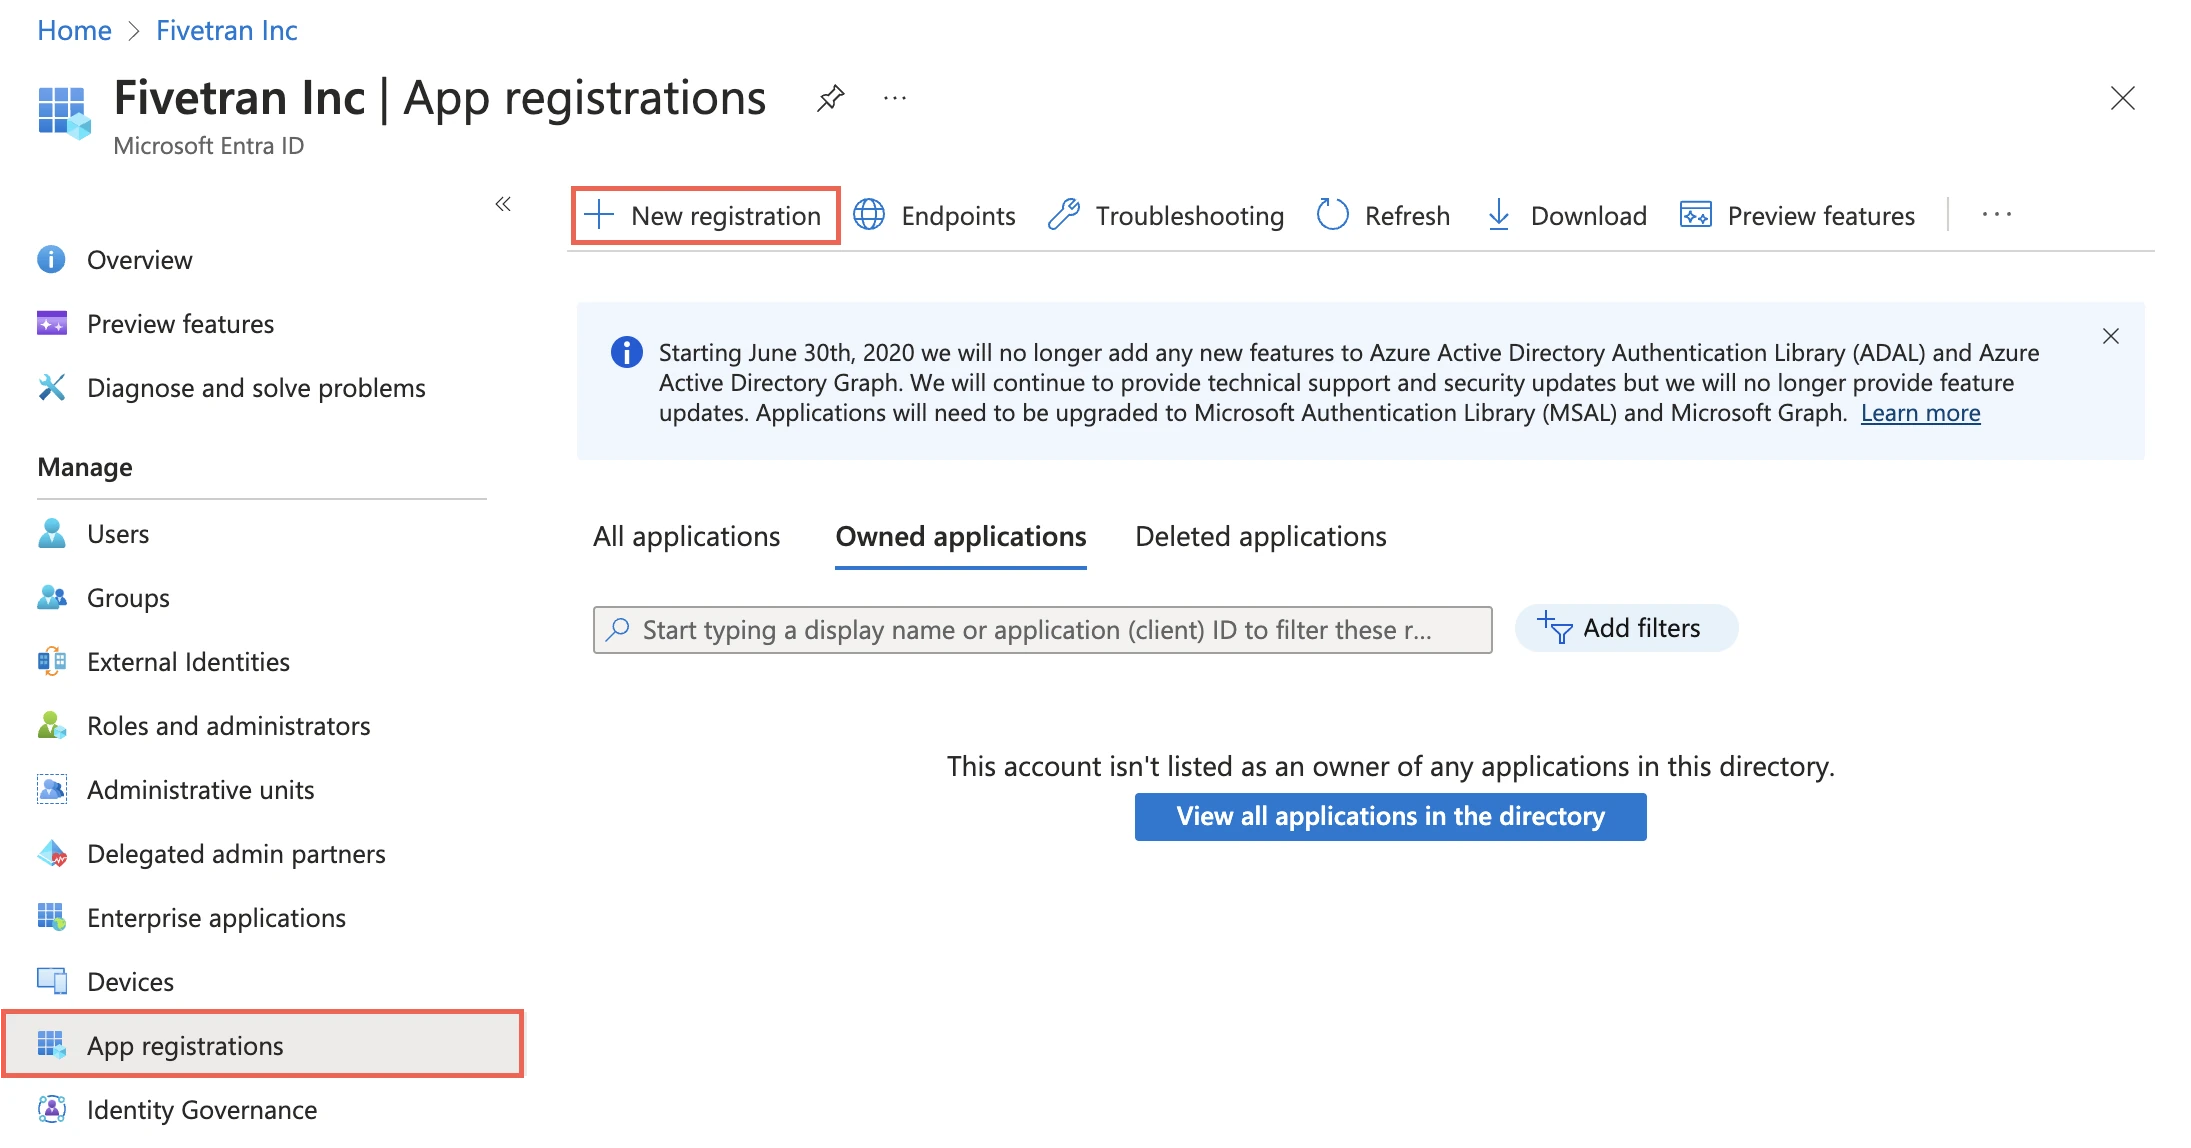
Enter a Name for the application.
In the Supported account types section, select Accounts in this organizational directory only.
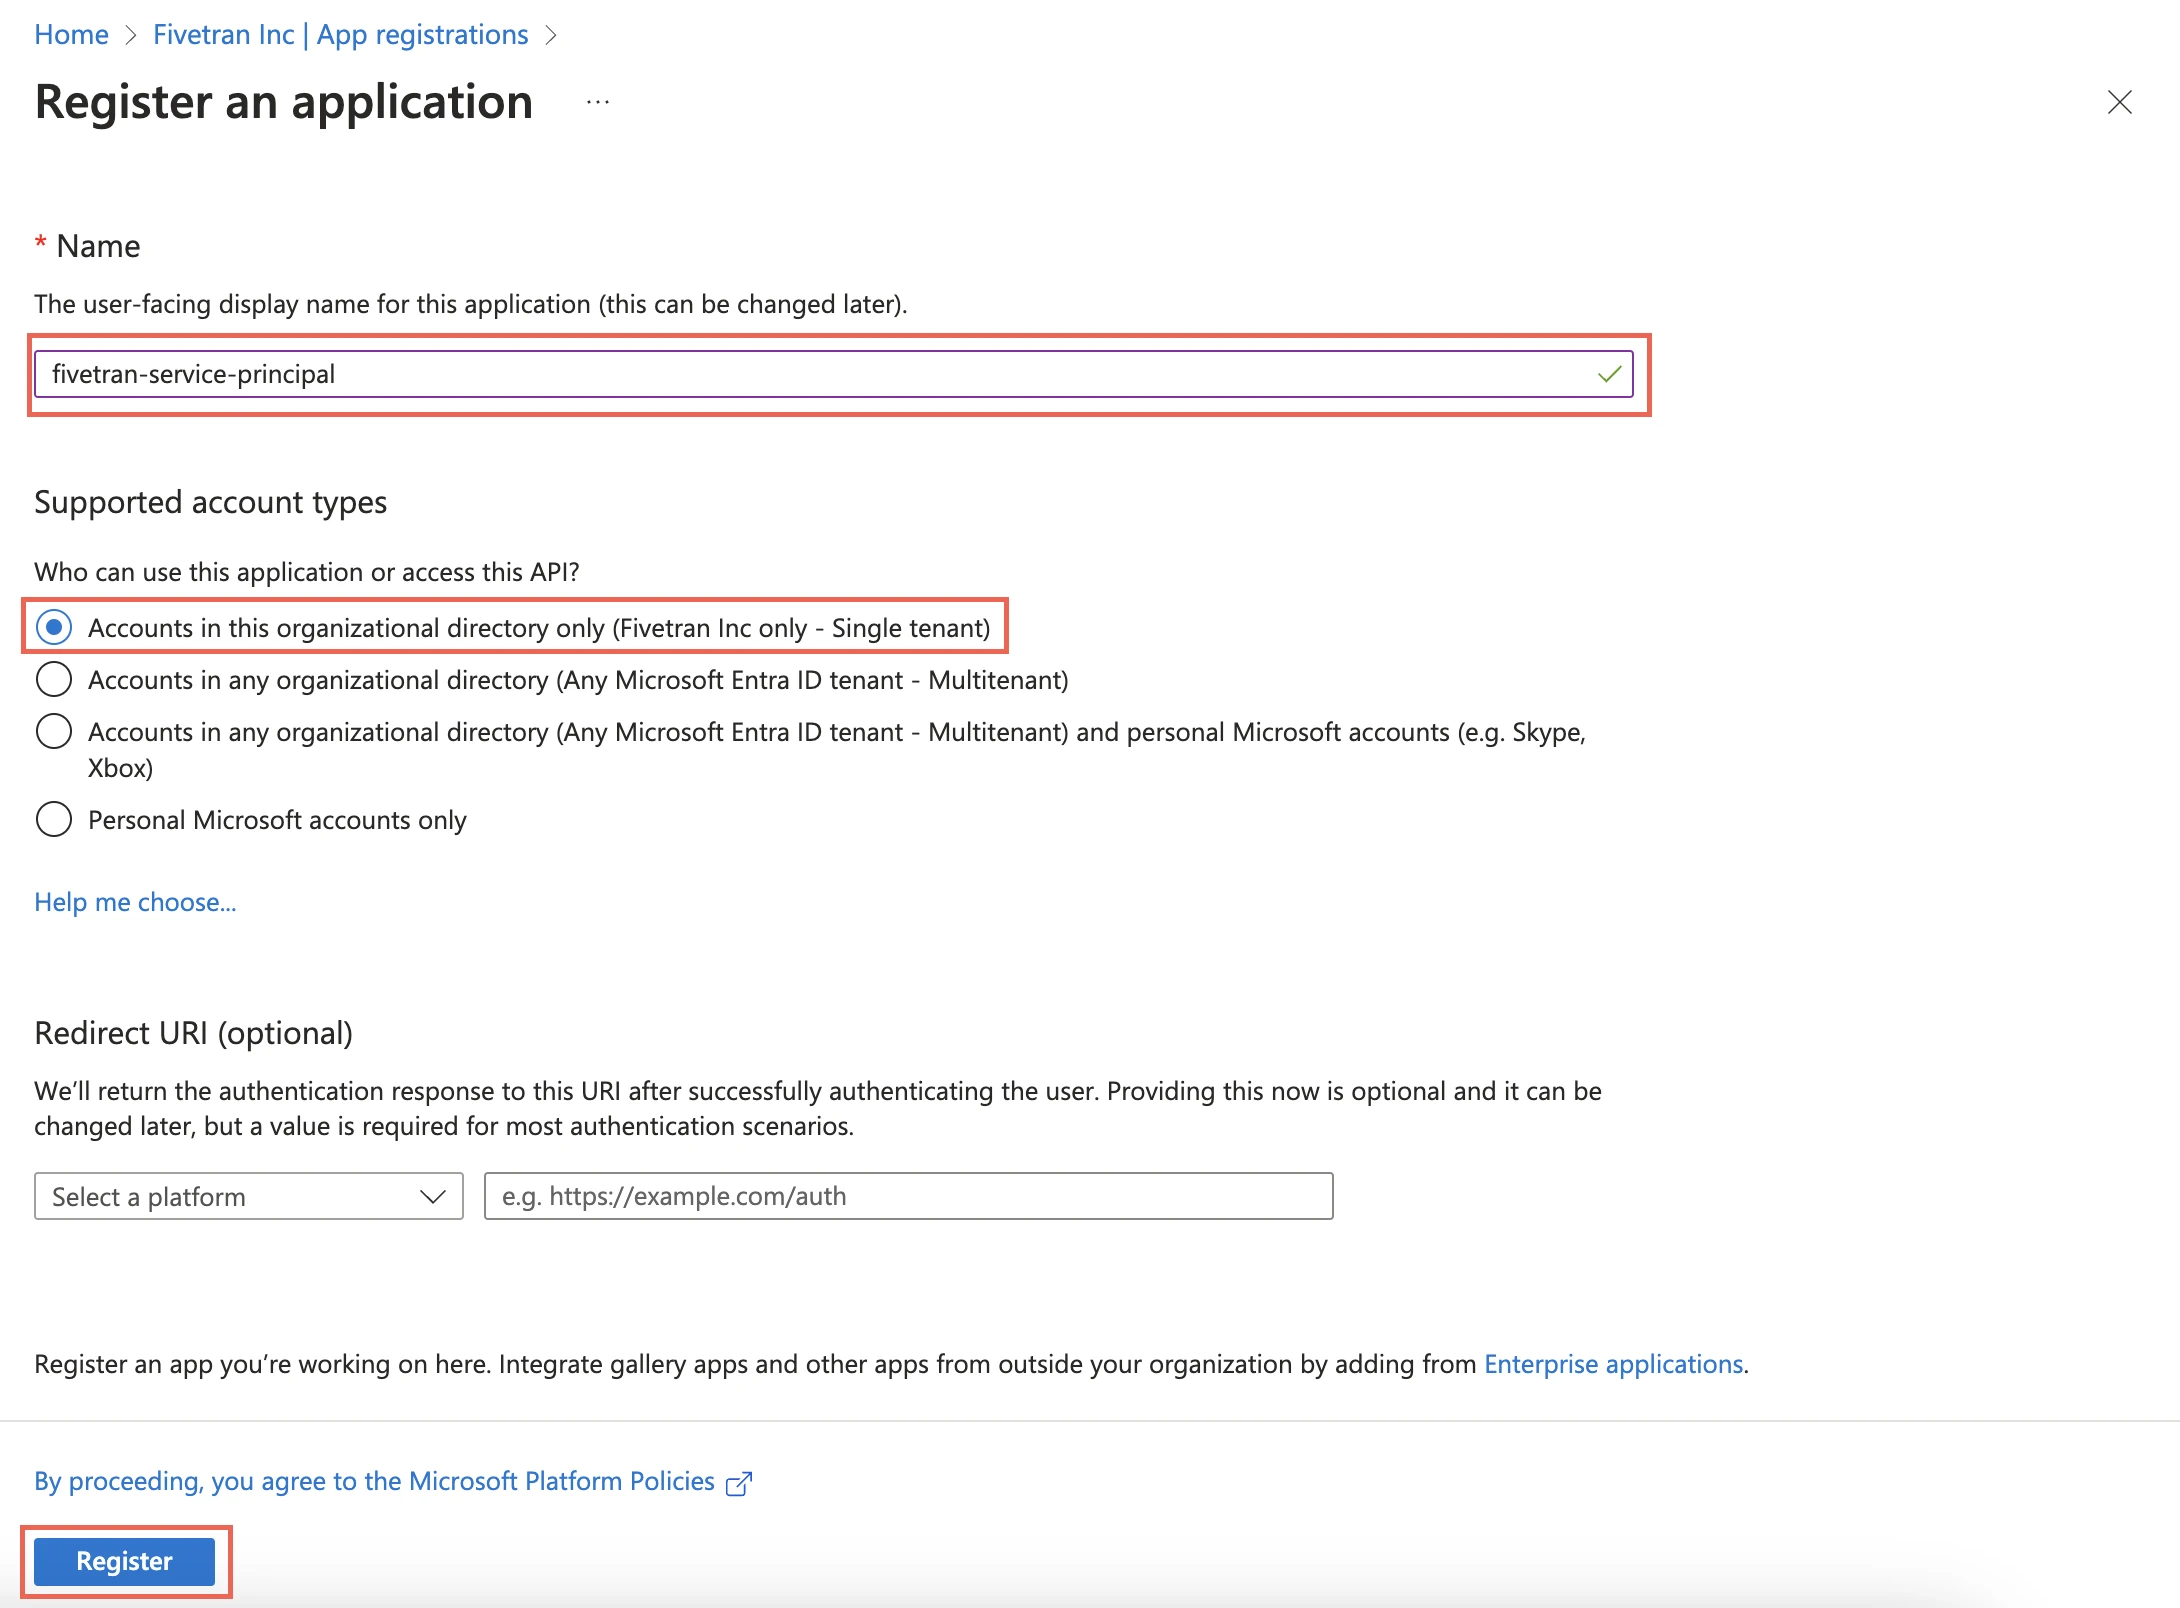
Click Register.
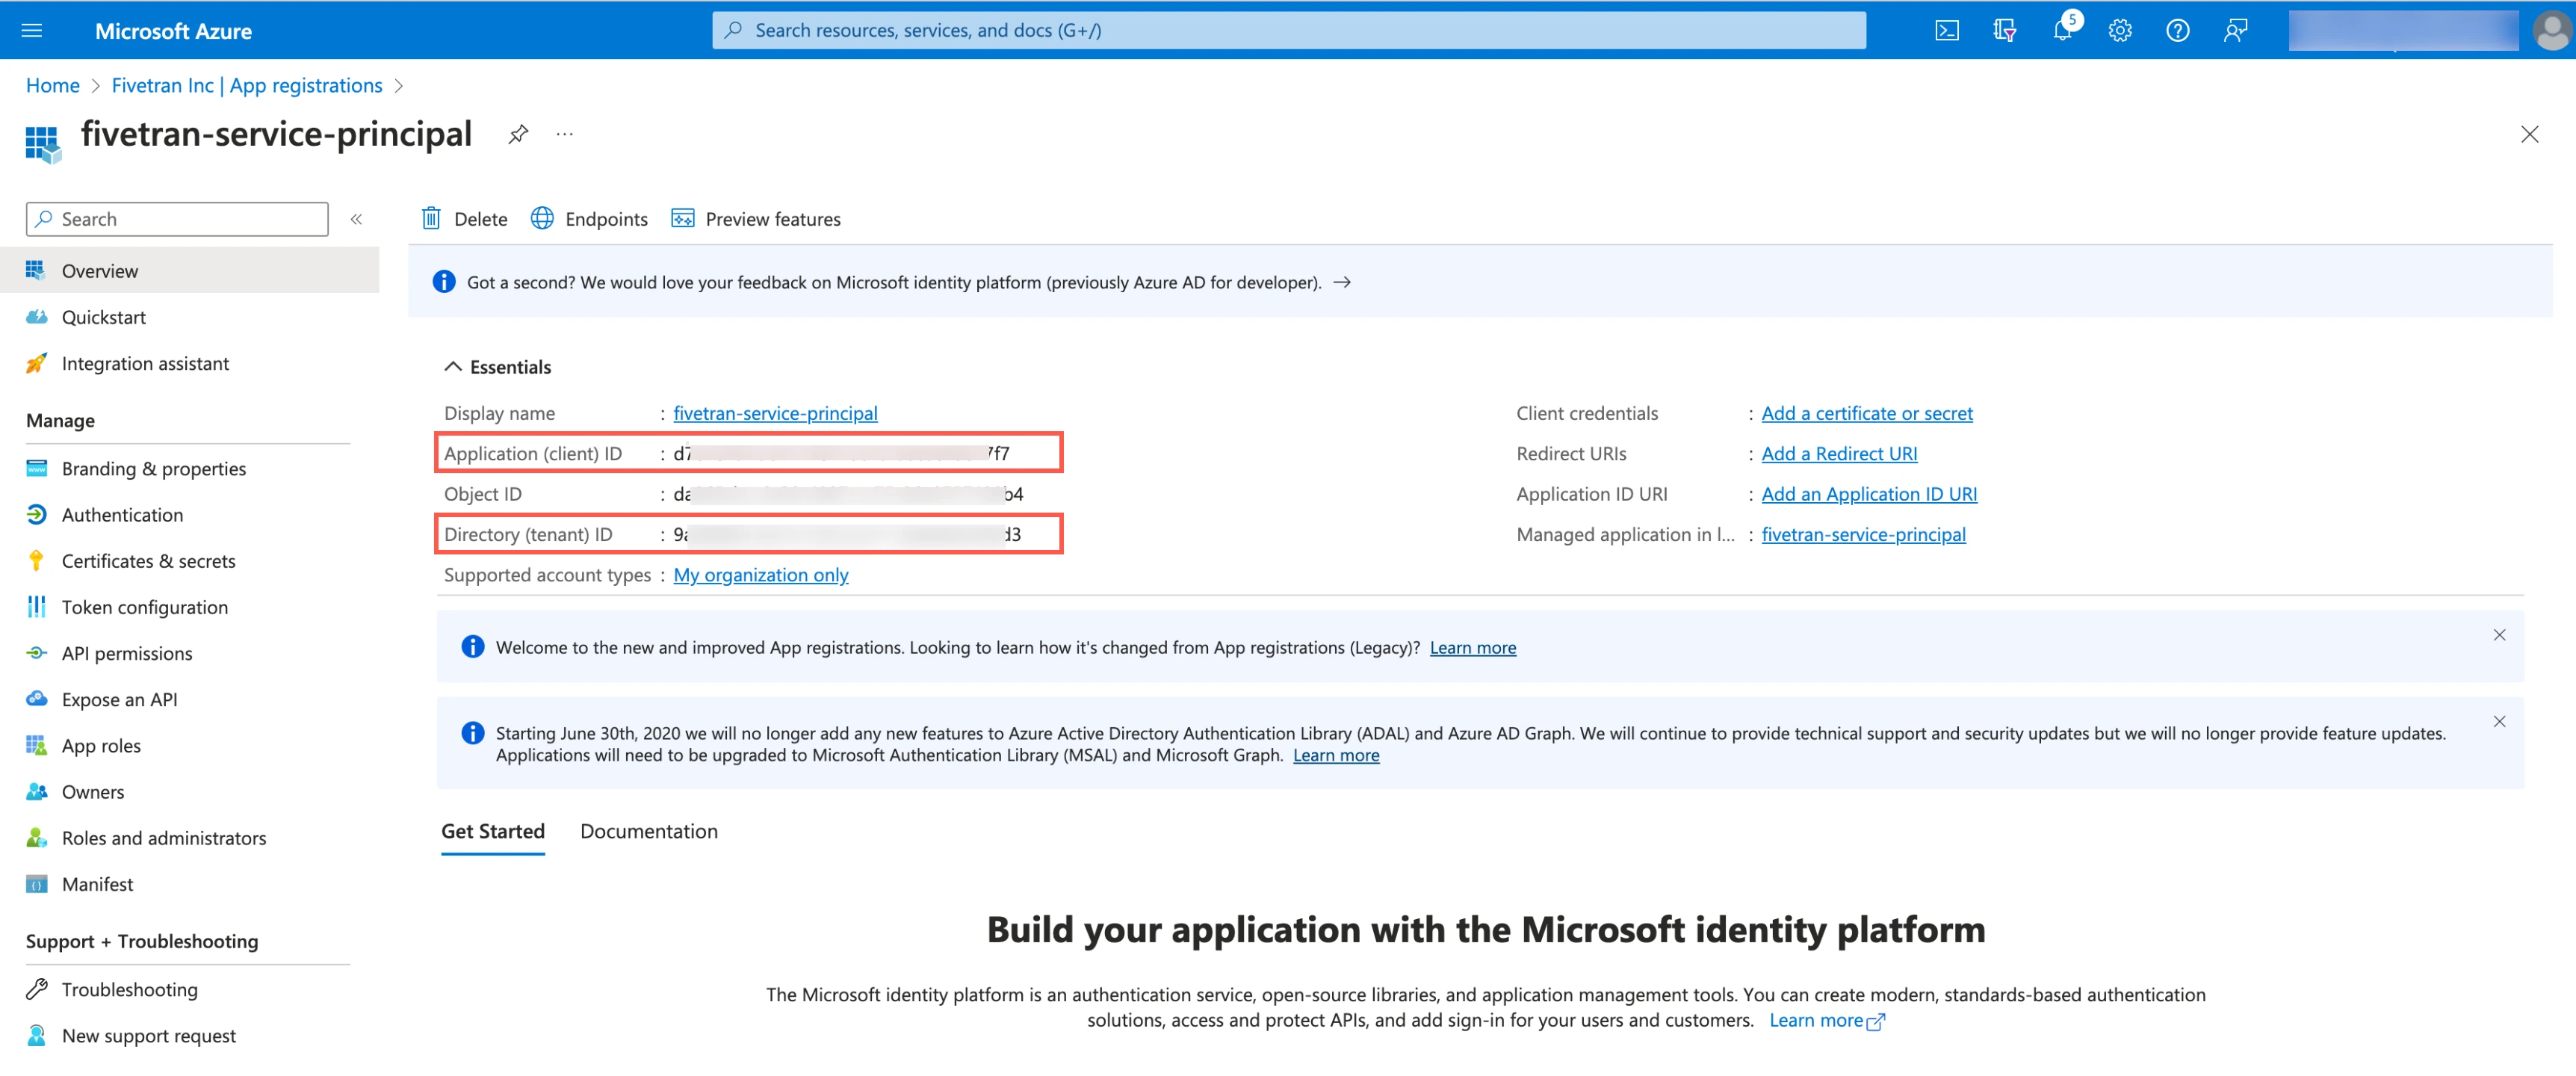
Make a note of the Application (client) ID and Directory (tenant) ID. You will need them to configure Fivetran.
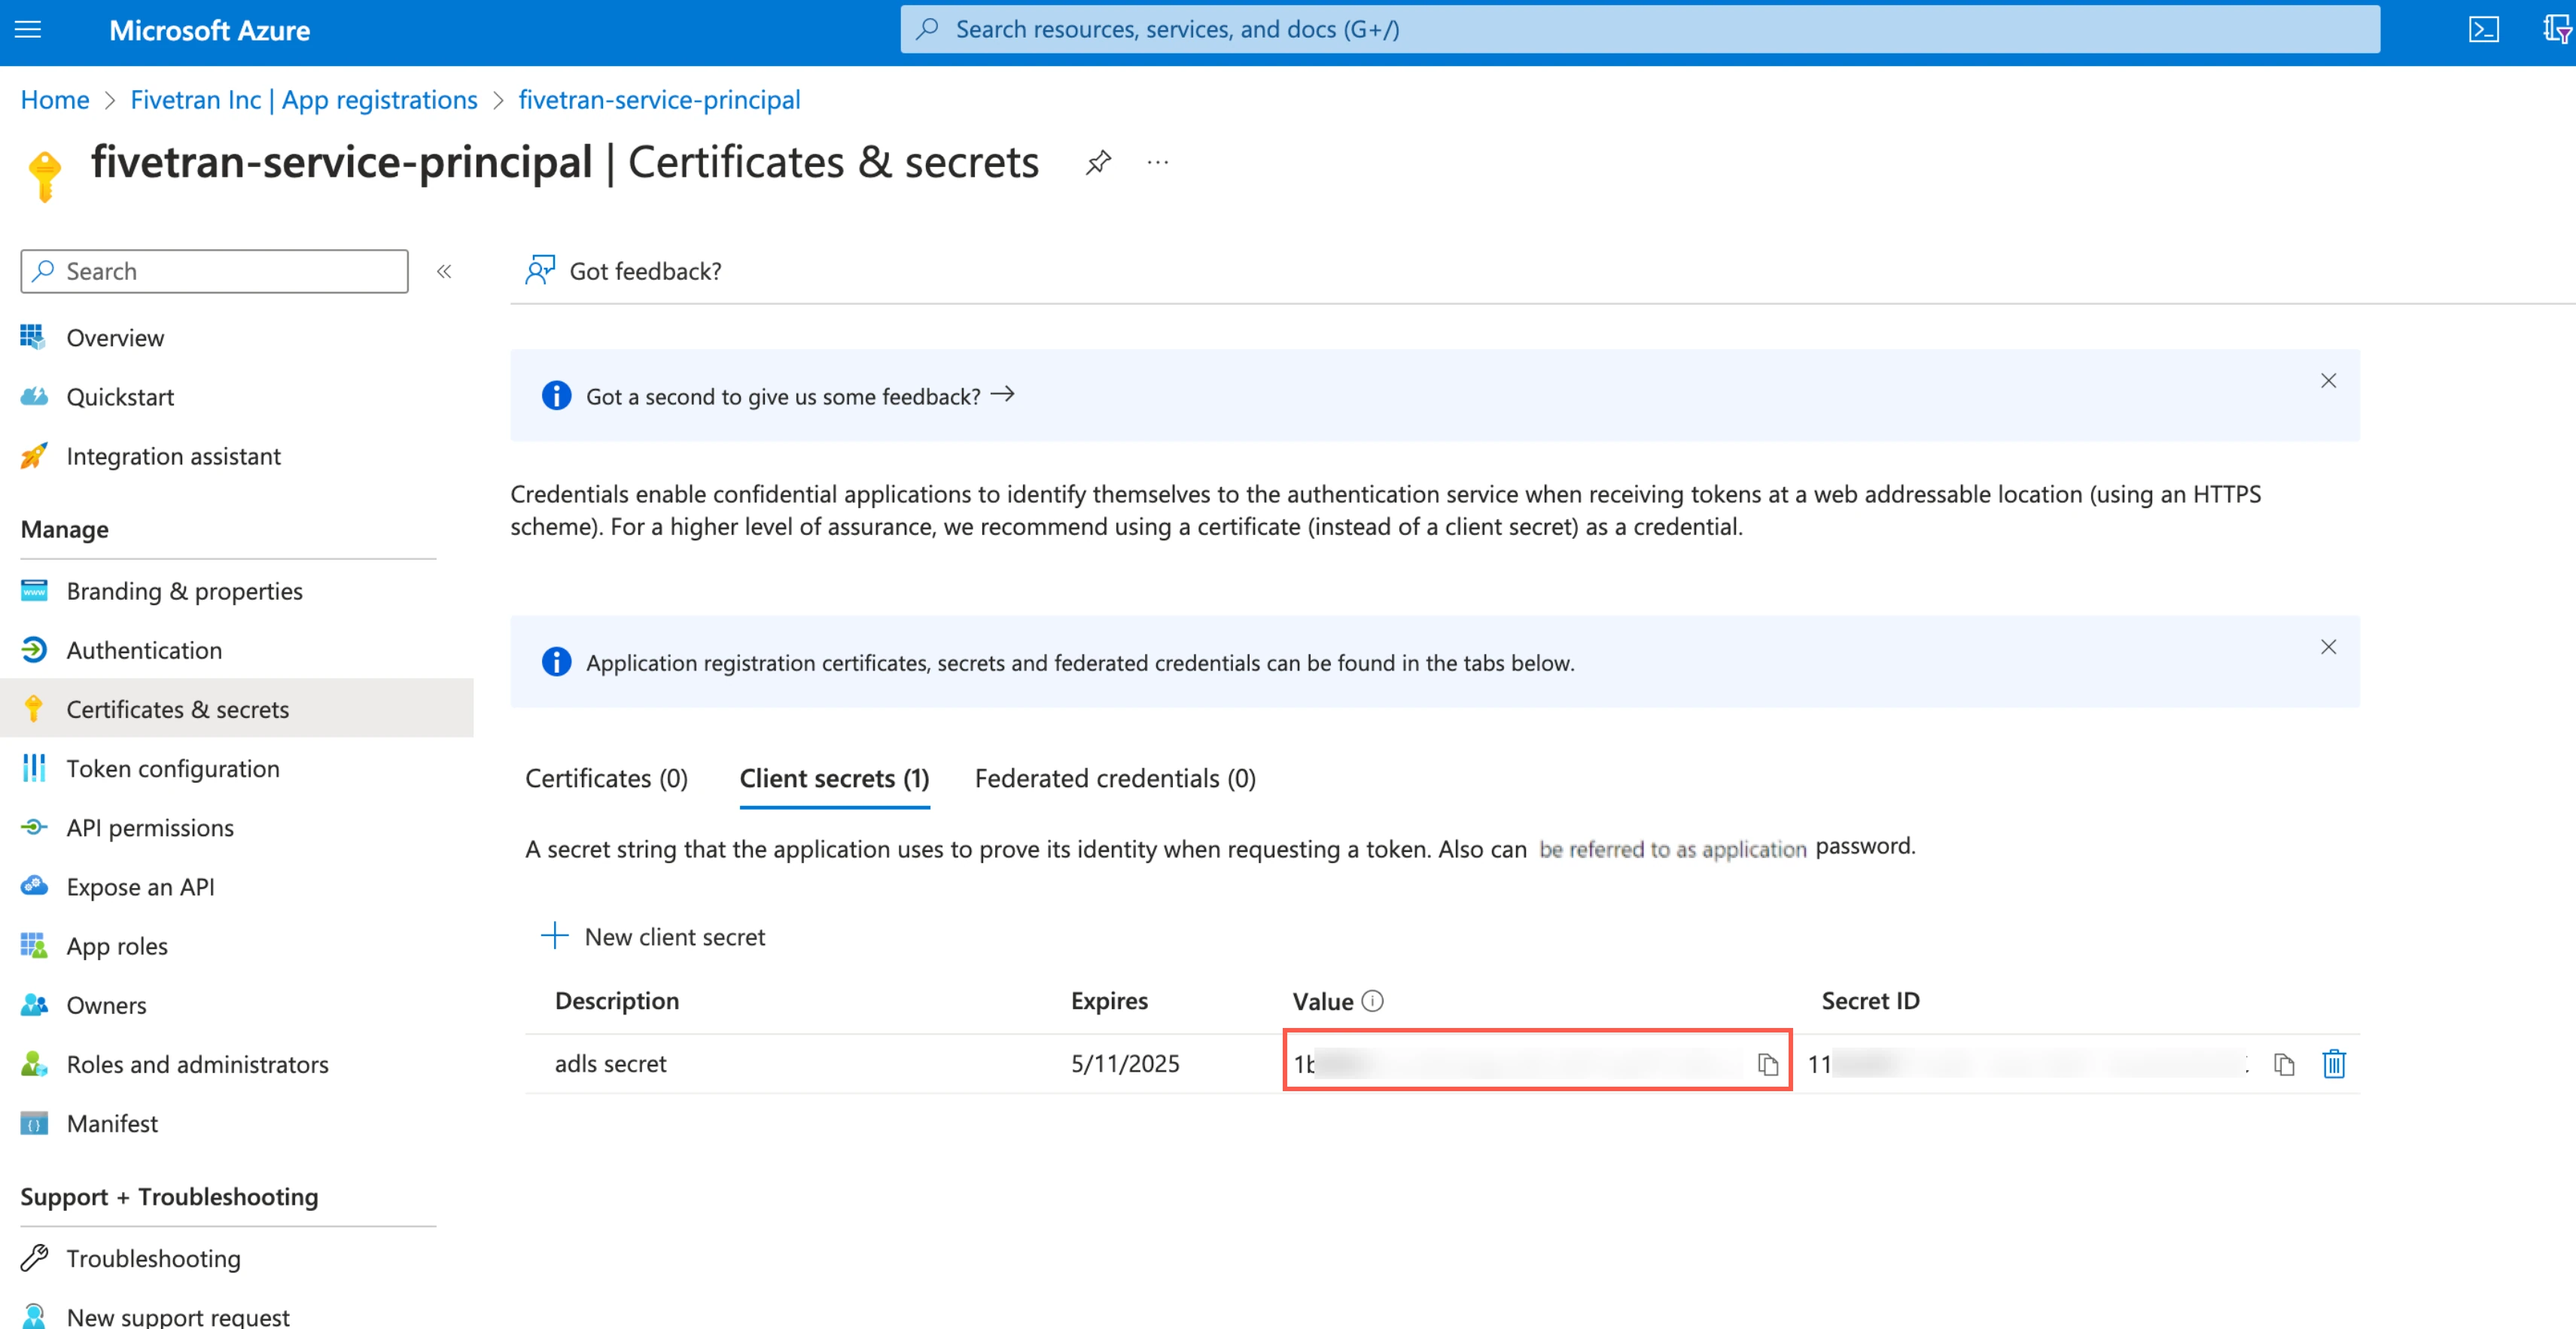
Create client secret
Select the application you registered.
In the navigation menu, go to Certificates & secrets.
Click + New client secret.
Enter a Description for your client secret.
In the Expires drop-down menu, select an expiry period for the client secret.
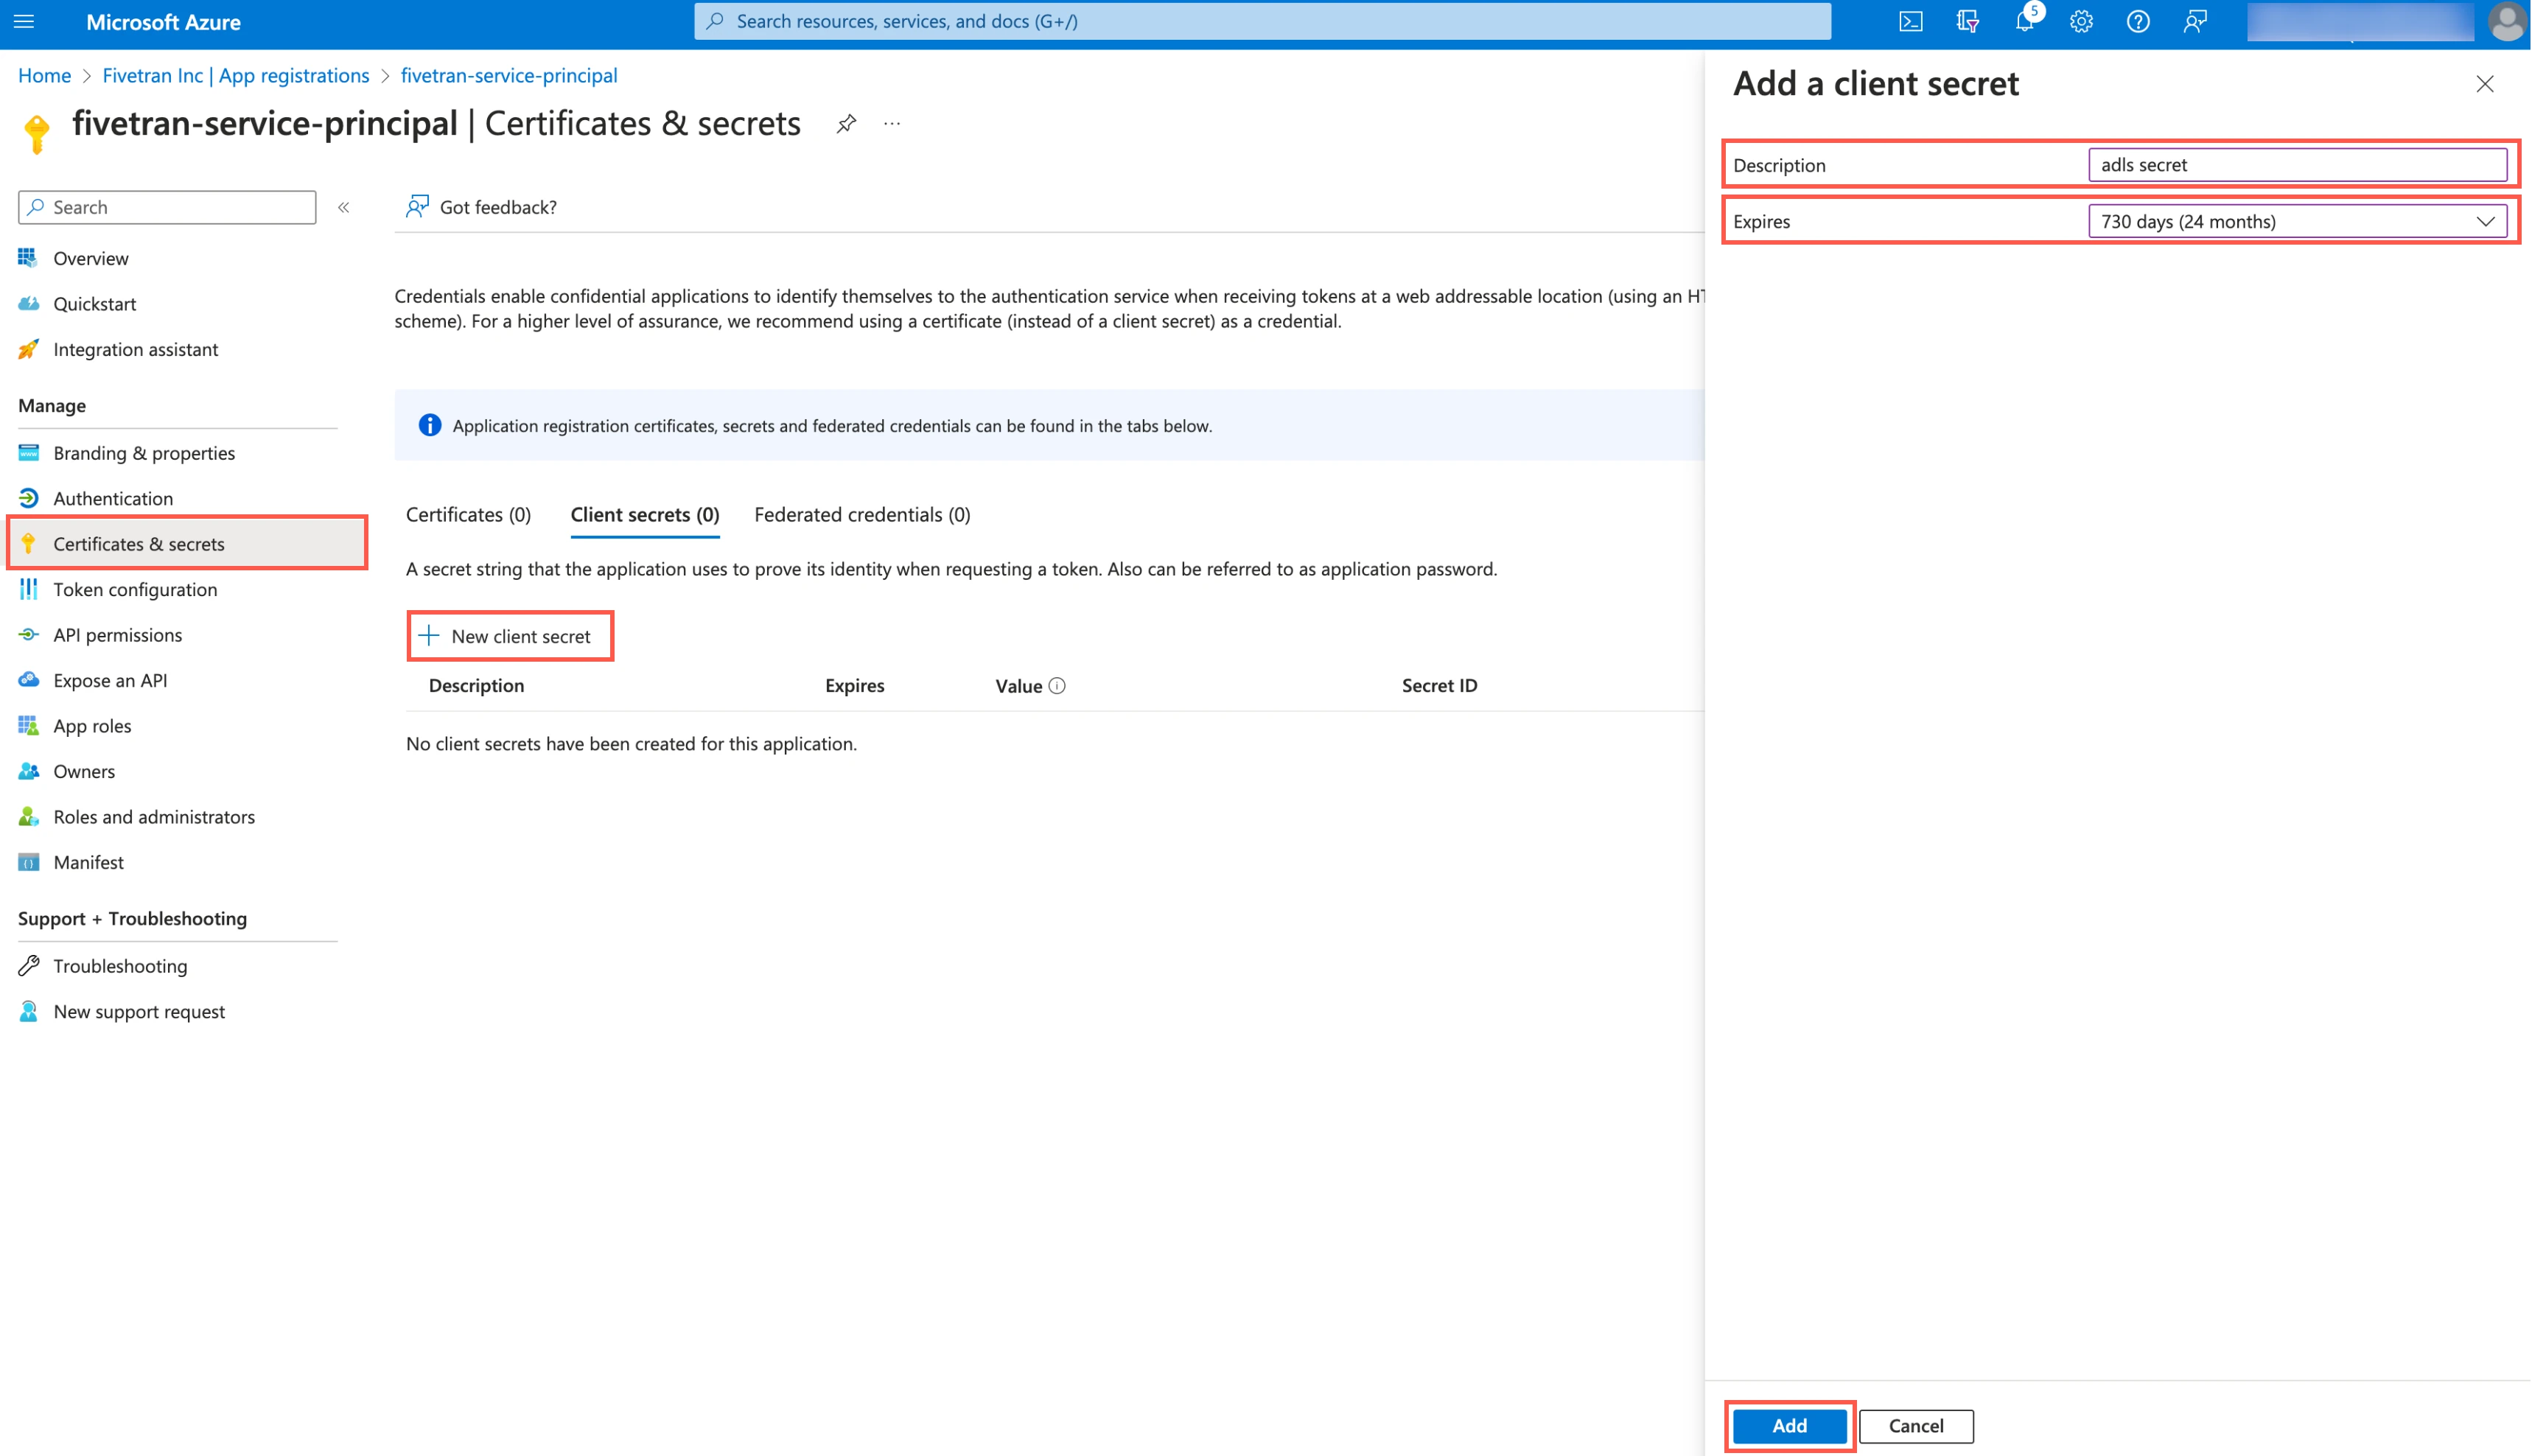
Click Add.
Make a note of the Client secret. You will need it to configure Fivetran.
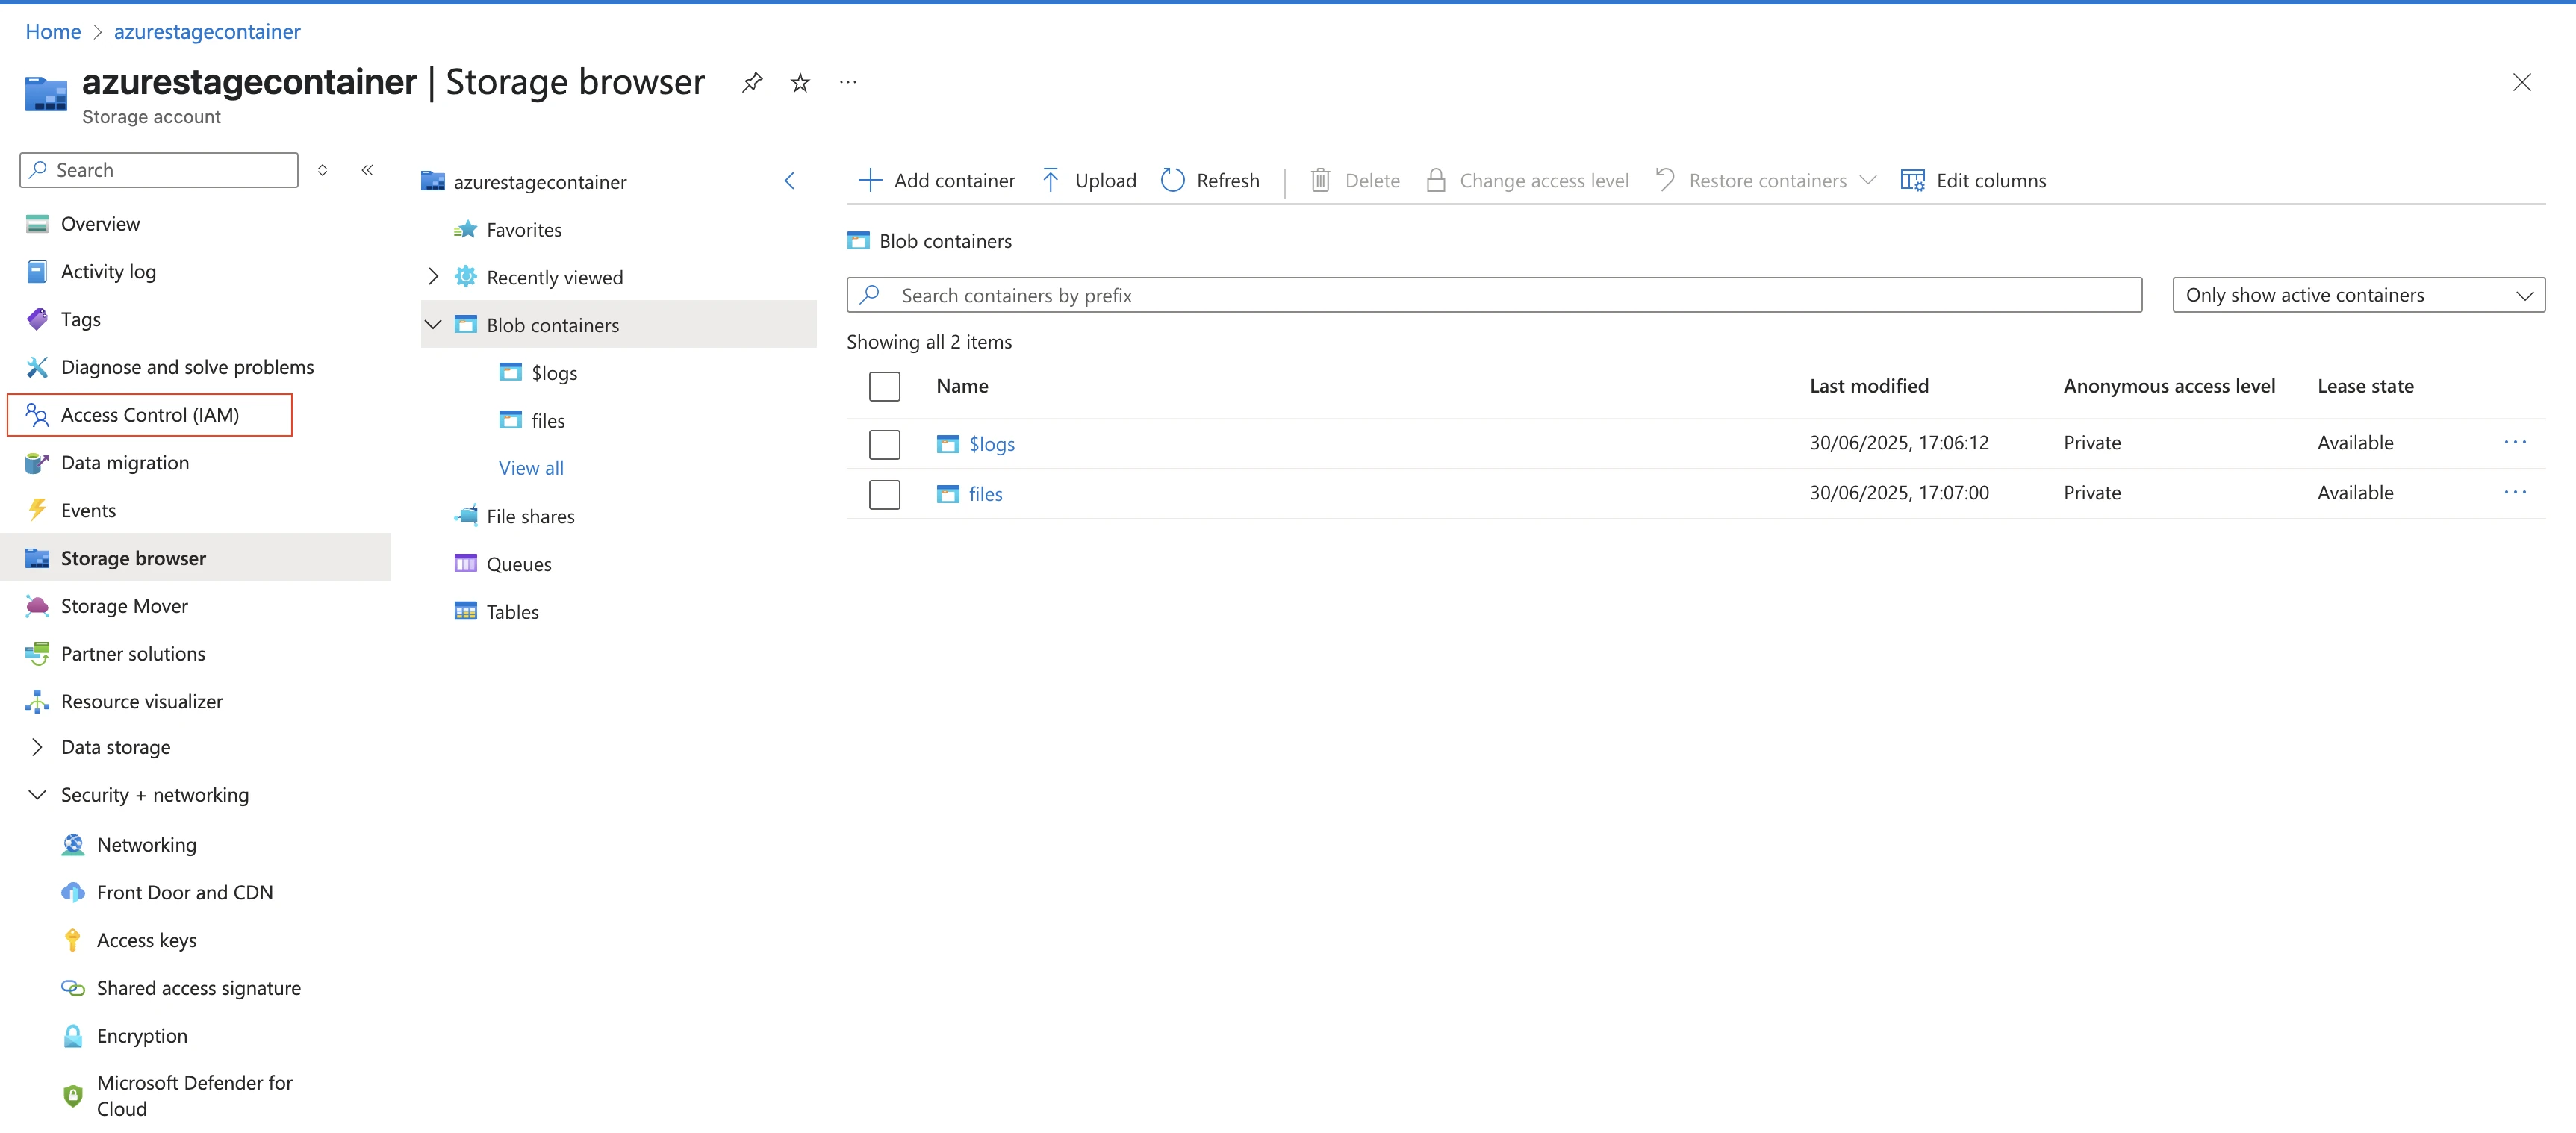
Assign role to container
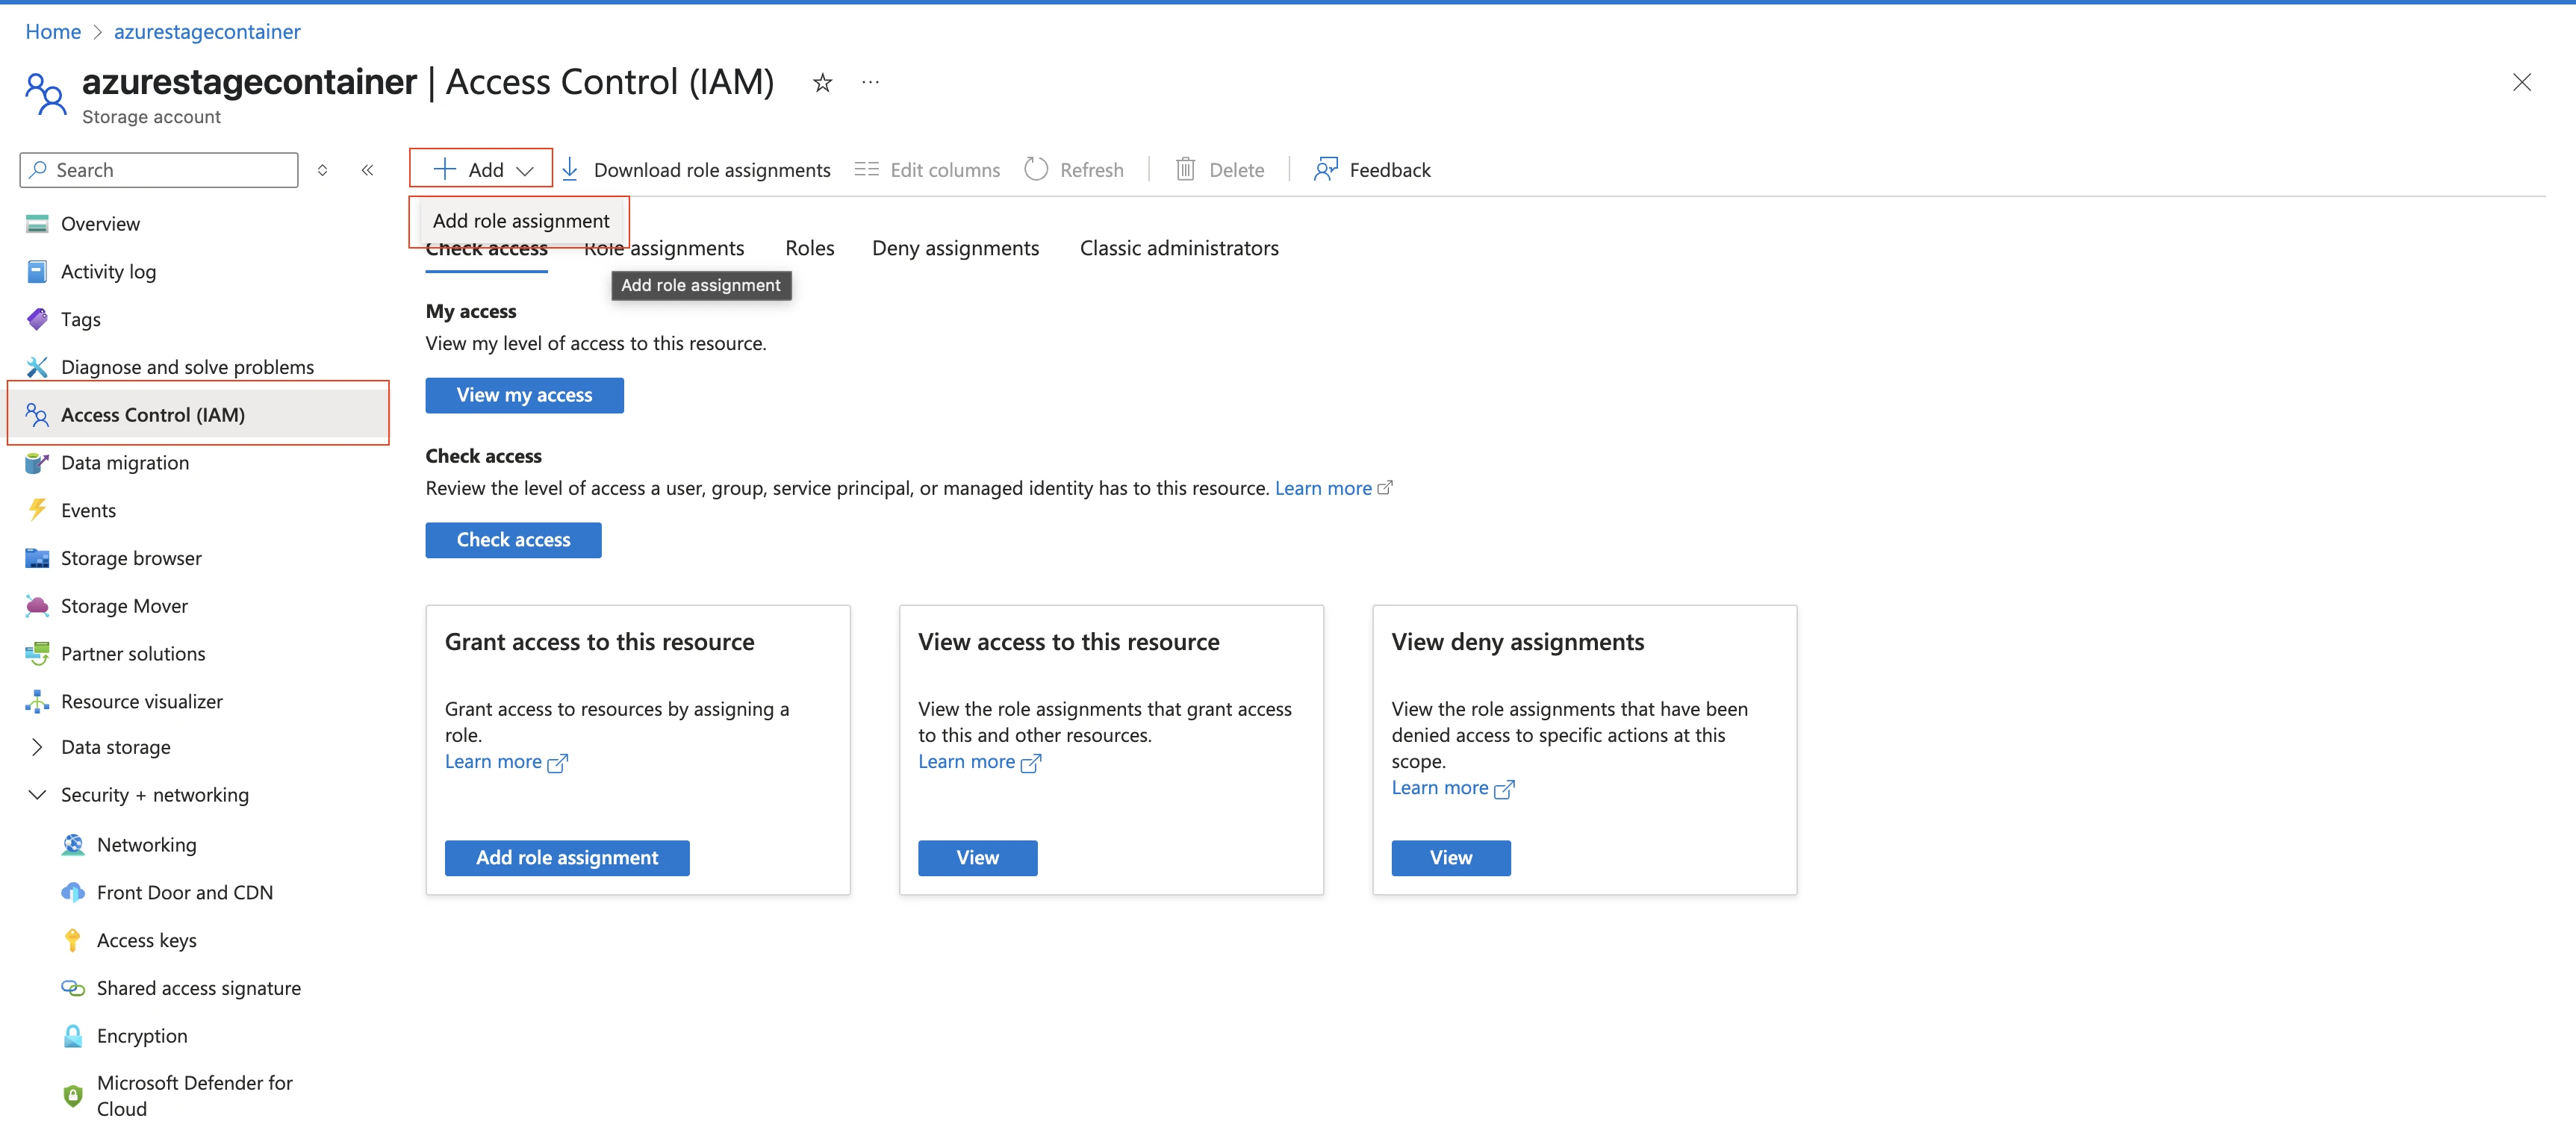
Go to the container you created and select Access Control (IAM).
Click Add > Add role assignment.
In the Role tab, select Storage Blob Data Contributor and click Next.
In the Members tab, select User, group, or service principal.
Click + Select members.
In the Select members pane, select the service principal you added and then click Select.
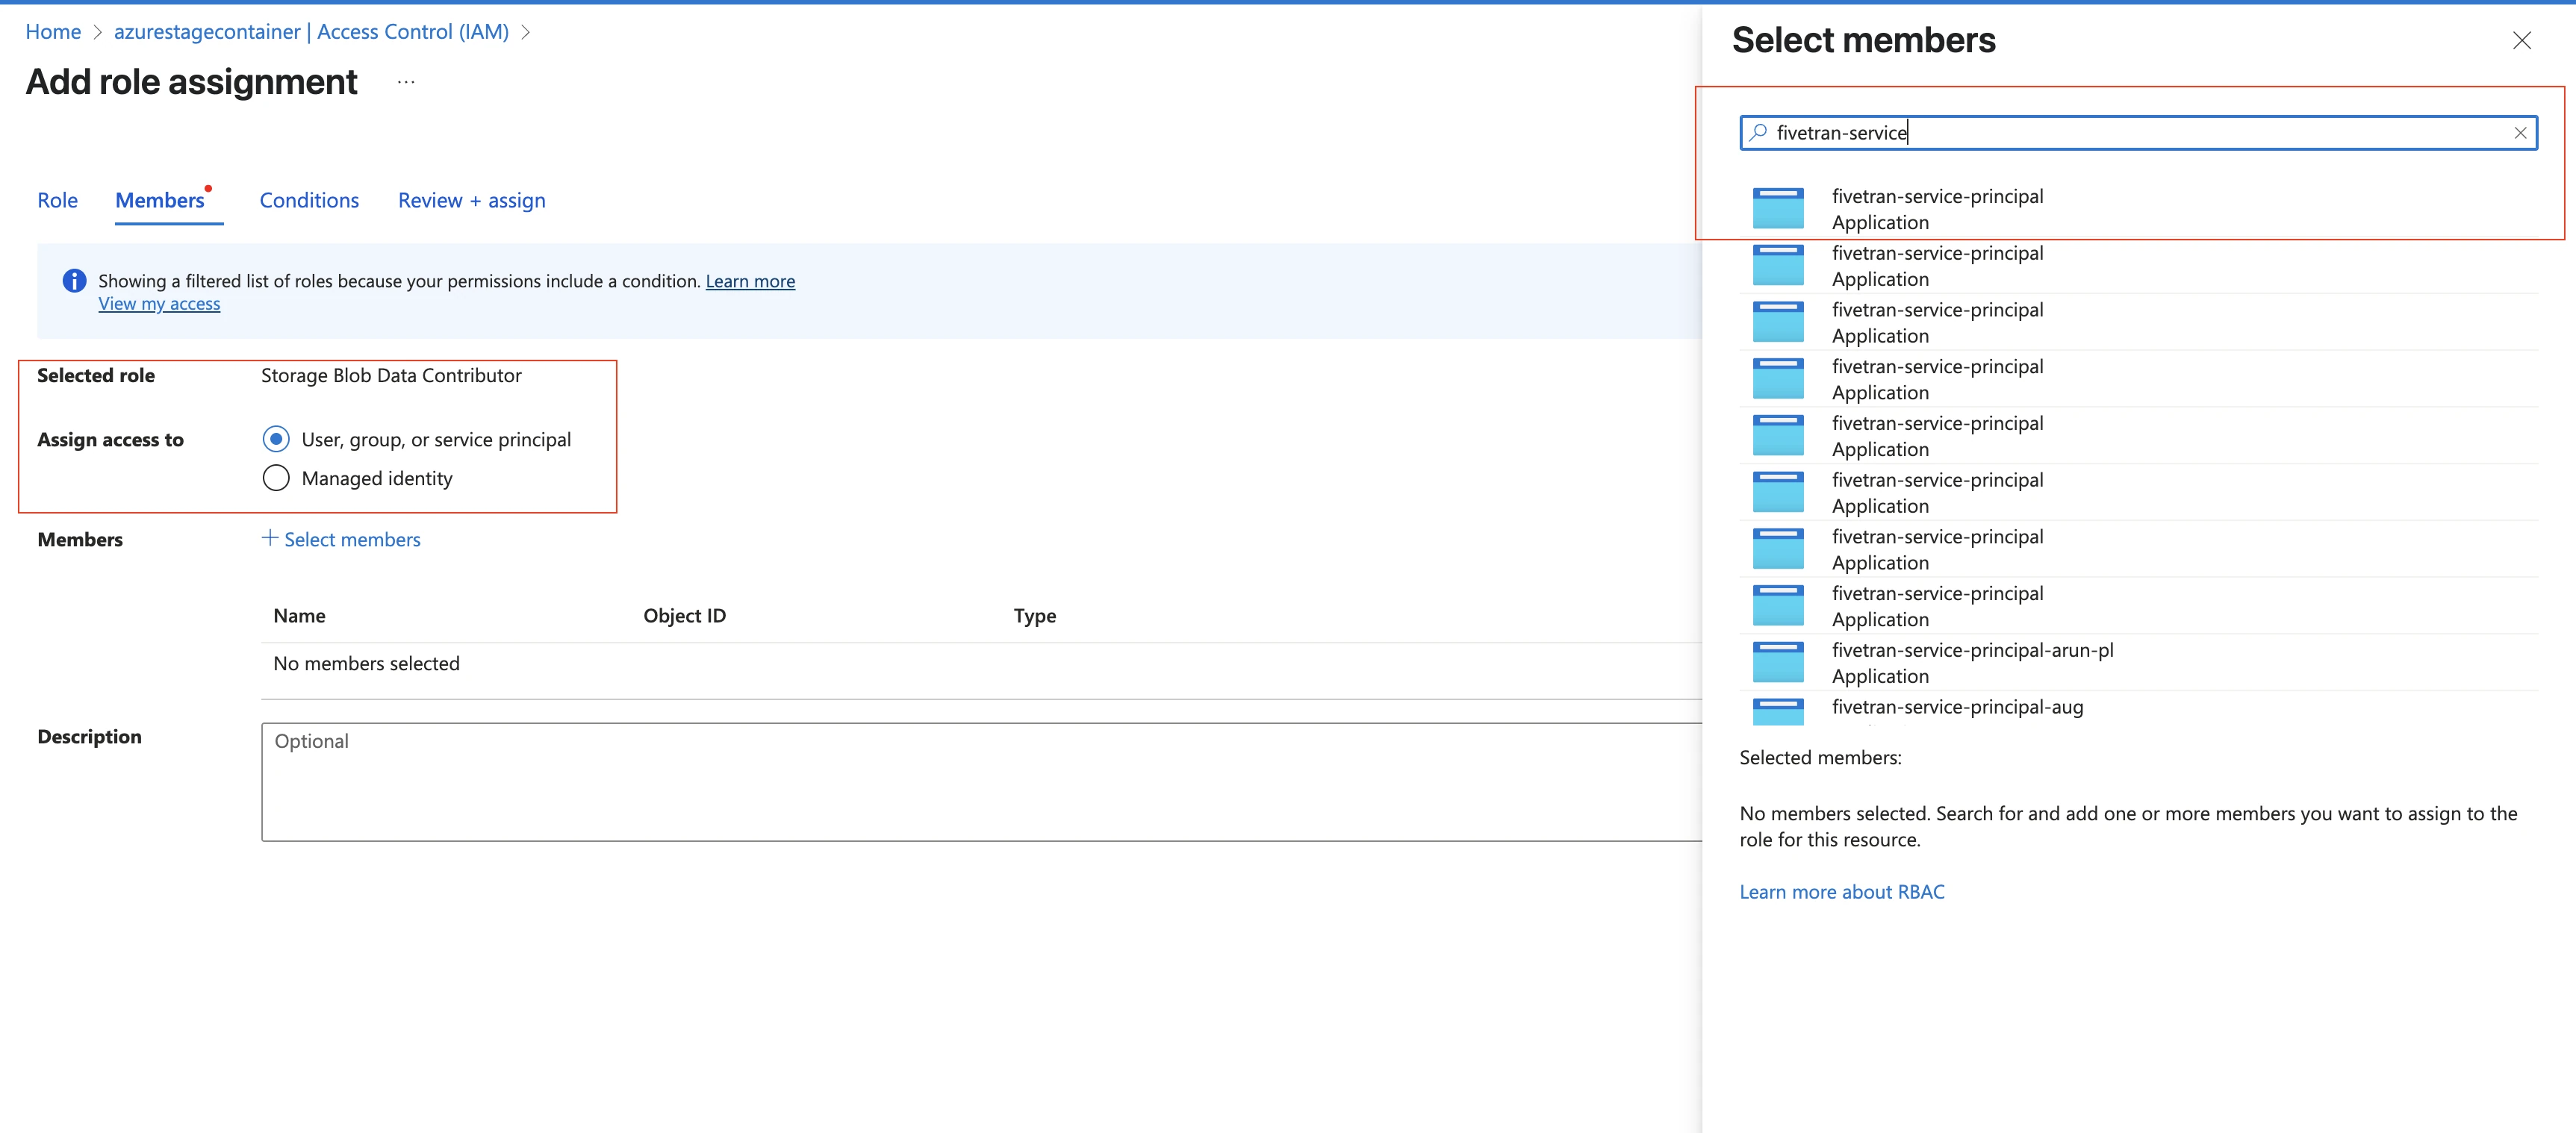
Click Review + assign.
(Optional) Connect using AWS PrivateLink, Azure Private Link, or Google Cloud Private Service Connect
You can connect Fivetran to your Snowflake destination using either AWS PrivateLink, Azure Private Link, or Google Cloud Private Service Connect. Fivetran uses your chosen service to move your data securely between our system and your Snowflake destination.
Connect using AWS PrivateLink
AWS PrivateLink allows VPCs and AWS-hosted or on-premises services to communicate with one another without exposing traffic to the public internet. PrivateLink is the most secure connection method. Learn more in AWS’ PrivateLink documentation.
Prerequisites
To set up AWS PrivateLink, you need a Business Critical Snowflake account in one of our supported regions.
Postrequisites
To use AWS PrivateLink, you must select AWS as a Cloud service provider in the Complete Fivetran configuration step.
Configure AWS PrivateLink for Snowflake destination
Contact Snowflake Support and tell them that you want to enable AWS PrivateLink for Fivetran. Provide the following information:
- Fivetran’s AWS VPC Account ID:
arn:aws:iam::834469178297:root - Your Snowflake account URL
- Your Snowflake account name
- Your Snowflake account locator
- Your Snowflake cloud platform
You can find this information in the Snowflake console under the user's account details.
Once Snowflake receives this information, they will allow Fivetran to establish a private link connection to your Snowflake destination.
- Fivetran’s AWS VPC Account ID:
Snowflake will provide you with a VPCe in the format
com.amazonaws.vpce.<region_id>.vpce-svc-xxxxxxxxxxxxxxxxx. Make a note of this VPCe. You will need it later.Go to your Snowflake instance and execute the following query:
SELECT SYSTEM$GET_PRIVATELINK_CONFIG();Send the VPCe you found in Step 2 and the output of the query to your Fivetran account manager. The output will be in the following format:
{
   "privatelink-account-name": "<account_name>",
   "privatelink-account-url": "<privatelink_account_url>",
   "privatelink-ocsp-url": "<privatelink_ocsp_url>",
   "privatelink-vpce-id": "<aws_vpce_id>"
}
Notify your Fivetran account manager that you have completed these steps. We then finish setting up PrivateLink for your Snowflake destination on our side. Once the setup is complete, we send you the host address and resource ID for your PrivateLink connection.
Make a note of the host address that you received from Fivetran. You need it to configure Fivetran.
Contact Snowflake Support and provide the resource ID (also known as the vpc_endpoint_id) that you received from Fivetran.
Connect using Azure Private Link
Azure Private Link allows VNet and Azure-hosted or on-premises services to communicate with one another without exposing traffic to the public internet. Learn more in Microsoft's Azure Private Link documentation.
Prerequisites
To set up Azure Private Link, you need a Snowflake account hosted in Azure.
Postrequisites
To use Azure PrivateLink, you must select Azure as a Cloud service provider in the Complete Fivetran configuration step.
Configure Azure Private Link for Snowflake destination
Contact Snowflake Support and tell them that you want to enable Azure Private Link for your Snowflake instance and Snowflake internal stage to connect Fivetran. Provide the following information:
- Fivetran’s Azure subscription ID:
6d755170-32cd-4a50-8bf2-621c984f3528 - Your Snowflake account URL
Once Snowflake receives this information, they will allow Fivetran to establish a private link connection to your Snowflake destination and Snowflake internal stage.
- Fivetran’s Azure subscription ID:
Once Snowflake has approved your request, go to your Snowflake instance and execute the following query as a user with the Snowflake ACCOUNTADMIN role to obtain the URL that we need to access Snowflake through Azure Private Link:
SELECT SYSTEM$GET_PRIVATELINK_CONFIG();Send the output of the query to your Fivetran account manager. The output will be in the following format:
{
  "privatelink-account-name": "<account_identifier>",
  "privatelink-internal-stage": "<privatelink_stage_endpoint>",
  "privatelink-account-url":"<privatelink_account_url>",
  "privatelink-ocsp-url": "<privatelink_ocsp_url>",
  "privatelink-pls-id": "<azure_privatelink_service_id>"
}
We then finish setting up Private Link for your Snowflake destination on our side. Once the setup is complete, we send you the host address and the resource ID for your Private Link connection.
Make a note of the host address that you received from Fivetran. You need it to configure Fivetran.
Contact Snowflake Support and provide the resource ID (also known as the private_endpoint_id) that you received from Fivetran.
For more information, see How to set up Privatelink to Snowflake from 3rd party Cloud Service vendors.
Connect using Google Cloud Private Service Connect
Google Cloud Private Service Connect allows VPCs and Google-hosted or on-premises services to communicate with one another without exposing traffic to the public internet. Learn more in Google Cloud's Private Service Connect documentation.
Prerequisites
To set up Google Cloud Private Service Connect, you need a Business Critical Snowflake account in one of our supported regions.
Postrequisites
To use Google Cloud Private Service Connect, you must select GCP as a Cloud service provider in the Complete Fivetran configuration step.
Configure Google Cloud Private Service Connect for Snowflake destination
Follow the instructions in Snowflake's Google Cloud Private Service Connect & Snowflake documentation. When contacting Snowflake Support, tell them that you want to enable Google Cloud Private Service Connect for Fivetran. Provide the following information:
- Fivetran’s project id:
fivetran-donkeys - Your Snowflake account URL
Once Snowflake receives this information, they will allow auto-approval for Fivetran’s project.
- Fivetran’s project id:
Once Snowflake has approved your request, go to your Snowflake instance and execute the following query as a user with the Snowflake ACCOUNTADMIN role to obtain the URL that we need to access Snowflake through Google Cloud Private Service Connect:
SELECT SYSTEM$GET_PRIVATELINK_CONFIG();Send the output of the query to your Fivetran account manager. The output will be in the following format:
{
  "privatelink-account-name": "<account_identifier>",
  "privatelink-account-url":"<privatelink_account_url>",
  "privatelink-ocsp-url": "<privatelink_ocsp_account_url>",
  "privatelink-gcp-service-attachment": "<privatelink_service_attachment_id>"
}
We then finish setting up Private Service Connect for your Snowflake destination on our side. Once the setup is complete, we send you the host address and the Resource ID (also known as the psc_connection_id).
Make a note of the host address that you received from Fivetran. You need it to configure Fivetran.
If you need to troubleshoot your connection with Snowflake Support, be sure to provide your Private Service Connection ID.
(Optional) Configure Snowflake network policy
If you have defined a Snowflake Network Policy, update your Snowflake Network Policy to add Fivetran IP address CIDRs or VPC IDs from one of the following sections.
Without AWS PrivateLink, Azure Private Link, or Google Cloud Private Service Connect
If you haven't configured AWS PrivateLink, Azure Private Link, or Google Cloud Private Service Connect connectivity, add Fivetran's IP addresses to your network policy's allowed list to allow connections from Fivetran.
With AWS PrivateLink
If you have configured AWS Private Link, add Fivetran's internal VPC CIDR range to the Snowflake network policy's allowed list: 10.0.0.0/8.
Alternatively, add the Fivetran VPC Endpoint ID (or AWS VPCE ID) to your network policy's allowed list.
Contact our support team and provide the name of the PrivateLink for the corresponding for the Fivetran VPC Endpoint ID (or AWS VPCE ID).
With Azure Private Link
If you have configured Azure Private Link, add Fivetran's internal VNet CIDR range to the Snowflake network policy's allowed list: 10.0.0.0/8.
Alternatively, add the Fivetran Resource ID (or Azure LinkID) to your network policy's allowed list.
Contact our support team and provide the name of the Private Link for the corresponding Fivetran Resource ID (or Azure LinkID).
With Google Cloud Private Service Connect
If you have configured Google Cloud Private Service Connect, add Fivetran's internal VPC CIDR range to the Snowflake network policy's allowed list: 10.0.0.0/8.
(Optional) Configure failover
You must have a Snowflake Business Critical account or higher to use failover. Learn more in Snowflake's failover documentation.
Since Fivetran supports using Snowflake Client Redirect, you can set up database failover for Snowflake if you'd like. To configure failover in Snowflake, you must have two Snowflake accounts in two different regions. You must also have an account with the ORGADMIN role to add the accounts to a Snowflake organization and navigate between them.
Alternatively, you could have one Snowflake account and one organization account if you have the ACCOUNTADMIN role. To enable failover for the organization account, run the following command as the ORGADMIN:
USE ROLE ORGADMIN;
SELECT system$global_account_set_parameter('<org-name>.<org-account-itself>', 'ENABLE_ACCOUNT_DATABASE_REPLICATION', 'true');
In either case, do the following to set up failover:
- If you haven't already, replicate your database. Follow the setup instructions in Snowflake's Replicating Databases Across Multiple Accounts documentation.
- Enable failover for your primary database to your secondary database. Follow the setup instructions in Snowflake's Enable Replication for Accounts in the Organization documentation.
- Set up Client Redirect to generate a single global URL that automatically points to the current primary account. Follow the setup in Snowflake's Configuring Client Redirect documentation.
Provide your Snowflake Client Redirect URL in the Host section of your setup form to ensure that Fivetran always points to the active account in case of failover.
Complete Fivetran configuration
Log in to your Fivetran account.
Go to the Destinations page and click Add destination.
Enter a Destination name of your choice and then click Add.
Select Snowflake as the destination type.
(Enterprise and Business Critical accounts only) Select the deployment model of your choice:
- SaaS Deployment
- Hybrid Deployment
If you selected Hybrid Deployment, click Select Hybrid Deployment Agent and do one of the following:
- To use an existing agent, select the agent you want to use, and click Use Agent.
- To create a new agent, click Create new agent and follow the setup instructions specific to your container platform.
(Hybrid Deployment only) Select the external storage you configured to stage your data.
Depending on the external storage you selected, do the following:
If you selected Snowflake Internal Stage, skip to the next step.
If you selected AWS S3, select the Authentication type (IAM ROLE or IAM USER) you configured for your S3 bucket, and then enter your S3 bucket's name and region.
If you selected Azure Blob Storage, enter your storage account name and storage account key.
If you selected Google Cloud Storage, upload the JSON file containing the service account key and enter the GCS bucket name.
(Optional, Private Preview only) If you want to manage your credentials outside of Fivetran, enable the Use External Secrets Manager toggle. For some connectors and destinations, this toggle only appears after you select a credential-based authentication method. See the External Secret Managers documentation for more information.
- If you have already configured External Secret Managers for your account, select one from the drop-down menu. Note that the list is filtered by the deployment model of the destination: if the destination uses SaaS Deployment, External Secret Managers configured for Hybrid Deployment won't be available, and vice versa.
- To edit the details of the selected External Secret Manager, click Edit manager details in Account Settings.
- To set up a new External Secret Manager, click Configure a new secrets manager. See the Create New External Secret Manager documentation for prerequisites and setup instructions.
- You can manage all your External Secret Managers at any time under Account Settings. See the External Secret Managers documentation for more information.
- When ESM is enabled, credential fields are replaced by ESM key fields. In each ESM key field, enter the name of the secret stored in your external secrets manager that corresponds to that credential — not the credential value itself. For more information, see External Secret Managers.
(Not applicable to Hybrid Deployment) In the Connection Method drop-down menu, select how you want Fivetran to connect to your destination.
- Connect directly
- Connect via PrivateLink
The Connect via PrivateLink option is available only for Business Critical accounts.
If you selected Connect via PrivateLink as the connection method, select an existing PrivateLink connection, or create a new AWS PrivateLink or Azure Private Link connection.
If you selected Connect directly as the connection method or if you choose Hybrid Deployment as the deployment model, enter the host name or IP address of the database server in the Host field.
If you're using database failover, enter the Snowflake Client Redirect URL in the Host field to ensure that Fivetran always points to the active account in case of failover. If you use AWS PrivateLink or Azure Private Link, the URL format is
<org-name>-<conn-name>.privatelink.snowflakecomputing.com. If you don't, the URL format is<org-name>-<conn-name>.snowflakecomputing.com.Enter the User and Database names you found in Step 2.
Choose your authentication mode: KEY-PAIR or PASSWORD. See the steps for key-pair authentication.
- If you selected PASSWORD, enter the Password you found in Step 3.
- If you selected KEY-PAIR, enter the Private key. The private key cannot have spaces and must be prefixed by
-----BEGIN PRIVATE KEY-----and postfixed by-----END PRIVATE KEY-----.
If you use an encrypted private key, set the Is Private Key encrypted toggle to ON, then enter your Passphrase. For OpenSSL versions older than 1.0, encrypted private keys must be prefixed by
-----BEGIN RSA PRIVATE KEY-----and postfixed with-----END RSA PRIVATE KEY-----.(Optional) If you want Fivetran to use a specific role instead of your default role, enter the Role name.
(Optional) In the Storage for Unstructured Files drop-down menu, select a storage integration. If you select an external storage integration such as S3, GCS, or Azure, do the following:
i. In the Storage Integration field, enter the name of the integration you created.
ii. In the Parent Folder Path field, enter the URI of the folder where External Stage files should be stored.
Ensure that this folder is accessible to both the IAM role created in the Create IAM Role step and the storage integration set up in the Create Storage Integration step.
- If you selected GCS, copy the service account email and provide the Storage Object Admin permission to the service account on the GCS bucket.
- If you selected Azure, enter the Application (client) ID, Directory (tenant) ID, and Client Secret Value (Application Secret).
In the Default Virtual Warehouse drop-down menu, select the virtual warehouse you want to use for your destination. The menu displays all the virtual warehouses available to the Fivetran user.
By default, all connections configured for this destination use the virtual warehouse you select in this field. To override this setting for a specific connection, choose a different warehouse in the connection setup form. The connection will then use the selected warehouse instead of the destination-level default.
(Not applicable to Hybrid Deployment) Choose the Data processing location. Depending on the plan you are on and your selected cloud service provider, you may also need to choose a Cloud service provider and cloud region as described in our Destinations documentation.
If you are using AWS PrivateLink, Azure Private Link, or Google Cloud Private Connect Service, select the corresponding Cloud service provider.
Choose your Timezone.
(Optional for Business Critical accounts and SaaS Deployment) To enable regional failover, set the Use Failover toggle to ON, and then select your Failover Location and Failover Region. Make a note of the IP addresses of the secondary region and safelist these addresses in your firewall.
Click Save & Test.
Fivetran tests and validates the Snowflake connection. On successful completion of the setup tests, you can sync your data using Fivetran connections to the Snowflake destination.
In addition, Fivetran automatically configures a Fivetran Platform connection to transfer the connection logs and account metadata to a schema in this destination. The Fivetran Platform Connector enables you to monitor your connections, track your usage, and audit changes. The Fivetran Platform connection sends all these details at the destination level.
If you are an Account Administrator, you can manually add the Fivetran Platform connection on an account level so that it syncs all the metadata and logs for all the destinations in your account to a single destination. If an account-level Fivetran Platform connection is already configured in a destination in your Fivetran account, then we don't add destination-level Fivetran Platform connections to the new destinations you create.
Setup tests
Fivetran performs the following Snowflake connection tests:
- The Host Connection test verifies that the Snowflake host is reachable and validates the database credentials provided in the connection setup form. We skip this test when a proxy is configured.
- The Validate Passphrase test validates the private key against the passphrase. We perform this test only when you use key-pair authentication.
- The Default Warehouse Test verifies that the specified Snowflake virtual warehouse exists and is configured as the default warehouse for the Fivetran user.
- The Database Connection test verifies that Fivetran can connect to the Snowflake database.
- The Validate privileges on storage integration test verifies that the Fivetran role has the required privileges on the Snowflake storage integration. We perform this test only when the Snowflake account is hosted on Google Cloud Platform (GCP).
- The Validate customer's storage credentials test verifies that the Fivetran role has the required permissions to access the configured cloud storage. We perform this test only for Hybrid Deployment.
- The Validate External Stage Configuration test creates a temporary Snowflake stage, uploads a probe file, and then deletes the file. This test verifies that Fivetran can create, write to, and manage the external stage. If Fivetran creates the stage successfully but cannot upload or delete the probe file, the test returns a warning and continues.
- The Validate Internal Stage Access Test verifies that we can upload data to the Snowflake internal stage. We perform this test only for Hybrid Deployment with internal staging.
- The Permission Test verifies that the Fivetran user has the
CREATE SCHEMA,CREATE TABLE, andCREATE TEMPORARY TABLEprivileges on the Snowflake database. - The Validate Snowflake and MDLS region compatibility test verifies that the Snowflake account region is compatible with the linked Managed Data Lake Service storage region. We perform this test only for destinations that use the Lakehouse table type.