Guidewire Cloud Data Access Setup Guide Private Preview
Follow our setup guide to connect your Guidewire CDA S3 bucket to Fivetran.
Prerequisites
To connect Guidewire Cloud Data Access to Fivetran, you need:
- Guidewire Cloud Data Access enabled and configured to export to an AWS S3 bucket
- The path to your CDA
manifest.jsonfile in the S3 bucket - An AWS account with an IAM role or access key that has
s3:GetObjectands3:ListBucketpermissions on the CDA bucket, unless you are using a public bucket.
Setup instructions
Begin Fivetran configuration
In the connection setup form, enter the Destination schema of your choice.
Enter the Table group name. We combine this with the destination schema name to form the Fivetran connection name
<destination_schema>.<table_group_name>. The Table group name value is used only in Fivetran and does not appear in your destination. We recommend naming it to reflect your CDA environment and application, for examplepolicycenter_prodorbillingcenter_dev.In the Destination schema names field, choose the naming convention you want Fivetran to use for the schemas, tables, and columns in your destination:
- Fivetran naming: Standardizes the schema, table, and column names in your destination according to the Fivetran naming conventions.
- Source naming: Preserves the original column names from the source system in your destination. The source naming rules apply only to the column names, while the schema and table names follow the Fivetran naming rules.
If you want to modify your selection, make sure you do it before you start the initial sync.
Enter your S3 Bucket name. The Guidewire CDA writes its exports to this bucket.
If you are using an access point, enter the Access Point alias if you already have it or create one using our Configure access point instructions.
In the Access approach drop-down menu, select one of the following options:
- IAM Role (most secure): Give Fivetran access by creating an IAM role using our External ID.
- Access Key and Secret: Provide Fivetran an access key and secret for your S3 bucket. You may need to use this method if you don't own the bucket and its access methods are limited.
- Public Bucket: Give Fivetran access through a public bucket. Your AWS account does not need special permissions to sync public buckets. Skip to the Finish Fivetran configuration step.
You can use the Access Analyzer for S3 to find out if your S3 bucket has public or shared access.
Create IAM policy
You must create an IAM policy for both the IAM Role and Access Key and Secret approaches.
For encrypted buckets, follow Amazon S3 bucket instructions to modify the AWS KMS key's policy to grant Fivetran permissions to download files from your encrypted bucket.
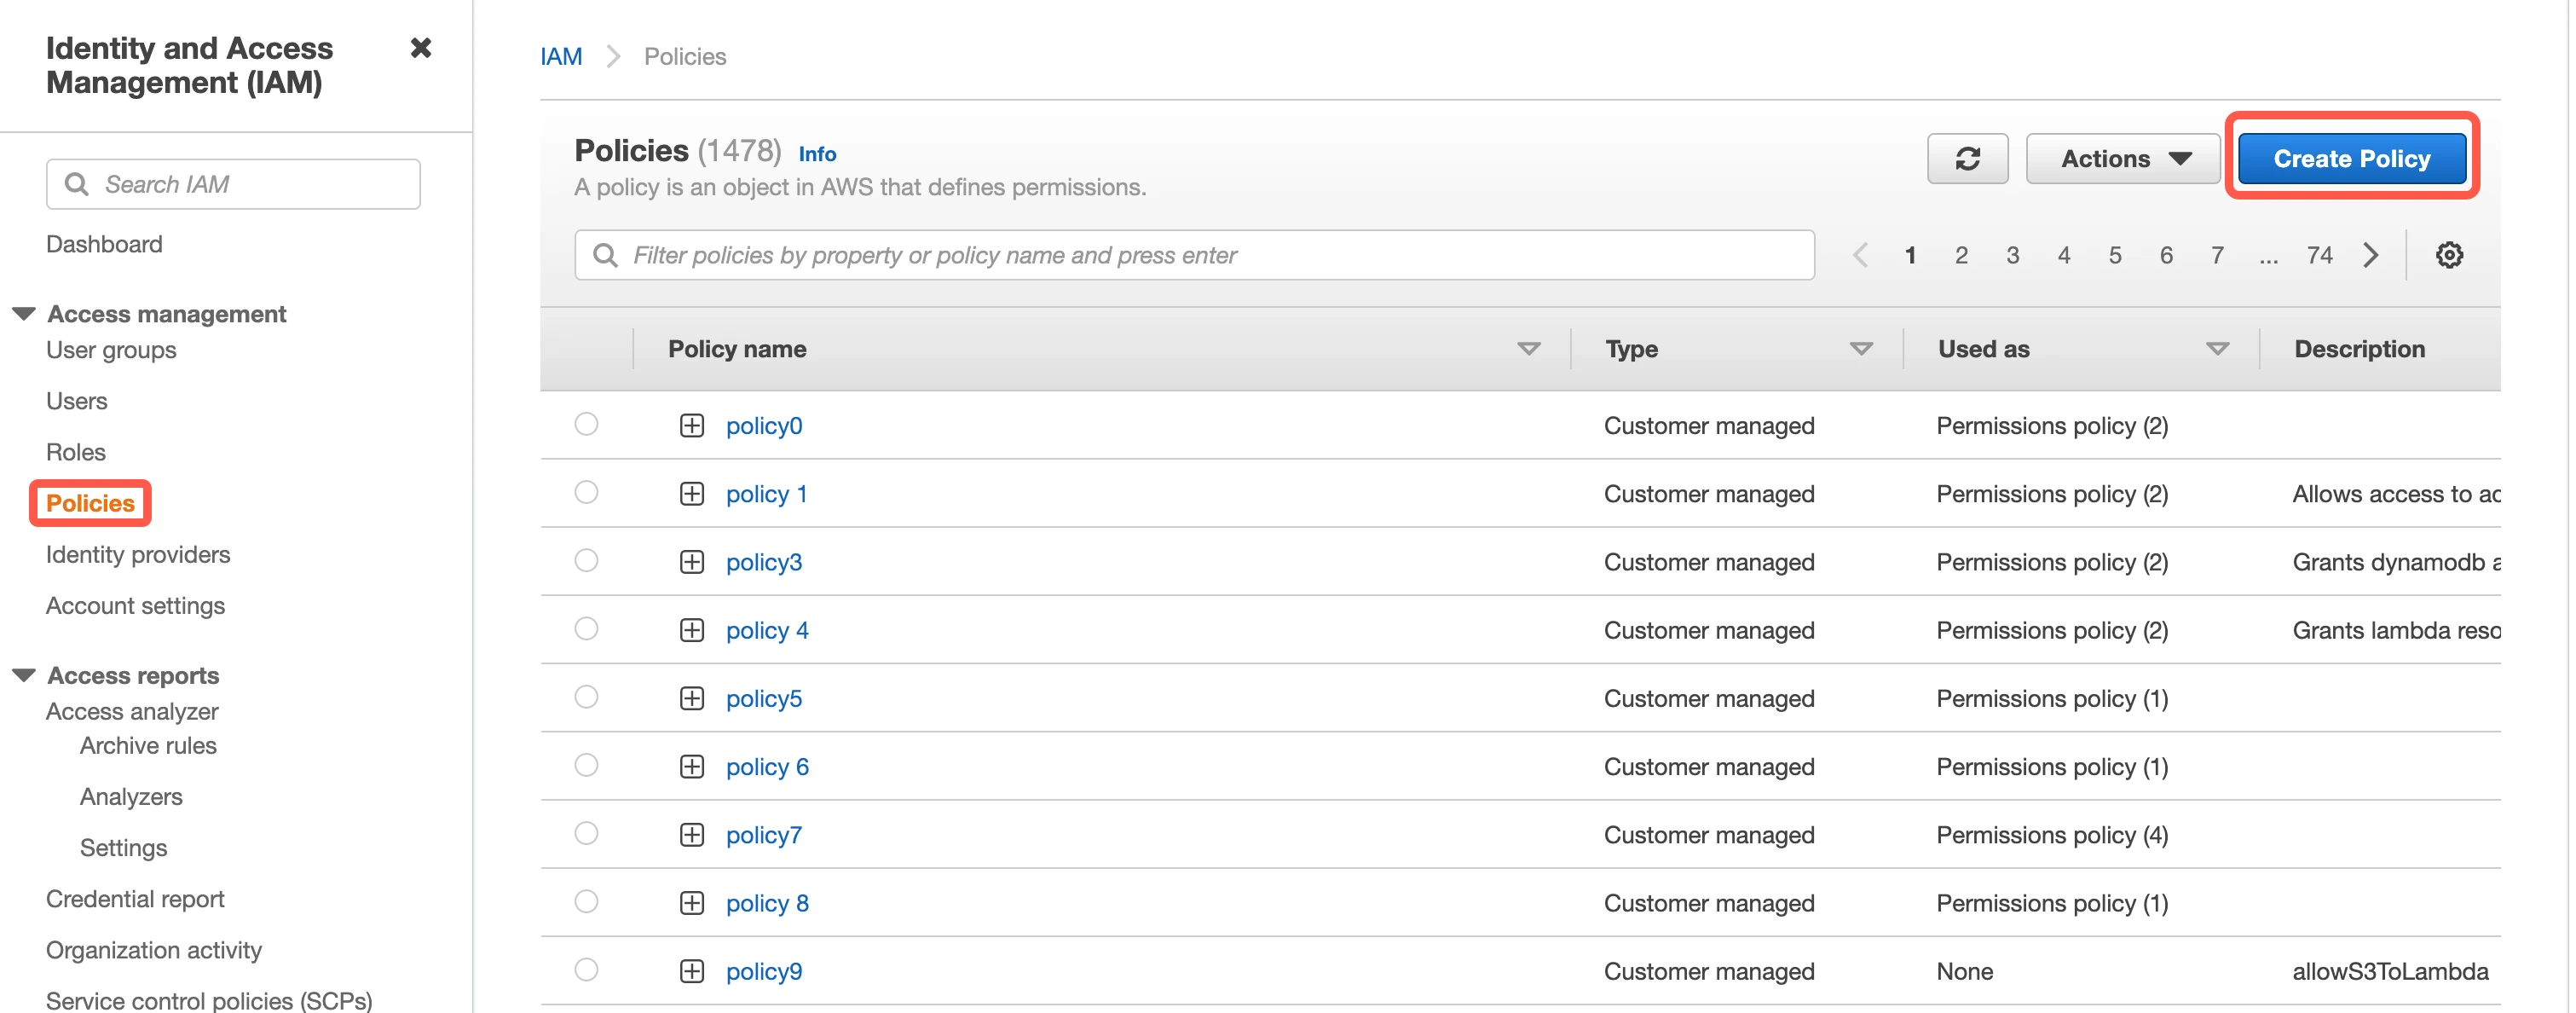
Open your Amazon IAM console.
Go to Policies, then click Create Policy.
Go to the JSON tab.

Copy the following policy and paste it into the visual editor. Replace
{your-bucket-name}with the name of your S3 bucket. After that, click Next: Tags.{ "Version": "2012-10-17", "Statement": [ { "Effect": "Allow", "Action": [ "s3:GetBucketLocation", "s3:GetObject", "s3:ListBucket" ], "Resource": [ "arn:aws:s3:::{your-bucket-name}/*", "arn:aws:s3:::{your-bucket-name}" ] } ] }(Optional) If you use a customer-managed KMS key, add the following policy to the Action section of the IAM policy to provide read access to the encrypted files.
     "Action": [
         "kms:Decrypt",
         "kms:GenerateDataKey"
     ]
In the Add tags step, you can optionally add custom tags that will be associated with your bucket. Click Next: Review.
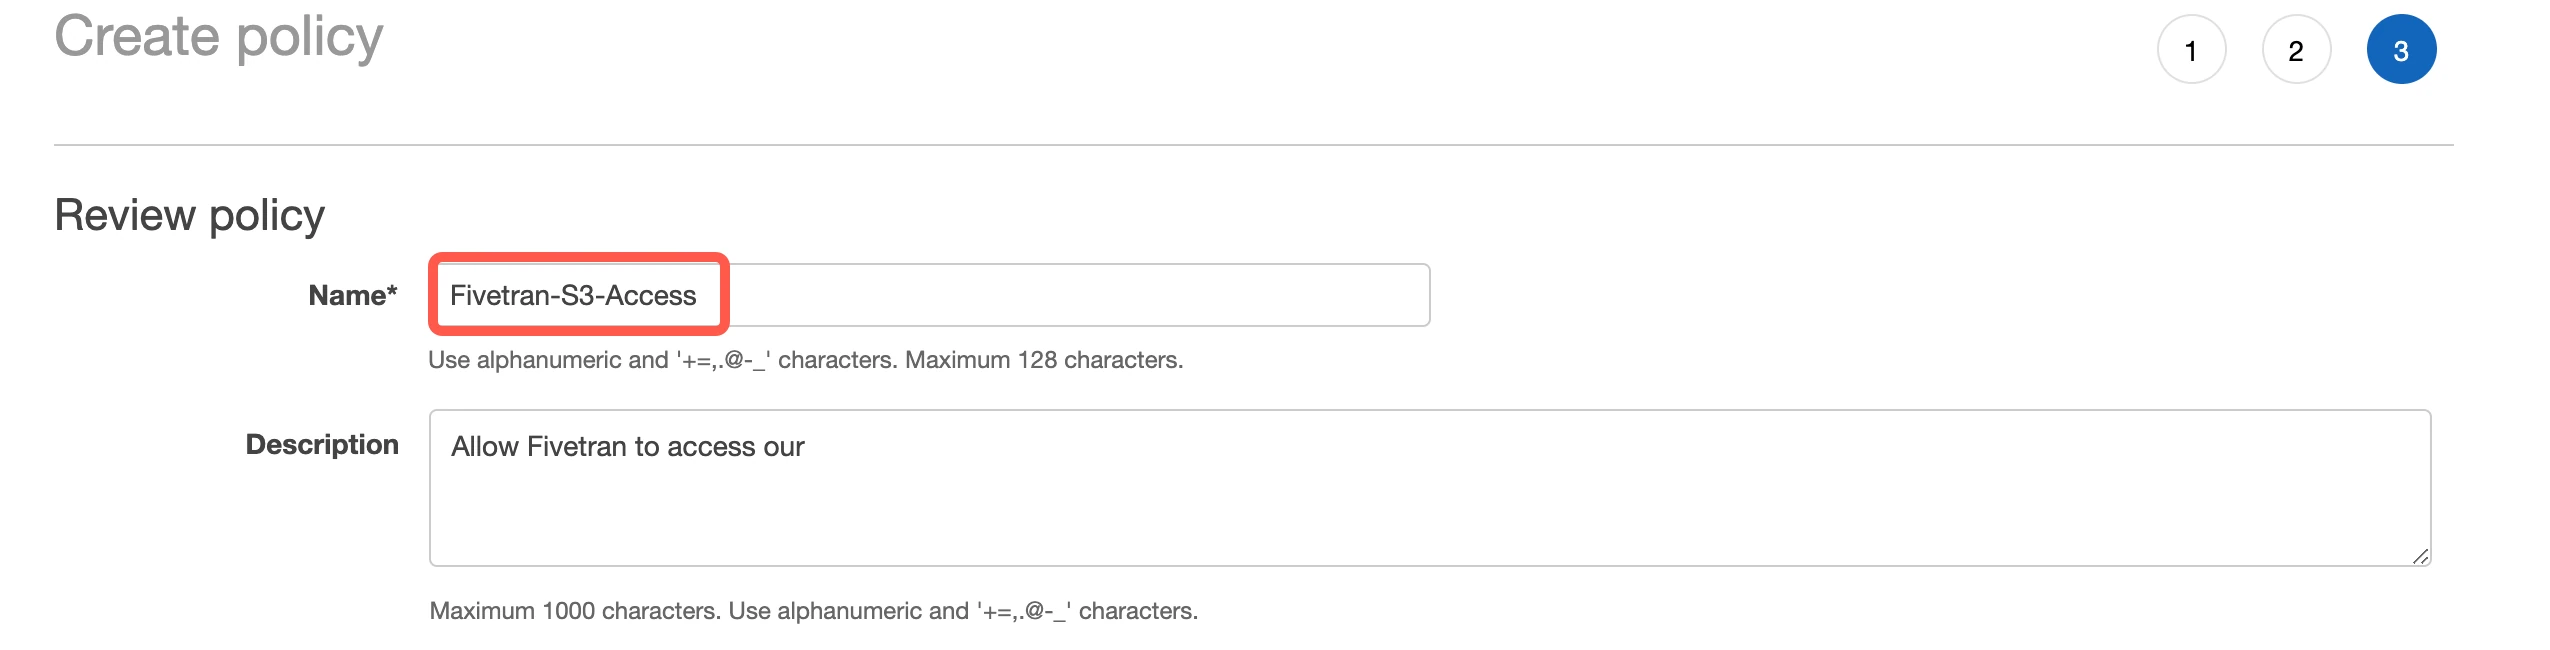
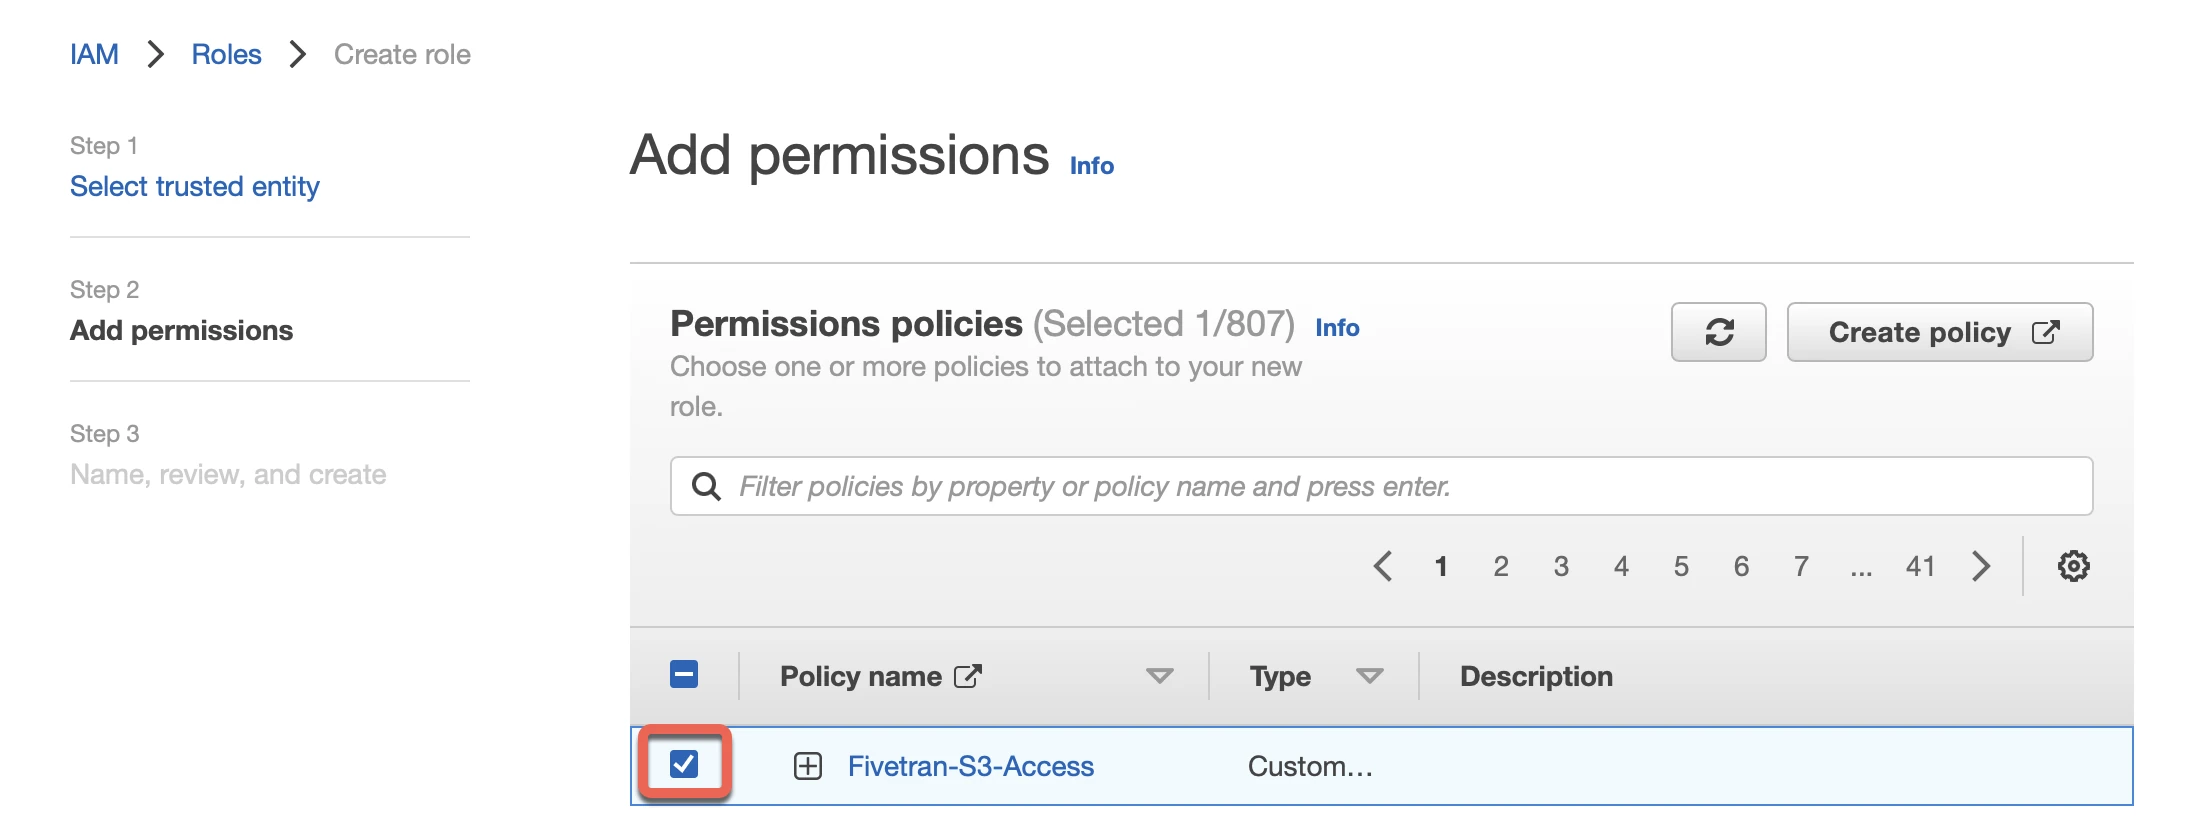
In the Review policy step, specify the name of your policy, for example "Fivetran-S3-Access", then click Create policy.
(Optional) Access using IAM role
Find External ID
In the connection setup form, find the automatically-generated External ID and make a note of it. You will need it to create an IAM role in AWS.
The automatically-generated External ID is tied to your account. If you close and re-open the setup form, the ID will remain the same. You can keep the tab open in the background while you configure your source for convenience.
Create IAM role
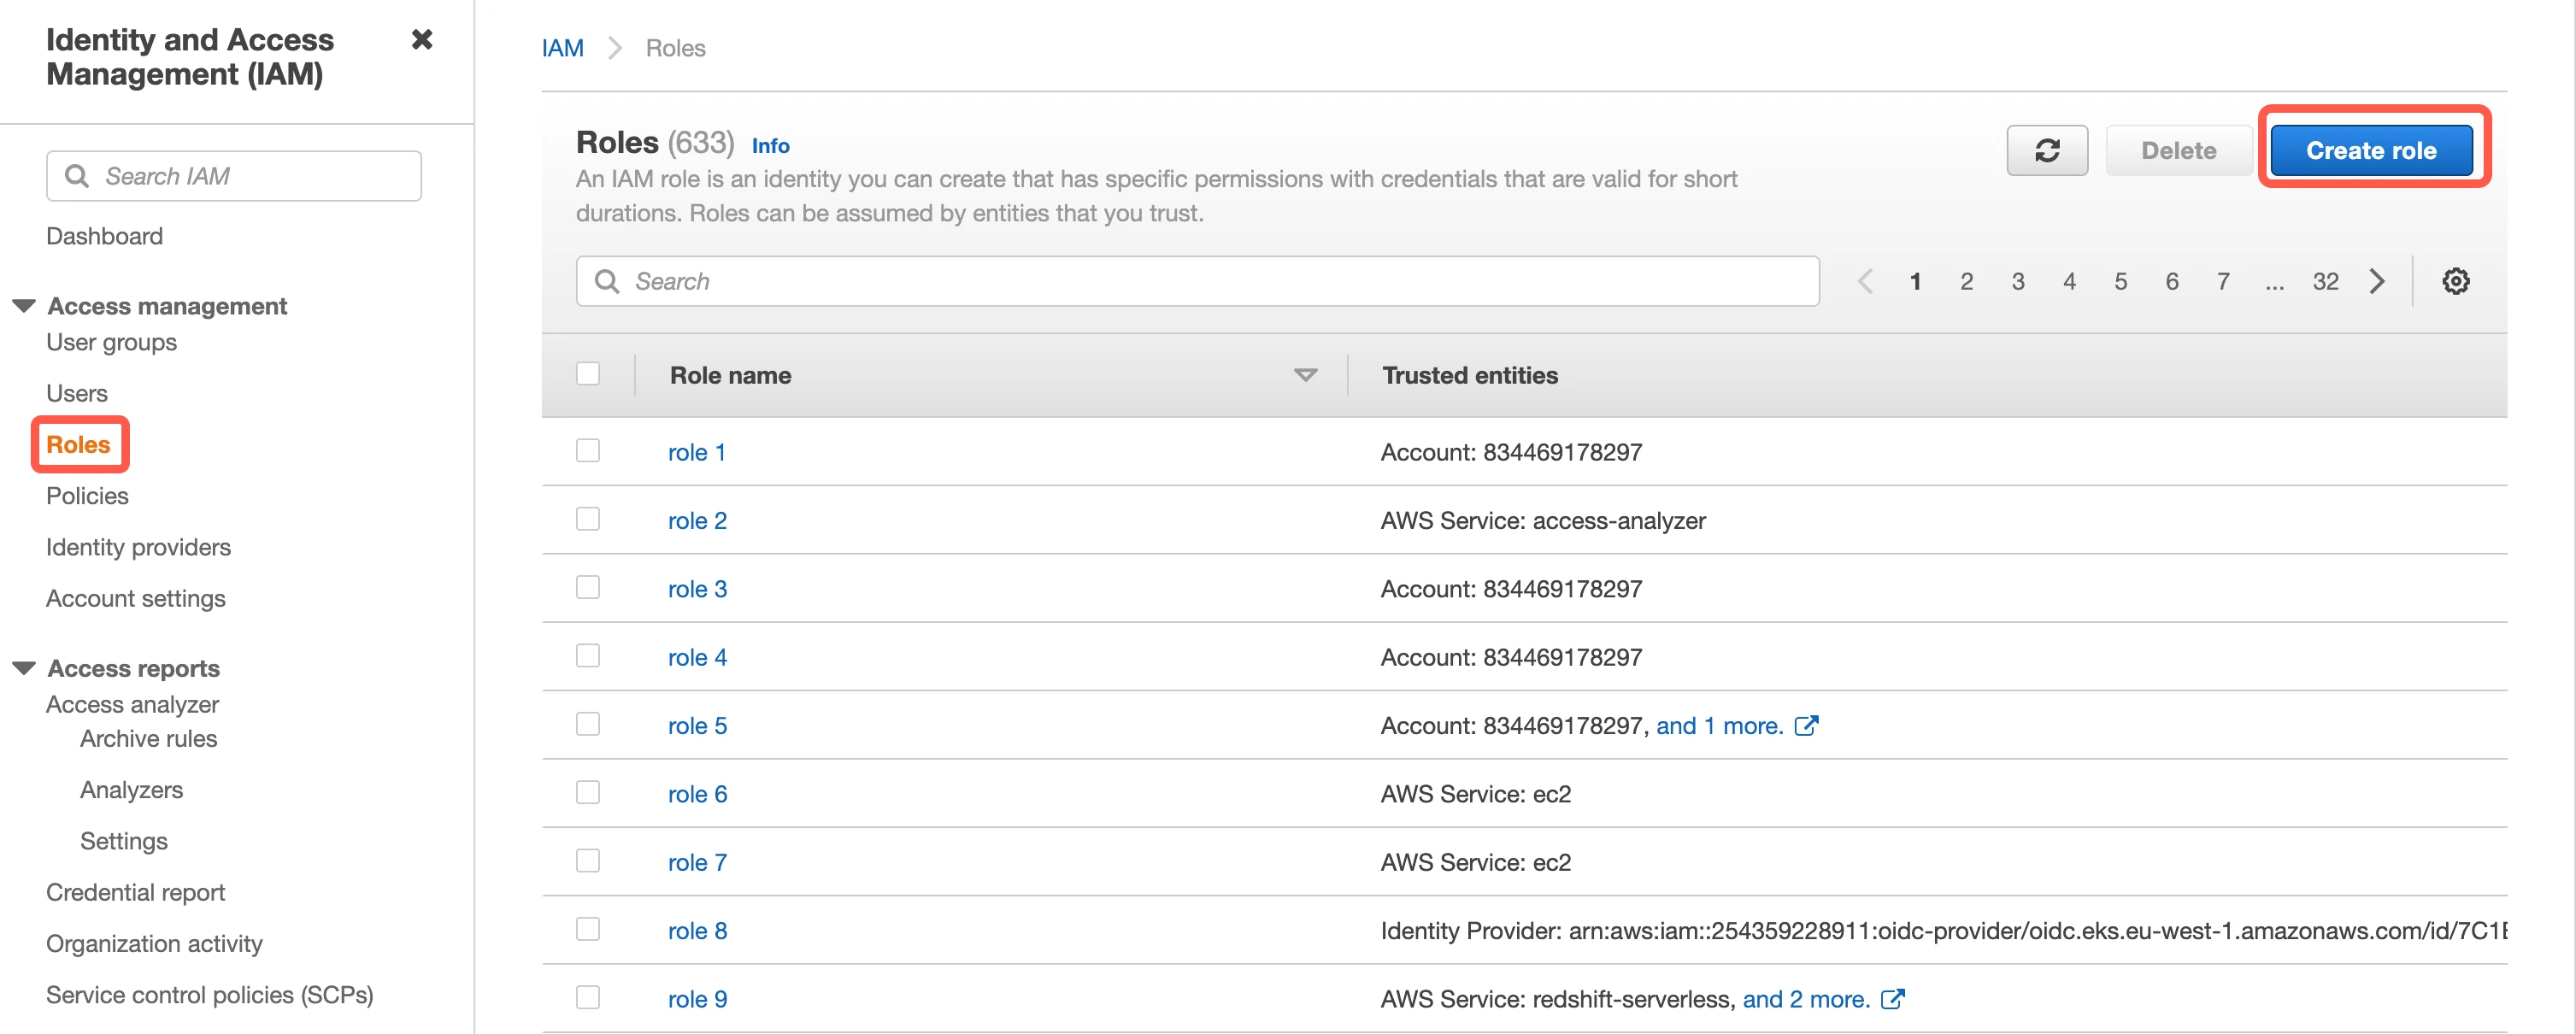
Go to Roles, then click Create role.
Select AWS account, then enter Fivetran’s AWS VPC Account ID,
834469178297, in the Account ID field.
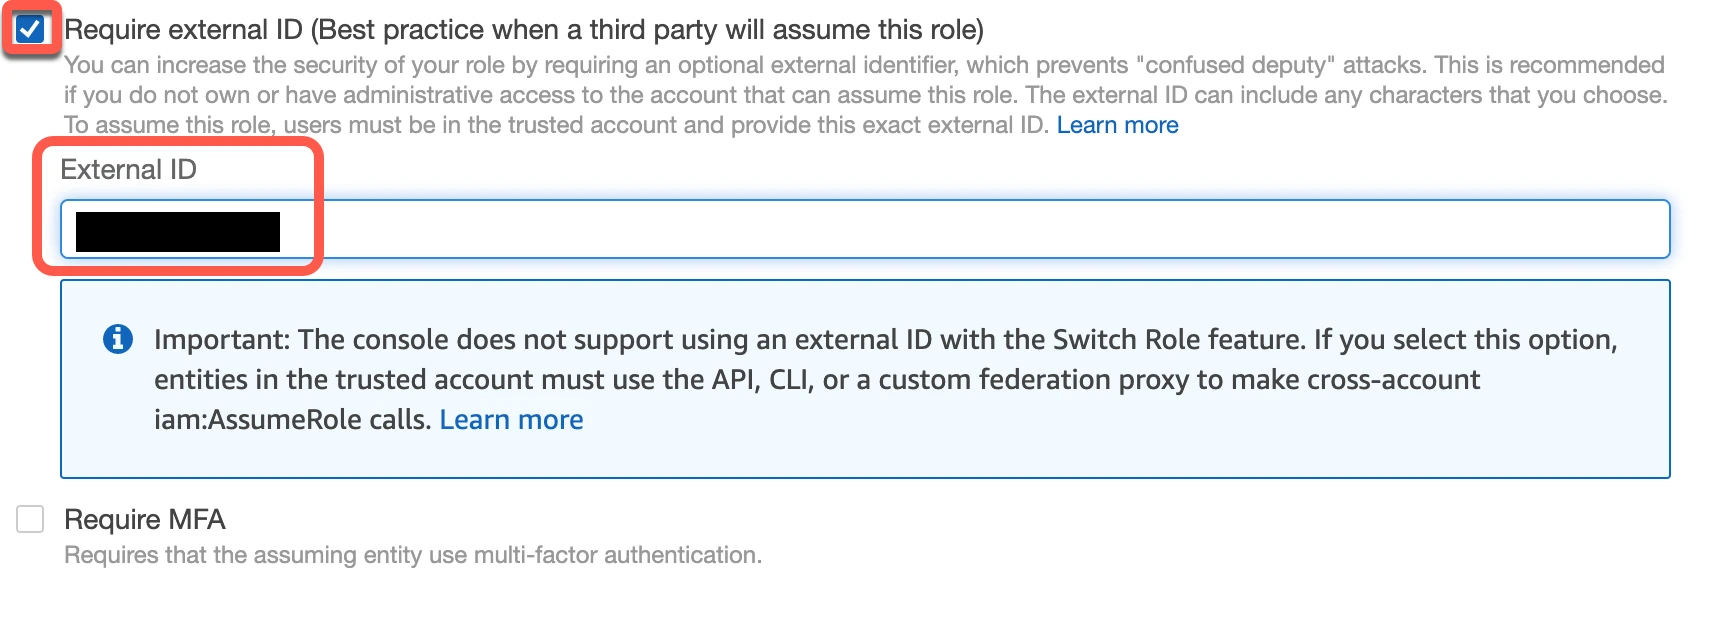
Select the Require external ID checkbox and enter the External ID you found above, then click Next.
In the Add permissions step, select the "Fivetran-S3-Access" policy you created, then click Next.
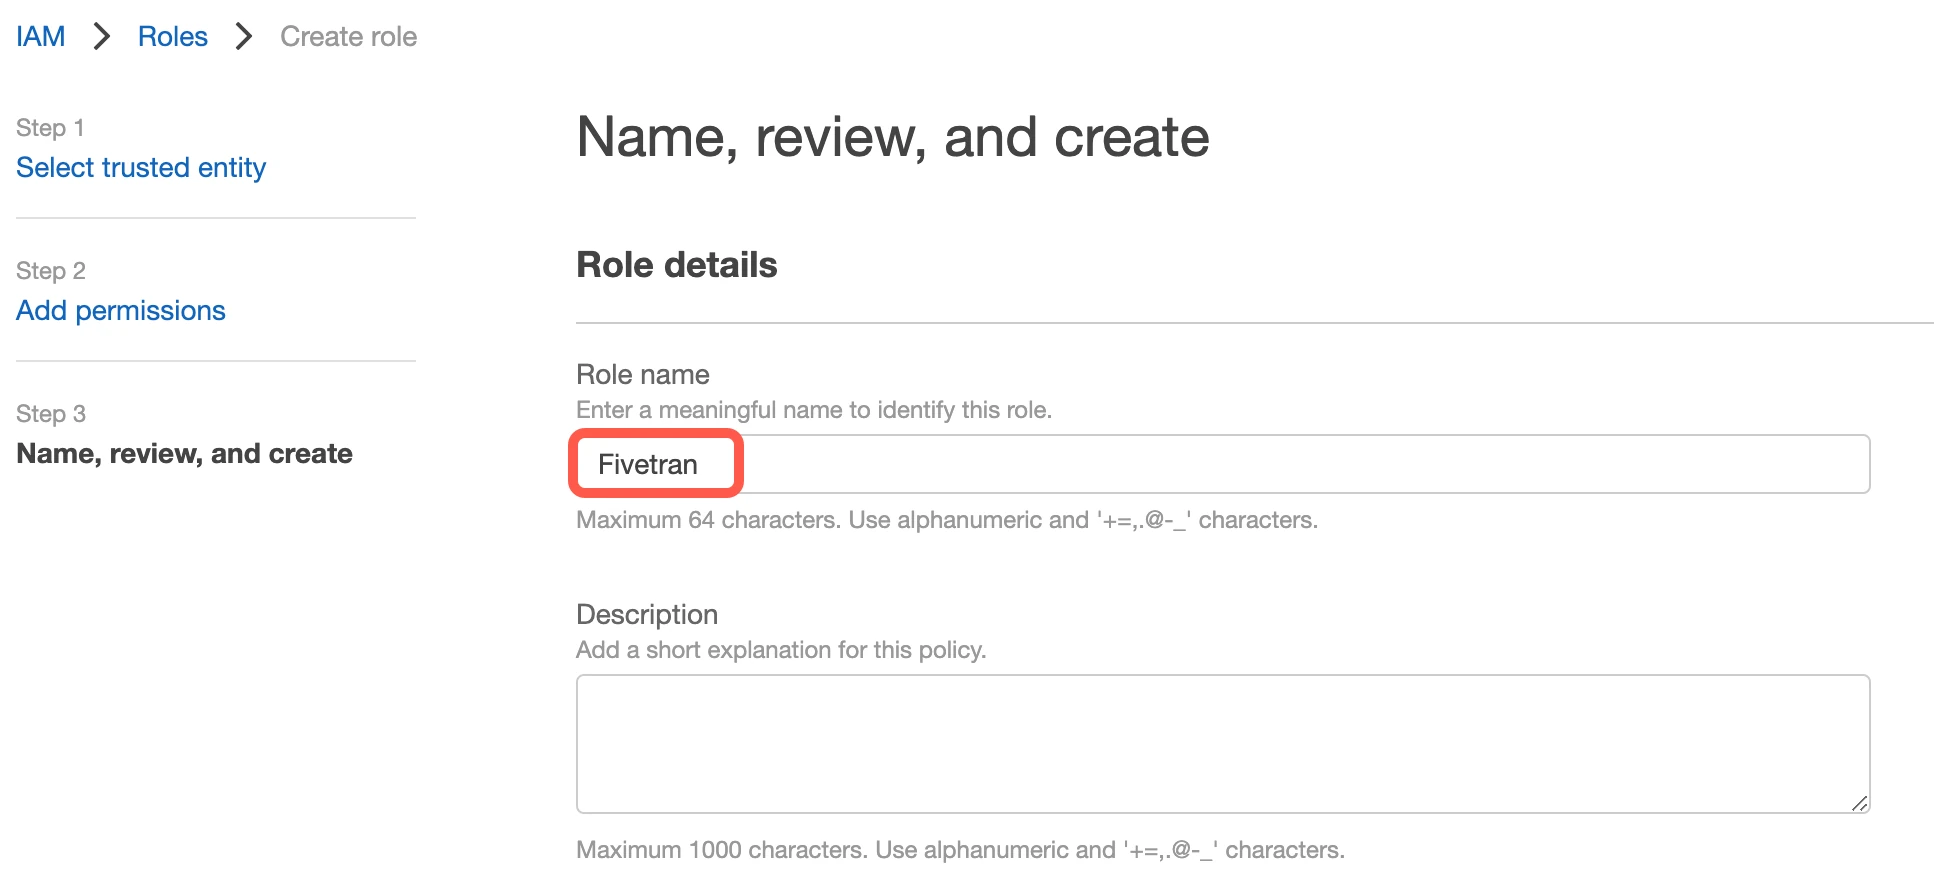
In the Name, review, and create step, specify the role name, for example "Fivetran", then click Create role at the bottom of the page.
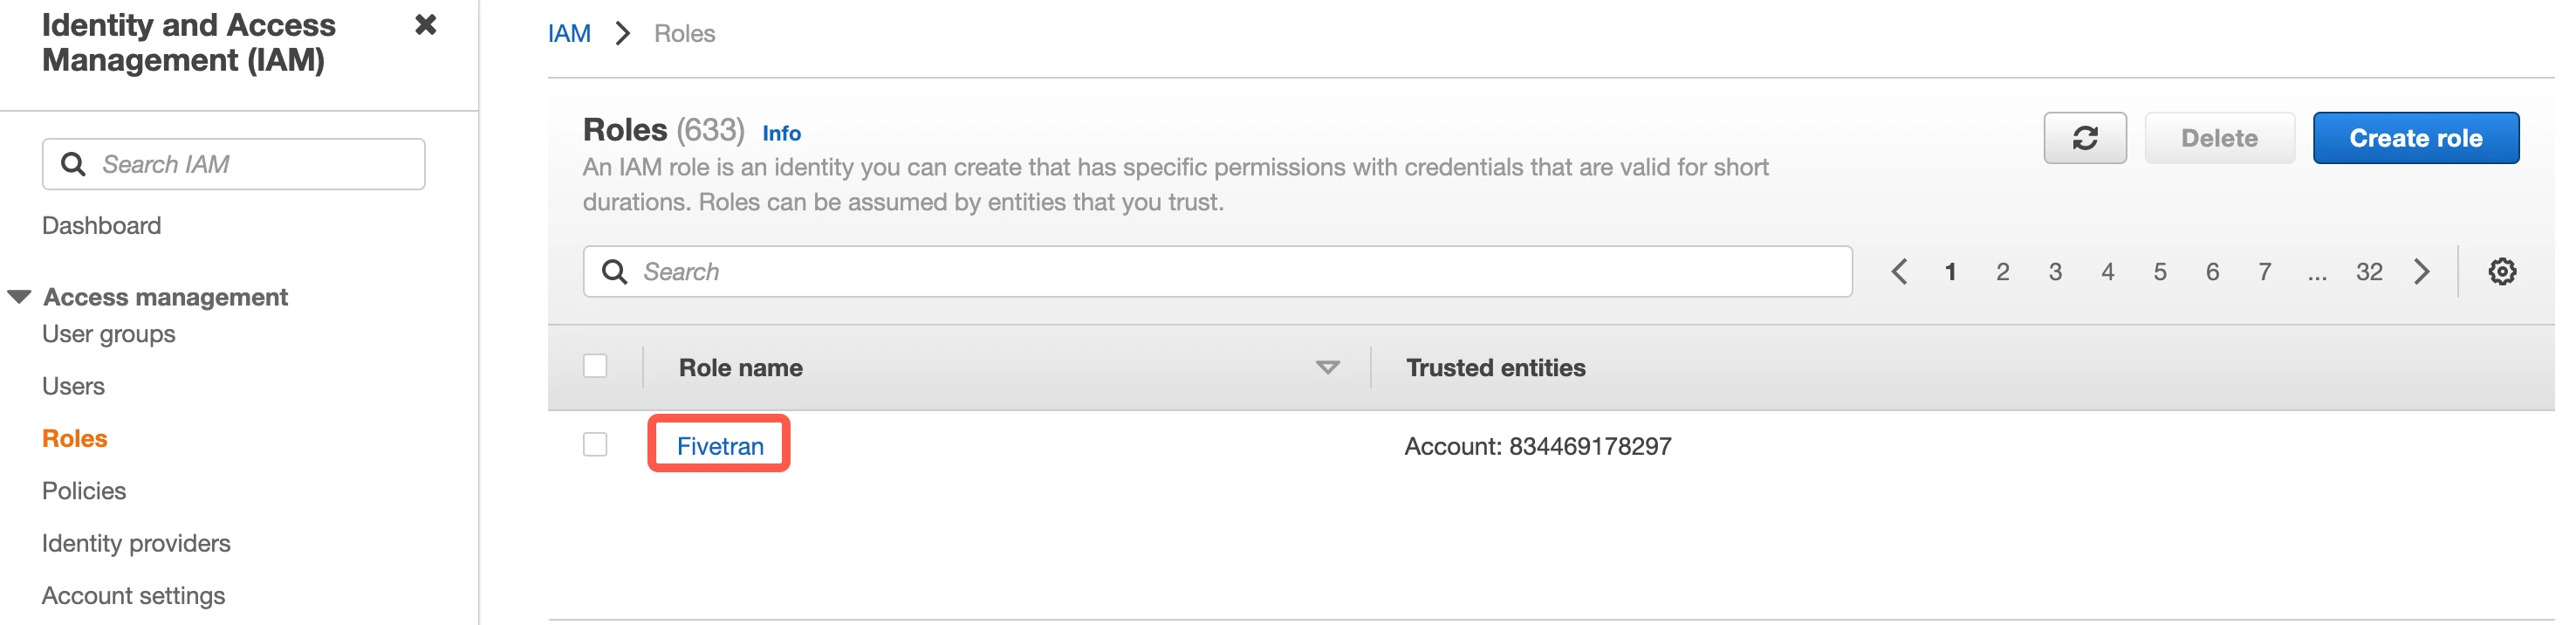
Click the Fivetran role you created.
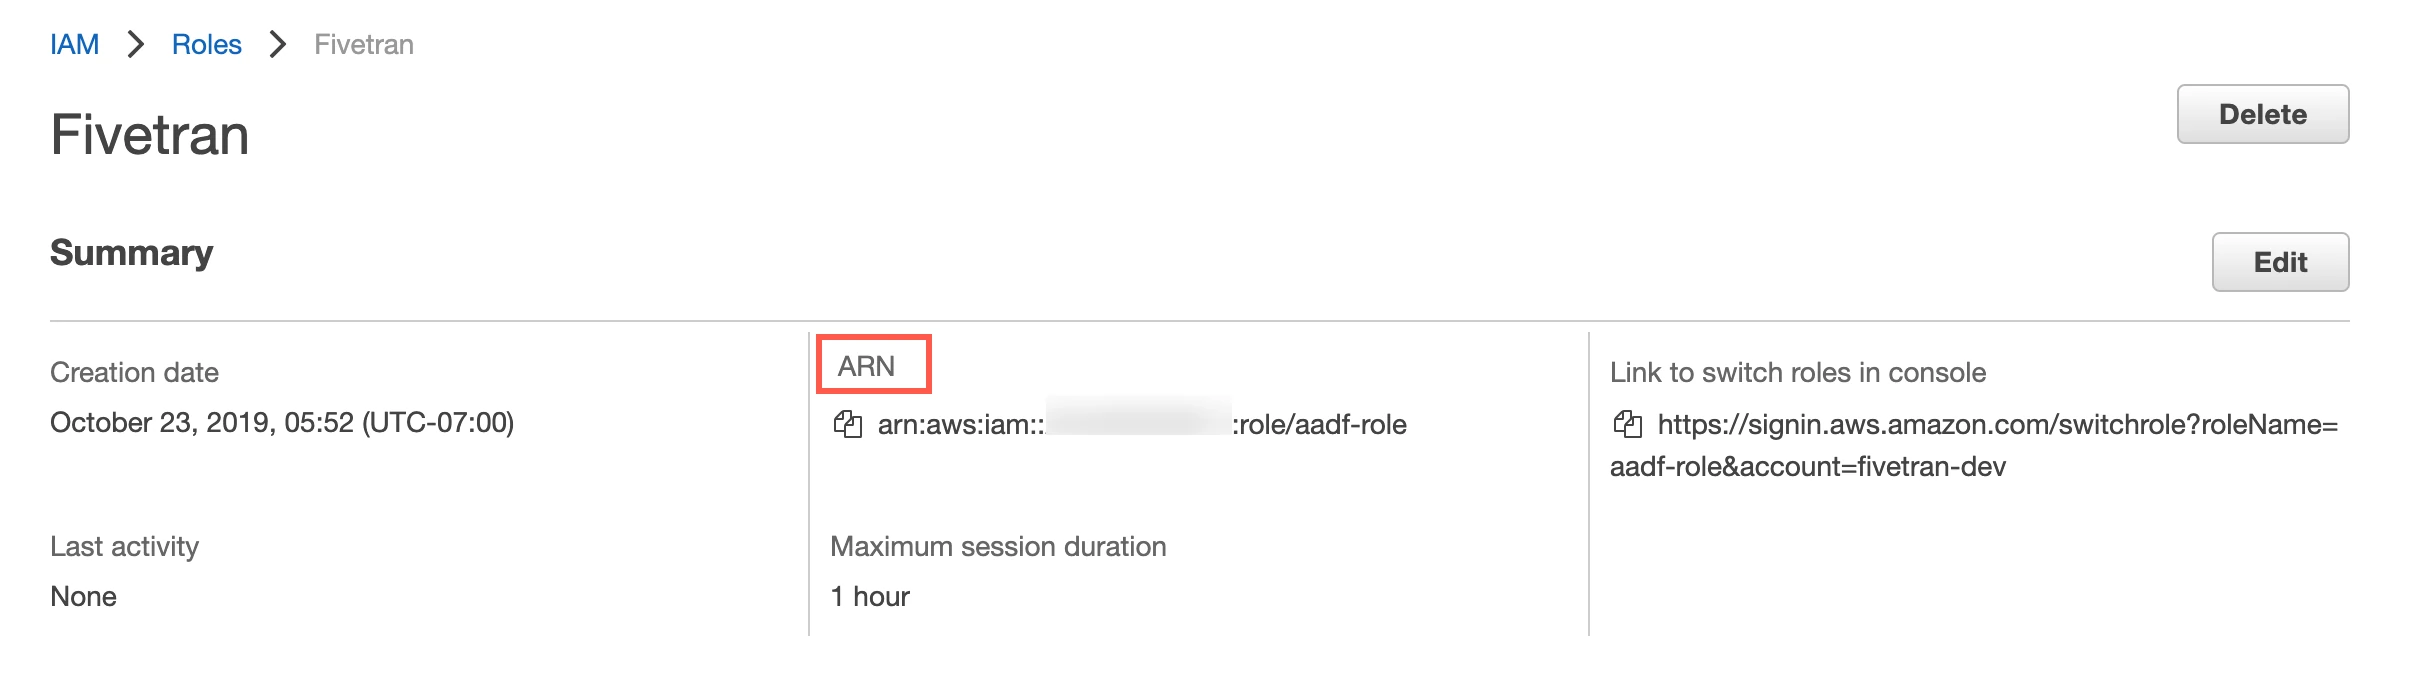
On the Summary page for the role, find the ARN and make a note of it. You will need it to configure Fivetran.
If you want to re-use an existing IAM role created for Fivetran account, you need to edit the trust policy for the same role. You can then add another external ID to the JSON policy or copy the following policy and paste it in your JSON tab:
    {
        "Version": "2012-10-17",
        "Statement": [
            {
                "Effect": "Allow",
                "Principal": {
                    "AWS" : "arn:aws:iam::834469178297:user/gcp_donkey"
                },
                "Action": "sts:AssumeRole",
                "Condition": {
                    "StringEquals": {
                        "sts:ExternalId": [
                            "external-id-1",
                            "external-id-2"
                        ]
                    }
                }
            }
        ]
    }
(Optional) Set permissions
You can specify permissions for the Role ARN that you designate for Fivetran. Giving selective permissions to this role will allow Fivetran to only sync the CDA objects it has permissions to read. At minimum, Fivetran must be able to read the configured manifest.json file and the CDA table folders referenced by the manifest.
Skip to the Configure AWS PrivateLink step.
(Optional) Access using key and secret
You can skip this step if you already have an access key and secret.
Create user
You can skip this step if you already have a user having access to the bucket.
Open your Amazon IAM console.
Go to Users, then click Add users.
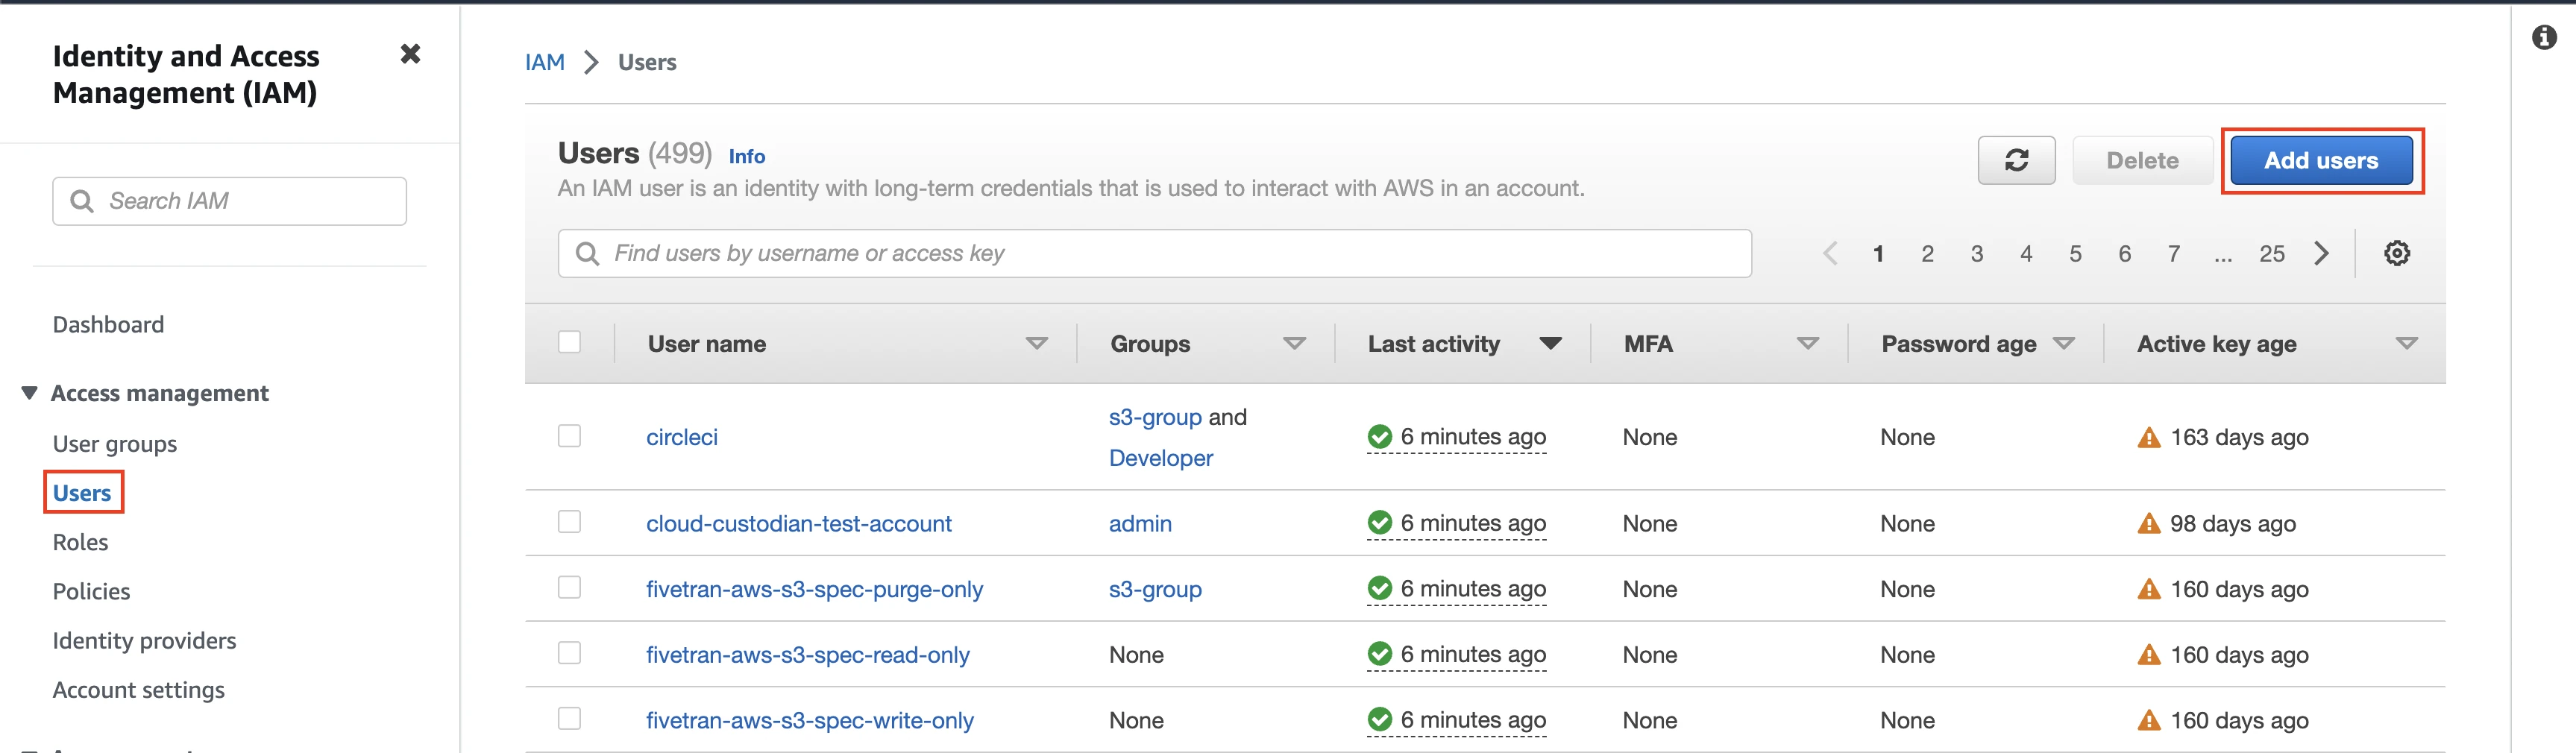
Enter the User name, then click Next.
Select the Attach policies directly option, then select the "Fivetran-S3-Access" policy you created.
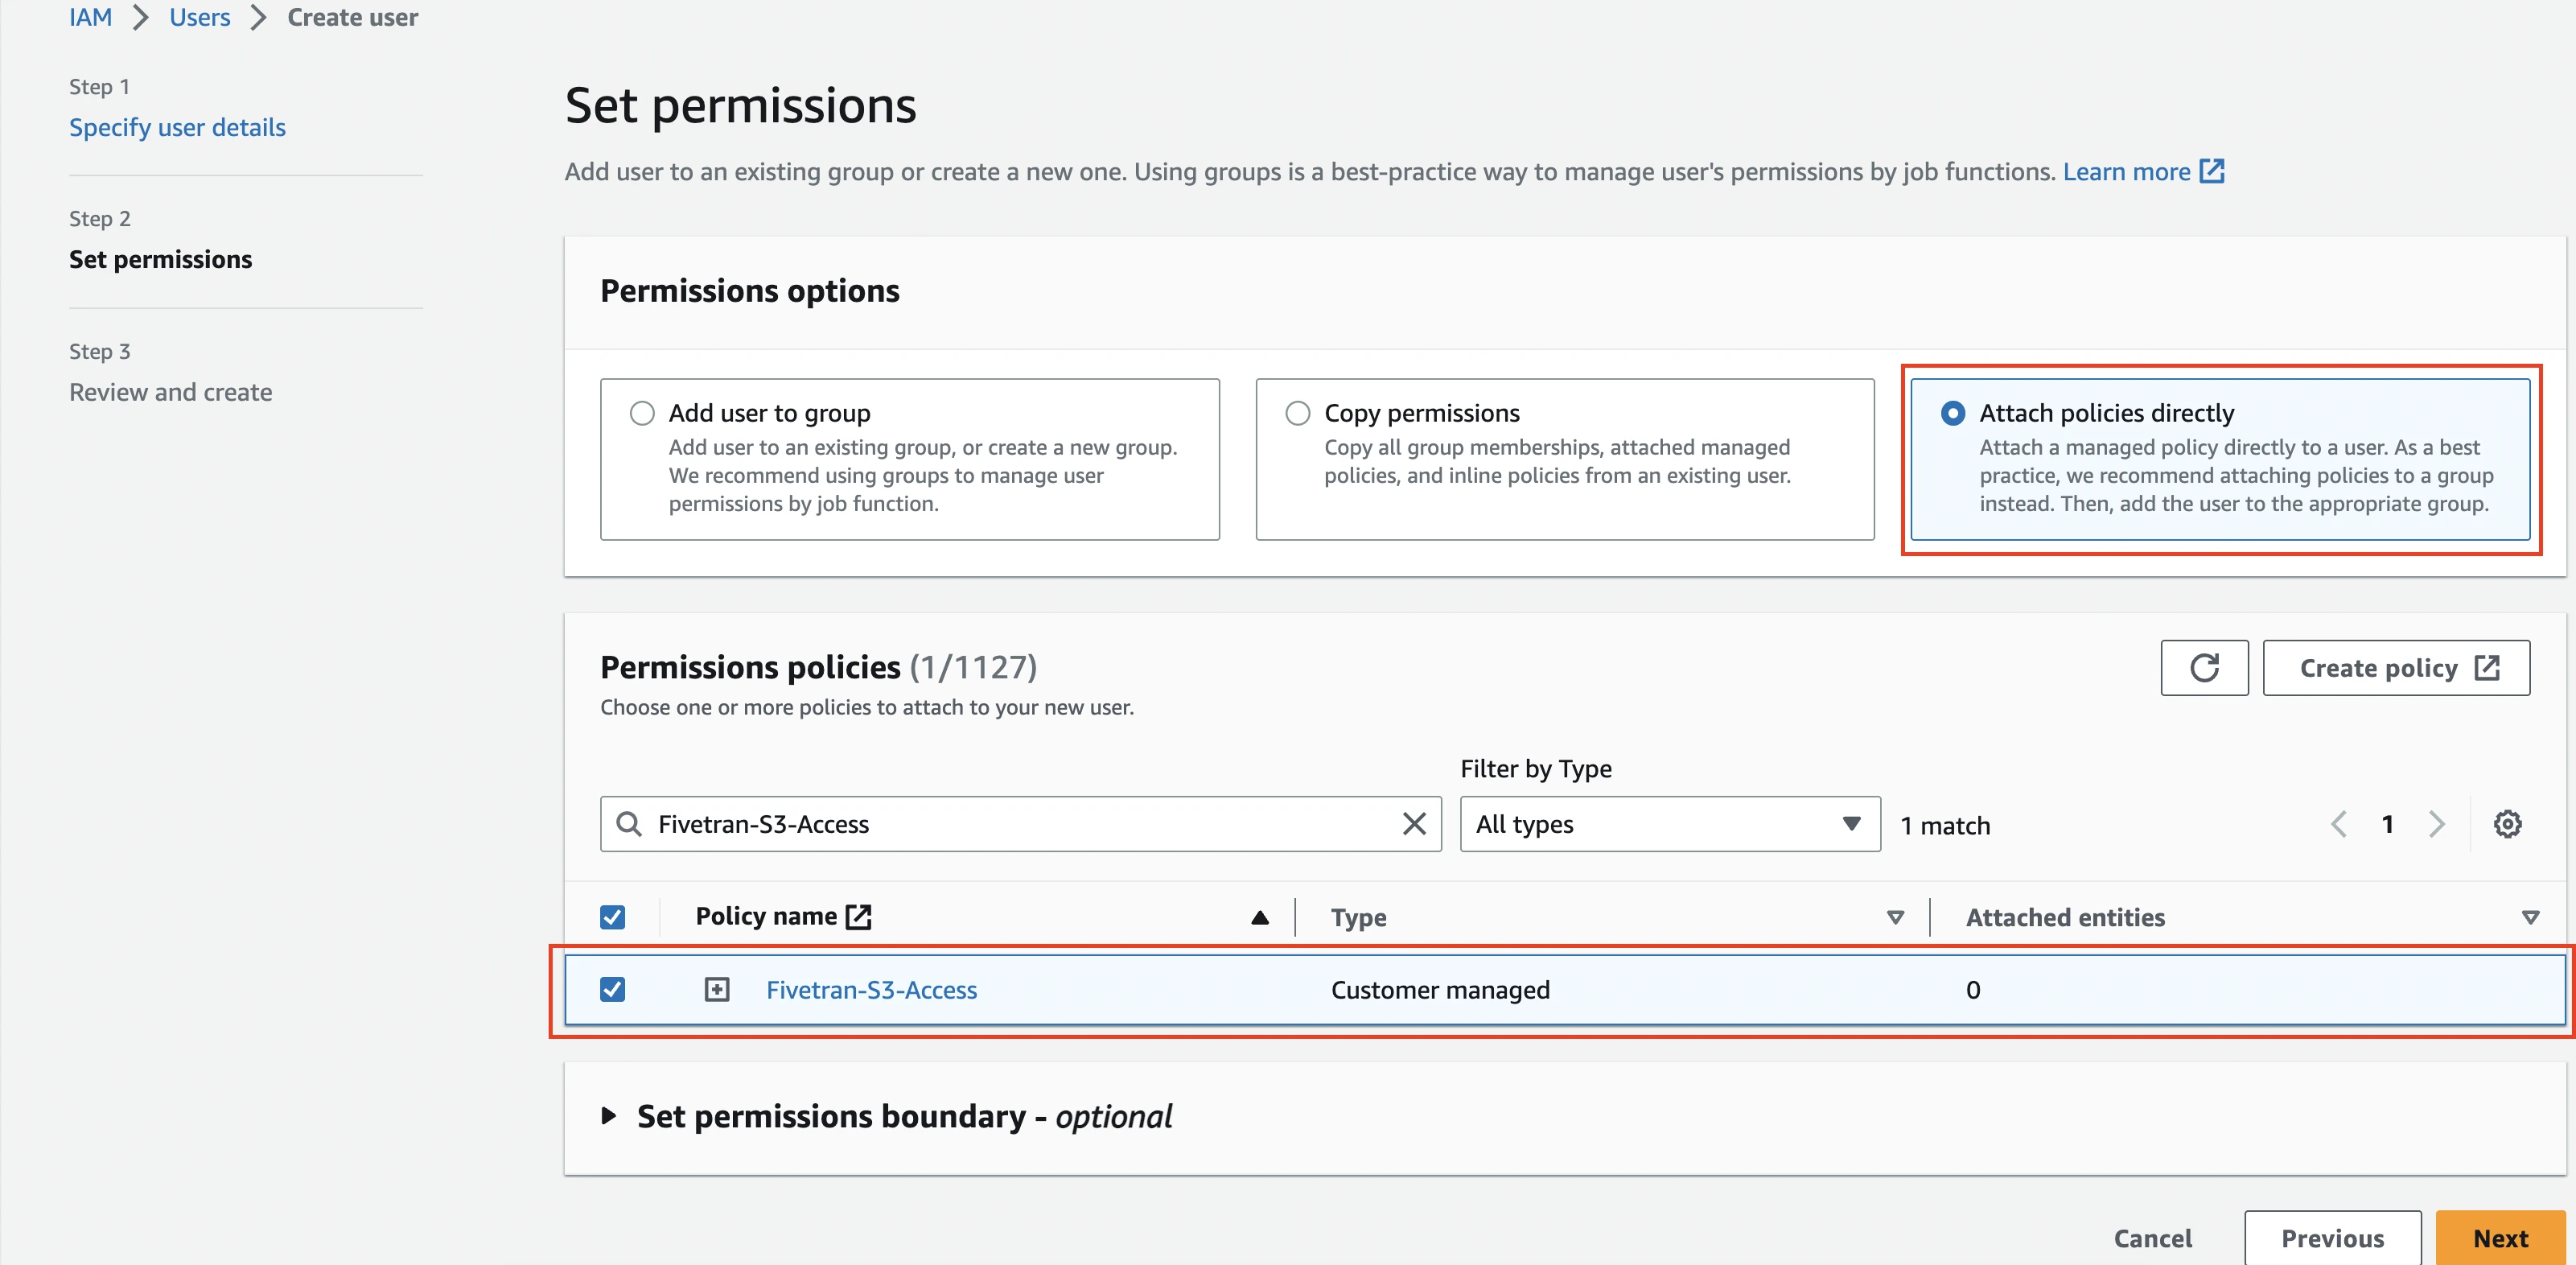
Click Next, then click Create user.
Generate access key and secret
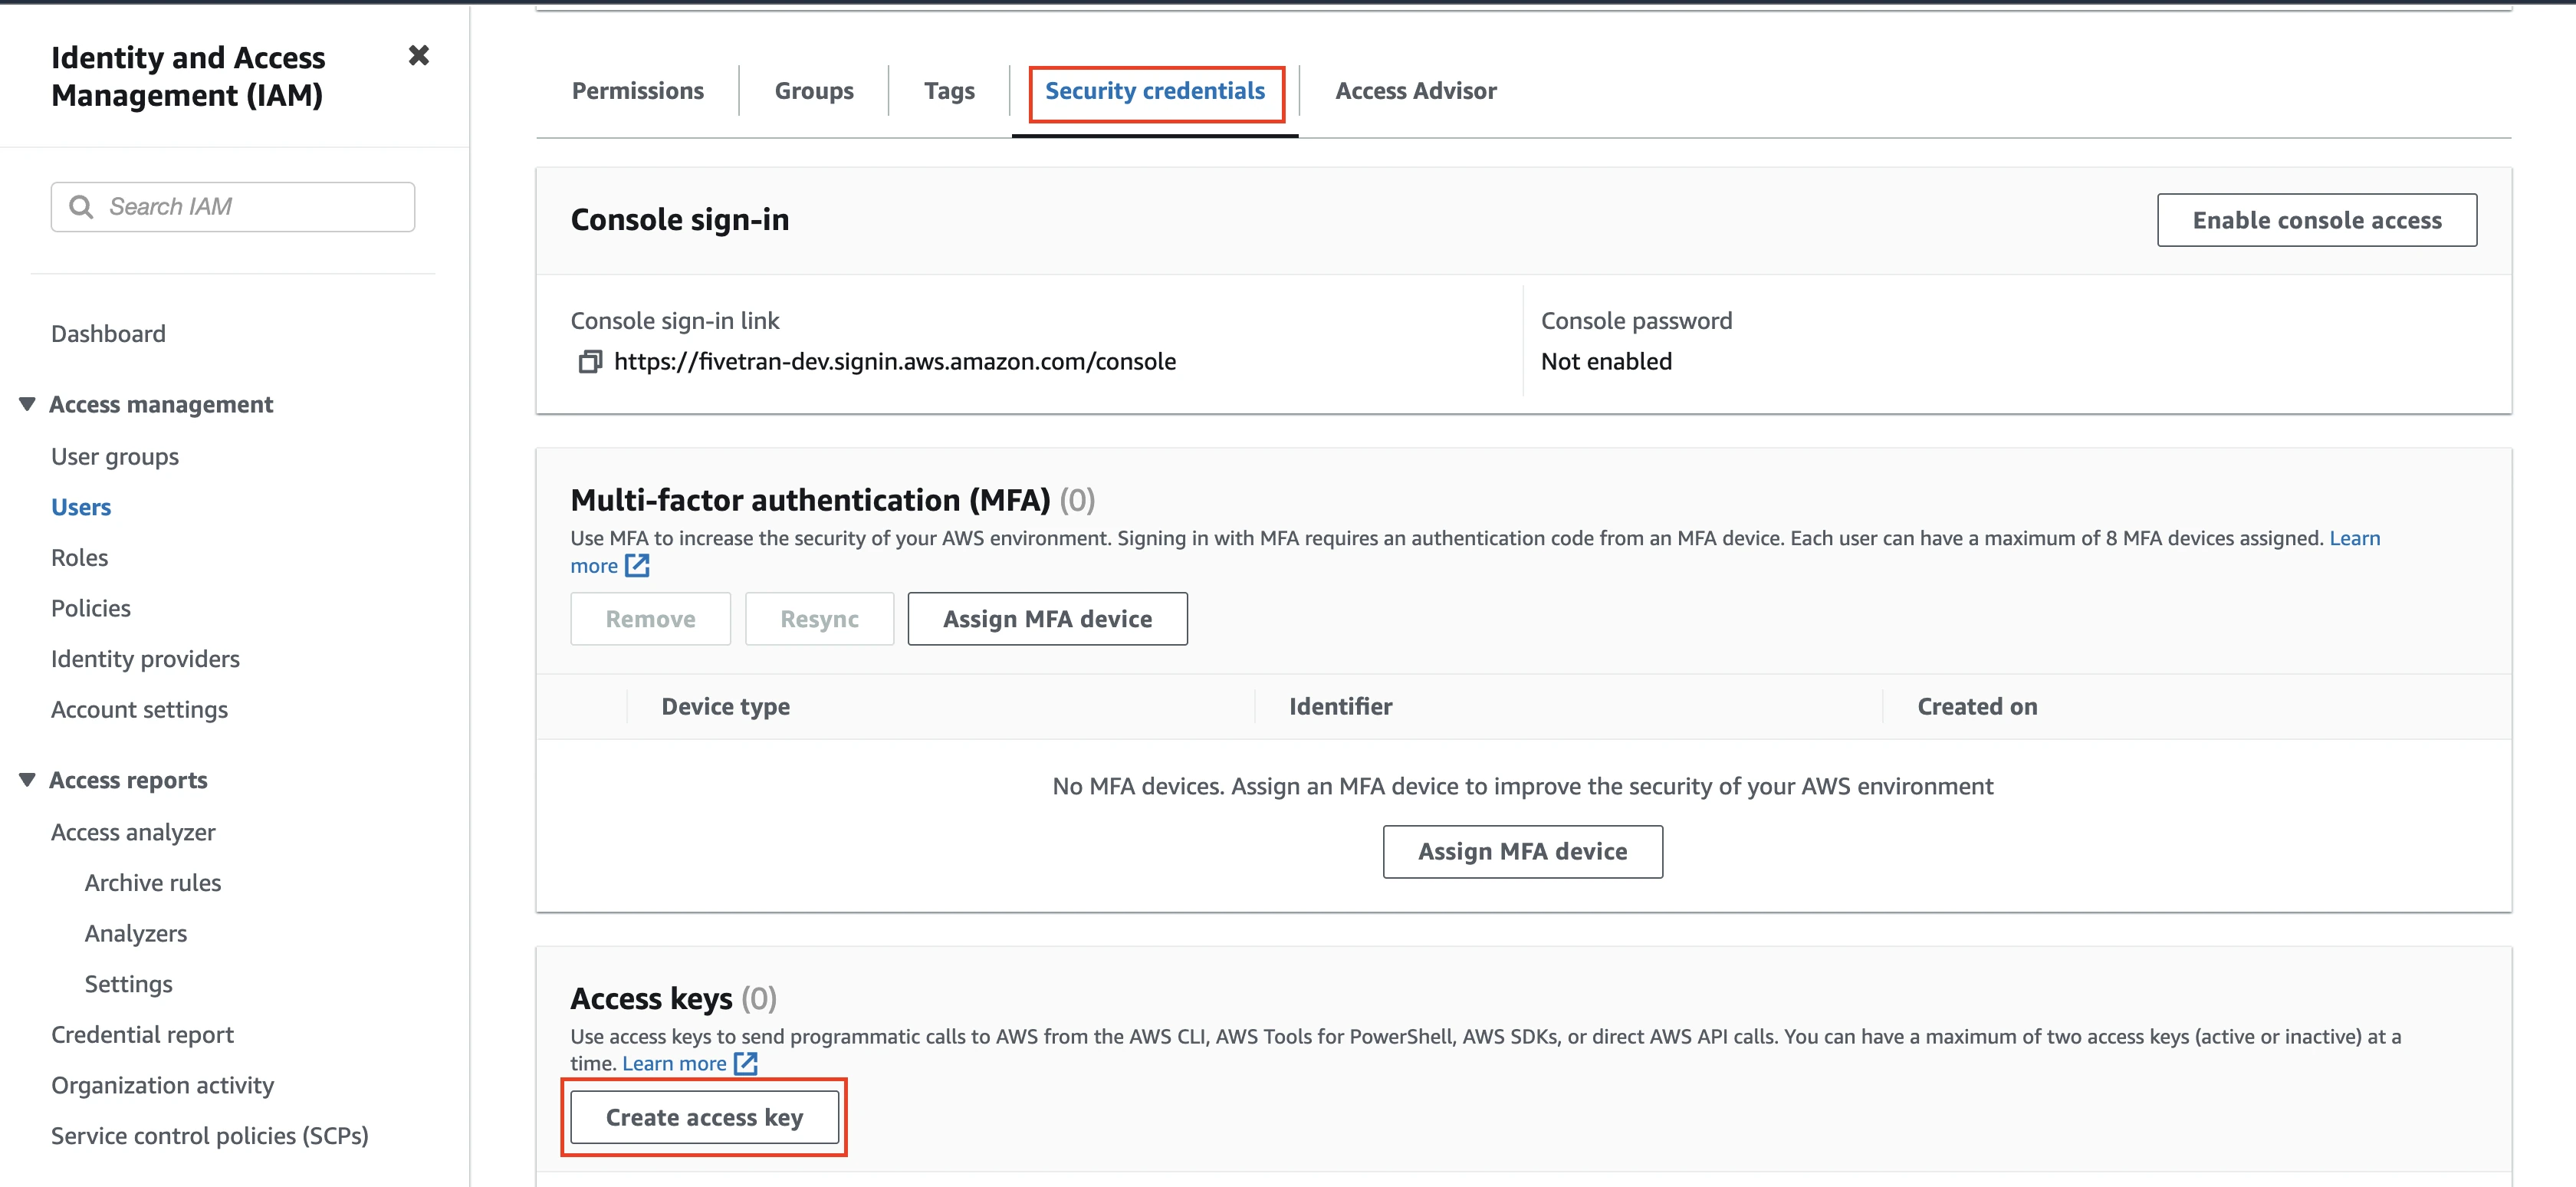
In the Users tab, open the User you created.
Go to Security credentials tab and navigate to the Access keys section.
Click Create access key.
From the Use Case options, select the Third-party service option and then click Next.
Enter a Description tag value and then click Create access key.
Copy the Access key and Secret access key values. You will need them to configure Fivetran.
(Optional) Configure AWS PrivateLink
You must have a Business Critical plan to use AWS PrivateLink.
AWS PrivateLink allows VPCs and AWS-hosted or on-premises services to communicate with one another without exposing traffic to the public internet. PrivateLink is the most secure connection method. Learn more in AWS PrivateLink documentation.
Follow our AWS PrivateLink setup guide to configure PrivateLink for your CDA S3 bucket.
There are two ways in which you can provide Fivetran access to your CDA data: using IAM policies to control access to S3 buckets (recommended) or using access points.
By default, you cannot configure PrivateLink if you want to use the Hybrid Deployment model. However, if you want to configure PrivateLink with Hybrid Deployment, see the Gateway endpoints for Amazon S3 documentation. With a gateway endpoint, you can access Amazon S3 from your VPC without an internet gateway or NAT device for your VPC.
(Optional) Configure access point
Create access point
Create an access point to provide Fivetran access to your CDA S3 bucket.
Open your S3 console.
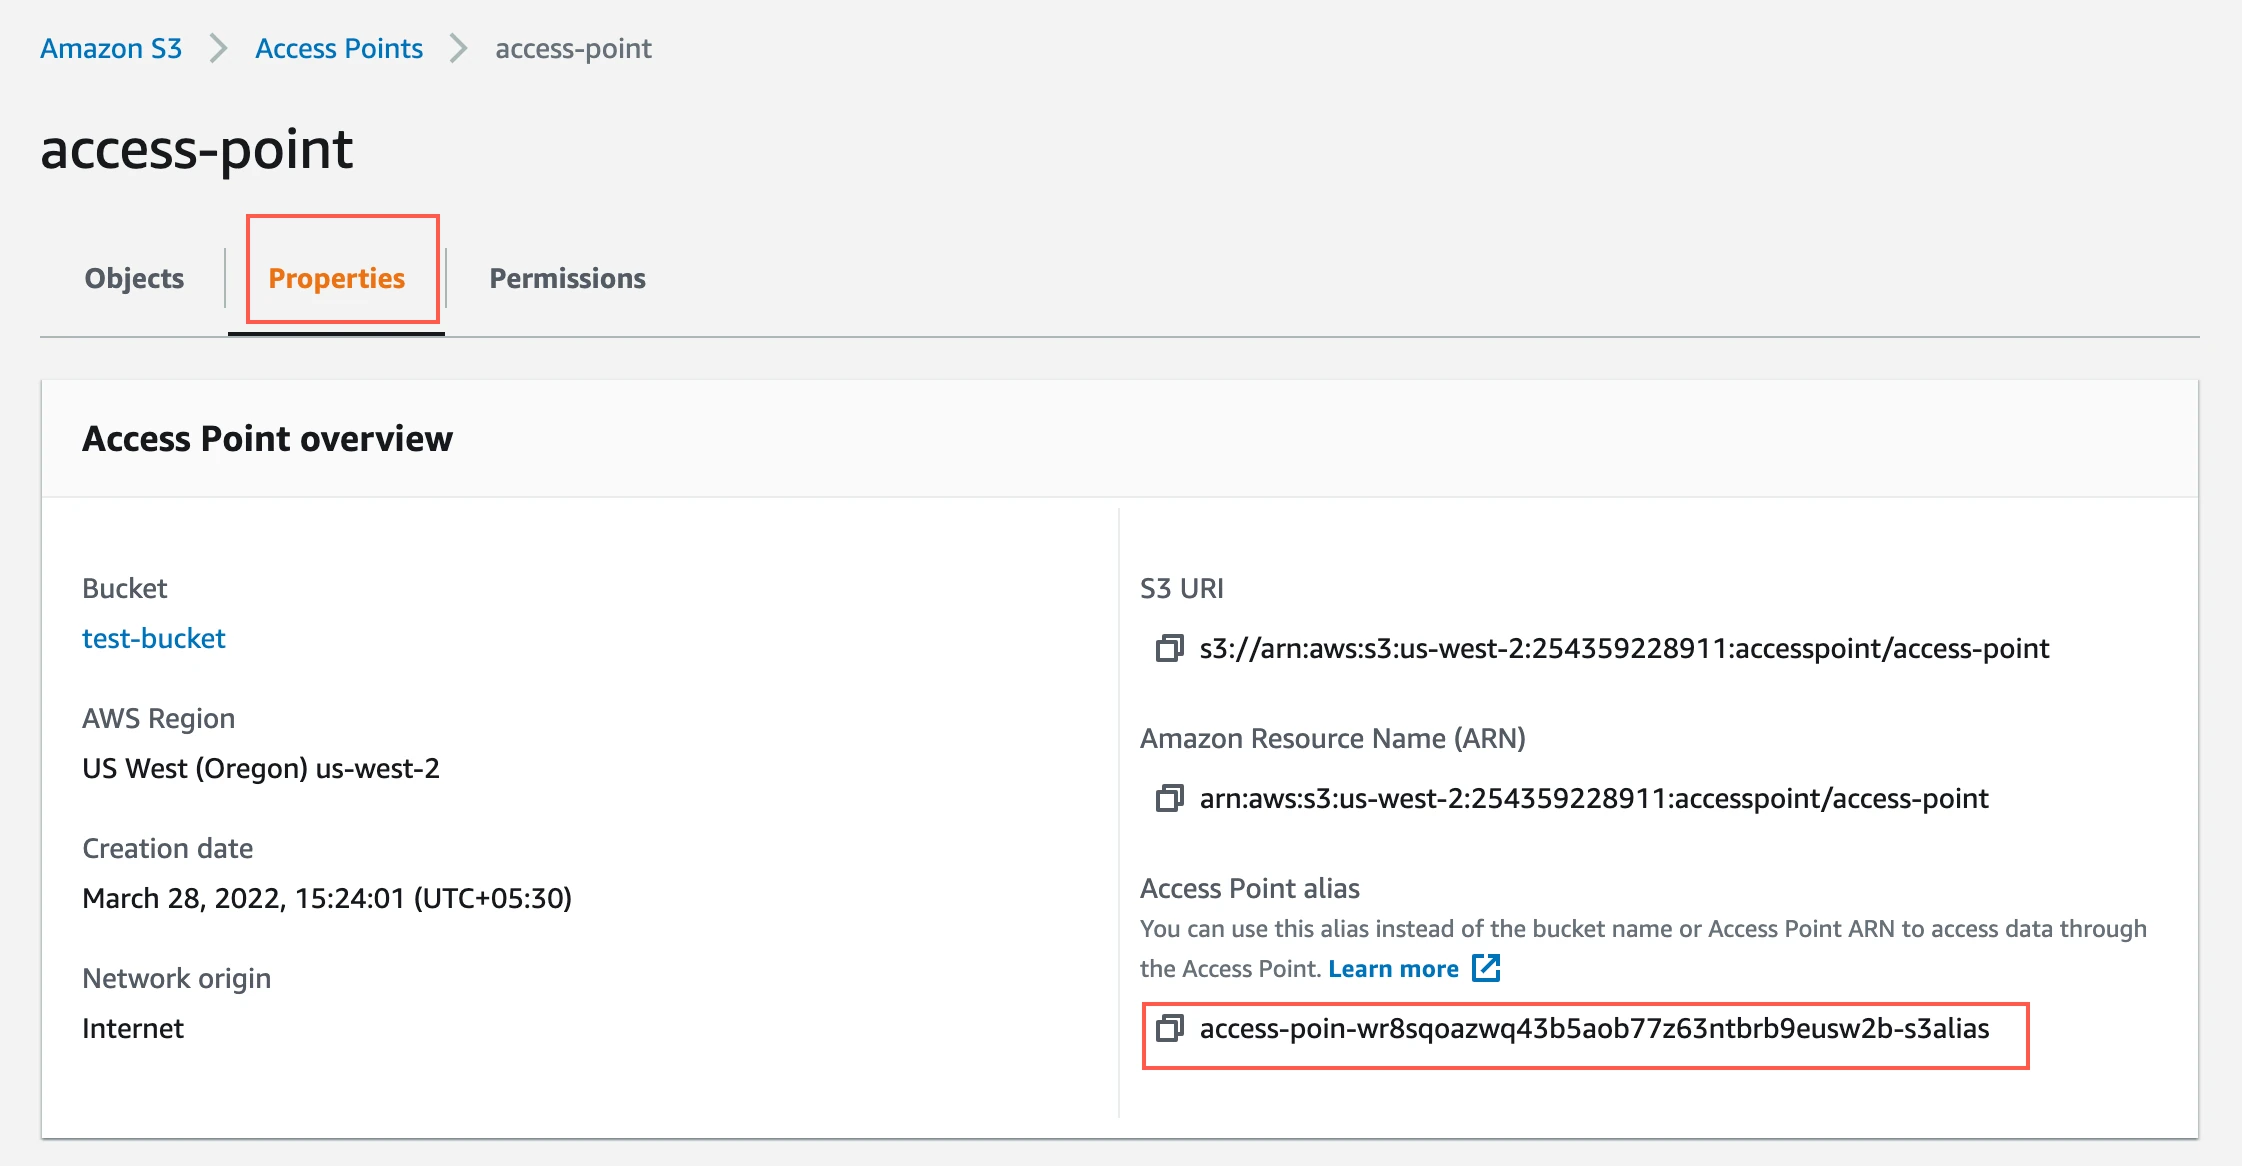
On the left navigation pane, click Access Points.
Select the access point.
Go to the Properties tab. Make a note of the Access Point alias. You will need it to configure Fivetran.
To provide your bucket access to the access point, copy the following into the bucket policy you created. Replace
{account-number}with your AWS account number,{role-name}with the role name that you created,{your-bucket-name}with the S3 bucket name that you used to configure the access point,{access-point-region}with the AWS region in which you created the access point, and{your-access-point}with the name of the access point you created.{ "Version": "2012-10-17", "Statement": [ { "Effect": "Allow", "Principal": { "AWS": "arn:aws:iam::{account-number}:role/{role-name}" }, "Action": [ "s3:GetObject", "s3:ListBucket" ], "Resource": [ "arn:aws:s3:::{your-bucket-name}", "arn:aws:s3:::{your-bucket-name}/*" ], "Condition": { "StringLike": { "s3:DataAccessPointArn": "arn:aws:s3:{access-point-region}:{account-number}:accesspoint/{your-access-point}" } } } ] }
Create an IAM policy for access point
Create a new access point policy. Copy the following policy and paste it in the JSON tab. Replace {access-point-region} with the region in which you created the access point, {account-number} with your account number, and {your-access-point} with the name of the access point you created.
{
    "Version": "2012-10-17",
    "Statement": [
        {
            "Effect": "Allow",
            "Action": [
                 "s3:GetObject",
                 "s3:ListBucket"
            ],
            "Resource": [
                 "arn:aws:s3:{access-point-region}:{account-number}:accesspoint/{your-access-point}",
                 "arn:aws:s3:{access-point-region}:{account-number}:accesspoint/{your-access-point}/*"
            ]
        }
    ]
}
Finish Fivetran configuration
Depending on your Access approach, do the following:
- If you selected IAM Role, enter the Role ARN you created.
- If you selected Access Key and Secret, enter the Access Key ID and Access Key Secret you created.
Enter the Manifest path. This is the path to your CDA
manifest.jsonfile within the S3 bucket, relative to the bucket root. The path is case-sensitive and must not include a leading slash or the bucket name itself. For example, if your manifest is ats3://my-bucket/dev/cc/1616566574/manifest.json, enterdev/cc/1616566574/manifest.json.(Not applicable to Hybrid Deployment) If you want to connect using AWS PrivateLink, set the Require PrivateLink toggle to ON.
By default, we use PrivateLink to connect if your S3 bucket and destination are in the same region. Enabling this option ensures that we always use PrivateLink to connect. If the regions are different, Fivetran won't create the connection.
(Hybrid Deployment only) If your destination is configured for Hybrid Deployment, the Hybrid Deployment Agent associated with your destination is pre-selected for the connection. To assign a different agent, click Replace agent, select the agent you want to use, and click Use Agent.
Click Save & Test. Fivetran validates the S3 bucket, reads the manifest, and syncs the CDA-generated Parquet files referenced by the manifest.