Microsoft Dynamics 365 Business Central Setup Guide
Follow our setup guide to connect Microsoft Dynamics 365 Business Central to Fivetran.
Prerequisites
To connect Microsoft Dynamics 365 Business Central to Fivetran, you need:
- a Microsoft Dynamics 365 Business Central account with Administrator privileges
- a Business Central sandbox environment with a valid license to develop AL extensions
- Visual Studio Code (VS Code)
For more information about installing VS Code, see its documentation.
Setup instructions
Install AL Language extension
Open VS Code.
On the navigation menu, click the Extensions icon and search for
AL Language extension for Microsoft Dynamics 365 Business Central.In the search results, click Install for AL Language extension for Microsoft Dynamics 365 Business Central.
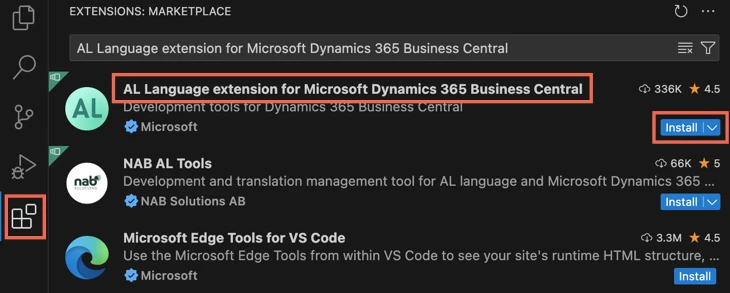
Once the installation is complete, restart VS Code.
Create AL package
- In VS Code, open the command palette and select AL: Go! to create an AL package in your local machine.
You can open the command palette using the following keyboard shortcuts:
- Windows: ctrl + shift + p
- macOS: cmd + shift + p
- Specify the path to the folder where you want to create the package and press Enter.
- Select the latest AL runtime version.
- You must select a runtime version higher than v7.0.
- We recommend that you use AL runtime version 12.0 (Business Central 2023 release wave 2). With runtime 13.0 (Business Central 2024 release wave 1), you may encounter issues while installing your AL package on your Business Central environment.
- For more information about choosing runtime versions, see Business Central's documentation.
- Select Microsoft cloud sandbox for online account as your server.
Connect VS Code instance to source
On the navigation menu, click the Explorer icon and open the
launch.jsonfile.In the JSON content of the file, set the value of
enviornmentNameto the name of a sandbox environment name in your Business Central account.Save and close the
launch.jsonfile.Open the command palette and select AL: Download symbols.
In the pop-up window, click Copy & Open. VS Code will copy a code to your clipboard and will redirect you to Microsoft's login page.

On the Microsoft's login page, paste the code from your clipboard and click Next.

Log in to your Business Central Administrator account.
In all the confirmation windows, click Continue to connect your local VS Code instance to your Business Central account.
Go to VS Code. You will see a confirmation message indicating that the download of symbols was successful.
Specify ID range for API pages
On the navigation menu, click the Explorer icon and select the
app.jsonfile.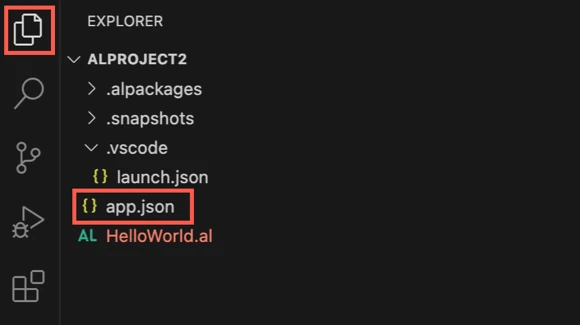
In the JSON content of the file, change the values for the
idRangessetting. Set the value offromto90000and the value oftoto90149.If the ID range from
90000through90149is already used by another package, specify a different range that is available for use.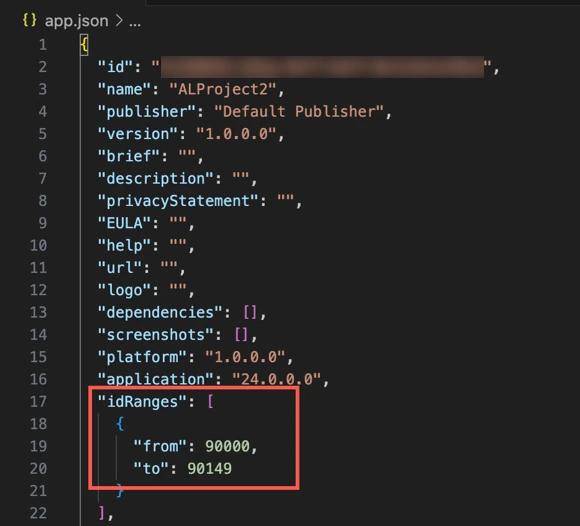
Save and close the
app.jsonfile.
Add API pages
Download the
initial_setup_periodic_reimport.alfile from our GitHub repository to the AL package you created in Step 2. This file contains pre-defined API pages for the standard tables in Business Central.If you do not want to download the file, copy its contents into a new AL file (
.alfile) and store it in your AL package.(Optional) If you want to configure webhook-based delete capture, download the InitialSetup.al file instead.
Verify whether the AL file contains API pages for all the tables you want to sync. If it doesn't, create new API pages for the missing tables. You can add the new pages to the same AL file or create a new AL file for them in your AL package.
You must expose the
systemIdandsystemModifiedAtcolumns in every API page you create. Both column names are case-sensitive.Verify whether the
idvalues for all the tables, API pages, and code units in your AL package are within theidRangesvalues you specified in Step 4.Go to VS Code and save all the AL files in your AL package.
- In the
initial_setup_periodic_reimport.alfile, the tables and their columns in the API pages are based on the US region. If your Business Central account is mapped to a different region, some tables and columns may differ. In such cases, you must add or remove the tables and columns accordingly. - If you get any compiler warning for the API page columns, see our troubleshooting documentation.
Generate permission set
- Open the command palette and select AL: Generate permission set as XML file containing current extension object. This will generate a
extensionsPermissionSet.xmlfile in your AL package. - Open the
extensionsPermissionSet.xmlfile and make a note of theRoleIdvalue. - Save all the files in the AL package.
Install AL package
Install AL package on sandbox environment
In VS Code, click Run without Debugging on the Run menu.
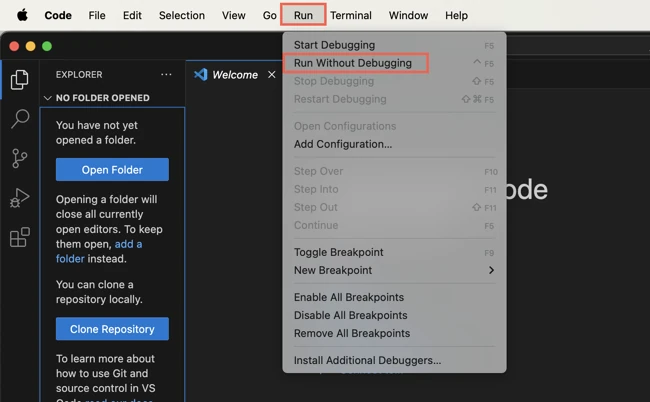
You can track the logs in the DEBUG CONSOLE panel to identify the errors (if any). For more information about resolving the errors, see our troubleshooting documentation.
Once the package is installed, you will be redirected to your Business Central account.
Install AL package on production environment
In VS Code, open the command palette and select AL: package. This generates a
.appfile in the AL package you created in Step 2.Go to your Business Central account.
Switch to any company in the production environment.
Go to the Extension Management page.
Go to the Manage tab and click Upload Extension.

In the Upload And Deploy Extension window, upload the newly generated
.appfile from your AL package.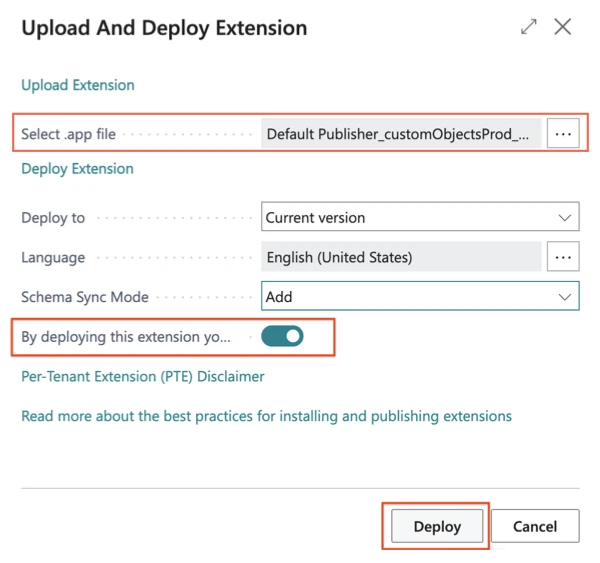
Set the acknowledgement toggle to ON.
Click Deploy.
To see the deployment status, go to the Manage tab and click Installation Status. If the deployment fails, see our troubleshooting documentation or contact Business Central's support team.
Allow HTTP requests for AL package
You must perform this step if you want us to capture deletes for your source tables.
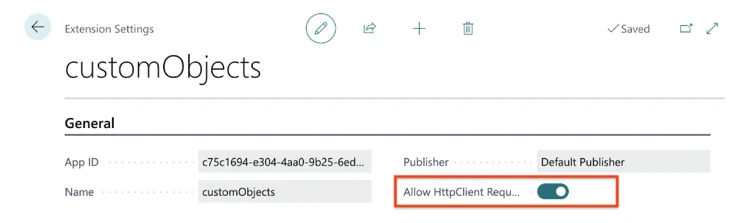
In your Business Central account, go to the sandbox or production environment where you installed your AL package in Step 7.
Go to the Extension Management page and select your AL package.
Set the Allow HttpClient Requests toggle to ON.
Assign permission set to user authenticating connection
- Go to your Business Central account.
- Switch to the environment where you installed the AL package.
- Go to the Users page and select the user you want to use to authenticate Fivetran's Business Central connection.
- Click New Line.
- In the Permission Set column for the new line, enter the
RoleIdvalue you found in theextensionsPermissionSet.xmlfile. - Click New Line again and then in Permission Set column for the new line, add the
D365 Readpermission set. - (Optional) If you want to sync the data of a subset of companies, create a New Line with the same permission set for each company whose data you want to sync instead of the blank company.
- Leaving the Company column blank assigns the permission set to all companies.
- If you have added custom tables to your AL package, provide the necessary Read permissions to
table,tableData, andpagetypes of the custom tables.
(Optional: For webhook-based delete capture only) Assign permission set to all users
Go to your Business Central account.
Switch to the environment where you installed the AL package.
Go to the Users page.
Go to Related > Permissions > Permission Set by User.

For every company in the environment, assign the
FIVETRAN_SETUPpermission set to all users who can delete records in the environment.To make sure we capture and mark the deletes in your destination, assign the
FIVETRAN_SETUPpermission set to all the users who have authenticated any integration that can delete records in the environment.
Find tenant ID
Find your tenant ID in your Business Central URL and make a note of it. For example, if your Business Central URL is https://businesscentral.dynamics.com/fivetran/, then your tenant ID is fivetran.
Find environment name
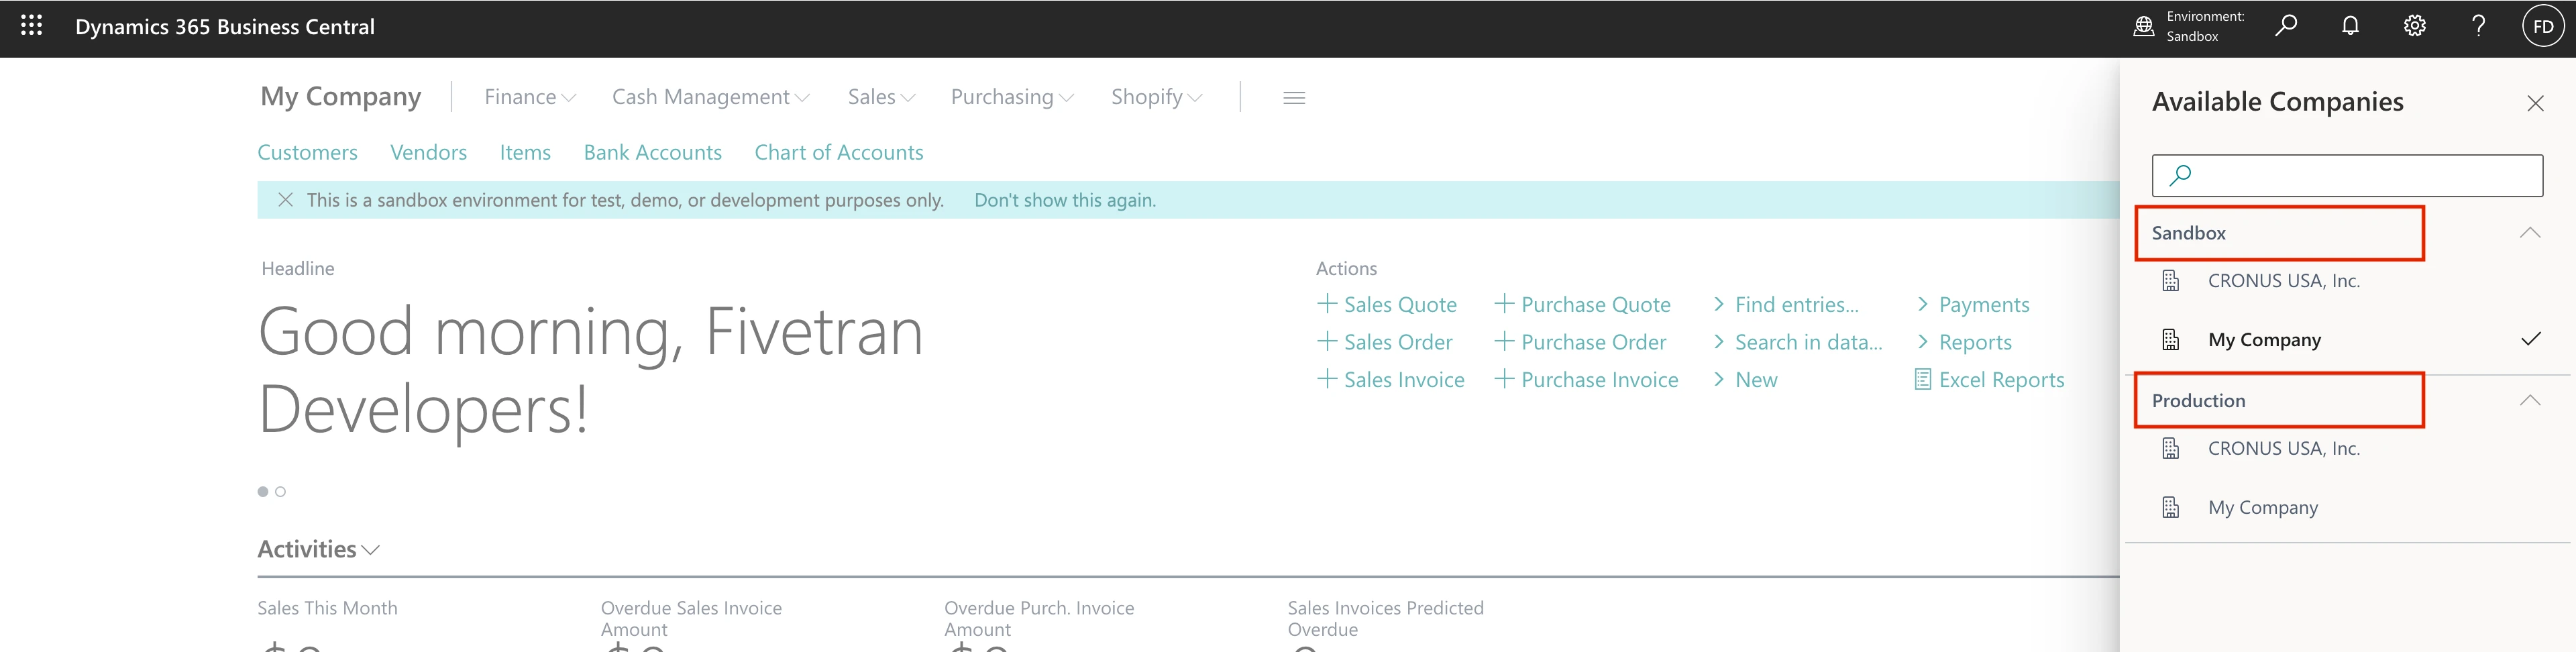
In the top right corner of your Business Central dashboard, click the Environment icon.
Make a note of your Business Central environment. You will need it to configure Fivetran.
Finish Fivetran configuration
- In the connection setup form, enter the Destination schema name of your choice.
In the Destination schema names field, choose the naming convention you want Fivetran to use for the schemas, tables, and columns in your destination:
- Fivetran naming: Standardizes the schema, table, and column names in your destination according to the Fivetran naming conventions.
- Source naming: Preserves the original schema, table, and column names from the source system in your destination.
If you want to modify your selection, make sure you do it before you start the initial sync.
- Enter the Tenant ID you found.
- Enter the Environment name you found.
- Click Authorize. You will be redirected to your Business Central account to authorize Fivetran's access.
- Click Accept to authorize Fivetran's access. You will be redirected back to Fivetran.
- Select the Companies whose data you'd like to sync.
(Hybrid Deployment only) If your destination is configured for Hybrid Deployment, the Hybrid Deployment Agent associated with your destination is pre-selected for the connection. To assign a different agent, click Replace agent, select the agent you want to use, and click Use Agent.
- Click Save & Test. Fivetran will take it from here and sync your Business Central data.