FinancialForce Setup Guide Sunset
Follow our setup guide to connect FinancialForce to Fivetran.
Prerequisites
To connect FinancialForce to Fivetran, you need:
- Access to an active Salesforce account with a FinancialForce subscription
- An Enterprise level account plan or higher, or purchased API calls
NOTE: You may create up to five connectors using one set of Salesforce account credentials. Salesforce limits the number of connections made using OAuth2 to five per account per application. If you attempt to authenticate more than five connectors using one set of Salesforce account credentials, the first connector you authenticated with those credentials will lose its authentication. If you need more than five Salesforce or FinancialForce connectors, you must use additional Salesforce account credentials to create those connectors.
Setup instructions
Enable field history tracking
Read the Salesforce documentation to learn how to enable field history tracking.
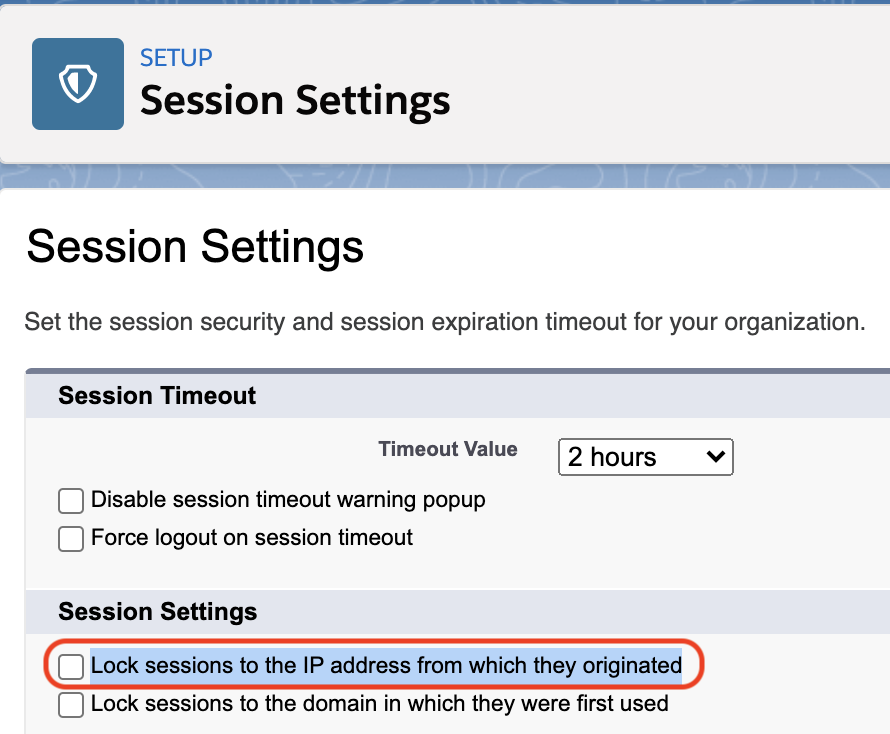
Disable session IP locking
If you have Session IP Locking enabled or get an INVALID_SESSION_ID error, go to the Session Settings page and uncheck the Lock sessions to the IP address from which they originated box. It is very rare that this setting needs to be updated (<1% of cases), because by default it is already disabled for the majority of users.

Finish Fivetran configuration
- In the connector setup form, enter the Destination schema name of your choice.
- Click Authorize to authorize the API. You will be taken to the Salesforce login page.
- Log in to your Salesforce account to authorize Fivetran to connect to it.
- Return to the Fivetran dashboard and click Save & Test. Fivetran will take it from here and sync your FinancialForce data from your Salesforce account.
(Optional) Limit permissions to tables or columns
Fivetran syncs the data that we have access to based on the viewing permissions of the connected user. If you don't want Fivetran to sync a certain type of data to into your destination, limit the permissions of the connecting user.
There are two ways to limit the data that we extract from your Salesforce account. You can either disable tables in the Fivetran dashboard or limit the connecting user in Salesforce.
Option 1. Disable tables in the Fivetran dashboard
- In your Fivetran dashboard, navigate to the FinancialForce connector details page.
- Go to the Schema tab and disable the tables and columns which you do not want to be synced.
If you are concerned about unintentionally syncing sensitive data to your destination, click the gear icon to open the Schema Change Settings menu, then select Allow columns.
Option 2. Limit the connecting user in Salesforce
Fivetran connects to your Salesforce instance through the credentials of the connecting user, so to limit our access to the data, limit that user's access. You can do this in Salesforce through Permission Sets.
It's best to limit the connecting user's access before you initially connect the user through our setup form. Otherwise, you may have some dead objects in Salesforce that will no longer be updated after you've restricted the user's permissions.
Log in to Salesforce. You must have administrative privileges to set permissions.
Go to Setup in the top right corner of your screen.
Under the Administer tab on the left side of the screen, click on the arrow next to Manage Users.
You should now see a drop-down menu below the arrow. Select Permission Sets in the drop-down menu.
We recommend that you create a new set of permissions specifically for the user that you will use to connect to Fivetran. Name it something memorable, such as "Fivetran Permissions."
Users can have multiple sets of permissions assigned to them. If you'd like to be certain of what data we have access to, assign only one set of permissions to the connecting user.
Press New > Enter in Label > Choose Appropriate User License Type
You'll see the settings for the new Permission Set (for example, "Fivetran Permissions"). Select Object Settings.
Select which fields you would like this connecting user, and therefore Fivetran, to have access to. The default setting is "No Access."
The only permissions relevant to Fivetran are that we can read the data, though the user themselves may need to be able to do more. The difference between the "Read" permission and the "View All" permission is that "Read" gives access to view records that are created by that user or are shared using rules, roles, or manual sharing. "View All" gives access to all records of that type (for example, the "Account" type).
When you've chosen the appropriate permissions, go to Administer > Manage Users > Users and select the user whose account you will use to log in through Fivetran.
When you're on that user's page, scroll down to Permission Set Assignments and click Edit Assignments.
Move "Fivetran Permissions" from "Available Permission Sets" to "Enabled Permission Sets" and click Save.
Related articles
description Connector Overview
account_tree Schema Information
settings API Connector Configuration