Salesforce
This page describes how to use Activations with Salesforce.
Getting Started
In this guide, we will show you how to connect Salesforce to Activations and create your first sync.
Required permissions
Activations connects to your Salesforce instance through a standard OAuth connection to an individual user account. We recommend using a stand-alone account specifically for Activations (often called a Service Account) so you can see Activations updates in your audit history. Activations primarily uses the Salesforce Bulk API to sync data to Salesforce in the most API quota-efficient way possible.
The Activations Service Account will need at least these permissions in order to connect successfully:
- "API Enabled" must be checked
- "Session Security Level Required at Login" must be "None"
- Further details: Salesforce blocks some API access when the High Assurance on Session security level required at login setting is used on user Profiles. This will prevent Activations from accessing your Salesforce instance. See Salesforce documentation on how to disable this for your Profile (Strangely, this can be enabled/disabled per user and seems to have no effect on the API. Only the profile-level setting causes issues).
- If API Access Control is enabled, the user must have the "Use any API Client" permission. If API Access Control is not enabled, the user should instead have the "Approve uninstalled connected apps" permission.
The objects and fields accessible to Activations are all determined by the user account you use when connecting Activations to your Salesforce instance. Activations will have the same access as the user, so if fields are read-only or hidden for that user, they will be to Activations. In general, you should give Activations "Read", "Create", "Edit", and "Delete" access to all the objects you'd like to manage via Activations.
Require a connection via an API-Only user?
If you have an API-Only Salesforce user that is unable to log into the Salesforce UI, please contact Support. We'd be happy to set up this connection with you.
Using a Salesforce Sandbox
Activations supports Salesforce Sandbox instances as well. Note that Sandboxes have their own set of user accounts and you may need to create a new account for Activations to replicate permissions. Any time a sandbox is refreshed from production, the account will need to be recreated and the Activations link re-authorized.
Identifying Salesforce records
Selecting the identifier on the destination object is one of the most important decisions when syncing to Salesforce. Salesforce in particular makes the process very flexible, but all the options can also get confusing. This article will guide you through the process of creating and selecting identifiers on your Salesforce objects.
Using External Identifier fields (Recommended)
This is the most reliable choice for identifiers on Salesforce objects, particularly for an Update or Create sync. This will ensure no records with duplicate IDs can be created. If you've already got a field like this, you can skip over the setup instructions, but take a look at the advice on reusing existing external ID fields below.
Before you start: You're going to need Salesforce admin permissions to edit your Salesforce objects. If you don't have that permission, ask your Salesforce admin.
Here's how to add a new External ID to your Salesforce Object:
In Salesforce, go to Setup, open the Object Manager, and click on the Salesforce object you want to sync to.
Select Fields & Relationships and press the New button in the top right.
Select the type of field. You'll want to stick to the Text, Email, or Number types as most others cannot be made into an External ID in the next step.
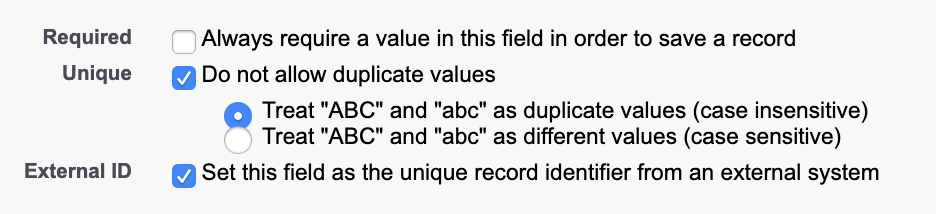
Define your new ID field. The important part is that you check External ID AND Unique. You can choose between case sensitive and case insensitive.
- Unique is strongly recommended. Without it, two records may have the same identifier value and Activations can't ensure we're updating the correct record.
- Case insensitive is a safer choice if you're ever going to have humans inputting values (such as an email address), but could in rare cases introduce a problem with computer-generated identifiers.
Continue through the field creation process and hit Save.
The field should now appear as an option in Activations when creating a new sync. You may need to hit the Refresh button next to the menu if we haven't updated metadata since you created the new field.
Extra steps for syncing to Multi-destination Objects
If you're planning to create a Multi-destination sync to both Lead & Contact or Lead & Account, you'll need to do two more steps.
- First, make sure you've created the same External ID on both the Lead and the Contact or Account.
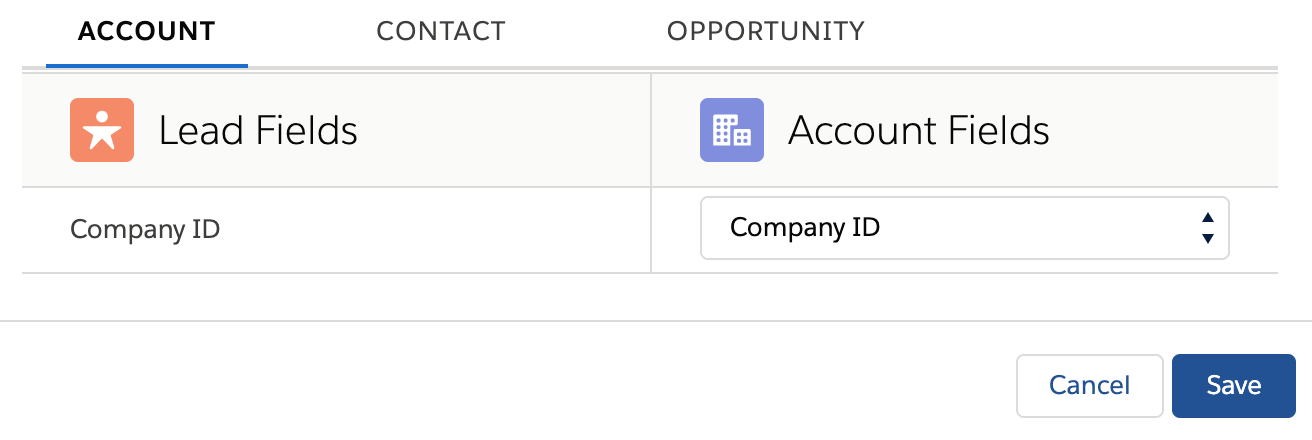
- Then, return to Lead in the Object Manager. Once again in Fields & Relationships and press the Map Lead Fields button in the top right. This UI will let you associate fields across a converted Lead. Create a mapping between your two external IDs and you're done!
Reusing existing External Identifier fields
If your object already has an identifier field, you're in great shape! One thing to double-check before using it for a sync is to make sure all the Salesforce records that should have an ID in that field actually do. If you've got an external ID field created but very few of the records that have an ID actually do, you'll want to make sure you fill that field first before creating a sync, otherwise Activations won't know those records exist and will end up creating duplicates.
If this sounds like your situation, you have a couple of options. You may choose to do all of them.
- Manually go through your Salesforce records and fill in the missing ID values by hand.
- Create a separate ID population sync in Activations. This sync would be Update Only and typically requires creating an Activations model that uses SQL to do some fuzzy matching on other properties such as the name of Salesforce records to fill the ID field.
- Create your new sync anyway and let it create duplicates in Salesforce. Then use Salesforce's deduplication workflow to merge the duplicated objects together, making sure to keep the new ID value.
Using Salesforce IDs
By default, every Salesforce object has an ID field. This ID is automatically generated and assigned whenever a new record is created, and can't be changed. This means the ID is completely under Salesforce's control. Activations (nor anyone else really!) cannot set or update that ID.
Activations can use the Salesforce ID field for Update Only syncs, but it cannot be used for Update or Create, or Create Only syncs.
Using non-External ID fields as identifiers
Activations does allow using non-External ID fields as identifiers in certain situations:
- Any string or numeric field can be used when using Update Only.
- Default Salesforce objects' other identifier fields. For example, the Contact object has an Email field that can be used as an identifier as well.
Note that, because these fields are not forced to be unique in Salesforce, Activations will have trouble identifying which Salesforce record to update if duplicates are present. When this happens, Activations will update one of the records, but not predictable.
For this reason, we recommend you try to use an Unique External Identifier field whenever possible.
Supported Objects and Sync Behaviors
Salesforce support is pretty straight forward!
| Object Name | Supported? | Sync Keys | Behaviors |
|---|---|---|---|
| All Standard and Custom Objects | ✅ | Salesforce Object Identifier | Create Only, Update or Create, Update Only, Mirror, Delete |
| Multi-Destination: Lead or Contact | ✅ | Activations ID, ID, Email | Update Only, Update and Create, Mirror |
| Multi-Destination: Lead or Account | ✅ | Activations ID, ID | Update Only, Update and Create, Mirror |
| Opportunity Contact Role | ✅ | Any unique identifier | Add |
| Email Message Relation | ✅ | Any unique identifier | Add |
Learn more about all of our sync behaviors in our Syncs documentation.
Contact Support if you want Activations to support more Salesforce objects and/or behaviors.
Syncing to OpportunityContactRole
The OpportunityContactRole in Salesforce is a bit weird. It doesn't actually support External ID fields like every other object in Salesforce, which means that Activations cannot support most typical operations. For this, and only this object type Activations supports an Add sync with a very specific configuration. This is definitely advanced mode so if you need help with these steps, please get in contact with Activations Support.
- On your source data model, you'll need to create a unique identifier for each record of the relationship you want to create with OpportunityContactRole. This can simply be
CONCAT(opportunity_id, contact_id)as part of your data model. Your data model should also still includeopportunity_id,contact_id, andcontact_email, as well as any other fields you want to eventually pass to Salesforce. Pro tip: Your model should exclude any records where either the Opportunity or Contact arenull. - Inside Salesforce, you'll need to add a new field to the OpportunityContactRole object. The API name of the field must be
census_tracking_id__c, though you can provide whatever label you want. - Now you can set up your sync!
- Select your data source and target OpportunityContactRole in your Salesforce connection.
- Your sync will be an add sync meaning that Activations can create OpportunityContactRole relations, but won't update or remove them.
- For Primary Identifier, you'll select the column you created in Step 1. Behind the scenes, Activations will use the Salesforce field you created in Step 2 to make sure we're not creating any duplicate relationships.
- In the sync mappings, make sure to set both the Opportunity Lookup with
opportunity_idas well as Contact lookup either using either Contactcontact_idorcontact_email. You can also map any other fields you want on the OpportunityContactRole. - Make sure you press the Refresh Fields button one last time to pick up all the new fields you created.
- At this point, you can use the Sync Tester to verify or save and run your sync. Even if you save and run your sync, we recommend limiting your data model to no more than 10 records just to verify relationships are being created as expected.
- Once your test or first sync has run, sign into Salesforce and verify that the OpportunityContactRole relationships were created the way you expected!
That should be it! OpportunityContactRole is one of the weirdest parts of the Salesforce platform so if you're still confused, not to worry. Reach out and let our support team get you going!
Supported data types
| Salesforce Field Types | Source SQL Types |
|---|---|
| Picklist (Multiple) | String separated by a In Snowflake, this is best done via In BigQuery, this can be via: |
| Lookup | On the object you are syncing to, the field you are looking up needs to be exposed as a unique and an external Id |
| The Rest | Activations will give an informative error message if rejected by Salesforce 😀 |
Clearing fields / Syncing null values
You can clear fields in Salesforce by syncing NULL values from your data source. Note that the Salesforce will ignore any empty string or '' values from your source and make no changes.
Why is my Salesforce sync so slow
Activations utilizes the bulk API to write data into Salesforce. If a sync is taking a while, check to see if there are any automations, process builders, or Apex triggers on those specific objects. If so, Activations must wait to upload/update the service. Our recommendation is to pause automations on that object for full syncs in the interest of speed.
Common Errors
There's a few errors which frequently cause skipped records on when syncing data to Salesforce.
Keep in mind, Activations will always retry syncing any records that are rejected by Salesforce so it's worth the effort to understand and address the cause of the issues. Once they're fixed, Activations will sync any of the changes that had been missed.
DUPLICATES_DETECTED:Use one of these records?:--
This error is caused when attempting to insert a new Account, Contact, or Lead record that Salesforce thinks is a duplicate of a record already in Salesforce. That "Use one of these records?" message is actually the title of a message you'd see if you were trying to do this manually in Salesforce. Unfortunately, it's not that helpful as an error message!
Though Leads are separate objects from Contacts and Accounts, Salesforce has predefined duplication rules that check for duplicates between Lead and Contact/Account. You can see the rules that define duplicates and even define custom ones in Setup. Usually preventing duplicates is a great thing. The best way around this is to use Activations' Multi-destination Syncs to sync to both Lead & Contact or Lead & Account at the same time.
In extreme cases, you can choose to turn off duplicate rules either only for the Fivetran account, or entirely for your org. This is probably a bad idea, so proceed with caution!
CANNOT_INSERT_UPDATE_ACTIVATE_ENTITY:MyCoolTrigger: System.LimitException: SBQQ:Too many SOQL queries: 101
Salesforce limits the number of SOQL queries that can be executed in an individual batch transaction. Because Activations uploads data in batches, any triggers associated with objects directly also need to handle large batches as well.
The primary cause of this problem is doing SOQL queries within a loop. The fix for this is straightforward, raise the SOQL queries outside the loop! Look for any other causes where you can get by with reusing the results of one query rather than requesting multiple times.
In some cases though, it can be hard to avoid many SOQL queries (Salesforce CPQ is built within the Salesforce platform for example and frequently runs into this error when handling batches). In this case, you'll need to use Apex's System.scheduleBatch() functionality to handle the trigger logic asynchronously. This gives you the flexibility to handle the changes in whatever batch size as appropriate to support your required number of SOQL queries.
CANNOT_EXECUTE_FLOW_TRIGGER: Apex CPU time limit exceeded
CANNOT_INSERT_UPDATE_ACTIVATE_ENTITY: Apex heap size too large
This is another form of the CANNOT_INSERT_UPDATE_ACTIVATE_ENTITY issue above. In this case, the validations, triggers, flows that are associated with the objects you are targeting are too computationally expensive. The cause may also be a loop, or optimized trigger code. And moving to the scheduleBactch() function can help with this as well.
If you're still having issues, please contact your Activations representative. In some cases, we can help control batch sizes being passed to Activations.
INVALID_CROSS_REFERENCE_KEY:INVALID CROSS REFERENCE ID
This error shows up when a sync is attempting to create a relationship using a Salesforce ID that doesn't actually exist in the particular Salesforce installation. This could happen if you are accidentally using a different type of ID as a Salesforce ID, but most often, we see this when trying to use Salesforce IDs that exist in one Salesforce environment but not the destination, for example, using Salesforce IDs that exist in production but that does not exist in a Salesforce Sandbox.
OAUTH_APP_BLOCKED: this app is blocked by admin
This error happens when Activations is installed in Salesforce, but needs to be unblocked in the Connected App OAuth Usage page, under Actions. Activations should also have read and write access to all the objects and fields you may want to update. Salesforce also currently requires that the user account have the "View Setup and Configuration" permission, so make sure this permission is set on the Profile assigned to this user under the "Administrative Permissions" heading of their profile.
UNABLE_TO_LOCK_ROW: unable to obtain exclusive access to this record or 200 records
This error occurs with highly automated or frequently changing Salesforce deployments. When Activations is updating, it submits a batch of records to Salesforce. Salesforce splits up this batch into smaller sub batches and attempts to update them in a transaction. In this case, Salesforce was unable to create a transaction to update the specified records.
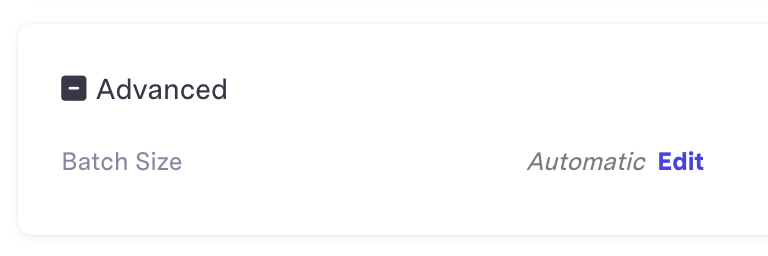
Typically, this is a transient issue and the next run of the sync won't have the same problem. However, if it persists, you can adjust the batch size of the sync using Advanced Configuration setting on the sync Overview Page. Please note this setting is only available for Salesforce syncs at present.