How to Configure Bidirectional or Multidirectional Replication with Oracle
Question
How can I configure bi-directional or multi-directional replication with Oracle?
Environment
HVR 5
Answer
In an active/active replication environment, there can always be collisions. Of course, you want to prepare your application to prevent unforeseeable collisions such as primary key values generated by a database sequence. In the case of RAC, you may choose to use a GUID to keep them unique across nodes.
However, despite the best preparations, collisions can still happen. For example, users may update the same row in different databases at the same time, or a row may be updated in one database and deleted in another database. If collisions happen the end result may be that your databases get out of sync which typically leads to databases growing further and further apart, and more and more errors arise. In some cases, you may know based on the application whether collisions are likely to occur or not, and if they occur, how do you want to deal with them.
HVR provides a sophisticated collision detection capability using a history table for every database table that will ensure that the most recent change to a row always wins and systems remain in sync in environments with any number of active systems.
If this is insufficient or not desired, HVR also provides another means resolving collisions. When CollisionDetect is defined with parameter /TimestampColumn, it is supported for all DBMSs. This means that a table must have a last update timestamp column. However, if this action is defined without parameter /TimestampColumn, meaning there is no last update timestamp column, then it is supported only for Ingres and Oracle DBMSs.
This implies that you have a timestamp column in the layout which your application always changes during any operation. So, the options are to use a timestamp column or our built-in history table which then creates another table in the database on the source and target.
Overview
Active/active replication can be really challenging. For most technologies, you spend a lot of time on such an implementation because the setup is point-to-point, and you have to perform configuration steps on every system in the setup. Using HVR for multi-way active/active database replication is easy, as described in this document. Also, the article describes how to configure HVR for conflict resolution and keep track of your changes worldwide and touch on alternatives.
All databases in an active/active replication setup must be in archive log mode. This requires to enable supplemental logging so HVR can capture the primary key value during updates. If the table does not have a primary key, HVR enables supplemental logging on all columns except for LOBs and LONG data types.
Steps
Define location configuration for all your locations participating in replication. For this example, configure 3 application locations for each of the databases you want to connect to. For example, the first user (app1) is local on a PC, Oracle XE database.
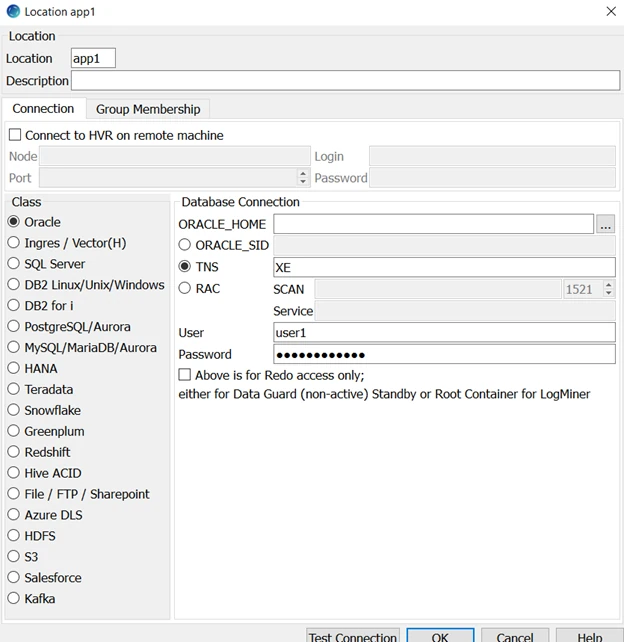
Configure the other 2 physical locations (app2 and app3) of the other 2 databases resulting in 3 location configurations as shown below.

Define a channel for replication by right-clicking Channel Definitions.

Define the logical locations or, as HVR refers to them, Location Groups. Since this is an active-active-active configuration, define only a single location group with all of logical locations participating. a. Right-click Location Group and select New Group. b. Define the group name as 'Active' and select all locations app1, app2, and app3.

Use Table Explorer and select the tables you want to be a part of your replication set from one of your locations. The app1 location has table test1 that you want to replicate to all locations.
Right-click Tables and select app1. Then click the test table.
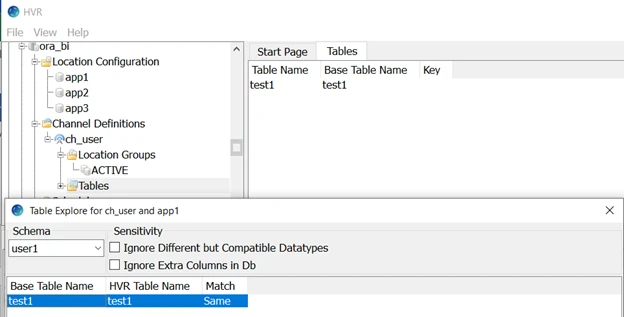
Create 2 actions, Capture and Integrate. For this, select the location group, right-click and select New Action and Capture.
Select
*for Table and ACTIVE for Group.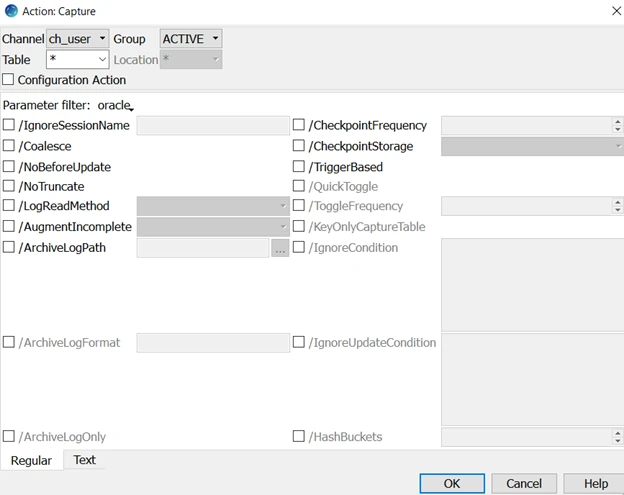
Add action Integrate /OnErrorSaveFailed. Select
*for Table and ACTIVE for Group.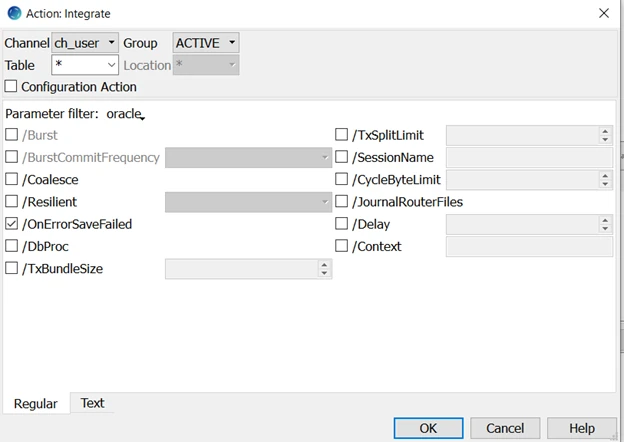
Right-click the location group and add action CollisionDetect to the channel. Select /AutoHistoryPurge for the ACTIVE group to clean up after replication.
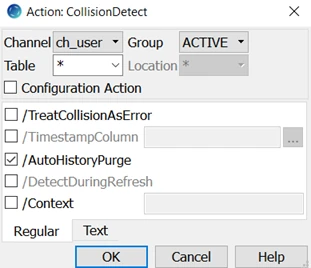
When action CollisionDetect is defined with parameter /TimestampColumn, it is supported for all DBMSs. This means that table must have a last update timestamp column. However, if this action is defined without parameter /TimestampColumn, meaning there is no last update timestamp column, then it is supported only for Ingres and Oracle DBMSs. For this scenario, let HVR history table resolve the conflict.
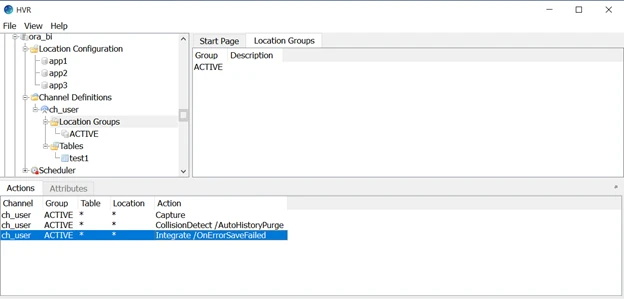
Once done, the hub looks as below.
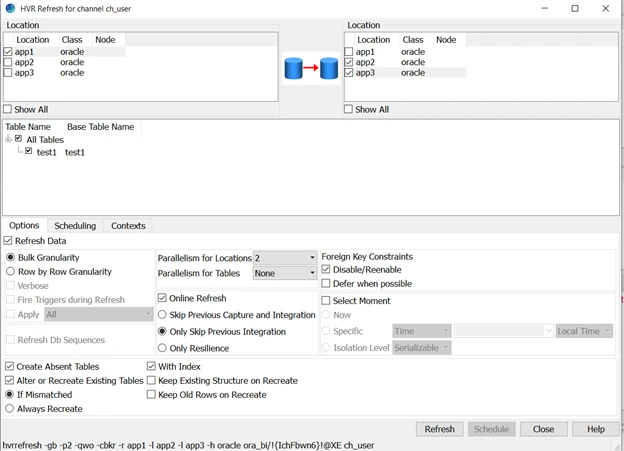
Refresh to create the tables on all the other locations. a. Select app1 as the source location because this schema has the table in it and the targets to be physical locations, app2 and app3.
b. Select All Tables, in this case test1, and Create Absent Tables.
c. Select Online Refresh option to ensure that once replication is running and catches up to the current state, then all systems are in sync. If the number or size of the table is large, you have the option to choose to set parallelism for location and/or tables and value that your server has resources to handle.
Initialize the channel. This step is usually done before HVR Refresh but for multi-directional replication you need to create the tables in all locations which needs to be done first followed by Initializing. Just a slight difference in order the first time you set up active/active replication.
If this is your initial setup, you need to select the options you see below. If you are adding a table to a running replication, you need to select other options such as Table Enrollment, Replace old Enrollment, Scripts & Jobs only.
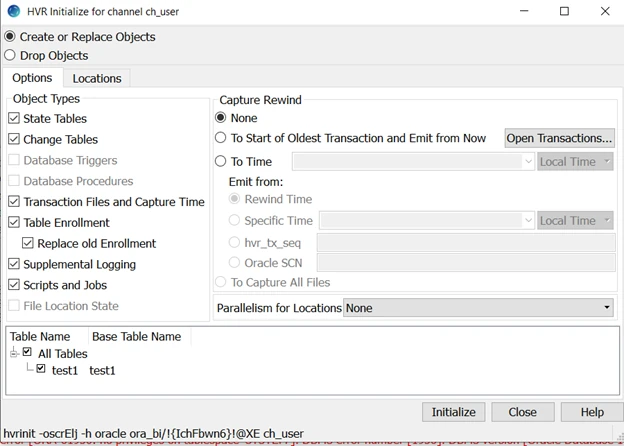
This process has created though not started jobs under the Scheduler. The setup is now complete.