Creating Channel
This section describes how to create a channel in the web user interface (web UI). The channel creation wizard that guides you through the process also includes the step to select or create location(s).
When finishing the channel creation, you can opt to perform the initial load and begin data replication.
To create a new channel, perform the following steps.
Select Channel Type
Specify the channel name and optionally the description of the channel on the left side pane of the Create New Channel page. You can also specify the channel name later when saving the channel.
Restrictions applied to channel names
The following restrictions are applied to channel names:
A channel name cannot exceed 12 characters.
A channel name can only start with an alphabetic character or underscore (not with a number), followed by an alphanumeric character or underscore.
Only lowercase is permitted. If Caps Lock is on, it will not allow you to type in this field.
Examples of valid channel names: _1234abcd, _abcd1234, abcd_1234, abcd1234_, _abcd1234_
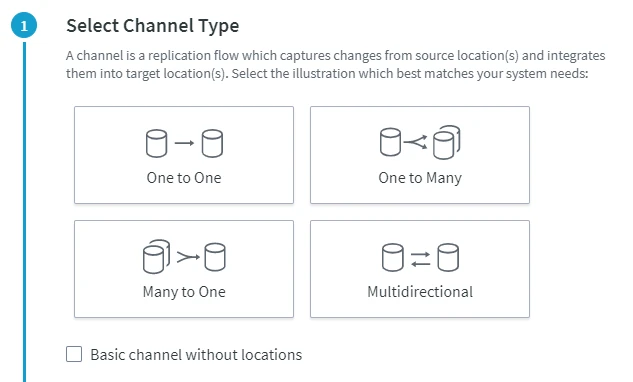
Select one of the available channel types. A channel type is a topology that defines data flow between source and target locations. For more information on different topologies supported by HVR, see section Replication Topologies.
To create a channel without locations, select Basic channel without locations. Locations may be added later when required.
Select Locations
Select a source location(s) and target location(s) that will be part of your channel. You can either create a new location or select it from the list of previously created locations.
To create a new location, click Create New Location. This will open the New Location page. For information on how to set up a new location, see section Creating Location.
To select an existing location, click Select Location and search for the required location.
Once you added all the necessary locations to the channel, click Confirm Locations. The locations will be added to the channel.
Depending on the channel type you selected in the previous step, the following scenarios are possible:
In a One to One scenario, you can select one source location and one target location.
In a One to Many scenario, you can create one source location and one or more target locations.
In a Many to One scenario, you can create one or more source locations and one target location.
In a Multidirectional scenario, a location is a source and target location at a time.
Configure Channel
If you selected File Location as the target location type in the channel, perform the steps under Adding File as a Location Type. Otherwise, follow the steps below.
Adding File as a Location Type
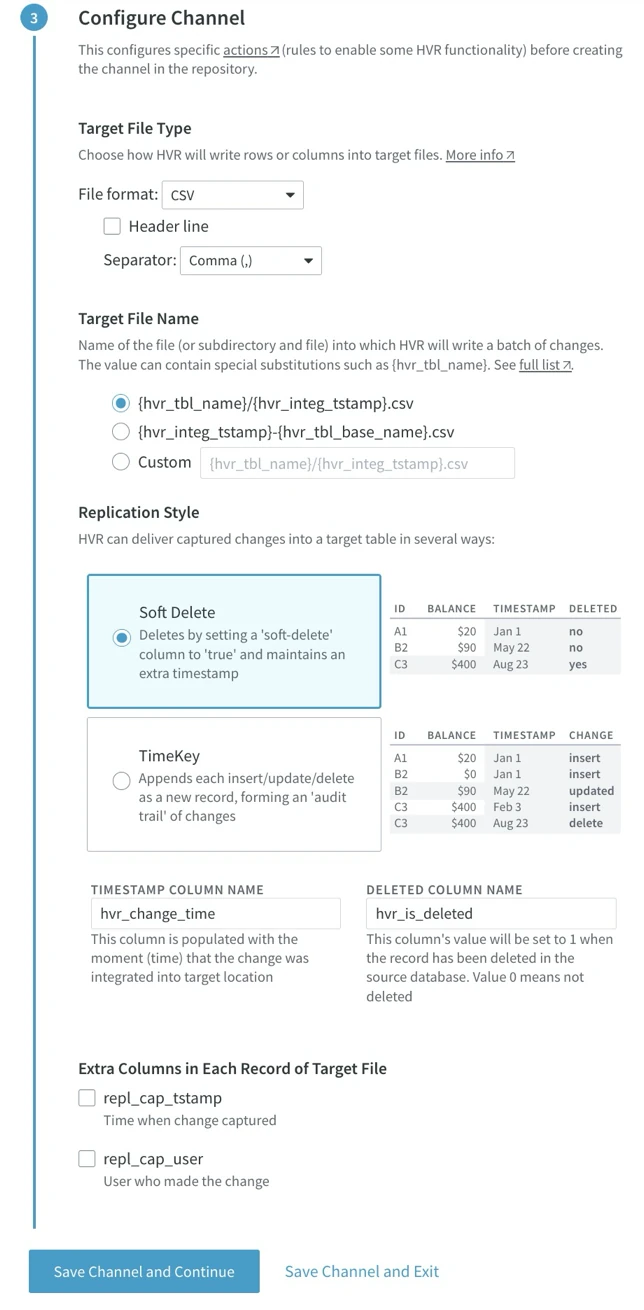
Select the file format from the dropdown.
Check if you want the header line to be displayed.
Select the type of the field separator.
Select the target file name. You can select a name from the list or set a custom file name.
Select the behavior of replication. In case of database-to-file replication, there are two options: Soft Delete or Time Key.
You can choose to add extra columns to the target file: repl_cap_tstamp (when the change was captured) and repl_cap_user (who made the change).
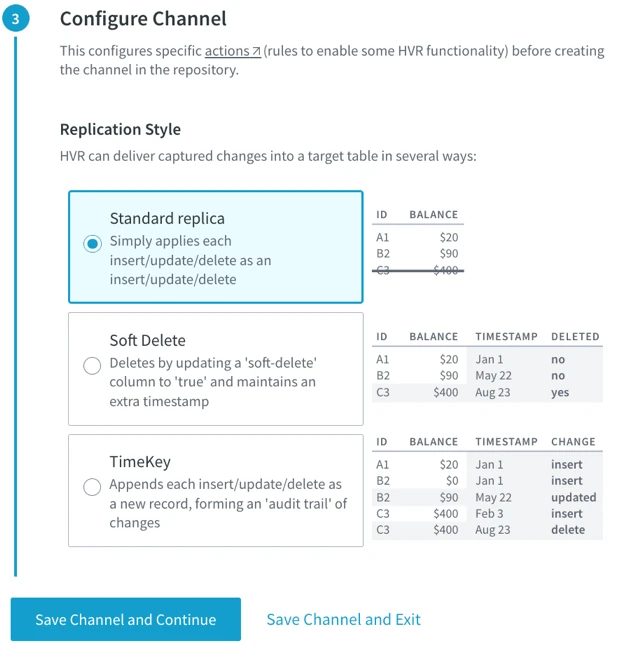
Define the replication style by specifying the method through which HVR delivers captured changes to a target location.
HVR supports three default replication styles:
- Standard replica: Processes each insert, update, and delete by mirroring these operations on the target, ensuring synchronization between the source and the target.
- Soft Delete: Marks rows on the target as deleted when they are physically deleted on the source. This approach is particularly useful in scenarios where downstream processing relies on information about deleted rows.
- TimeKey: Captures every change to a row on the source as a new record on the target, with metadata like the type and order of change. This method creates an audit trail of changes, making it well-suited for data lakes and streaming data use cases (e.g. Kafka).
Click Save Channel and Continue to add tables to the channel.
Click Save Channel and Exit to complete channel creation without adding tables. The tables may be added later when required. In this case, replication will not be activated automatically, and you will need to activate it manually.
Select Tables to Replicate
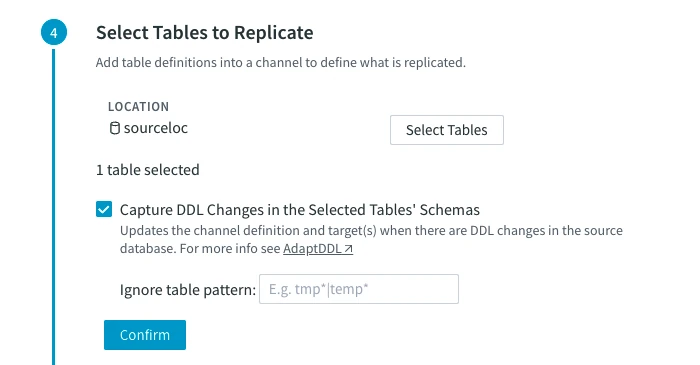
If you selected Save Channel and Continue in the previous step, the Select Tables to Replicate dialog will open. To add tables from the source location, click Select Tables. The Table selection from location... pop-up dialog will open where you can select the required tables. For the advanced options available when adding table(s) to a channel, such as table filtering and mapping, see section Adding Tables to a Channel.
Select the option Capture DDL Changes in the Selected Tables' Schemas for HVR to react to DDL statements.
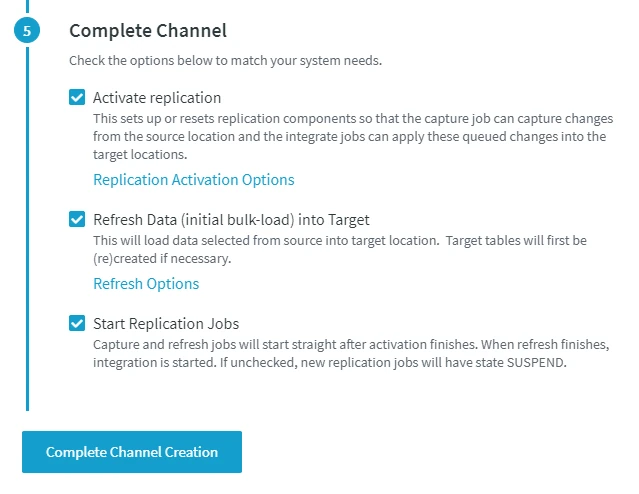
Complete Channel
In this step, you can select the necessary actions that will be performed immediately after you complete channel creation:
- Activate replication.
- Perform initial (bulk load) refresh into target location.
- Start replication jobs (Capture and Integrate).
Alternatively, you can leave the options unselected and run them later on the Channel Details page. On successful completion of the channel, you will be navigated to the Channel Details page where you can see the replication status and manage the channel configuration.
When channel creation is completed, HVR automatically creates a SOURCE location group containing the source location(s) and a TARGET location group containing the target location(s) and defines actions Capture and Integrate on the SOURCE and TARGET location groups, respectively.