Adding Tables to a Channel
This section explains how to add tables to a channel during channel creation using the Table Selection dialog.
Option Add Tables corresponds to the hvradapt CLI command.
The Table Selection dialog provides options for adding tables and views from specific database schemas. It allows you to:
- Select tables to include or exclude from a channel.
- Map (rename) schemas, tables, and columns between locations.
- Assign a Table Group to tables.
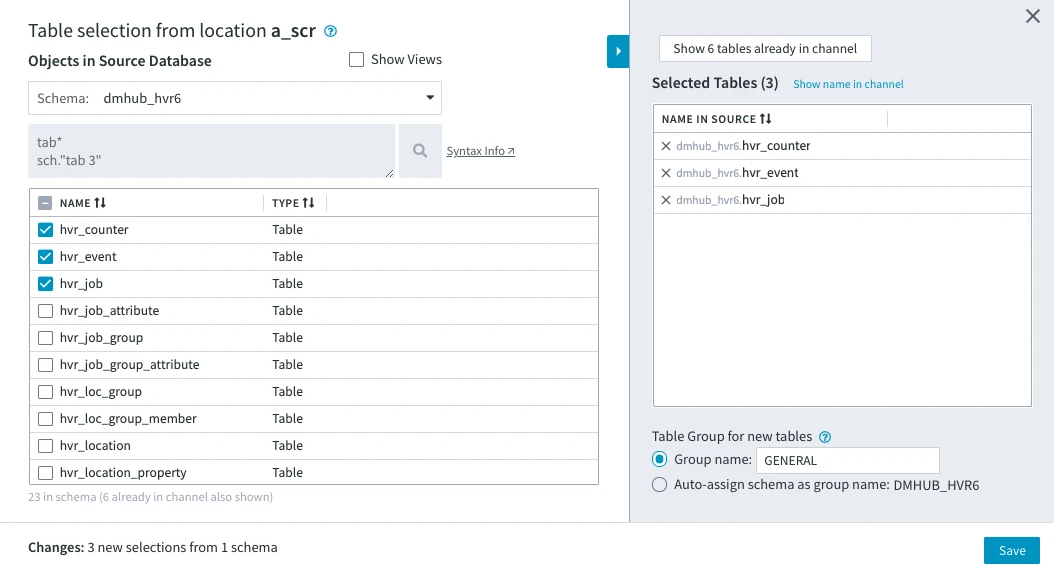
The left pane of the dialog allows you to select tables from a source database. It displays only the tables belonging to the schema chosen in the Schema field. You can use the drop-down menu in the Schema field to switch between schemas, enabling you to select tables from multiple schemas.
The right pane of the dialog allows you to:
- View already added tables by clicking Show X tables already in channel.
- See the table names as they appear in the channel by clicking Show/Hide name in channel.
- Modify selections:
- Tables selected from the left pane automatically appear in the right pane.
- Remove tables by clicking the x icon next to them or unchecking them in the left pane.
- Changes in one pane reflect in the other.
To add tables to a channel:
- In the Table Selection dialog, use the Schema drop-down menu to choose the source schema that contains the tables you want to add. Only tables from the selected schema will be displayed in the left pane.
- Use the search box to find the required tables. For advanced search options, refer to Table Filtering.
- Check the box next to each table you want to add.
- (Optional) By default, selected tables are assigned to the GENERAL group.To assign a different group, enter a custom name in the Table Group for new tables field.
- Click Save to confirm your table selection.
For instructions on adding tables to a channel with activated replication, see Adding Tables to a Channel with Activated Replication.
Table Filtering
If the source database has many tables, use the search box to find the tables you need: only the tables matching a specified pattern will be displayed. For example, tab* will filter out all table names that start with 'tab'. This is called Basic Filter.
Syntax for Table Filtering
This section describes the syntax for filtering tables. The syntax for filtering SAP tables is described in section Syntax for SAP Table Filtering.
[schema.]tablename

[schema.]tablename [-tablename]...
Value schema can be a literal only and value tablename can be a literal or pattern. Pattern matching can be done using the special symbols *, ? or [characters]. The table name must be enclosed in double quotes if the table name contains a space, a special character (*, ?, /), or a new line. Since HVR 6.1.0/13, if the table name contains the special character /, then it is not required to enclose the table name in double quotes.
Special symbol - is used to define negative patterns. Tables matching the negative pattern are excluded from the preceding pattern's result. In the following example, the filter selects all tables whose name begins with t, but excludes all tables whose name begins with tmp or ends with _temp.
t* -tmp* -*_temp
Empty lines and comments (e.g. # Test) are ignored.
Examples For Filtering Tables and Schemas
tbl1                 # Match table named 'tbl1' in default schema.

schema1.*            # Match all tables in 'schema1'.

schema2.tbl1         # Match table named 'tbl1' in 'schema2'.

history_*            # Match all tables whose name begins with 'history_' in default schema.

"my table"           # Match table named "my table" in default schema. Use double quotes
                     # if there is a space in table name.
Table Group
By default, the selected tables are assigned to group GENERAL. You can change the group name by entering a custom name in the Group name field. The name for the second option, Auto-assign schema as group name, is derived from a schema name which a table belongs to. If you select the second option, each table will be assigned to a group named according to its schema name. Group names are always capitalized.