Quick Start for HVR - Snowflake
This quick start guide helps you to get started with HVR for replicating data into Snowflake database.
To proceed with this replication you must have basic understanding about HVR's architecture and terminologies like Hub, Location, Channel, Location Groups, Actions etc.
HVR supports Snowflake only as a target location. Therefore, in this example, an Oracle database will be used as a source location. The example here demonstrates how to replicate tables from one Oracle schema to a Snowflake database.
Before proceeding with this example ensure that the requirements for using HVR with Oracle and Snowflake are met.
For information about access privileges and advanced configuration changes required for performing replication using Oracle and Snowflake, see:
Create Demo Schemas and Tables
Skip this section if you already have a source schema with tables which you plan to use for this replication and/or you do not want to create tables manually in the target schema.
Source Location
For this demonstration, create one schema (e.g. sourcedb) with two tables (e.g. dm51_product and dm51_order) in the Oracle source location and insert values into these tables. Use the following SQL statements to create the schema and tables in the Oracle location.
Create source schema sourcedb:
create user sourcedb identified by hvr
default tablespace users
temporary tablespace temp
quota unlimited on users;
Create tables in the source schema:
create table sourcedb.dm51_product
(
prod_id number(10) not null,
prod_price number(10,2) not null,
prod_descrip varchar2(100) not null
);
create table sourcedb.dm51_order ( prod_id number(10) not null, ord_id number(10) not null, cust_name varchar2(100) not null, cust_addr varchar2(100) );Insert values in the source tables:
insert into sourcedb.dm51_product
values (100, 90, 'Book');
insert into sourcedb.dm51_order values (100, 123, 'Customer1', 'P.O. Box 122, Anytown, Anycountry');
Target Location
In the Snowflake location, create a warehouse, database, schema, role, user and tables by executing the following SQL statements. Note that these objects may be created via the Snowflake web interface.
Create a target destination (e.g. targetwh). The destination properties such as size, type, etc. can be defined based on your requirement:
create warehouse targetwh with warehouse_size = 'xlarge' warehouse_type = 'standard' auto_suspend = 600 auto_resume = true;Create a target database (e.g. targetdb):
create database targetdb;Create a target schema (e.g. tgt_schema):
create schema targetdb.tgt_schema;Create a role (e.g. hvrrole) and grant privileges to the role:
use role accountadmin;
create role hvrrole;
Create a user (e.g. hvruser):
create user hvruser password = 'hvruser' default_role = hvrrole
must_change_password = false;
Create tables in the target schema:
create table tgt_schema.dm51_product
(
prod_id number(10) not null,
prod_price number(10,2) not null,
prod_descrip varchar2(100) not null
);
create table tgt_schema.dm51_order ( prod_id number(10) not null, ord_id number(10) not null, cust_name varchar2(100) not null, cust_addr varchar2(100) );
Hub Database
The hub database is a small database that HVR uses to control its replication activities. The hub database contains HVR catalog tables that hold all specifications of replication such as the names of the replicated databases, the replication direction and the list of tables to be replicated.
The hub database may be created in one of the supported locations. For this Quick Start Guide, the hub database (e.g. hvrhub) is created in Oracle.
create user hvrhub
identified by hvr
default tablespace users
temporary tablespace temp
quota unlimited on users;
Grants/Access Privileges
This section describes the grants/access privileges required for the source schema, target schema, and hub database.
Configure the privileges for the source schema (sourcedb). For more information, see section Grants for Log-Based Capture in Requirements for Oracle.
grant create session to sourcedb;
grant create table to sourcedb;
grant alter table to sourcedb;
grant select any dictionary to sourcedb;
grant select any transaction to sourcedb;
Configure the privileges for the target role (hvrrole).
grant all privileges on future tables in database database to role hvrrole;
grant select, insert, update, delete, truncate on future tables in database database to role hvrrole;
grant usage, modify, create table on schema in database database to role hvrrole;
Grant role hvrrole to the target user (hvruser).
grant role hvrrole to user hvruser;Configure the privileges for the hub schema (hvrhub). For more information, see section Grants for Hub Schema in Requirements for Oracle.
grant create session to hvrhub;
grant create table to hvrhub;
grant create procedure to hvrhub;
grant create trigger to hvrhub;
grant execute on dbms_alert to hvrhub;
Download and Install HVR
An HVR distribution is available for download at the Fivetran.com website. For more information, see Downloading HVR.
Install HVR on a hub machine. For details on installing HVR, see the respective operating system sections:
The HVR distribution requires a license key in order for the software to operate. Please see the HVR licensing page for more details on how to install the HVR license.
After the installation, you can control HVR using the HVR graphical user interface (HVR GUI).
- If the hub machine is Windows, then HVR GUI can be executed directly on the hub machine.
- To control HVR remotely from your PC, connect to the hub machine using Windows Remote Desktop Connection and launch HVR GUI on the hub machine.
- If the hub machine is Linux, then HVR GUI can be executed directly on the hub machine. However, an application like X Server or VNC viewer must be installed to run HVR GUI directly on Linux.
- To control HVR remotely from your PC, install HVR on the PC (with Windows or macOS) and configure the HVR Remote Listener on the hub machine.
- If the hub machine is Unix, then HVR GUI should typically be run remotely from a PC to control HVR installed on the hub machine. To do this, install HVR on the PC (with Windows or macOS) and configure the HVR Remote Listener on the hub machine.
The HVR Remote Listener allows you to connect HVR GUI available on your PC to the remote HVR hub machine. For more information about connecting to remote HVR installation, see Configuring Remote Installation of HVR on Unix or Linux and Configuring Remote Installation of HVR on Windows.
Launch HVR GUI
This section describes how to launch HVR GUI on various operating systems.
On Windows and macOS, double-click the HVR shortcut icon available on the desktop or execute command hvrgui in the CLI.
On Linux, double-click the hvrgui file available in the HVR_extracted_path/bin directory or execute command hvrgui in the CLI.
Linux requires applications like X server or VNC viewer to execute HVR GUI.
On Unix, HVR GUI is not supported. So, HVR GUI should be run on a remote PC (with Windows, Linux, or macOS) to control HVR installed on the Unix machine.
Register Hub
This section describes how to connect HVR GUI to the hub database.
When you launch HVR GUI for the first time, the Register Hub dialog is displayed automatically. The Register Hub dialog can also be accessed from menu File by selecting Register Hub. Skip steps 1 to 4 if you want to run HVR GUI directly on the hub machine.
Click Connect to HVR on remote machine.
To connect HVR GUI on a PC to a remote HVR hub machine, the HVR Remote Listener must be configured and running on the HVR hub machine.
Enter the name or IP address of the hub machine in the Node field (e.g. myserver).
Enter the port number (defined in the HVR Remote Listener of the hub machine) in the Port field (e.g. 4343).
Enter the Login (e.g. myserveradmin) and Password for the hub machine. By default, this is the operating system login credentials of the hub machine.
Select Oracle in the Class pane.
Specify Database Connection details.
- Enter the directory path in ORACLE_HOME. You can also click the browse button to select the directory path.
- Enter the Oracle System ID in ORACLE_SID or TNS credentials.
- Enter the user name of the hub database in User (e.g. hvrhub).
- Enter the password for the hub database in Password (e.g. hvr).
Click Connect.

Click Yes in the prompt dialog asking to create catalog tables in the hub database.
HVR displays this prompt when connecting to a hub database for the first time.
On connecting successfully to the hub database, the navigation tree pane displays the hub machine and the hub database. Location Configuration, Channel Definitions, and Scheduler are displayed under the hub database.
Create Locations
This section describes how to create locations in HVR GUI. A location is a storage place (for example, database or file storage) from/into where HVR captures (source location) or integrates (target location) changes.
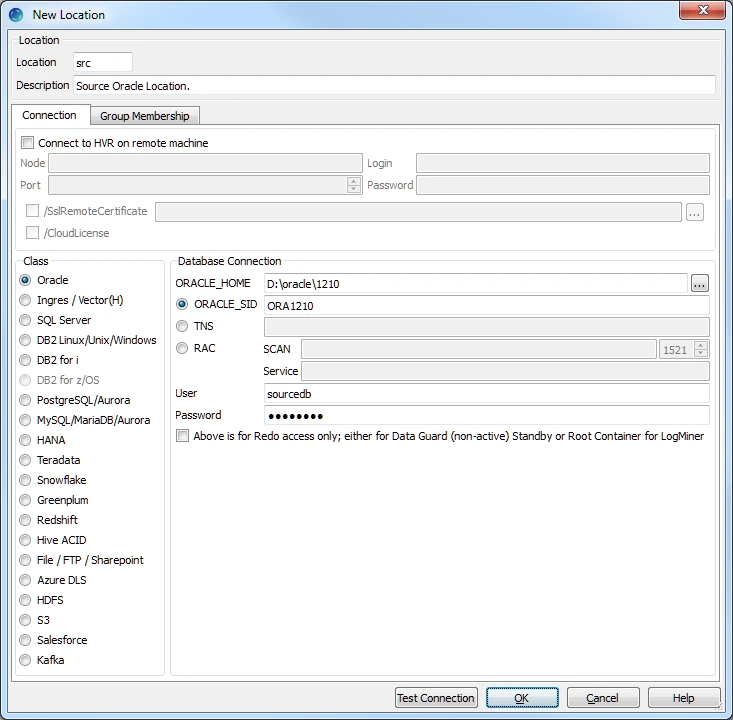
- Create a source location (e.g. src) connected to the source schema (sourcedb) in Oracle.
In the navigation tree pane, right-click Location Configuration ▶ New Location.
Enter the Location name and Description for the location.
Select Oracle in Class.
Specify the Database Connection details. For more information on the Database Connection fields, see section Location Connection in Requirements for Oracle.
Enter the directory path for ORACLE_HOME. You can also click browse to select directory path.
Enter the Oracle System ID in ORACLE_SID or TNS credential or RAC credential.
For RAC connectivity, ensure to provide the remote machine connection details under the Connection tab.
Enter username sourcedb of the source schema in User.
Enter the password for the source schema in Password.
Click Test Connection to verify the connection to the location database.
Click OK.
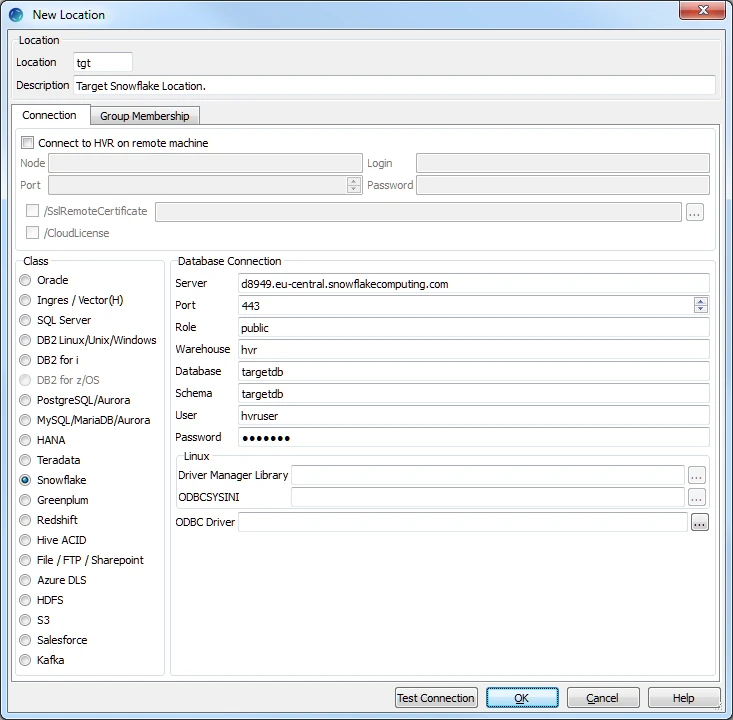
- Create a target location (e.g. tgt) connected to the target schema (targetdb) in Snowflake.
In the navigation tree pane, right-click Location Configuration ▶ New Location.
Enter the Location name and Description for the location.
Select Snowflake in Class.
Specify the Database Connection details. For more information on the Database Connection fields, see section Location Connection in Requirements for Snowflake.
- Enter the hostname or IP address of the Snowflake server in Server.
- Enter the Port number on which the Snowflake server is expecting connections.
- Enter the name of the Snowflake Role to be used.
- Enter the name of the Snowflake Data Warehouse.
- Enter the name of the Snowflake Database.
- Enter the name of the default Snowflake Schema to be used.
- Enter username targetdb of the target database in User.
- Enter the password for the target database in Password.
- Browse and select the directory path where the ODBC Driver Manager Library is installed.
- Browse and select the directory path where the odbc.ini and odbcinst.ini files are located.
- Browse and select the appropriate ODBC Driver if you have multiple drivers of Snowflake installed.
Click Test Connection to verify the connection to location database.
Click OK.
Create Channel
This section describes how to create a channel (e.g. hvrdemo) in HVR.
In the navigation tree pane, right-click Channel Definitions ▶ New Channel.
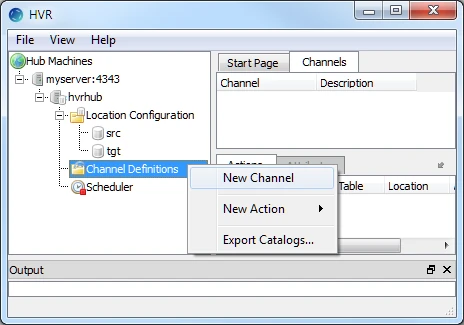
Enter the Channel name and Description for the channel in the New Channel dialog.
Click OK.
Create Location Groups
This section describes how to create location groups in the channel. The location groups are used for defining actions on the location. Typically, a channel contains two location groups - one for the source location and one for the target location. Each location group can contain multiple locations.
In this example, create one source location group (e.g. SRCGRP) and one target location group (e.g. TGTGRP).
- In the navigation tree pane, click + next to the channel (hvrdemo).
- Create the source location group (SRCGRP):
Right-click Location Groups ▶ New Group.
Enter the Group Name and Description for the location group.
Select the source location (src) in Group Membership.
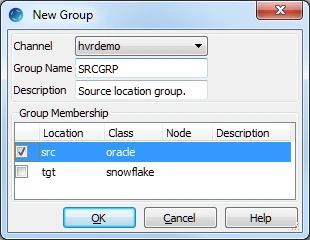
Click OK.
- Create the target location group (TGTGRP):
Right-click Location Groups ▶ New Group.
Enter the Group Name and Description for the location group.
Select the target location (tgt) from Group Membership.
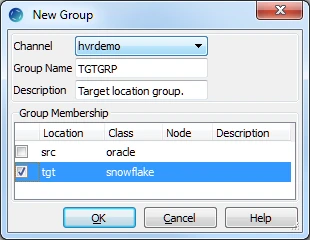
Click OK.
Select Table(s)
This section describes how to select the tables (dm51_product and dm51_order) from the source location for replication. Table Explore allows you to select schema(s) and/or table(s) for replication.
Right-click Tables ▶ Table Explore.
Select the source location (src) from the list.
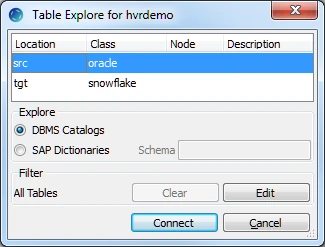
Click Connect.
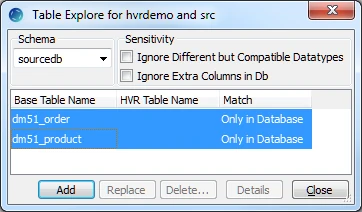
Select tables in the Table Explore dialog. Press the Shift key to select multiple tables or Ctrl+A to select all tables.
Click Add to add the selected tables.
Click OK in the HVR Table Name dialog.
Click Close in the Table Explore dialog.
Define Actions
This section describes how to define actions on the location groups (SRCGRP and TGTGRP). Actions define the behavior of a replication activity.
Define action Capture to capture changes from all the tables in the source location group.
Right-click source location group SRCGRP ▶ New Action ▶ Capture.
Click OK
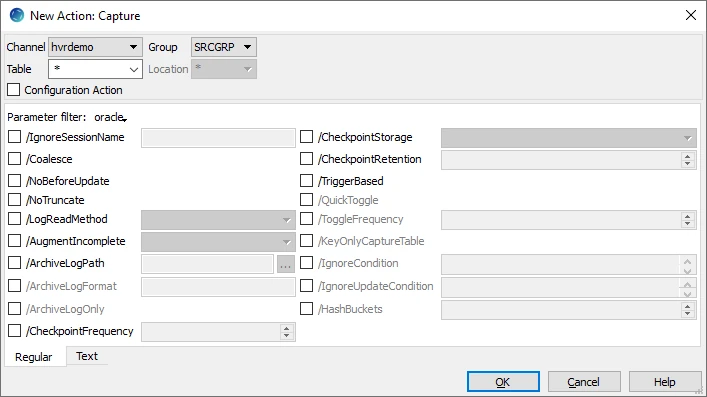
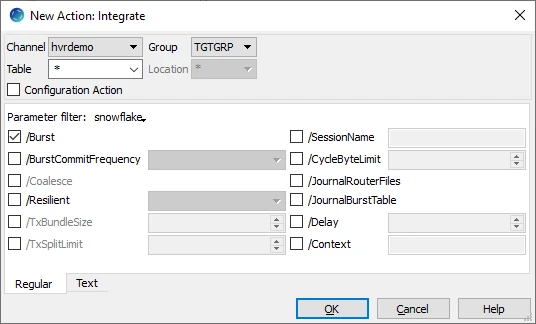
Define action Integrate to integrate changes into all the tables in the target location group.
Since HVR 5.6.5/12, by default HVR stages data on the Snowflake's internal staging before loading it into Snowflake while performing Integrate with Burst and Bulk Refresh. If your HVR version is not 5.6.5/12 or higher, then define action LocationProperties to bulk load data using the Snowflake COPY INTO command for maximum performance.
To perform bulk load into Snowflake on AWS, Azure, or Google Cloud Storage the respective requirements should be satisfied:Snowflake on AWS
HVR can be configured to stage the data on AWS S3 before loading it into Snowflake. For staging the data on AWS S3 and perform Integrate with Burst and Bulk Refresh, the following are required:
An AWS S3 location (bucket) - to store temporary data to be loaded into Snowflake. For more information about creating and configuring an S3 bucket, refer to AWS Documentation
An AWS user with AmazonS3FullAccess permission policy - to access the S3 bucket. Alternatively, an AWS user with minimal set of permission can also be used.
For more information, refer to the following AWS documentation:Minimal set of permissions.
- s3:GetBucketLocation
- s3:ListBucket
- s3:ListBucketMultipartUploads
- s3:AbortMultipartUpload
- s3:GetObject
- s3:PutObject
- s3:DeleteObject
Sample JSON file with a user role permission policy for S3 location
{
    "Statement": [
        {
            "Sid": <identifier>,
            "Effect": "Allow",
            "Principal": {
                    "AWS": "arn:aws:iam::<account_id>:<user>/<username>",
            },
            "Action": [
                    "s3:GetObject",
                    "s3:GetObjectVersion",
                    "s3:PutObject",
                    "s3:DeleteObject",
                    "s3:DeleteObjectVersion",
                    "s3:AbortMultipartUpload"
            ],
            "Resource": "arn:aws:s3:::<bucket_name>/*"
        },
        {
            "Sid": <identifier>,
            "Effect": "Allow",
            "Principal": {
                    "AWS": "arn:aws:iam::<account_id>:<user>/<username>"
            },
            "Action": [
                    "s3:ListBucket",
                    "s3:GetBucketLocation",
                    "s3:ListBucketMultipartUploads"
            ],
            "Resource": "arn:aws:s3:::<bucket_name>"
        }
    ]
}
For more information on the Amazon S3 permissions policy, refer to the AWS S3 documentation
Define action LocationProperties on the Snowflake location with the following parameters:
/StagingDirectoryHvr: the location where HVR will create the temporary staging files (ex. s3://my_bucket_name/).
/StagingDirectoryDb: the location from where Snowflake will access the temporary staging files. If /StagingDirectoryHvr is an Amazon S3 location then the value for /StagingDirectoryDb should be same as /StagingDirectoryHvr.
/StagingDirectoryCredentials: the AWS security credentials. For AWS, multiple formats are available for supplying the credentials (including encryption). For more information see LocationProperties /StagingDirectoryCredentials.
Following are the two basic formats:- role=AWS_role
- aws_access_key_id=key;aws_secret_access_key=secret_key
E.g.: aws_access_key_id=TWENDUIOWNDH1Q;aws_secret_access_key=N5D98Ae0EssvnPaBXlCJiBmpyMpmiD
For more information about getting your AWS credentials or Instance Profile Role, refer to AWS Documentation.
By default, HVR connects to us-east-1 once for determining your S3 bucket region. If a firewall restriction or a service such as Amazon Private Link is preventing the determination of your S3 bucket region, you can change this region (us-east-1) to the region where your S3 bucket is located by defining the following action:
Group Table Action Snowflake * Environment/Name=HVR_S3_BOOTSTRAP_REGION/Value=s3_bucket_region Snowflake on Azure
Since v5.5.5/4HVR can be configured to stage the data on Azure BLOB storage before loading it into Snowflake. For staging the data on Azure BLOB storage and perform Integrate with Burst and Bulk Refresh, the following are required:
An Azure BLOB storage location - to store temporary data to be loaded into Snowflake
An Azure user (storage account) - to access this location. For more information, refer to the Azure Blob storage documentation.
Define action LocationProperties on the Snowflake location with the following parameters:
- /StagingDirectoryHvr: the location where HVR will create the temporary staging files (e.g. wasbs://myblobcontainer).
- /StagingDirectoryDb: the location from where Snowflake will access the temporary staging files. If /StagingDirectoryHvr is an Azure location, this parameter should have the same value.
- /StagingDirectoryCredentials: the Azure security credentials. The supported format for supplying the credentials is azure_account=azure_account;azure_secret_access_key=secret_key.
E.g.: azure_account=mystorageaccount;azure_secret_access_key=t34RdYhph5bnIB7tWiKy5kDPteVJN4BTzBne3EDOP7KQBpuD
For Linux (x64) and Windows (x64), since HVR 5.7.0/8 and 5.7.5/4, it is not required to install and configure the Hadoop client. However, if you want to use the Hadoop client, set the environment variable HVR_AZURE_USE_HADOOP=1 and follow the steps mentioned below.
For HVR versions prior to 5.7.0/8 or 5.7.5/4, the Hadoop Client must be present on the machine from which HVR will access the Azure Blob FS.
Hadoop client configuration steps
Internally, HVR uses the WebHDFS REST API to connect to the Azure Blob FS. Azure Blob FS locations can only be accessed through HVR running on Linux or Windows, and it is not required to run HVR installed on the Hadoop NameNode, although it is possible to do so. For more information about installing Hadoop client, refer to Apache Hadoop Releases.
Hadoop Client Configuration
The following are required on the machine from which HVR connects to Azure Blob FS:
- Hadoop 2.6.x client libraries with Java 7 Runtime Environment or Hadoop 3.x client libraries with Java 8 Runtime Environment. For downloading Hadoop, refer to Apache Hadoop Releases.
- Set the environment variable $JAVA_HOME to the Java installation directory. Ensure that this is the directory that has a bin folder, e.g. if the Java bin directory is d:\java\bin, $JAVA_HOME should point to d:\java.
- Set the environment variable $HADOOP_COMMON_HOME or $HADOOP_HOME or $HADOOP_PREFIX to the Hadoop installation directory, or the hadoop command line client should be available in the path.
- One of the following configuration is recommended,
Set $HADOOP_CLASSPATH=$HADOOP_HOME/share/hadoop/tools/lib/*
Create a symbolic link for $HADOOP_HOME/share/hadoop/tools/lib in $HADOOP_HOME/share/hadoop/common or any other directory present in classpath.
Since the binary distribution available in Hadoop website lacks Windows-specific executables, a warning about unable to locate winutils.exe is displayed. This warning can be ignored for using Hadoop library for client operations to connect to a HDFS server using HVR. However, the performance on integrate location would be poor due to this warning, so it is recommended to use a Windows-specific Hadoop distribution to avoid this warning. For more information about this warning, refer to Hadoop Wiki and Hadoop issue HADOOP-10051.
Verifying Hadoop Client Installation
To verify the Hadoop client installation,
The HADOOP_HOME/bin directory in Hadoop installation location should contain the hadoop executables in it.
Execute the following commands to verify Hadoop client installation:
$JAVA_HOME/bin/java -version
$HADOOP_HOME/bin/hadoop version
$HADOOP_HOME/bin/hadoop classpath
If the Hadoop client installation is verified successfully then execute the following command to check the connectivity between HVR and Azure Blob FS:
To execute this command successfully and avoid the error "ls: Password fs.adl.oauth2.client.id not found", few properties needs to be defined in the file core-site.xml available in the hadoop configuration folder (for e.g., <path>/hadoop-2.8.3/etc/hadoop). The properties to be defined differs based on the Mechanism (authentication mode). For more information, refer to section 'Configuring Credentials' in Hadoop Azure Blob FS Support documentation.
$HADOOP_HOME/bin/hadoop fs -ls wasbs://containername@accountname.blob.core.windows.net/
Verifying Hadoop Client Compatibility with Azure Blob FS
To verify the compatibility of Hadoop client with Azure Blob FS, check if the following JAR files are available in the Hadoop client installation location ( $HADOOP_HOME/share/hadoop/tools/lib ):
hadoop-azure-<version>.jar
azure-storage-<version>.jar
Snowflake on Google Cloud Storage
Since v5.6.5/7HVR can be configured to stage the data on Google Cloud Storage before loading it into Snowflake. For staging the data on Google Cloud Storage and perform Integrate with Burst and Bulk Refresh, the following are required:
A Google Cloud Storage location - to store temporary data to be loaded into Snowflake
A Google Cloud user (storage account) - to access this location.
Configure the storage integrations to allow Snowflake to read and write data into a Google Cloud Storage bucket. For more information, refer to Configuring an Integration for Google Cloud Storage in Snowflake documentation.
Define action LocationProperties on the Snowflake location with the following parameters:
/StagingDirectoryHvr: the location where HVR will create the temporary staging files (e.g. gs://mygooglecloudstorage_bucketname).
/StagingDirectoryDb: the location from where Snowflake will access the temporary staging files. If /StagingDirectoryHvr is a Google cloud storage location, this parameter also should have the same value.
/StagingDirectoryCredentials: Google cloud storage credentials. The supported format for supplying the credentials is "gs_access_key_id=key;gs_secret_access_key=secret_key;gs_storage_integration=integration_name_for_google_cloud_storage".
E.g.: gs_access_key_id=GOG88NACDFGFXERTE2RQ5C7;gs_secret_access_key=CbjneJGS0iEqb92BDBikEGDYlQoDKgOe6oDSG;gs_storage_integration=my_integration
To define action LocationProperties:
- Right-click target location group TGTGRP ▶ New Action ▶ LocationProperties.
- Set value for the parameter /StagingDirectoryHvr.
- Browse and select the directory for bulk load staging files. This directory should be located on the machine from where HVR connects to the source database.
- Set value for the parameter /StagingDirectoryDb.
- Enter the local directory on the Snowflake head-node or a URL pointing to /StagingDirectoryHvr.
- Enter the security credentials in /StagingDirectoryCredentials.
- Click OK.
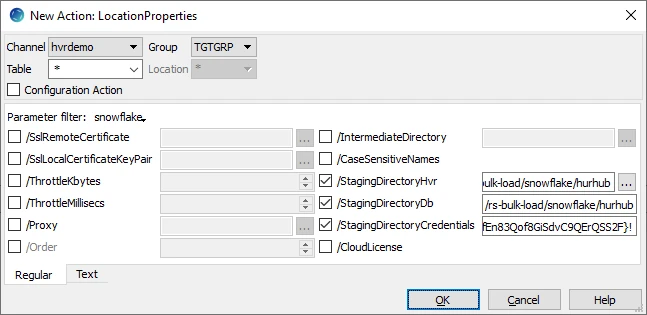
The Actions pane only displays actions related to the object selected in the navigation tree pane. Click the channel name (hvrdemo) to view actions defined for all location groups in the selected channel.
Initialize
This section describes how to initialize the replication. HVR Initialize first checks the channel and creates replication jobs in the HVR Scheduler.
In this example, HVR Initialize creates one capture job (hvr_demo-cap-src) and one integrate job (hvr_demo-integ-tgt).
Right-click channel hvrdemo ▶ HVR Initialize.
Select Create or Replace Objects in the HVR Initialize dialog.
Click Initialize.
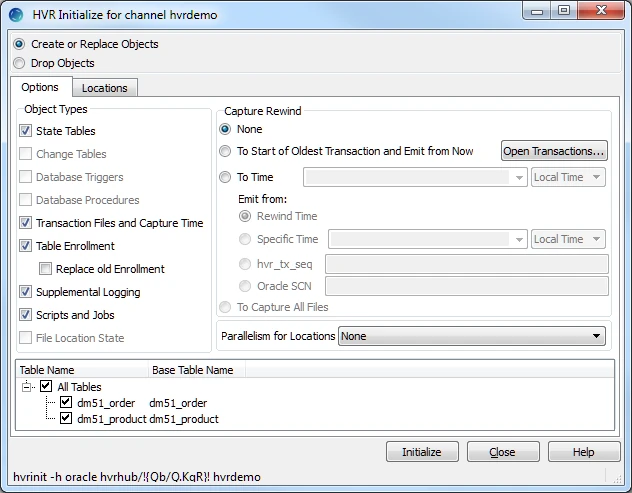
Click OK.

Click Close.
Expand the Scheduler node in the navigation tree pane to view the capture and integrate jobs in Jobs tab.
For more information about initiating replication in HVR, see section Replication Overview.
Start Scheduler and Create Windows Service
This section describes how to start the HVR Scheduler and create a Windows service.
This section describes how to start the HVR Scheduler and create a Windows service.
Start the Scheduler. In the navigation tree pane, right-click Scheduler ▶ Start.
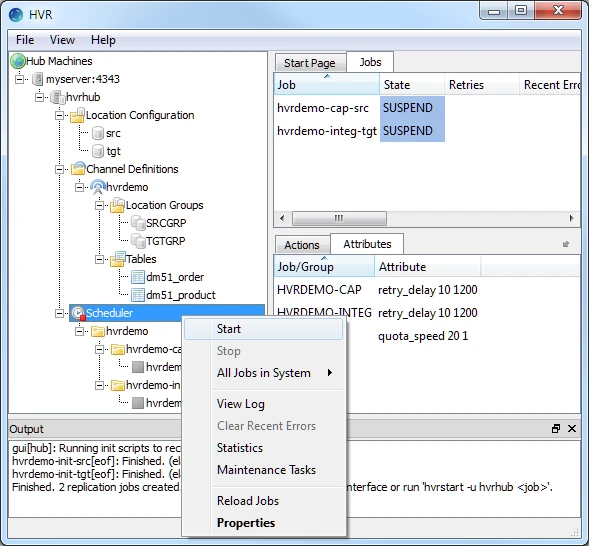
Click Create in the prompt asking to create the service hvrscheduler_hvrhub.
Select Local System Account ('SYSTEM') in the Create Windows Service dialog.
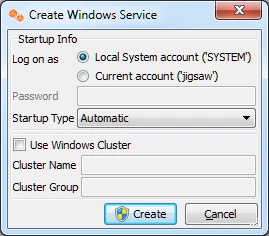
Click Create.
Start Capture Job
This section describes how to start the job for capturing changes from the source location (src). By starting the Capture job in HVR Scheduler, HVR begins capturing all changes since the moment HVR Initialize was executed. This 'capture begin moment' can be modified using the option Capture Rewind available in the Advanced Options tab of the HVR Initialize dialog.
In the navigation tree pane, click Scheduler.
Start the capture job. In the Jobs pane, right-click capture job hvrdemo-cap-src ▶ Start.
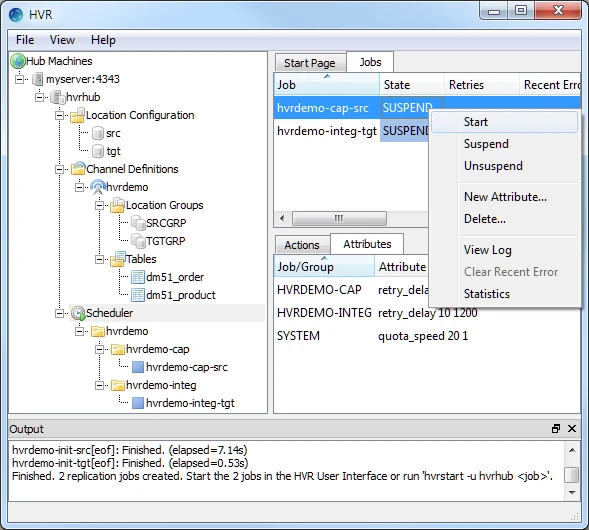
Click Yes in the Start dialog. On starting the capture job (hvrdemo-cap-src) successfully, the status of the job changes from SUSPEND to RUNNING.
Refresh
This section describes how to perform initial load into the target database. HVR Refresh copies all existing data from the source location (src) to the target location (tgt) and optionally creates new tables and keys in the target location.
In the navigation tree pane, right-click channel hvrdemo ▶ HVR Refresh.
Select the required tables for HVR Refresh.
By default, the Bulk Refresh option (Bulk Granularity) is selected. If you do not want to perform Bulk Refresh then select Row by Row Granularity.
Select Create Absent Tables.
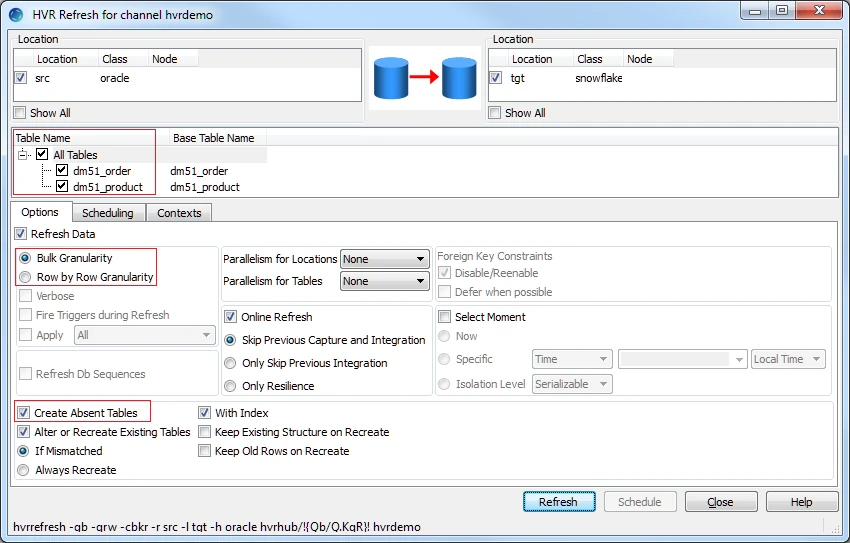
Click Refresh.
Click Yes to start HVR Refresh. When the refresh is completed, the Refresh Result dialog displays the total number of rows replicated from the selected tables.
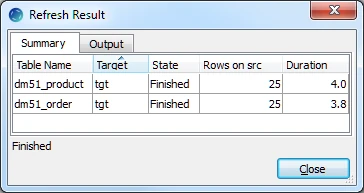
Click Close in the Refresh Result dialog.
Click Close in the HVR Refresh dialog.
Start Integrate Job
This section describes how to start the job to integrate changes into the target location (tgt).
In the navigation tree pane, click Scheduler.
Start the integrate job. In the Jobs pane, right-click integrate job hvrdemo-integ-tgt ▶ Start.
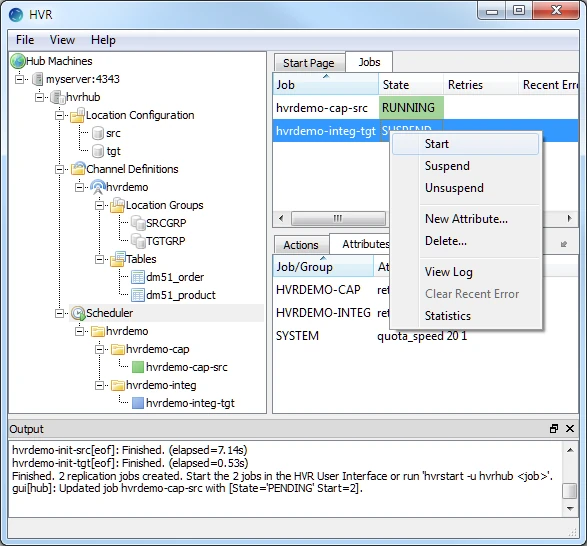
Click Yes in Start dialog. On starting the integrate job (hvr_demo-integ-tgt) successfully, the status of the job changes from SUSPEND to RUNNING.
Verify Replication
This section describes the two methods for verifying HVR's replication activity.
Viewing Log File
HVR creates a separate log file for the hub (hvrhub), channel (hvrdemo), and for each replication jobs (hvrdemo-cap-src and hvrdemo-integ-tgt). This log file contains the details of the changes captured and integrated. To view the replication activity log:
In the navigation tree pane, click + next to the Scheduler.
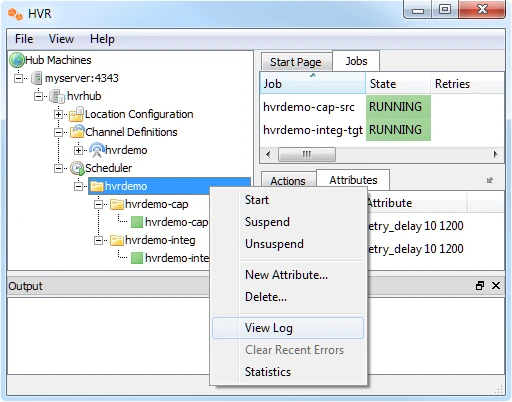
Right-click hvrdemo ▶ View Log to view the output of the jobs.
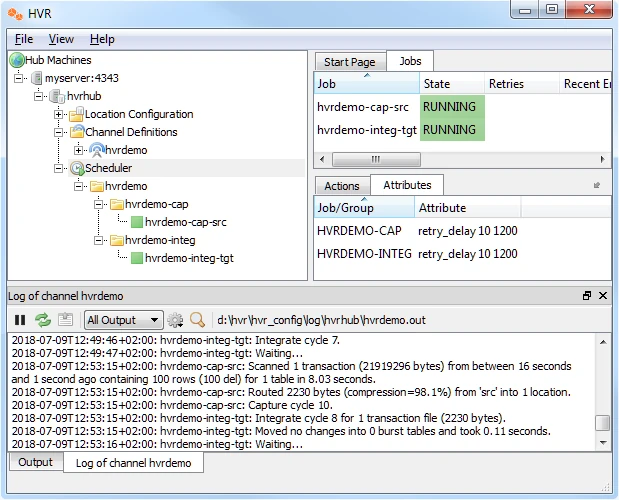
The directory path for HVR log files is displayed in the log pane.
Update the value(s) in the source location database and review the log for the changes being replicated.
Using HVR Compare
HVR Compare allows you to verify the replication activity by comparing the data in source and target locations. To compare the source and target locations:
Stop the integrate job (hvrdemo-integ-tgt),
In the navigation tree pane, click Scheduler.
In the Jobs pane, right-click integrate job hvrdemo-integ-tgt ▶ Suspend.
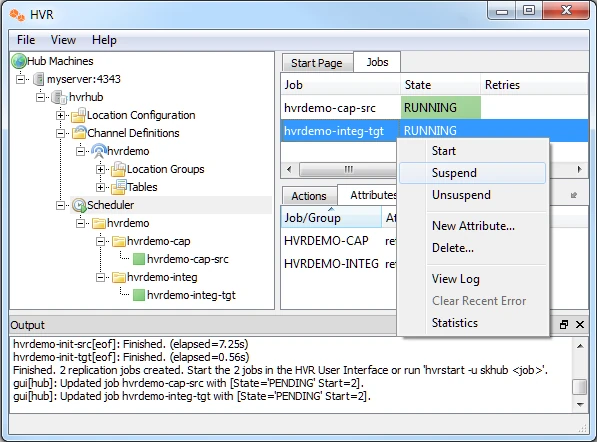
Click Yes in the Start dialog.
Update the value(s) in the source location database.
Execute HVR Compare:
In the navigation tree pane, right-click channel hvrdemo ▶ HVR Compare.
Select the source location (src) on the left side and the target location (tgt) on the right side.
Select Row by Row Granularity in the Options tab.
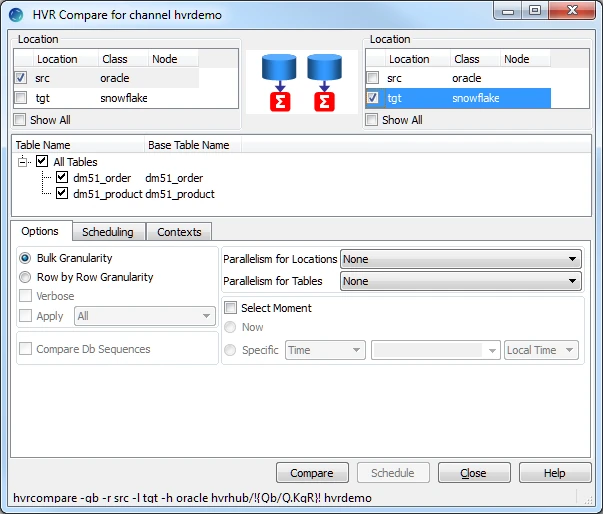
Click Compare.
On completion, the Compare Result dialog is displayed. If the State column displays Different, it indicates that the data in the source and target locations are not identical.

Click Close in the Compare Result dialog and HVR Compare dialog.
Start the integrate job (hvrdemo-integ-tgt).
Execute HVR Compare again (step 3). In the Compare Result dialog, if the State column displays Identical, it indicates that the changes were replicated successfully.

