Quick Start Guide
The aim of this quick start guide is to help you achieve four primary objectives:
- Gain a preview and hands-on experience with Fivetran HVR.
- Deploy your first live replication flow using HVR.
- Validate data to ensure systems are in sync.
- Learn about efficient, high-volume data replication using log-based Change Data Capture (CDC).
HVR Distributed Architecture
To proceed with this replication, you need to have a basic understanding of HVR architecture and concepts such as hub, location, channel, location groups, actions, etc.
The architecture of HVR is modular and flexible, leveraging HVR Agent(s) for optimum efficiency. HVR Agent (HVA) is an installation of HVR software that acts on instructions from another HVR installation known as a hub.
Agents enable you to manage data replication successfully, even in extremely high-volume environments. Three key reasons motivate the recommendation to use agents:
Performance:
- Agents provide low-latency access to data endpoints, including databases and transaction log files for log-based Change Data Capture (CDC).
- Agents use compressed and optimized data transfer methods, thereby minimizing bandwidth requirements and reducing sensitivity to high latency. These advantages are particularly crucial for Wide Area Network (WAN) data transfers, such as those occurring between on-premises and cloud, among different cloud providers, or between availability zones within a cloud environment.
Scalability:
- Agents serve as units of scalability, facilitating parallelization and delivering improved performance.
- With agents in place, a single hub can manage numerous data flows, all managed from a unified console.
Security
- Agents provide unified authentication capabilities with rich security features.
- Communication is secured through encryption using TLS 1.3.
All HVR capabilities, including one-time load (refresh), data replication (capture and integrate), and data validation (compare), fully leverage the advantages of the distributed architecture.
HVR uses the concept of a hub server, which can host one or more hubs. The hub server must connect to a repository database to store metadata for its hubs. The hub server runs an HTTP(S) listener, and most users interact with HVR through a web browser user interface. HVR also supports a command-line interface, as well as instructions through REST APIs. All interactions with the HVR Hub Server are recorded as events to facilitate change tracking and regulatory compliance.
Prerequisites
This quick start guide demonstrates a common scenario of replicating data from an on-premises Oracle system (source) to a cloud-hosted Snowflake instance. The HVR Agent (referred to as the 'agent') is installed on the on-premises Oracle database server, and the HVR Hub Server is installed within the same cloud availability zone as your Snowflake instance to ensure optimal data delivery without using a separate agent.
For this guide, we assume that you have already completed the following steps:
You have a source schema with tables that you plan to use for this replication.
Access privileges and advanced configuration changes required for performing replication from Oracle to Snowflake are completed for both Oracle as the source and Snowflake as the target:
HVR Hub that you will access through a browser is installed, configured, and running. For steps to install and configure the hub, see:
An HVR Agent is installed and configured on the source machine for the hub server to access and capture data from the remote Oracle database. For steps to install and configure the HVR Agent, see:
Setup Steps
This quick start guide primarily focuses on the steps for the web user interface (UI). However, you also have the option to accomplish the same tasks using the command-line interface (CLI).
Perform the following steps to set up a replication channel.
In the login dialog, enter your user credentials and click Log in. These are the username and password created in step 6 during the hub system setup.
If you forgot your user credentials, see section Unable to Log in for assistance.
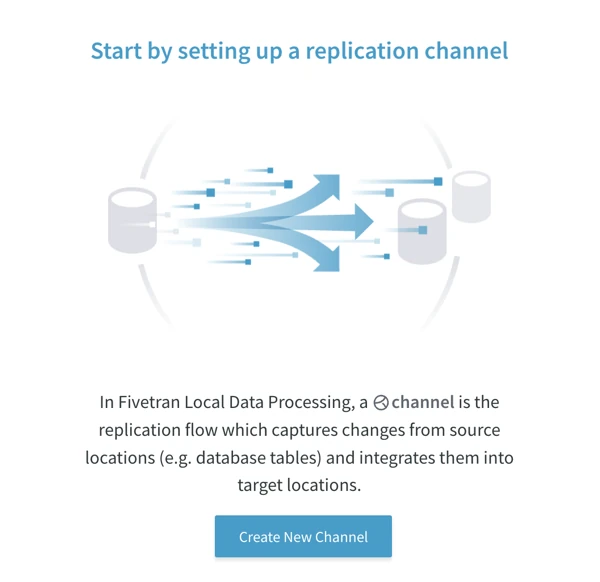
On the Start page, click Create New Channel.
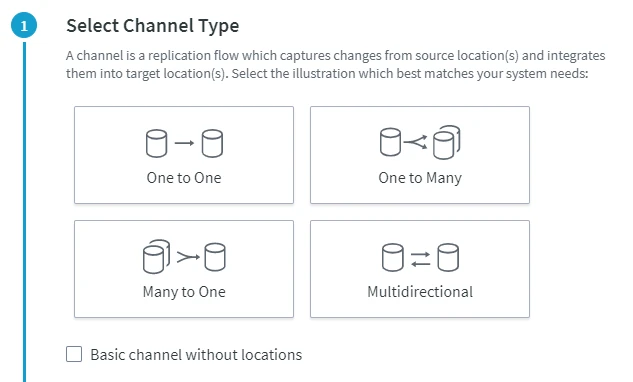
On the Create New Channel page, you can start configuring your replication channel. The channel creation workflow consists of the following five steps.
Select Channel Type
Specify the channel name and optionally provide a channel description on the left side pane of the Create New Channel page. You can also specify the channel name later when saving the channel.
Guidelines for channel names
The following guidelines are applied when you name a channel:
A channel name cannot exceed 12 characters.
A channel name can only start with an alphabetic character or underscore (not with a number), followed by an alphanumeric character or underscore.
Only lowercase is permitted. If Caps Lock is on, it will not allow you to type in this field.
Examples of valid channel names: _1234abcd, _abcd1234, abcd_1234, abcd1234_, abcd1234
Select One to One channel type.
A channel type is a topology that defines data flow between source and target locations. For more information on different topologies supported by HVR, see the Replication Topologies section.
Select Locations
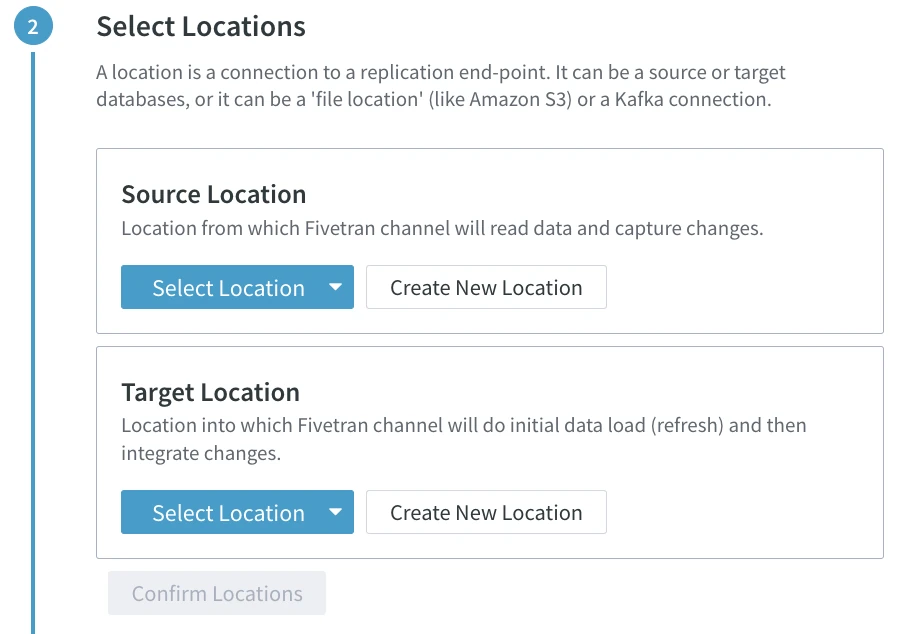
In this step, you need to create a source location (Oracle) and a target location (Snowflake) that will be part of your channel.
Define the source location. Click Create New Location under Source Location.
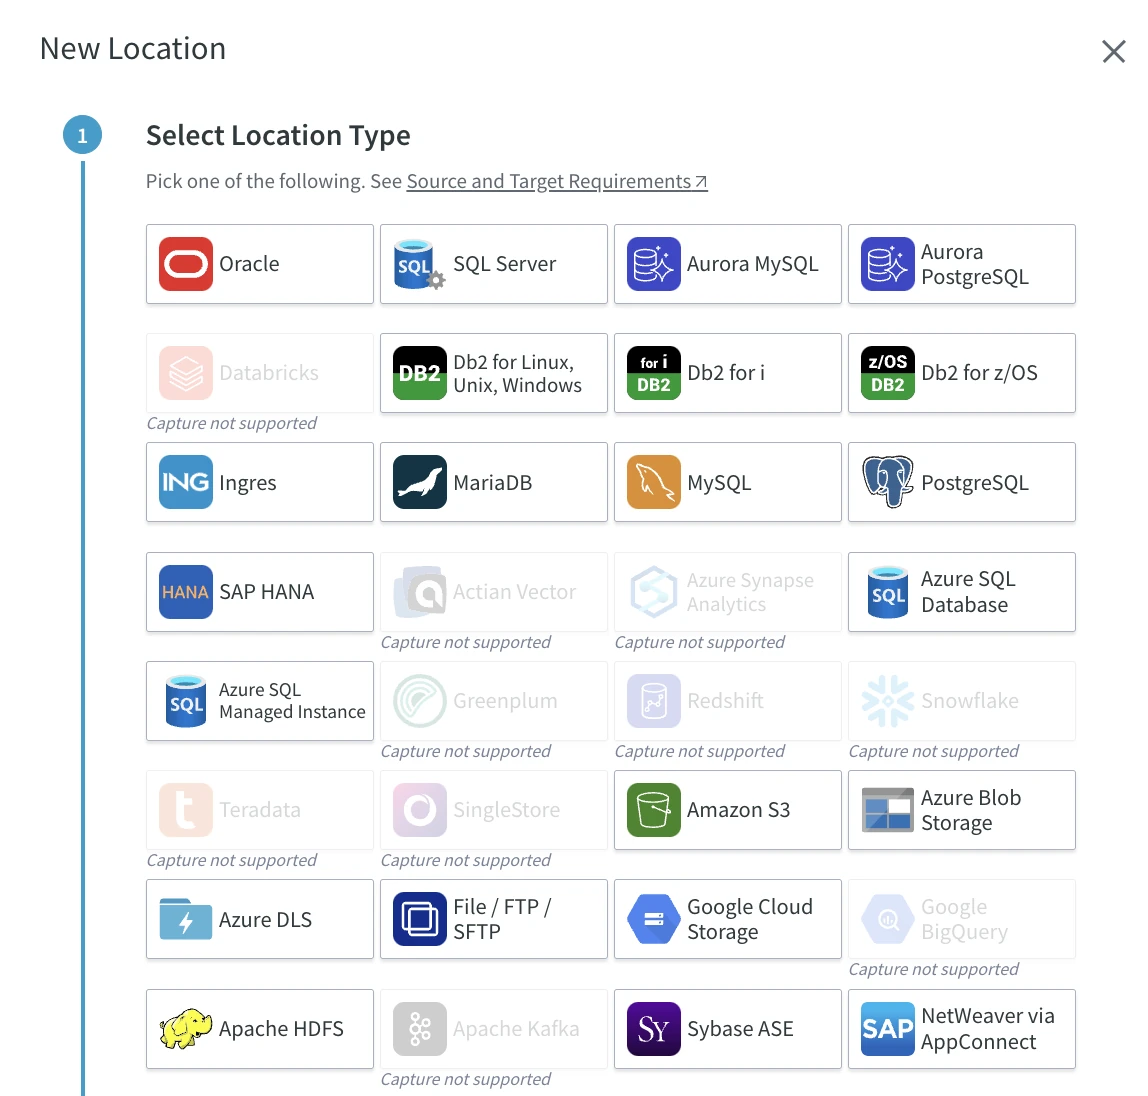
In the New Location dialog, click the Oracle logo on the top left.
The highlighted logos indicate which sources you can select for your channel.
Select the connection type between the source database and the hub, which can be via agent (HVR Agent) or direct. In this guide, the hub connects to the Oracle source database using HVR Agent:
a. Under Select Agent Connection, select Connect via High-Volume Agent.
b. Enter your connection details for the agent.
- AGENT HOST: Hostname or IP-address of the server on which the HVR Agent is installed/running.
- AGENT PORT: Port number defined in the HVR Agent Listener of the HVR Agent remote machine. The default port number is 4343.
c. Click Test Agent Connection to ensure a successful connection with the agent.
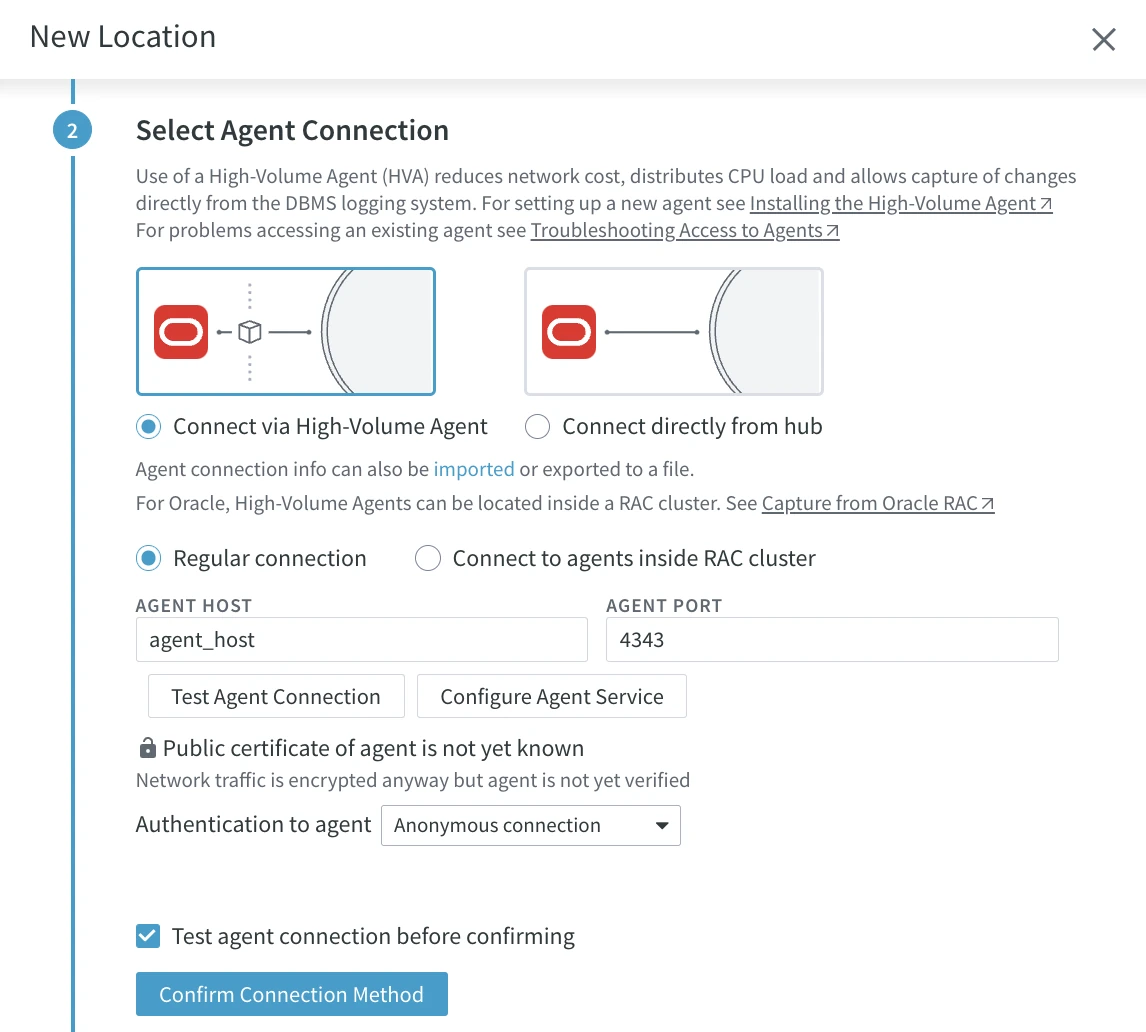
If the agent service you are connecting to is not yet configured, or you want to reconfigure the existing configuration, click Configure Agent Service. This will open the Agent Service Configuration dialog. For steps to configure the agent service, see the section Configuring HVR Agent from Browser.
Click Confirm Connection Method.
Under Configure Location Connection, specify connection details for your Oracle source database:
- ORACLE_HOME: Directory path where Oracle is installed.
- SID: Unique name identifier of the Oracle instance/database.
- USER: Username for connecting HVR to the Oracle database.
- PASSWORD: Password of the USER.
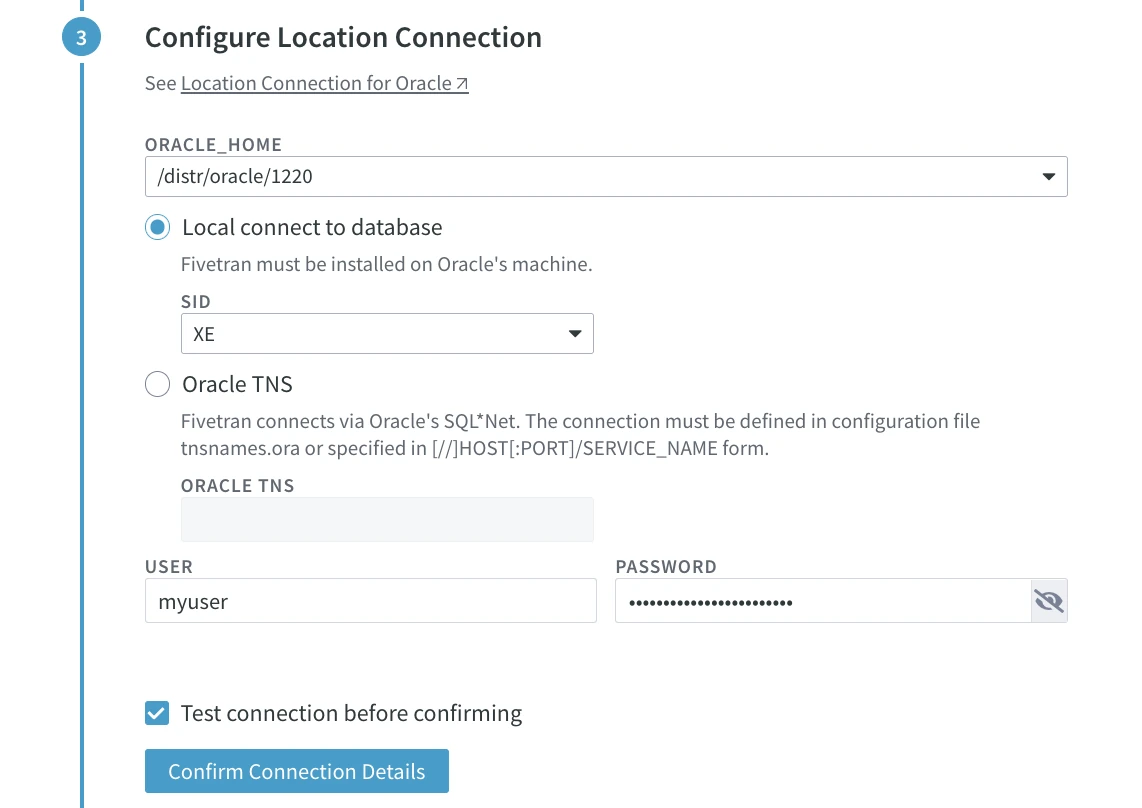
Click Confirm Connection Details.
Under Configure Capture for Oracle Location, select Direct Redo Access.
HVR supports different Oracle setups with various configuration options, including clustered Oracle RAC systems and Exadata. It can capture data on a physical standby system or parse changes from archived redo logs, often on a system that is not one of the primary database servers. In this setup guide, we choose the default option Direct Redo Access.
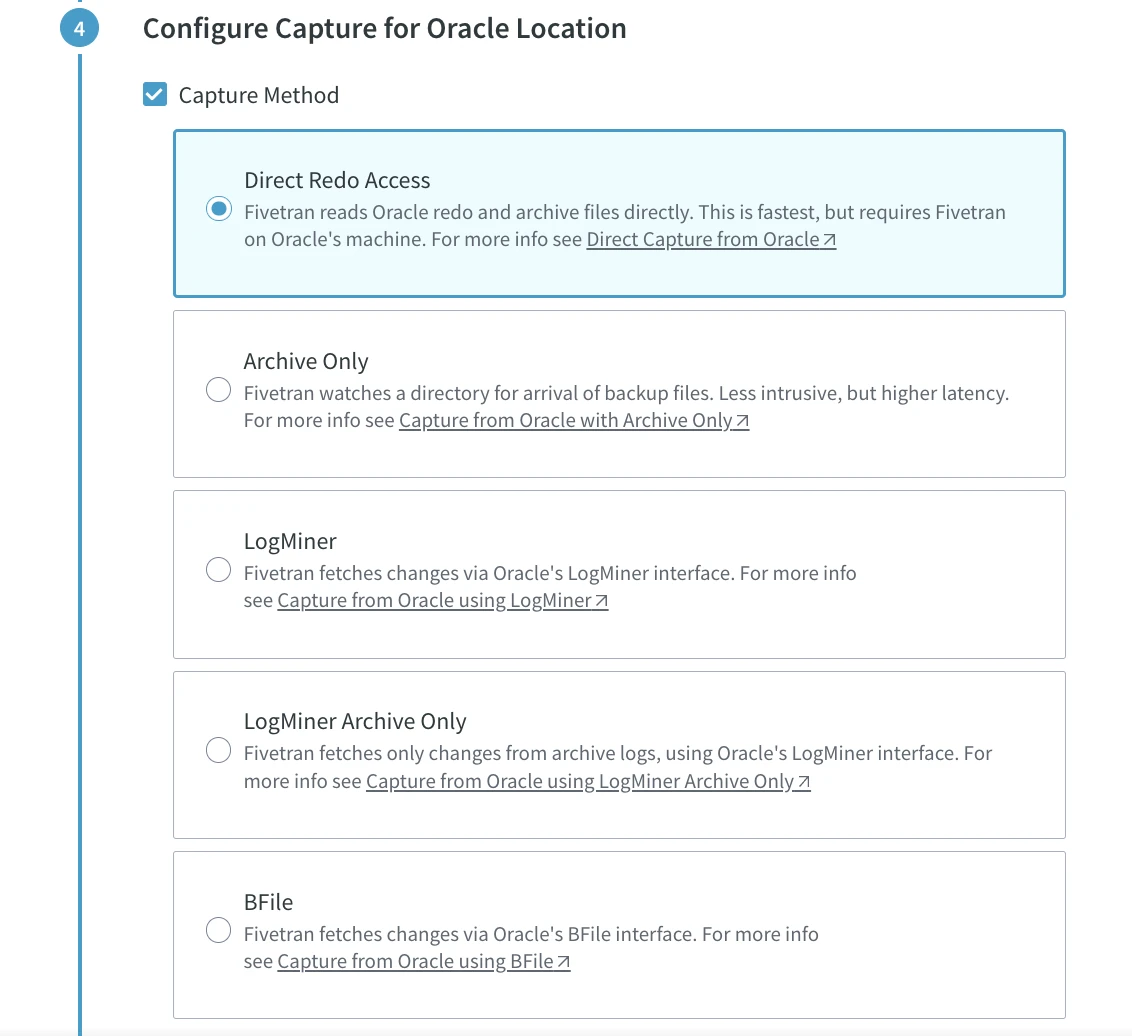
At the bottom of this dialog, select Test connection before confirming and click Confirm Capture.
Specify the name and, optionally, a description for your Oracle location.
Click Save Location to complete the source location setup.
Define the target location. Click Create New Location under Target Locations.
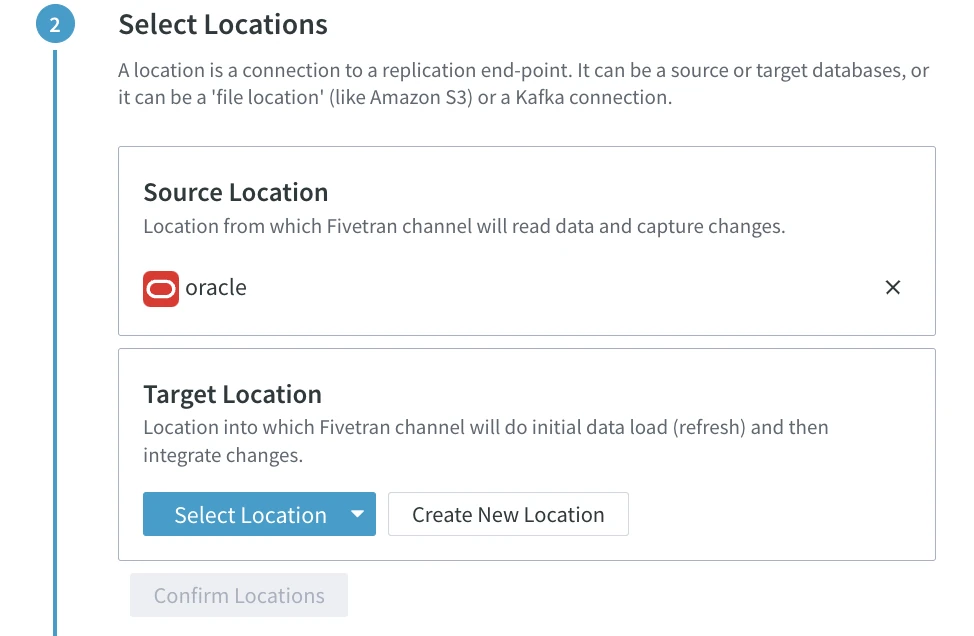
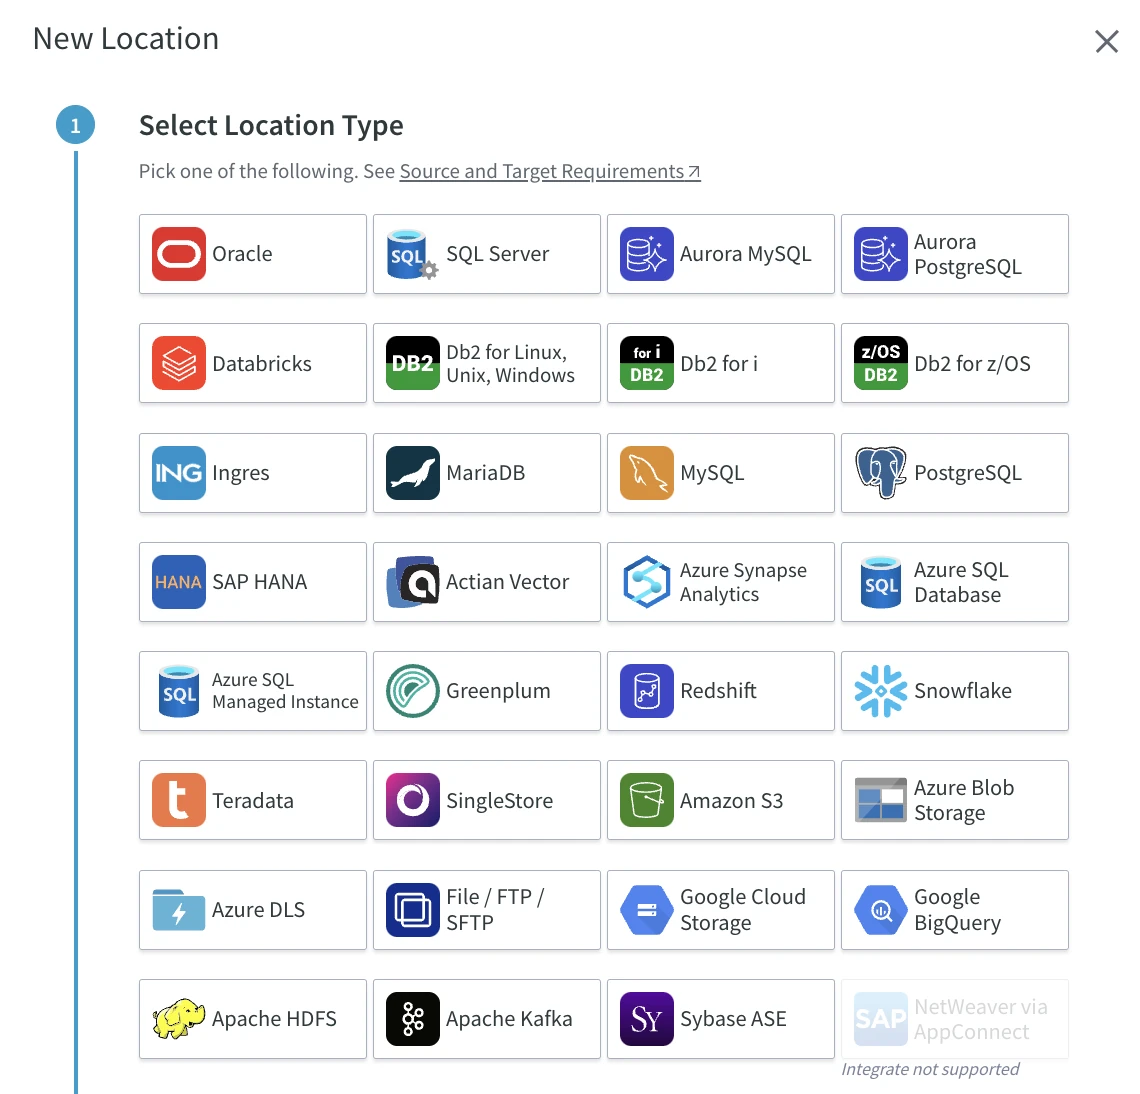
Select Snowflake from the list of available location types.
Select the connection type between the target database and the hub, which can be via HVR Agent (HVR Agent) or direct. In this guide, the hub connects directly to the Snowflake target database. Under Select Agent Connection, select Connect via High-Volume Agent.
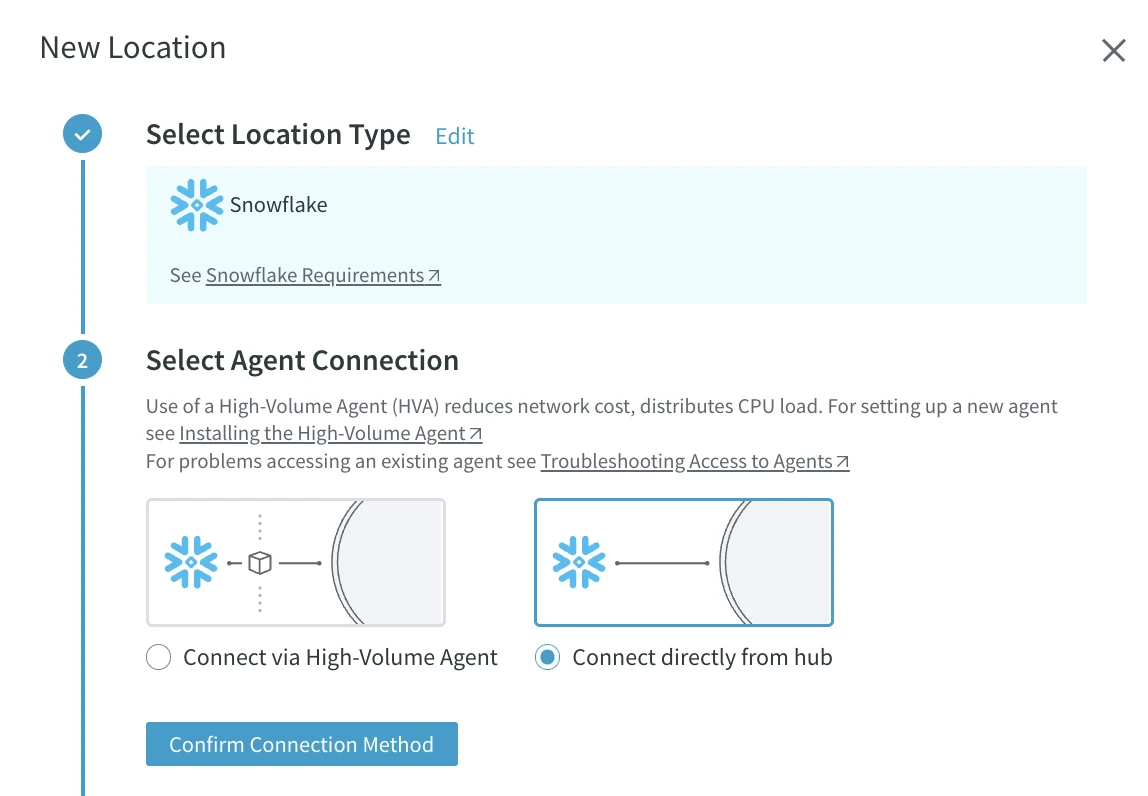
Click Confirm Connection Method.
Under Configure Location Connection, specify connection details for your Snowflake target database:
- SERVER: Hostname or IP address of the server on which Snowflake connection is running.
- PORT: Port number on which the Snowflake server is expecting connections.
- ROLE: Name of the Snowflake role.
- WAREHOUSE: Name of the Snowflake warehouse.
- DATABASE: Name of the Snowflake database.
- SCHEMA: Name of the default schema to be used for this connection.
- USER: Username for connecting HVR to the Snowflake database.
- AUTHENTICATION METHOD: Authentication method for connecting HVR to a Snowflake server. Available options are Password and Key Pair.
- PASSWORD: Password for the database user. This field is enabled only if AUTHENTICATION METHOD is set to Password.
- CLIENT PRIVATE KEY: Directory path where the .pem file containing the client's SSL private key is located. This field is enabled only if AUTHENTICATION METHOD is set to Key Pair.
- CLIENT PRIVATE KEY PASSWORD: Password of the client's SSL private key specified in CLIENT PRIVATE KEY. This field is enabled only if AUTHENTICATION METHOD is set to Key Pair.
Under the Advanced Settings, specify the following:
LINUX/UNIX ODBC DRIVER MANAGER LIBRARY PATH (Linux/Unix only): The directory path where the ODBC Driver Manager Library is installed. For a default installation, the ODBC Driver Manager Library is located at /usr/lib64 and does not need to be specified in this field. However, if UnixODBC is installed in, for example, /opt/unixodbc, the value for this field should be /opt/unixodbc/lib.
LINUX/UNIX ODBCSYSINI (Linux/Unix only): Directory path where the odbc.ini and odbcinst.ini files are stored. For a default installation, these files can be found in the /etc directory and do not need to be specified in this field. However, if UnixODBC is installed in, for example, /opt/unixodbc, the value for this field should be /opt/unixodbc/etc. The odbcinst.ini file should contain information about the Snowflake ODBC Driver under the heading [SnowflakeDSIIDriver].
ODBC DRIVER: Name of the user-defined (installed) ODBC driver used to connect HVR to the Snowflake Database.
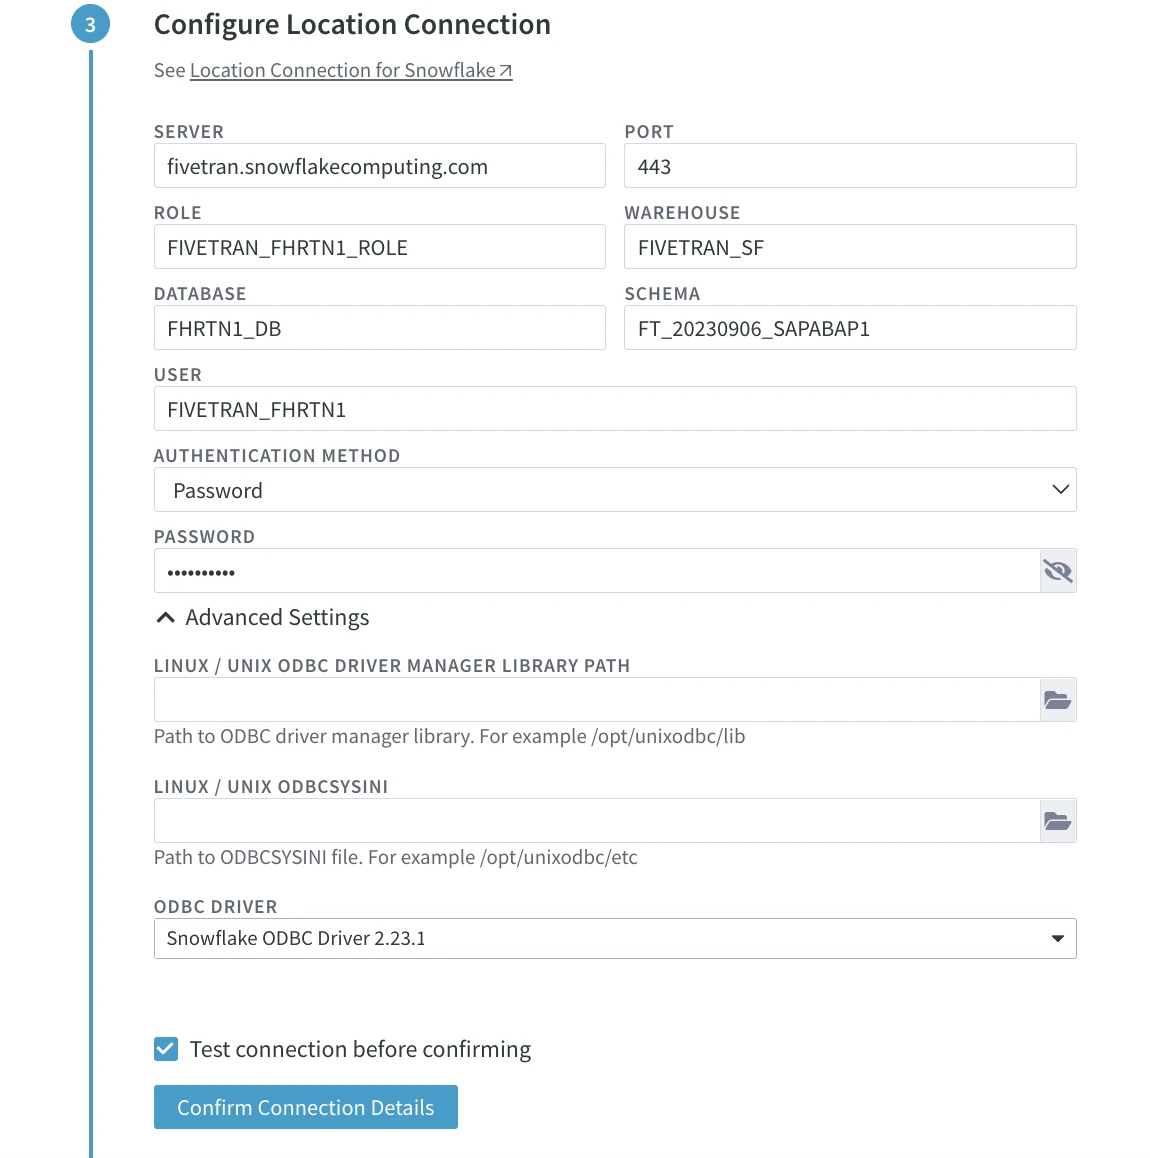
Click Confirm Connection Details.
To keep this quick start guide simple, unselect Integrate Staging Directory under Configure Integrate for Snowflake Location and click Confirm Integrate.
The preferred methods for writing data into Snowflake are Burst Integrate and Bulk Refresh as they provide better bulk load performance into Snowflake. However, when running Burst Integrate or Bulk Refresh, you need to temporarily store data in a designated directory referred to as 'staging file' before loading it to a target database. For the steps to configure the staging directory for Snowflake, see the Staging for Snowflake section.
Specify the name and, optionally, a description for your Snowflake target location.
Click Save Location to complete the target location setup.
Click Confirm Locations.
Configure Channel
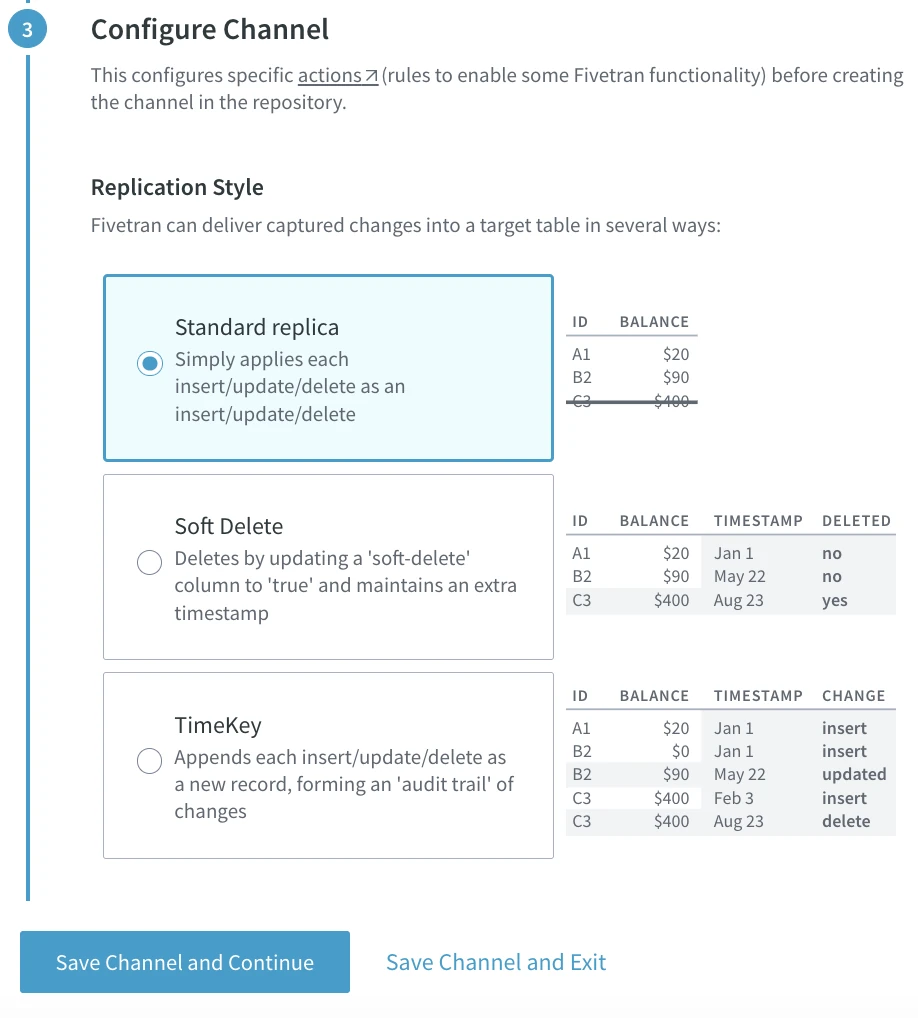
Replication styles dictate how HVR handles data changes when replicating data from the source to the target location.
HVR offers the following replication styles:
- Standard replica: Processes each insert, update, and delete by mirroring these operations on the target, ensuring synchronization between the source and the target.
- Soft Delete: Marks rows on the target as deleted when they are physically deleted on the source. This style is particularly useful in scenarios where downstream processing relies on information about deleted rows.
- TimeKey: Captures every change to a row on the source as a new record on the target, with metadata like the type and order of change. This style creates an audit trail of changes, making it well-suited for data lakes and streaming data use cases (e.g. Kafka).
In this quick start guide, we are using the Standard replica method.
Click Save Channel and Continue.
In the Channel Name and Description field, provide the name and, optionally, a description for your channel.
Click Save.
Select Tables to Replicate
Click Select Tables. HVR automatically discovers table definitions from the source database dictionary.
Select the NAME checkbox to select all tables in your current schema. Alternatively, you can select each table individually.
Click Save to include the tables in the channel definition.
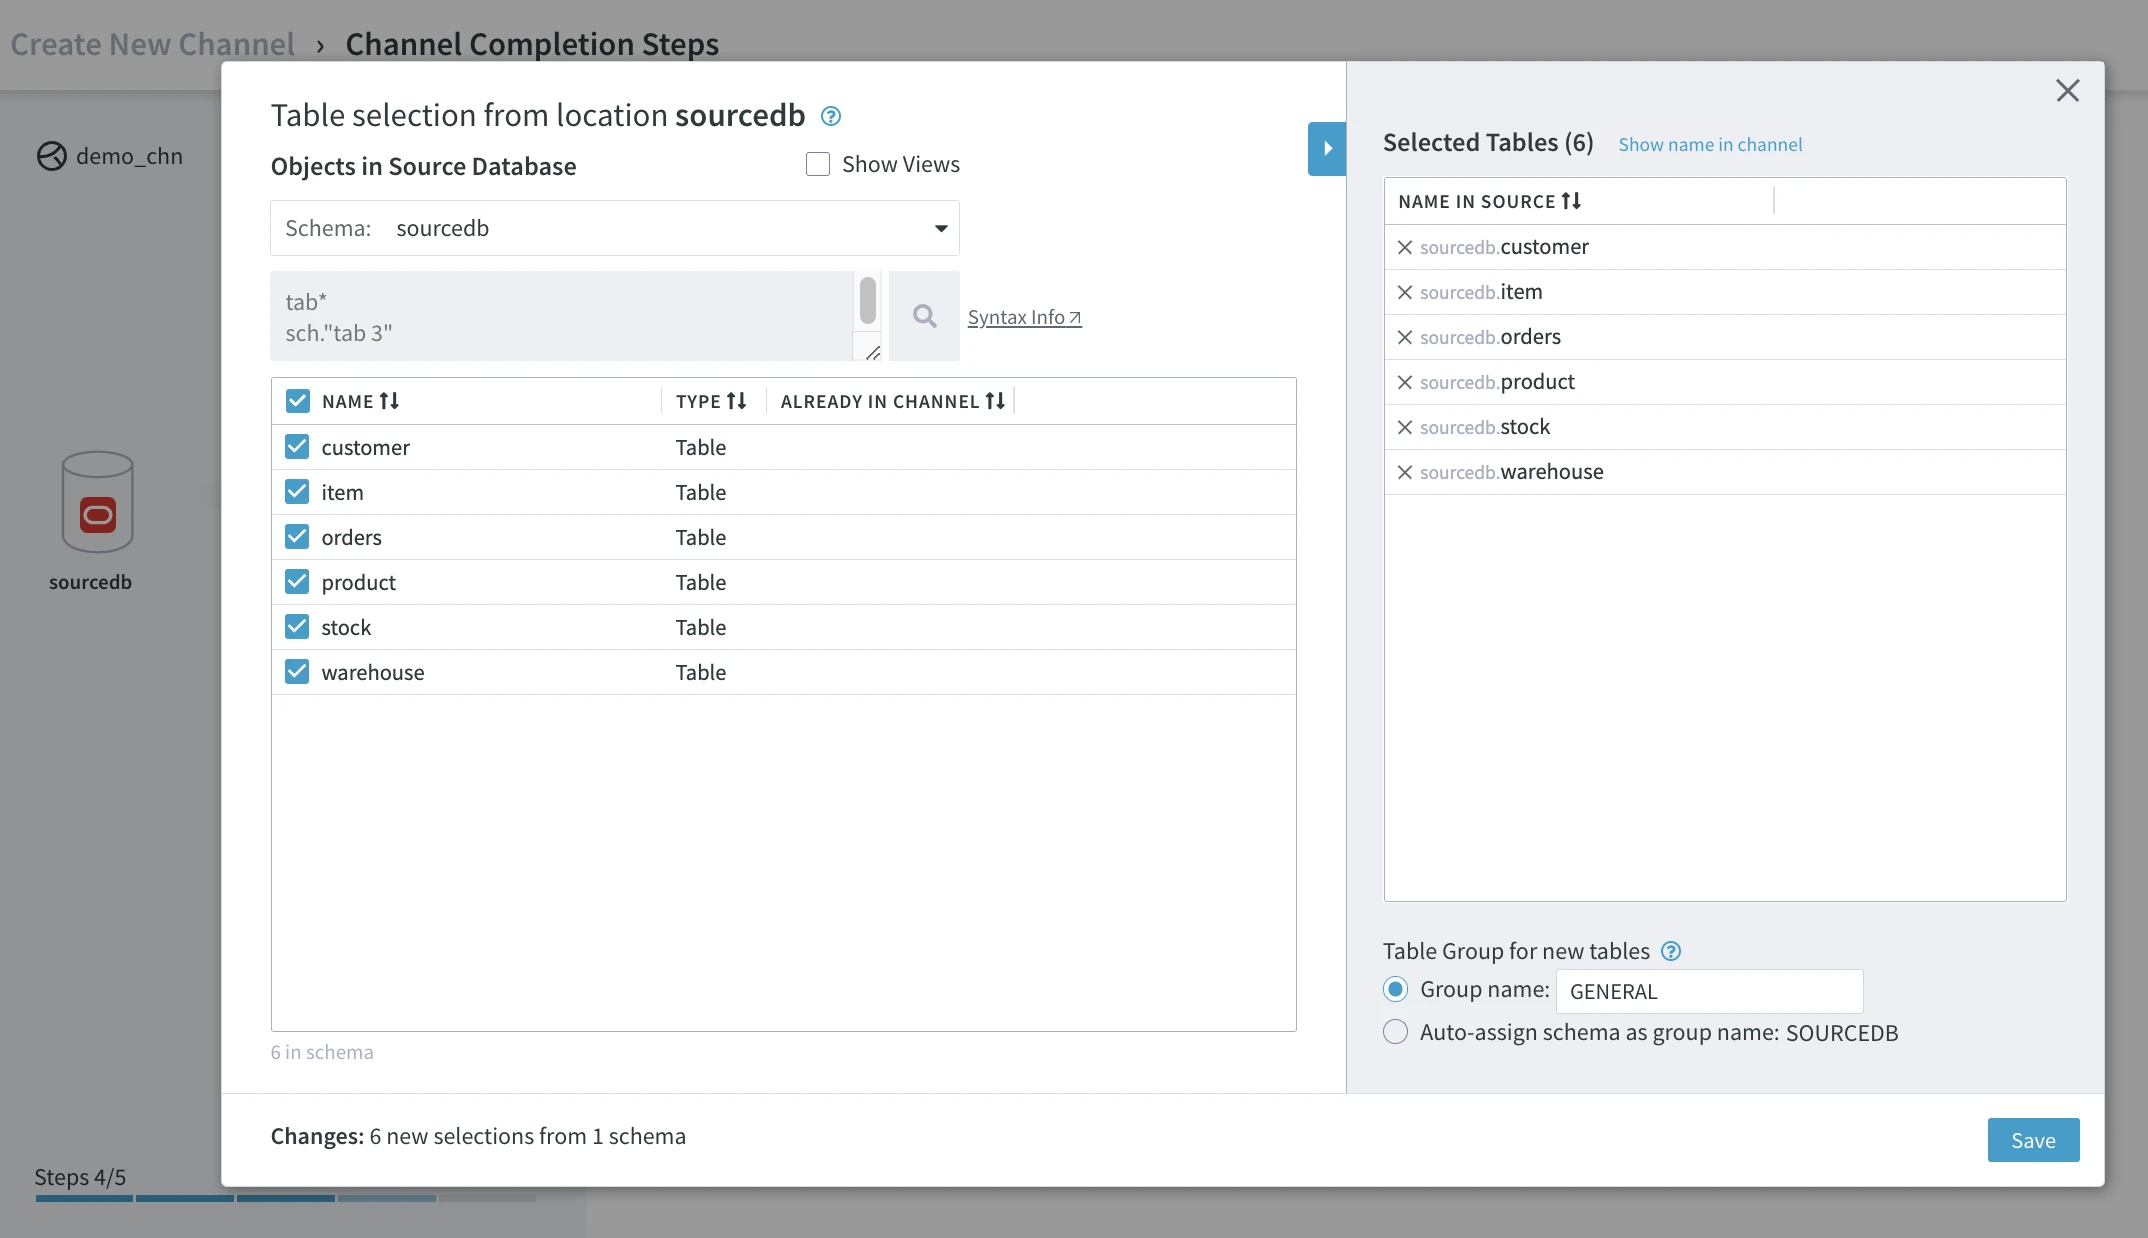
Click Confirm to add tables to your channel.
Complete Channel
To initiate replication, click Complete Channel Creation with the default options selected:
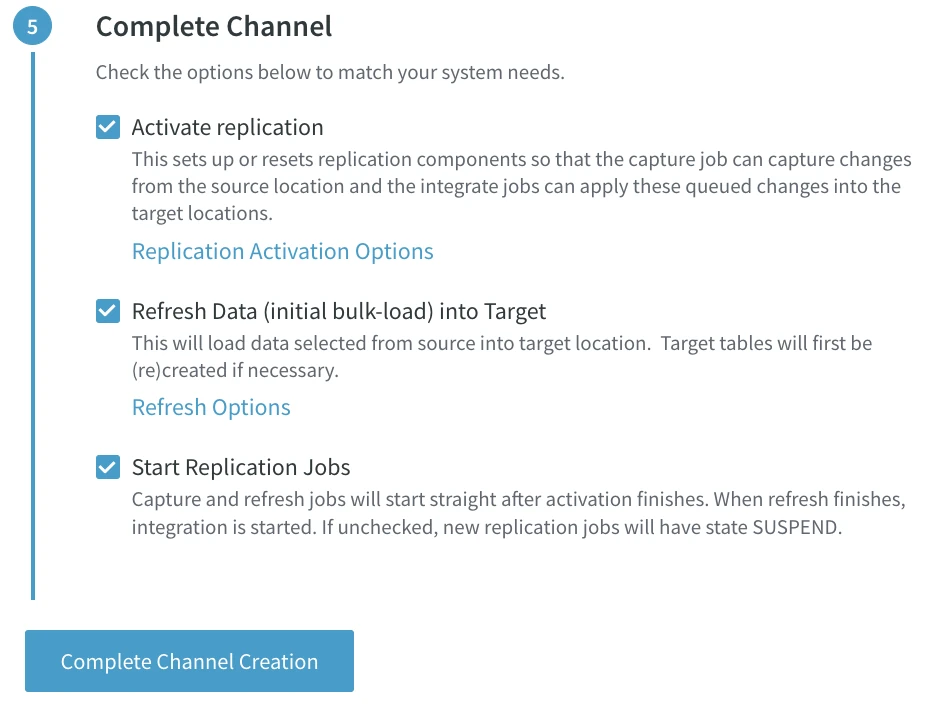
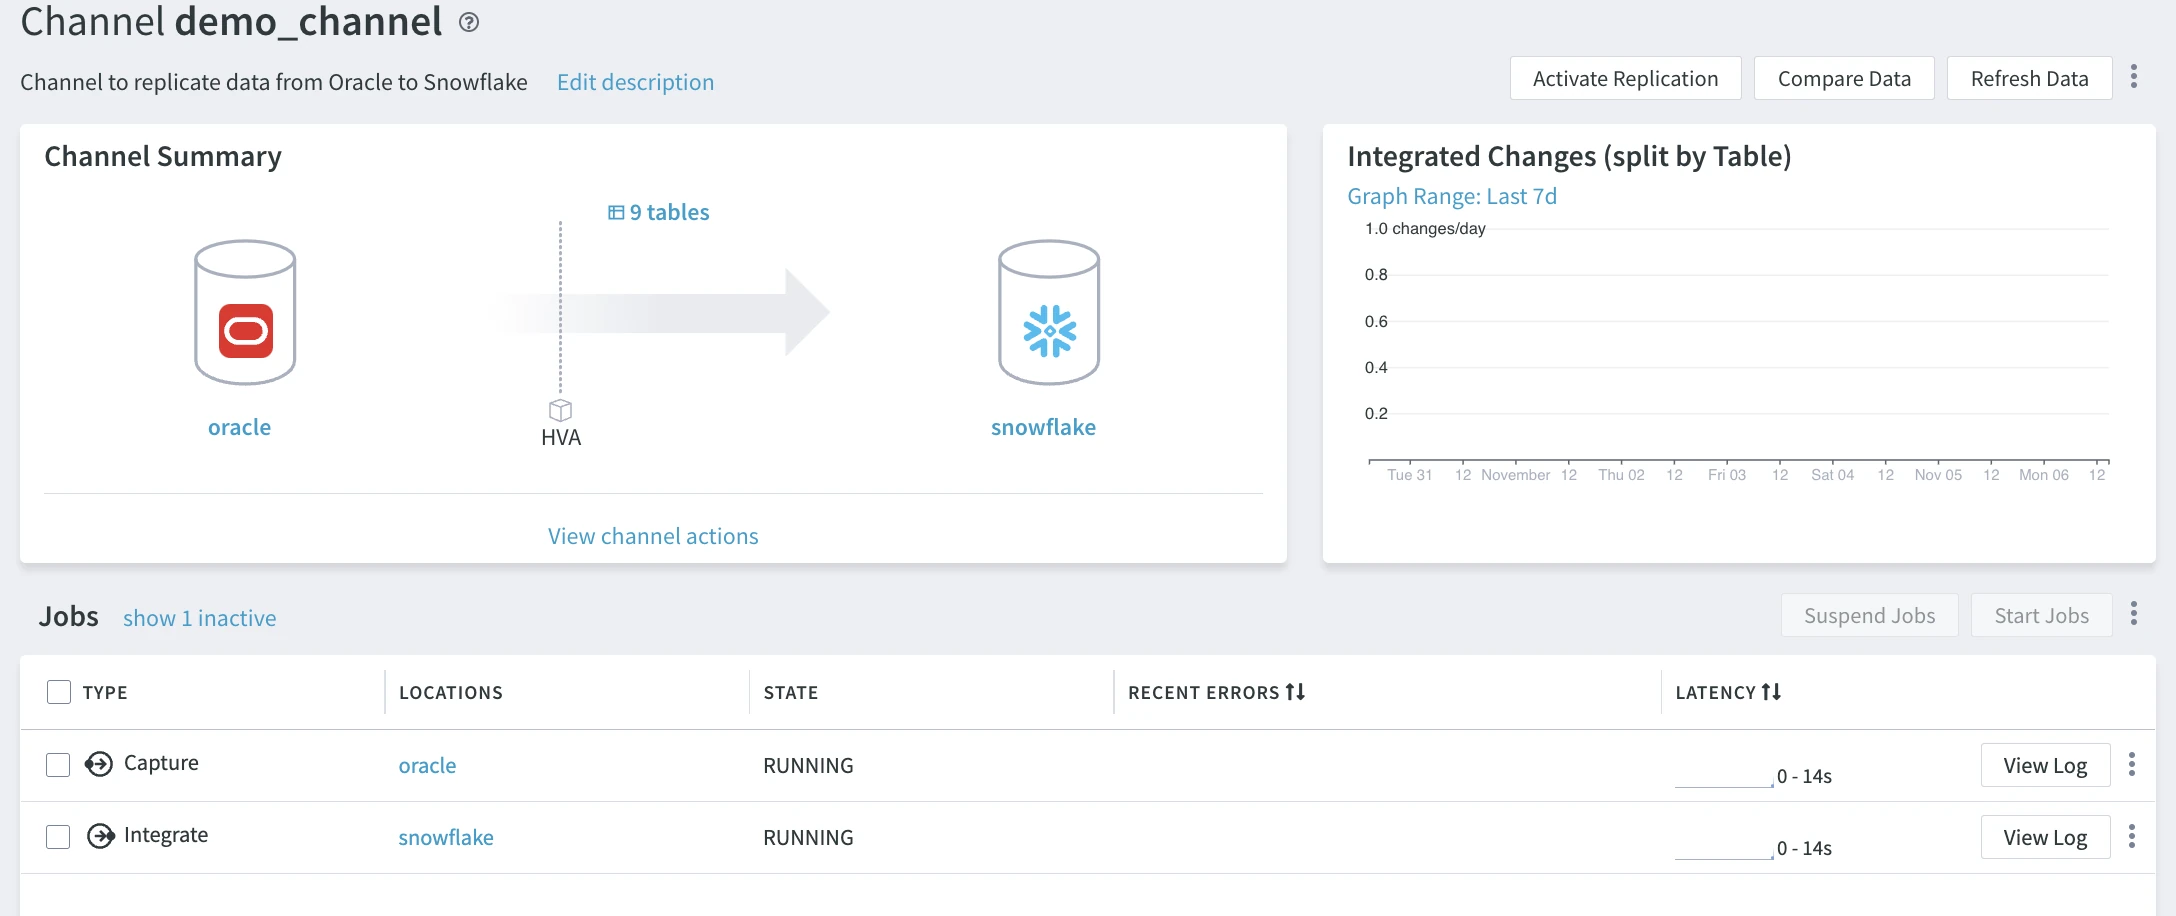
After a few moments, you will see the replication has started and the capture and integrate jobs are running. Changes now move between the source and the target. You have successfully configured replication from the Oracle source to the Snowflake target.
You can view integrated changes on the chart at the top right of the screen. To see minute-level increments, switch the Graph Range to Last 10m.
Data Validation
The Compare feature in HVR enables data validation. This is achieved by comparing the data and table structures between the source and target locations (databases) within a channel.
Follow these steps to validate your replicated data:
In the left-hand navigation menu, click Channels.
On the Channels page, select your channel to open the Channel Details page.
Click Compare Data at the top right.
In the Compare Data dialog, the Online Compare option is selected by default to keep track of in-flight changes.
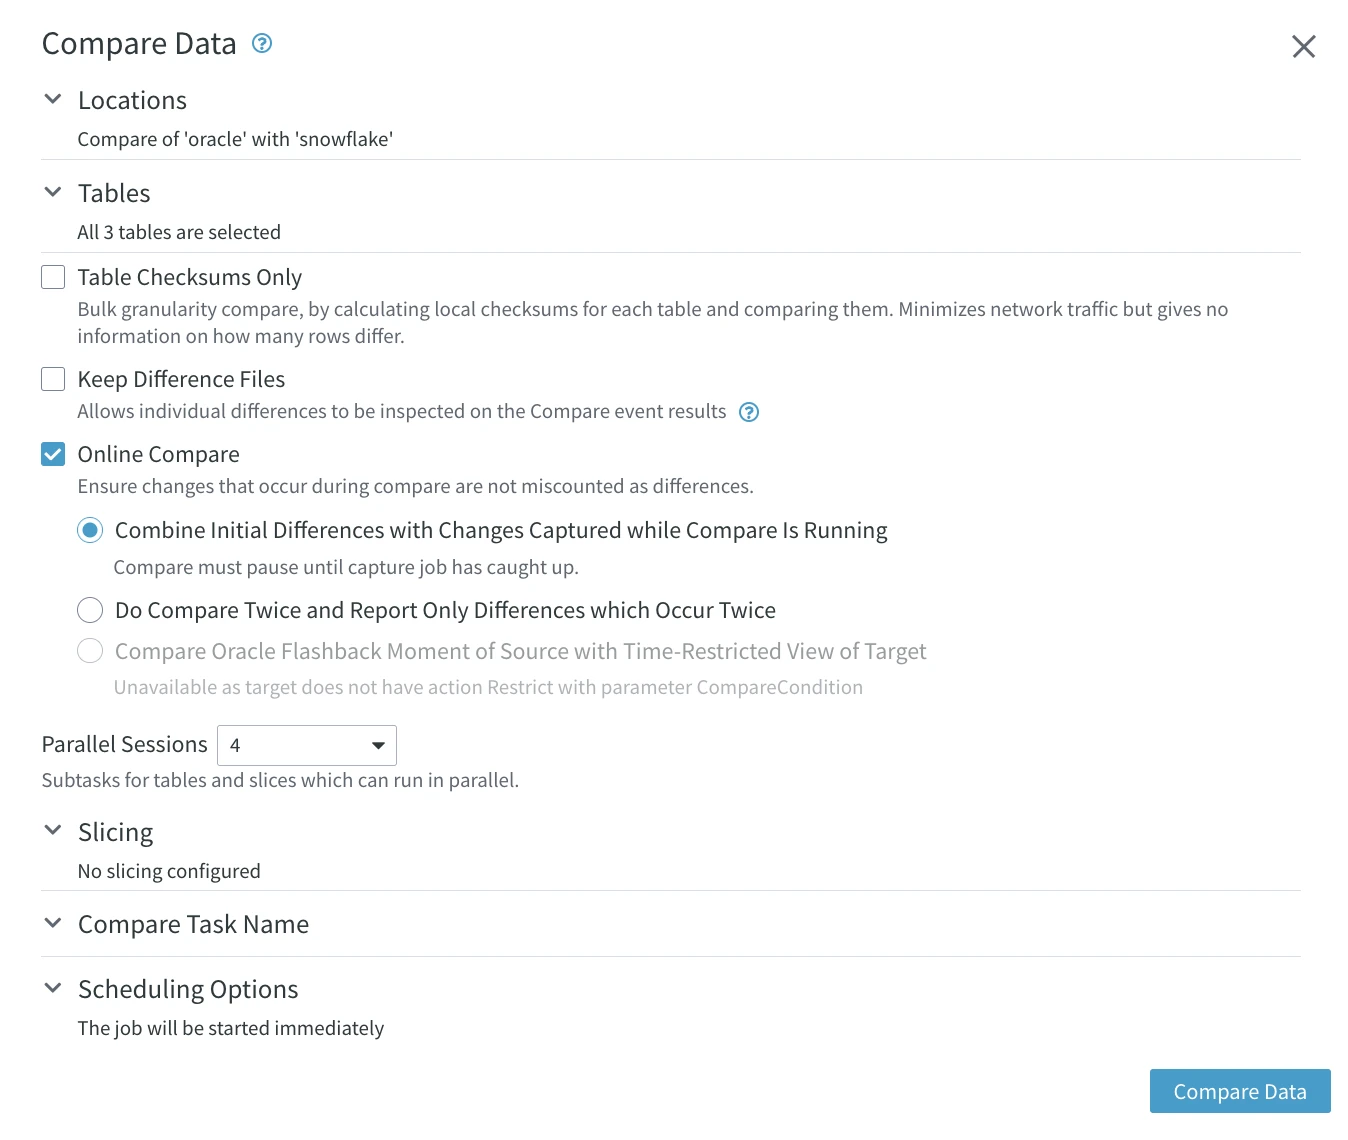
Click Compare Data at the bottom of the dialog. You will notice the compare job on the Jobs pane while it is running. When it is finished, it disappears.

Click the View Log button next to the compare job.
Click the event link to see the details of the compare event on the Event Details page.

An alternative way to access the Event Details page is to go to the EVENTS from the left-hand navigation menu, click the compare event, and then click the View Results button.
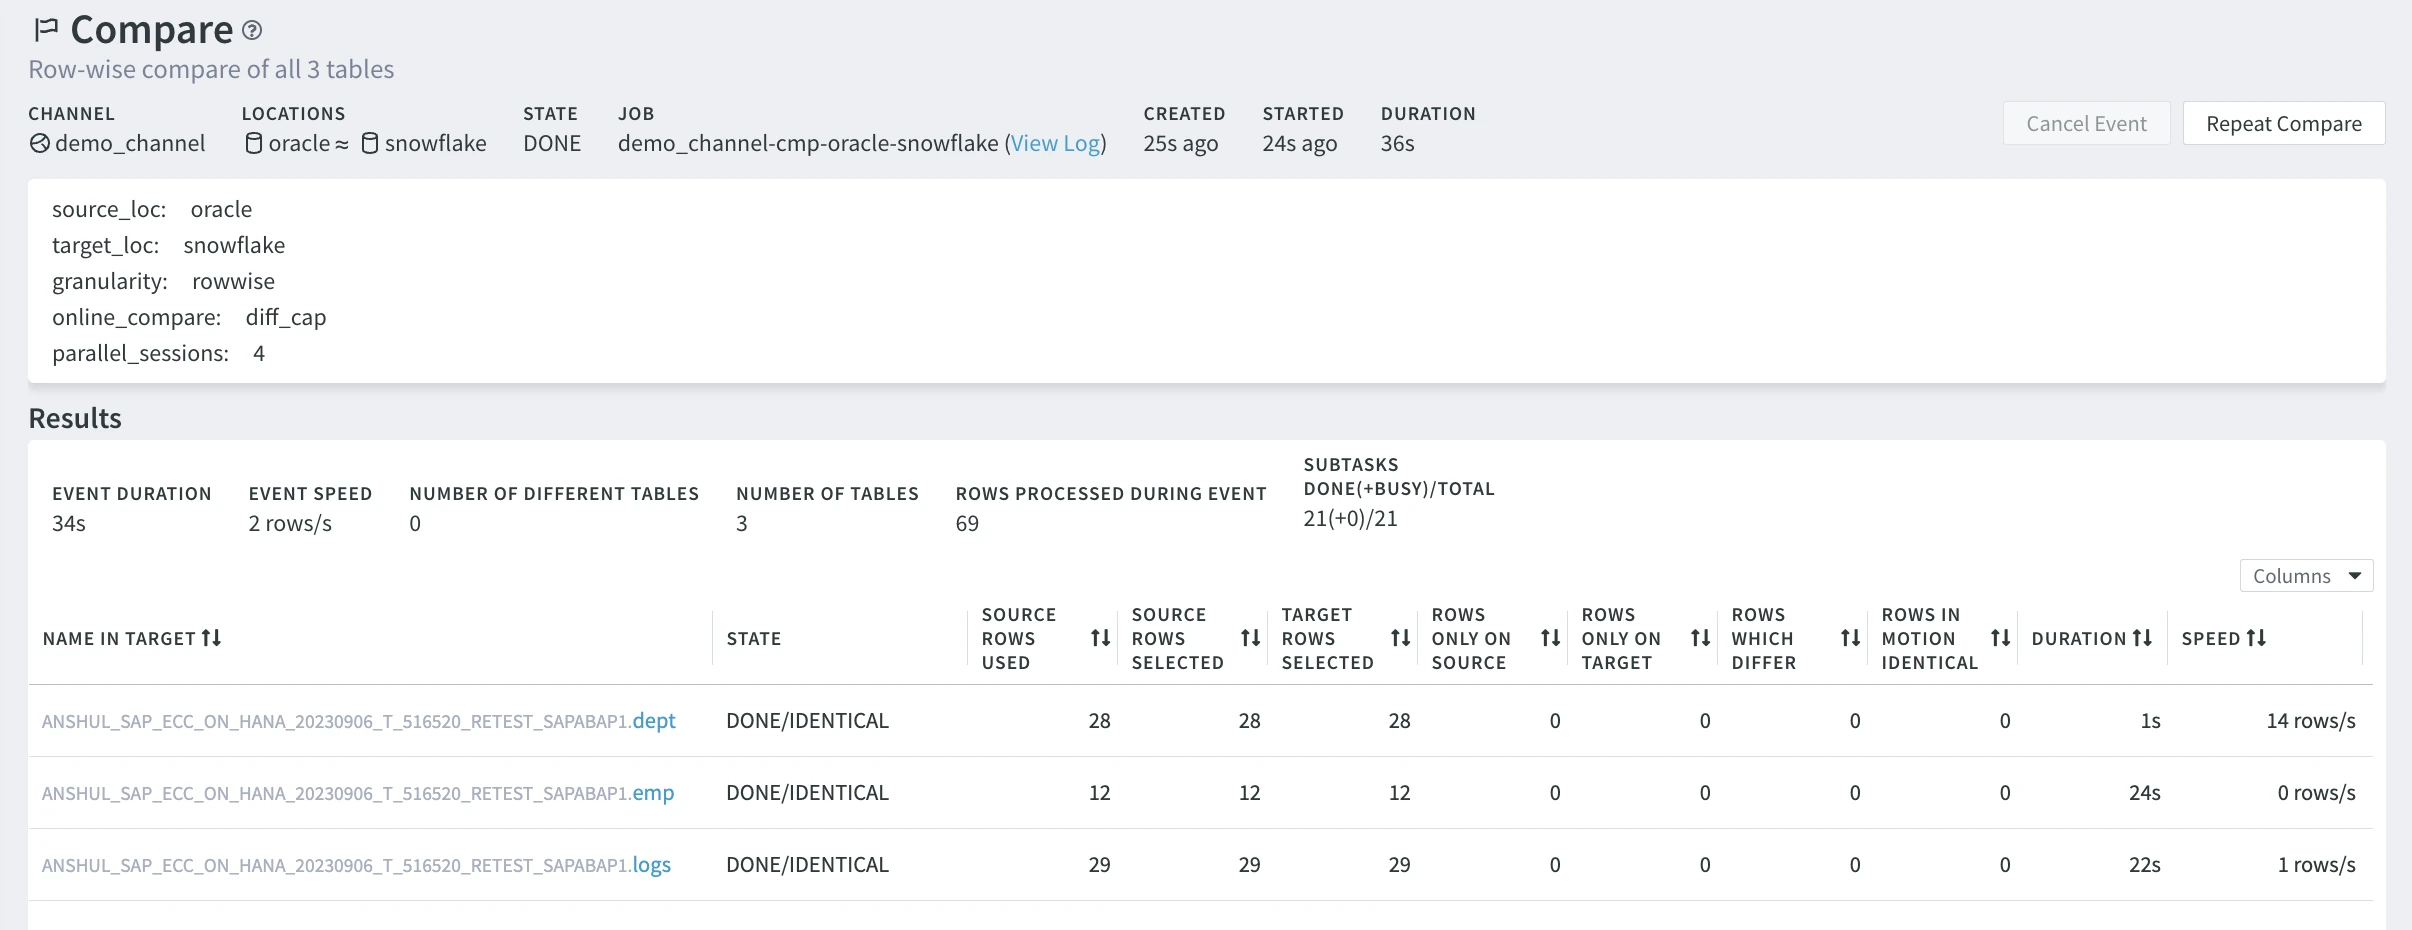
Once the job is complete, inspect the compare details on the Results pane.
Monitoring
The HVR hub gathers information about the replication jobs. In this section, you will explore various ways to monitor data replication activity.
Topology
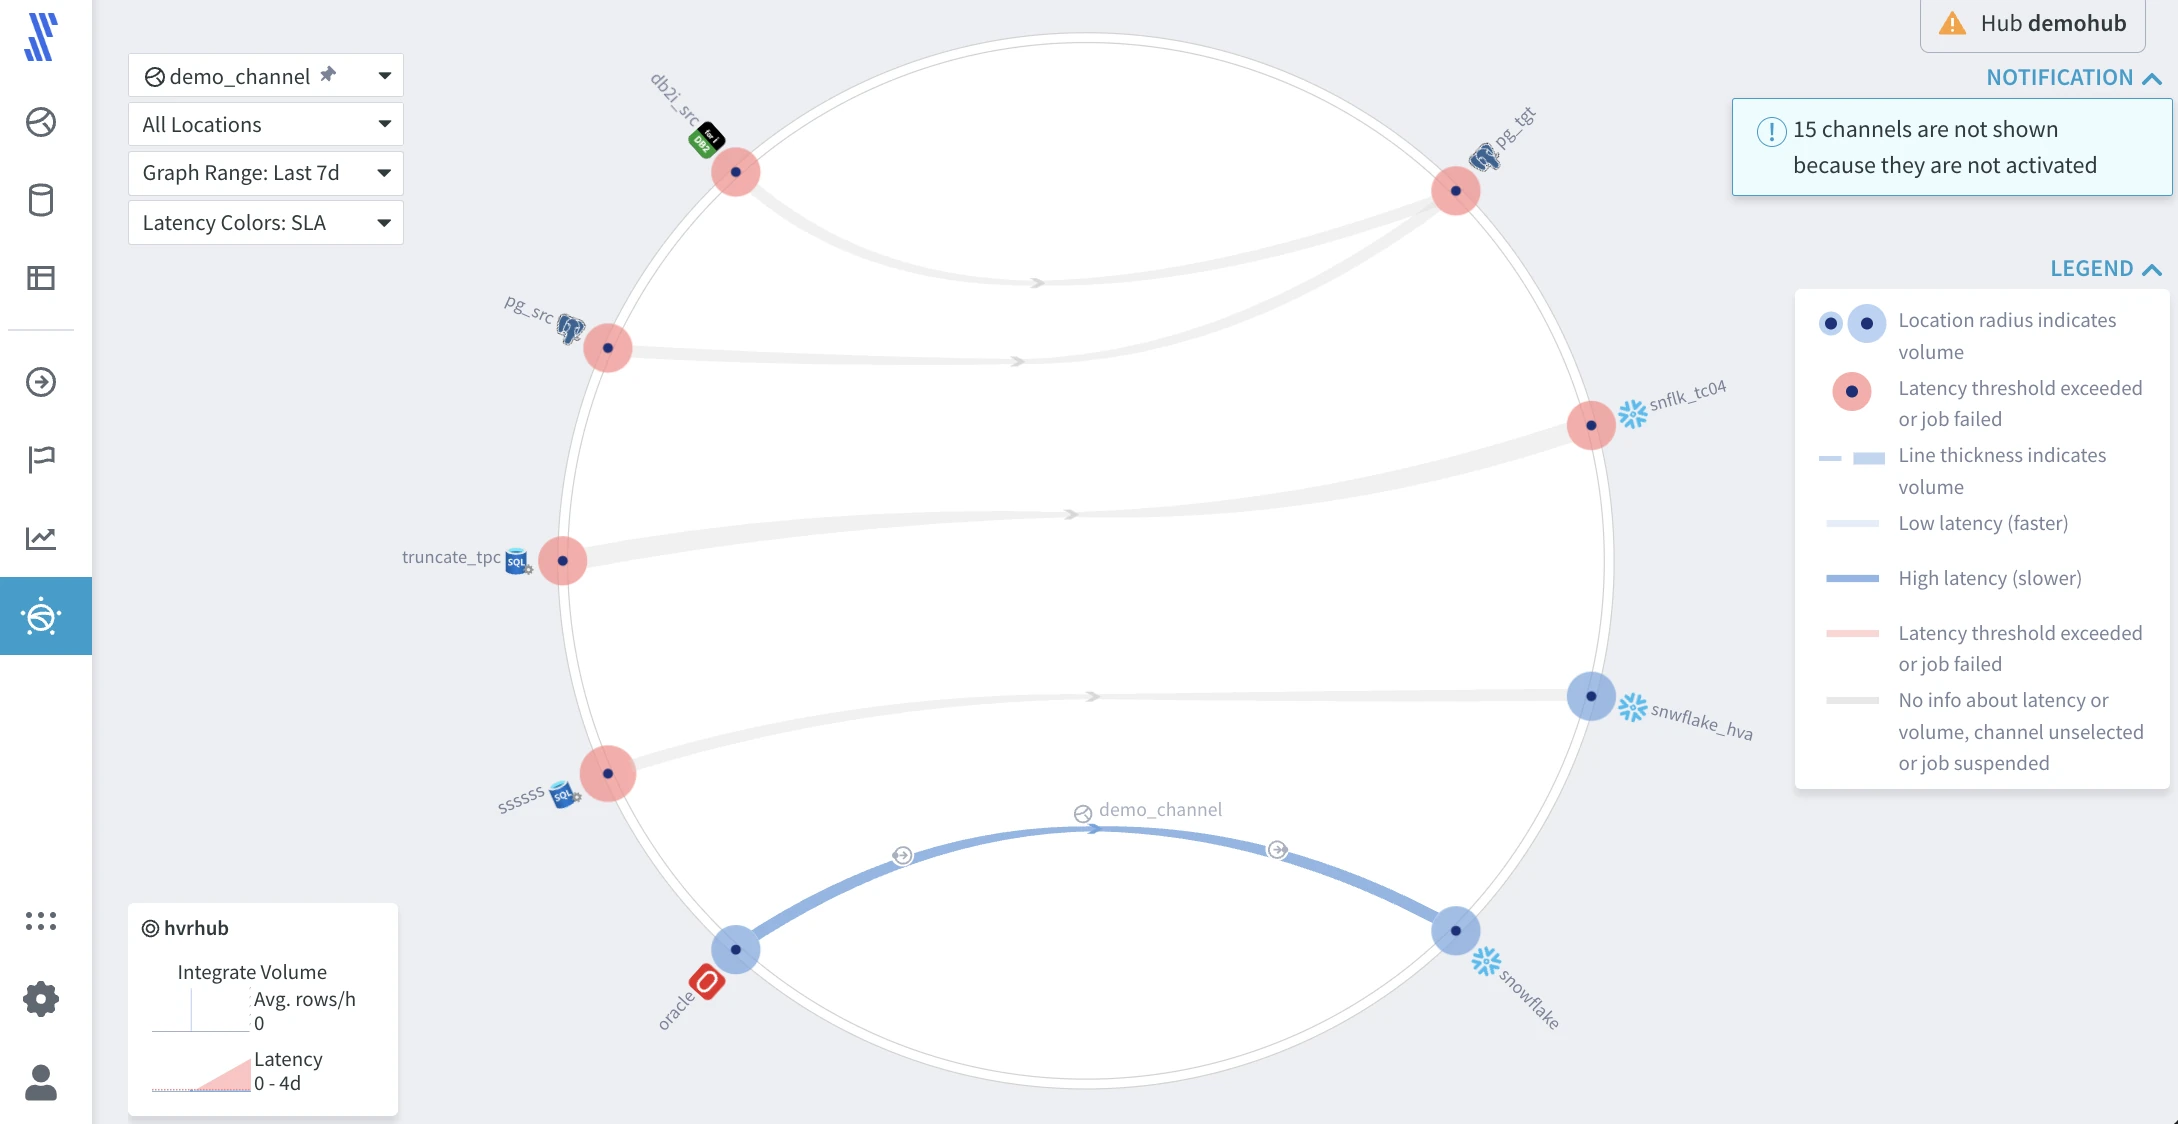
The Topology view presents all data replication flows managed by the hub. In a single glance, it displays the direction of data flows, data volume indicators, a relative indication of latency, and the status of running jobs. The chart is interactive, allowing you to retrieve more information such as actual current latency and volume details.
To open the Topology page, click TOPOLOGY on the left-hand navigation menu.
Explore the graph as follows:
- Use the LEGEND drop-down on the top right to understand the information displayed on the screen.
- Click the small arrows on the lines to open a live status card displaying live statistical metrics of the selected element.
For more information on the Topology view capabilities, see the Topology section.
Statistics
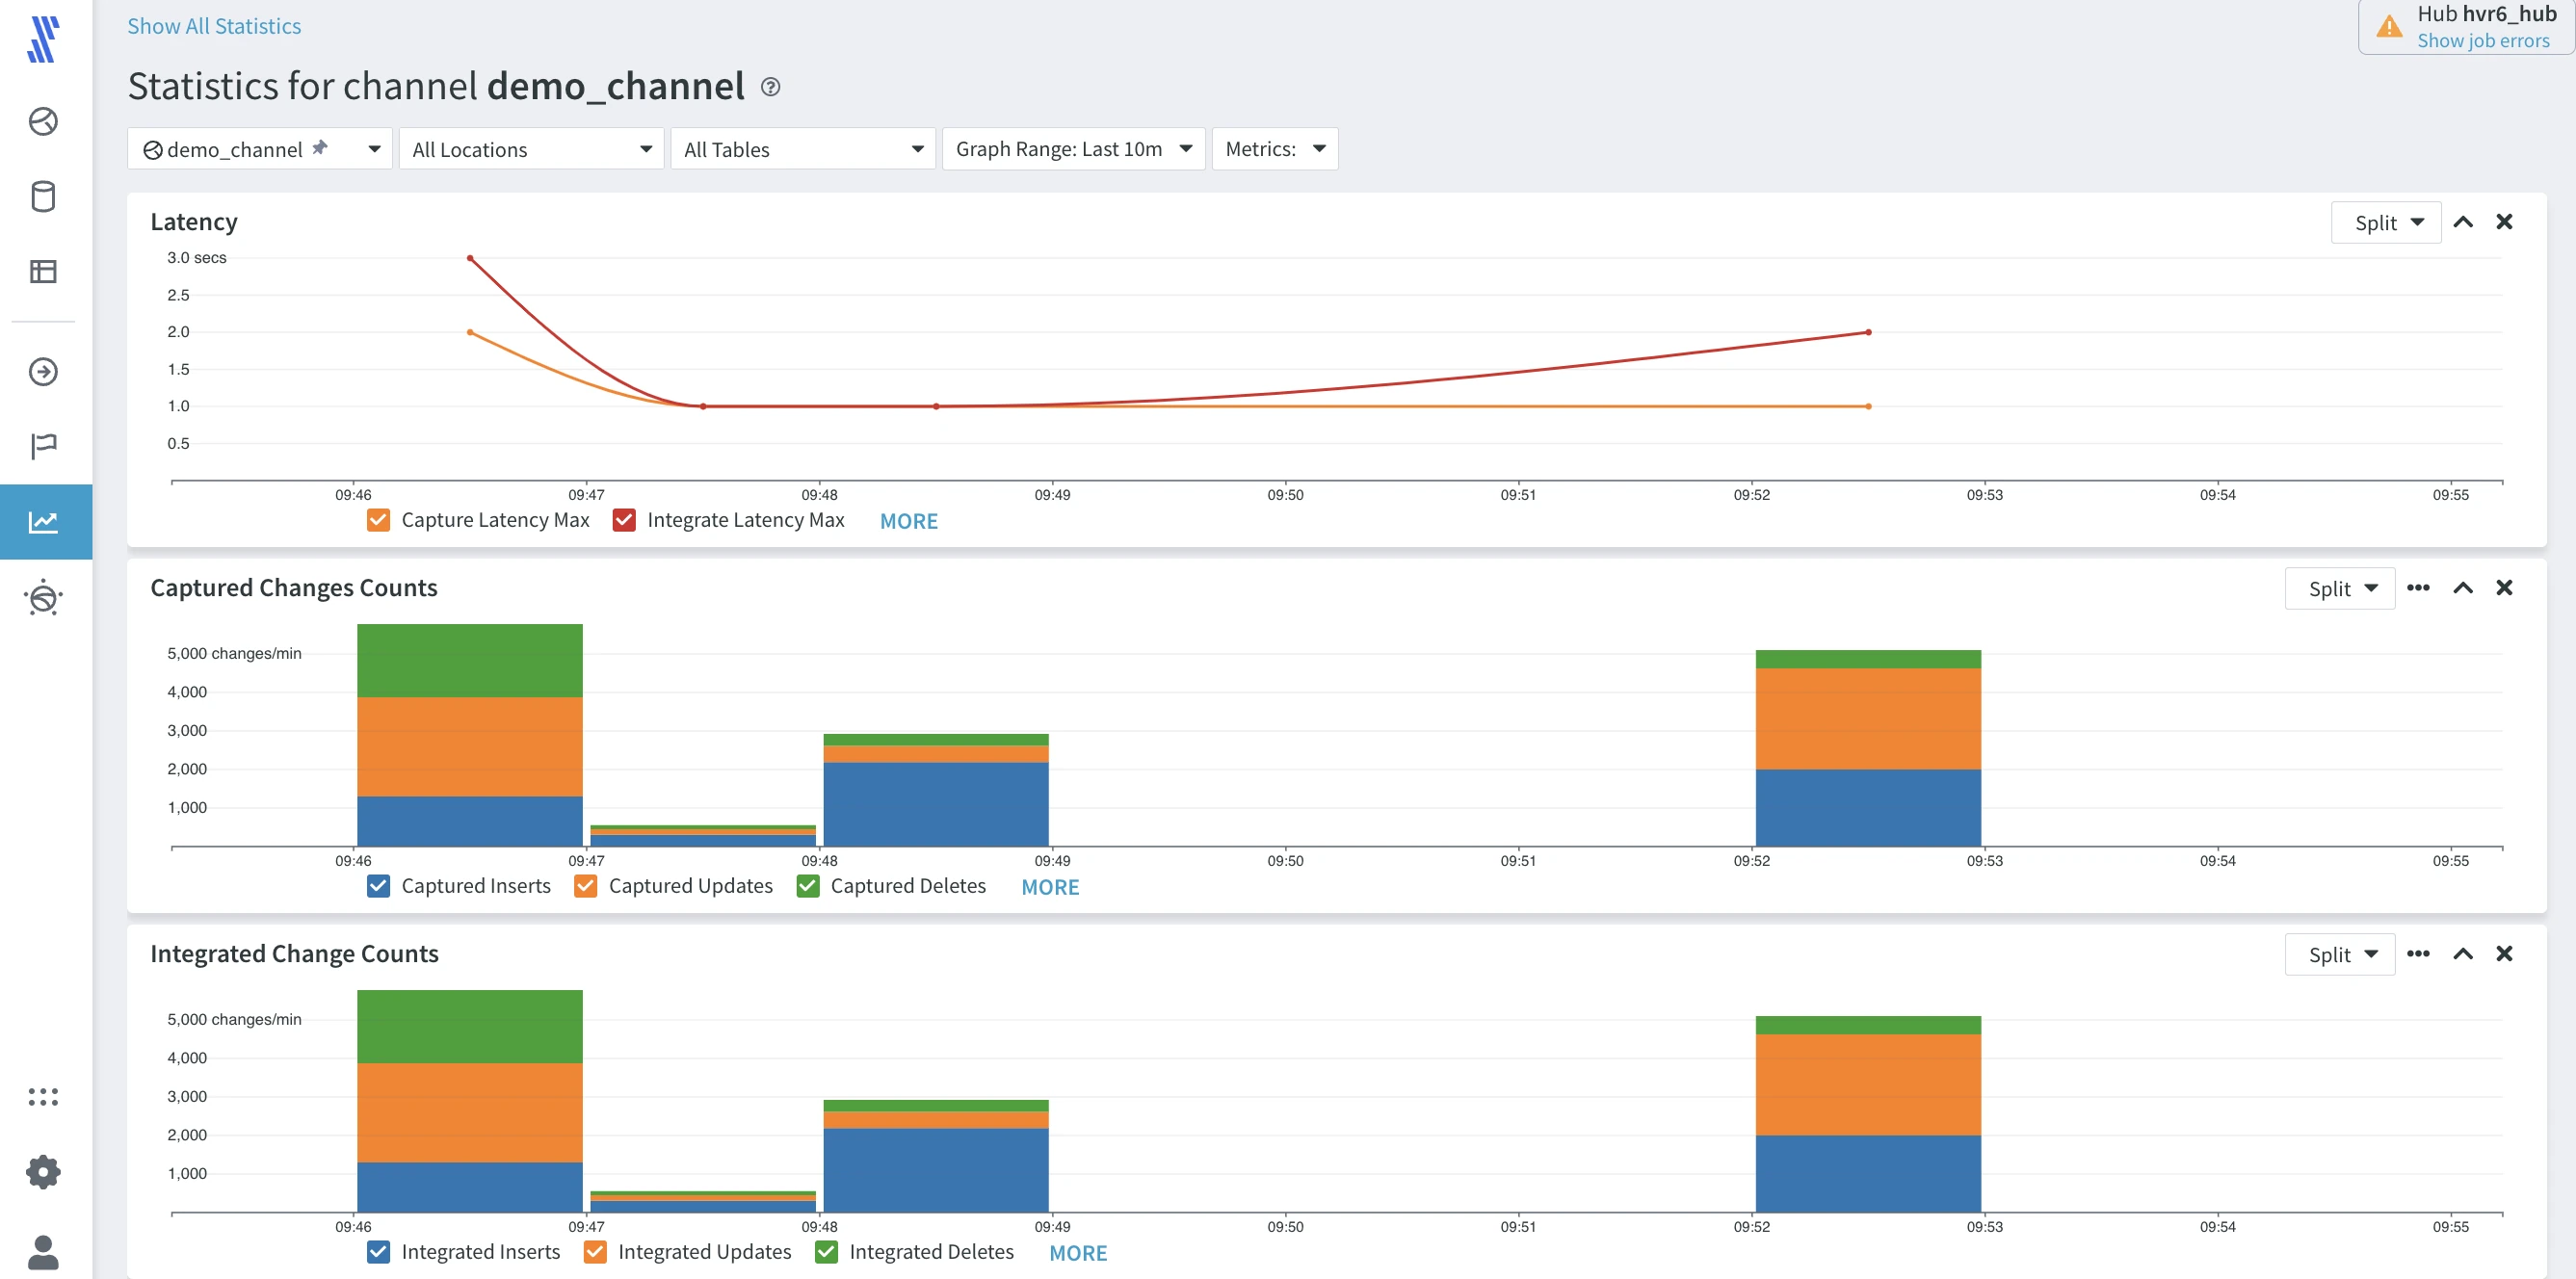
As data flows between the source and target, HVR keeps track of detailed logs, enabling the generation of historical time series statistics about the replication flows. The time series uses fixed intervals, with metrics aggregated over these time intervals (e.g., the total number of changes, or minimum/maximum latency for the interval, etc.).
The Statistics shows the same granularity defined in the Channel Details page. When you hover over the chart, you can view the actual data totals.
To open the Statistics page, click STATISTICS on the left-hand navigation menu.
Explore different metrics in the Metrics drop-down at the top of the page. Also, explore Split for the individual line and bar charts.
For more information on the Statistics features, see the Statistics section.
Jobs
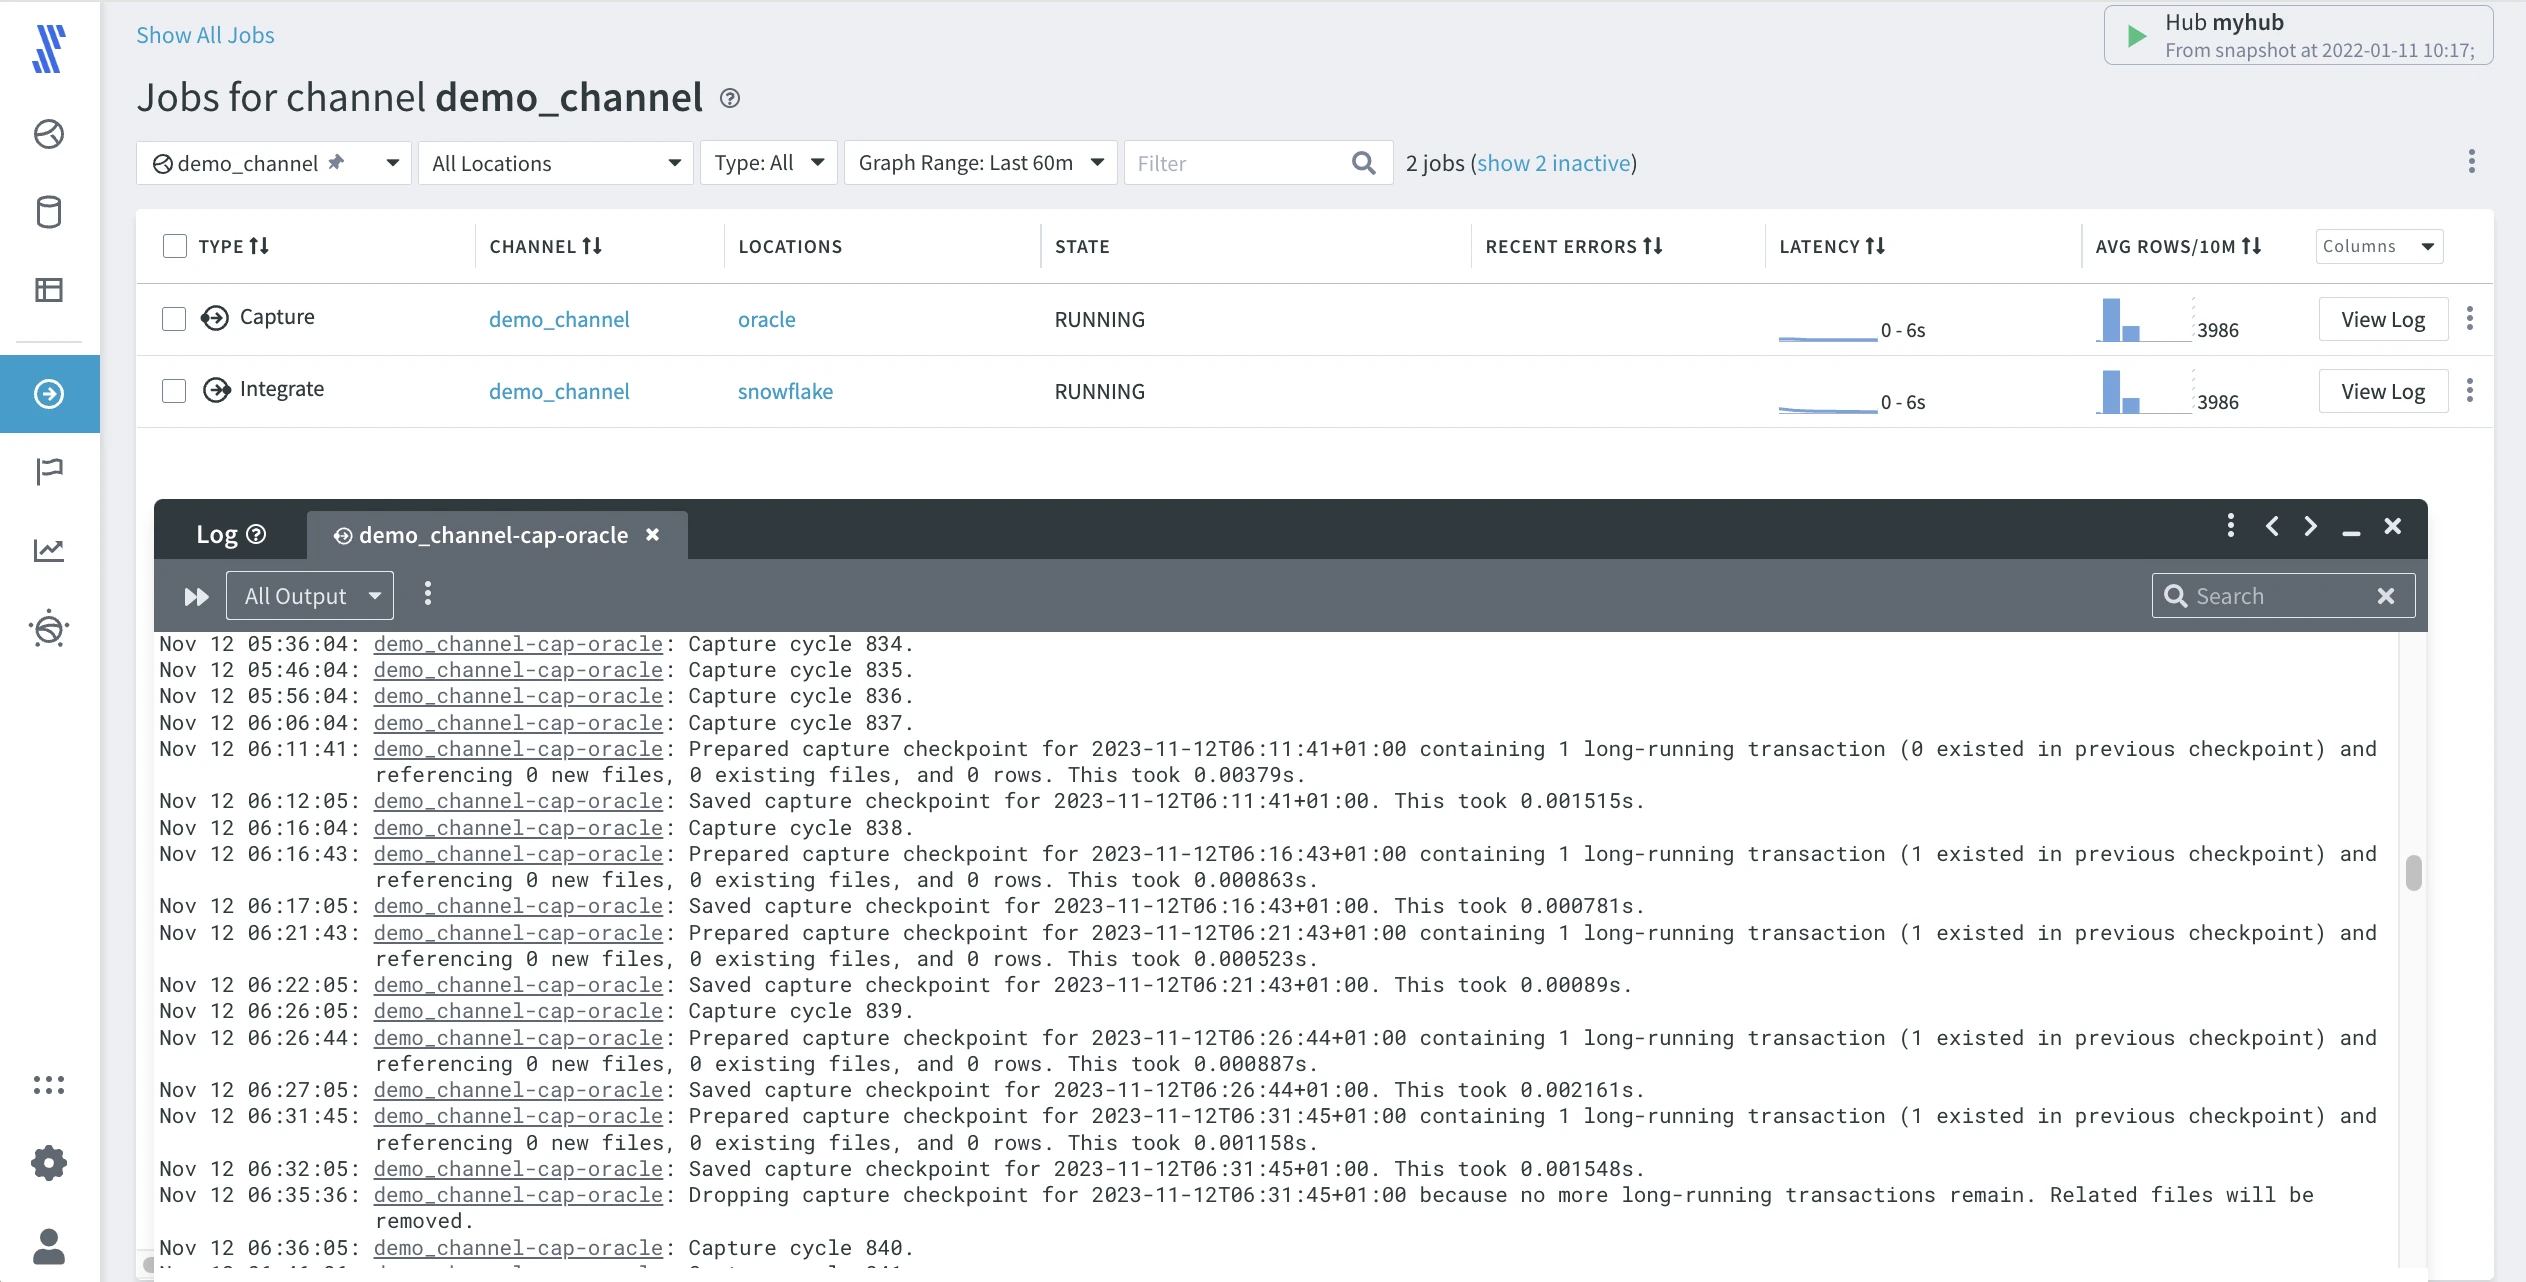
A job is a process that performs a certain task, such as capturing changes, refreshing data, integrating changes, and comparing data. At any moment a job has a certain state. The current state of all jobs managed by the hub is available on the Jobs page.
To open the Jobs page, click JOBS on the left-hand navigation menu.
Click View Log for the Capture job to observe changes getting captured.
For more information on how to monitor and manage jobs, see the Jobs section.
Events
HVR records all repository changes, such as job starts and stops, as events that you can inspect on the Events page.
To open the Events page, click EVENTS on the left-hand navigation menu.
Events of type Definition Change can be undone. Events of type Refresh and Compare can be repeated, optionally allowing changes before starting the event again.
For more information on the HVR event system, see the Events (user interface) and Events (concepts) sections.

Reviewing Metadata Definitions
HVR maintains metadata about channels, locations, and tables.
Tables
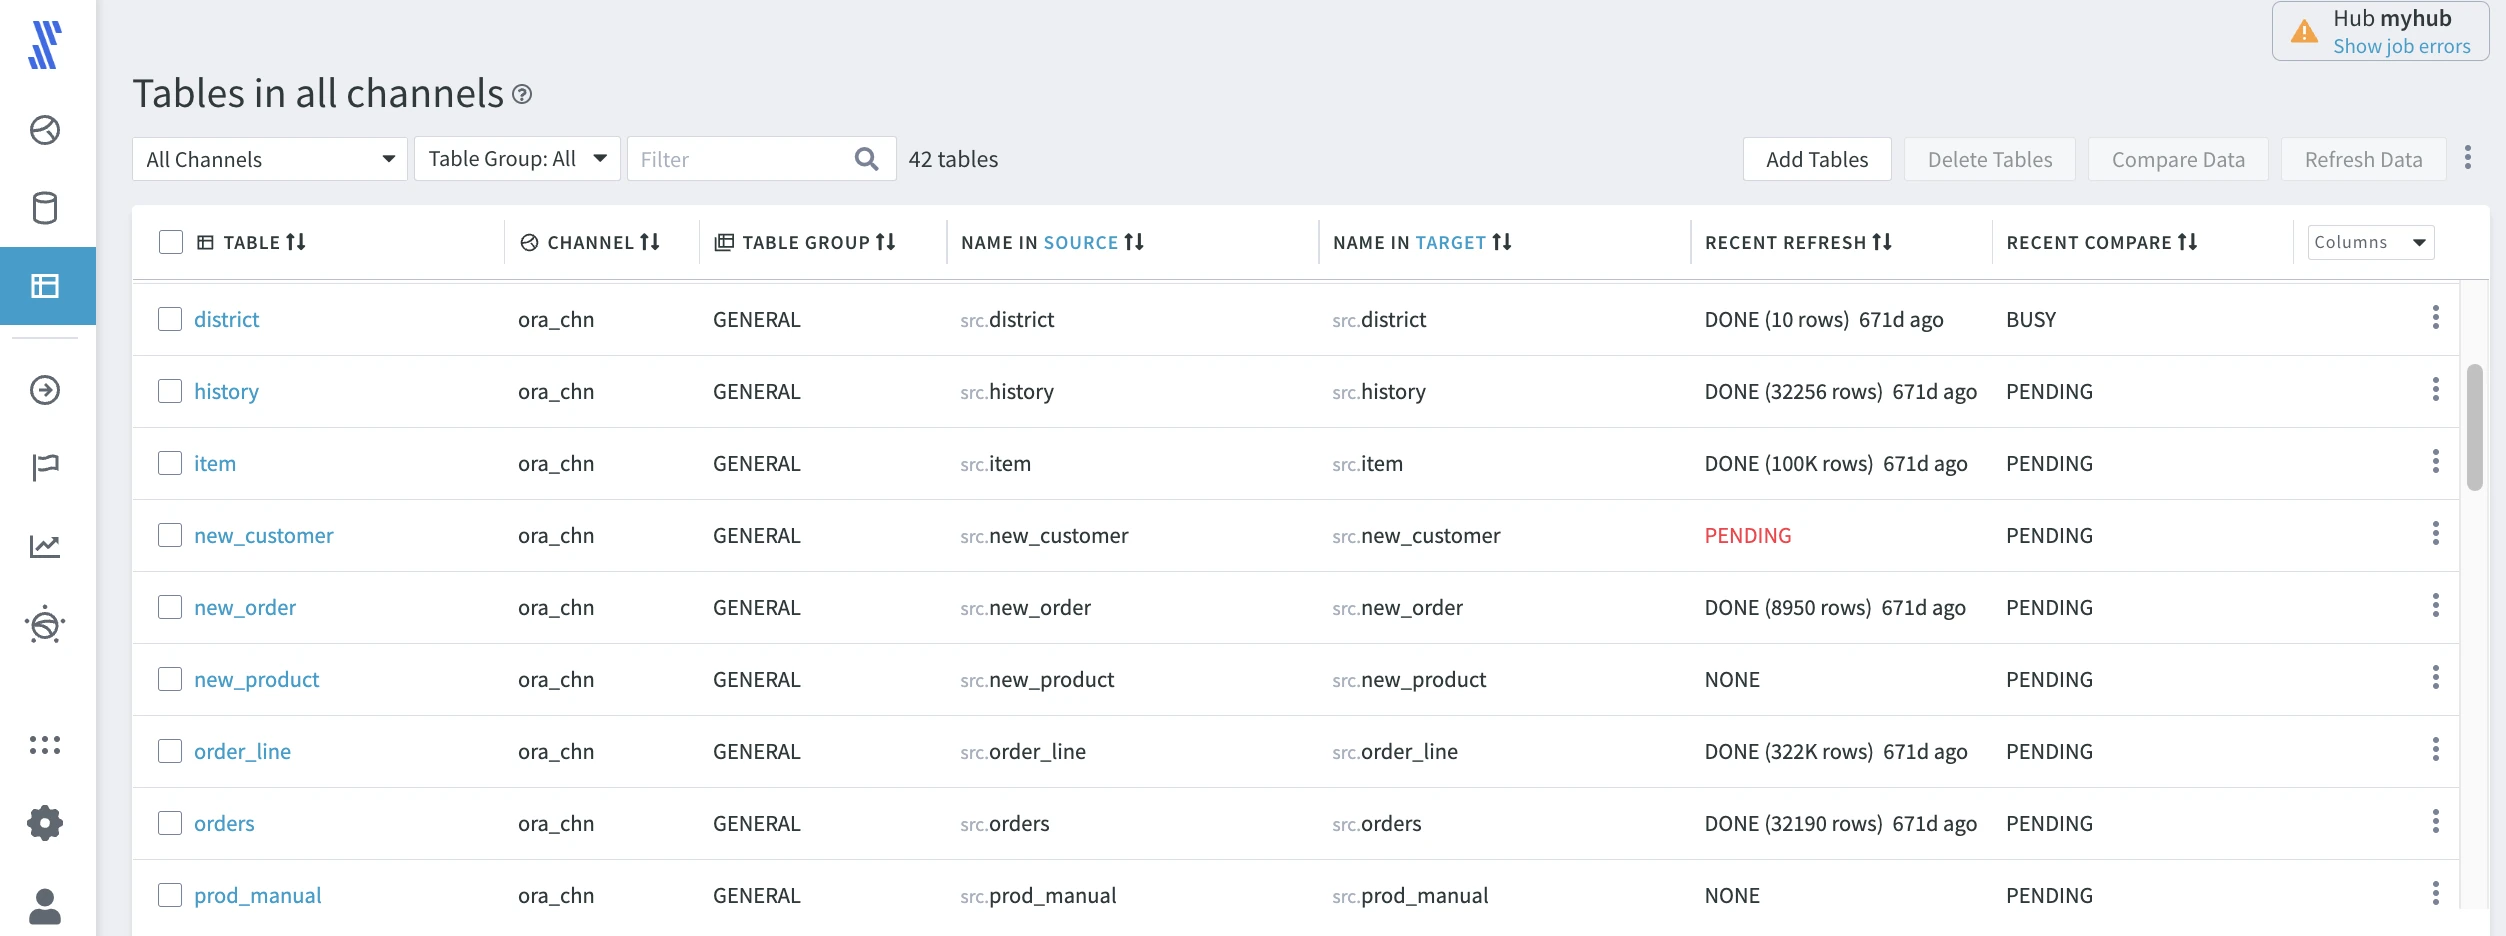
To review table definitions in your hub, click TABLES in the left-hand navigation menu.
The Tables overview page displays the actual table names in the source and target, recent refresh information, and recent compare data. Note that in the table header, you can change the target location to review.
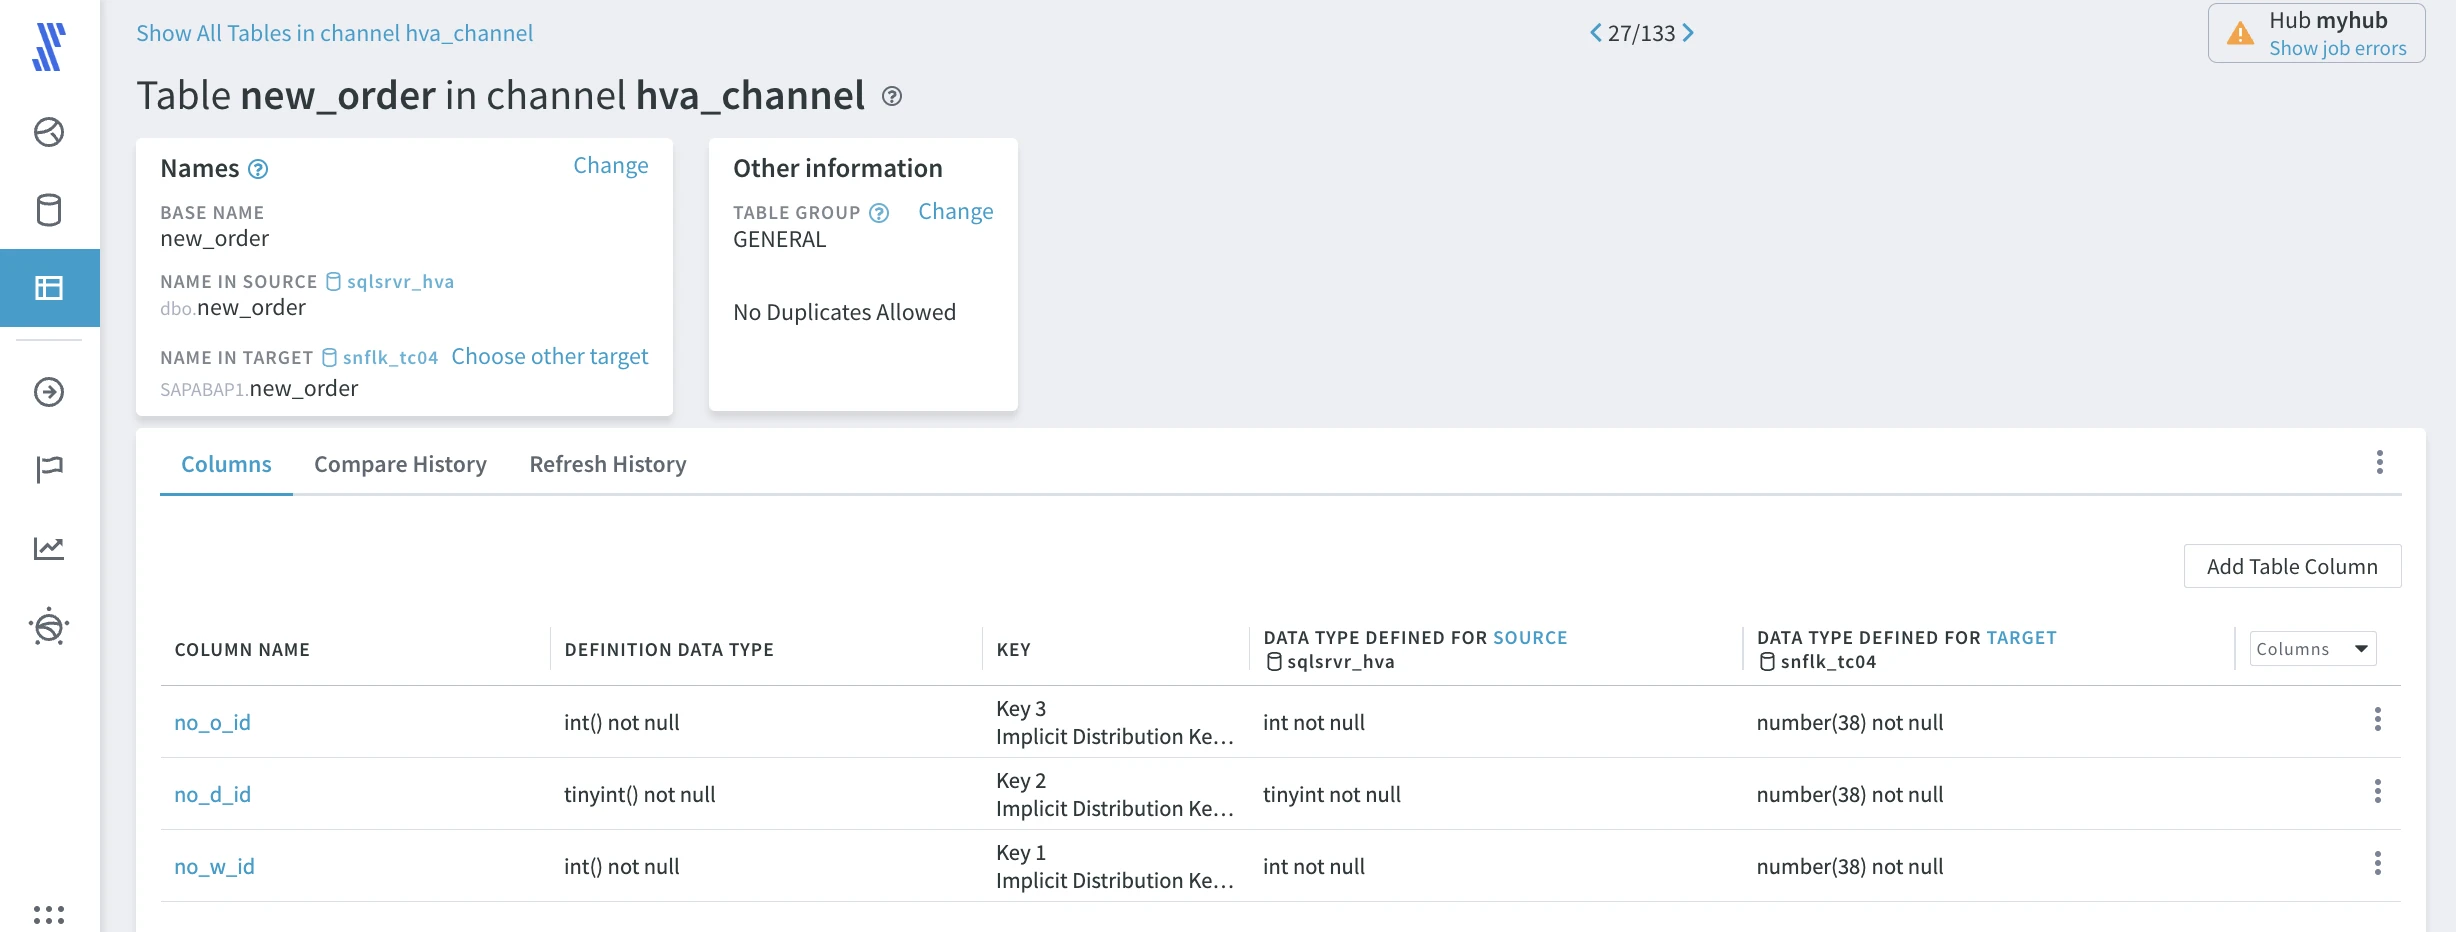
The details that HVR maintains about a specific table are available on the Table Details page, where data type and encoding information are available for the replication endpoints. To open this page, click the respective table's name in the tables list.
Locations
To view all locations in your hub, click LOCATIONS in the left-hand navigation menu.
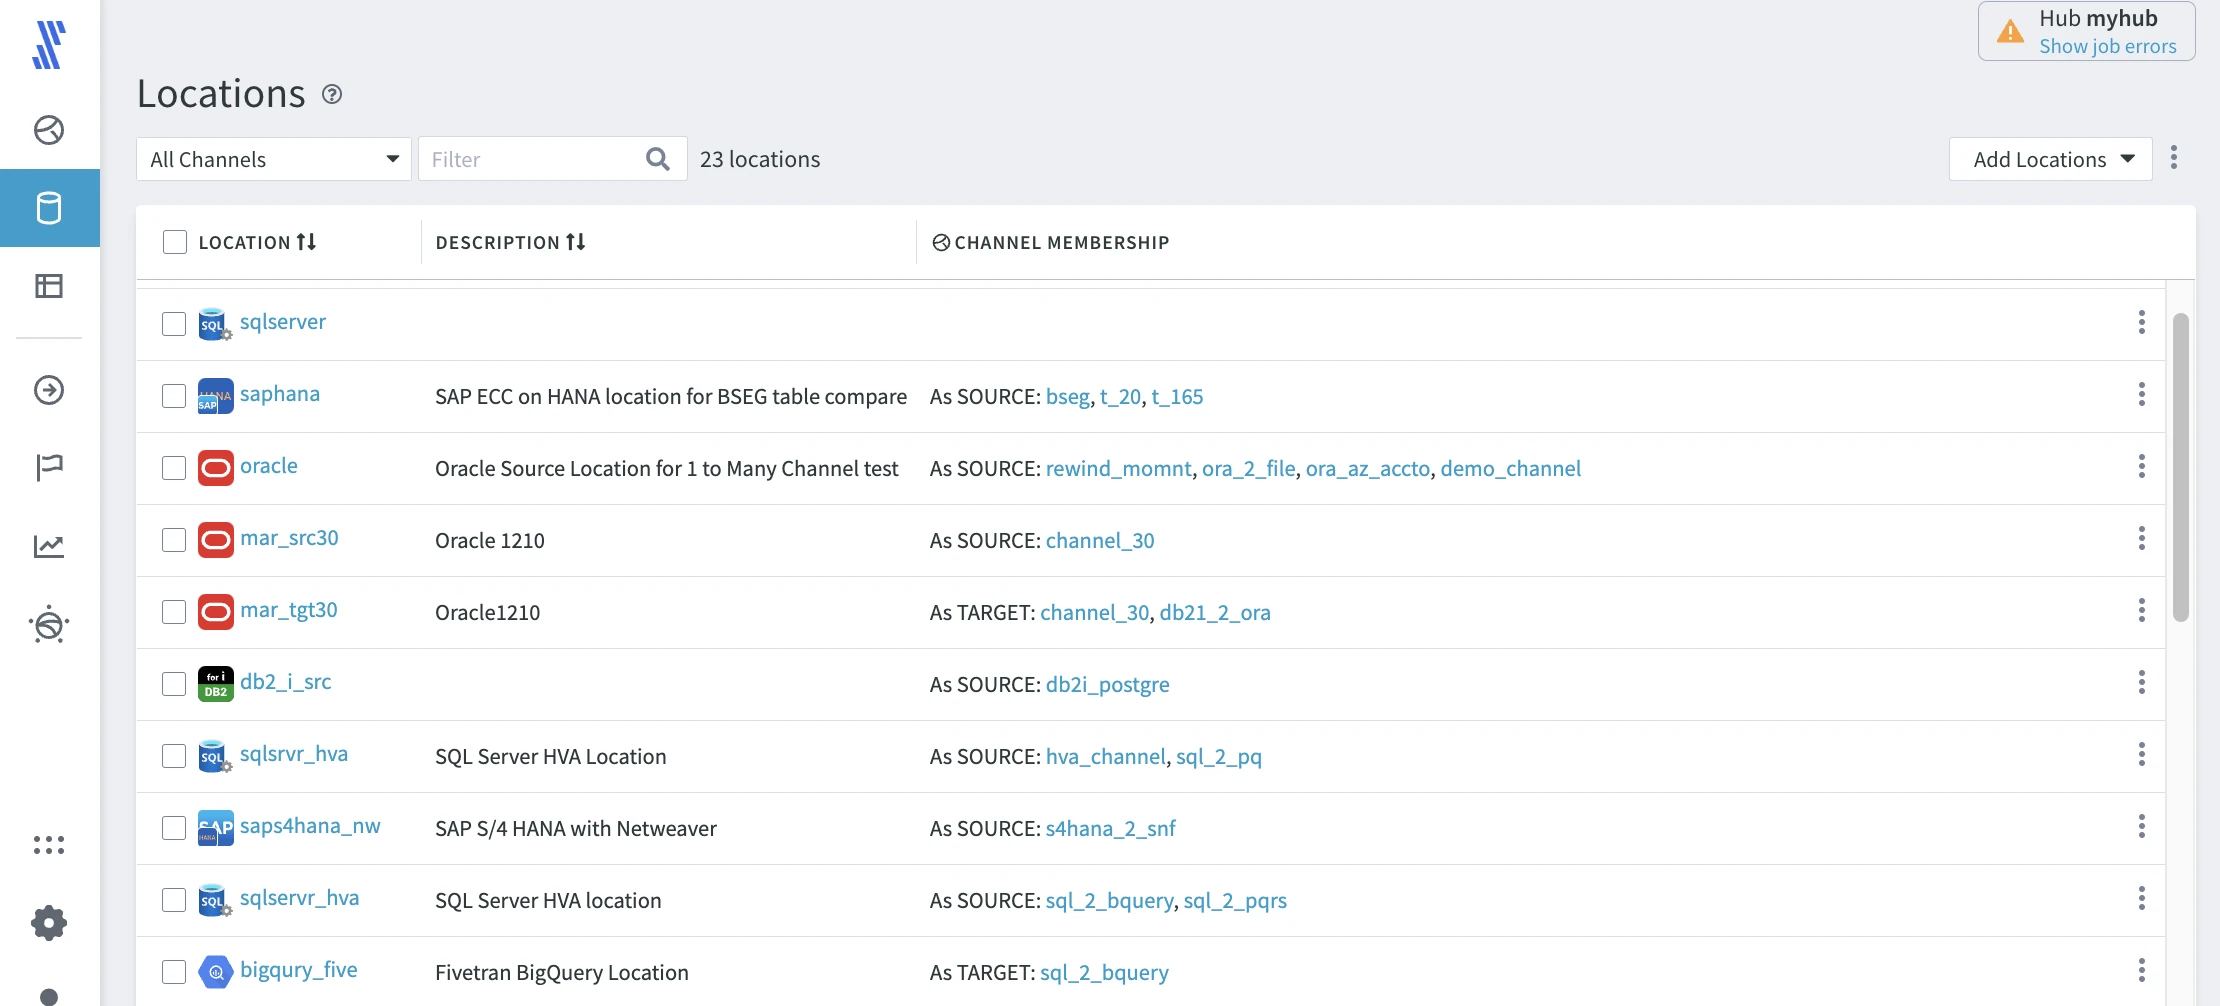
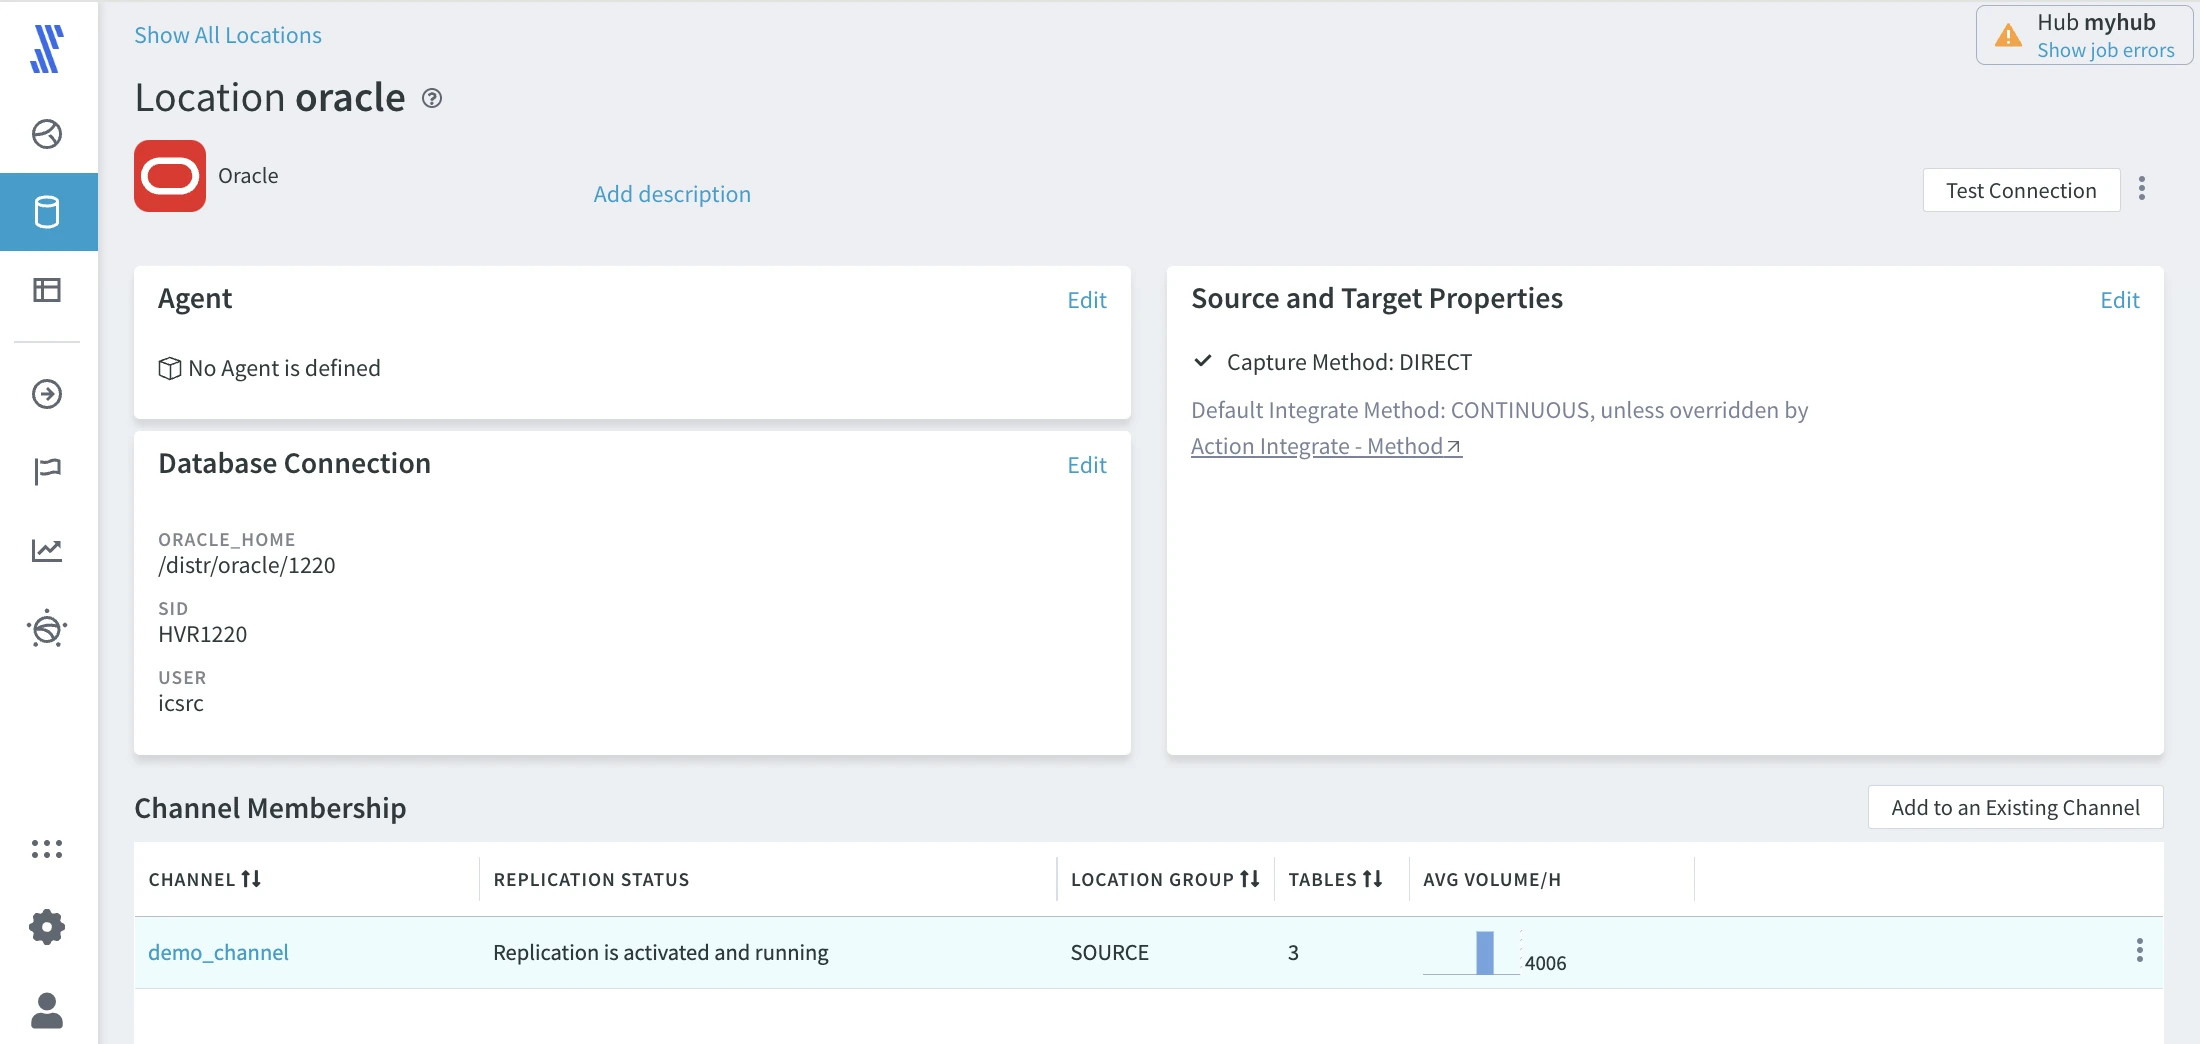
The details about a specific location, such as agent connection, database connection, source and target properties, are available on the Localtion Details page. To open this page, click the respective table's name in the locations list.
Channels
To view all channels in your hub, click CHANNELS in the left-hand navigation menu.
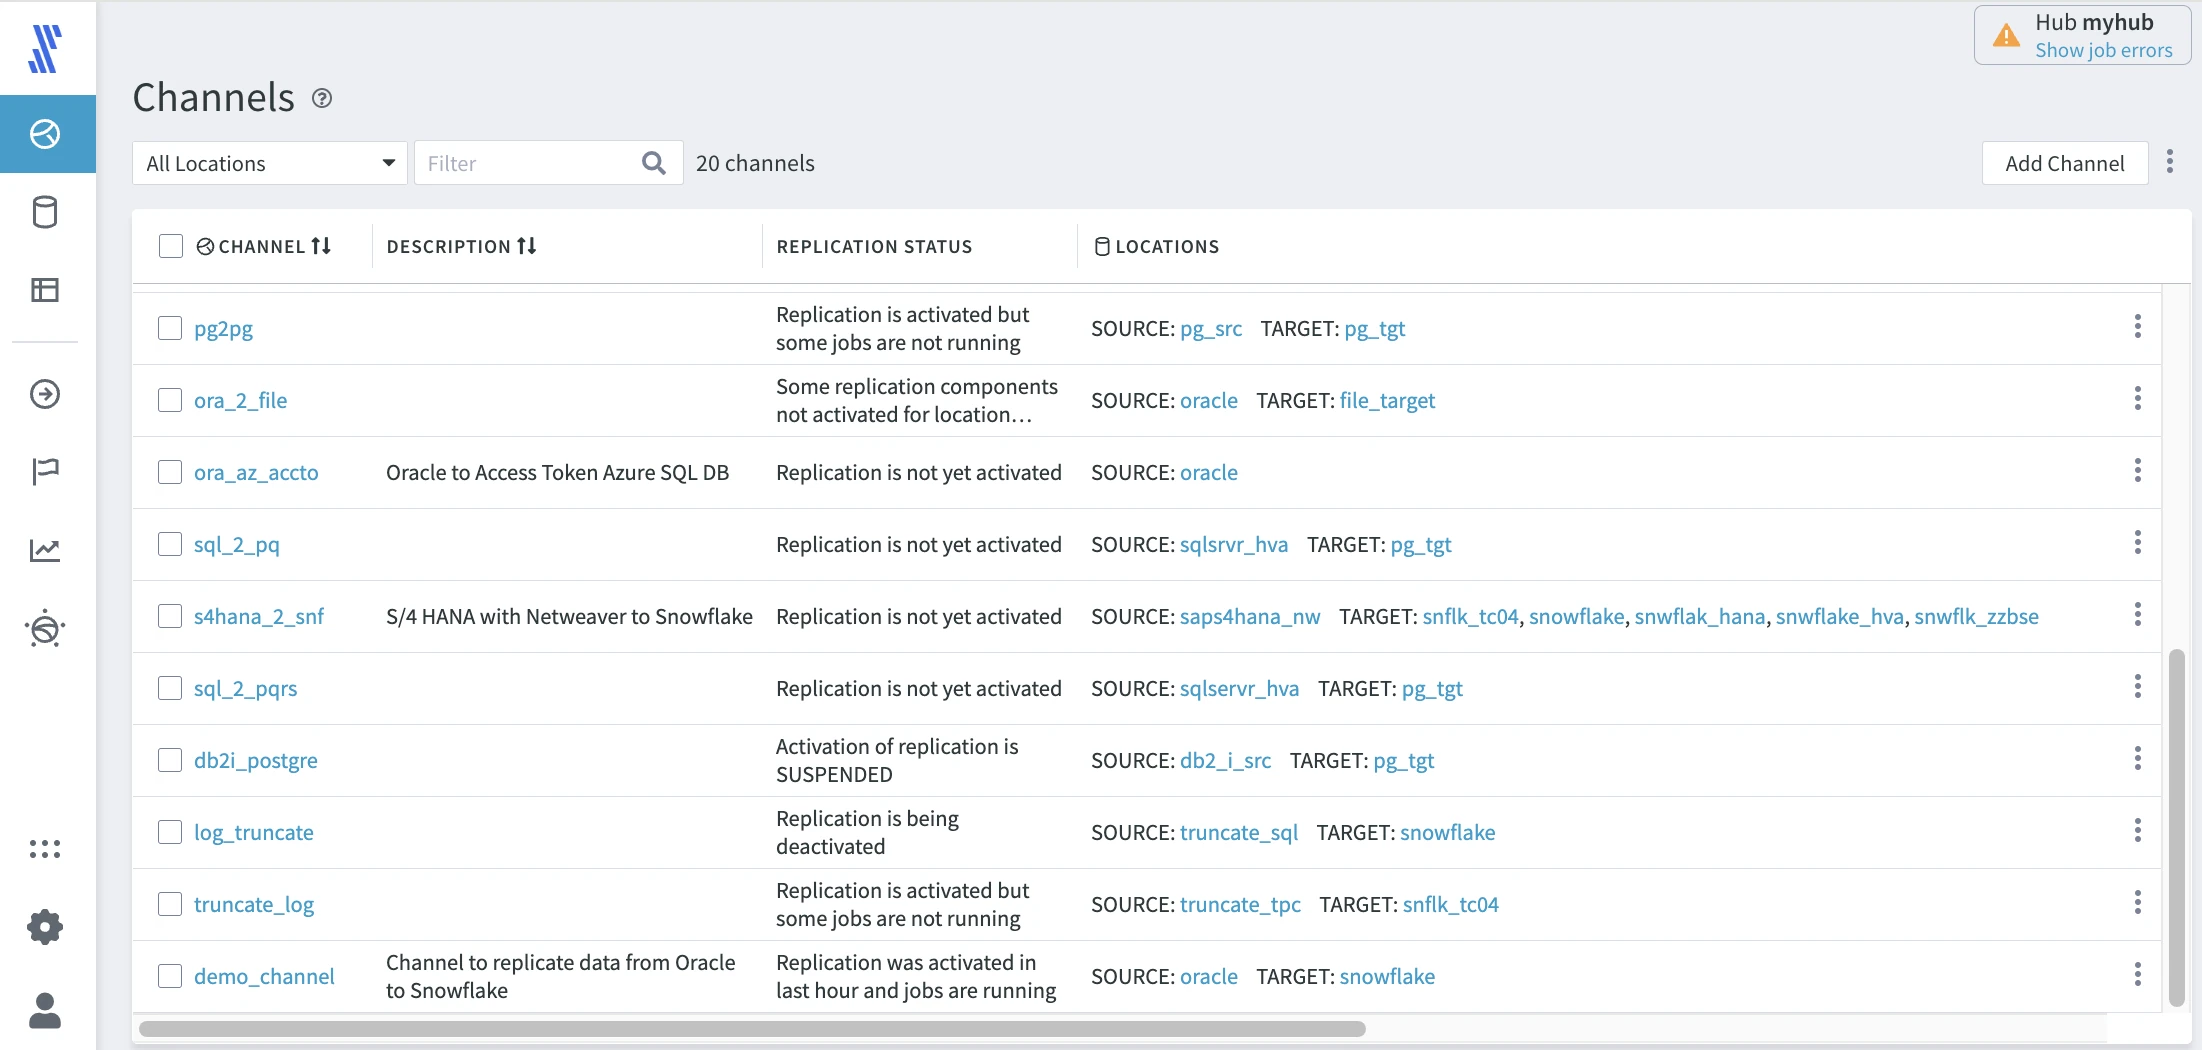
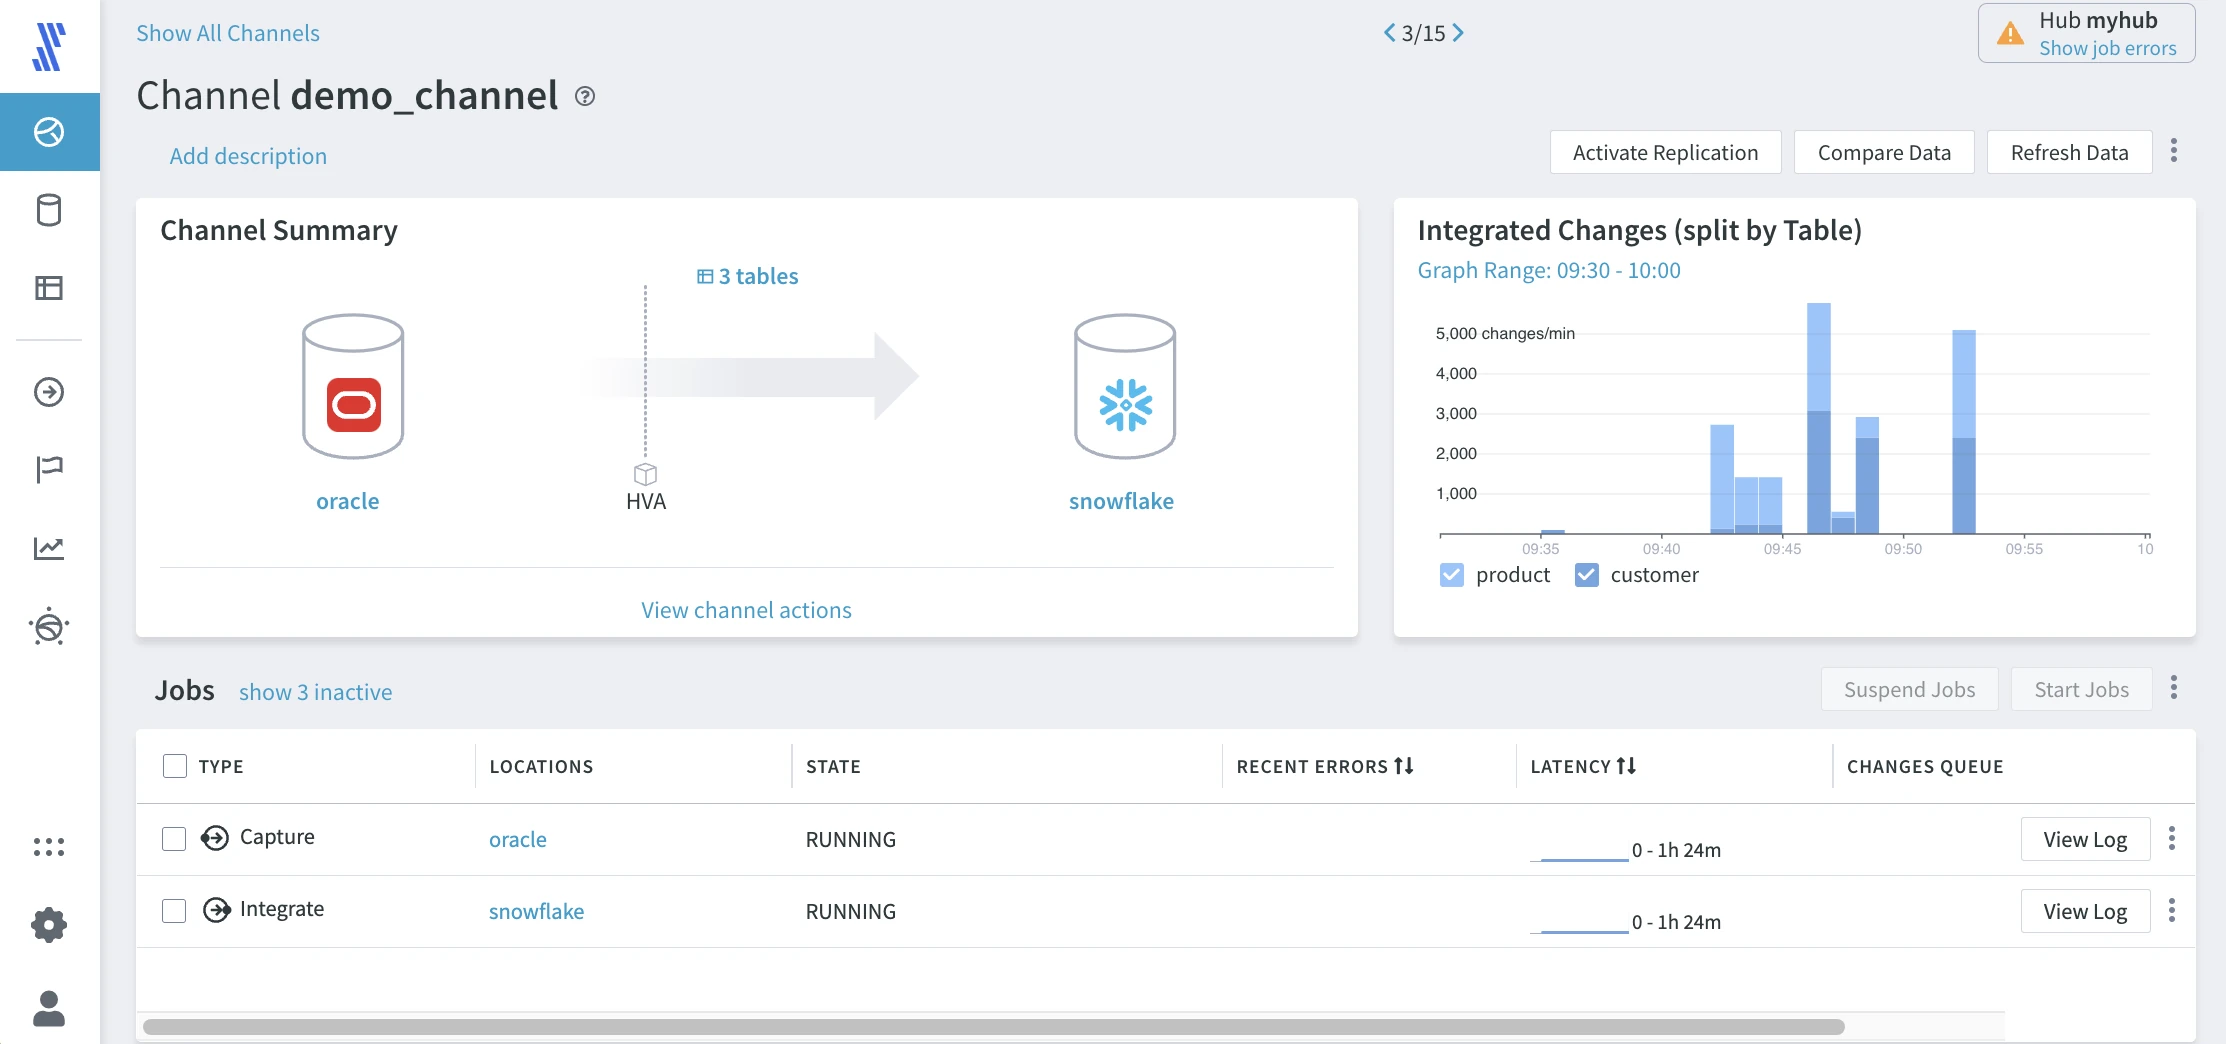
Click the name of a respective channel to go directly to the Channel Details page that provides multiple options to manage the channel.
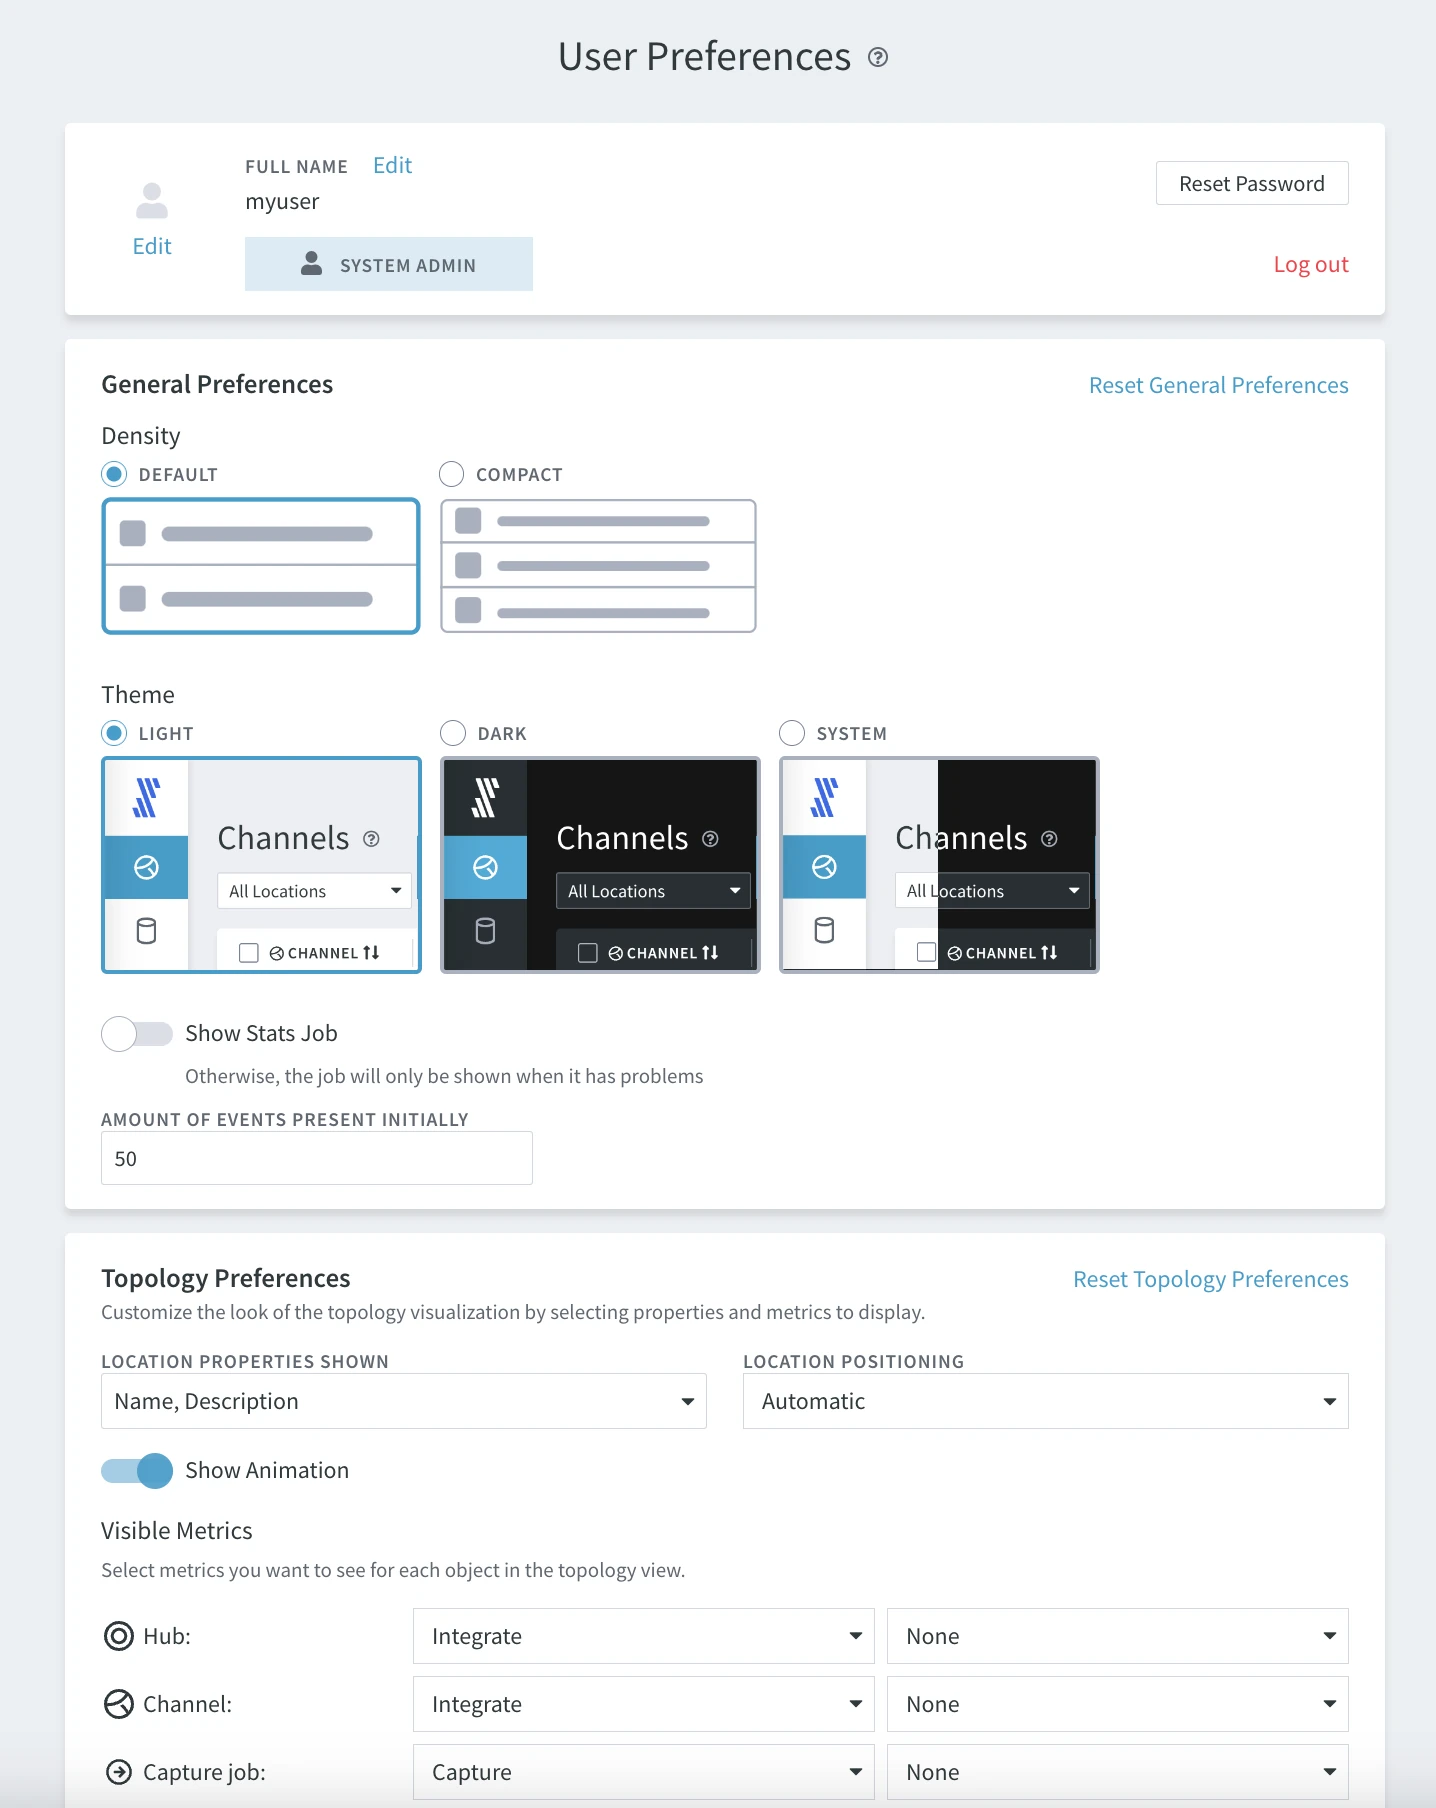
Preferences
HVR allows you to customize your user interface view. At the bottom of the left-hand navigation menu, select PREFERENCES. Inspect the multiple preferences and make preferred changes. For example, switch to dark mode.
Administration
HVR supports multiple hubs on a single hub server. Replication is always configured within the context of a hub. An organization may configure multiple hubs to separate access to systems, or to separate development, test, and production environments.
HVR provides its own authentication and access control system. It can also integrate with existing enterprise security environments, like LDAP or Kerberos.
Click SYSTEM in the left-hand navigation menu to view the current hub settings.
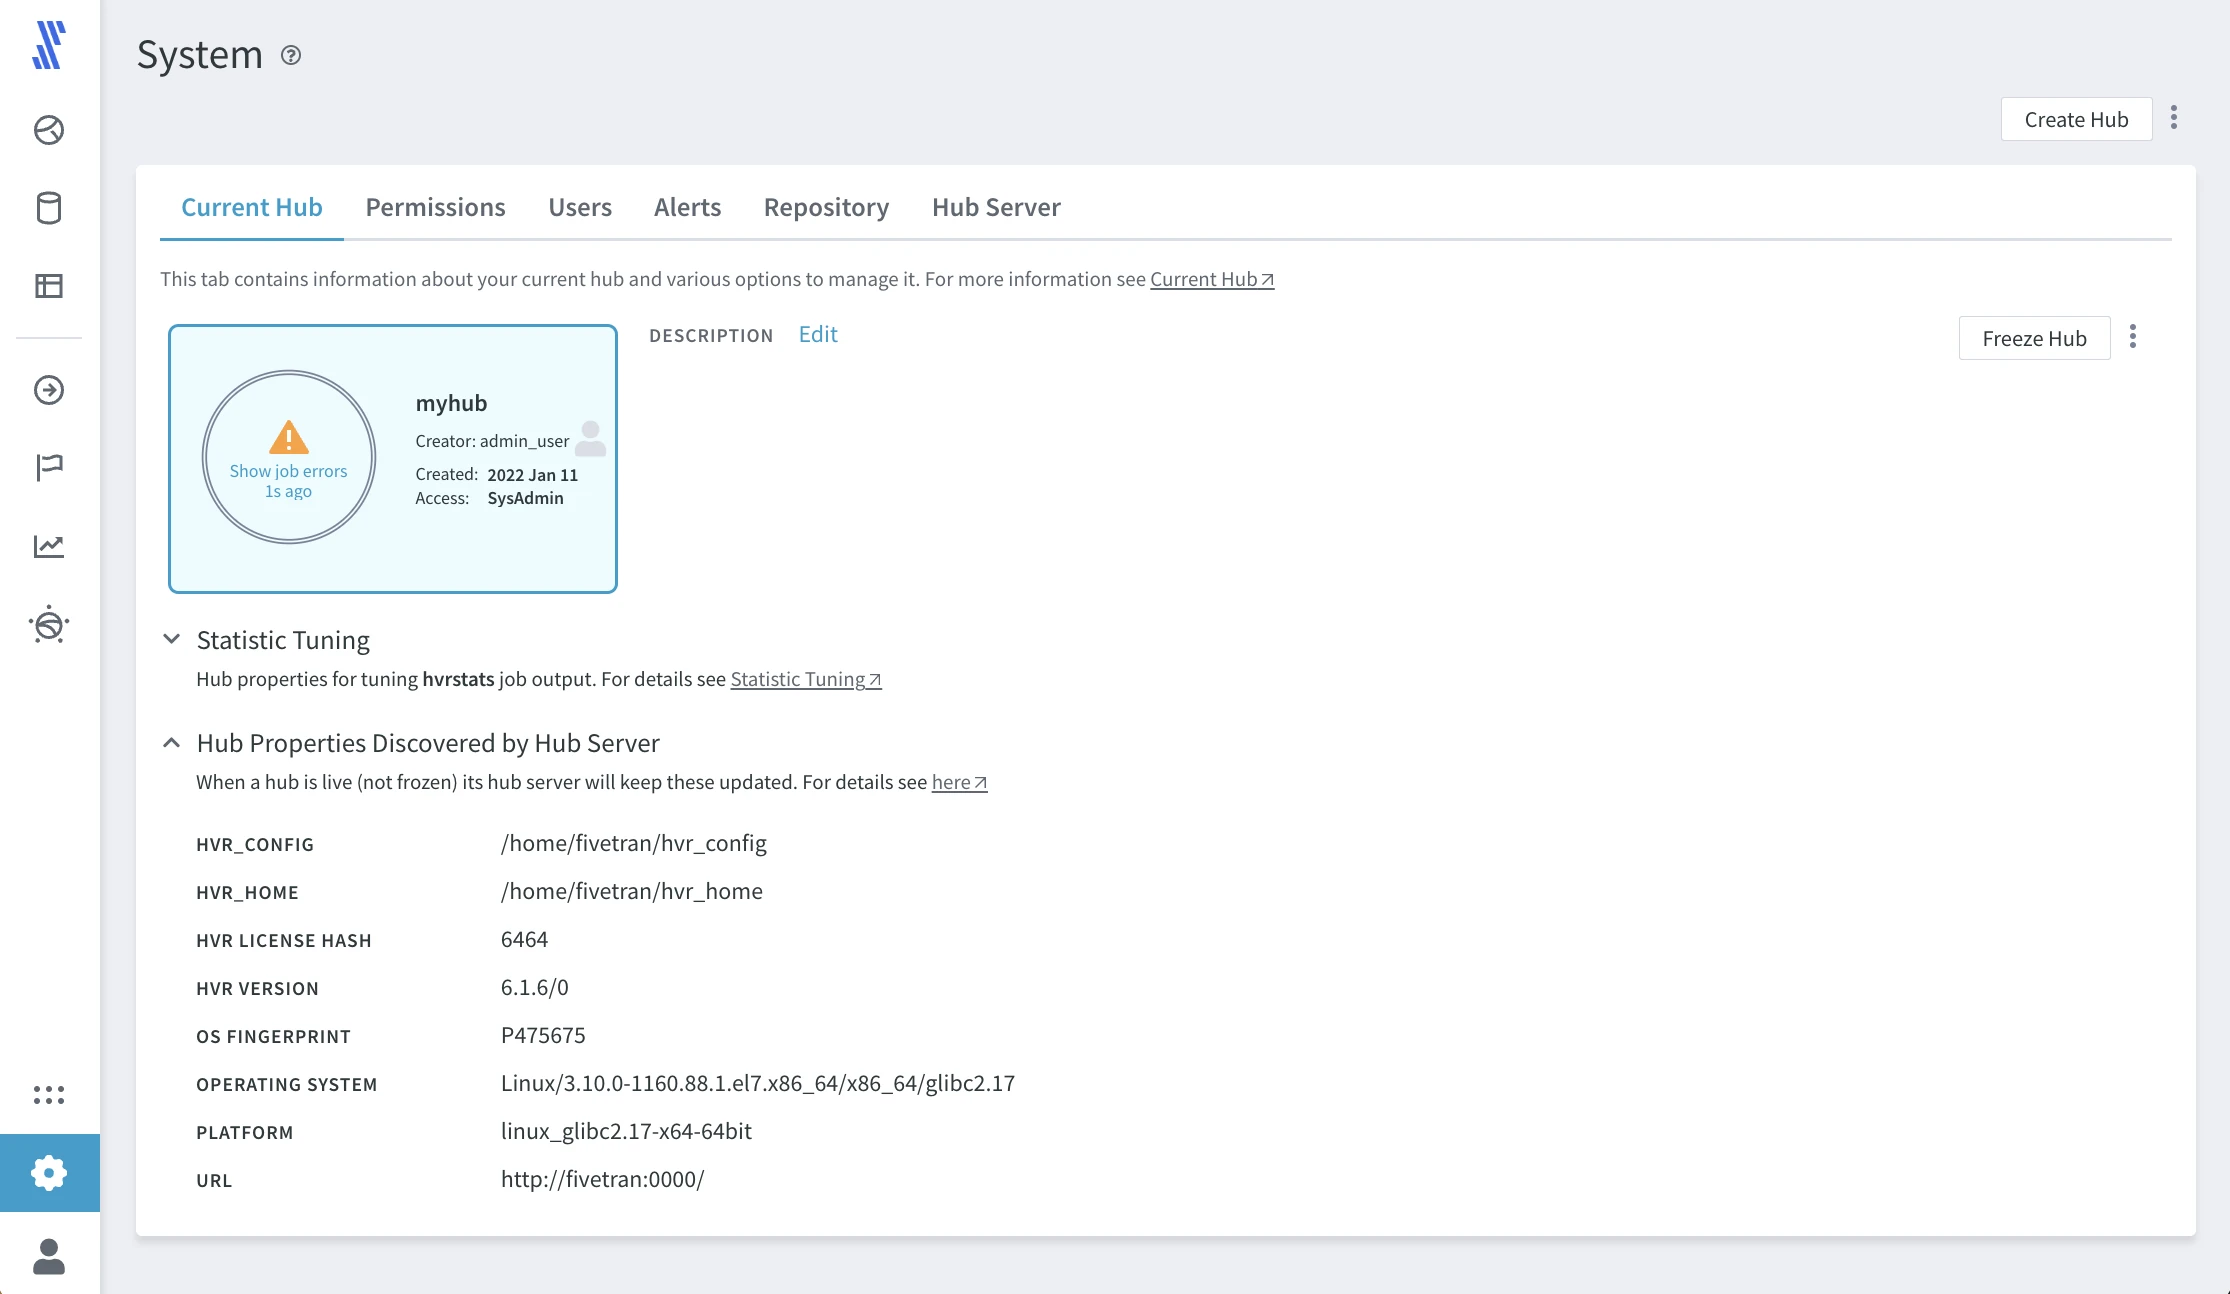
Review the options to define users, set permissions, and configure alerts. Use the Freeze Hub option to stop all jobs in the hub.
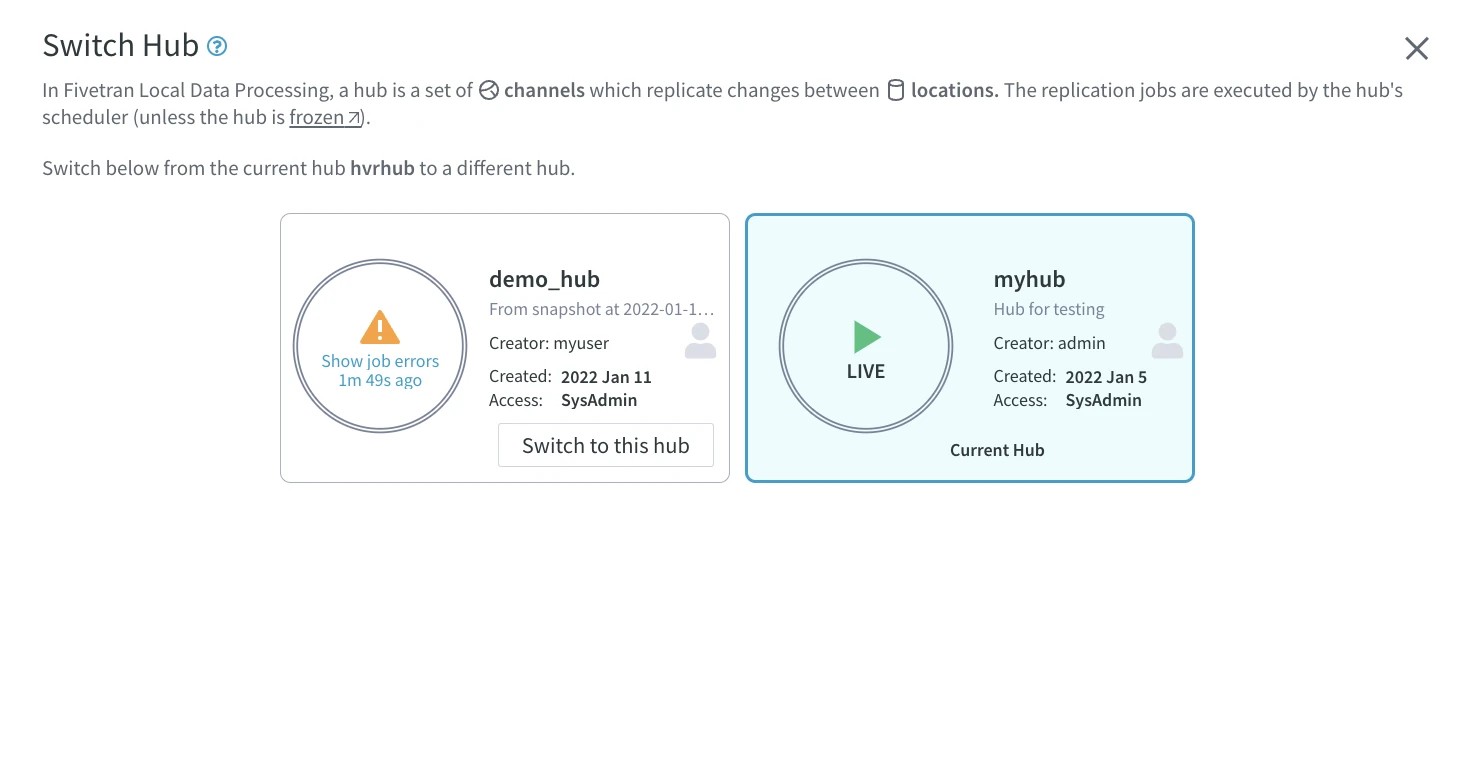
Use the SWITCH HUB option in the left-hand navigation menu to switch between hubs if you have more than one hub configured.
