Migrating HVR Hub to New Server
This section describes the procedural steps for an HVR administrator to migrate a current HVR Hub to a new server. It is assumed that moving the HVR Hub will not impact any HVR Agent installation or connection to any location.
The steps apply to migrating an HVR Hub from/to Windows or Linux/UNIX platforms. This procedure is for migration and not intended for HVR upgrade. Instructions for upgrading an HVR instance in place can be found on the Upgrading HVR page.
- This section does not address generating or using new SSL certificate information.
- This section does not address any Agent Plugin actions that reference a custom file path or any other environment variable that may reference a custom file path.
Scenario
At some point, an HVR administrator may need to upgrade the server, on which the HVR Hub is installed. The reason may be that the old hardware is no longer supported or the need to move to a server with an upgraded or different operating system or faster storage disks, and for a variety of other reasons. In this case, the administrator has to stop the replications services on the HVR Hub to move (aka migrate) all the replication objects (locations, channel definitions, jobs, schedules, and maintenance tasks) to a new server. The result is HVR replication services run on a new HVR Hub server without losing any transactional data during migration with minimal downtime.
Prerequisites
Ensure you read the compatibility section to ensure that HVR is compatible with a new server you selected to be the HVR Hub.
Ensure you download the HVR installation distribution from the HVR product download site for your specific operating system in advance of performing any steps to reduce the outage time during migration.
Ensure you have already installed the database that will serve as the new HVR repository and created a schema/database/user that has the same name as the previous HVR repository prior to performing migration.
This section does not cover steps that involve renaming your repository schema/database/user during migration. Changing the owner of the HVR Catalogs impacts path statements in the router folders requiring additional steps not covered in this section.
If installing the HVR Hub on a Windows server, ensure you have installed Perl.
Review the requirements section for specific operating system (Windows or UNIX/Linux) for the new Hub.
If you are moving the HVR Hub to Azure, ensure you read the section on Installing HVR on Azure using HVR Image.
Prepare New HVR Hub
Install HVR on a new HVR Hub server.
Copy the HVR license file from the old server to the new server.
- License files are located in the HVR_HOME/lib directory with a .lic file extension.
- Some license files are generated with a unique HVR hub fingerprint matching your older server. If a license file contains a fingerprint, it will not be usable on the new server. To determine if your license file includes a fingerprint, view the contents of the file to see if it includes a line with # Hub fingerprint. Here is an example of a license file that includes a fingerprint:

While the default file name is hvr.lic, many sites have multiple license keys, so ensure you copy all files with the .lic file extension and transfer them to the new server to the HVR_HOME/lib directory.
If your license file is bound to a unique server fingerprint, then you will need to obtain a new HVR license key. For more information on how to do this, refer to the 'HVR License File' section of the Installing and Upgrading HVR page.
Start the HVR Remote Listener on the new server.
Launch the HVR GUI. When you launch it for the first time, the Register Hub window is displayed automatically. Register Hub can also be accessed from menu File ▶ Register Hub.
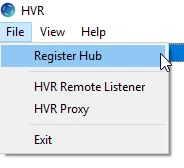
Enter the details to connect to your HVR Hub server, including:
- HVR Remote Listener server node, port, and login information
- Repository Class
- Database Connection
If the old hub connects to a remote database, you don't need to export/import catalogs after registering the new hub. In this case, firewalls relative to the new hub server must be opened to initiate connectivity.
Migrate HVR Location Definitions from Old HVR Hub to New HVR Hub
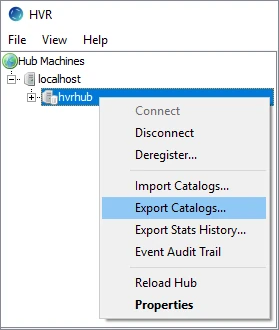
Export the location definitions: right-click the old HVR Hub and select Export Catalogs.
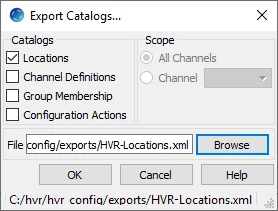
In the Catalog dialog, clear all the items except for Locations.
Use the Browse button to choose a folder and name the file to store the output. Click OK.
Import the location definitions: right-click the new HVR Hub and select Import Catalogs.
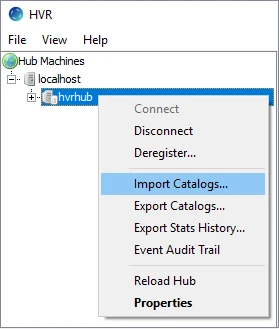
Select the XML file, to which you saved the exported location definitions and click Open.
Test Connection for All Locations in New HVR Hub
Right-click each location to view their Properties.
If any of the locations was previously defined on the old HVR Hub as a local connection, it may need to be updated to include the properties of the remote connection.
Click Test Connection and adjust the location properties if needed.
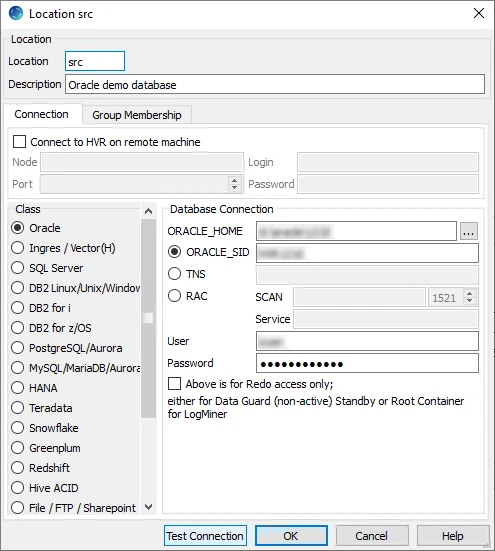
Repeat this step for all connections until all connection tests are successful.
Migrate Remaining Catalog Definitions from Old HVR Hub to New HVR Hub
Export the location definitions: right-click the old HVR Hub and select Export Catalogs.
In the Catalog dialog, clear the Locations item and leave the Channel Definitions, Group Membership, and Configuration Actions items for All Channels selected.
Use the Browse button to choose a folder and name the file to store the output. Click OK.
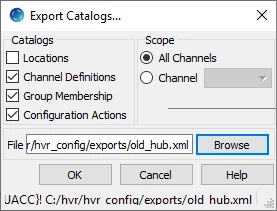
Import the catalog definitions: right-click the new HVR Hub and select Import Catalogs.
Select the XML file, to which you saved the exported catalog definitions and click Open.
Verify that your entire HVR Catalog has been imported to the new HVR Hub server.
The hvr_stats and hvr_event catalogs are not part of the catalog being exported/imported.
Shut Down Old Hub
There are two methods to consider when shutting down the old HVR Hub to transfer all of the stateful information to the new HVR Hub server.
Method 1: Stop the entire HVR Scheduler, which subsequently stops all replication jobs under the Scheduler. The advantage of the first method is that all jobs complete in one step, so you minimize the time to move files to the new HVR Hub server.
Method 2: First stop all the capture jobs and wait until all the integrate jobs have completed. The advantage of the second method is that you don't have to archive as many unprocessed HVR transaction files, which can sometimes contain hundreds of files.
- Stop the entire HVR Scheduler, thereby stopping all the jobs defined under the HVR Scheduler.
- Alternatively, stop all the capture jobs first, wait for all the integrate jobs to drain all pending changes, then stop all the integrate jobs, and after that stop the entire HVR Scheduler.
- Close all the HVR GUI dialog windows associated with the old HVR Hub server.
Migrate Stateful Information from Old HVR Hub to New HVR Hub Server
- Archive the entire $HVR_CONFIG directory and its sub-directories from the old HVR Hub server.
- Transfer the archived file from the old HVR Hub server to the new HVR Hub server.
- Unzip the entire $HVR_CONFIG to the parent /hvr directory on the new HVR Hub server.
Deploy and Start New HVR Hub
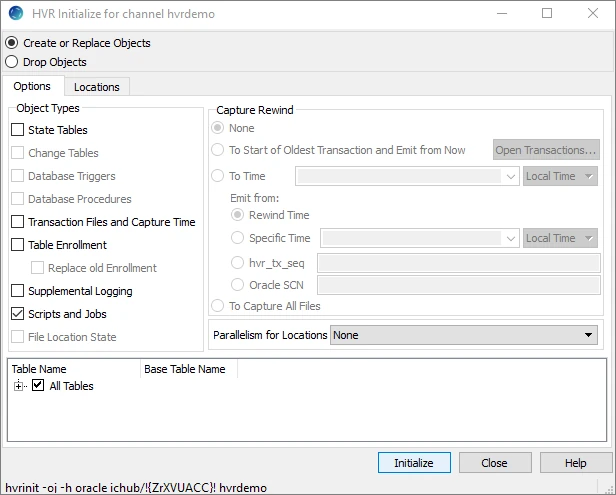
Launch the HVR GUI and connect to the new HVR Hub repository. For all channels, you must run HVR Initialize to deploy local runtime objects, including scripts and jobs.
Right-click the channel definition and select HVR Initialize.
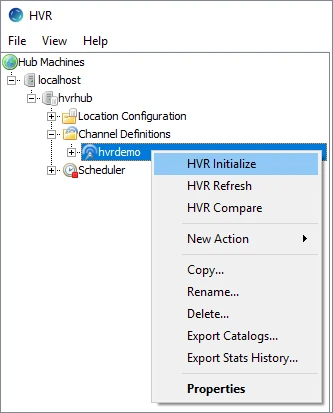
In the Object Types box, select Scripts and Jobs, leaving all other objects unselected, and click Initialize.
Repeat these steps for all channels.
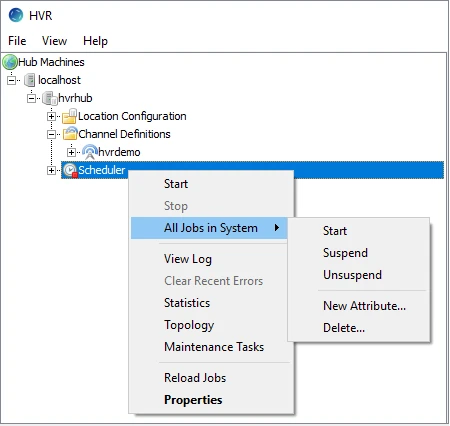
Right-click the HVR Scheduler and select All Jobs in System ▶ Start. This will start all the replication jobs under the HVR Scheduler.
Run Maintenance Tasks
You can configure maintenance tasks to manage and maintain the replication environment once the system goes live. HVR will send alerts as needed by email if errors are detected.
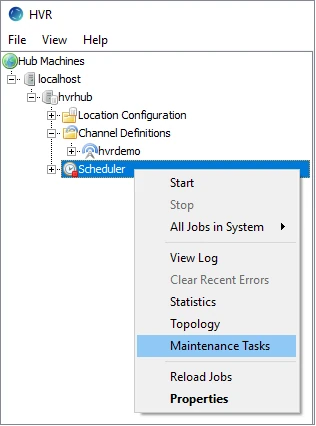
Right-click the HVR Scheduler and select Maintenance Tasks.
In the Maintenance Tasks dialog, schedule and run maintenance tasks as needed.
