Fivetran SCIM Configuration Guide for Microsoft Entra ID
You must have an Enterprise or Business Critical plan to use Fivetran SCIM for Microsoft Entra ID.
Overview
If your organization uses Microsoft Entra ID (formerly Azure Active Directory) to manage your employees' access to tools and services, you can leverage Microsoft Azure's user provisioning support to automatically grant access to your users. This document explains how to configure Microsoft Entra ID to work with Fivetran to provide user provisioning through the System for Cross-domain Identity Management (SCIM) protocol. SCIM is designed to make the user identity management in cloud-based applications and services easier.
Supported features
Once you set up the SCIM integration between Entra ID and Fivetran, Administrators can perform the following Fivetran actions within Microsoft Entra ID:
- Create users
- Update user attributes
- Deactivate users
- Create groups
- Update groups
- Delete groups
We don’t support configuring team roles via SCIM. This means you can’t map groups to team roles.
Prerequisites
To connect Fivetran SCIM service with a new Microsoft Entra ID application, you need:
- A Fivetran account on an Enterprise or Business Critical plan
- A Fivetran user with the Account Administrator role
- An active Microsoft Entra ID subscription
- A Microsoft Entra ID user with one of the following roles:
- Application Administrator
- Cloud Application Administrator
- Global Administrator
Setup Guide
Configure Fivetran and obtain your API token
In your Fivetran dashboard, go to Account Settings > General.
On the Account Settings tab, scroll down to the SCIM Config section to access your SCIM provisioning settings.
The section is only visible if you are on an Enterprise or Business Critical plan.
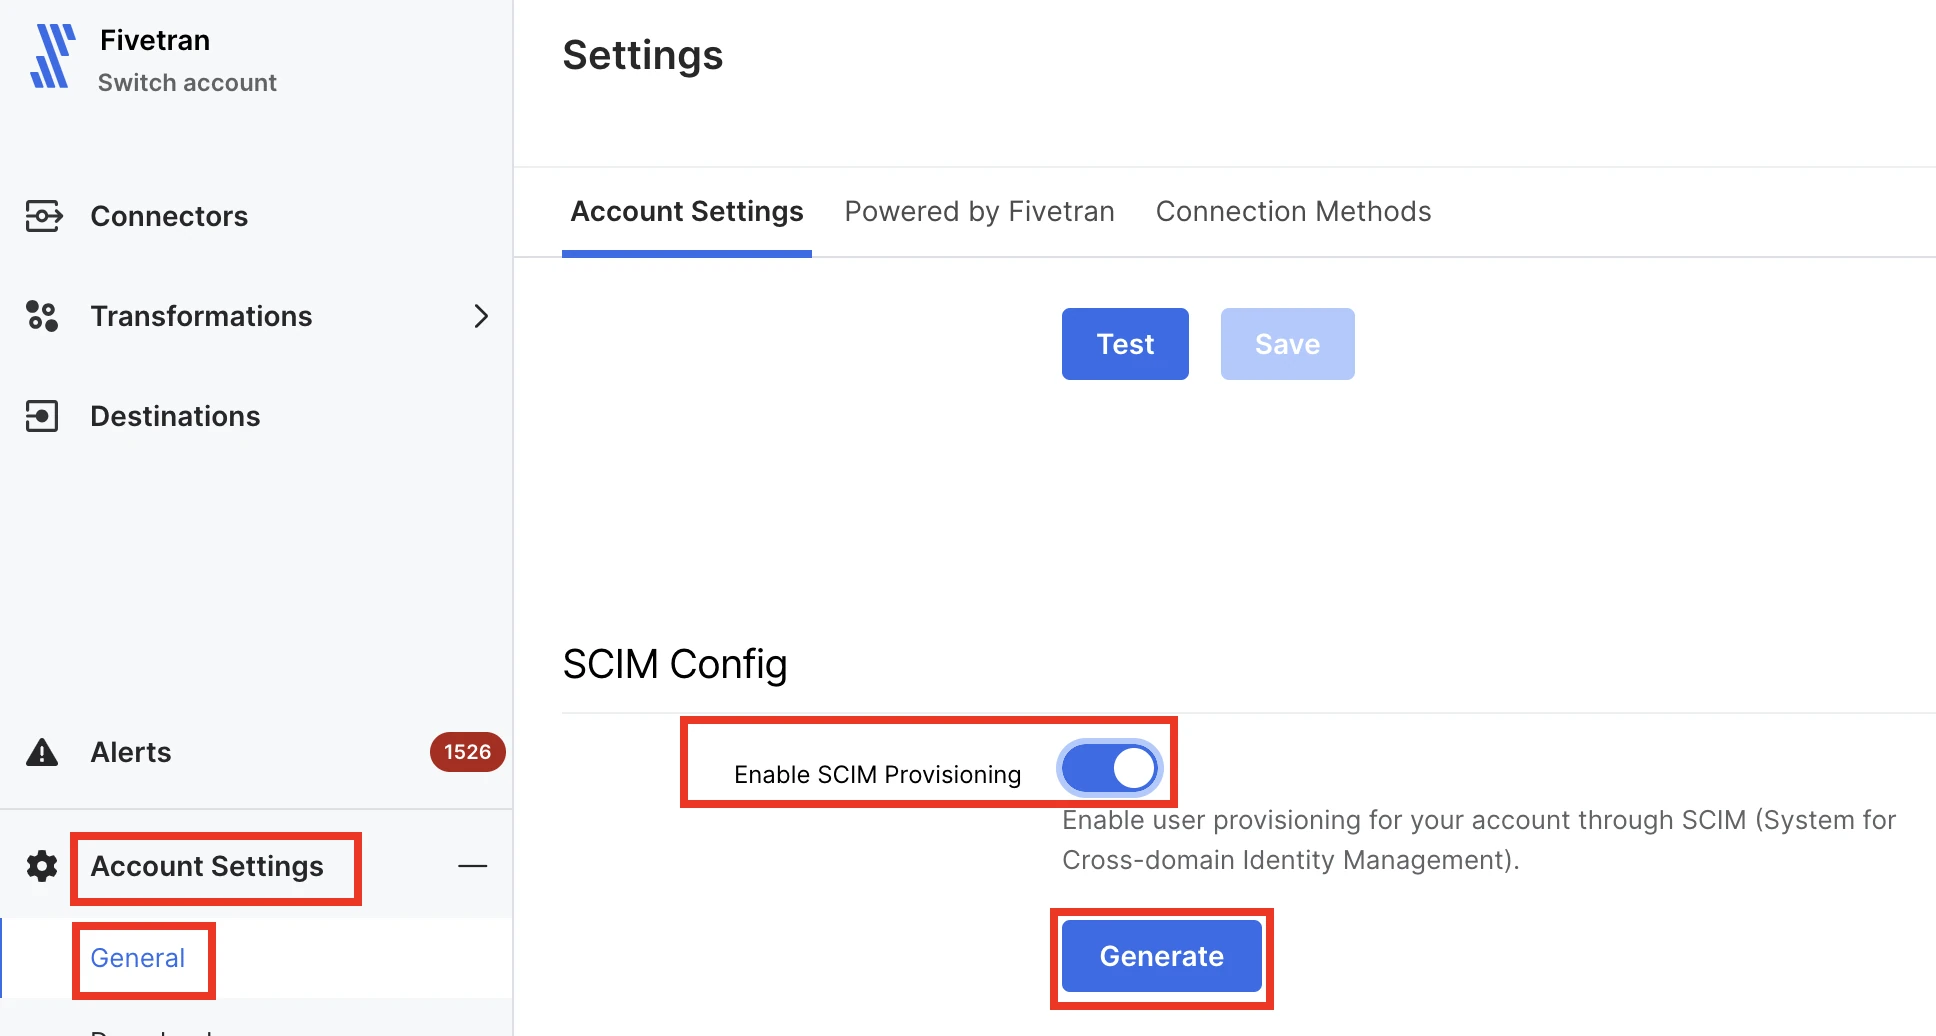
Switch the Enable SCIM Provisioning toggle to ON.
Click Generate to generate a new API token.
Copy your API token. You will need to provide it in your Microsoft Entra ID Application.
Click Save Config.
Create an enterprise application
Log in to the Azure portal.
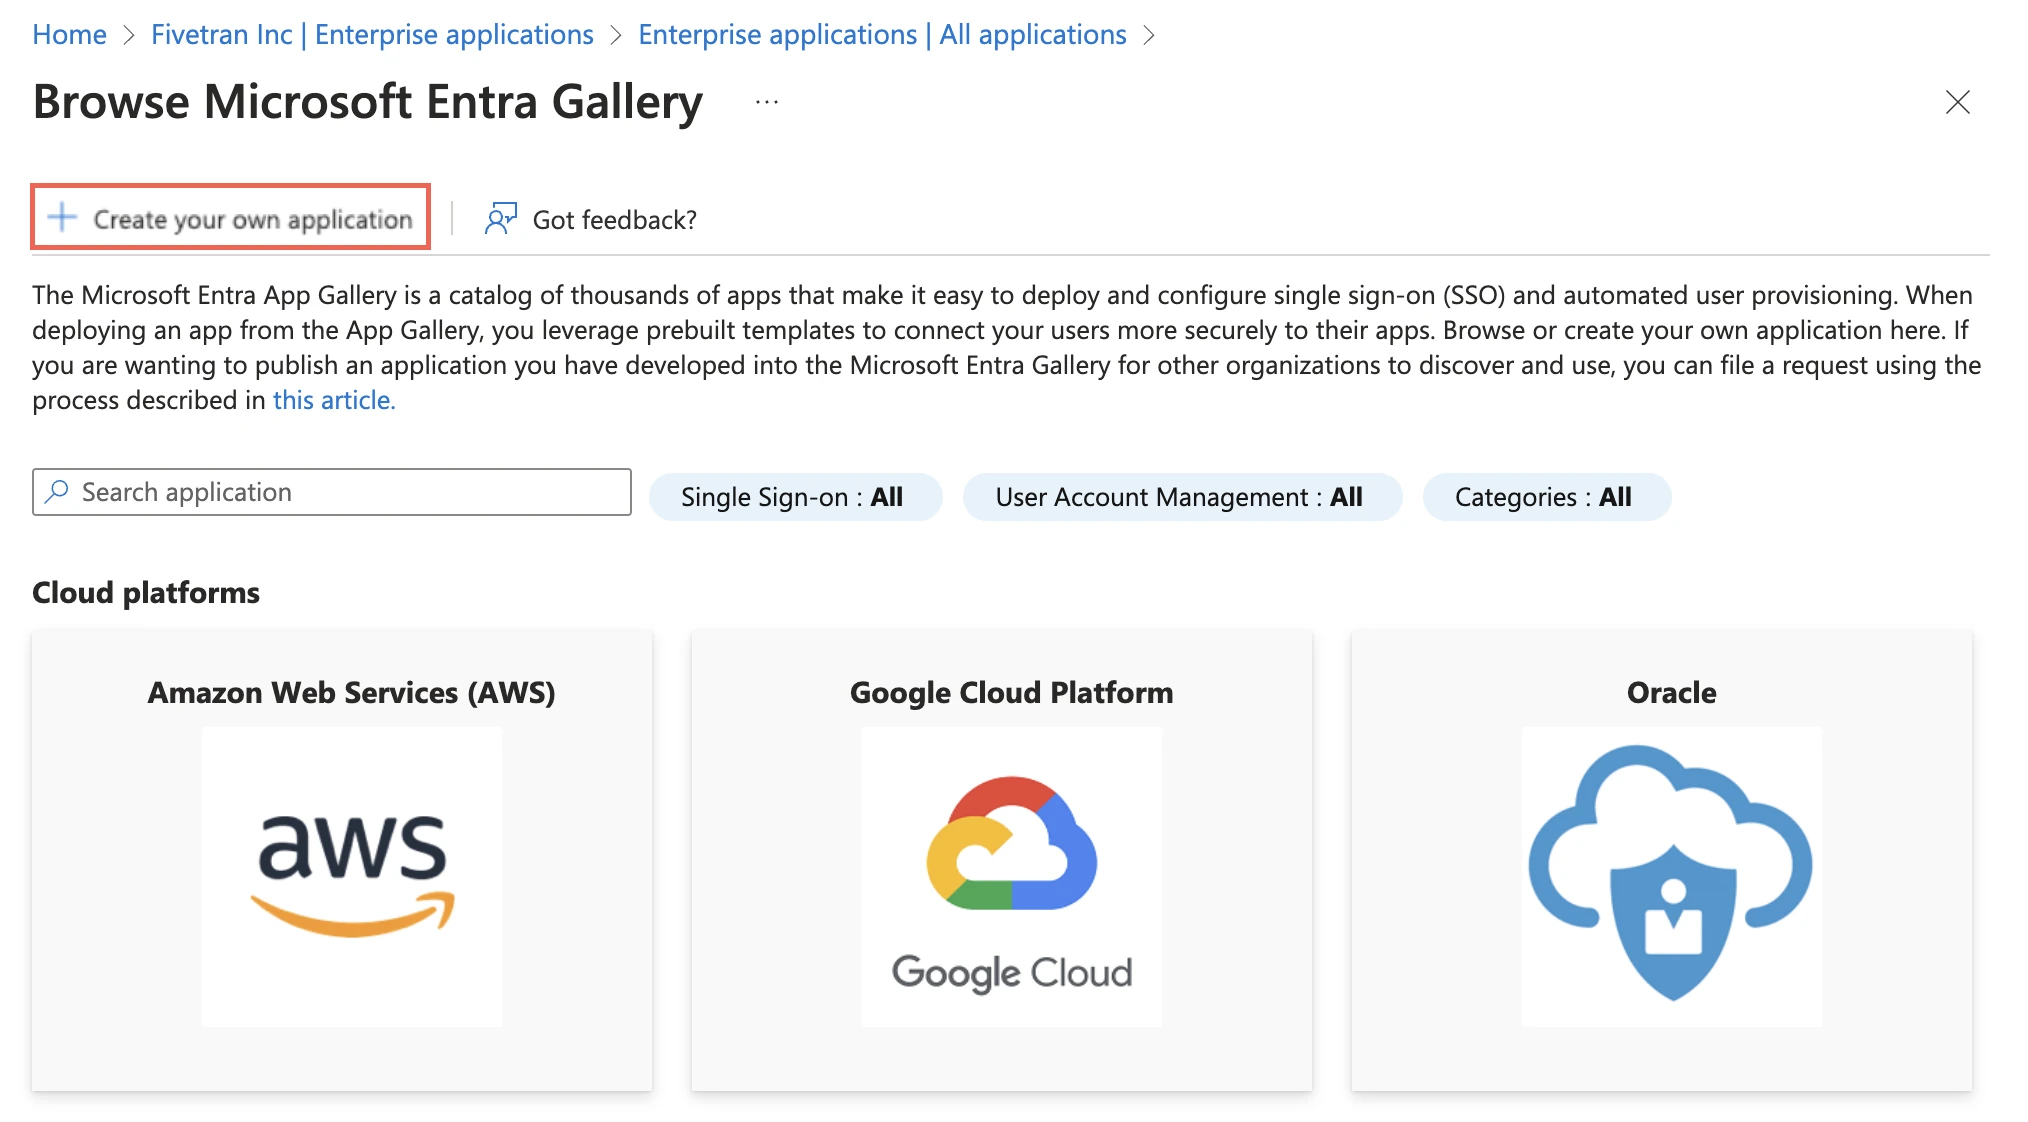
Go to Microsoft Entra ID , click Enterprise Applications in the left panel, and then click + New application to create a new enterprise application.
Click + Create your own application.
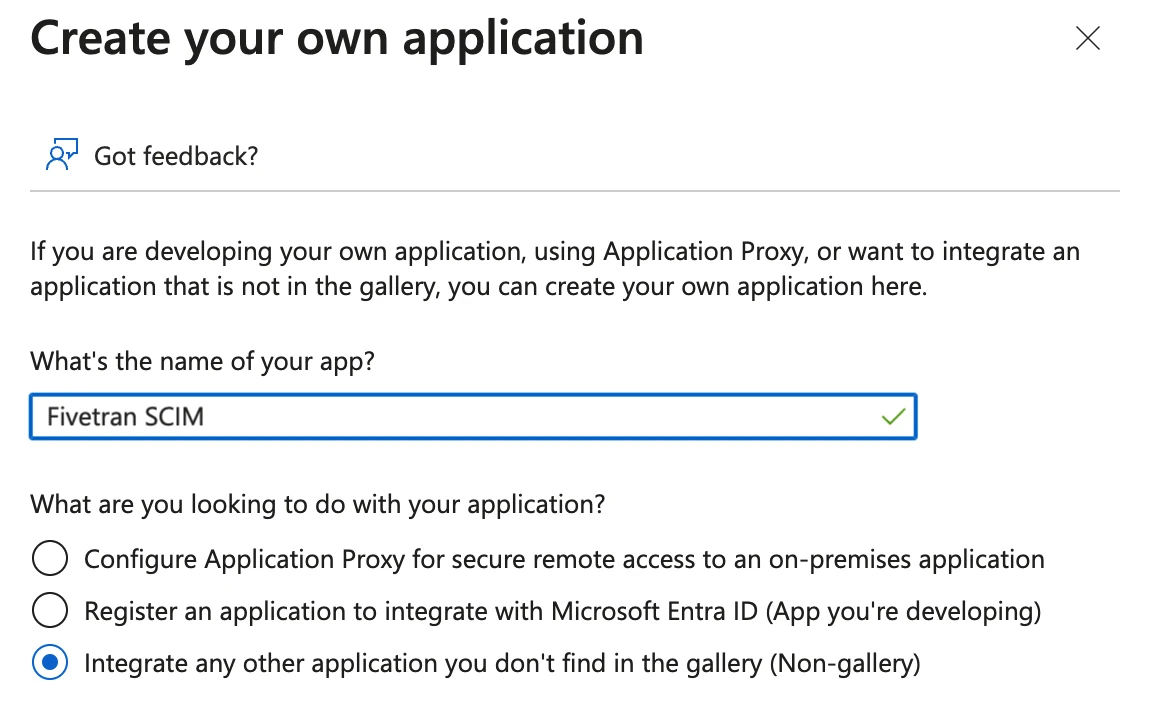
Enter a descriptive name for your app, then select Integrate any other application you don't find in the gallery (Non-gallery) because you'll be creating your own application instead of using a published gallery app.
Set up provisioning
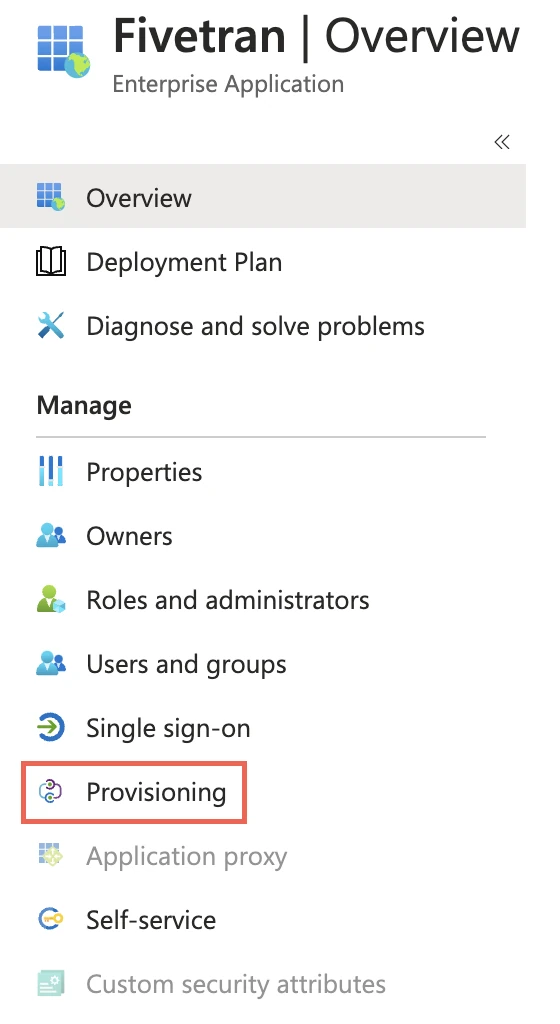
After the app has been created, go to the app's Provisioning section.
Click Get Started.
In the provisioning properties, set the following values:
- Provisioning Mode: set to Automatic
- Tenant URL: https://api.fivetran.com/scim/v2
- Secret token: specify the token you copied in the Configure Fivetran and obtain your API token step.
Learn more about provisioning in Microsoft's Managing user account provisioning for enterprise apps in the Microsoft Entra admin center.
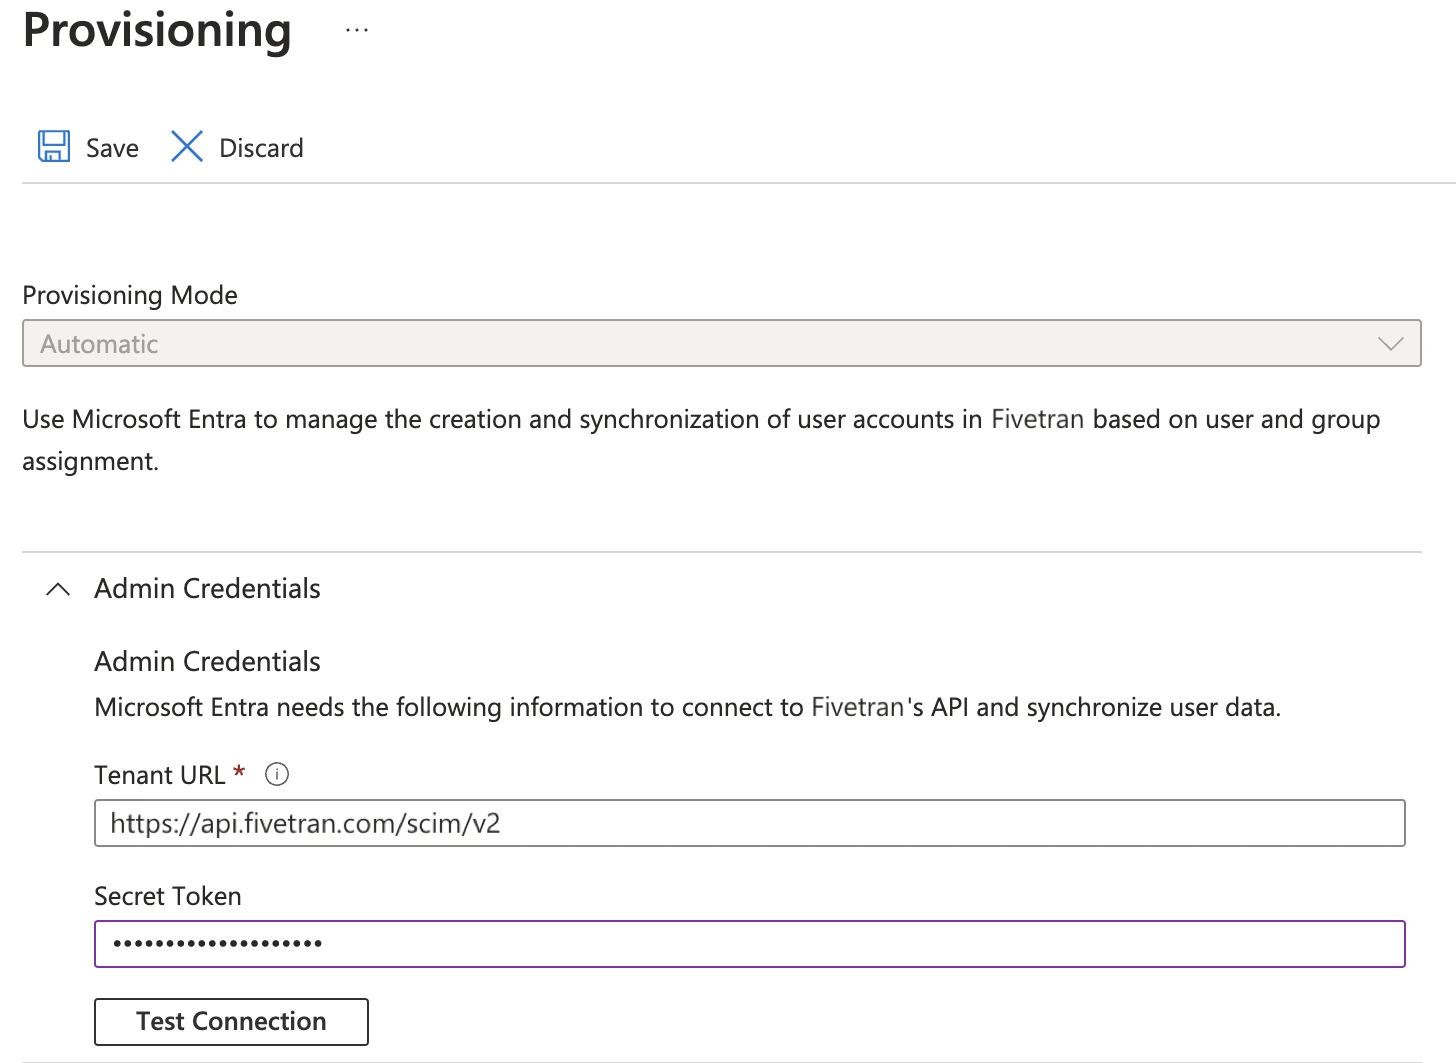
Click Test Connection to make sure that the credentials you provided are valid. If you see any error messages, make sure your tenant URL and secret token are correct and try again. If the connection test keeps failing, contact the Fivetran support team.
Click Save.
Add roles to the application
Return to the main Microsoft Entra ID page and click App registrations in the left panel.
Click All applications.
Open your application and click App roles in the left panel.
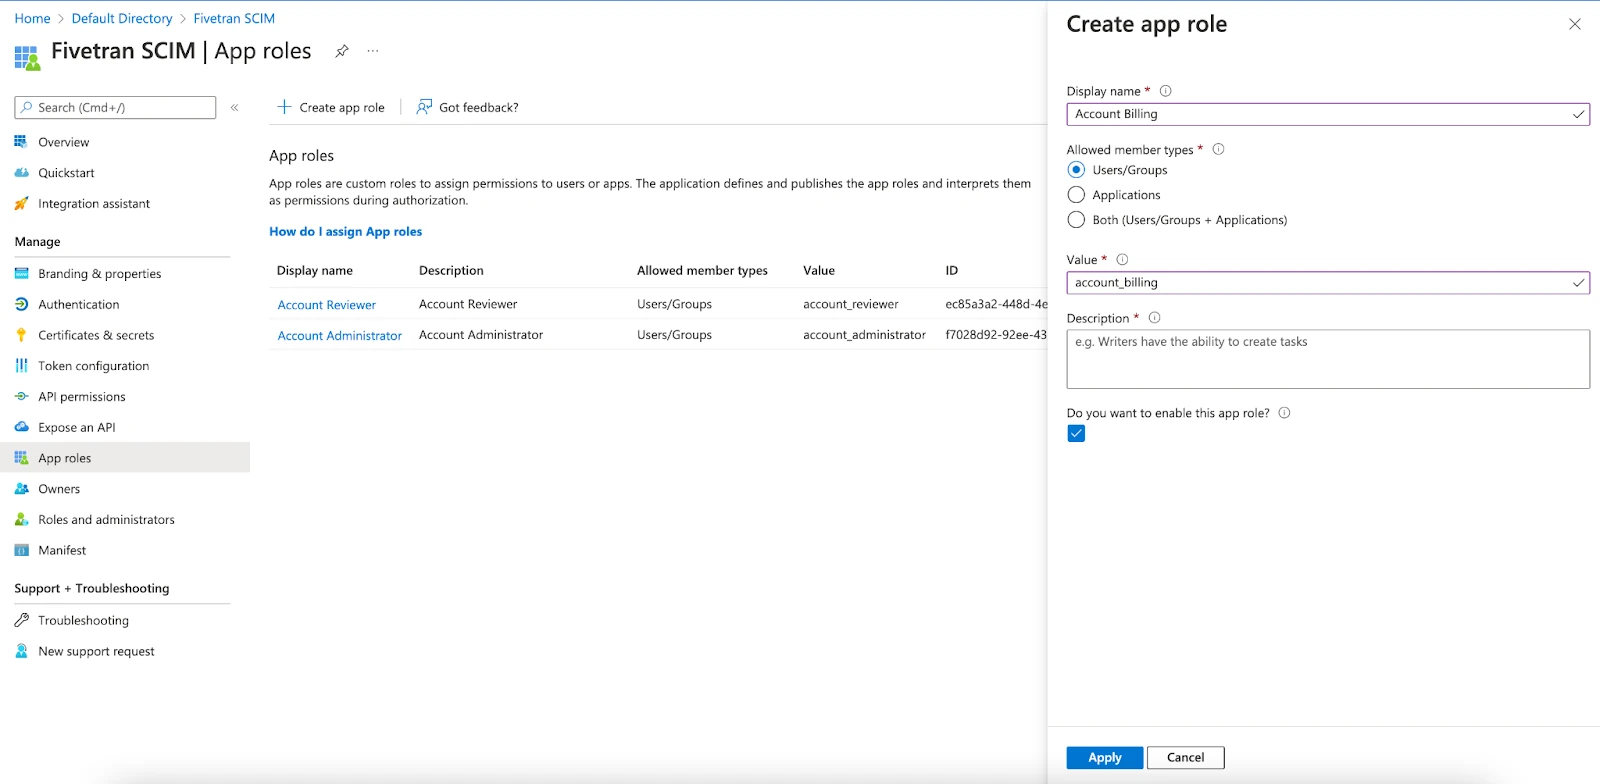
Add the roles that you want to assign to provisioned users. To add a new role, do the following:
Click + Create app role.
In the Display name field, enter the name of the new role. The name must exactly match the name of the relevant standard user role in Fivetran RBAC model or an existing custom user role in your account.
Destination-level or connection-level roles are not supported in the Fivetran SCIM API.
If you want to use standard account-level roles, fill in the attribute fields as listed below:
Display Name Value Account Administrator account_administrator Account Analyst account_analyst Account Billing account_billing Account Reviewer account_reviewer Destination Creator destination_creator Set Allowed member type to Users/Groups.
In the Value field, enter the same value as in the Display name field, but using lowercase letters and underscores. For example, if you specified Account Billing as the display name, specify account_billing as the value.
Add a description for your new role.
Select the Do you want to enable this app role? checkbox.
Click Apply.
Customize user provisioning attribute mappings
Return to the main Microsoft Entra ID page and click Enterprise Applications in the left panel.
Open your app and click Provisioning in the left panel.
Click Edit provisioning.
Expand the Mappings section and confirm that provisioning is enabled for both users and groups.
Click Provision Microsoft Entra Groups. Edit the Group Mappings one-by-one, deleting all attributes except the following ones:
- displayName – displayName
- members – members
Click Save and then Yes in the Save Changes pop-up window.
Close the Attribute Mapping screen.
Click Provision Microsoft Entra Users.. Edit the User Mappings one-by-one, deleting all attributes except for the following ones:
- userPrincipalName – userName
- Switch([IsSoftDeleted], , "False","True", "True", "False") – active
- mail – emails[type eg "work"].value
- givenName – name.givenName
- surname – name.familyAdded Name
We require matching email and username values for SCIM provisioning. For more information, see our SCIM limitations.
Configure mapping for user roles. Click Add New Mapping.
Set the following parameters:
Mapping type : Expression
Expression: SingleAppRoleAssignment([appRoleAssignments])
Target attribute: roles[primary eq "True"].value
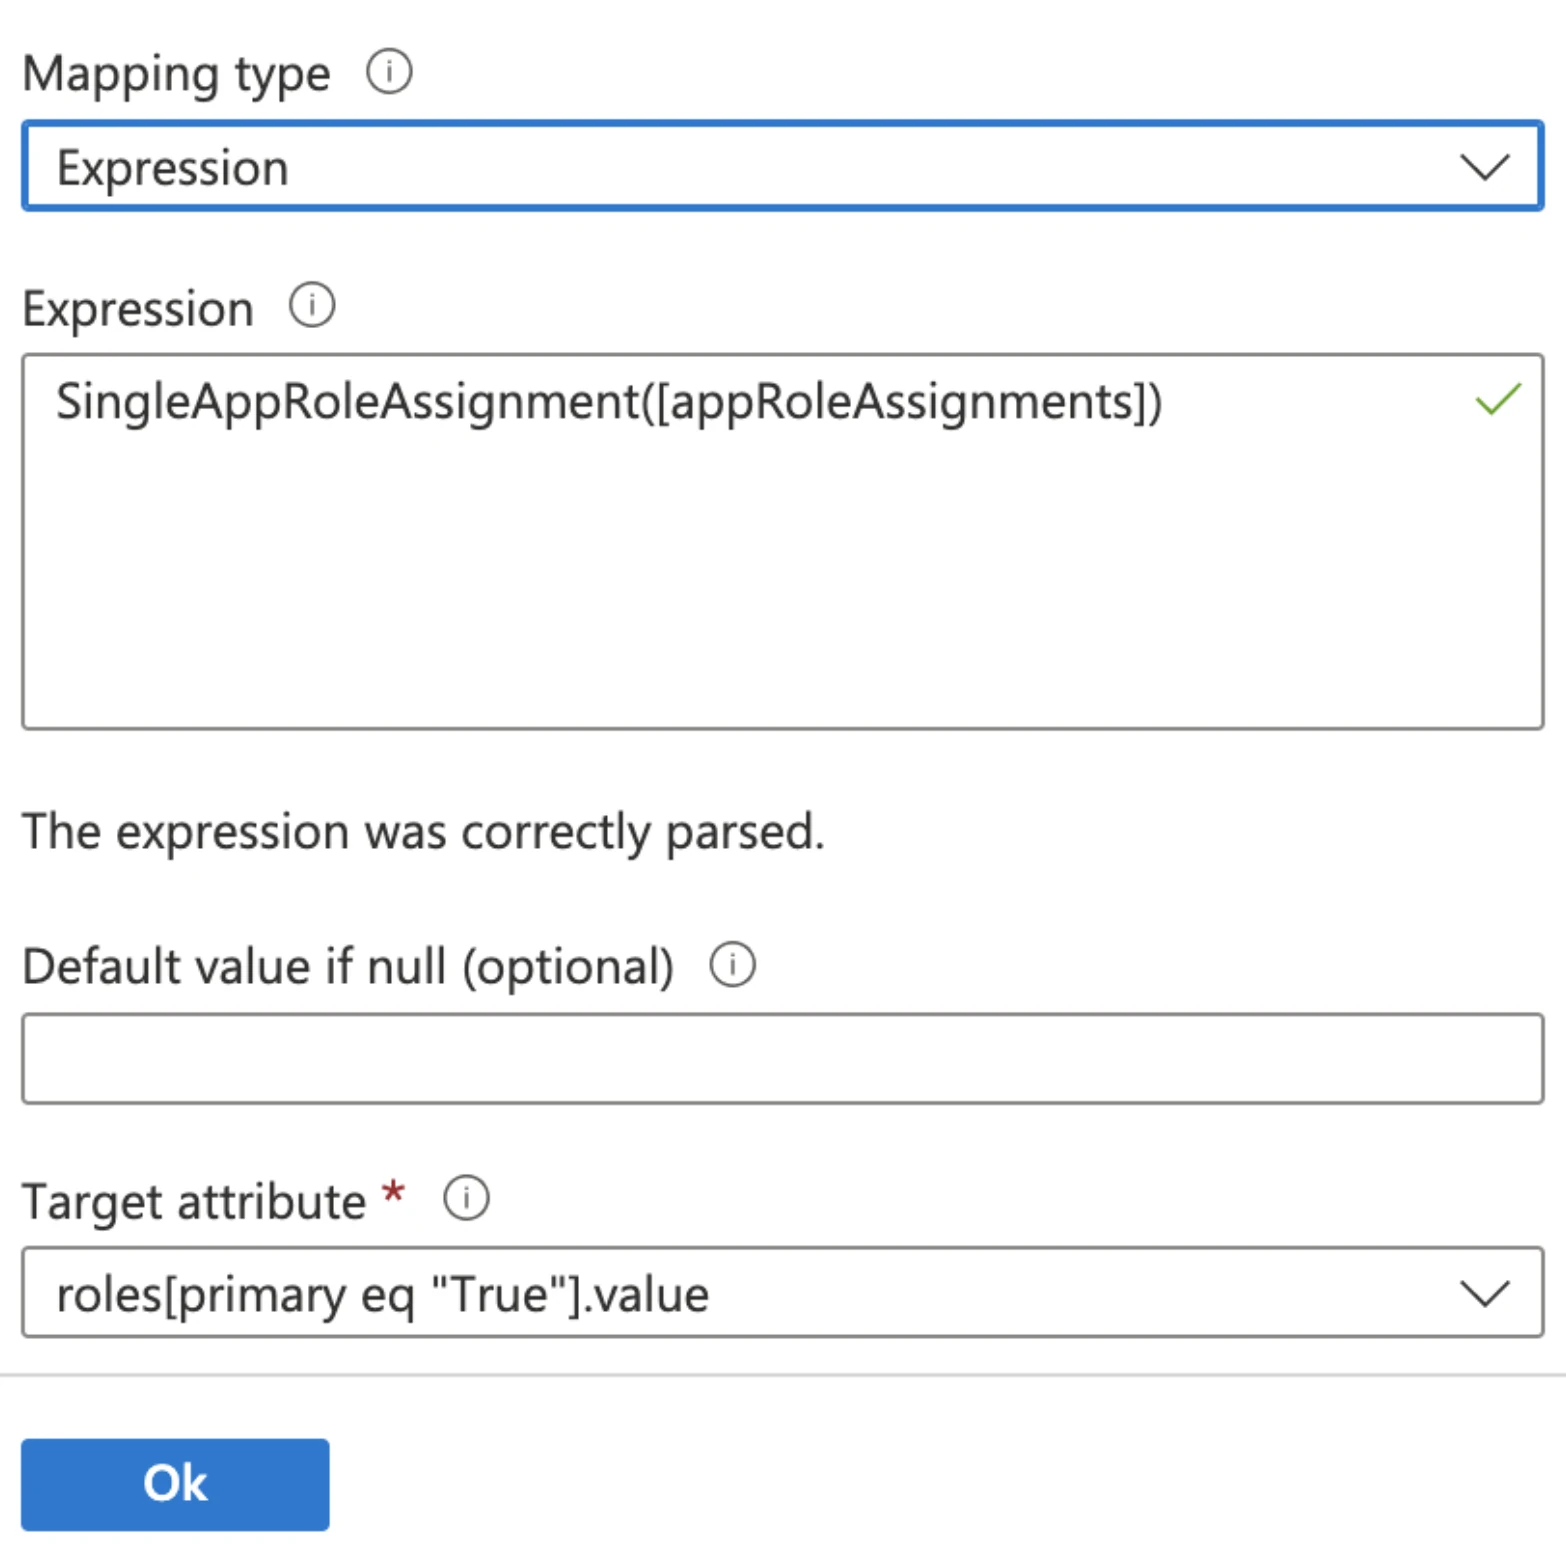
- Click Ok to add the new mapping.
- Click Save and then Yes in the Save Changes pop-up window.
- Set Provisioning Status to On and click Save on the Provisioning tab. The manual SCIM provisioning setup is now complete.
Assign users and groups to your application in Microsoft Entra ID
Return to the main Microsoft Entra ID page and click Enterprise Applications in the left panel.
Open your Fivetran application and click Users and groups.
Click + Add user/group.

Select users and, optionally, groups that you want to assign to your Fivetran app.
Select the role you want to assign to the selected users.
Group roles are not synced to Fivetran.
Click Assign. The selected users and groups will be automatically provisioned in your Fivetran account.
Limitations
Administrators can no longer manage users directly in Fivetran once SCIM is enabled.