Azure Customer-Managed Keys Setup Guide
Follow our setup guide to configure Azure customer-managed keys.
Prerequisites
To set up Azure customer-managed keys for your Fivetran account, you need:
- A Business Critical Fivetran account
- An Azure Key Vault
Setup instructions
Authorize vault access
- Log into your Azure portal.
- Click the menu button in the top left corner of your screen, then select Microsoft Entra ID (formerly Azure Active Directory).
- Find the Tenant ID value and make a note of it.
- In the Fivetran dashboard, go to Account Settings > General > Customer-Managed Keys Configuration.
- Click Add Key.
- Select Azure Key Vault.
- Enter the Tenant ID you found in the previous step.
- Click Authorize.
- In the pop-up window, authorize the Fivetran Azure app to access your Key Vault.
Create Azure key
- In the Azure portal, go to the Key Vaults section.
- Click on the Key Vault that you want to use with Fivetran.
- On the Overview page, find the Vault URI value and make a note of it. You will need it to configure Fivetran.
- In the left menu, go to the Keys page.
- Click + Generate/Import.
- Enter a memorable name for your key (for example, fivetran-cmk).
- Verify that the Key Type is RSA and the RSA key size is
4096. - Click Create.
- Click on the newly-created key.
- Click on the version marked Current Version.
- Copy the Key Identifier value. You will need it to configure Fivetran.
Assign key permissions
- In the Azure portal, return to the Key Vault.
- In the left menu, go to the Access policies page.
- Check the permission model. How you do this depends on which permissions model you use.
If the permission model is Vault access policy, do the following:
i. Click Add Access Policy.
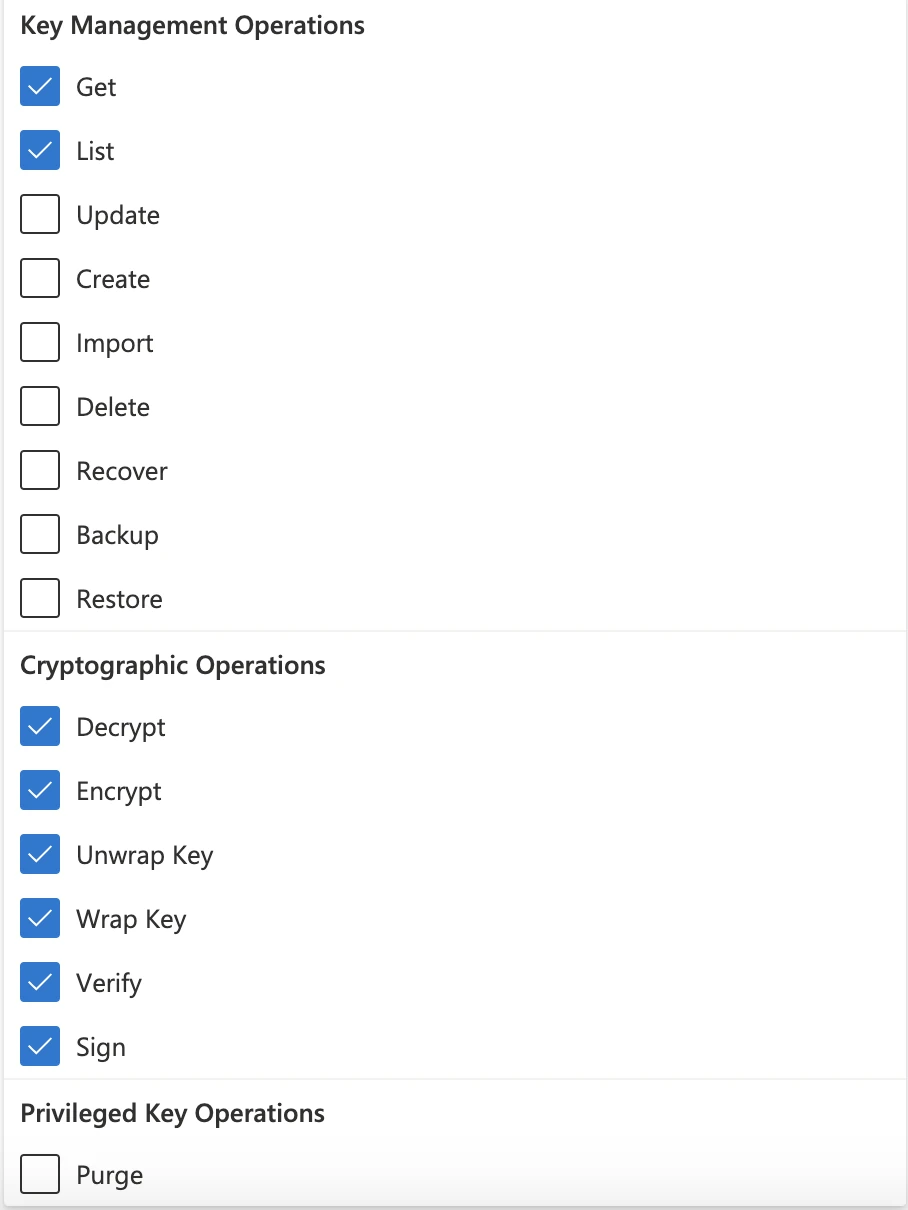
ii. In the Key permissions field, select the following permissions:
iii. Click Select principal. Search for Fivetran to find the Fivetran Azure app you authorized in Step 1.
iv. Click on the Fivetran Azure app, then click Select.
v. Click Add.If the permission model is Azure role-based access control, do the following:
i. Go to Keys.
ii. Click on your newly-created key.
iii. Go to Access control (IAM).
iv. In the Grant access to this resource section, click Add role assignment (Preview).If the Add role assignment (Preview) field is grayed out, you do not have appropriate permissions to assign roles in this Key Vault. Contact your Azure account administrator for help.
v. Select Key Vault Crypto User as the role.
vi. Click Next.
vii. In the Assign access to section, select User, group, or service principal.
viii. Click Select members.
ix. Search for Fivetran to find the Fivetran Azure app you authorized in Step 1.
x. Click on the Fivetran Azure app, then click Select.
xi. Click Next.
xii. Review the role, scope and members. Make sure that Fivetran is assigned as part of the role.
xiii. Click Review + assign.
(Optional) Safelist Fivetran's IP
- In the Azure portal, return to the Key Vault.
- Go to the Overview page.
- Under Firewalls and virtual networks section, check whether Allow access form option is set to Private endpoints and selected networks. If so, add Fivetran's IP
34.85.252.27/32under the Firewall section and click Save.
Finish Fivetran configuration
- In your Fivetran dashboard, enter the Vault URL and Key ID that you found in Step 2.
- Click Submit.