Securing HVR Communication Using SSL/TLS
Question
How can I secure HVR communication using SSL/TLS?
Environment
HVR 5
Answer
This guide explains how to enable two-way SSL communication between the HVR Hub and its connected HVR Agent or HVR GUI machines. This is achieved using SSL certificate pairs. SSL certificates ensure:
Encrypted Data: Data transmissions are secured using the latest TLS protocol supported by HVR (currently TLS 1.3). Encrypted connections are represented by the lock icon
 in the diagrams throughout this guide.
Verified Identity: Certificate-based authentication guarantees you are communicating with authorized HVR components. Authentication is represented by the checkbox icon
 in the diagrams throughout this guide.
Additionally, this guide explains how to use certificates when connecting through a proxy server.
At-rest encryption is not discussed here. For more information about at-rest encryption, see Hub Wallet and Encryption.
Certificate Pairs
HVR uses OpenSSL for encryption. Use the hvrsslgen command to generate valid certificate key pairs. These are self-signed certificates, valid for 20 years, and are always unique.
Older versions of HVR included a default key pair hvr.priv_key and hvr.pub_cert in the HVR_HOME/lib/cert directory. This default key pair was for demonstration purposes only and should never be used in production environments. Anyone who has downloaded HVR may have access to it, compromising the security of your communication.
The following example generates a key pair oracle_source.priv_key and oracle_source.pub_cert, which will be used in the examples in this guide:
hvrsslgen -a 2048 oracle_source "Oracle Source location"
Sample output:
hvrsslgen: HVR 5.7.0/5 (linux_glibc2.12-x64-64bit)
hvrsslgen: Generating SSL key pair...
hvrsslgen: Generating SSL key pair... completed.
hvrsslgen: Private key written to 'oracle_source.priv_key'.
hvrsslgen: Public Certificate written to 'oracle_source.pub_cert'.
hvrsslgen: Certificate subject: 'HVR Oracle Source location'
hvrsslgen: Certificate contains 2048 bit RSA Public Key.
hvrsslgen: Certificate valid from Dec 17 23:17:38 2020 GMT
hvrsslgen: Certificate valid until Dec 12 23:17:38 2040 GMT
hvrsslgen: Finished. (elapsed=0.44s)
For the examples in this article, two more certificate pairs are created using an equivalent command - hub.priv_key, hub.pub_cert, and proxy.priv_key, proxy.pub_cert.
- You can use key pairs generated outside of HVR as long as they are in the OpenSSL PEM format and not password-protected.
- HVR requires a “common name” within the key pair certificate.
- The public certificate must include any root certificate/certificate chain for HVR to accept it. The top level of the chain must be self-signed.
Encrypted Communication
Communication between HVR executables is encrypted both ways when the HVR listener is started with an encryption certificate pair. Such a setup also protects against man-in-the-middle attacks.
For the encrypted communication to succeed, the matching public certificate must be available in the environment that initiates the communication.
HVR Configuration for Network Encryption
In HVR versions 4.x and 5.x, the default location for encryption certificates is HVR_HOME/lib/cert. Certificates stored elsewhere must be referenced using an absolute path. The examples in this article assume certificates are available in the default location.
Depending on your operating system, there are different ways to run the HVR listener:
Using hvrremotelistener command
Every operating system that supports an HVR agent or hub allows starting the HVR remote listener using the hvrremotelistener command. Use option –K to reference the certificate key pair. For example:
hvrremotelistener -d -K oracle_source 4343
Configuring a socket through systemctl (Linux)
When configuring a socket through systemctl, you must include the reference to the encryption certificate key pair in the service definition using option -K with the key pair name in the ExecStart line:
# cat /etc/systemd/system/hvr@.service

[Unit]
Description=HVR listener service

[Service]
Environment="HVR_HOME=/opt/hvr/hvr_home"
Environment="HVR_CONFIG=/opt/hvr/hvr_config"
User=root
ExecStart=/opt/hvr/hvr_home/bin/hvr -r -K oracle_source
StandardInput=socket
KillMode=process

[Install]
WantedBy=multi-user.target
Configuring a service through xinet (Linux)
When configuring a service through xinet, you must include the reference to the encryption certificate key pair in the service definition using option -K with the key pair name in the server_args line:
# cat /etc/xinetd.d/hvr

service hvr
{
socket_type = stream
wait = no
user = root
server = /home/hvruser/hvr/hvr_home/bin/hvr
server_args = -r –K oracle_source
env += HVR_HOME=/home/hvruser/hvr/hvr_home
env += HVR_CONFIG=/home/hvruser/hvr/hvr_config
env += HVR_TMP=/home/hvruser/hvr/hvr_tmp
disable = no
cps = 10000 30
per_source = 100
instances = 500
}
Configuring a service through inetd (Unix)
When configuring a service through inetd (in a Unix system), you must include the reference to the encryption certificate key pair in the call to the HVR executable using option -K with the key pair name:
# cat /etc/inetd.conf

hvr stream tcp nowait root /home/hvruser/hvr/hvr_home/bin/hvr hvr –r –K oracle_source -EHVR_HOME=/home/hvruser/hvr/hvr_home -EHVR_CONFIG=/home/hvruser/hvr/hvr_config -EHVR_TMP=/home/hvruser/hvr/hvr_tmp
Creating the remote listener service through the HVR GUI (Windows)
On Windows, you can create the remote listener service through the HVR GUI.
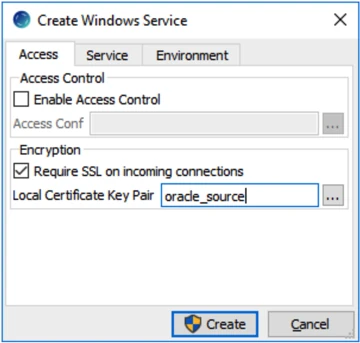
In the HVR GUI's File menu, select HVR Remote Listener. Create a listener on a port that is open on the server. In the Create Windows Service dialog, select Require SSL on incoming connections option and specify the certificate key pair in the Local Certificate Key Pair field to create a listener with encryption enabled.
Connecting to an Encrypted Listener
There are two scenarios for connecting to a listener using encryption:
Encryption between HVR hub and HVR GUI machines
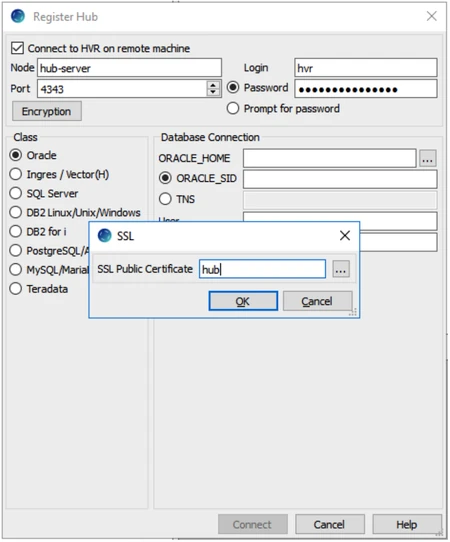
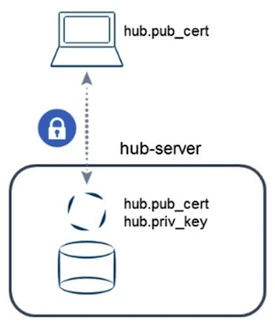
The public certificate matching the listener's encryption must be available on the HVR GUI machine. Transfer the public certificate to the HVR GUI machine or copy the public key’s contents to an equivalent public certificate file on the HVR GUI machine. With the certificates copied, use the Encryption button at the top of the Register Hub dialog when registering a new hub.
Here is a schematic overview:
Encryption between HVR hub and HVR agent machines
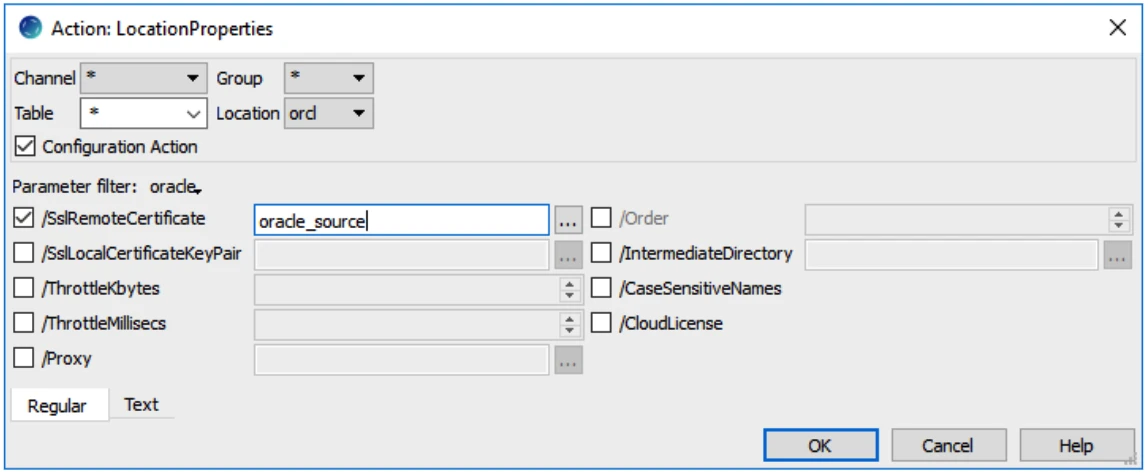
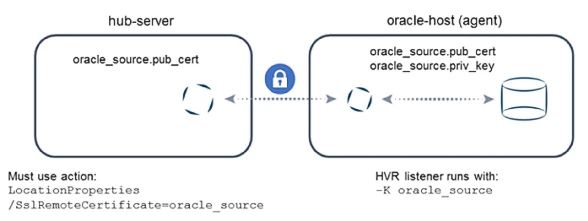
The public certificate for the listener's encryption must be on the HVR hub. Define action LocationProperties with parameter /SslRemoteCertificate set to the respective public certificate. Make sure to define the correct context for the action at the top of the dialog, such as the location itself. For example:
Here is a schematic overview:
Certificate-based Authentication
Certificate-based authentication offers an alternative or additional layer of security compared to username/password authentication.
Key Points:
- Available between HVR Hub and HVR Agent. However, the HVR GUI does not support certificate-based authentication for its connection to the hub.
- Requires encryption to be configured first.
- Use different certificate pairs for encryption and authentication (recommended for optimal security).
HVR Configuration for Authentication
To configure certificate-based authentication, you must have the following:
- A certificate key pair on the HVR hub machine.
- The matching public certificate on the HVR agent machine where authentication is enforced.
- An access configuration XML file at the agent listener indicating the certificate required for authentication. The XML definition may also limit connectivity down to a domain, an IP range, a single IP address, or a DNS entry.
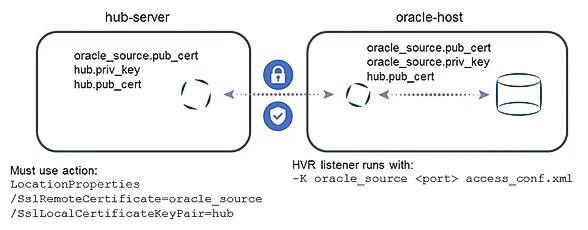
The following example uses a virtual machine running the Oracle database on a server called oracle-host. Its listener uses the certificate key pair oracle_source generated by hvrsslgen. The matching public certificate is on a hub server called hub-server. The hub stores the hub private key/public certificate key pair, with the matching public certificate on the agent.
On the Oracle virtual machine, create a file named access_conf.xml with the following contents:
$ cat access_conf.xml

<?xml version="1.0" encoding="utf-8"?>
<!DOCTYPE hvraccess SYSTEM "hvraccess.dtd">
<hvraccess>
    <allow>
        <from>
            <host>oracle-host</host>
            <ssl remote_cert="hub"/>
        </from>
    </allow>
</hvraccess>
On the HVR agent machine, run the remote listener using the hvrremotelistener command (requires both OS user and certificate-based authentication).
In a test environment, you could consider including the -N option to disable authentication.
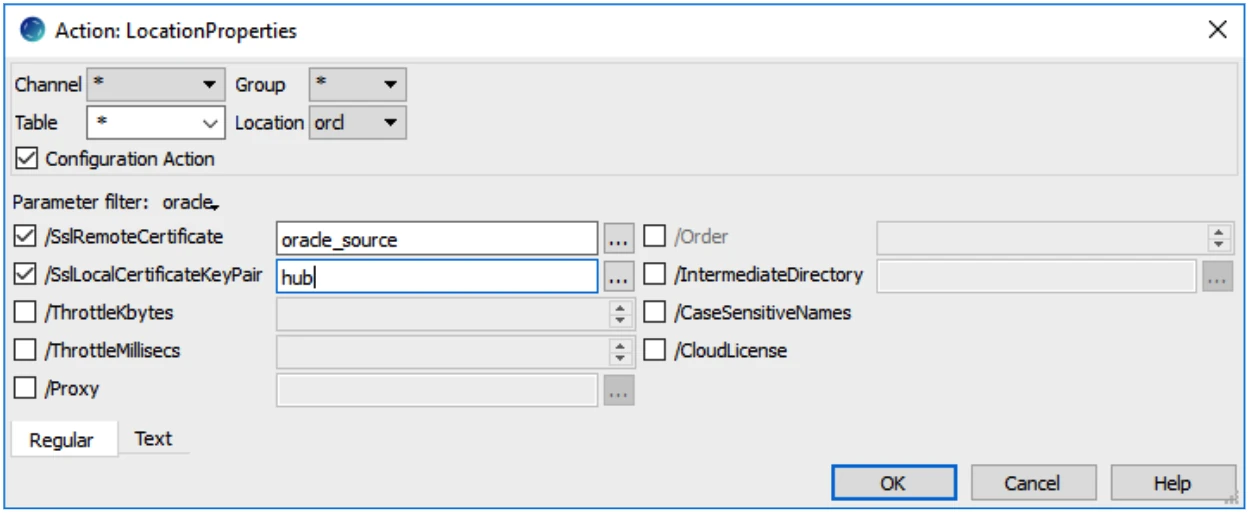
hvrremotelistener –d –K oracle_source 4343 access_conf.xmlOn the hub, define action LocationProperties with parameters /SslRemoteCertficate=oracle_source and /SslLocalCertificateKeyPair=hub for this location, for the connection to be established:
Here is a schematic overview:
Connecting Through a Proxy
The use of a proxy is common between a cloud-based HVR hub and an on-premises HVR agent. A proxy in a DMZ (De-Militarized Zone) may be used to avoid the need to open a firewall port directly to the agent.
This scenario allows for certificate-based authentication on the proxy and for the agent to authenticate the proxy.
Encryption can be configured separately between HVR hub and proxy, as well as between proxy and HVR agent as needed.
The HVR installation includes a file HVR_HOME/lib/hvrproxy_example.xml showcasing some of the options when using a proxy.
The example environment runs:
- Proxy: proxy-server
- HVR hub: hub-server
- HVR agent: oracle-host
Encryption between Hub and Proxy
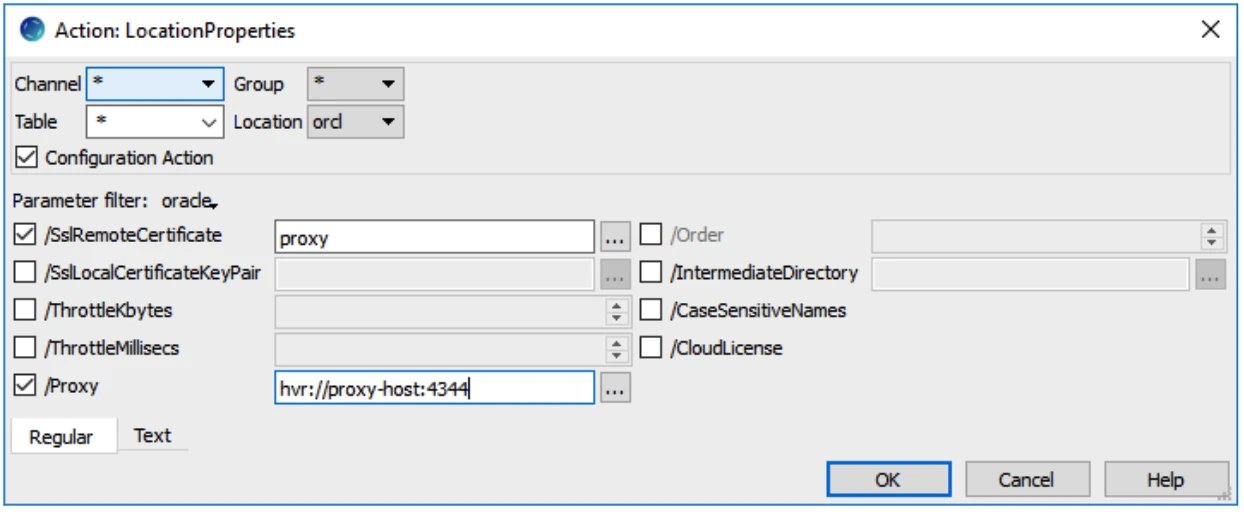
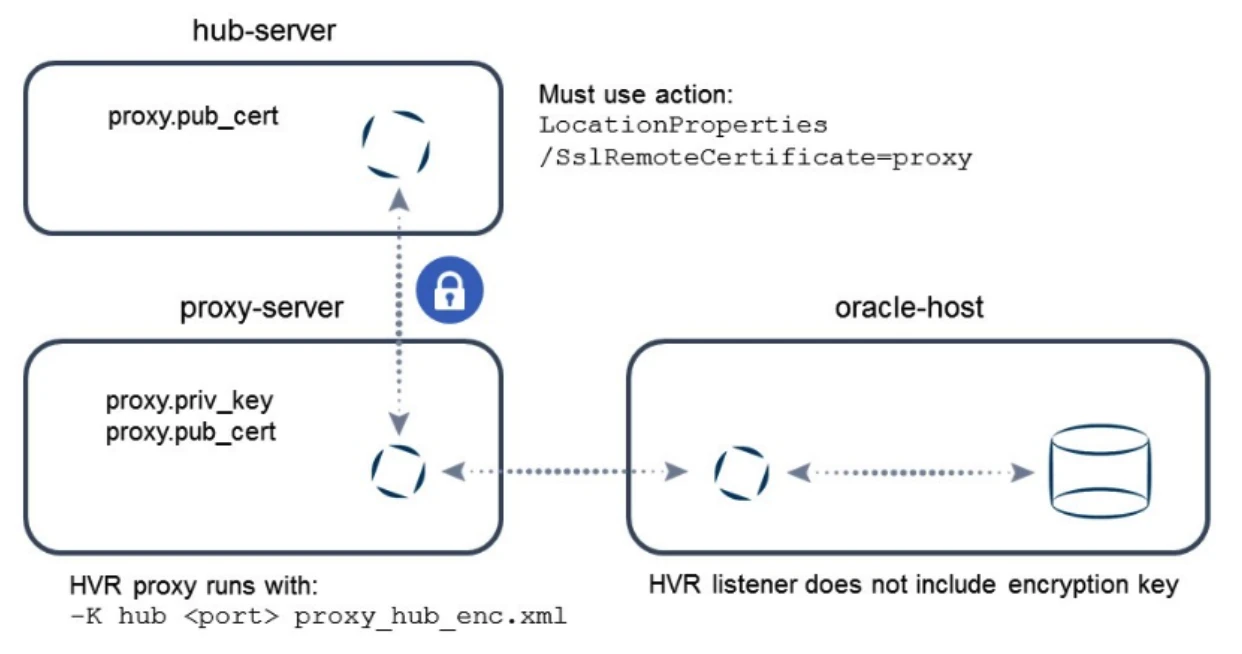
This example illustrates enabling encryption between HVR hub and proxy, with no encryption between proxy and HVR agent.
Copy the public certificate proxy.pub_cert to the HVR hub machine.
On the proxy server, create a restrictive proxy definition file named proxy_hub_enc.xml:
$ cat proxy_hub_enc.xml

<?xml version="1.0" encoding="utf-8"?>
<!DOCTYPE hvraccess SYSTEM "hvraccess.dtd">
<hvraccess>
    <allow>
        <from>
         <host>hub-server</host>
         <ssl />
     </from>
     <to>
         <host>oracle-host</host>
         <port>4343</port>
     </to>
    </allow>
</hvraccess>
The proxy definition only allows traffic coming from the hub host with SSL for incoming traffic. Connectivity can only be established with the HVR agent.
Start the proxy running on port 4344 using the command hvrproxy:
hvrproxy -d -K proxy 4344 proxy_hub_enc.xmlOn the HVR agent machine, run the remote listener without any encryption certificate using the hvrremotelistener command (requires OS authentication).
hvrremotelistener -d 4343In a test environment, you could consider including the -N option to disable authentication.
On the HVR hub, define the LocationProperties action with the following parameters:
Here is a schematic overview:
Encryption between Hub and Proxy with Certificate Authentication
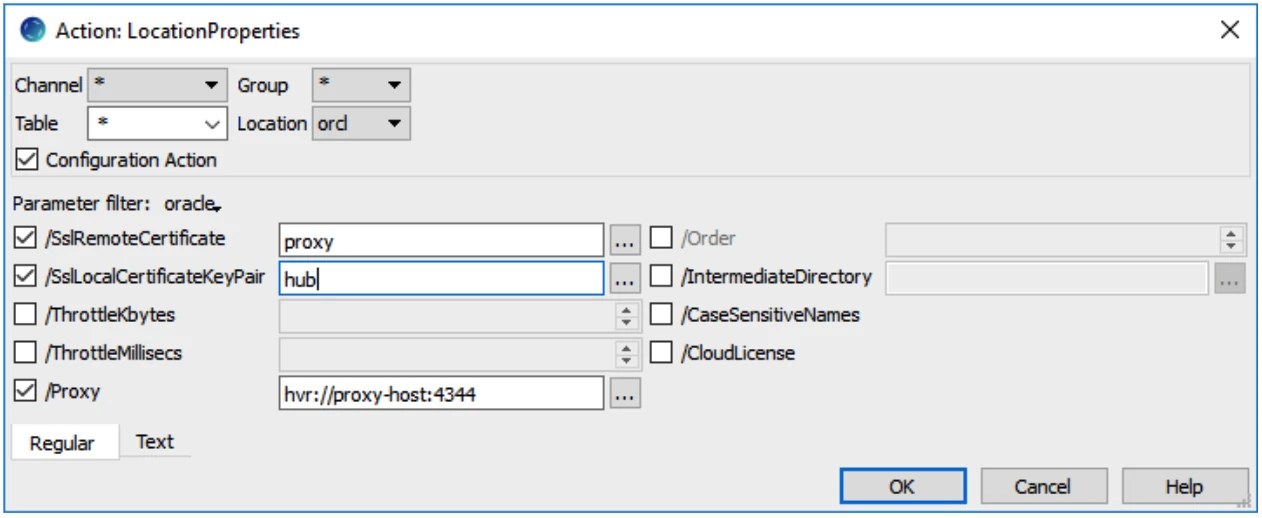
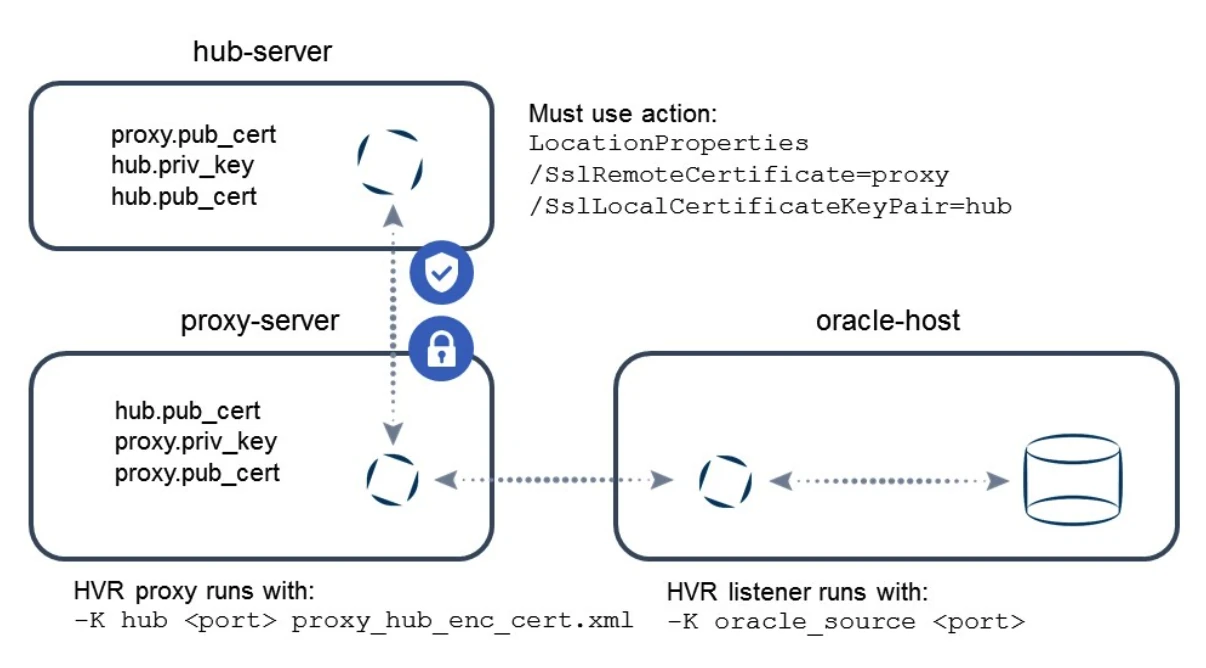
This example illustrates enabling encryption between the HVR hub and proxy, with certificate authentication enforced for the hub.
On the proxy server, create a restrictive proxy definition file named proxy_hub_enc_cert.xml:
$ cat proxy_hub_enc_cert.xml

<?xml version="1.0" encoding="utf-8"?>
<!DOCTYPE hvraccess SYSTEM "hvraccess.dtd">
<hvraccess>
    <allow>
        <from>
            <host>hub-server</host>
            <ssl remote_cert="hub"/>
        </from>
        <to>
            <host>oracle-host</host>
            <port>4343</port>
        </to>
    </allow>
</hvraccess>
Copy the hub.pub_cert file to the proxy server.
Stop and start the proxy using the hvrproxy command (if necessary):
hvrproxy –k 4344

hvrproxy -d -K proxy 4344 proxy_hub_enc_cert.xml
Run the remote listener on the HVR agent machine without SSL enabled:
hvrremotelistener -d 4343On the HVR hub, define the LocationProperties action with the following parameters:
Here is a schematic overview:
On-the-wire Encryption and Certificate Authentication with Proxy
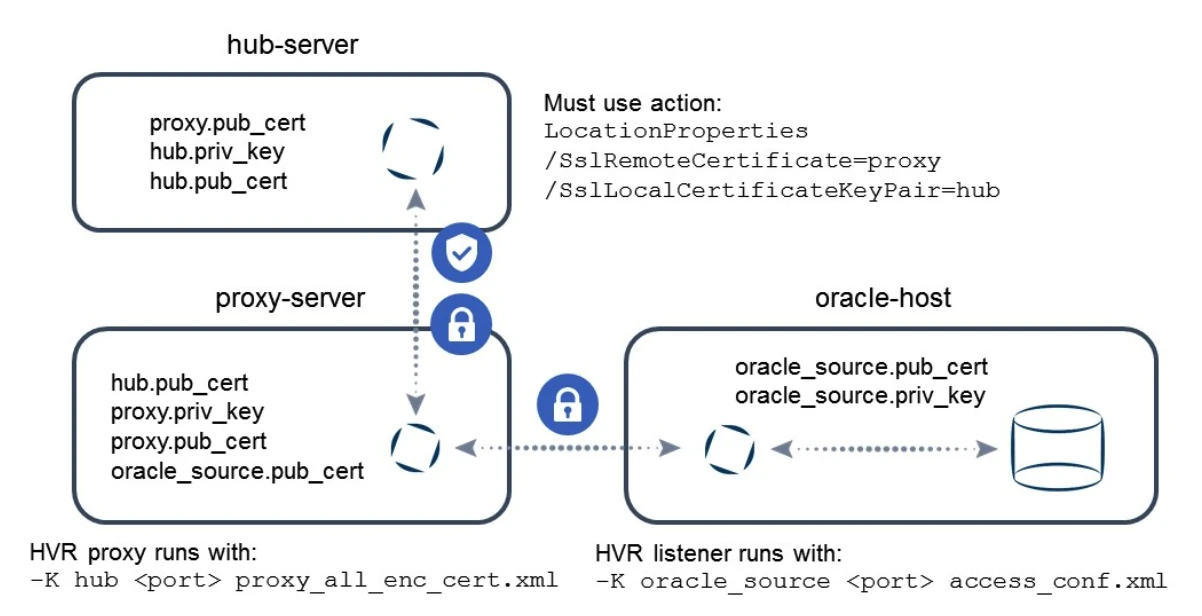
This example illustrates enabling encryption on the wire between HVR hub and proxy as well as between proxy and HVR agent. In addition to this, the hub must authenticate with a certificate to the proxy environment.
On the proxy server, create a more restrictive proxy definition file:
$ cat proxy_all_enc_cert.xml

<?xml version="1.0" encoding="utf-8"?>
<!DOCTYPE hvraccess SYSTEM "hvraccess.dtd">
<hvraccess>
    <allow>
        <from>
            <host>hub-server</host>
            <ssl remote_cert="hub"/>
        </from>
        <to>
            <host>oracle-host</host>
            <port>4343</port>
            <ssl remote_cert="oracle_source"/>
        </to>
    </allow>
</hvraccess>
Copy both hub.pub_cert and oracle_source.pub_cert files to the proxy server.
Stop and start the proxy using the hvrproxy command (if necessary):
hvrproxy –k 4344

hvrproxy -d -K proxy 4344 proxy_hub_enc_cert.xml
(Optional) Create an access_conf.xml file on the HVR agent machine:
$ cat access_conf.xml

<?xml version="1.0" encoding="utf-8"?>
<!DOCTYPE hvraccess SYSTEM "hvraccess.dtd">
<hvraccess>
    <allow>
        <from>
            <host>proxy-server</host>
            <ssl />
        </from>
    </allow>
</hvraccess>
Incoming traffic must be encrypted and originate from the proxy host (proxy server).
Stop and start the remote listener using the hvrremotelistener command (if necessary):
hvrremotelistener –k 4343

hvrremotelistener -d -K oracle_source 4343 access_conf.xml
On the HVR hub, define the LocationProperties action with the following parameters:
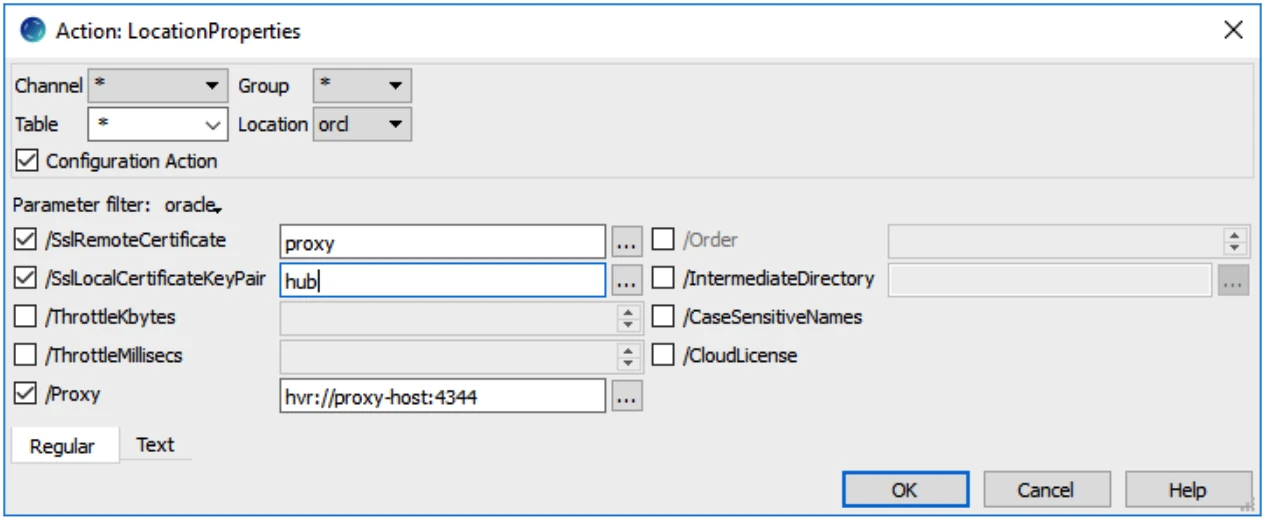
The communication between the proxy and the HVR agent is now encrypted.
Here is a schematic overview:
On-the-wire Encryption and Certificate Authentication with Proxy and End Point
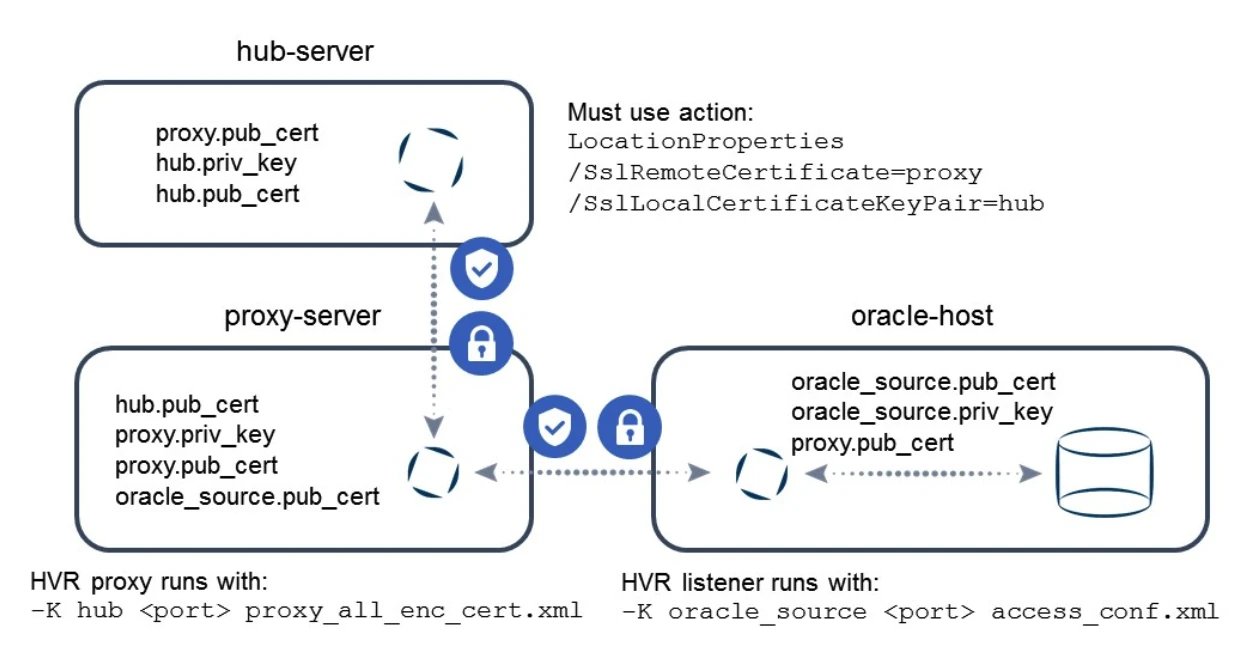
This example illustrates enabling encryption on the wire between the HVR hub and proxy as well as between proxy and HVR agent. In addition to this, the hub must authenticate with a certificate to the proxy environment, and the proxy authenticates with a certificate to the endpoint. Note that the proxy uses the same certificate it uses for encryption on the outgoing connections.
The setup for this example is largely identical to the previous example. The only differences are in the configuration for the HVR agent:
- Copy proxy.pub_cert file to the oracle-host system.
- Change the access_conf.xml file on the HVR agent machine as follows:
$ cat access_conf.xml

<?xml version="1.0" encoding="utf-8"?>
<!DOCTYPE hvraccess SYSTEM "hvraccess.dtd">
<hvraccess>
    <allow>
        <from>
            <host>proxy-server</host>
            <ssl remote_cert="proxy"/>
        </from>
    </allow>
</hvraccess>
Here is a schematic overview:
