Azure Data Lake Storage Setup Guide
Follow our setup guide to connect Azure Data Lake Storage (ADLS) to Fivetran.
Prerequisites
To connect a Azure Data Lake Storage to Fivetran, you need the following:
- An ADLS Gen2 account with Administrator permissions
- An ADLS Gen2 container
- Permissions to create an Azure service principal
Setup instructions
Create storage account
Log in to the Azure portal.
Follow the instructions in Microsoft’s documentation to create a storage account.
- While creating the storage account, make sure you have selected the Enable hierarchical namespace checkbox in the Advanced tab of the Create storage account page.
- If you have a firewall enabled and if your Fivetran instance is not configured to run in the same region as your Azure storage account, create a firewall rule to allow access to Fivetran's IPs.
- If you have a firewall enabled and if your Fivetran instance is configured to run in the same region as your Azure storage account, you must configure virtual network rules and add Fivetran's internal virtual private network subnets to the list of allowed virtual networks. For more information, see Microsoft's documentation.
- As you are adding a rule for a subnet in a virtual network that belongs to another Microsoft Entra tenant (Fivetran), you must use a fully qualified subnet ID. For more information, see Microsoft's documentation
- To retrieve the list of region-specific fully qualified subnet IDs, contact our support team.
Create ADLS container
Go to the storage account you created.
In the navigation menu, go to Containers and click + Container.
In the New container pane, enter a Name for your container and make a note of it. You will need it to configure Fivetran.
In the Public access level drop-down menu, select an access level for the container.
Click Create.
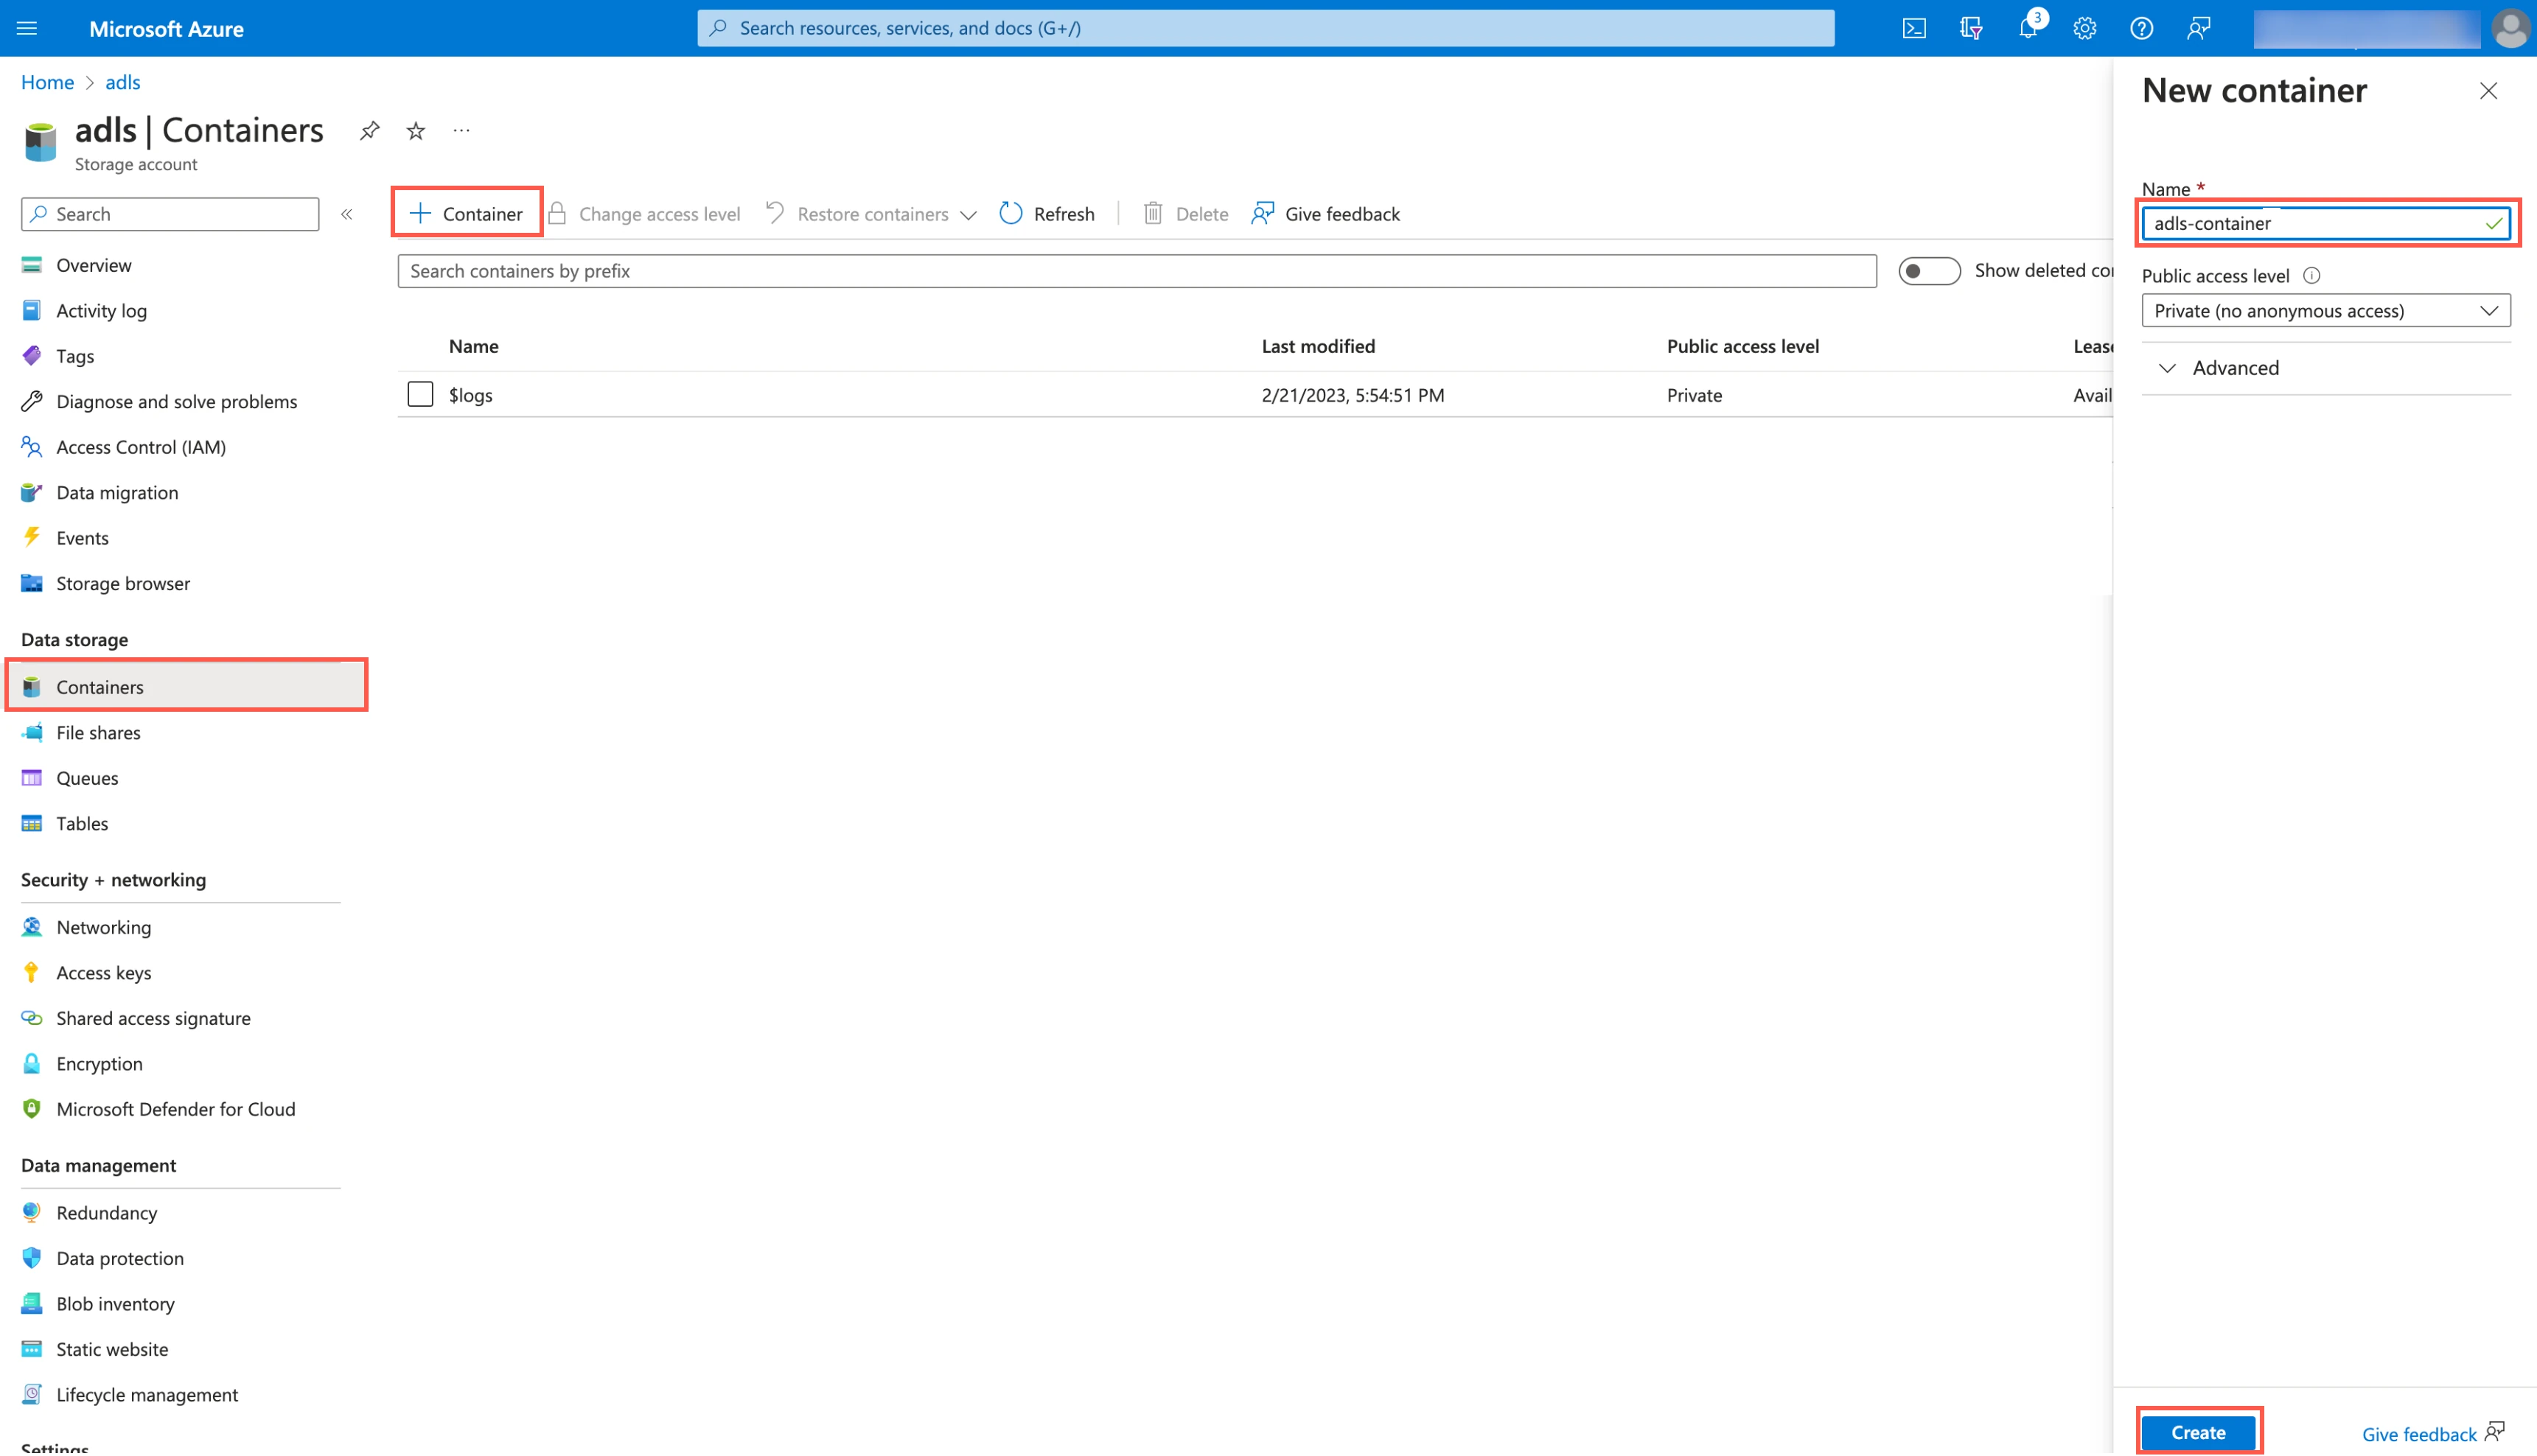
If any private endpoints exist in the Storage Account > Networking section, you must use Azure Private Link to connect Fivetran to the container.
Register an application and add a service principal
In the navigation menu, select Microsoft Entra ID (formerly Azure Active Directory).
Go to App registrations and click + New registration.
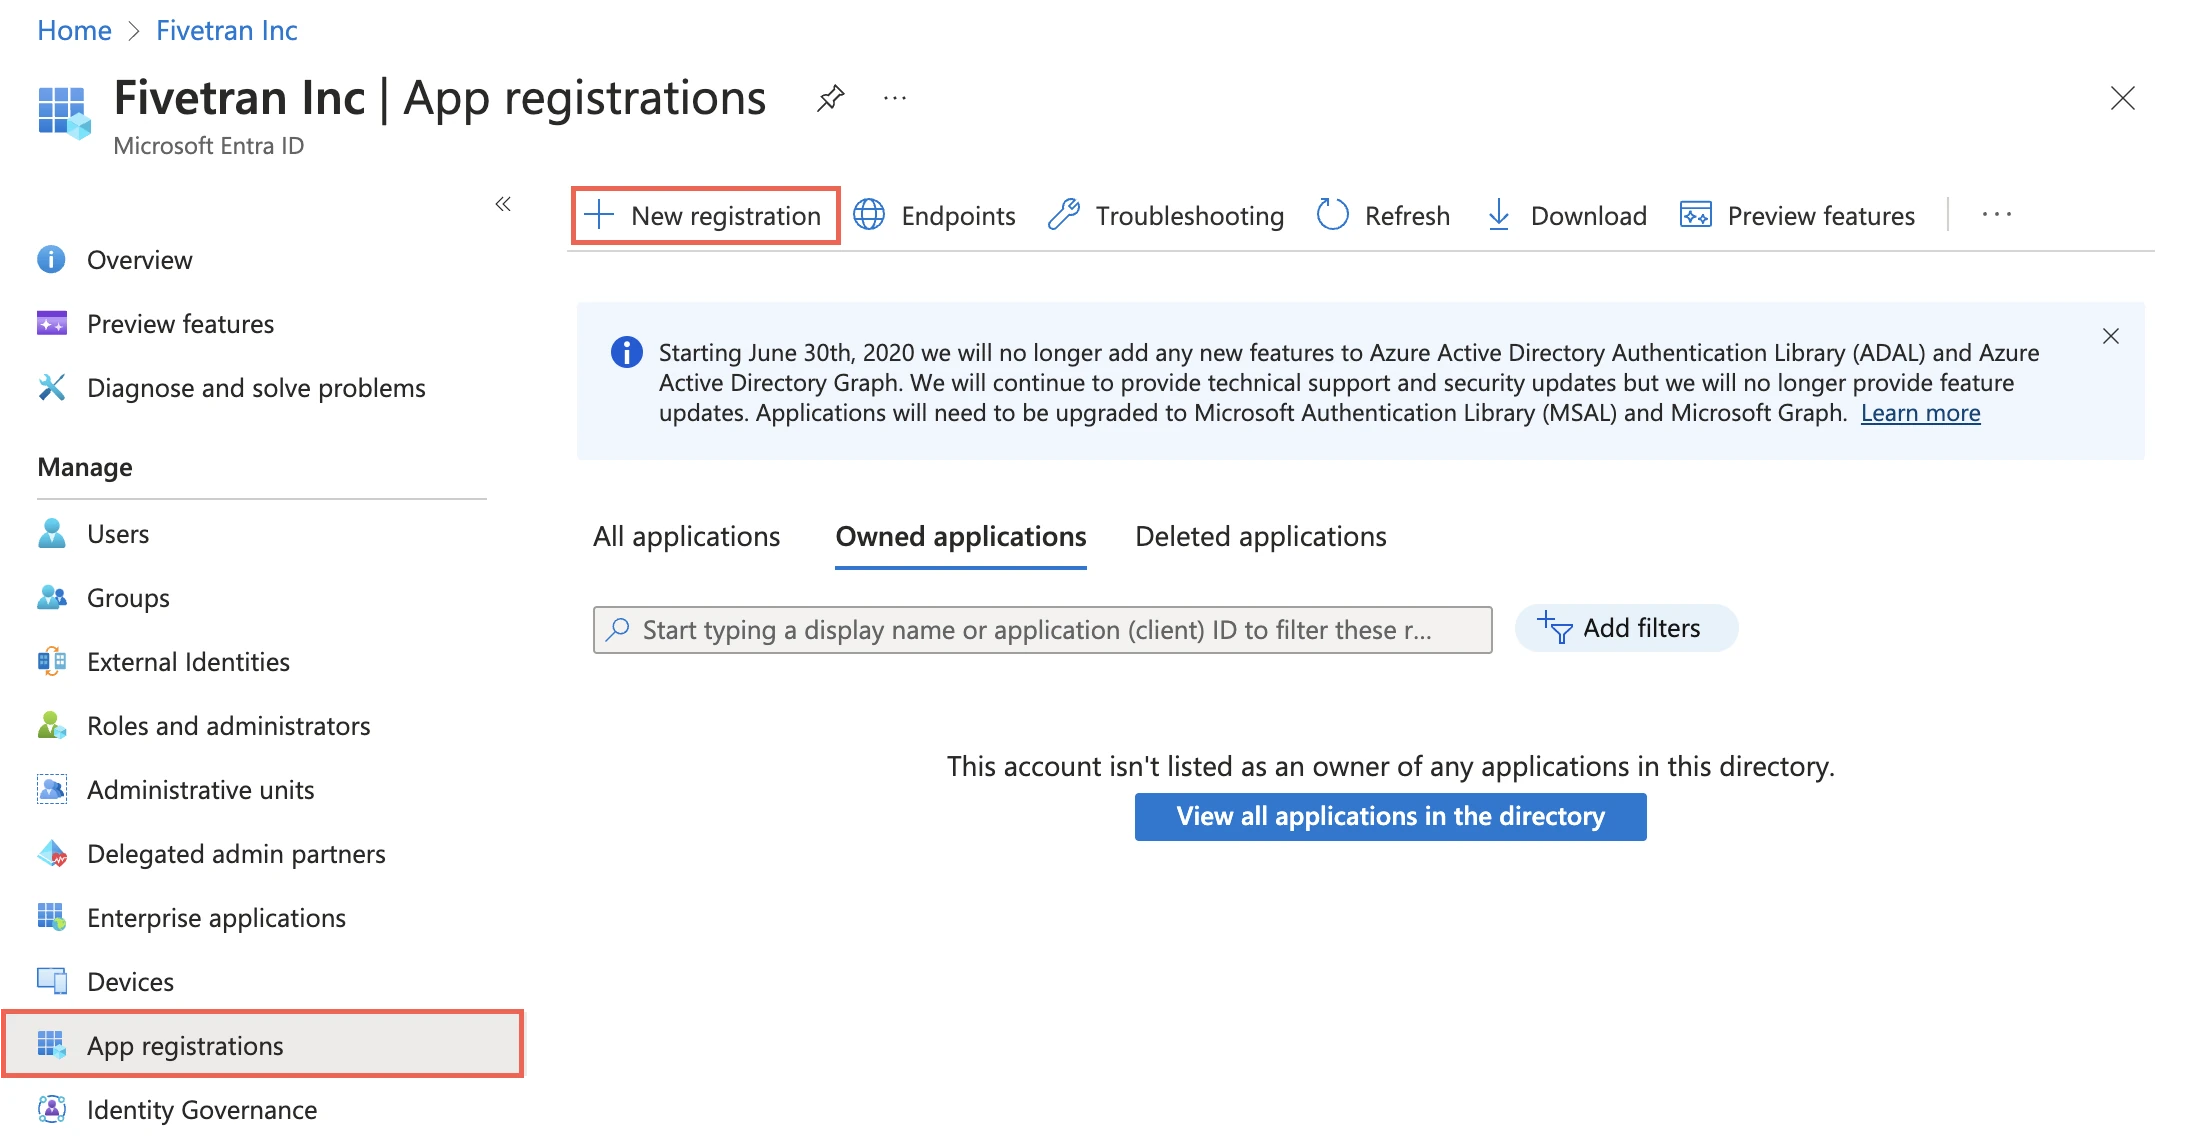
Enter a Name for the application.
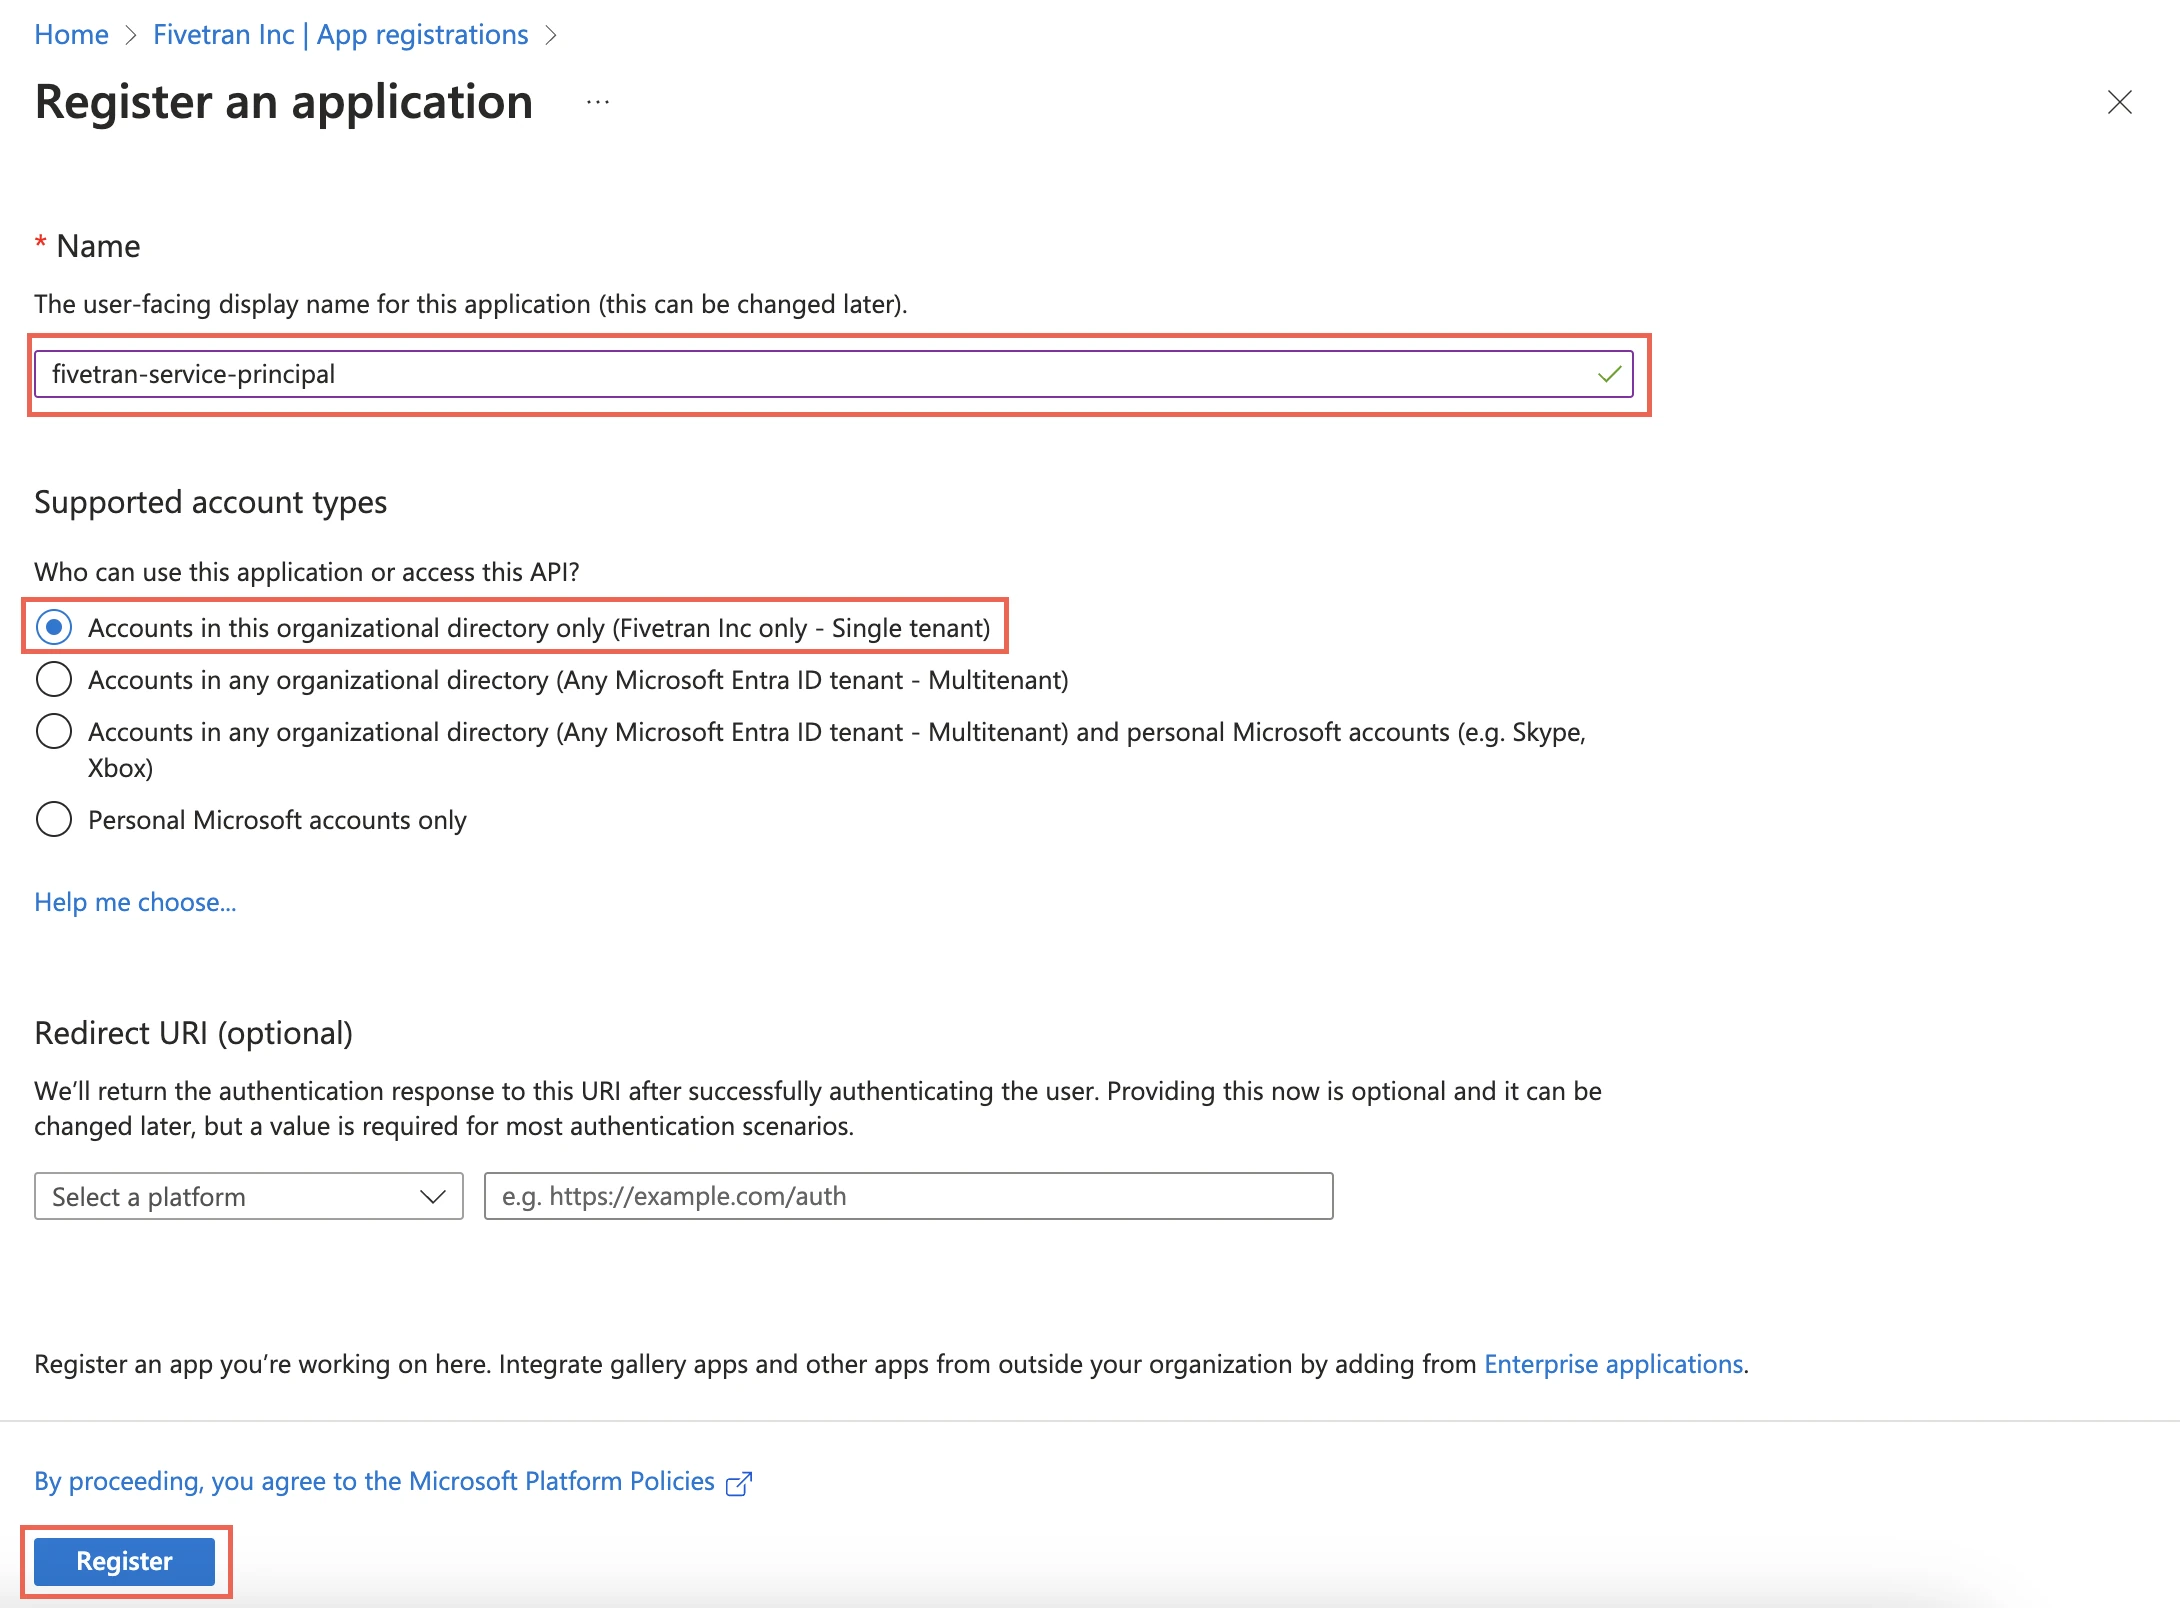
In the Supported account types section, select Accounts in this organizational directory only and click Register.
Make a note of the Application (client) ID and Directory (tenant) ID. You will need them to configure Fivetran.
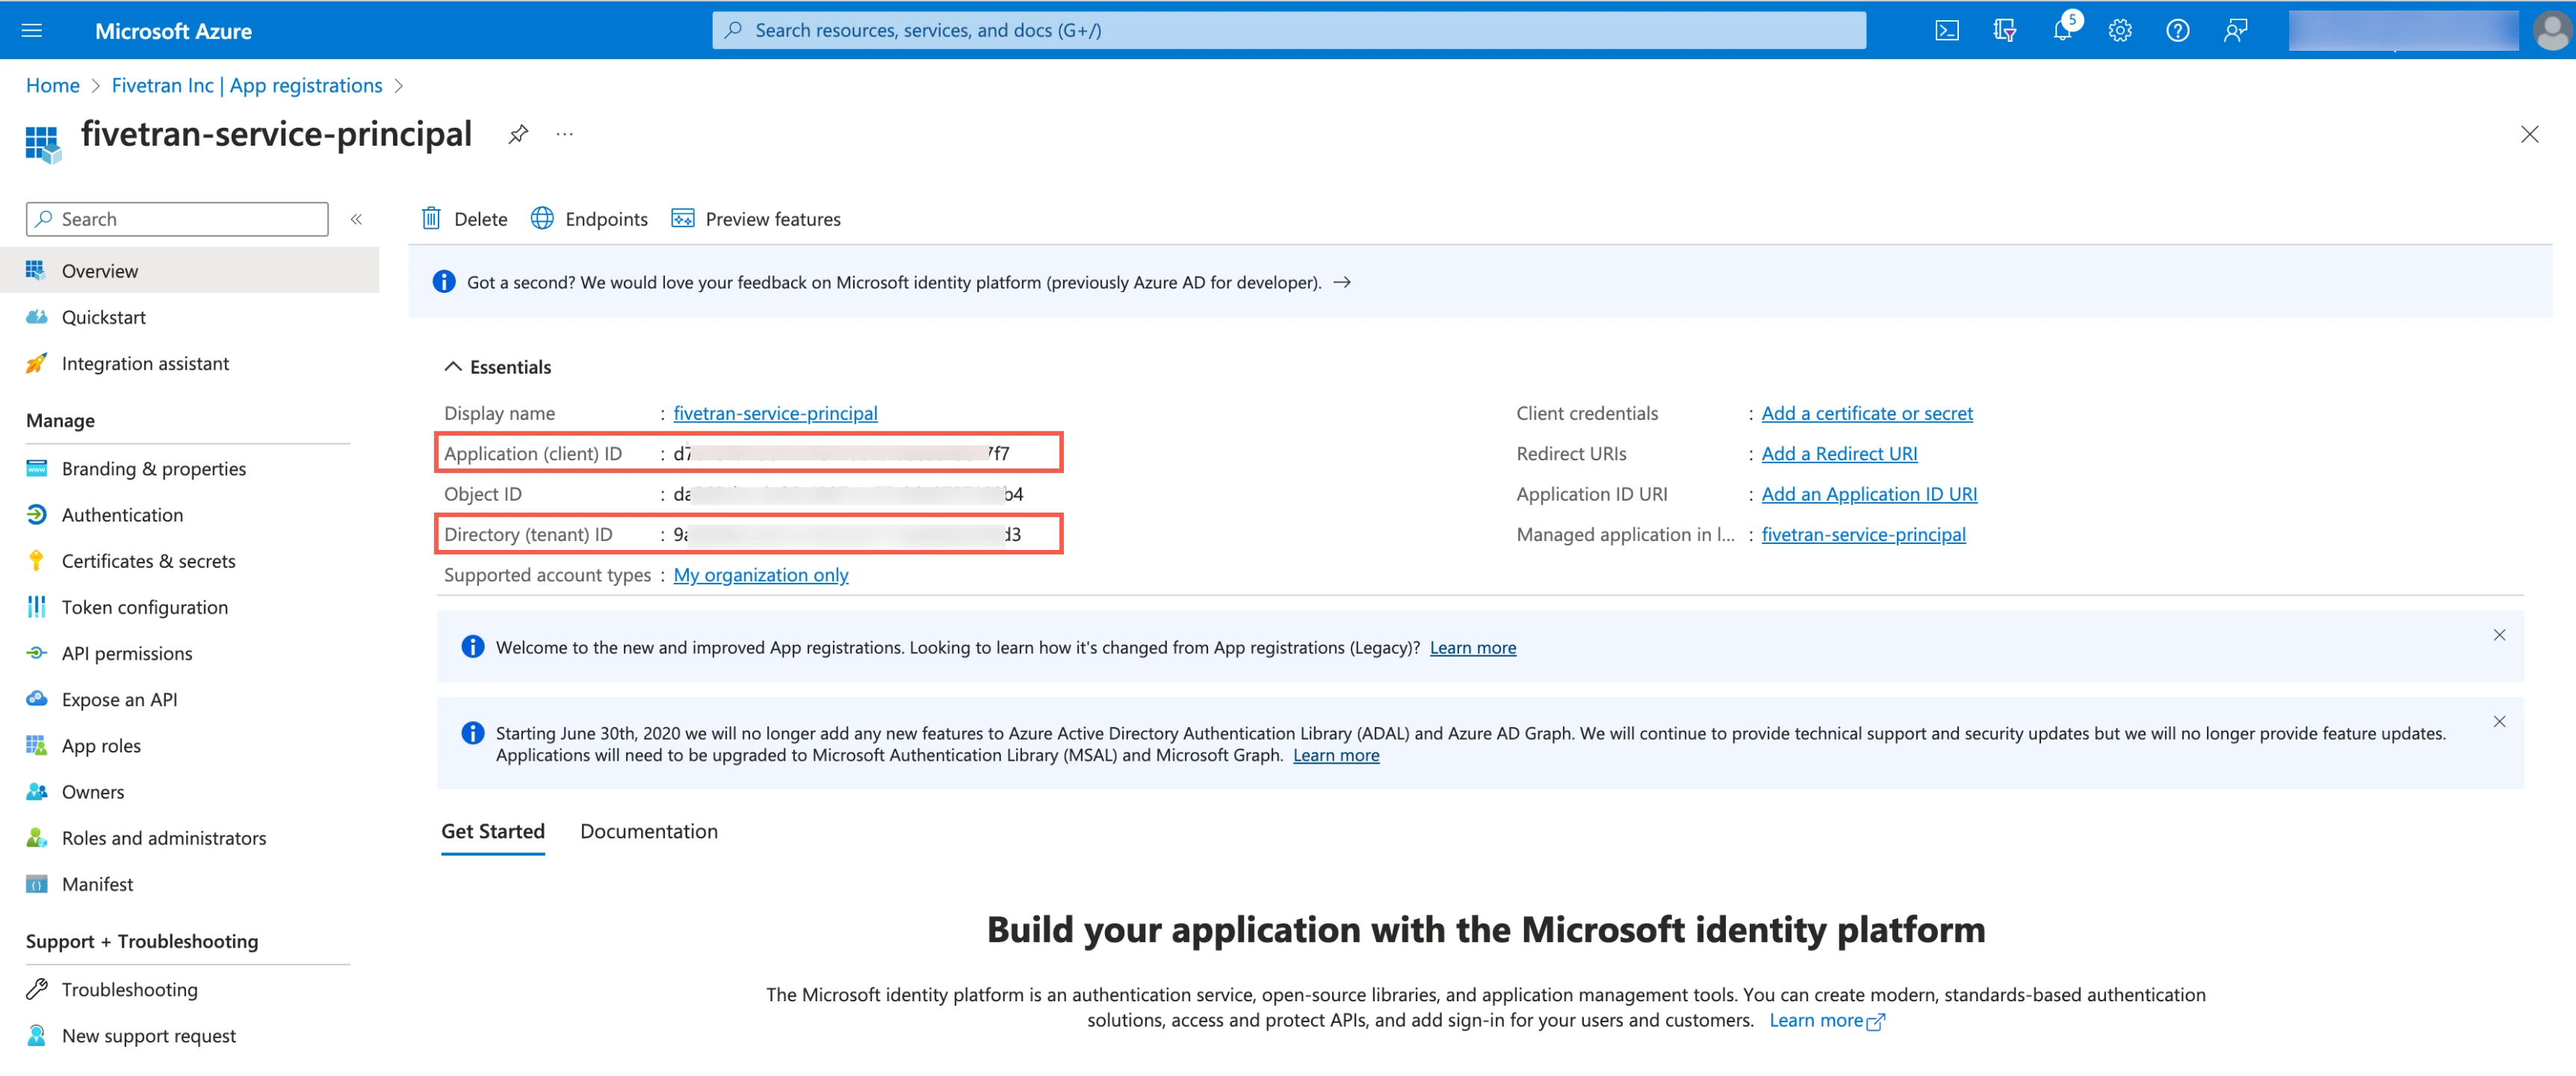
Create client secret
Select the application you registered.
In the navigation menu, go to Certificates & secrets and click + New client secret.
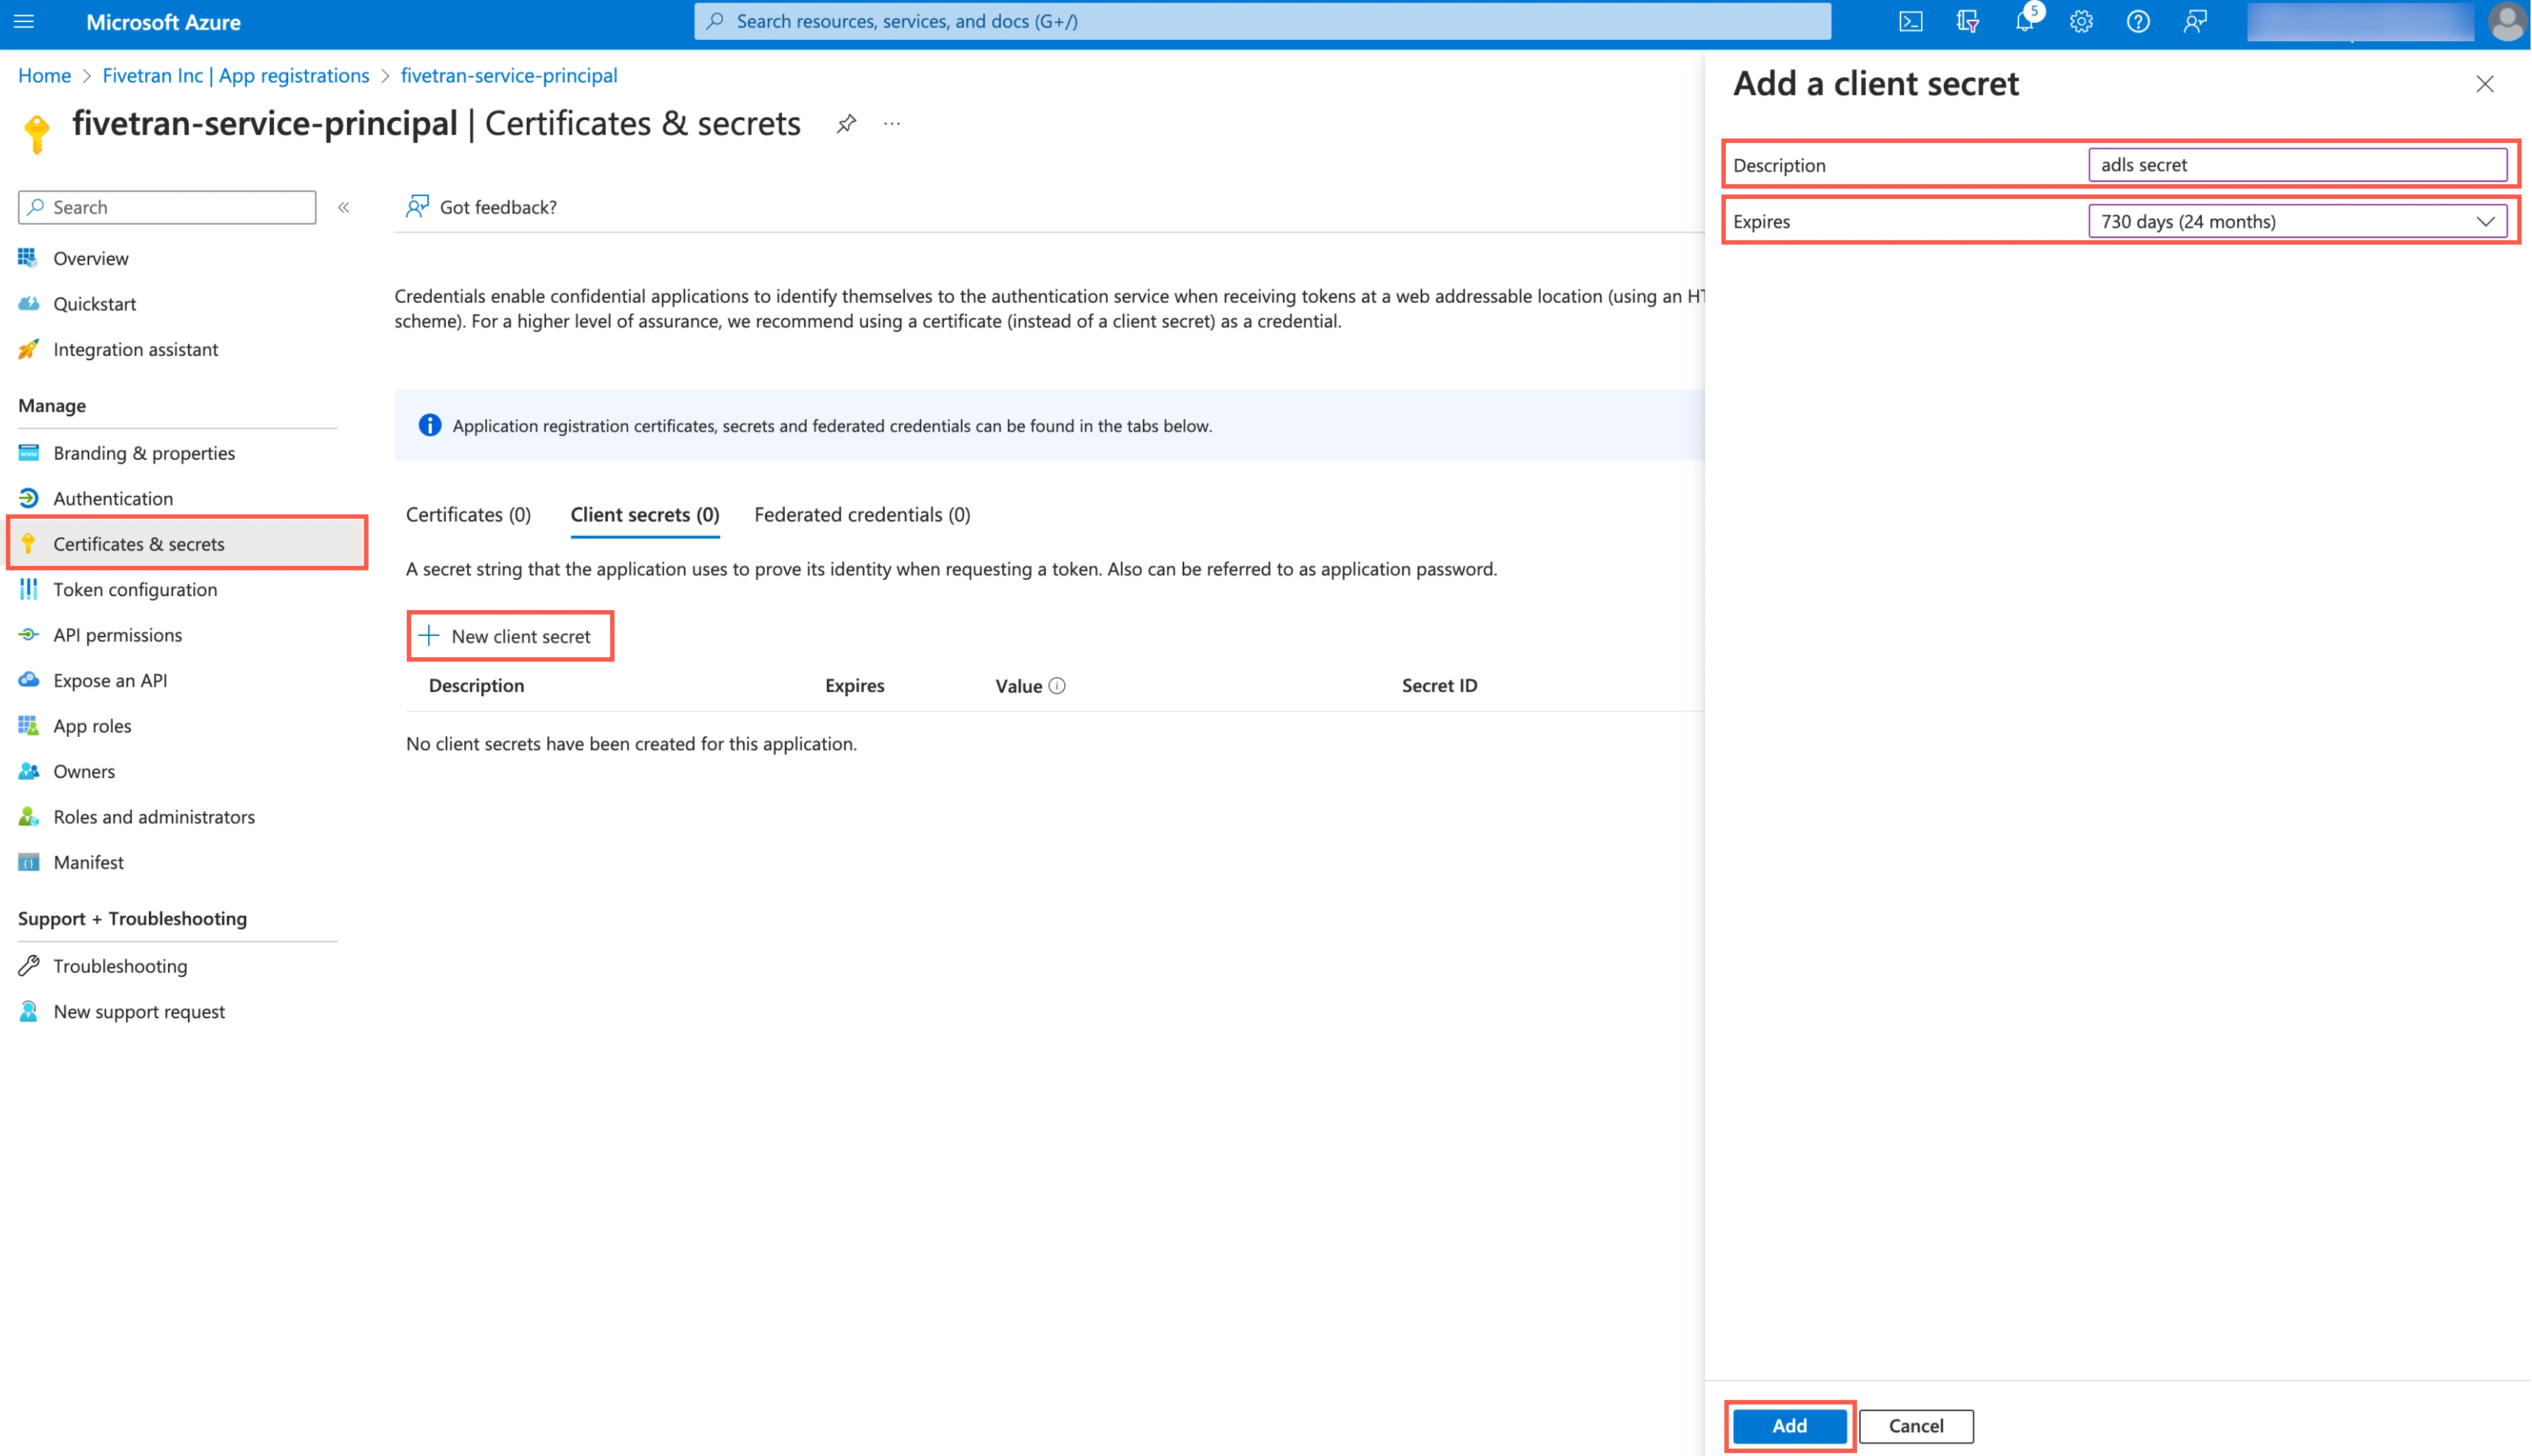
Enter a Description for your client secret.
In the Expires drop-down menu, select an expiry period for the client secret.
Click Add.
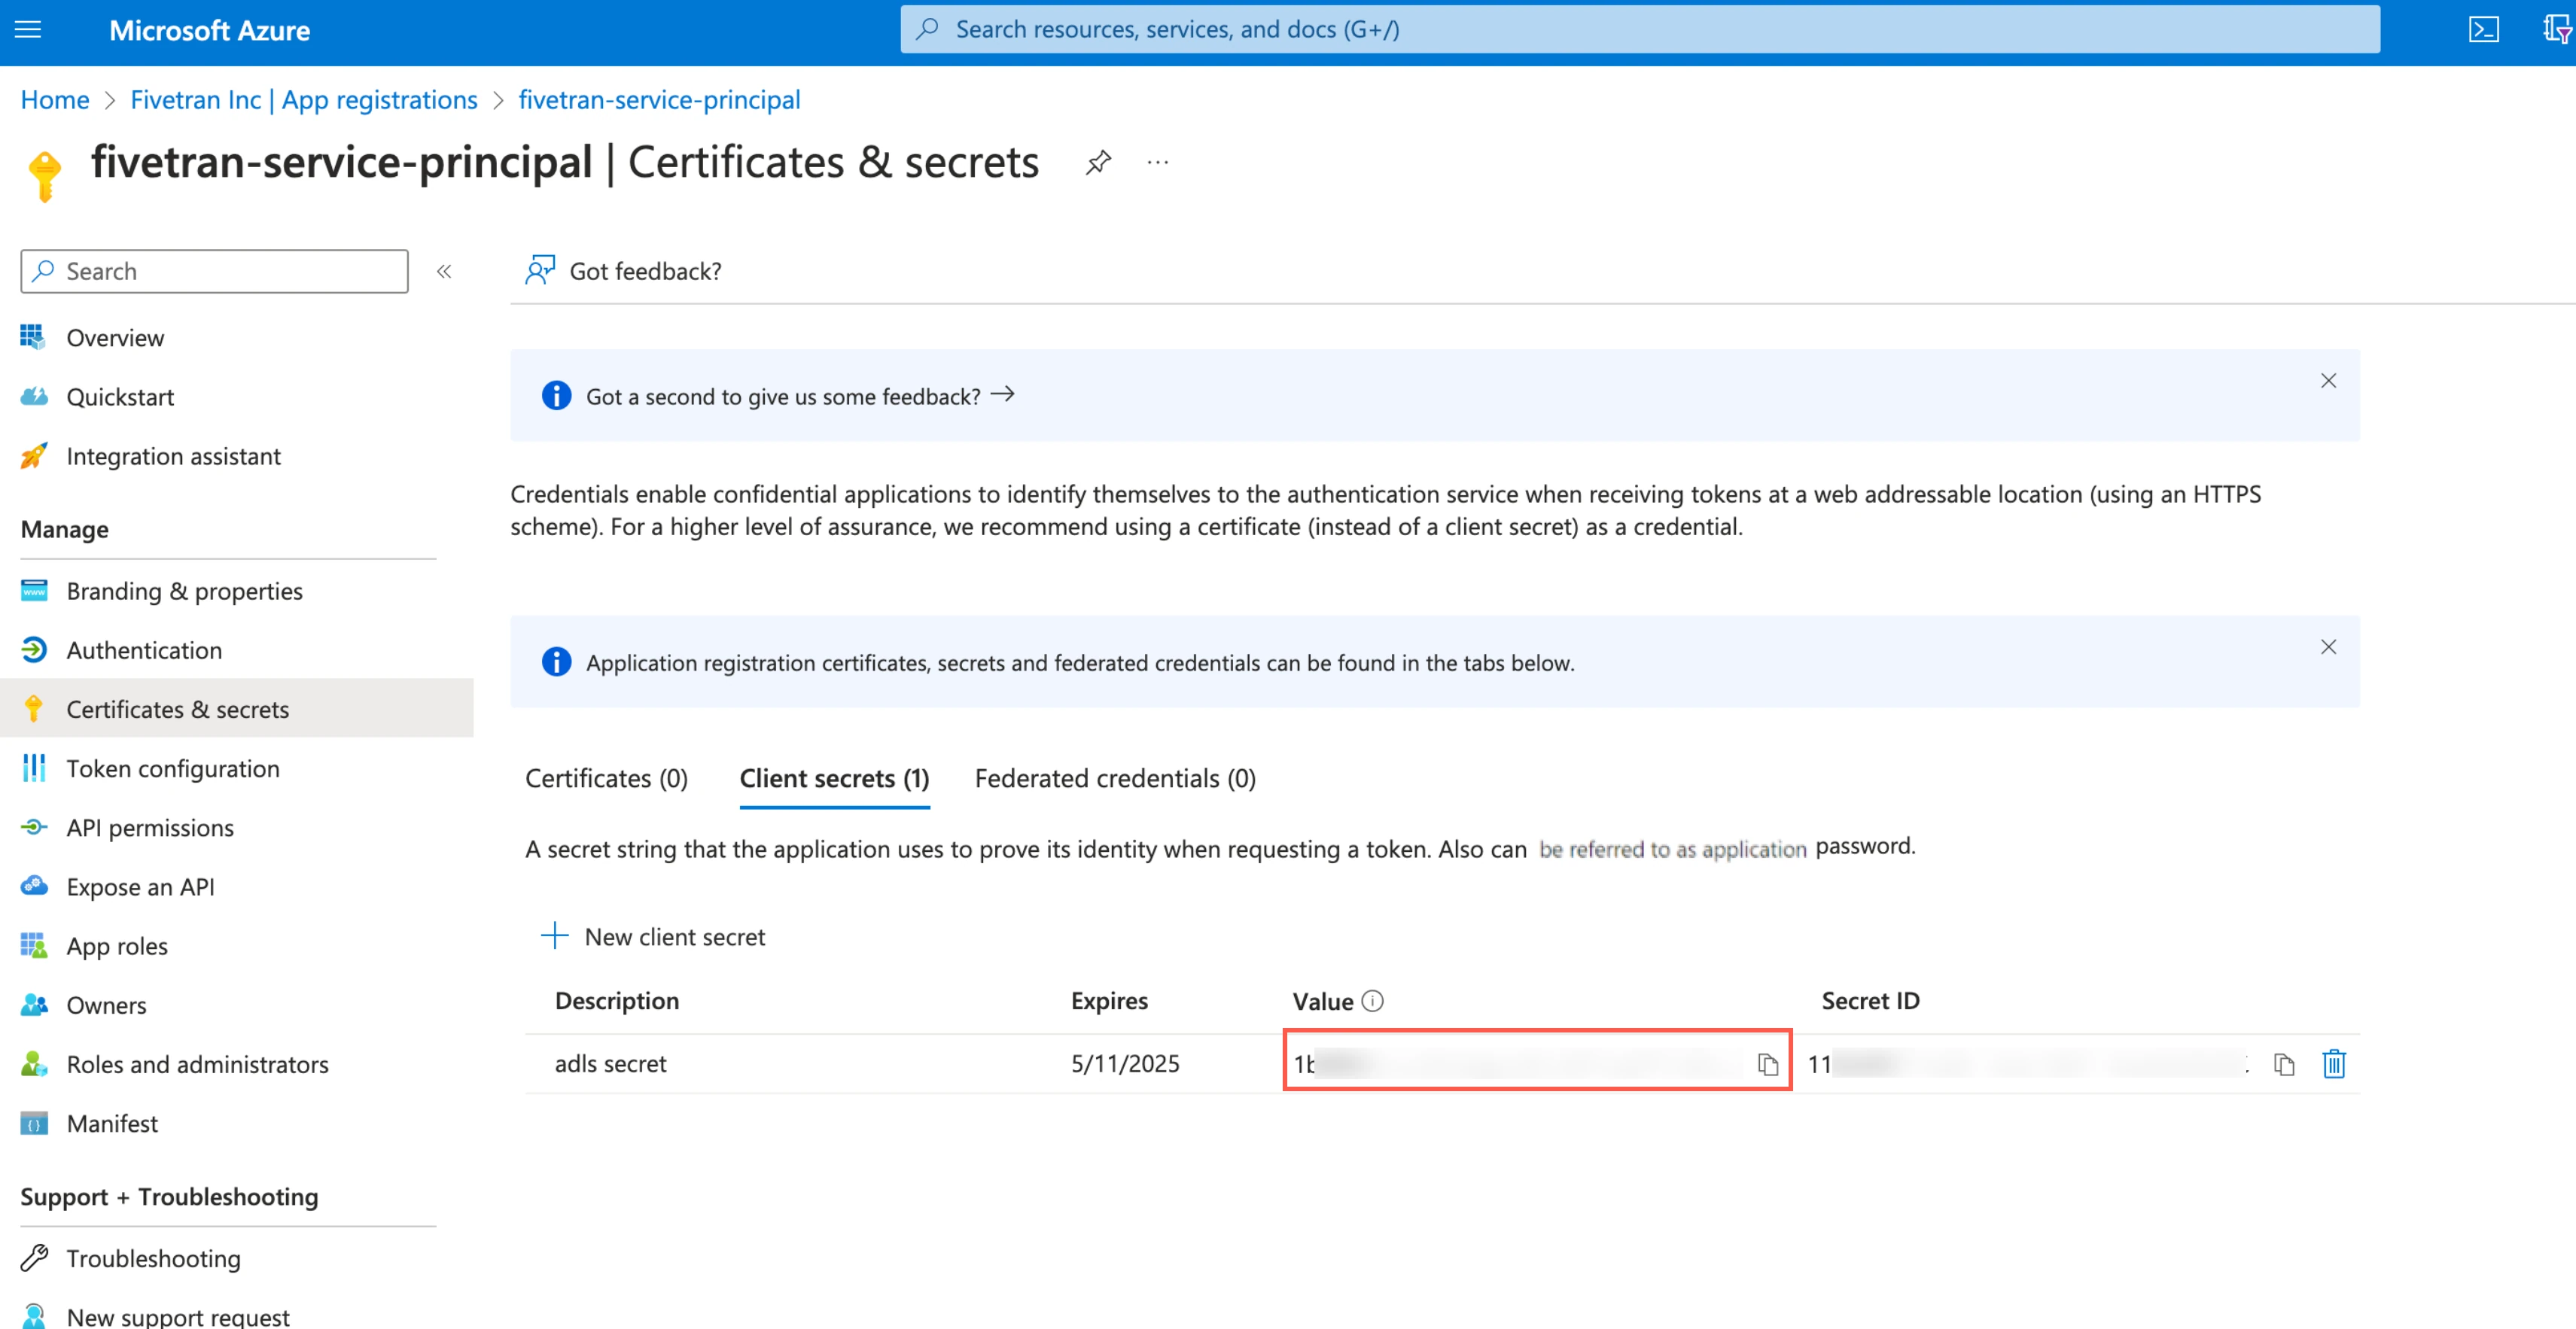
Make a note of the client secret. You will need it to configure Fivetran.
Assign role to container
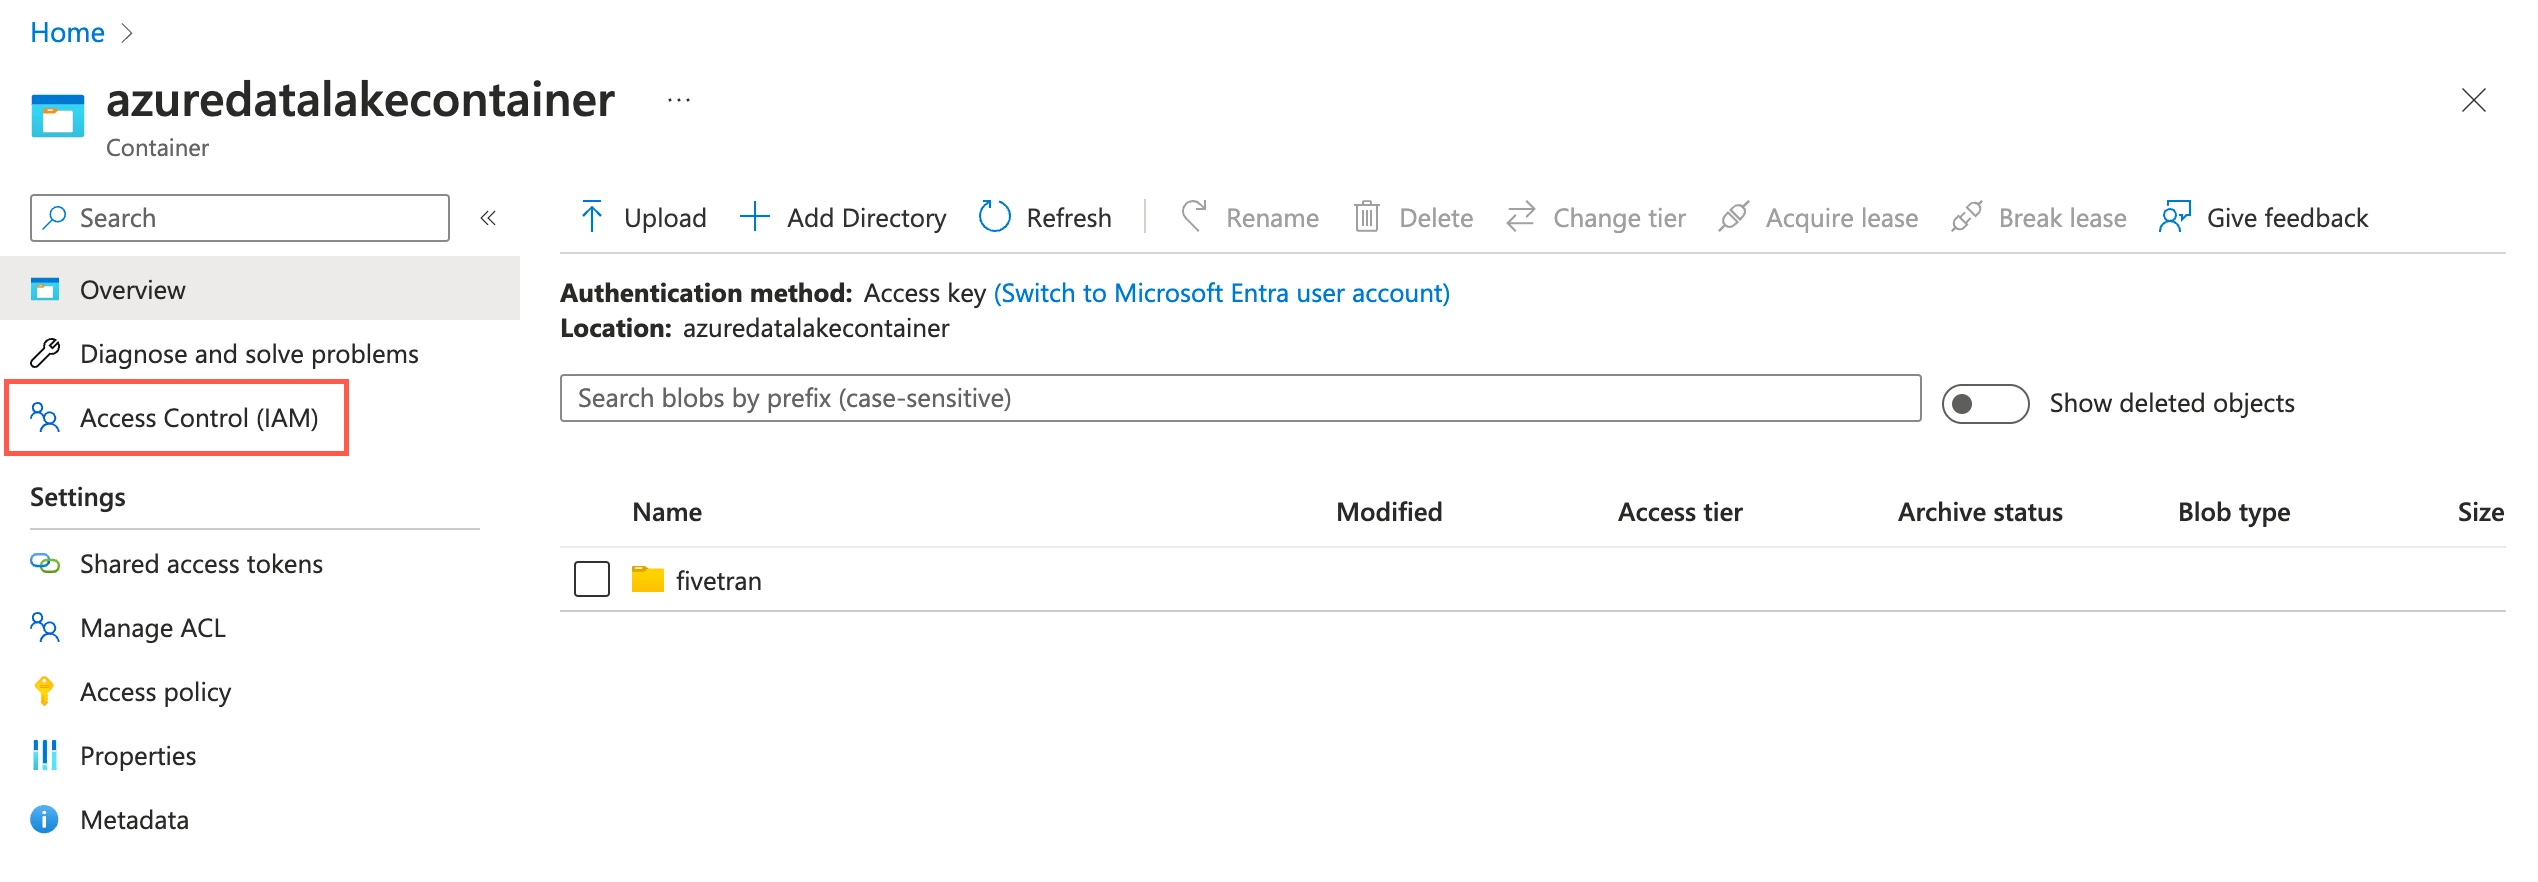
Go to the container you created and select Access Control (IAM).
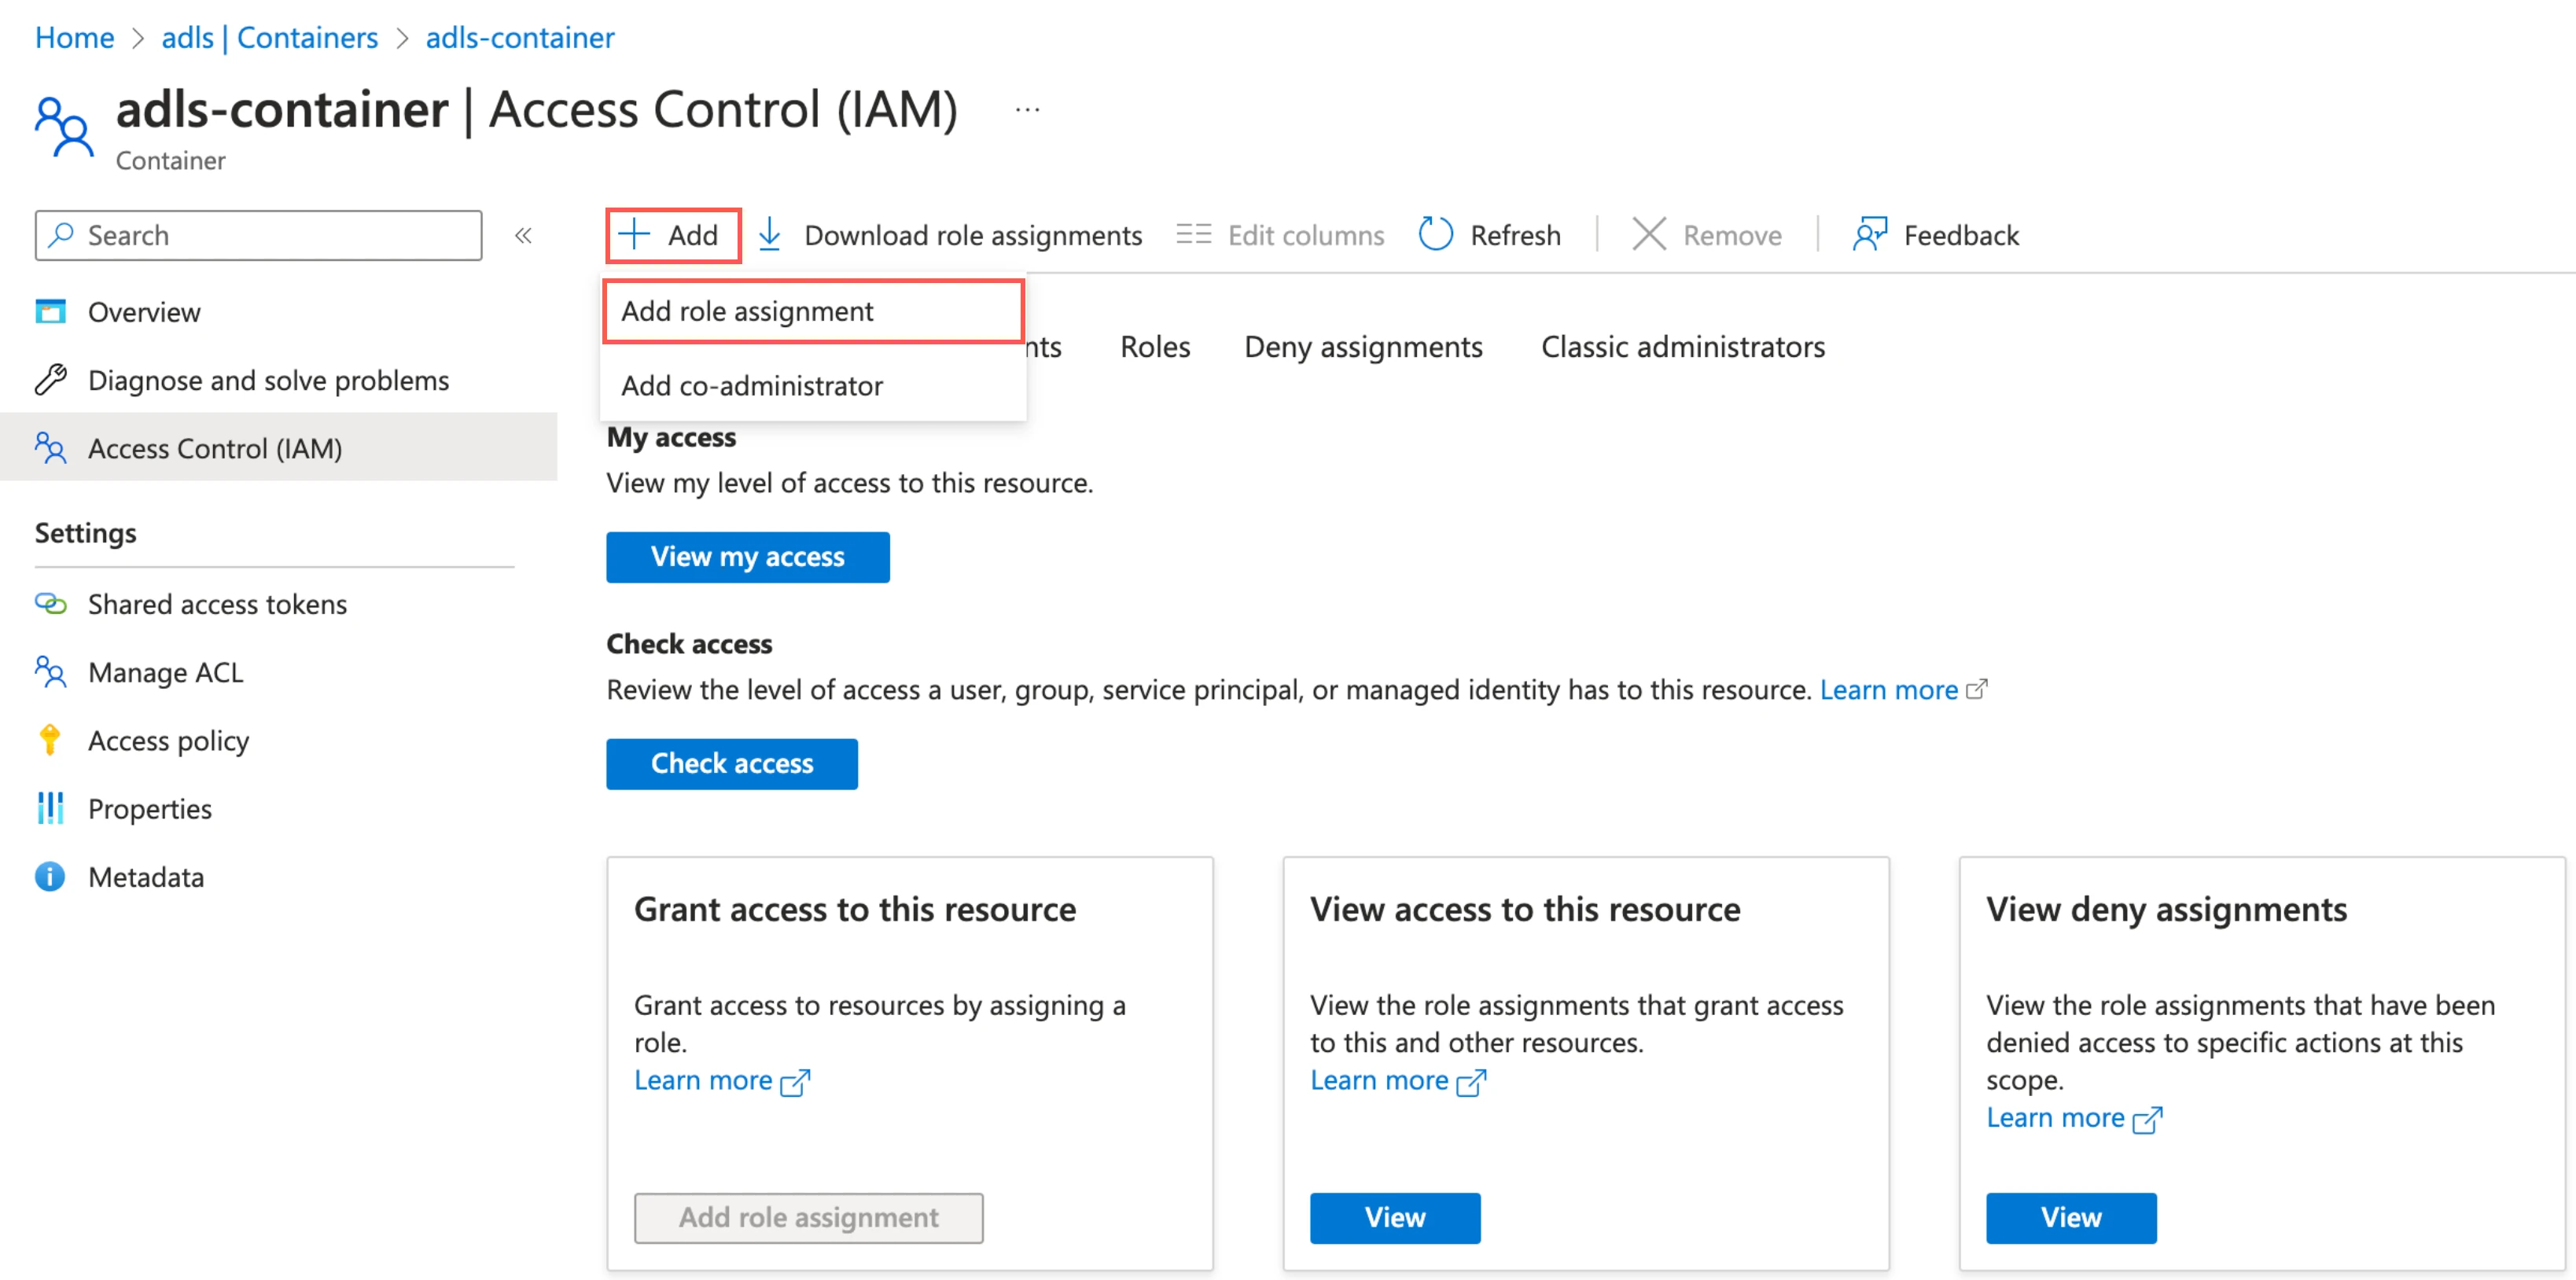
Click Add, then select Add role assignments.
In the Role tab, select Storage Blob Data Contributor and click Next.
In the Member tab, select User, group, or service principal.
Click + Select members.
In the Select members pane, select the service principal you added and then click Select.
Click Review + assign.
(Optional) Connect using Azure Private Link
You must have a Business Critical plan to use Azure Private Link. If any private endpoints exist in the Storage Account > Networking section of your Azure portal, you must use Azure Private Link to connect Fivetran to the container. We strongly recommend that you create your private endpoints by following our Configure Azure Private Link instructions.
Azure Private Link allows Virtual Networks (VNets) and Azure-hosted or on-premises services to communicate with one another without exposing traffic to the public internet. Learn more in Microsoft's Azure Private Link documentation.
Prerequisites
To set up Azure Private Link, you need a Fivetran instance configured to run in Azure.
Configure Azure Private Link
Go to the storage account you created.
On the navigation menu, click Overview.
Make a note of the storage account's name, resource group, and subscription ID and provide these details to your Fivetran account manager.
We set up a Private Link connection for both the
blobanddfsendpoints since Azure storage uses different private endpoints for different operations. For more information, see Microsoft's documentation to understand how Azure Storage uses private endpoints.
Once your account manager confirms that the setup was successful, verify and approve both the endpoint connection requests from Fivetran. Fivetran then completes the Private Link setup for your Azure Data Lake Storage destination.

(Optional) Set up automatic schema migration for Delta Lake tables in Databricks
Expand for instructions
Prerequisites
To configure automatic schema migration for the Delta Lake tables, you need the following:
- A Databricks account.
- Unity Catalog enabled in your Databricks workspace. Unity Catalog is a unified governance solution for all data and AI assets including files, tables, machine learning models and dashboards in your lakehouse on any cloud. We recommend that you use Fivetran with Unity Catalog as it simplifies access control and sharing of the tables that Fivetran creates. Legacy deployments can continue to use Databricks without Unity Catalog.
- A SQL warehouse. SQL warehouses are optimized for data ingestion and analytics workloads, start and shut down rapidly and are automatically upgraded with the latest enhancements by Databricks. Legacy deployments can continue to use Databricks clusters with Databricks Runtime v7.0 or above.
Configure Unity Catalog
Skip this step if your Unity Catalog is already configured in Databricks.
Create storage account
You can use an Azure Blob Storage account or Azure Data Lake Storage Gen2 storage account for Unity Catalog.
Depending on the type of storage account you want to use, do one of the following:
Create an Azure Blob Storage account by following the instructions in Microsoft documentation.
Create an Azure Data Lake Storage Gen2 storage account by following the instructions in Microsoft documentation.
Create container
Depending on your storage account type, do one of the following:
Create a container in Azure Blob storage by following the instructions in Microsoft documentation.
Create a container in ADLS Gen2 storage by following the instructions in Microsoft documentation.
Configure managed identity for Unity Catalog
Perform this step only if you want to access the metastore using a managed identity.
You can configure Unity Catalog (Preview) to use an Azure managed identity to access storage containers.
To configure a managed identity for Unity Catalog, follow the instructions in Databricks documentation.
Create workspace
Log in to the Azure portal.
Create a workspace by following the instructions in Microsoft documentation.
Create metastore and attach workspace
Create a metastore and attach your workspace by following the instructions in Microsoft documentation.
Enable Unity Catalog for workspace
Enable Unity Catalog for your workspace by following the instructions in Microsoft documentation.
Configure external data storage
Skip this step if your external data storage is already configured in Databricks.
Create storage credentials
Log in to your Databricks workspace.
Go to Data Explorer > External Data.
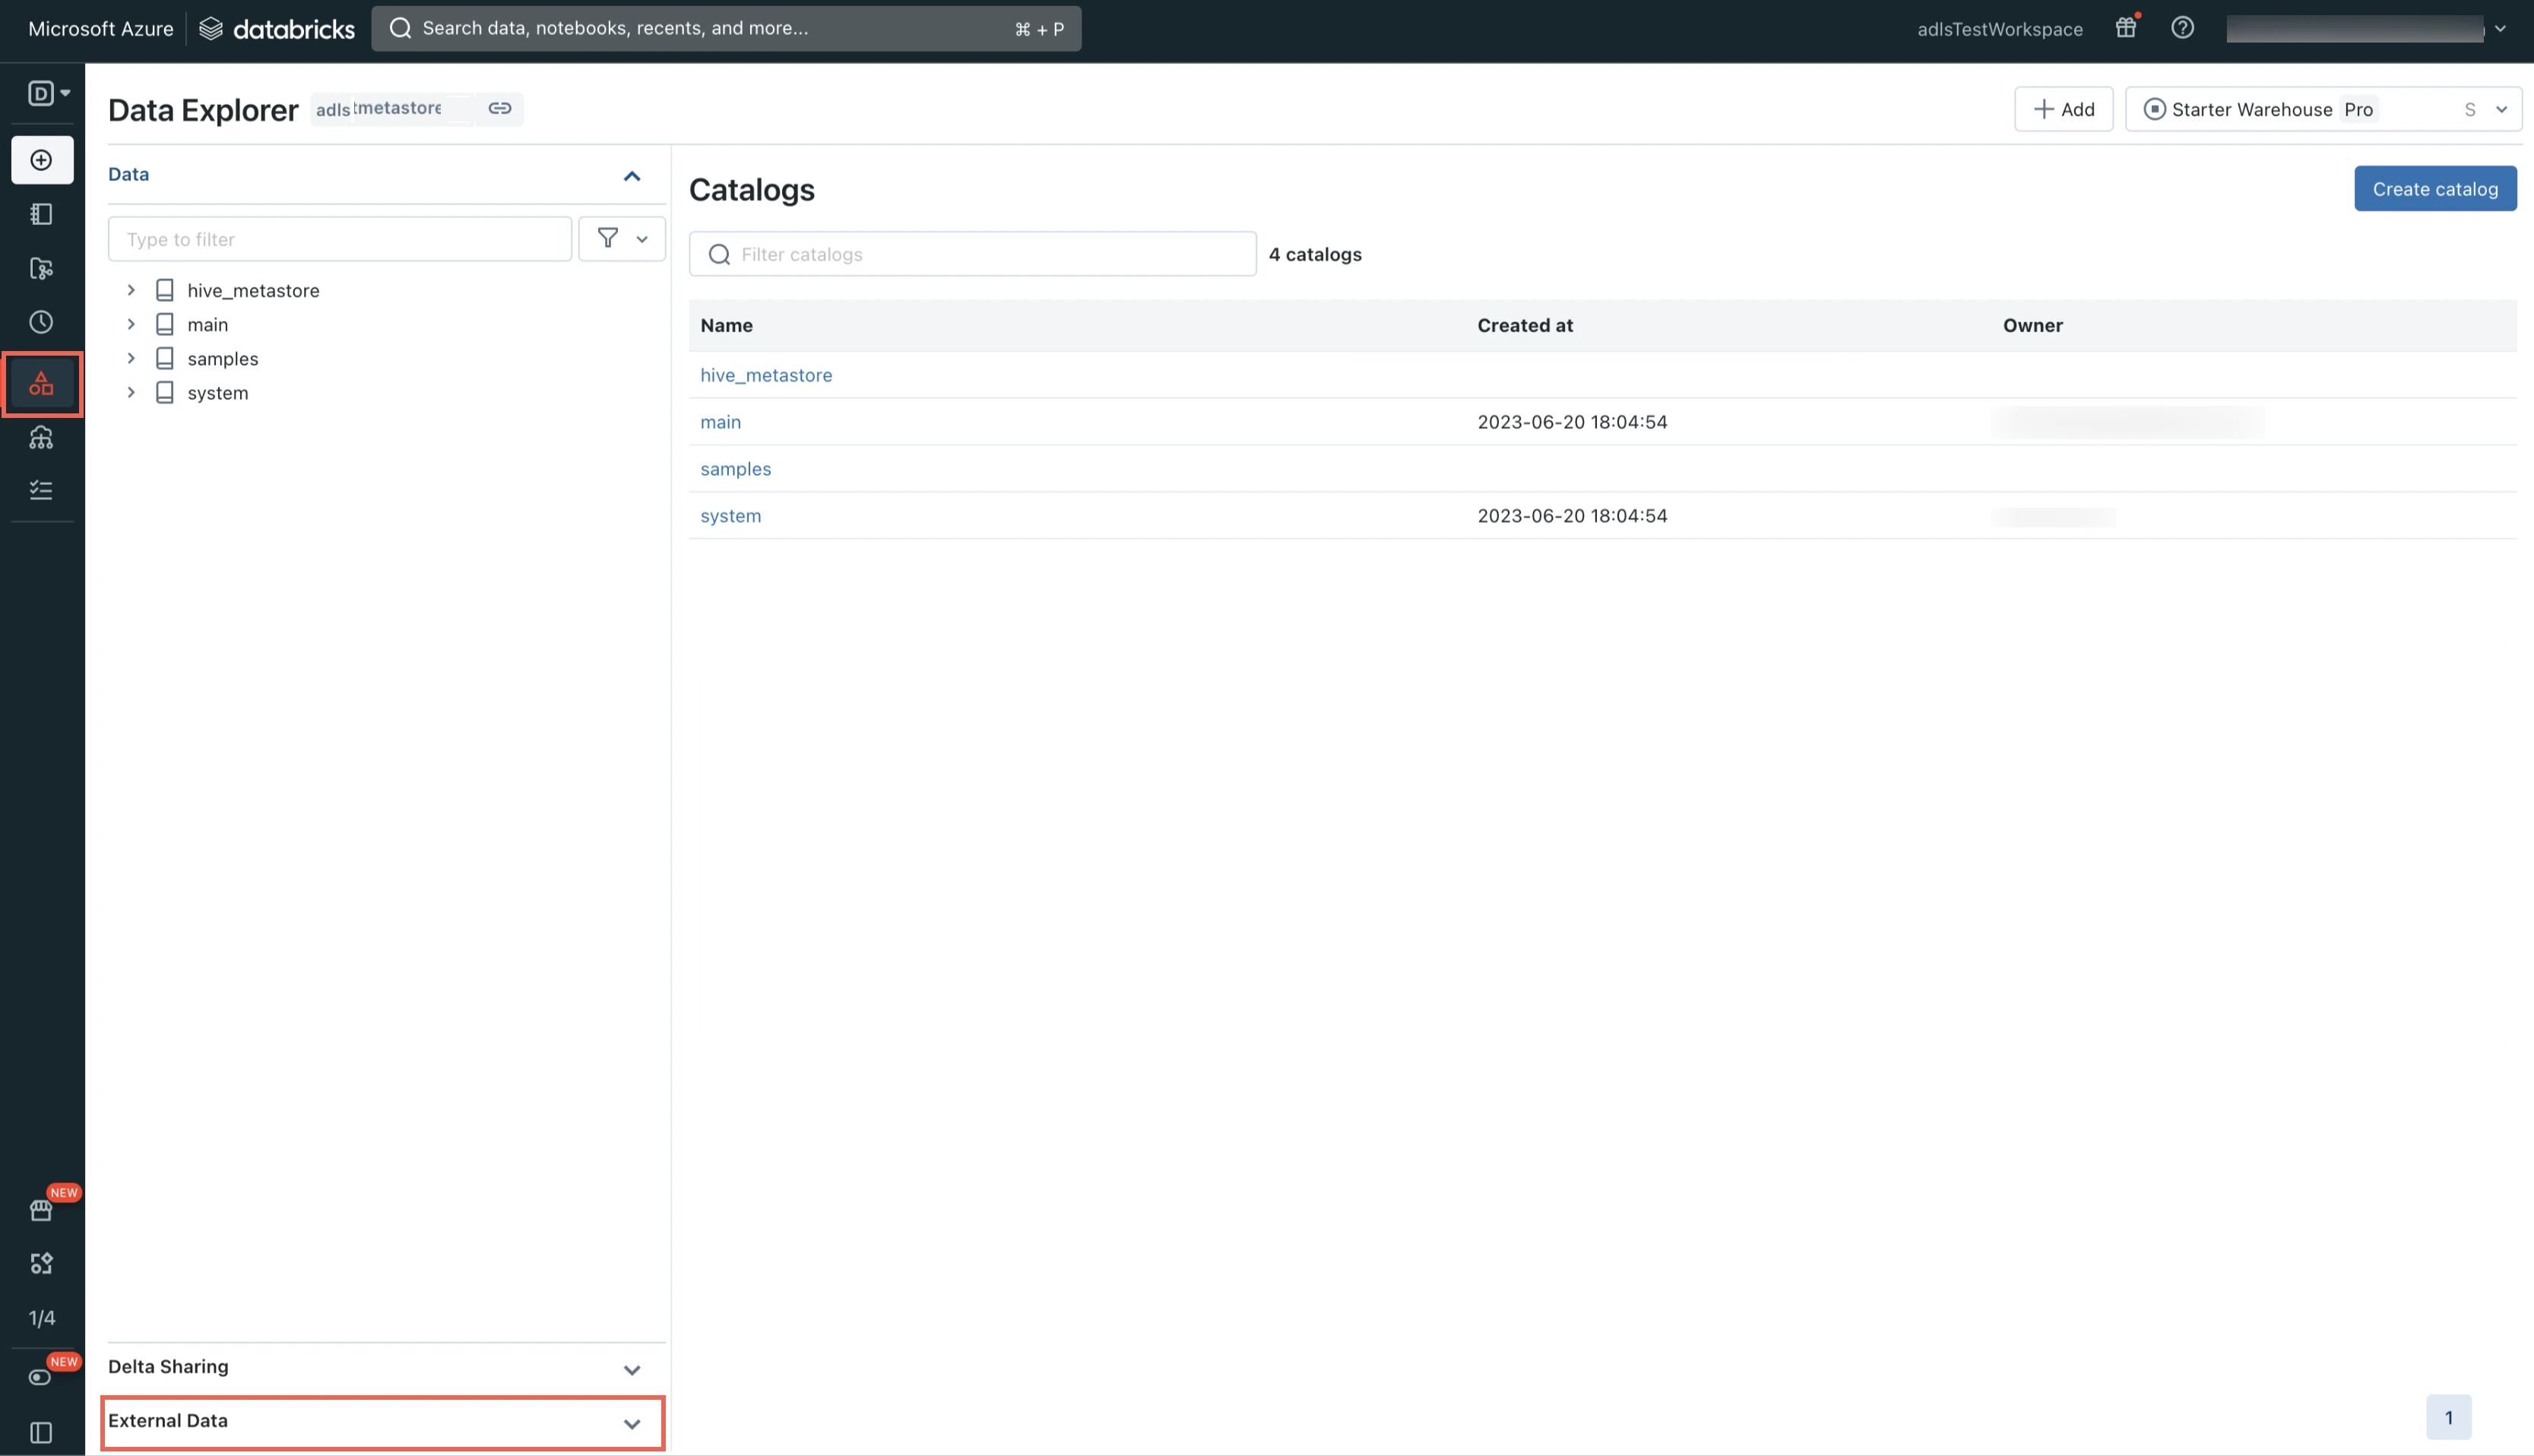
Select Storage Credentials.

Click Add and then select Add a storage credential.
Select Service Principal.

Enter the Storage credential name of your choice.
Enter the Directory ID and Application ID of the service principal you created for your ADLS destination.
Enter the Client Secret you created for your ADLS destination.
Click Create.
You can also configure Unity Catalog to use an Azure managed identity for authenticating your storage account.
Create external location
Go to the Data Explorer page.
In the Data Explorer page, select External Locations.

Click Add and then select Add an external location.
Enter the External location name.
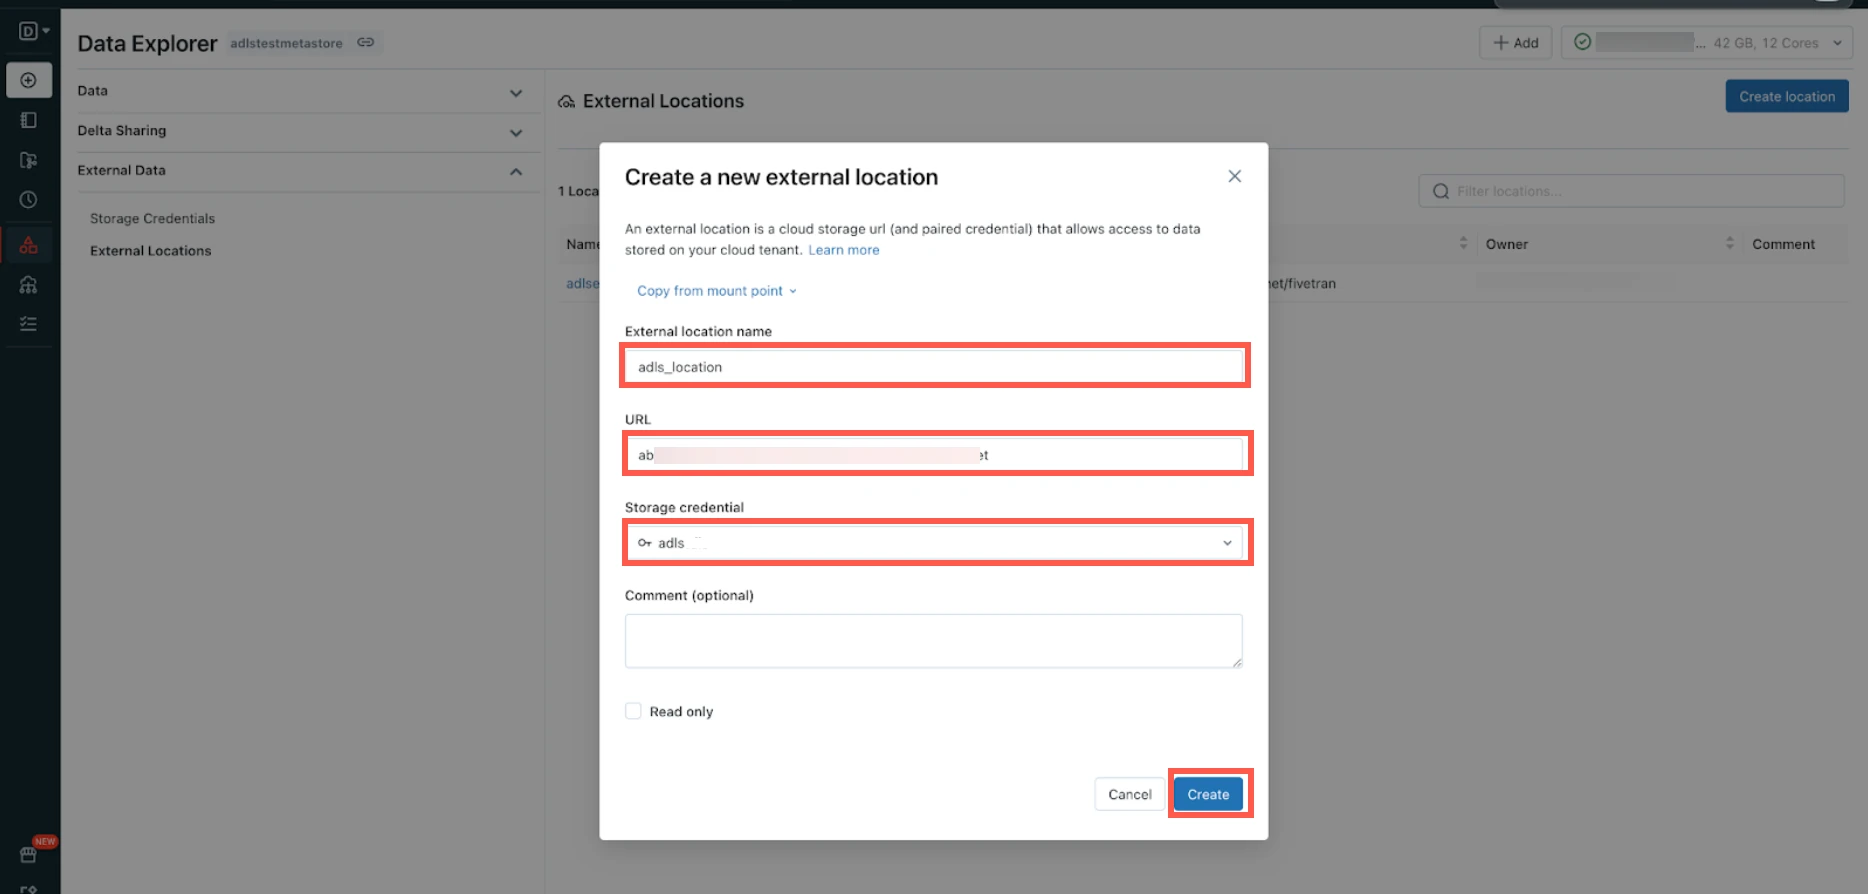
Enter your ADLS account URL.
Select the Storage credential you created in the Create storage credentials step.
Click Create.
(Optional) Connect using Azure Private Link
You must have a Business Critical plan to use Azure Private Link.
You can connect Fivetran to your Databricks account using Azure Private Link. Azure Private Link allows VNet and Azure-hosted or on-premises services to communicate with one another without exposing traffic to the public internet. Learn more in Microsoft's Azure Private Link documentation.
Connect Databricks cluster
If you want to set up a SQL warehouse, skip to the Connect SQL warehouse step
Log in to your Databricks workspace
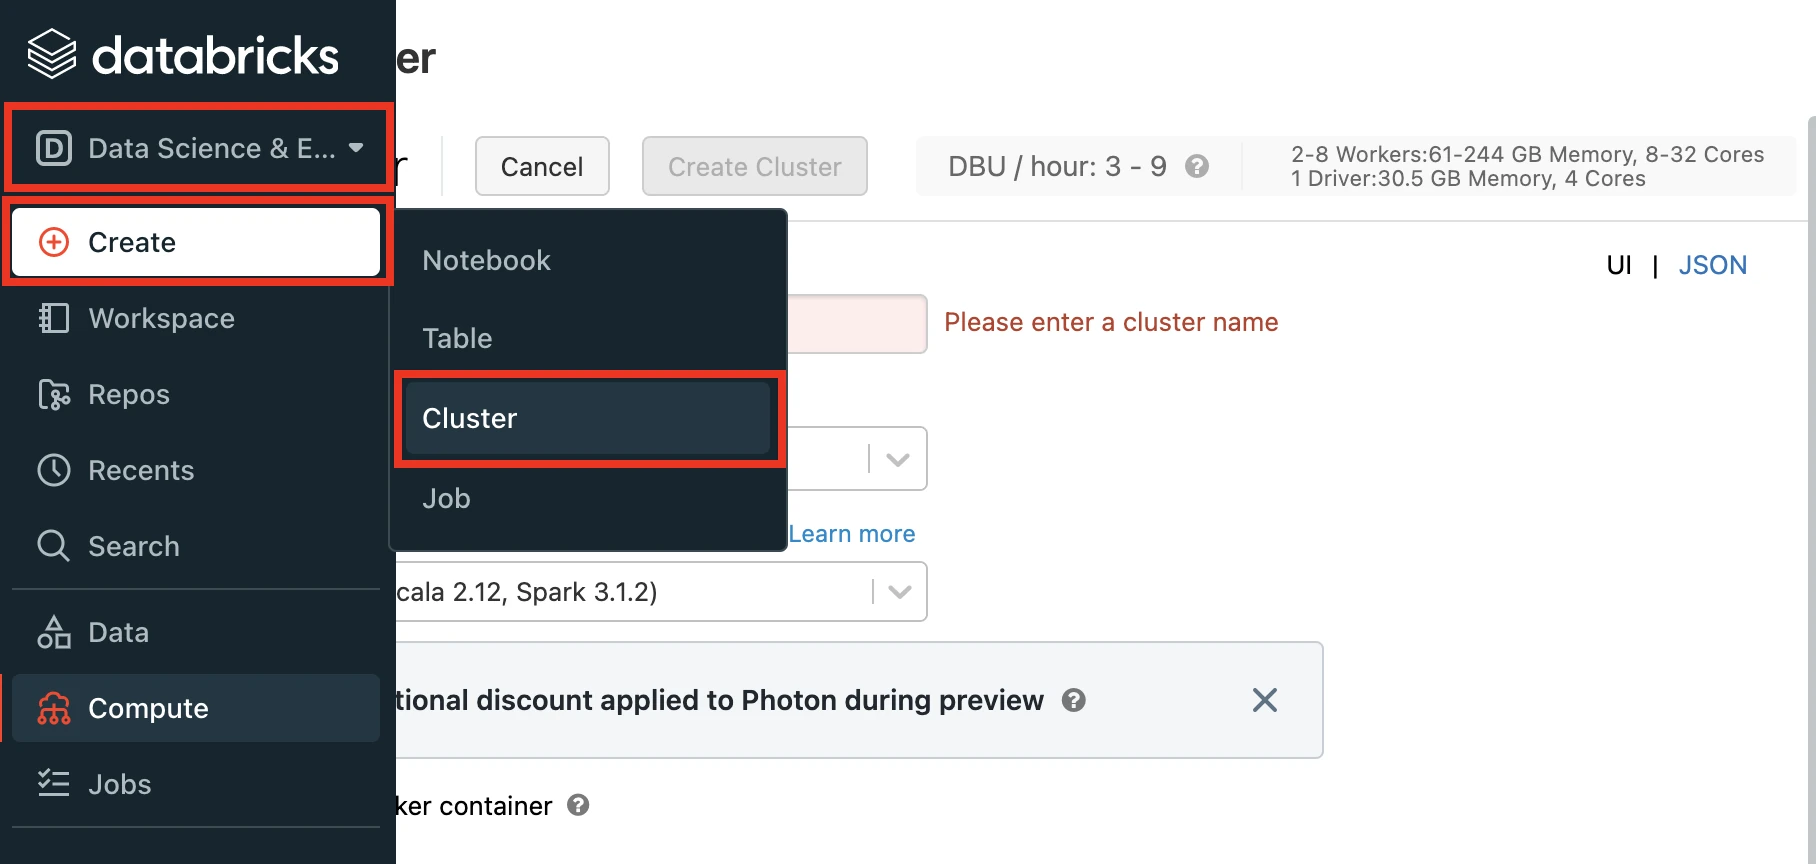
In the Databricks console, go to Data Science & Engineering > Create > Cluster.
Enter a Cluster name of your choice.
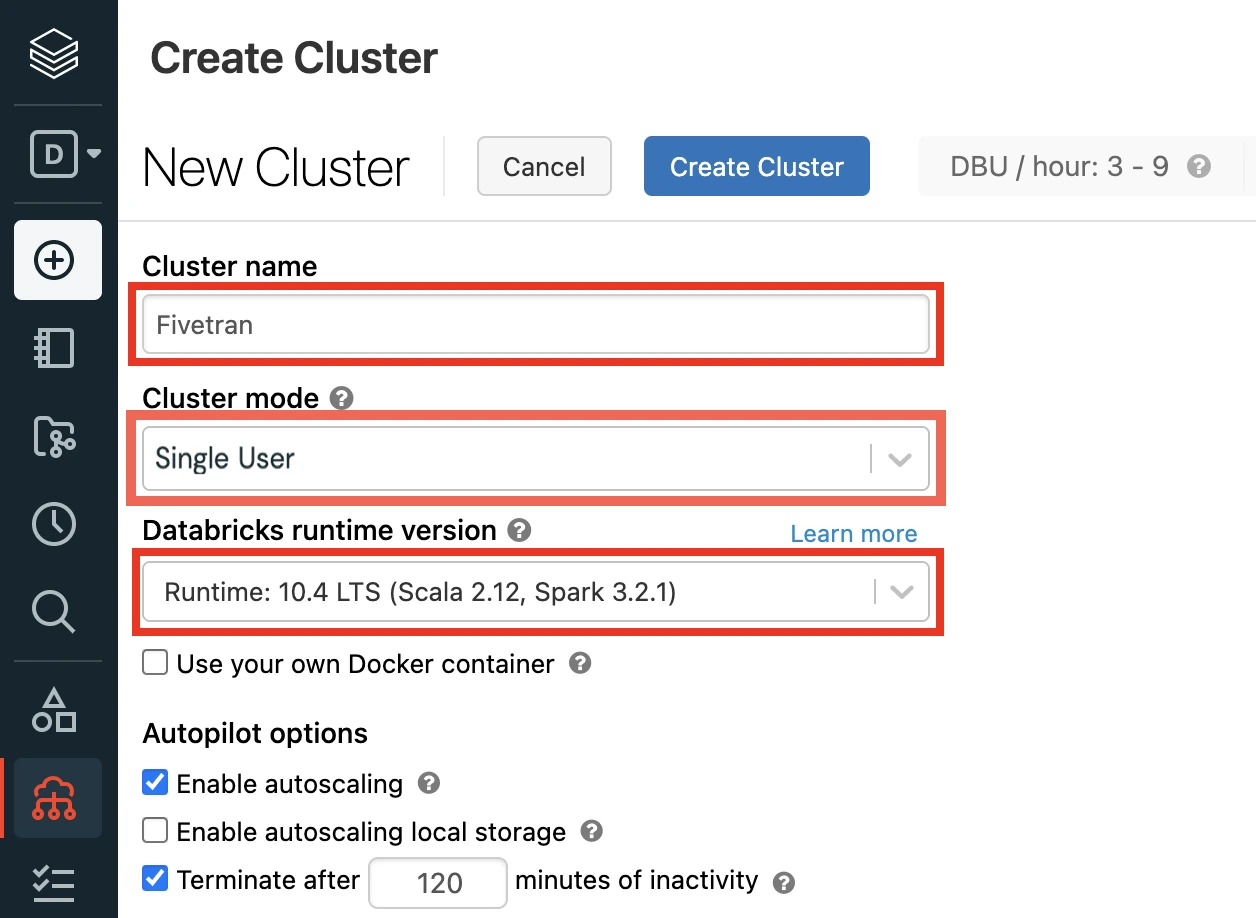
Select the Cluster mode.
For more information about cluster modes, see Databricks documentation.
Set the Databricks Runtime Version to 7.3 or above (recommended version: 10.4).
In the Advanced Options window, in the Security mode drop-down menu, select either Single user or User isolation.
Click Create Cluster.
In the Advanced Options window, select JDBC/ODBC.
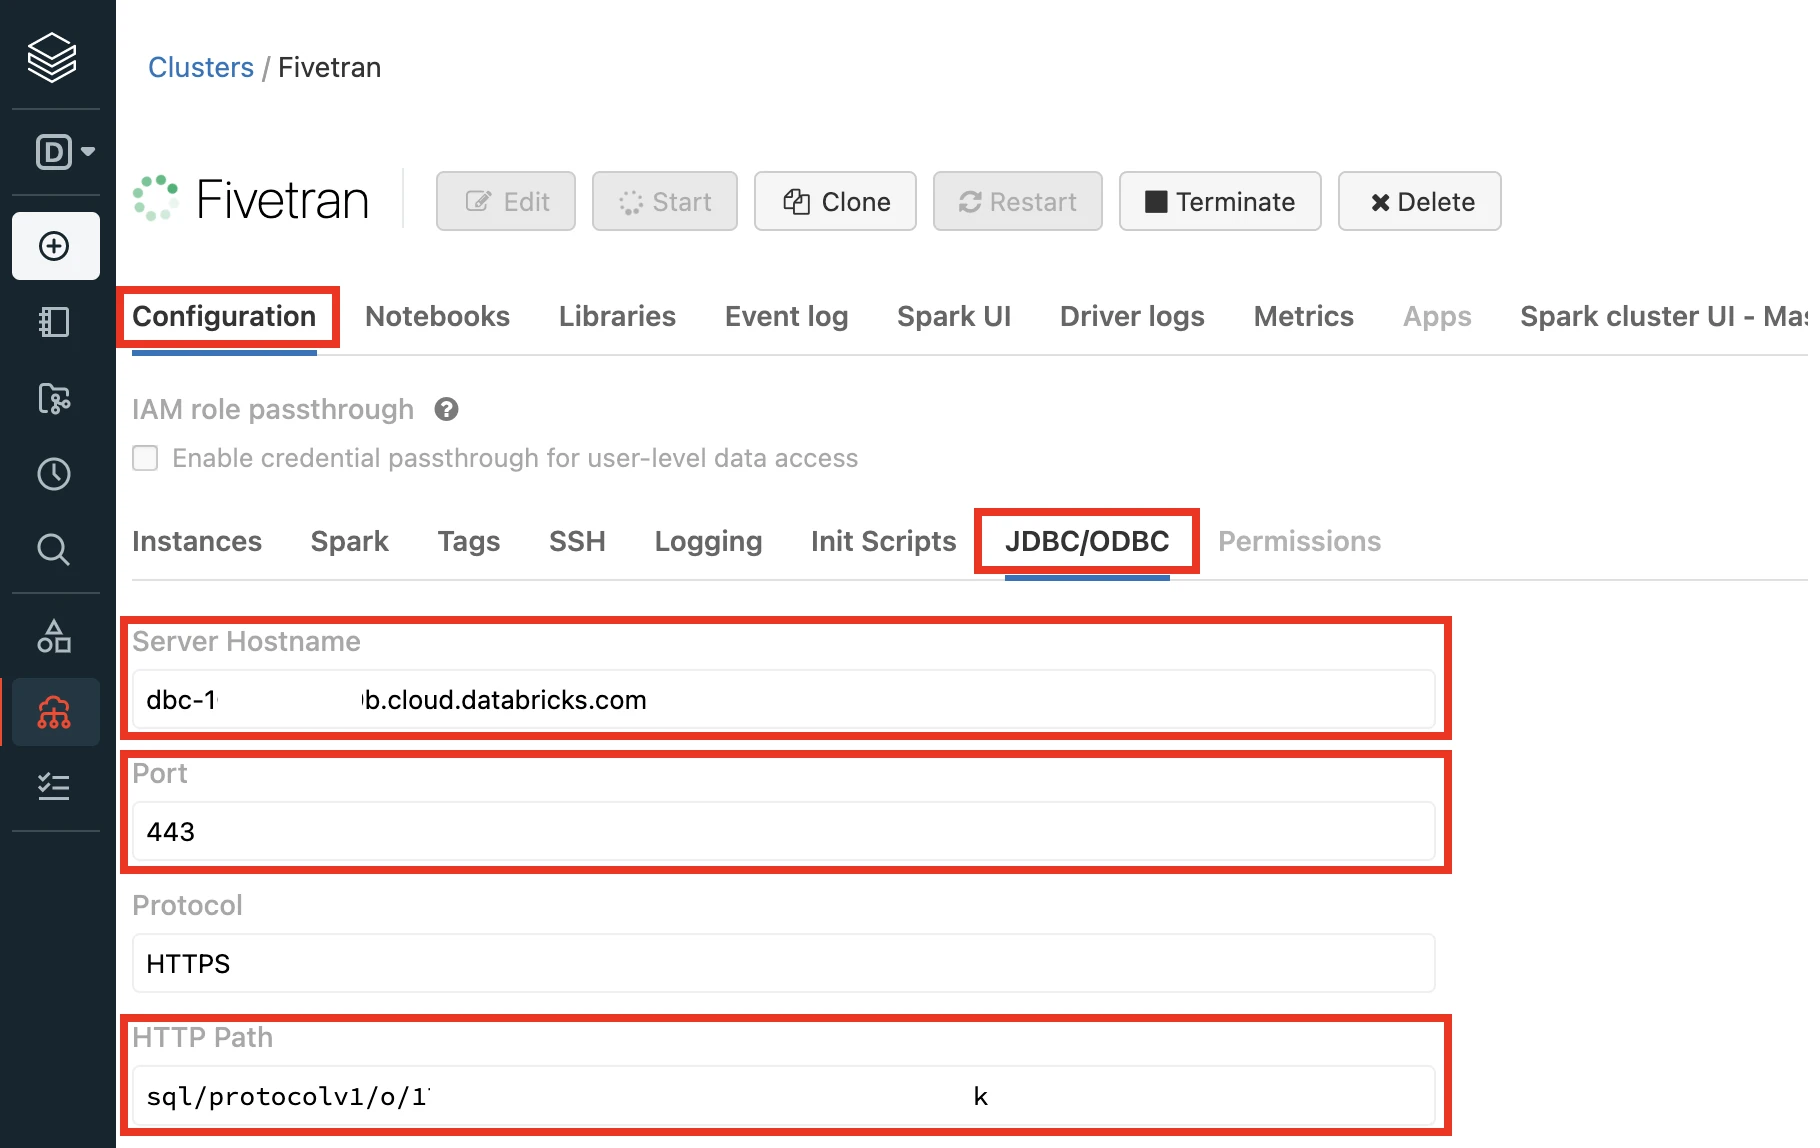
Make a note of the following values. You will need them to configure Fivetran.
- Server Hostname
- Port
- HTTP Path
Connect SQL warehouse
Perform this step only if you want to use a SQL warehouse instead of a Databricks cluster.
Log in to your Databricks workspace.
In the Databricks console, go to SQL > Create > SQL Warehouse.
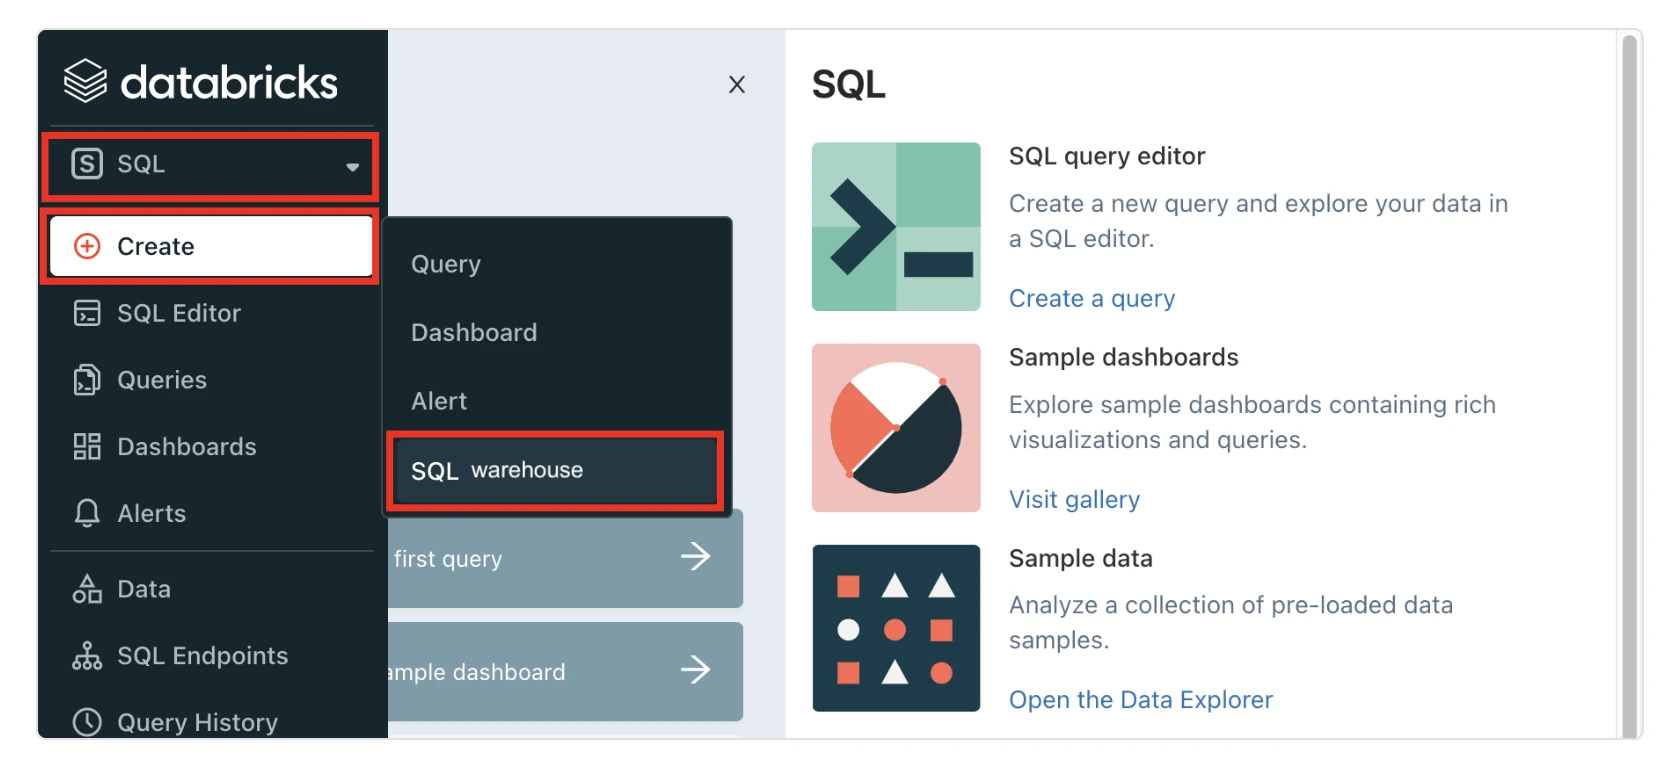
In the New SQL warehouse window, enter a Name for your warehouse.
Choose your Cluster Size and configure the other warehouse options.
We recommend that you start with the 2X-Small cluster size and scale up according to your workload demands.
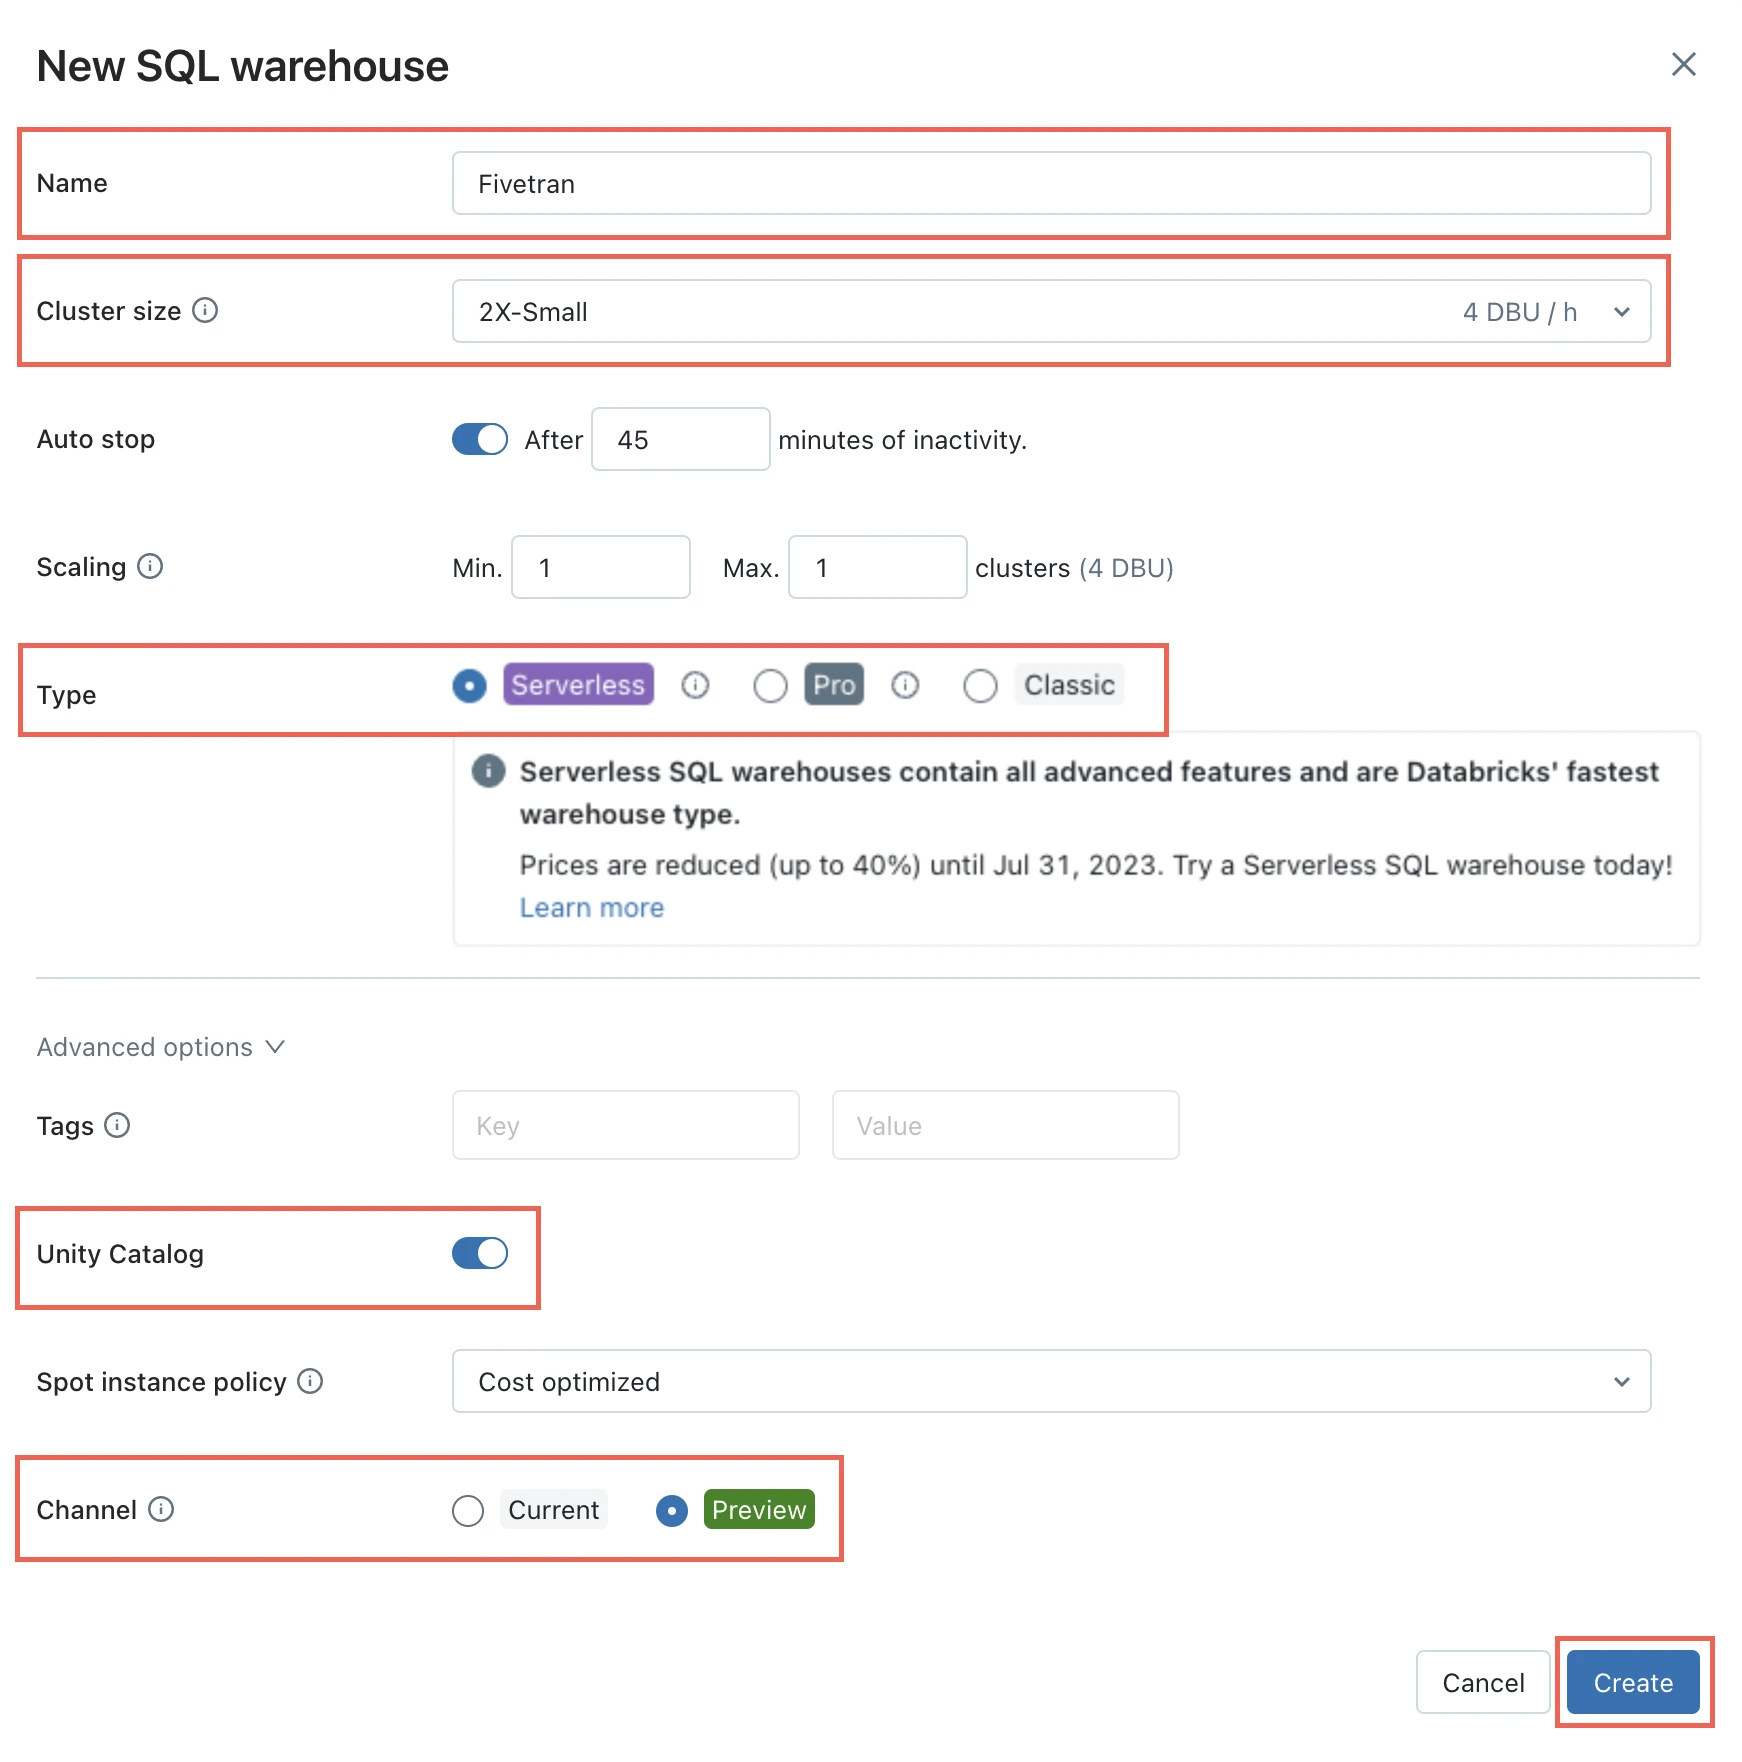
Choose your warehouse Type:
- Serverless
- Pro
- Classic
The Serverless option appears only if serverless is enabled in your account. For more information about warehouse types, see Databricks' documentation.
In the Advanced options section, set the Unity Catalog toggle to ON and set the Channel to Preview.
Click Create.
Go to the Connection details tab.
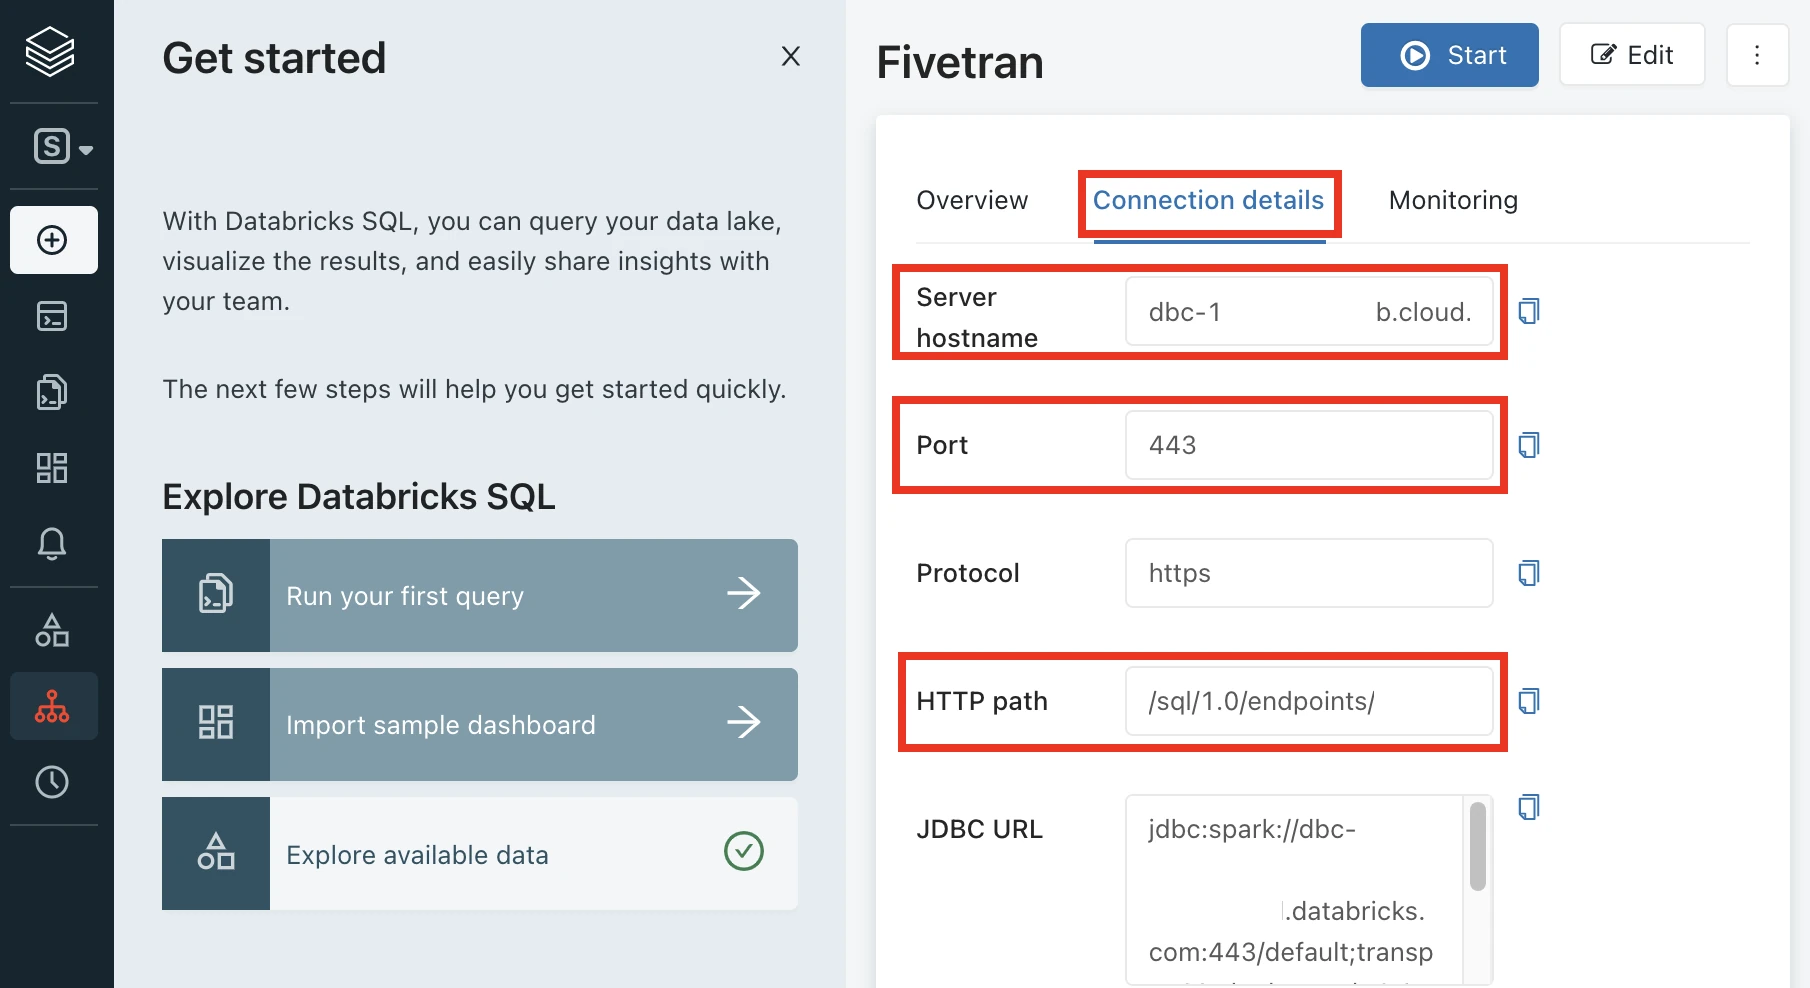
Make a note of the following values. You will need them to configure Fivetran.
- Server Hostname
- Port
- HTTP Path
Choose authentication type
You can use one of the following authentication types for Fivetran to connect to Databricks:
Databricks personal access token authentication
To use the Databricks personal access token authentication type, create a personal access token by following the instructions in Databricks documentation.
Assign the following catalog privileges to the user or service principal you want to use to create your access token:
- CREATE SCHEMA
- CREATE TABLE
- MODIFY
- REFRESH
- SELECT
- USE CATALOG
- USE SCHEMA
To create external tables in a Unity Catalog-managed external location, assign the following privileges to the user or service principal you want to use to create your access token:
- On the external location:
- CREATE EXTERNAL TABLE
- READ FILES
- WRITE FILES
- On the storage credentials:
- CREATE EXTERNAL TABLE
- READ FILES
- WRITE FILES
- On the external location:
When you grant a privilege on the catalog, it is automatically granted to all current and future schemas in the catalog. Similarly, the privileges that you grant on a schema are inherited by all current and future tables in the schema.
OAuth machine-to-machine (M2M) authentication
To use the OAuth machine-to-machine (M2M) authentication type, create your OAuth client ID and secret by following the instructions in Databricks documentation.
You cannot use this authentication type if you use the AWS PrivateLink or Azure Private Link connection method.
Complete Fivetran configuration
Log in to your Fivetran account.
Go to the Destinations page and click Add destination.
Enter a Destination name of your choice and then click Add.
Select ADLS as the destination type.
In the destination setup form, enter the Storage Account Name.
You cannot change the Storage Account Name after you save the setup form.
Enter the Container Name you found.
You cannot change the Container Name after you save the setup form.
(Optional) Enter the Prefix Path of your ADLS container.
You cannot change the Prefix Path after you save the setup form.
Enter the Tenant ID and Client ID you found.
In the Secret Value field, enter the client secret you found.
In the Table Format drop-down menu, select the format you want to use for your destination tables.
You cannot change the table format after you save the setup form.
In the Snapshot Retention Period drop-down menu, select how long you want us to retain your table snapshots.
We perform regular table maintenance operations to delete the table snapshots that are older than the retention period you select in this field. You can select Retain All Snapshots to disable the deletion of table snapshots.
(Optional) To automate schema migration of Delta Lake tables in Databricks, set the Maintain Delta Tables In Databricks toggle to ON and do the following:
i. Choose the Databricks Connection Method.
ii. Enter the following details of your Databricks account:
- Catalog name
- Server Hostname
- Port number
- HTTP Path
iii. Select the Authentication Type you configured.
iv. If you selected PERSONAL ACCESS TOKEN as the Authentication Type, enter the Personal Access Token you created.
v. If you selected OAUTH 2.0 as the Authentication Type, enter the OAuth 2.0 Client ID and OAuth 2.0 Secret you created.
Choose your Data processing location.
Choose your Connection Method:
- Connect directly
- Connect via Private Link
The Connect via Private Link option is available only for Business Critical accounts.
Choose your Cloud service provider and its region as described in our Destinations documentation.
Choose your Time zone.
(Optional for Business Critical accounts) To enable regional failover, set the Use Failover toggle to ON, and then select your Failover Location and Failover Region. Make a note of the IP addresses of the secondary region and safelist these addresses in your firewall.
Click Save & Test.
Fivetran tests and validates the Azure Data Lake Storage connection. On successful completion of the setup tests, you can sync your data using Fivetran connectors to the Azure Data Lake Storage destination.
In addition, Fivetran automatically configures a Fivetran Platform Connector to transfer the connection logs and account metadata to a schema in this destination. The Fivetran Platform Connector enables you to monitor your connections, track your usage, and audit changes. The connector sends all these details at the destination level.
If you are an Account Administrator, you can manually add the Fivetran Platform Connector on an account level so that it syncs all the metadata and logs for all the destinations in your account to a single destination. If an account-level Fivetran Platform Connector is already configured in a destination in your Fivetran account, then we don't add destination-level Fivetran Platform Connectors to the new destinations you create.
Setup tests
Fivetran performs the Read and Write Access test to check the accessibility of your ADLS Gen2 container and to validate the ADLS credentials you provided in the setup form.
The Private Link test validates if you have accurately configured the Private Link or approved the private endpoint connection requests from Fivetran. We perform this test only if you have opted to connect through Private Link.
Fivetran performs the Validate Permissions test checks on the databricks creds if we have the necessary READ/WRITE permissions to
CREATE,ALTER, orDROPtables in the database. We perform this test only if you have opted to automate schema migration of delta tables in databricks.
These tests may take a couple of minutes to complete.