AWS MSK Destination Setup Guide
Follow our setup guide to connect AWS MSK to Fivetran.
Prerequisites
To connect AWS MSK to Fivetran, you need the following:
- An AWS account
- An AWS MSK cluster
Choose your deployment model
Before setting up your destination, decide which deployment model best suits your organization's requirements. This destination supports both SaaS and Hybrid deployment models, offering flexibility to meet diverse compliance and data governance needs.
See our Deployment Models documentation to understand the use cases of each model and choose the model that aligns with your security and operational requirements.
You must have an Enterprise or Business Critical plan to use the Hybrid Deployment model.
Configure schema registry
Fivetran supports the following AWS MSK implementations:
- AWS MSK with AWS Glue Schema Registry
- AWS MSK with Confluent Cloud Schema Registry
Configure AWS Glue Schema Registry
Create schema registry
Create your AWS Glue Schema Registry by following the instructions in AWS' documentation.
Use the GlueSchemaRegistryKafkaDeserializer class to deserialize the values while consuming data from the topic.
Find External ID
- In the destination setup form, in the Schema Registry drop-down menu, select AWS Glue.
- Find the automatically-generated External ID and make a note of it. You will need it to create an IAM role.
The automatically-generated External ID is tied to your account. The ID does not change even if you close and re-open the setup form. For your convenience, you can keep the browser tab open in the background while you configure your destination.
Create IAM policy for AWS Glue
Open the Amazon IAM console.
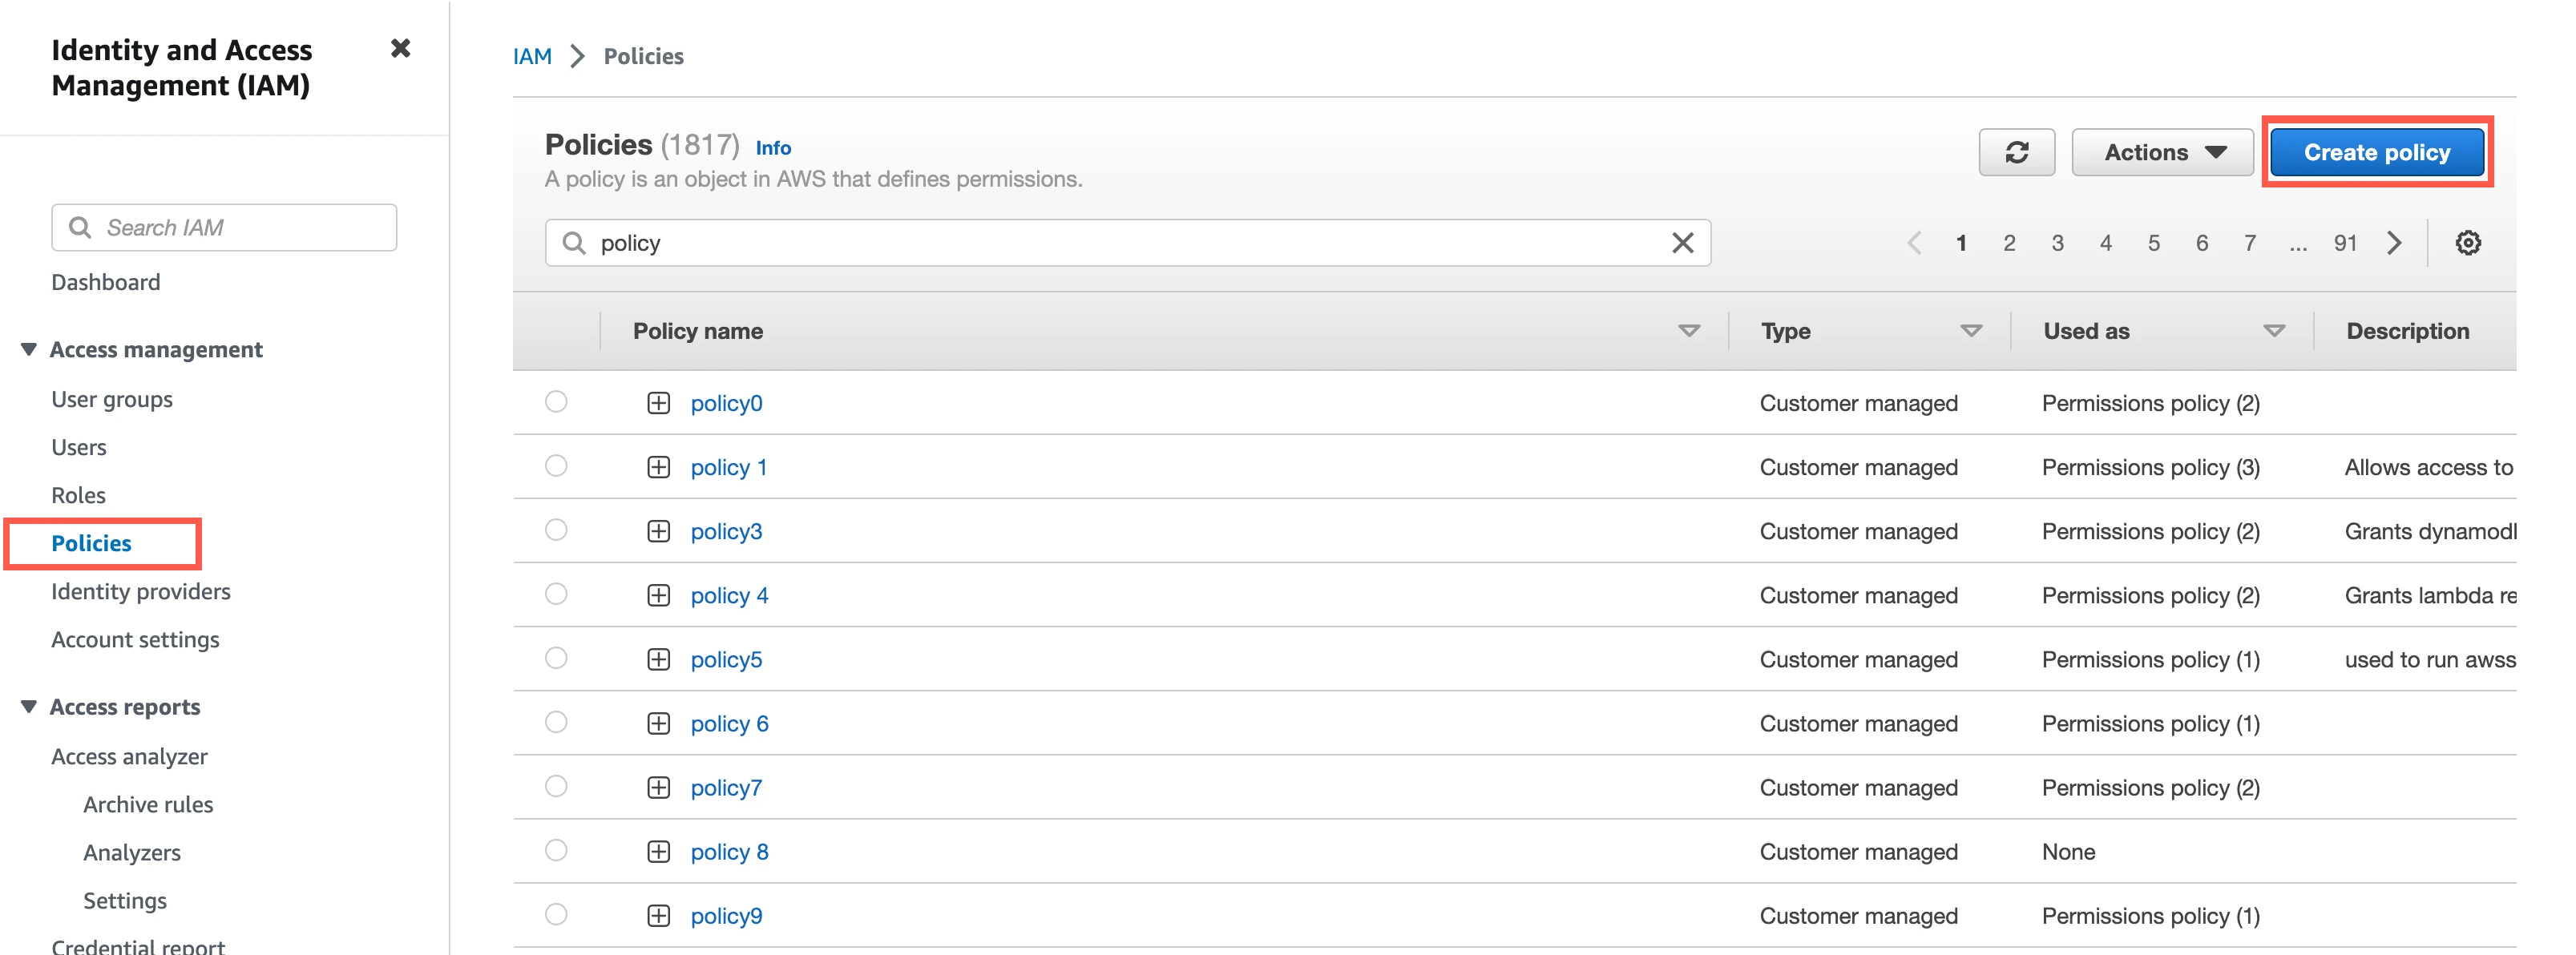
Go to Policies, and then click Create Policy.
Go to the JSON tab.
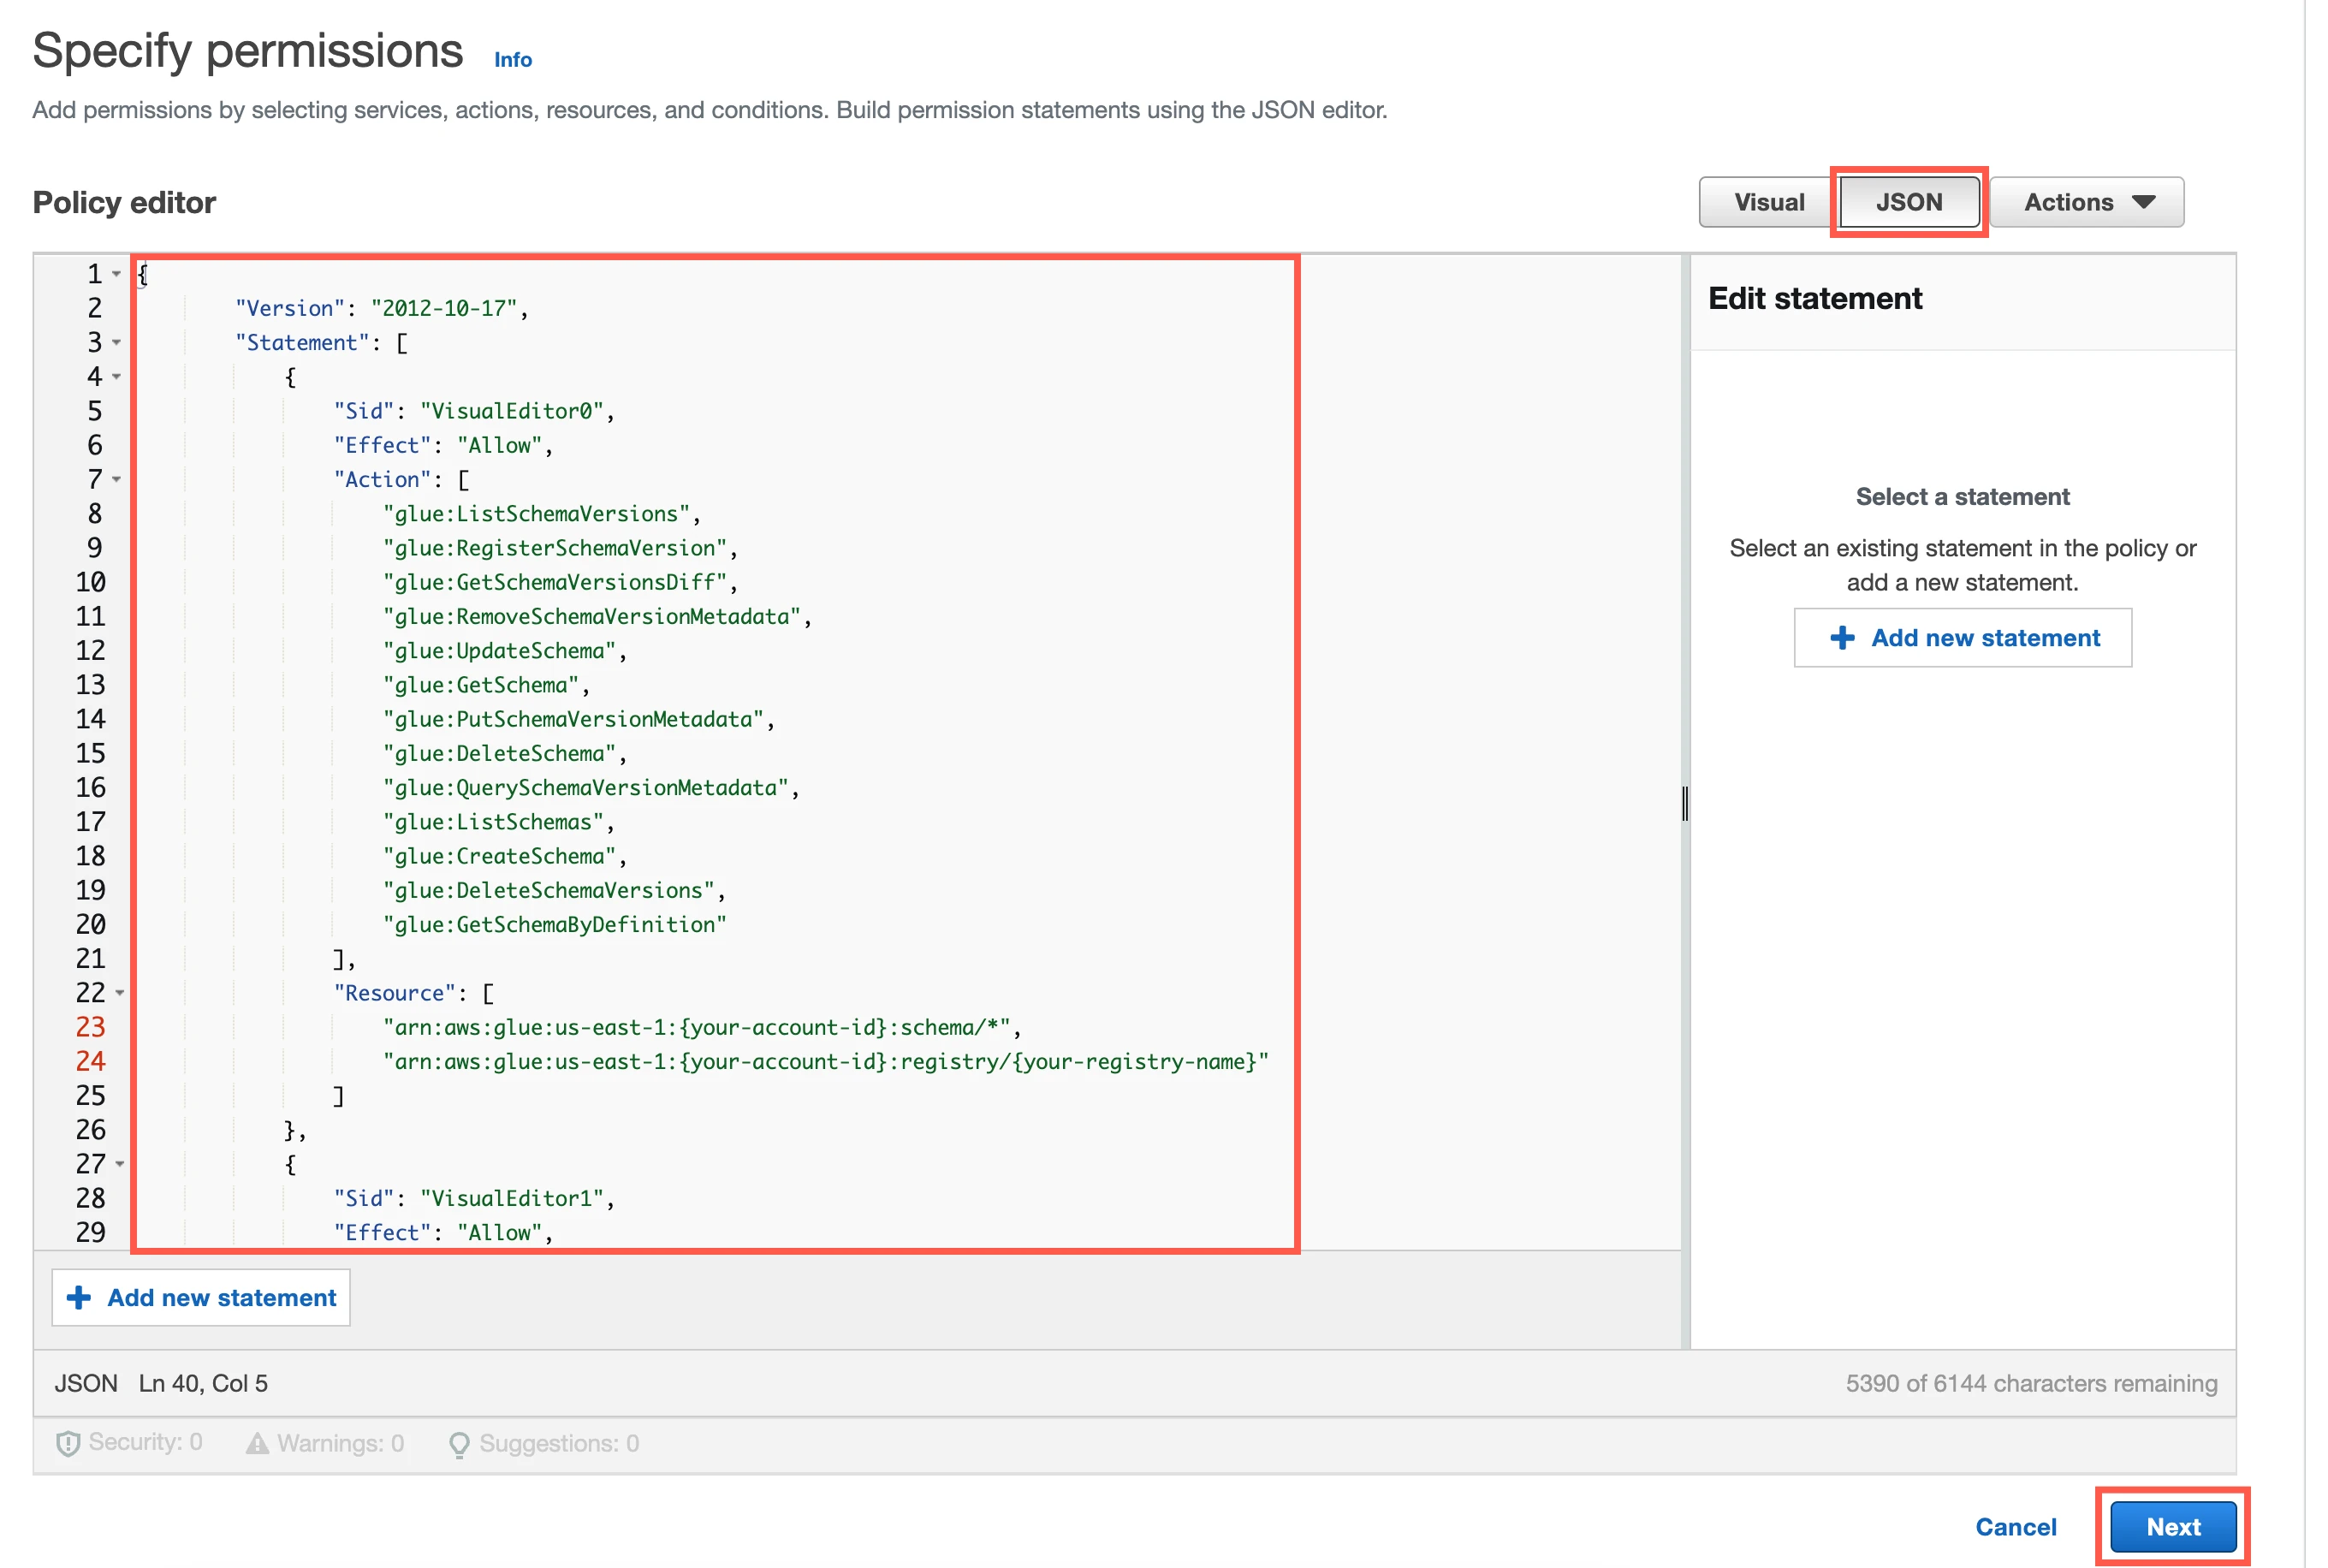
Copy the following policy and paste it in the JSON editor.
{
    "Version": "2012-10-17",
    "Statement": [
        {
            "Sid": "VisualEditor0",
            "Effect": "Allow",
            "Action": [
                "glue:ListSchemaVersions",
                "glue:RegisterSchemaVersion",
                "glue:GetSchemaVersionsDiff",
                "glue:RemoveSchemaVersionMetadata",
                "glue:UpdateSchema",
                "glue:GetSchema",
                "glue:PutSchemaVersionMetadata",
                "glue:DeleteSchema",
                "glue:QuerySchemaVersionMetadata",
                "glue:ListSchemas",
                "glue:CreateSchema",
                "glue:DeleteSchemaVersions",
                "glue:GetSchemaByDefinition"
            ],
            "Resource": [
                "arn:aws:glue:{region}:{your-account-id}:schema/*",
                "arn:aws:glue:{region}:{your-account-id}:registry/{your-registry-name}"
            ]
        },
        {
            "Sid": "VisualEditor1",
            "Effect": "Allow",
            "Action": "glue:CheckSchemaVersionValidity",
            "Resource": "*"
        },
        {
            "Sid": "VisualEditor2",
            "Effect": "Allow",
            "Action": "glue:GetSchemaVersion",
            "Resource": "*"
        }
    ]
}
In the policy, replace
{your-account-id}with your AWS account ID,{region}with the region of your Glue registry, and{your-registry-name}with the name of your registry.Click Next.
Enter a Policy name, and then click Create policy.
Create Glue IAM role
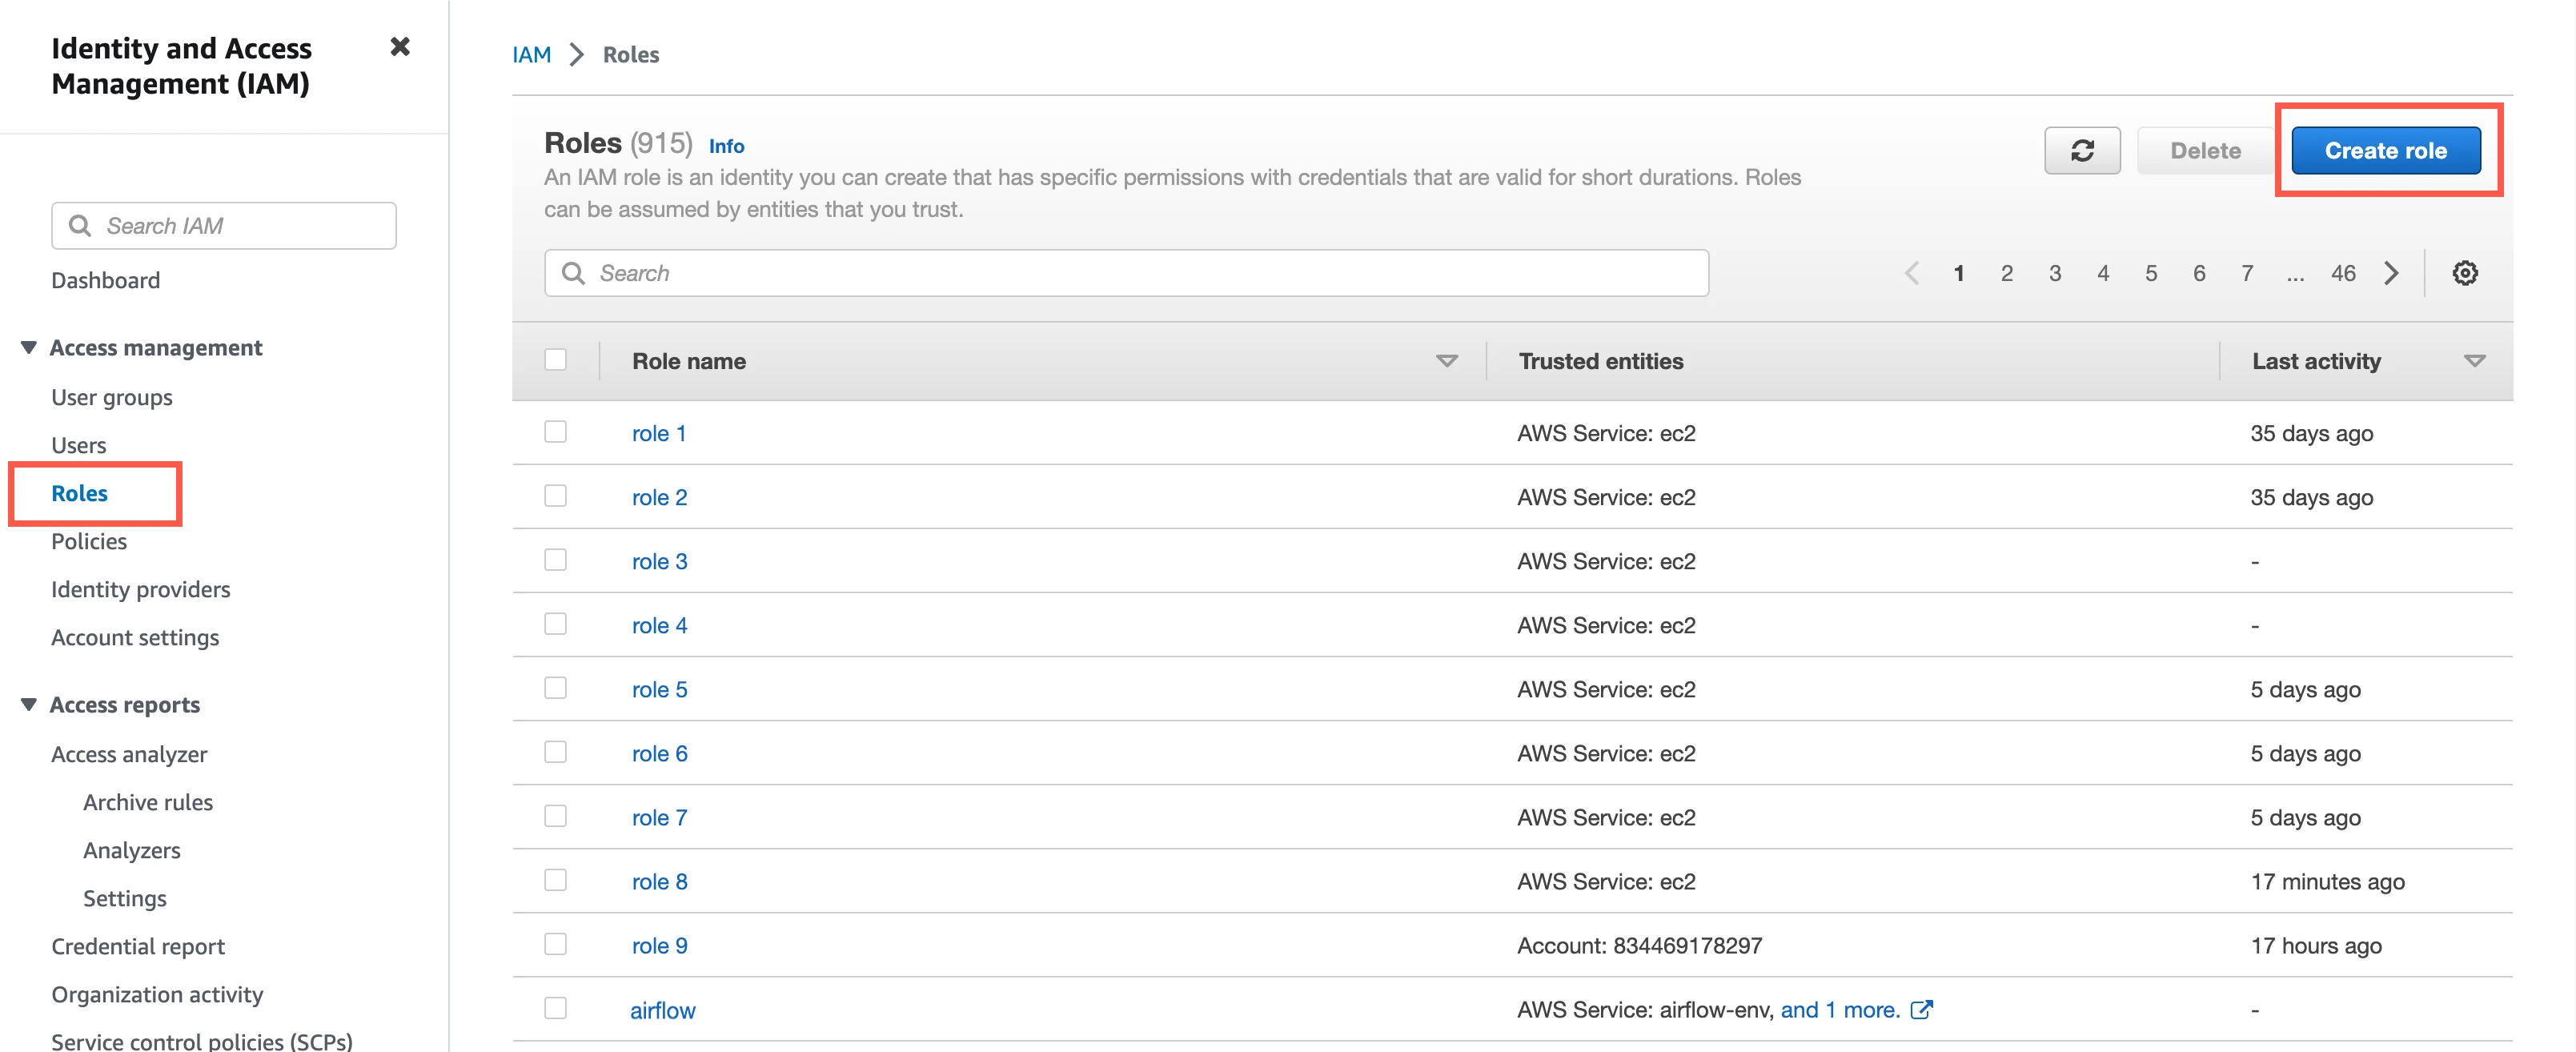
On the Amazon IAM console, go to Roles, and then click Create role.
Select AWS account, and then select Another AWS account.
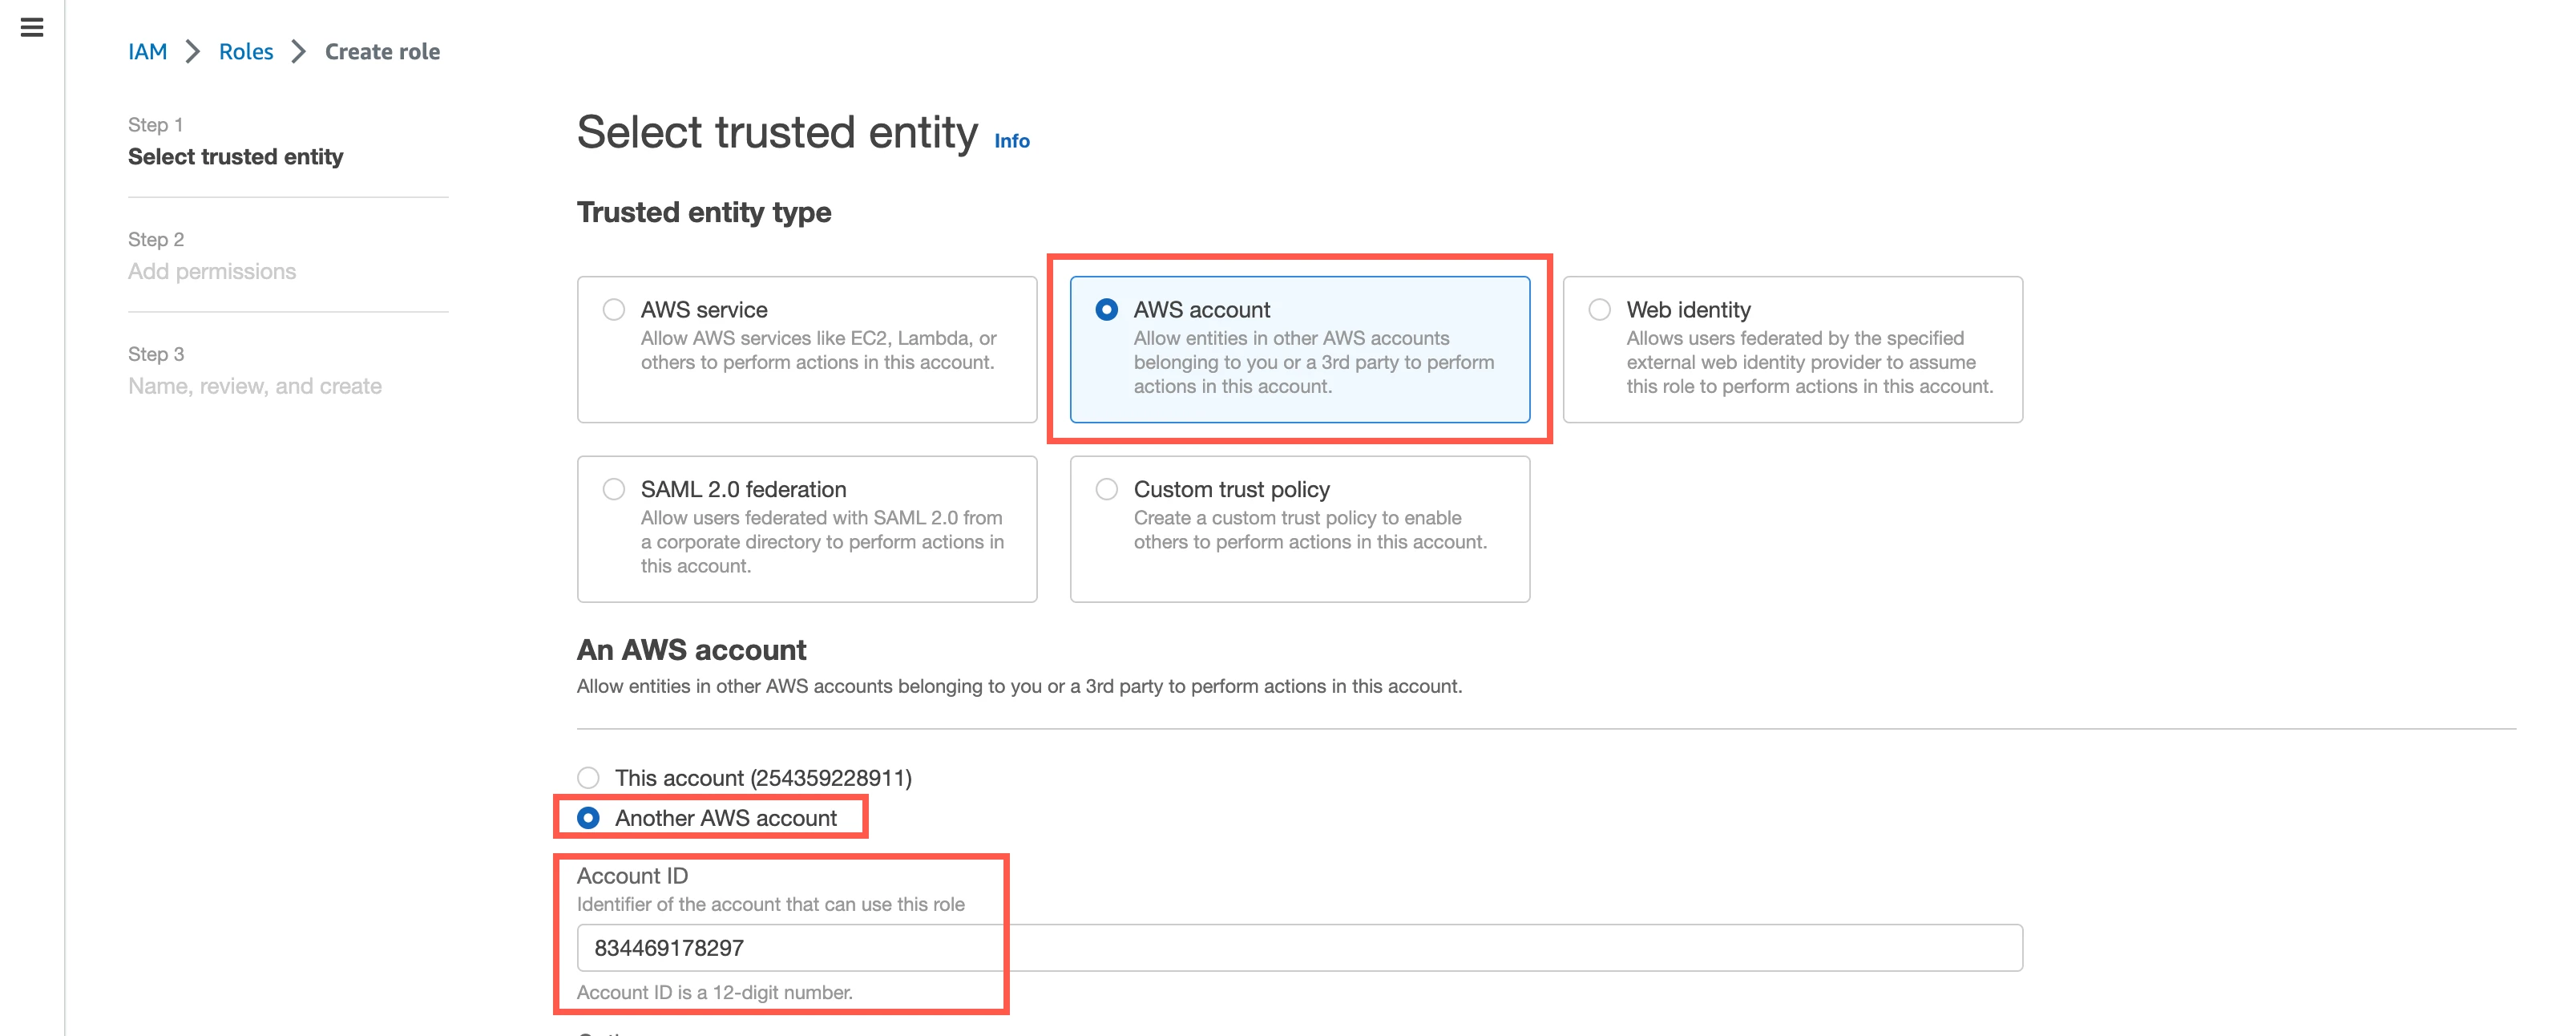
In the Account ID field, enter Fivetran's account ID,
834469178297.Select the Require external ID checkbox, and then enter the External ID you found.

Click Next.
Select the IAM policy you created.
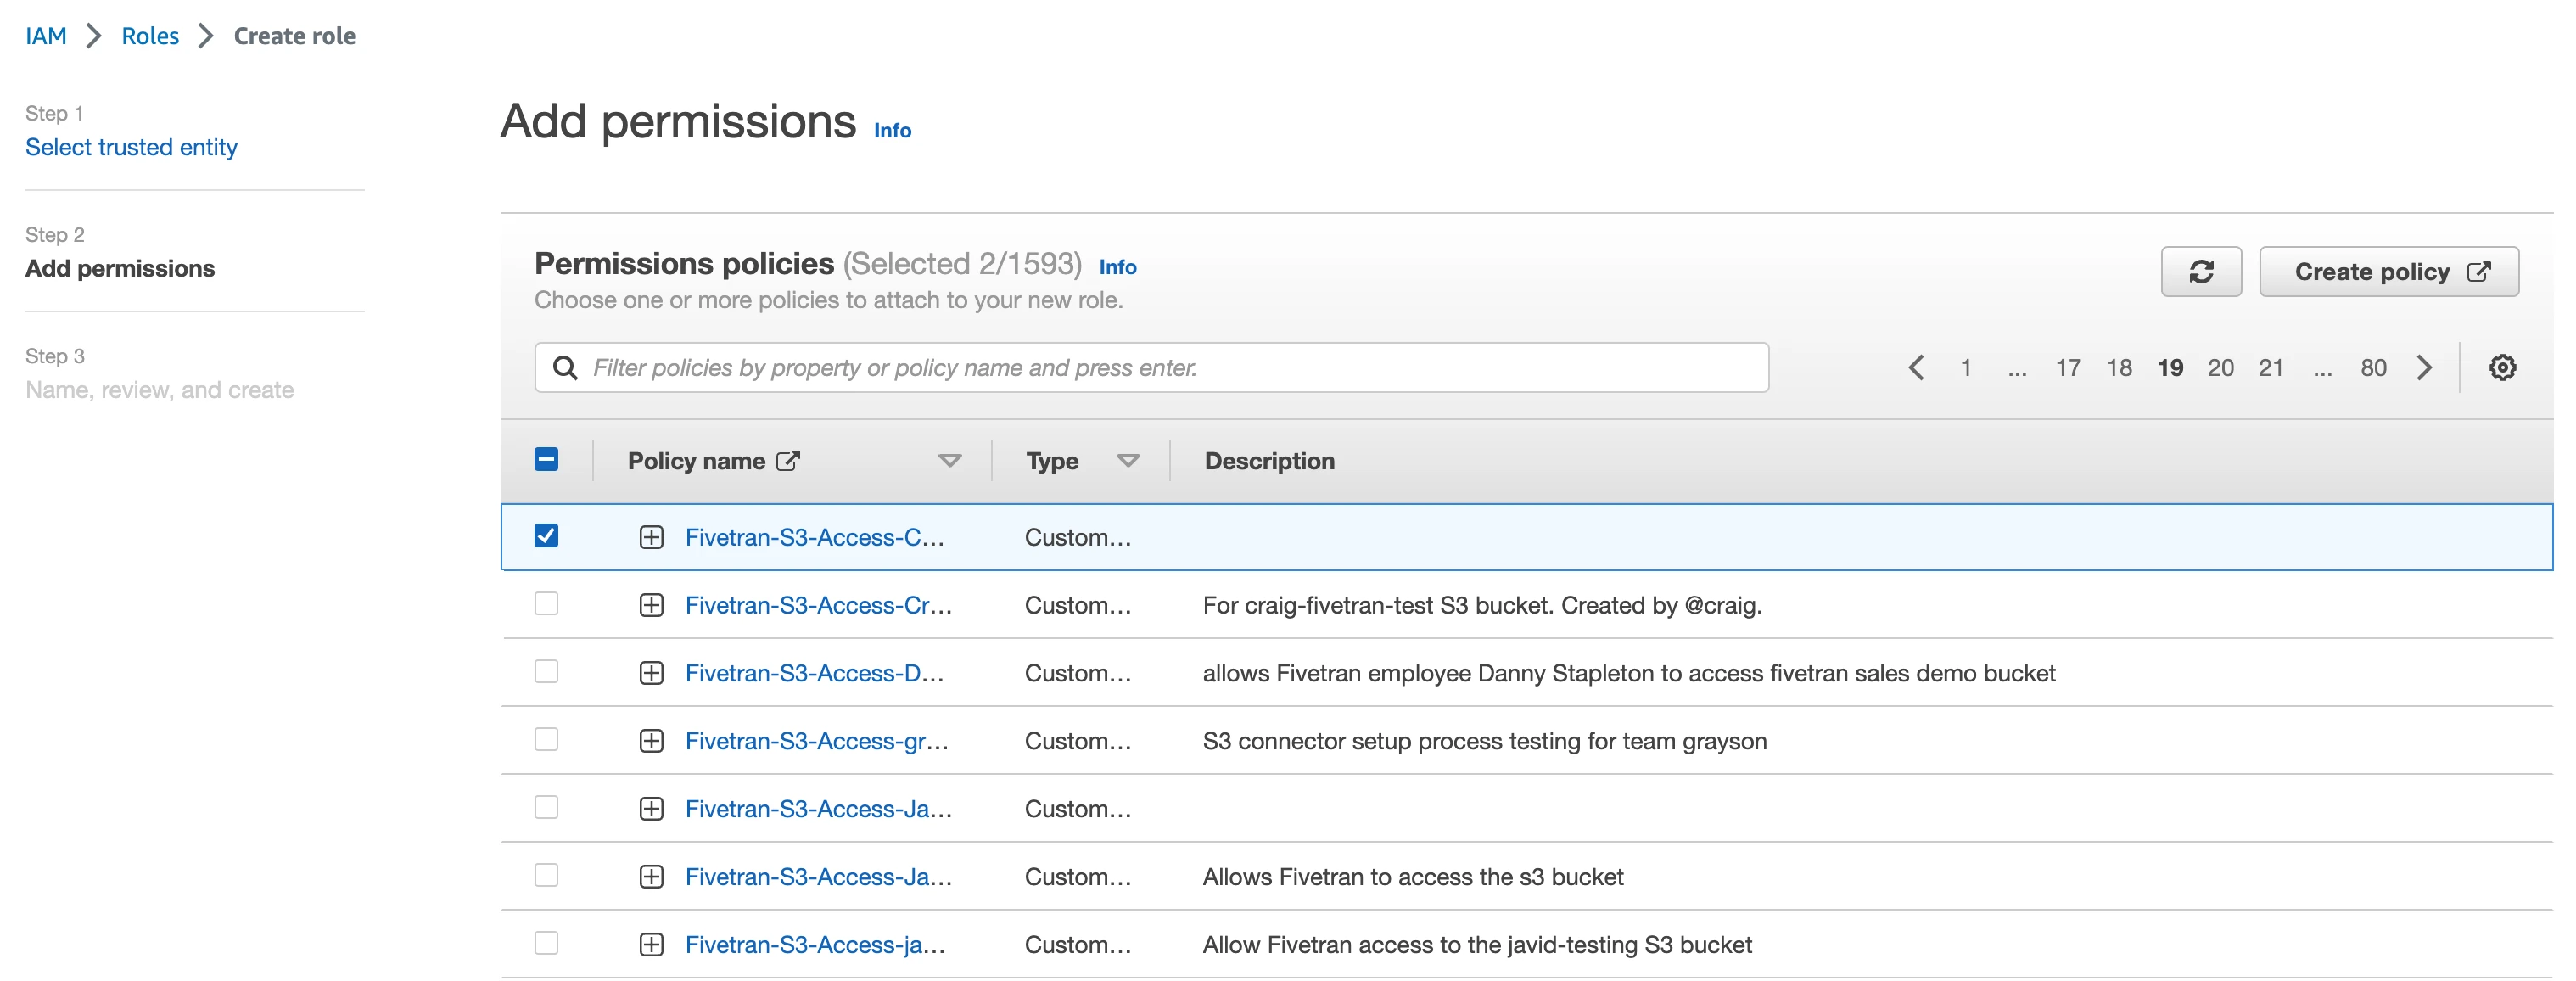
Click Next.
In the Role name field, enter a name for the role, and then click Create role.

In the Roles page, select the role you created.
Make a note of the ARN. You will need it to configure Fivetran.

After completing this step, skip to the Configure AWS PrivateLink step.
Configure Confluent Cloud Schema Registry
Set up your Confluent Cloud Schema Registry by following the instructions in Confluent Cloud's documentation.
(Optional) Configure AWS PrivateLink
You must have a Business Critical plan to use AWS PrivateLink.
AWS PrivateLink allows VPCs and AWS-hosted or on-premises services to communicate with one another without exposing traffic to the public internet. PrivateLink is the most secure connection method. Learn more in AWS’ PrivateLink documentation.
Configure PrivateLink for your AWS MSK platform by following our AWS PrivateLink setup instructions.
For more information about configuring MSK clusters with AWS PrivateLink, see AWS' documentation.
In PrivateLink connections, you don't need to expose brokers to public IP addresses. If you are using a PrivateLink connection, skip to the Complete Fivetran configuration step.
Enable public access to brokers
Enable public access to the brokers of your MSK clusters by following the instructions in AWS' documentation.
Configure authentication
You can opt to use SASL/SCRAM or IAM role-based authentication.
Configure SASL/SCRAM authentication
If you want to use SASL/SCRAM authentication, provide read and write access to your Kafka topics by following the instructions in AWS' documentation.
After completing this step, skip to the Find Bootstrap server names step.
Configure IAM role-based authentication
Find MSK External ID
- In the destination setup form, in the SASL Mechanism drop-down menu, select AWS_MSK_IAM.
- Find the automatically-generated External ID and make a note of it. You will need it to create an IAM role.
Create IAM policy for AWS MSK
Open the Amazon IAM console.
Go to Policies, and then click Create Policy.
Go to the JSON tab.
Copy the following policy and paste it in the JSON editor.
{
"Version": "2012-10-17",
"Statement": [
    {
        "Sid": "VisualEditor0",
        "Effect": "Allow",
        "Action": [
            "kafka-cluster:DescribeTopicDynamicConfiguration",
            "kafka-cluster:AlterTopicDynamicConfiguration",
            "kafka-cluster:WriteDataIdempotently",
            "kafka-cluster:AlterClusterDynamicConfiguration",
            "kafka-cluster:CreateTopic",
            "kafka-cluster:AlterTopic",
            "kafka-cluster:ReadData",
            "kafka-cluster:AlterCluster",
            "kafka-cluster:DescribeTopic",
            "kafka-cluster:Connect",
            "kafka-cluster:DeleteTopic",
            "kafka-cluster:WriteData"
        ],
        "Resource": [
            "arn:aws:kafka:{region}:{your-account-id}:topic/*/*/*",
            "{msk-cluster-arn}"
        ]
    }
]
}
In the policy, replace
{your-account-id}with your AWS account ID,{region}with the region of your MSK Cluster, and{msk-cluster-arn}with your MSK Cluster ARN.Click Next.
Enter a Policy name, and then click Create policy.
Create MSK IAM role
- On the Amazon IAM console, go to Roles, and then click Create role.
- Select AWS account, and then select Another AWS account.
- In the Account ID field, enter Fivetran's account ID,
834469178297. - Select the Require external ID checkbox, and then enter the External ID you found.
- Click Next.
- Select the IAM policy you created.
- Click Next.
- In the Role name field, enter a name for the role, and then click Create role.
- In the Roles page, select the role you created.
- Make a note of the ARN. You will need it to configure Fivetran.
Find bootstrap server names
Log in to the AWS MSK console and go to your cluster.
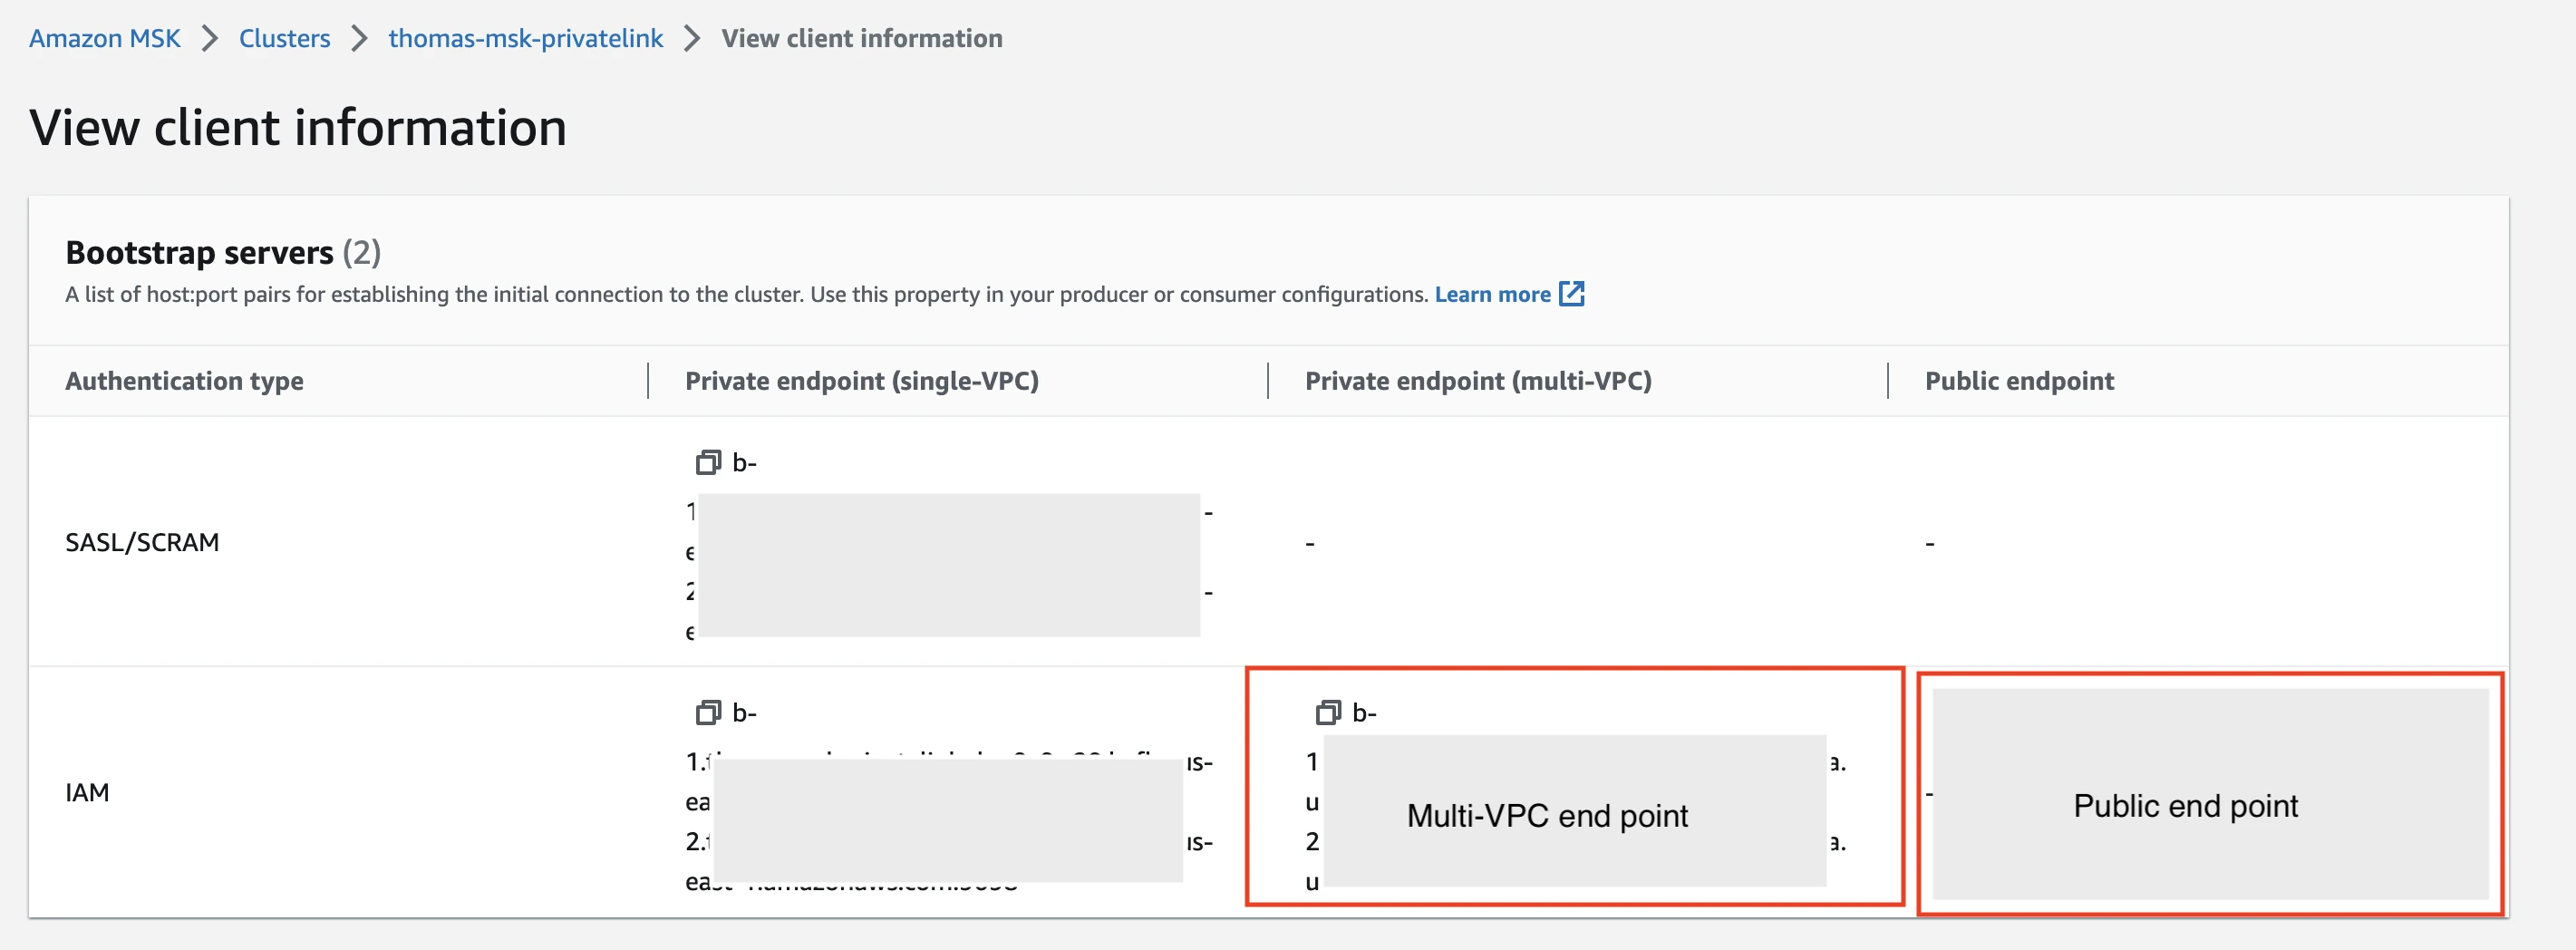
Click View client information.

Depending on your connection preference, do the following:
- If you want to use a direct connection, make a note of the public endpoint.
- If you want to use a private link connection in a multi-VPC configuration, make a note of the private endpoint.
You will need the details to configure Fivetran.
Complete Fivetran configuration
Log in to your Fivetran account.
Go to the Destinations page and click Add destination.
Select AWS MSK as the destination type.
Enter a Destination name of your choice and then click Add.
(Enterprise and Business Critical accounts only) Select the deployment model of your choice:
- SaaS Deployment
- Hybrid Deployment
If you selected Hybrid Deployment, click Select Hybrid Deployment Agent and do one of the following:
- To use an existing agent, select the agent you want to use, and click Use Agent.
- To create a new agent, click Create new agent and follow the setup instructions specific to your container platform.
In the Bootstrap Servers field, click + Add and enter the public endpoint you found. The server name must be in
<host>:<port>format.Click + Add to add more than one server name.
Select the SASL Mechanism:
- If you choose SASL/SCRAM, enter your API Key and API Secret.
- If you choose AWS_MSK_IAM, enter the Fivetran MSK Role ARN and MSK Region.
(Optional) To sync all the source data into a single Kafka topic, set the Sync Data Into Single Topic toggle to ON.
Enter the number of Partitions you want to create in your topic. Partitions allow us to split the data of a topic across multiple brokers and balance the load between them.
A consumer group can consume data from only one partition. Therefore, the number of consumer groups that consume data in parallel depend on the number of partitions in the topic.
Enter a Replication Factor to specify the number of replicas you want to create for each of your topic partitions.
The partition replicas increase the reliability and fault tolerance of the connection. The minimum and maximum supported values are
2and4, respectively. However, for best performance, we recommend that you set the Replication Factor to3.Select your Data Format: JSON or AVRO.
You cannot change the data format after you set up the connection.
Select your Schema Registry.
If you selected AWS Glue in the Schema Registry drop-down menu, do the following:
i. Enter the Fivetran Glue Role ARN you found.
ii. Enter your Schema Registry Region and Registry Name.
iii. Select the Default Compatibility Mode of your registry.
If you selected Confluent Cloud in the Schema Registry drop-down menu, enter the following Schema Registry credentials:
- Schema Registry URL
- Schema Registry API Key
- Schema Registry API Secret
Select your connection method: Connect directly or Connect via PrivateLink. If you choose Connect via PrivateLink, Fivetran connects to your message brokers using AWS PrivateLink.
(Not applicable to Hybrid Deployment) Choose the Data processing location. Depending on the plan you are on and your selected cloud service provider, you may also need to choose a Cloud service provider and cloud region as described in our Destinations documentation.
Choose your Cloud service provider and its region as described in our Destinations documentation.
Choose your Time zone.
(Optional for Business Critical accounts and SaaS Deployment) To enable regional failover, set the Use Failover toggle to ON, and then select your Failover Location and Failover Region. Make a note of the IP addresses of the secondary region and safelist these addresses in your firewall.
Click Save & Test.
Fivetran tests and validates the AWS MSK connection. On successful completion of the setup test, you can sync your data using Fivetran connectors to the AWS MSK destination.
In addition, Fivetran automatically configures a Fivetran Platform connection to transfer the connection logs and account metadata to a schema in this destination. The Fivetran Platform Connector enables you to monitor your connections, track your usage, and audit changes. The Fivetran Platform connection sends all these details at the destination level.
If you are an Account Administrator, you can manually add the Fivetran Platform connection on an account level so that it syncs all the metadata and logs for all the destinations in your account to a single destination. If an account-level Fivetran Platform connection is already configured in a destination in your Fivetran account, then we don't add destination-level Fivetran Platform connections to the new destinations you create.
Setup test
Fivetran performs the Connecting to Kafka test to:
- validate the broker credentials
- check if we can access your topic schema through your schema registry
- check if we have the permission to write data to your topics
The test may take a couple of minutes to complete.