Azure Database for PostgreSQL Setup Guide
Follow these instructions to replicate your Azure Database for PostgreSQL to your destination using Fivetran.
Prerequisites
To connect your PostgreSQL database to Fivetran, you need:
- PostgreSQL version 9.5 - 18
- Your database host's IP (for example,
1.2.3.4) or domain (for example,your.server.com) - Your database's port (usually
5432) - TLS enabled on your database
Setup instructions
Choose connection method
Decide on your preferred method for connecting Fivetran to your Azure Database for PostgreSQL, and then configure the necessary settings for that method. This connector supports the following connection methods:
Connect directly
Fivetran connects directly to your Azure Database for PostgreSQL. This is the simplest connection method to set up, requiring minimal configuration.
To connect directly, you must do the following:
Enable TLS on your Azure Database for PostgreSQL. Follow Microsoft's instructions to enable SSL/TLS on your database.
Configure the Azure firewall to allow incoming connections to your database host and port (usually
5432) from Fivetran's IPs for your database's region. For detailed instructions, see Enable access.
Connect using SSH
Fivetran connects to a separate server in your network that provides an SSH tunnel to your Azure Database for PostgreSQL database. You must connect through SSH if your database resides in an inaccessible network.
To connect using an SSH tunnel, configure an SSH tunnel between Fivetran and your Azure Database for PostgreSQL database. For more information, see our SSH connection setup documentation.
The SSH tunnel setup requires adding Fivetran's SSH public key to the authorized_keys file on your SSH tunnel host. Copy the public key from the connector setup form, which is visible when you select Connect via an SSH tunnel in the Connection method drop-down.
Connect using Azure Private Link
Azure Private Link allows Virtual Networks (VNets) and Azure-hosted or on-premises services to communicate with one another without exposing traffic to the public internet. Private networking is the most secure connection method.
You must have a Business Critical plan to use Azure Private Link.
For more information, see our Azure PrivateLink setup documentation.
Connect using Proxy Agent
Fivetran connects to your database through the Proxy Agent, providing secure communication between Fivetran processes and your database host. The Proxy Agent is installed in your network and creates an outbound network connection to the Fivetran-managed SaaS.
To learn more about the Proxy Agent, how to install it, and how to configure it, see our Proxy Agent documentation.
(Optional) Authenticate using Microsoft Entra ID
Fivetran supports authenticating using Microsoft Entra ID in the following configurations:
- Azure Database for PostgreSQL flexible server
- Connection methods:
- Direct connection
- Azure Private Link
- Incremental sync methods:
- Query-Based
You cannot authenticate using Microsoft Entra ID if you use the logical replication incremental sync method.
Expand for instructions
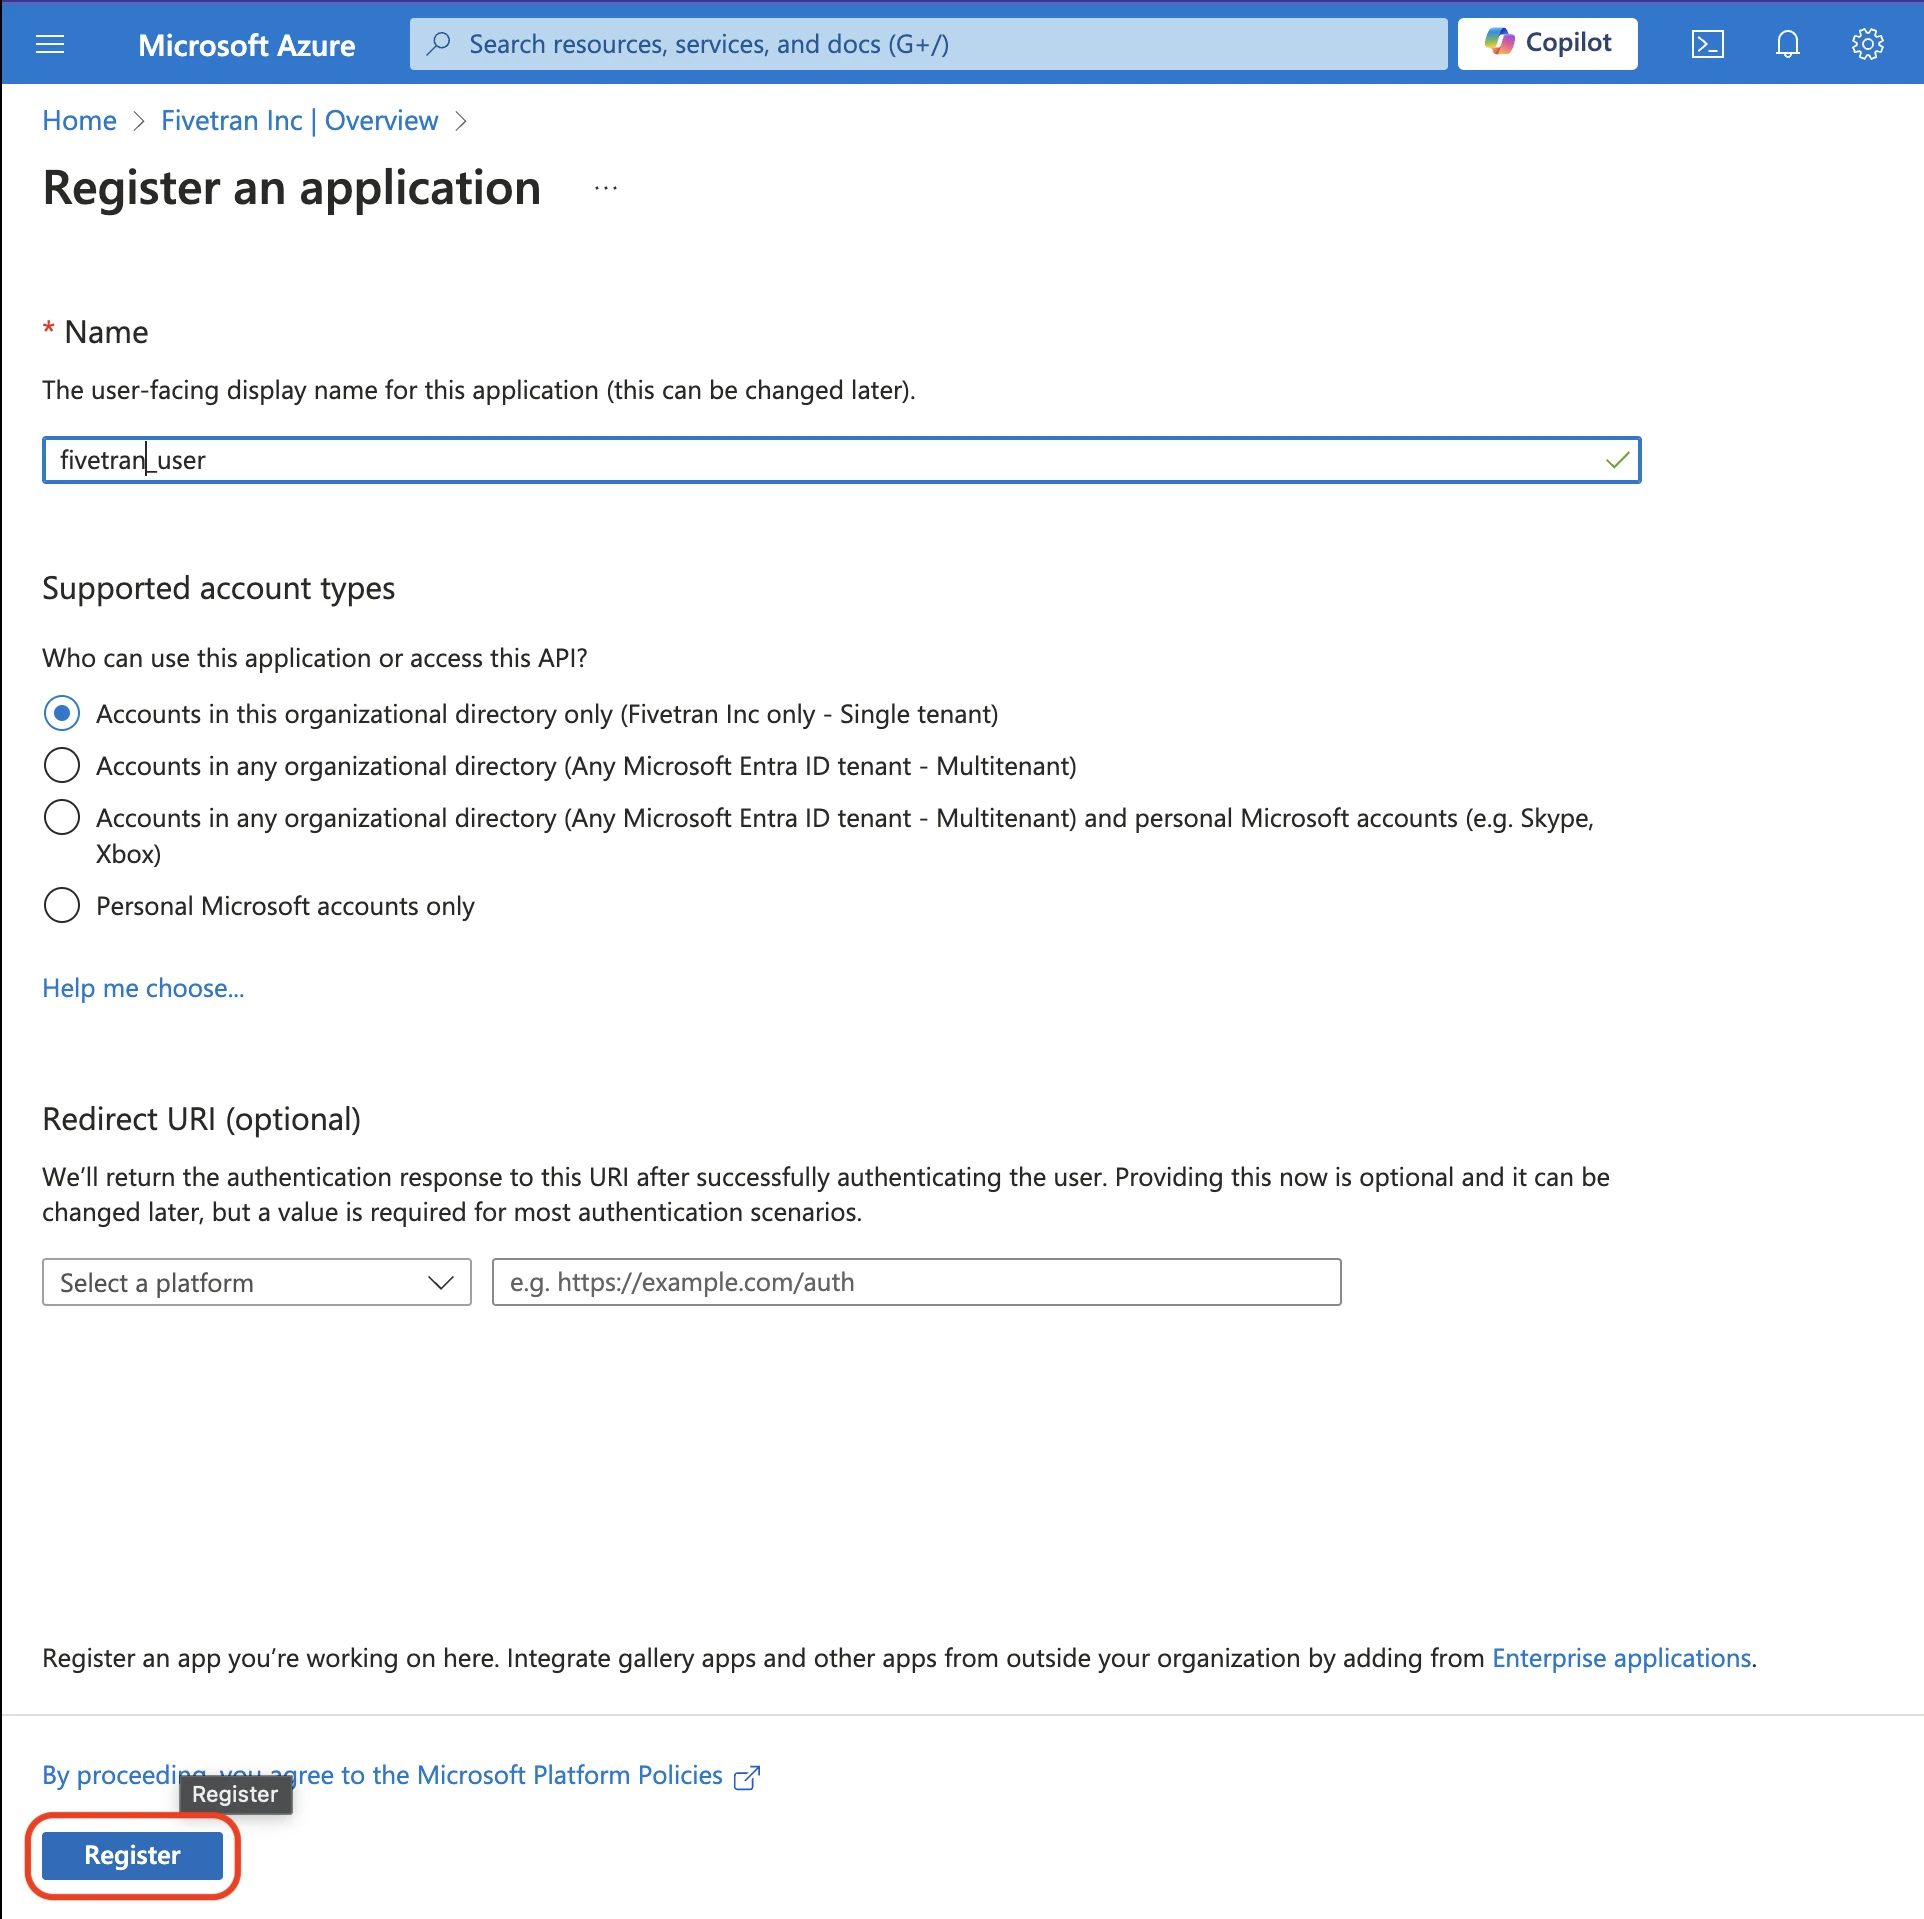
Follow the instructions in the Register an application with the Microsoft identity platform documentation register a new application.
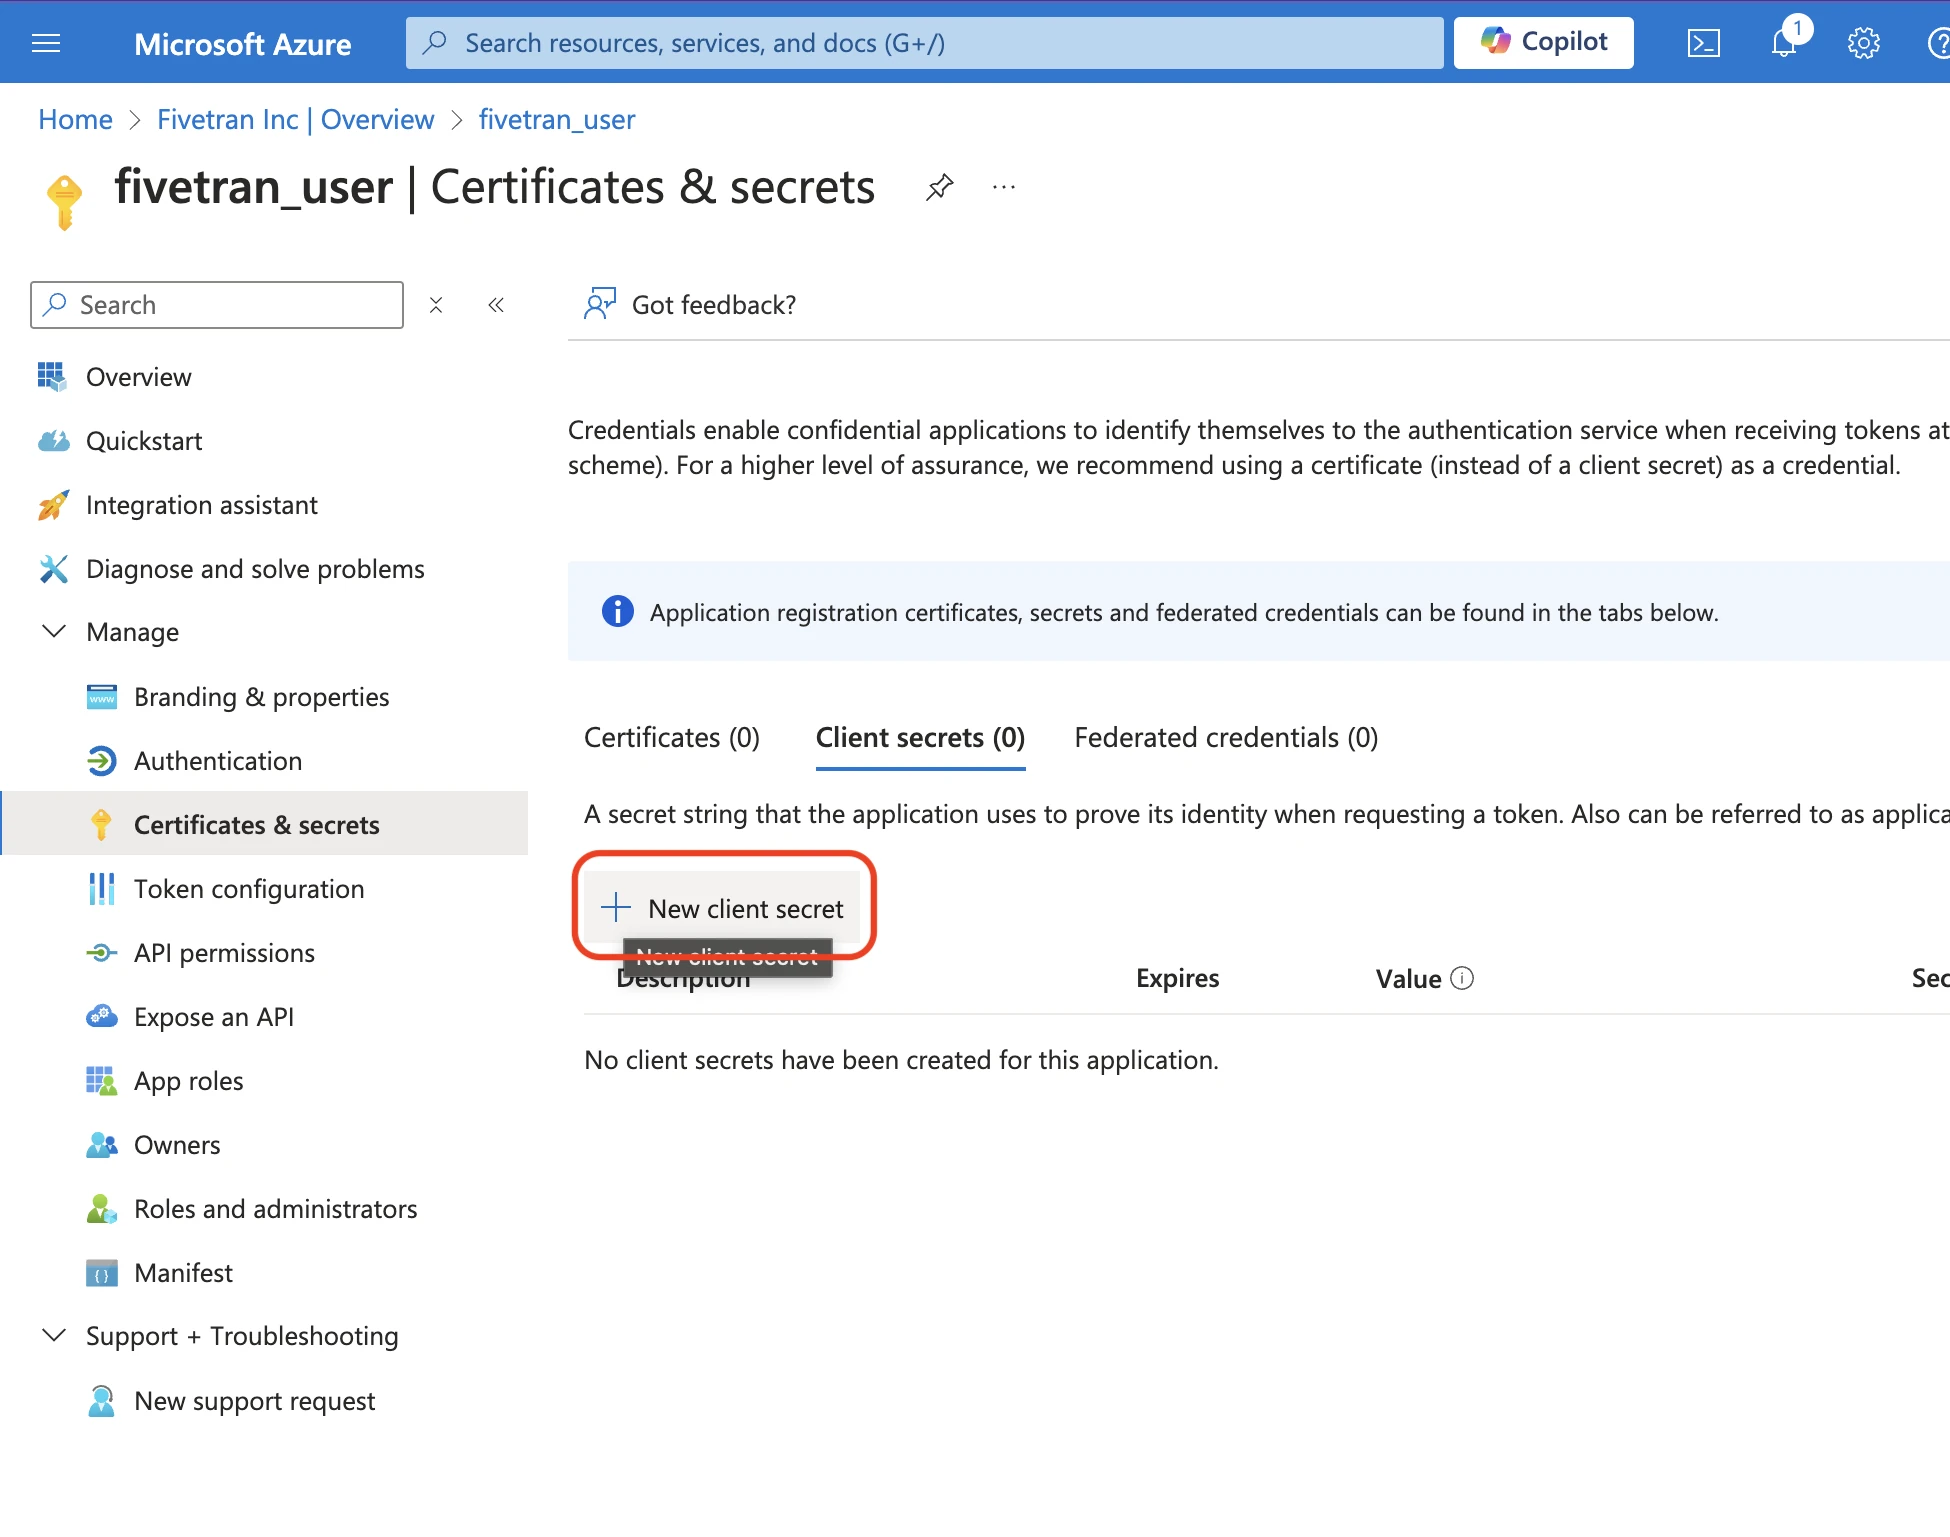
Follow the instructions in the Microsoft Add credentials documentation to add a credential with a client secret. Store the generated client secret in a secure place, because you cannot access this value later.
In the Azure Database for PostgreSQL flexible server, navigate to the Authentication section and ensure that one of the following options is selected:
- Microsoft Entra authentication only
- PostgreSQL and Microsoft Entra authentication
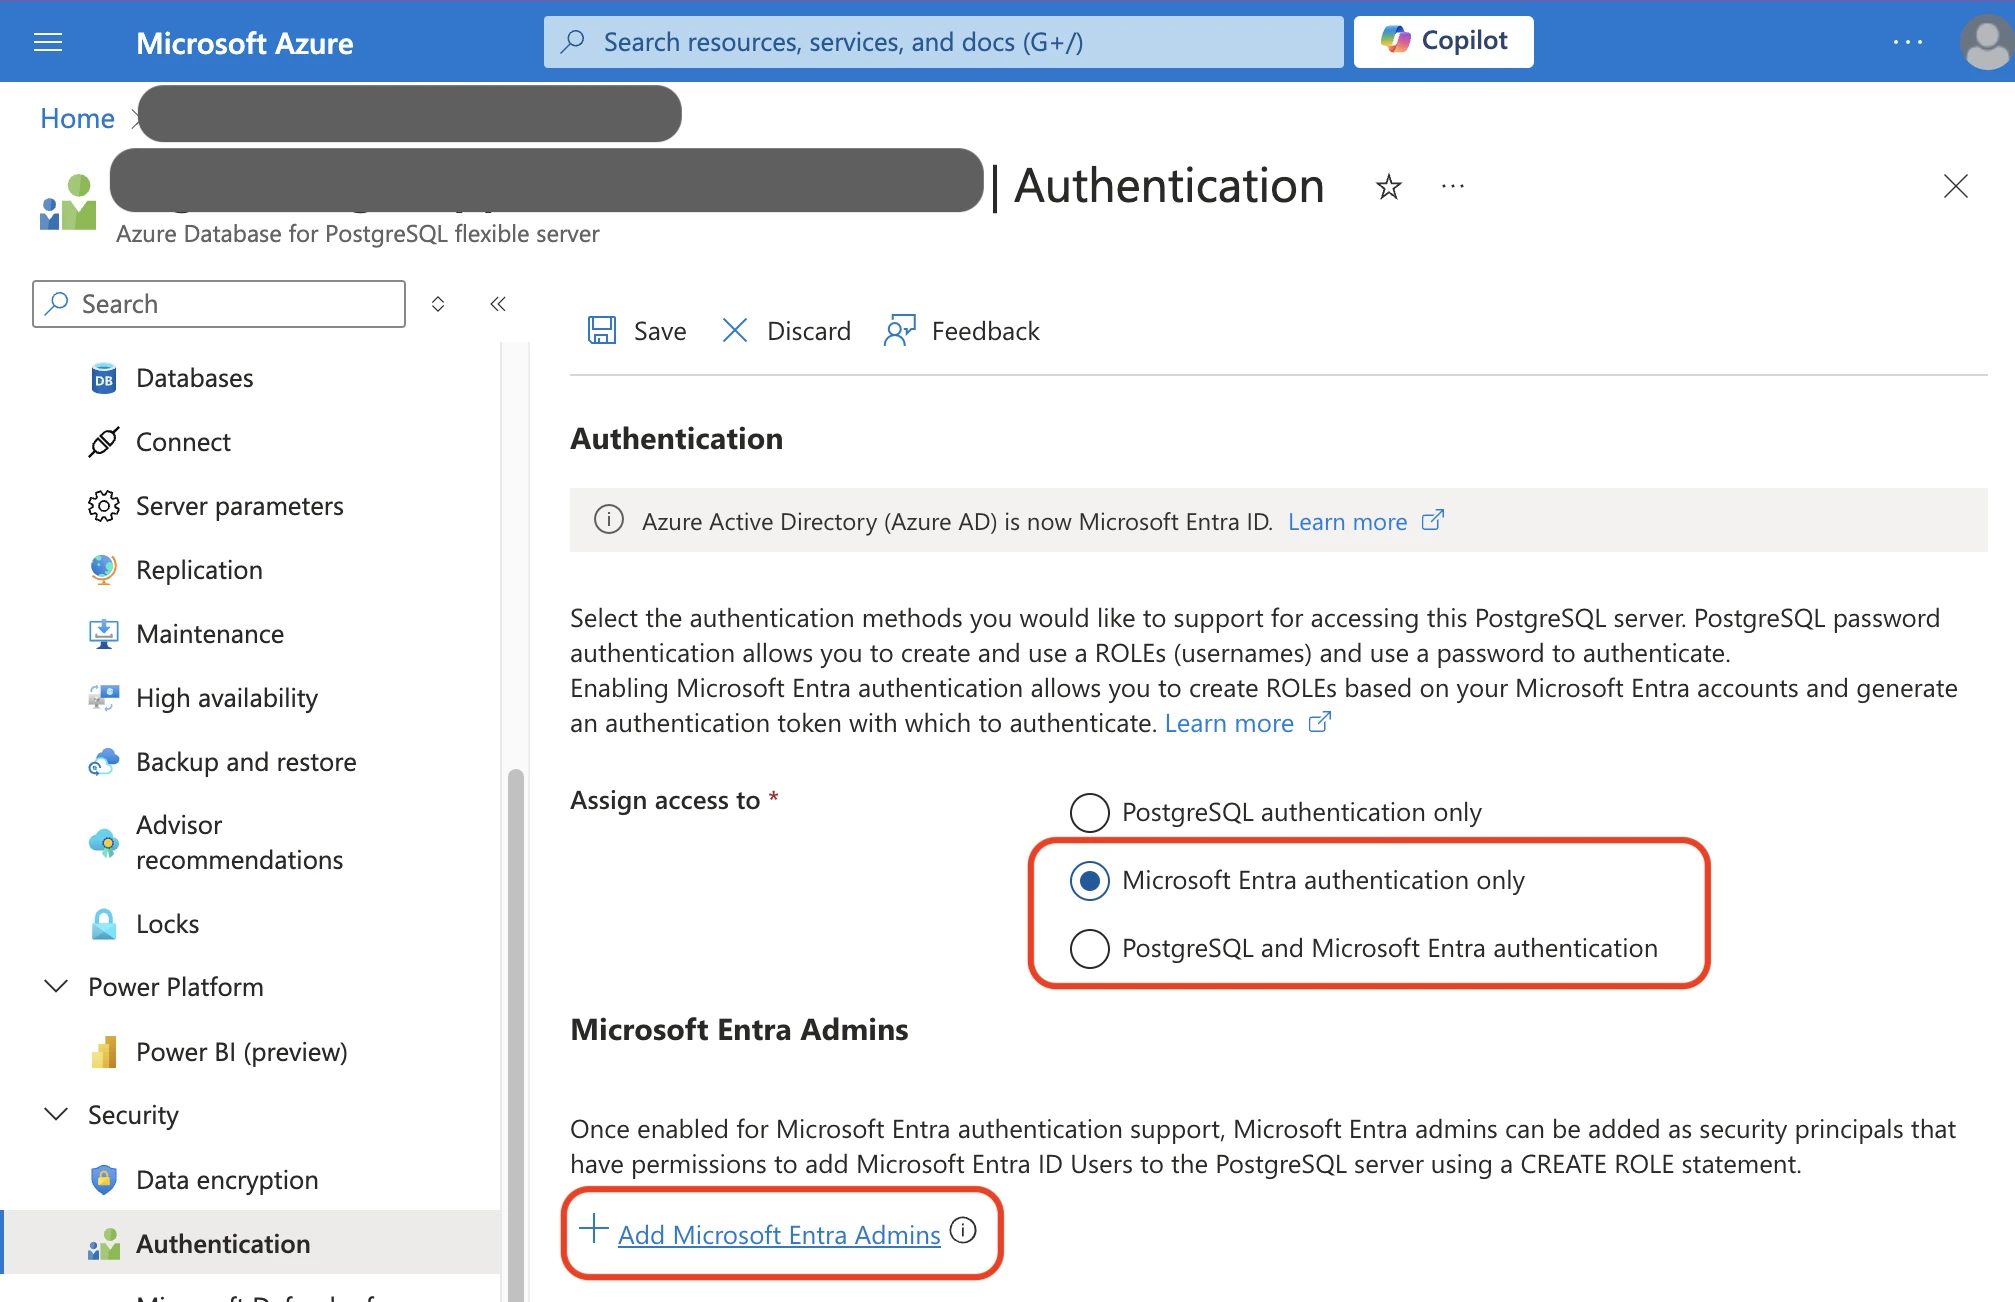
Add a Microsoft Entra Admin if an admin is not already present.
Connect to the
postgresdatabase within your Azure Database for PostgreSQL flexible server using the Microsoft Entra Admin's credentials.Follow the instructions in the Manage Microsoft Entra roles in Azure Database for PostgreSQL - Flexible Server documentation to add the service principal as user in PostgreSQL. Once you run the command
SELECT * FROM pgaadauth_create_principal('fivetran_user', false, false);, you can now use the service principalfivetran_useras a user.Fill in the following details in the corresponding fields in the connection setup form:
- User: Registered App Display Name
- Password: Client Secret Value
- Entra App ID: Registered App (client) ID
- Azure Tenant ID: Directory (tenant) ID
Enable access
You must configure the firewall to grant Fivetran's data processing servers access to your database server.
In the Azure console, open the SQL database firewall settings.
Select the Azure Database for PostgreSQL that you want to connect to Fivetran.
In Settings, click Connection security.
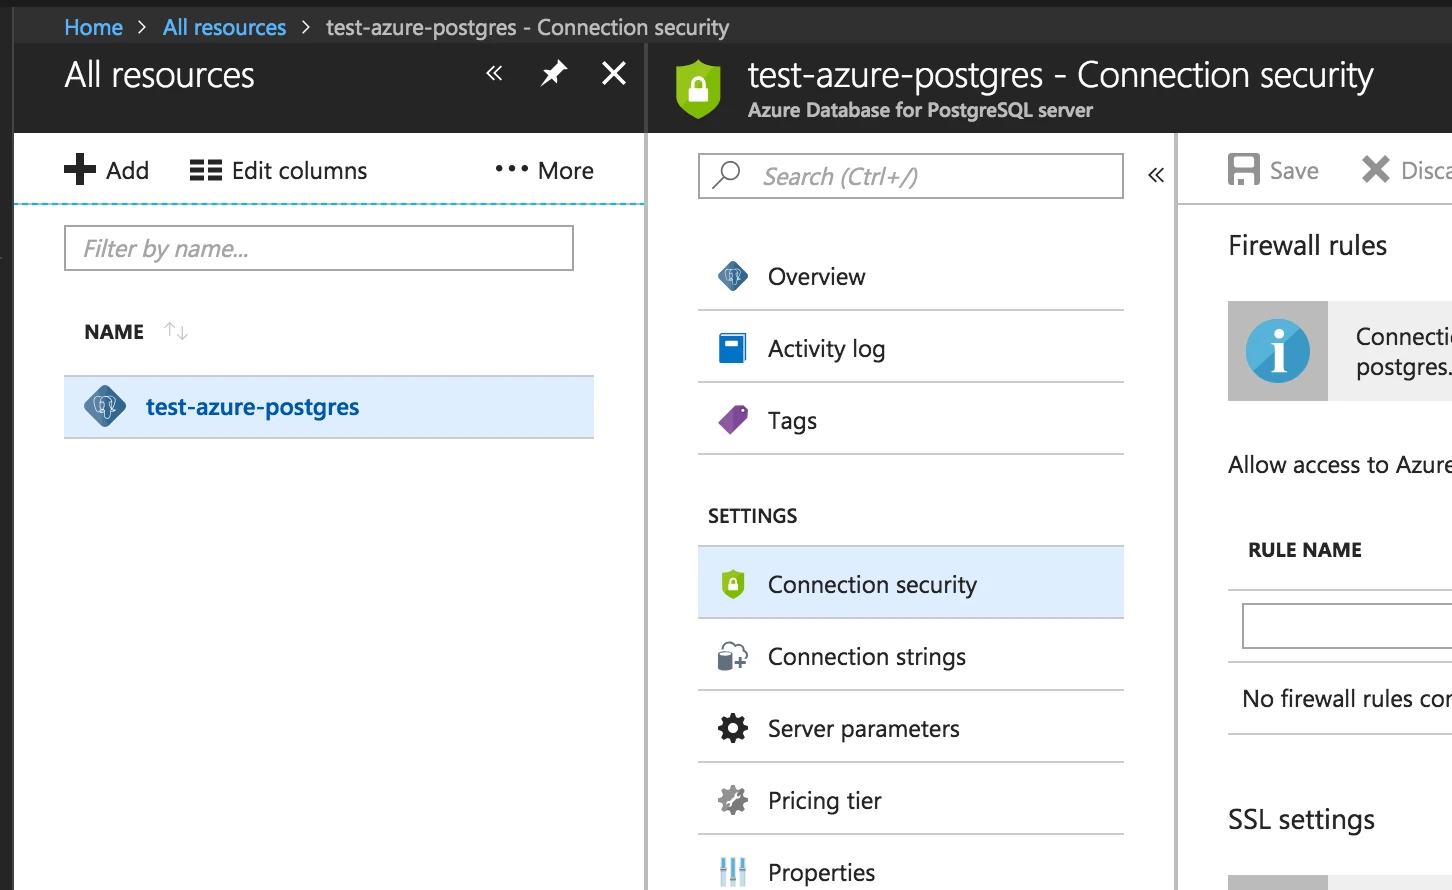
Add a new firewall rule. Enter Fivetran's IP in both the Start IP and End IP fields to define the firewall rule's range.
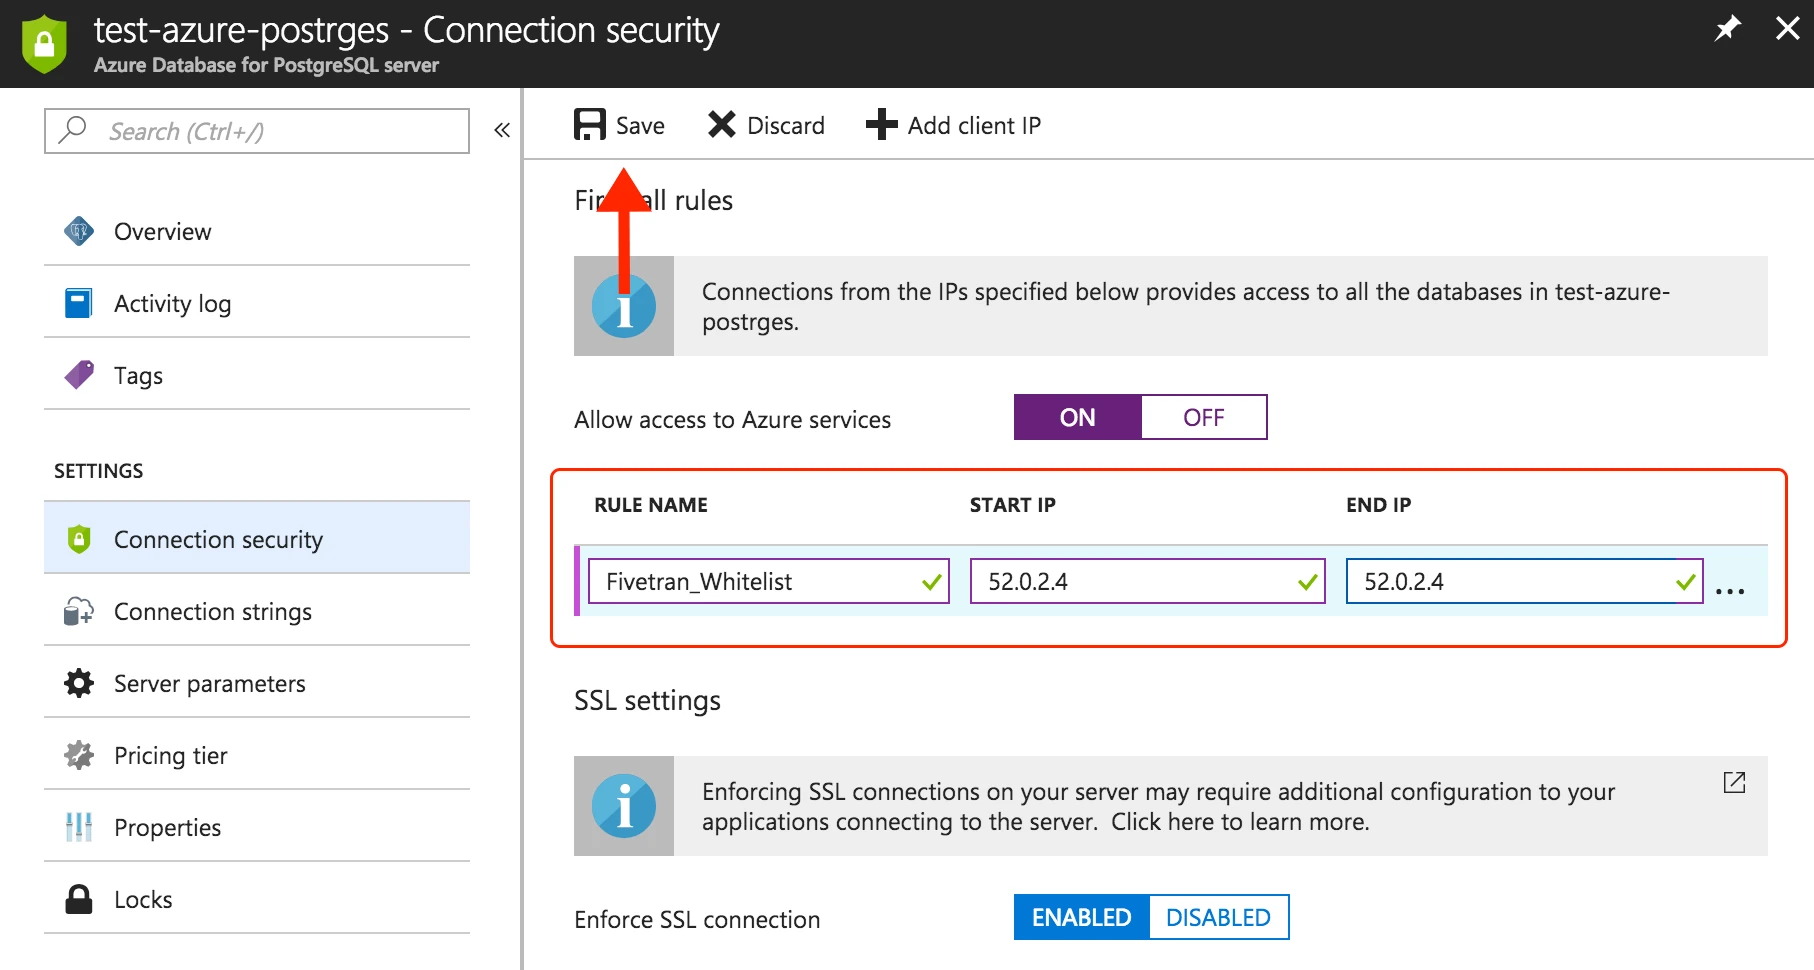
Click Save.
Create user
Open a connection to your primary PostgreSQL database.
Create a user for Fivetran by executing the following SQL command. Replace
<username>andsome-passwordwith a username and password of your choice.
CREATE USER <username> PASSWORD 'some-password';
Grant read-only access
Grant the Fivetran user read-only access to all tables by running the following commands. To grant access to a schema other than PostgreSQL's default public schema, replace public with your schema name. If you want to grant access to multiple schemas, run these commands for each schema.
GRANT USAGE ON SCHEMA "public" TO <username>;
GRANT SELECT ON ALL TABLES IN SCHEMA "public" TO <username>;
ALTER DEFAULT PRIVILEGES IN SCHEMA "public" GRANT SELECT ON TABLES TO <username>;
The ALTER DEFAULT PRIVILEGES command ensures that future tables created in the schema are also accessible to the Fivetran user.
Restrict access to tables (optional)
You can limit Fivetran's access to specific tables by granting access only to the tables that you want to sync.
You must grant access individually for each table. You cannot grant access to all tables and then revoke access for a subset of tables.
Ensure that the Fivetran user has access to the schema that contains your table(s):
GRANT USAGE ON SCHEMA "your_schema" TO <username>;Revoke previously granted table-level permissions:
ALTER DEFAULT PRIVILEGES IN SCHEMA "your_schema" REVOKE SELECT ON TABLES FROM <username>;
REVOKE SELECT ON ALL TABLES IN SCHEMA "your_schema" FROM <username>;
Grant access to each table:
GRANT SELECT ON "your_schema"."your_table" TO <username>;By default, new tables created in the schema are not accessible to the Fivetran user. To grant access to new tables, run the following command:
ALTER DEFAULT PRIVILEGES IN SCHEMA "your_schema" GRANT SELECT ON TABLES TO <username>;
Restrict access to columns (optional)
You can limit access to specific columns within a table by granting permissions only to those columns.
Revoke existing table-level permissions:
REVOKE SELECT ON "your_schema"."your_table" FROM <username>;Grant access to specific columns:
If you chose Query-Based as your incremental sync method, you must grant us access to the hidden system columns
xminandctid. This speeds up your initial sync and enables capturing deletes. If you chose Logical replication, granting access toxminis recommended for new connections to enable faster initial sync and re-import.GRANT SELECT (xmin, ctid, some_column, other_column) ON "your_schema"."your_table" TO <username>;
After restricting column access, newly added columns will not be accessible automatically. To grant access to new columns, rerun the command above with the additional columns.
Configure incremental sync method
To keep your data up to date after the initial sync, Fivetran offers multiple incremental sync methods. These methods track recent data changes so Fivetran can sync only what changed since the last sync instead of copying entire tables each time. Learn more in our Updating data documentation.
We recommend using the Logical replication method when possible because it is faster and more efficient than Query-Based. For guidance on choosing the best option for your workload, see Logical replication vs Query-Based documentation.
Configure your chosen incremental sync method:
Logical replication
You can only enable logical replication if your Azure Database for PostgreSQL flexible server's version is 11 or later.
We do not support logical replication for Azure Database for PostgreSQL single server.
Logical replication relies on the logical decoding of the PostgreSQL write-ahead log (WAL). Fivetran reads the WAL using the pgoutput plugin to detect any new or changed data. This plugin replicates data from your custom publication without needing additional libraries. Learn more in our logical replication documentation.
We support logical replication of read replicas only if you are using PostgreSQL version 16 or higher. If your PostgreSQL version is below 16, you must connect to your primary database.
To enable logical replication, follow these steps:
Ensure that your server has ample free space for the logs. Logs that Fivetran has already processed are released. However, logs are not released if replication stops (for example, if we lose access). In this case, logs may accumulate on your server and consume additional storage. The amount of additional disk space consumed by these logs is proportional to the amount of changes committed on the server. If a lost connection can't be resumed quickly enough, you can drop the replication slot, which releases the storage of unconsumed logs. You would then need to do a full re-sync of your connection to reset the cursor in the replication slot.
In your Azure portal, do the following:
i. Set the
wal_levelserver parameter to LOGICAL, then click Save.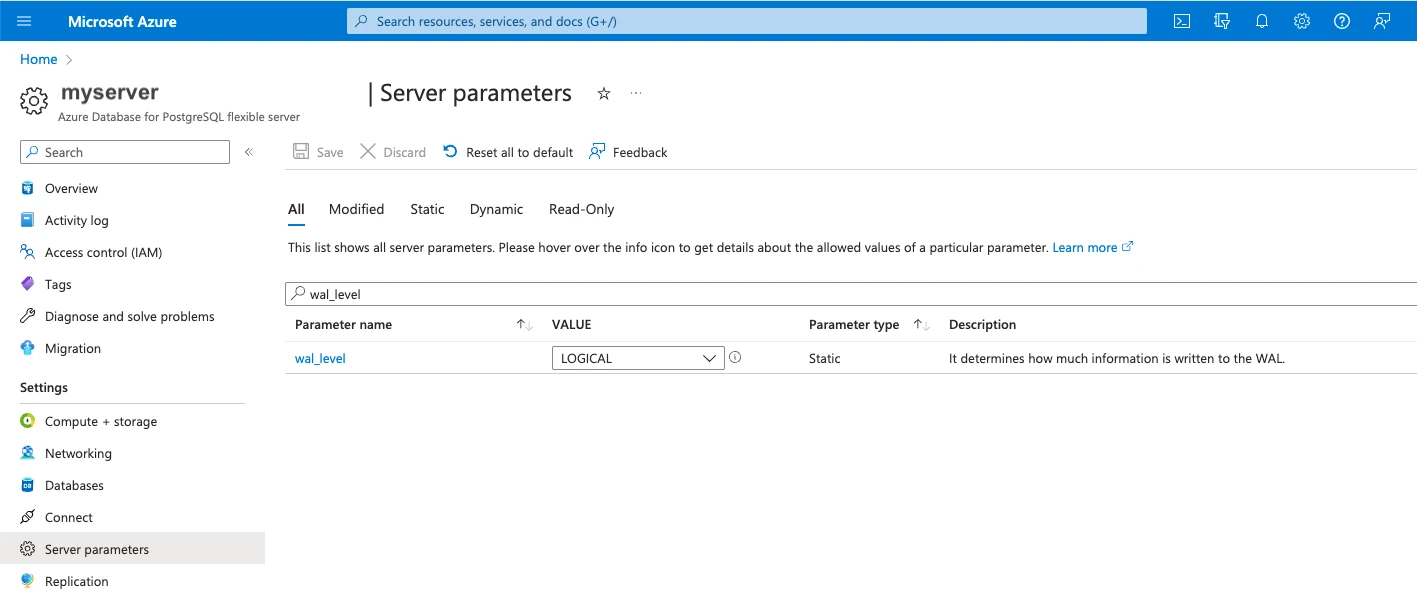
ii. Click Yes to restart the server to apply the change.

Use a PostgreSQL console to log in to your primary database as an admin user.
Create a publication for your tables. If you want, you can create a publication for only certain tables so that you add or remove tables from the publication later on. Only changes from tables in the publication are replicated to Fivetran. Each database can have multiple distinct publications. You must have
CREATEprivileges or above to run this command.The publication name
fivetran_pubquoted throughout this guide is used purely as an example. The actual publication name should be unique for every database and cannot start with a number.CREATE PUBLICATION fivetran_pub FOR TABLE table2, table4, table8;To add or remove a table from a publication, run the following command. You must have ownership rights over the table(s).
ALTER PUBLICATION fivetran_pub ADD/DROP TABLE table_name;Alternatively, you can create a publication for all of your tables. However, you cannot remove any table from this publication later on. You must have superuser privileges to run this command.
CREATE PUBLICATION fivetran_pub FOR ALL TABLES;(Optional) You can choose which operations to include in the publication. For example, the following publication includes only
INSERTandUPDATEoperations.CREATE PUBLICATION insert_only_pub FOR TABLE table1 WITH (publish = 'INSERT, UPDATE');To add partitioned tables for PostgreSQL version 13 or later, run the following command to enable publish_via_partition_root.
CREATE PUBLICATION fivetran_pub FOR ALL TABLES WITH (publish_via_partition_root=true);Create a logical replication slot for the database you want to sync by running the following command. You must use the standard output plugin
pgoutput. Ensure that you are connected to the correct database when you create your replication slot, or your connection will not be able to find the slot.To create replication slot, the admin user has to have
REPLICATIONpermission:ALTER ROLE <admin_role> WITH REPLICATION;You must create a unique replication slot for every connection that uses the same PostgreSQL cluster. Replication slot names cannot start with a number. (The replication slot name
fivetran_pgoutput_slotquoted throughout this guide is used purely as an example.)You need to create the replication slot after you have created the publication.
SELECT pg_create_logical_replication_slot('fivetran_pgoutput_slot', 'pgoutput');If your PostgreSQL server version is 16 or later and you want to sync from a standby, create the replication slot in the read replica.
Verify that your chosen tables are in the publication.
SELECT * FROM pg_publication_tables;Grant the Fivetran user permission to read the replication slot.
ALTER ROLE fivetran WITH REPLICATION;Log in as the Fivetran user.
Verify that the Fivetran user can read the replication slot by running the following command. Replace
fivetran_pgoutput_slotwith your replication slot name andfivetran_pubwith the publication name.SELECT count(*) FROM pg_logical_slot_peek_binary_changes('fivetran_pgoutput_slot', null, null, 'proto_version', '1', 'publication_names', 'fivetran_pub');If the query succeeds, then permissions are sufficient.
Query-Based
You must use the Query-Based method if your Azure Database for PostgreSQL version is earlier than 10.
Fivetran runs SQL queries that read PostgreSQL system columns (xmin and, when applicable, ctid) to detect new and changed data during each sync.
Capture Deletes (optional)
By default, Query-Based sync detects new and updated rows. If you also want to detect deleted rows, you can turn on Capture Deletes in the connection setup form.
When you enable Capture Deletes:
Fivetran adds an internal helper column
ctid_fivetran_idto each synced table. Fivetran uses this column to track deletes by storing the row'sctidvalue at the end of each sync.- Before the initial sync (new connection): Fivetran creates tables with
ctid_fivetran_idduring the initial sync (no additional re-sync). - After data is already synced (existing connection): Fivetran runs a one-time migration sync (does not trigger table re-sync) of the selected tables to populate
ctid_fivetran_idcolumn and capture a snapshot of the source table. The migration sync can take a bit more time than a regular sync because we have to populate the extractid_fivetran_idcolumn.
- Before the initial sync (new connection): Fivetran creates tables with
This setting is permanent for the connection. After you click Save & Test, it's locked and can’t be disabled later, whether or not the connection has run its first sync.
For details and limitations, see our Capturing deletes documentation.
Query-Based sync requires full table scans to detect updates and may be slower than logical replication, especially for large tables. In high-write databases, PostgreSQL xmin freezing/wraparound can also cause older rows to be re-synced, increasing sync volume and load on your PostgreSQL source database. If possible, use logical replication.
For some accounts, these re-syncs may also increase MAR for that sync. To mitigate this, you can enable pg_visibility and pageinspect and create the required wrapper functions. See our FAQ page for more information.
Fivetran Teleport Sync Sunset
Fivetran Teleport Sync is a proprietary incremental sync method that can capture deletes without requiring additional setup beyond a read-only SQL connection. Updates are captured using the XMIN system column. Learn more in our Fivetran Teleport Sync documentation.
If you are trying to connect with a standby or read replica, run the following SQL command on your primary database as the Fivetran user:
CREATE AGGREGATE BIT_XOR(IN v bigint) (SFUNC = int8xor, STYPE = bigint);
If you are not connecting with a read replica, you do not need to do any additional configuration. The aggregate that the Teleport mechanism will later use is automatically created for you.
Finish Fivetran configuration
In your connection setup form, enter a Destination schema prefix. This is used as the connection name and cannot be modified once the connection is created.
In the Destination schema names field, choose the naming convention you want Fivetran to use for the schemas, tables, and columns in your destination:
- Source naming: Preserves the original schema, table, and column names from the source system in your destination.
- Fivetran naming: Standardizes the schema, table, and column names in your destination according to the Fivetran naming conventions.
If you want to modify your selection, make sure you do it before you start the initial sync.
Depending on your selection, we will either prefix the connection name to each replicated schema or use the source schema names instead.
In the Host field, enter your database host's IP (for example,
1.2.3.4) or domain (for example,your-database.cp0rdhwjbsae.us-east-1.rds.amazonaws.com).In the Port field, enter your database instance's port number. The port should be
5432, unless you changed the default.In the User field, enter the username:
- If you are connecting with Flexible Server, enter
<username>. - If you are connecting with Single Server, enter
<username>@<servername>, where<servername>is part of your Azure host URL:<servername>.database.windows.net.
- If you are connecting with Flexible Server, enter
In the Password field, enter the password for the Fivetran-specific user that you created in Step 3.
In the Database field, enter the name of the database that you want to replicate from (for example,
your_database).(Hybrid Deployment only) If your destination is configured for Hybrid Deployment, the Hybrid Deployment Agent associated with your destination is pre-selected for the connection. To assign a different agent, click Replace agent, select the agent you want to use, and click Use Agent.
From the Connection method drop-down, select how Fivetran connects to your database and enter the required information:
Connect directly
Connect via an SSH tunnel
- In the SSH Host field, enter the hostname or IP address of the SSH server. Do not use a load balancer IP address or hostname.
- In the SSH Port field, enter the port used by the SSH server.
- In the SSH User field, enter the username of the SSH user.
- If you enabled TLS on your database in Step 1 - Choose connection method, keep the Require TLS through Tunnel toggle turned ON.
Ensure that you have added Fivetran's SSH Public Key to the
authorized_keysfile on your SSH tunnel host.Connect via private networking
- If you enabled TLS on your database in Step 1 - Choose connection method, keep the Require TLS when using Private Networking toggle turned ON.
Connect via Proxy Agent
- Select an existing agent from the Proxy agents drop-down list or click + Configure a new proxy agent to set up a new agent.
- If you enabled TLS on your database in Step 1 - Choose connection method, keep the Require TLS when using Proxy Agent toggle turned ON.
In the Update Method field, select the incremental sync method that you want to use:
- Logical Replication: Enter your Replication Slot name and Publication Name.
- Query-Based: (Optional) Set the Capture Deletes toggle to ON if you want to capture deletes. For more information, see Capture deletes.
(Not applicable to Hybrid Deployment) Copy the Fivetran's IP addresses (or CIDR) that you must safelist in your firewall.
Click Save & Test. Fivetran tests and validates our connection to your Azure Database for PostgreSQL. Upon successful completion of the setup tests, you can sync your data using Fivetran.
Setup tests
Fivetran performs the following tests to ensure that we can connect to your Azure Database for PostgreSQL and that it is properly configured:
- The Connecting to SSH Tunnel Test validates the SSH tunnel details you provided in the setup form. It then checks that we can connect to your database using the SSH Tunnel. (We skip this test if you aren't connecting using SSH.)
- The Connecting to Host Test validates the database credentials you provided in the setup form. The test verifies that the host is not private and then checks the connectivity to the host.
- The Validating Certificate Test generates a pop-up window where you must choose which certificate you want Fivetran to use. It then validates that certificate and checks that we can connect to your database using TLS. (We skip this test if you selected an indirect connection method and then disabled the Require TLS through Tunnel toggle.)
- The Connecting to Database Test checks that we can access your database.
- The Connecting to WAL Replication Slot Test confirms that the database associated with the replication slot matches the name you supplied in the setup form. It then verifies that the replication slot uses the
pgoutputplugin if you selected the logical replication incremental sync method. Lastly, it makes sure that the Fivetran user has replication privileges. (We skip this test if you selected Query-Based as your incremental sync method) - The Checking Configuration Values Test checks a set of WAL-configured values against the recommended settings and detects if they are below the recommended range. (We skip this test if you selected Query-Based as your incremental sync method.)
- The Publication Test verifies that the supplied publication name exists in your database. (We skip this test if you selected Query-Based as your incremental sync method.)
- The Query-Based Extensions Test checks that the correct extensions are enabled for the Query-Based incremental sync method. (This test is skipped if you select Logical Replication as your incremental sync method.)
The tests may take a few minutes to finish running.