
Proxy Agent with Docker Setup Guide Private Preview
Follow our setup guide to deploy the Proxy Agent as a Docker container in your environment. Fivetran supports Docker-based Proxy Agent deployment on Linux hosts and on Windows Server 2019, Windows Server 2022, and Windows Server 2025 hosts that run Windows containers.
Linux prerequisites
Before you install the Proxy Agent, provision a host in your network. The host can be a physical server, virtual machine, or cloud instance.
The host must meet the following requirements.
Linux system requirements
| Resource | Minimum requirement |
|---|---|
| CPU | 4 vCPU, x86-64 or ARM64 |
| Memory | 6 GB RAM |
| Storage | 2 GB available disk space for executables and logs |
The Proxy Agent includes a bundled Java Runtime Environment (JRE) based on open-source Azul Zulu JDK. You do not need to install Java separately or purchase additional Java licenses.
Linux software requirements
The host must have the following software installed:
- A modern and up-to-date Linux distribution
- Docker Engine v20.10.17 or later
curlinstalled and available in yourPATH
We recommend the following security configuration:
Use an encrypted file system to protect Proxy Agent files and directories.
Run Docker in rootless mode for improved security. If you run Docker in rootless mode, enable user linger for the Proxy Agent user. This allows the Proxy Agent container to start automatically on system boot and continue running after the user logs out. Replace
<proxy_agent_user>with the Linux user that runs the Proxy Agent (for example,fivetran).sudo loginctl enable-linger <proxy_agent_user>
Linux user requirements
You need a non-root Linux user to operate the Proxy Agent container (for example, fivetran). The user must have permission to run Docker commands.
Do not run the Proxy Agent installation script as root. The installation script fails when executed by the root user.
Linux network requirements
The host running the containerized Proxy Agent must be able to establish outbound connections to the Fivetran services required for installation and runtime.
Unless specified otherwise, all required outbound connections use port 443.
Linux installation-time network access
The following endpoints are required during installation.
| Service | Purpose | Host |
|---|---|---|
| Fivetran Public API | Fetches the Proxy Agent configuration | api.fivetran.com |
| Google Artifact Registry | Downloads the Proxy Agent Docker image | us-docker.pkg.dev |
| GitHub | Downloads the Proxy Agent management scripts | raw.githubusercontent.com |
For us-docker.pkg.dev and raw.githubusercontent.com, use domain-based allowlisting. IP ranges for these hosts are managed by Google and GitHub respectively and may change.
Linux runtime network access
The following endpoints are required while the Proxy Agent is running. Replace <region> and <cloud_provider> with the Fivetran region and cloud provider for your Proxy Agent (for example, us-east-1 and aws).
| Service | Purpose | Host | Port |
|---|---|---|---|
| Proxy Broker | Maintains the Proxy Agent control connection | orchestrator.fivetran.com | 443 |
| Proxy Server | Routes traffic through the Proxy Agent | *.<region>.<cloud_provider>.proxy.prod.fivetran.com | 443 |
For IP ranges, see Fivetran IP addresses for Proxy Agent users. As with the installation-time endpoints, use domain-based allowlisting for these domains instead of IP ranges, since the IP ranges can change.
The Proxy Agent host must also be able to establish connections to your source or High-Volume Agent (HVA) host on the port configured for the connection.
Linux setup instructions
Create Proxy Agent for Linux
Log in to your Fivetran account.
In the database connection setup form, in the Connection Method drop-down menu, select Connect via Proxy Agent.
Click + Configure a new proxy agent.
In the Agree to terms step, review the License Addendum and Software Specific Requirements.
Select the I have read and agree to the terms of the License Addendum and the Software Specific Requirements checkbox.
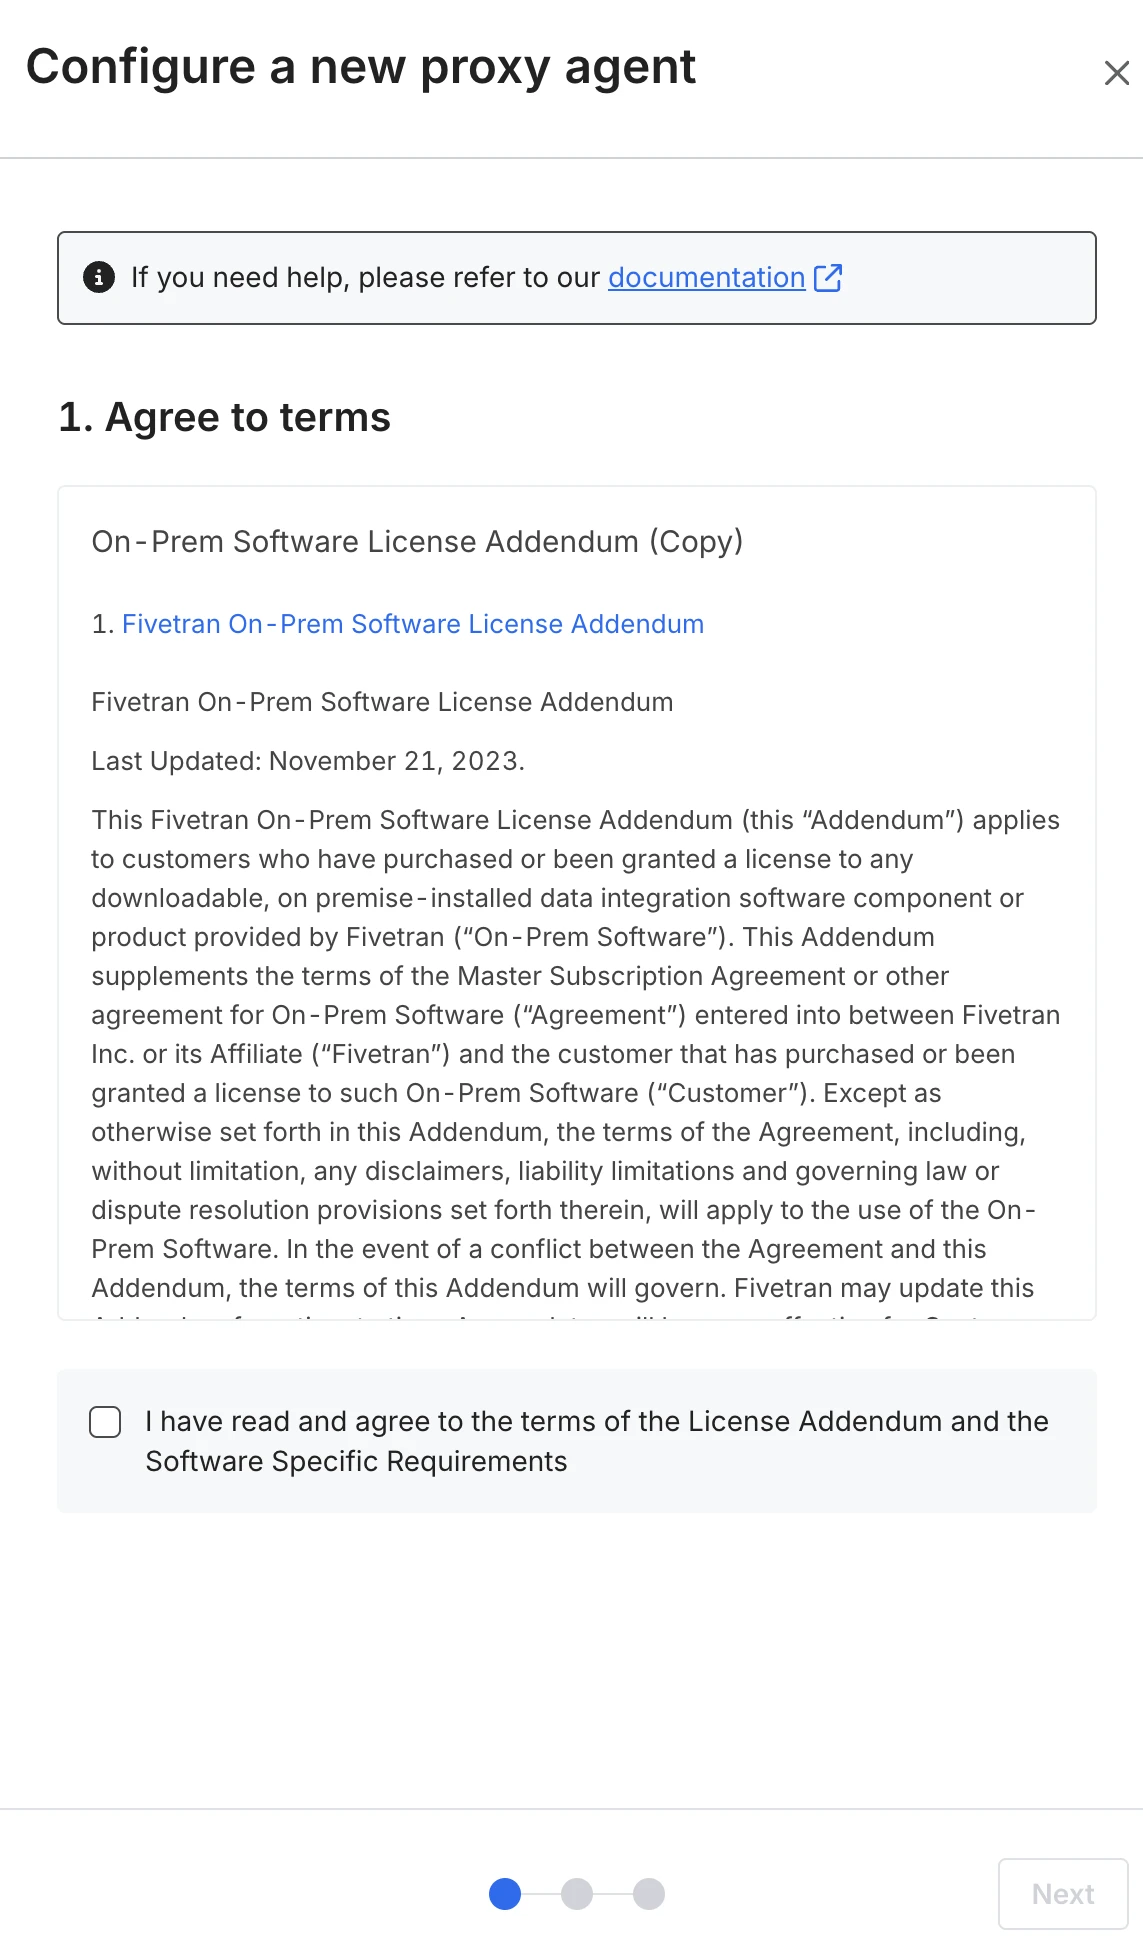
Click Next.
In the Choose your deployment type step, select Docker Engine for Linux.
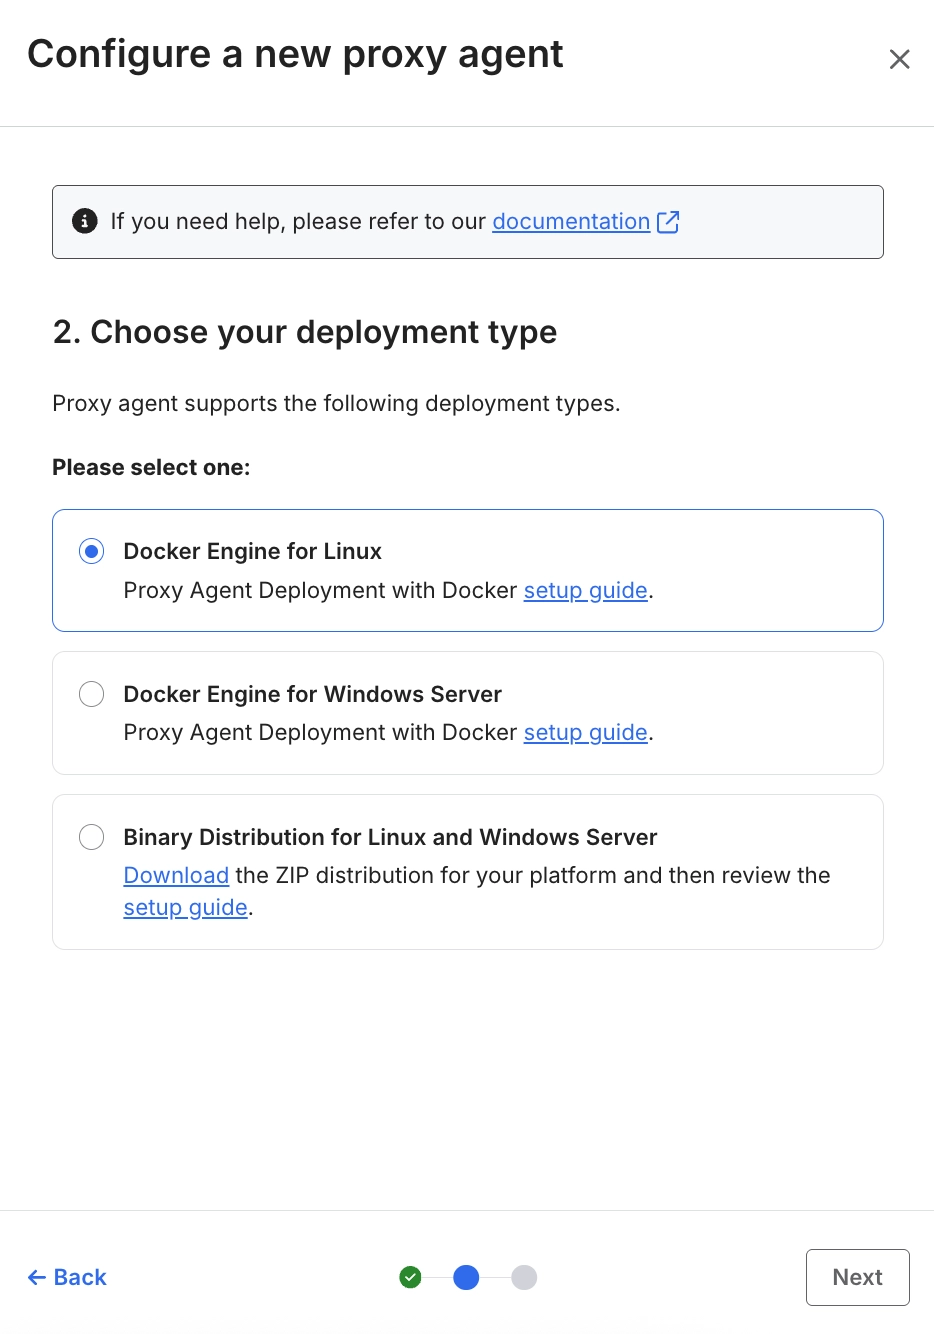
Click Next.
In the Name the proxy agent step, enter a name in the Proxy agent name field.
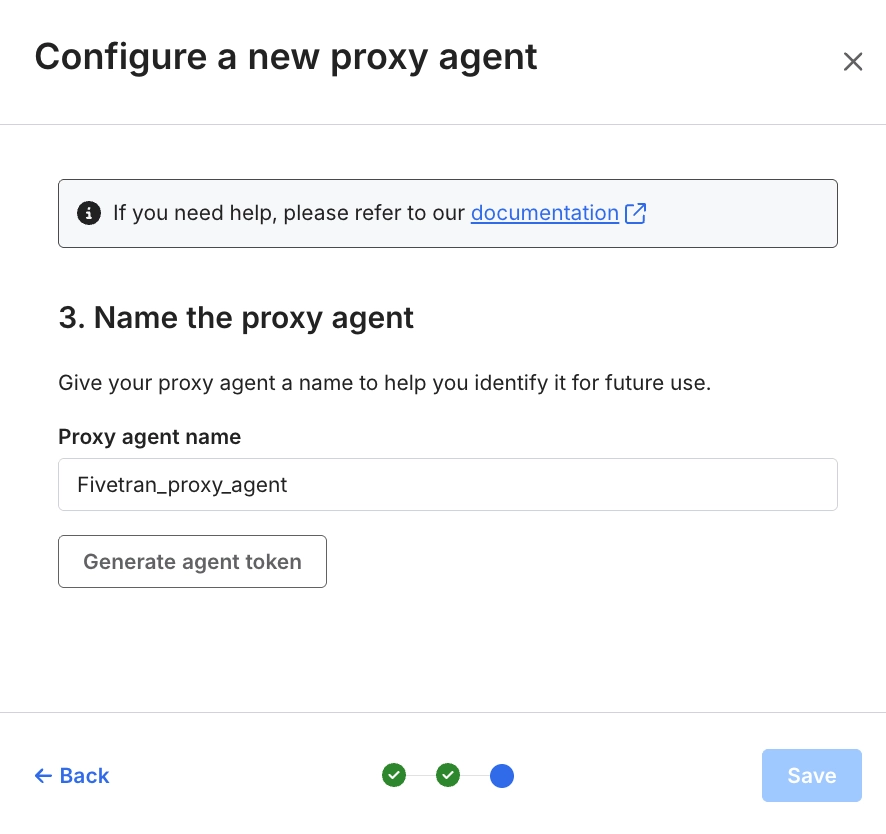
Click Generate agent token.
Make a note of the Agent token and the Install and start agent command. You'll need the agent token for manual installation and the installation command for automated installation. The installation command already includes your agent token and can be run without modification.
The token is shown only once. Store it securely before closing this dialog.
Each Proxy Agent has a unique token and installation command.
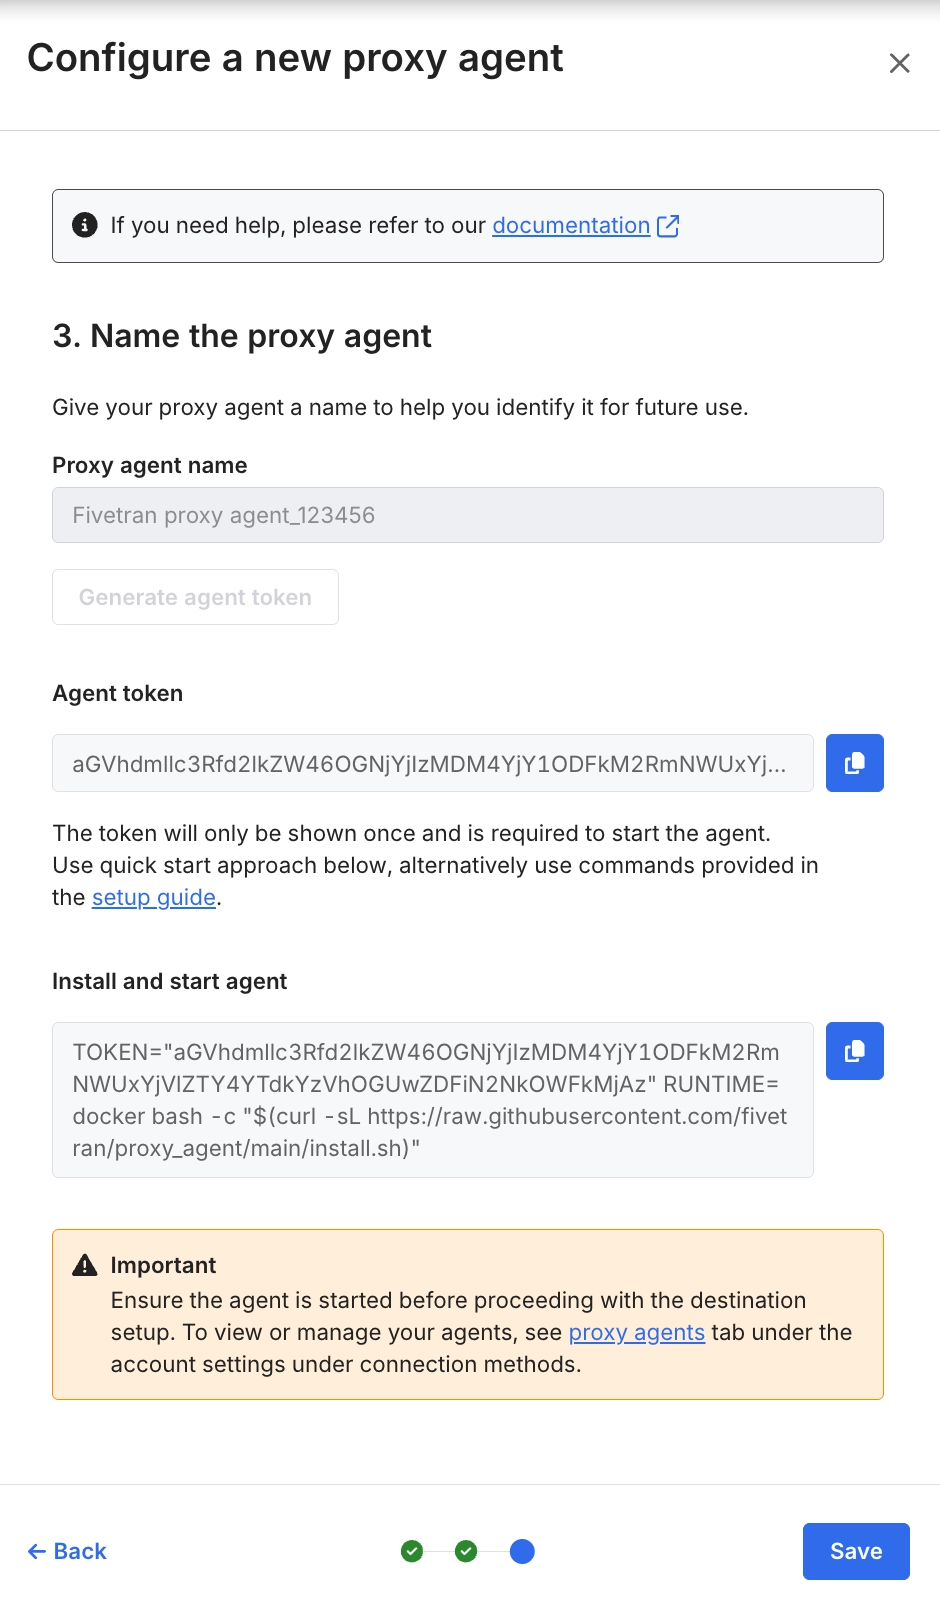
Click Save.
Confirm that the new Proxy Agent is selected in the Proxy agents drop-down menu.
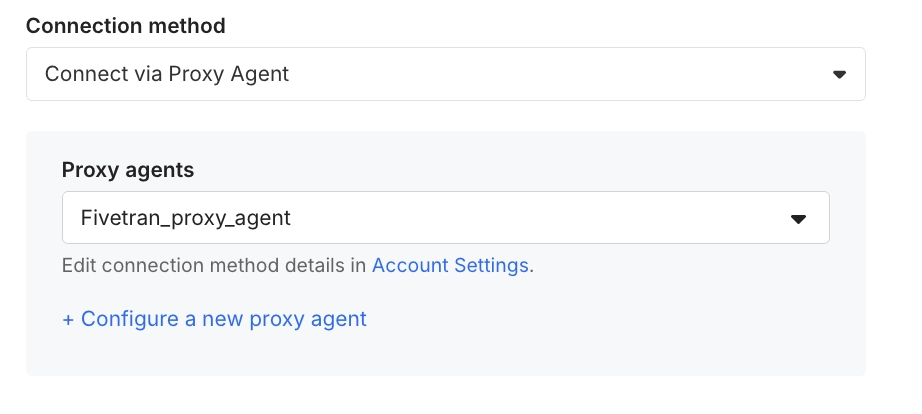
You must install and start the Proxy Agent before completing the database connection setup. To view or manage your Proxy Agents, go to the Proxy Agents tab in your account settings under Connection Methods.
(Optional) Configure Linux proxy settings
Configure the Proxy Agent host and Docker to use your network proxy during installation.
Perform this step if the installation commands and Docker must use a proxy server (for example, Squid) to reach the required installation endpoints. These settings don't configure the Proxy Agent's runtime connections to Fivetran. To route those connections through your network proxy, also complete Configure Proxy Agent to use proxy server after installation. If you are not using a proxy server, skip to Install Proxy Agent on Linux.
Expand for instructions
Configure local Linux environment
Configure proxy environment variables on the Proxy Agent host so local commands and management scripts can reach required services through your proxy server.
Log in to your Proxy Agent host machine using the Fivetran user.
Go to the
/etc/profile.d/directory and add a new file namedproxy.sh. This directory requires root privileges, so usesudoto create the file.In the
proxy.shfile, set appropriate values for the following system-wide environment variables:http_proxy: Specifies the proxy server to use for HTTP requests.https_proxy: Specifies the proxy server to use for HTTPS requests.no_proxy: Excludes specific domains or IPs from using the proxy.
For example:
export http_proxy="http://<proxy_host>:<proxy_port>" export https_proxy="http://<proxy_host>:<proxy_port>" export no_proxy="localhost,127.0.0.1"- We recommend using the Fully Qualified Domain Name (FQDN) or IP address of the proxy host.
- The
no_proxyvalue can include a custom list of exclusions. In most environments, this includeslocalhost,127.0.0.1.
Apply the new environment variables to your current session by sourcing the file, or open a new login shell:
source /etc/profile.d/proxy.shFiles in
/etc/profile.d/are loaded automatically only when a new login shell starts. If you don't source the file or start a new login shell, the environment variables won't be available to the commands you run in the rest of this procedure.
Configure container runtime
To ensure Docker correctly uses proxy settings when you run containers from the command line, configure the appropriate proxy values in Docker configuration files.
Complete the following in order:
- Set proxy values for Docker CLI.
- Update the Docker service configuration for your privilege mode: rootless or root.
These configuration files belong to Docker, not the Fivetran Proxy Agent configuration file (~/fivetran-proxy-agent/config/config.json).
Set proxy values for Docker CLI
Add the proxy configuration for the user that runs Docker commands. Docker CLI reads this from $DOCKER_CONFIG/config.json, which defaults to ~/.docker/config.json.
For example:
{
  "proxies": {
    "default": {
      "httpProxy": "http://<proxy_host>:<proxy_port>",
      "httpsProxy": "http://<proxy_host>:<proxy_port>",
      "noProxy": "localhost,127.0.0.1"
    }
  }
}
Update service configuration for Docker running in rootless mode
Perform these steps only if you are using Docker in rootless mode. If you are running Docker with root privileges, skip to Update service configuration for Docker running with root privileges.
Create a systemd drop-in for the Docker service so your proxy settings survive Docker package updates:
systemctl --user edit docker.serviceIn the editor, add the environment variables to the
[Service]section:[Service] Environment="HTTP_PROXY=http://<proxy_host>:<proxy_port>" Environment="HTTPS_PROXY=http://<proxy_host>:<proxy_port>" Environment="NO_PROXY=localhost,127.0.0.1"Save and close the editor, then restart the service to apply the change:
systemctl --user restart docker.service
systemctl --user status docker.service
Verify the settings:
i. Get the main PID of the rootless Docker daemon:
systemctl --user show --property=MainPID docker.serviceii. Inspect the environment variables of the process:
cat /proc/<pid>/environ
Update service configuration for Docker running with root privileges
Perform this step only if you are using Docker with root privileges.
Create a systemd drop-in for the Docker service so your proxy settings survive Docker package updates:
sudo systemctl edit docker.serviceIn the editor, add the environment variables to the
[Service]section:[Service] Environment="HTTP_PROXY=http://<proxy_host>:<proxy_port>" Environment="HTTPS_PROXY=http://<proxy_host>:<proxy_port>" Environment="NO_PROXY=localhost,127.0.0.1"Save and close the editor, then restart the Docker service to apply the change:
sudo systemctl restart docker.service
sudo systemctl status docker.service
Verify the settings:
i. Get the main PID of the Docker daemon:
systemctl show --property=MainPID docker.serviceii. Inspect the environment variables of the process:
cat /proc/<pid>/environ
Install Proxy Agent on Linux
You can install the Proxy Agent using one of the following methods:
- Automated installation (recommended): Install and start the Proxy Agent by running the installation script.
- Manual installation: Create the Proxy Agent directories and
config.jsonfile, then start the Proxy Agent manually.
Automated Linux installation (recommended)
Log in to your Proxy Agent host machine as the Fivetran user (non-root).
Open a terminal and run the installation command from the Create Proxy Agent for Linux step.
When run in a terminal, the installation script prompts you to specify how much memory to allocate to the Proxy Agent container. Press Enter to use the default value of 5120 MB. For an unattended installation, set the
MEMORY_ALLOCATION_MBenvironment variable before running the installation command.Do not run the installation as
root. The installer will exit with an error if run asroot.The installation command does the following:
- Validates your system against the prerequisites (Docker version, CPU, RAM, disk space).
- Exchanges your agent token with Fivetran to download your configuration file.
- Downloads the
proxy-agent-manager.shmanagement script. - Pins the latest available Proxy Agent version.
- Starts the Proxy Agent container and waits for it to report healthy.
The installation command creates the Proxy Agent directories in the following structure:
~/fivetran-proxy-agent/         --> Proxy Agent home directory
├── proxy-agent-manager.sh      --> Management script
├── settings.sh                 --> Container memory allocation
├── config/                     --> Configuration file location
│   └── config.json             --> Proxy Agent configuration file and credentials
├── logs/                       --> Log file location
└── version                     --> Pinned Proxy Agent version
To install to a custom directory, pass
--install-dir /your/pathto the installation command.
Manual Linux installation
Expand for instructions
Configure local Linux environment for Proxy Agent
Log in to your Proxy Agent host machine as the Fivetran user (non-root).
Run the following command to create the Proxy Agent directories:
mkdir -p ~/fivetran-proxy-agent/config ~/fivetran-proxy-agent/logsThis creates the following directory structure:
~/fivetran-proxy-agent/         --> Proxy Agent home directory
├── config/                     --> Configuration file location
└── logs/                       --> Log file location
Using your agent token from the Create Proxy Agent for Linux step, download your configuration file and save it to
~/fivetran-proxy-agent/config/config.json. Replace<agent_token>with your agent token:(umask 177 && curl -fsS -X POST \ -H "Authorization: Basic <agent_token>" \ -H "Accept: application/json" \ https://api.fivetran.com/proxy-agent/configure \ -o ~/fivetran-proxy-agent/config/config.json) \ || { echo "ERROR: Failed to fetch configuration. Verify your agent token and try again." >&2; exit 1; }Download
proxy-agent-manager.shinto~/fivetran-proxy-agentand make it executable:curl -fSsL --max-time 30 \ "https://raw.githubusercontent.com/fivetran/proxy_agent/main/proxy-agent-manager.sh" \ -o ~/fivetran-proxy-agent/proxy-agent-manager.sh chmod u+x ~/fivetran-proxy-agent/proxy-agent-manager.shResolve and pin the Proxy Agent version by querying the image registry and writing the version to
~/fivetran-proxy-agent/version:VERSION=$(curl -s -f "https://us-docker.pkg.dev/v2/prod-eng-fivetran-public-repos/public-docker-us/proxy-agent/tags/list" \ | grep -oE '"[0-9]+\.[0-9]+\.[0-9]+-ubuntu-26\.04"' | tr -d '"' | sort -V | tail -1) [ -n "$VERSION" ] || { echo "ERROR: Unable to determine the latest Proxy Agent version." >&2; exit 1; } echo "$VERSION" > ~/fivetran-proxy-agent/version
Start Proxy Agent on Linux
Log in to your Proxy Agent host machine as the Fivetran user (non-root).
Go to the Proxy Agent home directory you created.
Start the Proxy Agent container:
./proxy-agent-manager.sh start
(Optional) Configure Proxy Agent to use proxy server
Complete this step only if the Proxy Agent itself needs to forward traffic through the same intermediate network proxy you configured in Configure Linux proxy settings to reach the Proxy Broker and Proxy Server. That earlier step routes only the installation process and Docker through the proxy; this step additionally configures the running Proxy Agent to use it.
Open
~/fivetran-proxy-agent/config/config.json.Add the
proxy_hostandproxy_portfields:Do not include
http://orhttps://in theproxy_hostvalue.{ "proxy_host": "<proxy_host>", "proxy_port": <proxy_port> }Restart the Proxy Agent to apply the change:
./proxy-agent-manager.sh restart
Verify Proxy Agent status
Verify the Proxy Agent is running by doing any of the following:
- Run
docker ps -aand look for a container namedproxy-agent-<agent-id>with a(healthy)status. - From the Proxy Agent home directory, run
./proxy-agent-manager.sh status. - On the Fivetran dashboard, go to Account Settings > Connection Methods > Proxy Agents and verify the Proxy Agent status.
Manage Proxy Agent on Linux
Use proxy-agent-manager.sh from your Proxy Agent home directory to manage the Proxy Agent after installation.
Start the Proxy Agent container:
./proxy-agent-manager.sh startStop the Proxy Agent container:
./proxy-agent-manager.sh stopRestart the Proxy Agent container:
./proxy-agent-manager.sh restartShow the current container status:
./proxy-agent-manager.sh statusStream the Proxy Agent logs:
./proxy-agent-manager.sh logsUpgrade Proxy Agent to the latest available version:
./proxy-agent-manager.sh upgradeThis command checks for the latest available version, replaces the running container with minimal downtime, and automatically rolls back to the previous version if the upgrade fails.
Windows prerequisites
Before you install the Proxy Agent, provision a Windows Server host in your network. The host can be a physical server, virtual machine, or cloud instance.
The host must meet the following requirements.
Windows system requirements
| Resource | Minimum requirement |
|---|---|
| CPU | 4 vCPU, x86-64 |
| Memory | 8 GB RAM |
| Storage | 12 GB available disk space |
The Proxy Agent includes a bundled Java Runtime Environment (JRE) based on open-source Azul Zulu JDK. You do not need to install Java separately or purchase additional Java licenses.
Windows software requirements
The host must have the following software installed:
- Windows Server 2019, Windows Server 2022, or Windows Server 2025 (64-bit)
- The Windows Containers feature. To install it, run
Install-WindowsFeature -Name Containersin an elevated PowerShell session, then restart the host. - Docker CE, running Windows containers. Docker CE 29.8.2 is tested; the Microsoft installation script installs the current release. To check, run
docker info --format '{{.OSType}}'. The command must returnwindows. - PowerShell 5.1 or later
The installer selects the Proxy Agent image that matches your Windows Server version: Windows Server 2019 uses the ltsc2019 image, Windows Server 2022 uses the ltsc2022 image, and Windows Server 2025 uses the ltsc2025 image.
We recommend the following security and availability configuration:
Use an encrypted file system (for example, BitLocker) to protect Proxy Agent files and directories.
Set the Docker service to start automatically. This allows the Proxy Agent container to start automatically on system boot without a user signing in. Run the following command in an elevated PowerShell session:
Set-Service -Name docker -StartupType Automatic
Windows user requirements
Install and manage the Proxy Agent as a member of the local Administrators group, in an elevated PowerShell session. By default, Docker Engine on Windows Server allows only members of the local Administrators group to run Docker commands.
The installer displays a warning that running as an Administrator user isn't recommended. You can ignore this warning on Windows Server; it doesn't block installation.
Windows network requirements
The host running the containerized Proxy Agent must be able to establish outbound connections to the Fivetran services required for installation and runtime.
Unless specified otherwise, all required outbound connections use port 443.
Windows installation-time network access
The following endpoints are required during installation.
| Service | Purpose | Host |
|---|---|---|
| Fivetran Public API | Fetches the Proxy Agent configuration | api.fivetran.com |
| Google Artifact Registry | Downloads the Proxy Agent Docker image | us-docker.pkg.dev |
| GitHub | Downloads the Proxy Agent management scripts | raw.githubusercontent.com |
For us-docker.pkg.dev and raw.githubusercontent.com, use domain-based allowlisting. IP ranges for these hosts are managed by Google and GitHub respectively and may change.
Windows runtime network access
The following endpoints are required while the Proxy Agent is running. Replace <region> and <cloud_provider> with the Fivetran region and cloud provider for your Proxy Agent (for example, us-east-1 and aws).
| Service | Purpose | Host | Port |
|---|---|---|---|
| Proxy Broker | Maintains the Proxy Agent control connection | orchestrator.fivetran.com | 443 |
| Proxy Server | Routes traffic through the Proxy Agent | *.<region>.<cloud_provider>.proxy.prod.fivetran.com | 443 |
For IP ranges, see Fivetran IP addresses for Proxy Agent users. As with the installation-time endpoints, use domain-based allowlisting for these domains instead of IP ranges, since the IP ranges can change.
The Proxy Agent host must also be able to establish connections to your source or High-Volume Agent (HVA) host on the port configured for the connection.
Inside the Proxy Agent container, localhost refers to the container itself. If your source or High-Volume Agent (HVA) host runs on the same Windows host as the Proxy Agent, use the IP address of the host's vEthernet (nat) network adapter instead of localhost.
Windows setup instructions
Create Proxy Agent for Windows
Log in to your Fivetran account.
In the database connection setup form, in the Connection Method drop-down menu, select Connect via Proxy Agent.
Click + Configure a new proxy agent.
In the Agree to terms step, review the License Addendum and Software Specific Requirements.
Select the I have read and agree to the terms of the License Addendum and the Software Specific Requirements checkbox.
Click Next.
In the Choose your deployment type step, select Docker Engine for Windows Server.
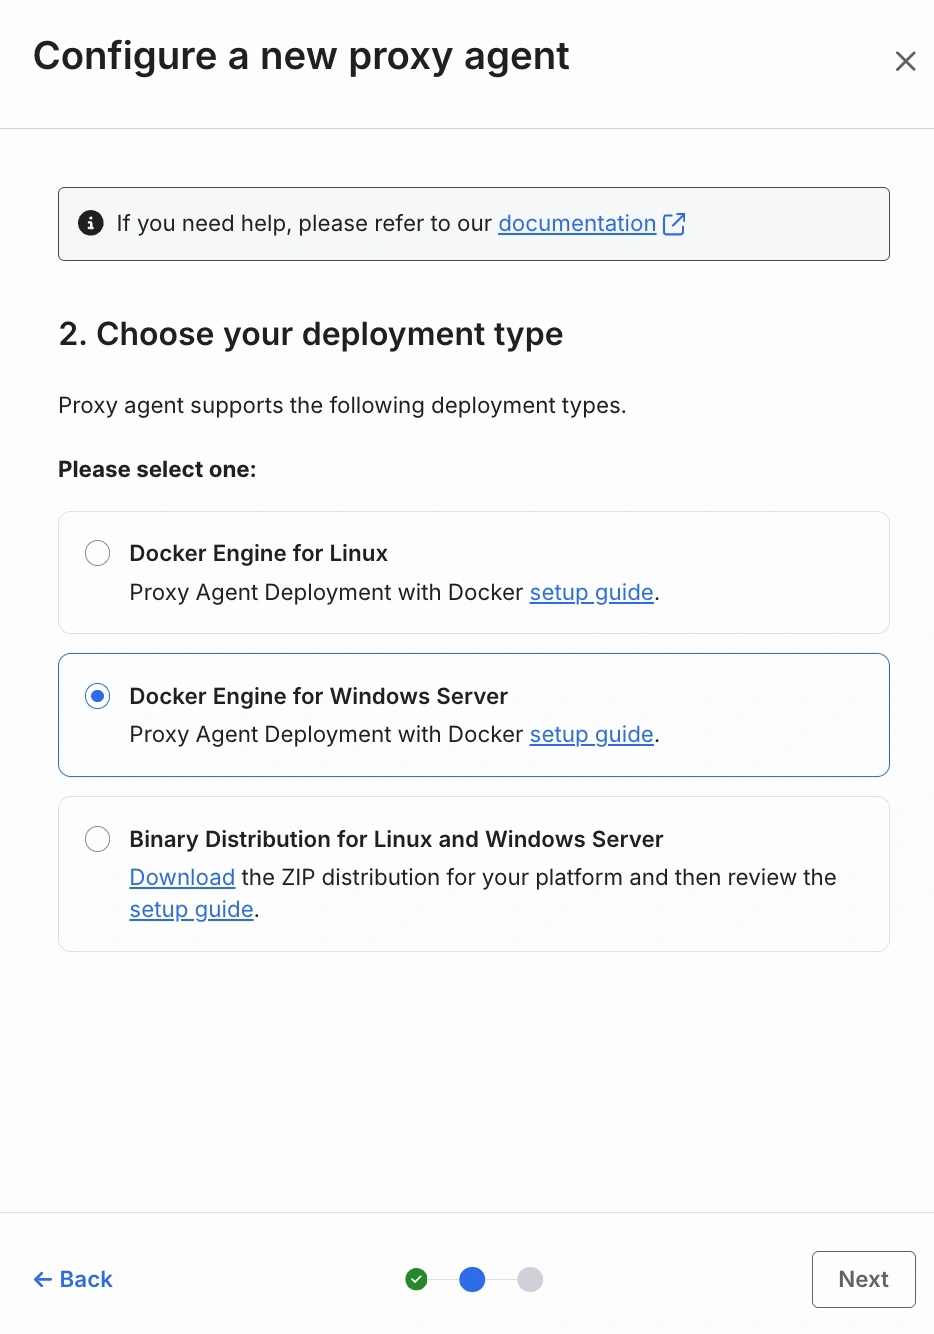
Click Next.
In the Name the proxy agent step, enter a name in the Proxy agent name field.
Click Generate agent token.
Make a note of the Agent token and the Install and start agent command. You'll need them to install the Proxy Agent on Windows. The installation command already includes your agent token and can be run without modification.
The token is shown only once. Store it securely before closing this dialog.
Each Proxy Agent has a unique token and installation command.
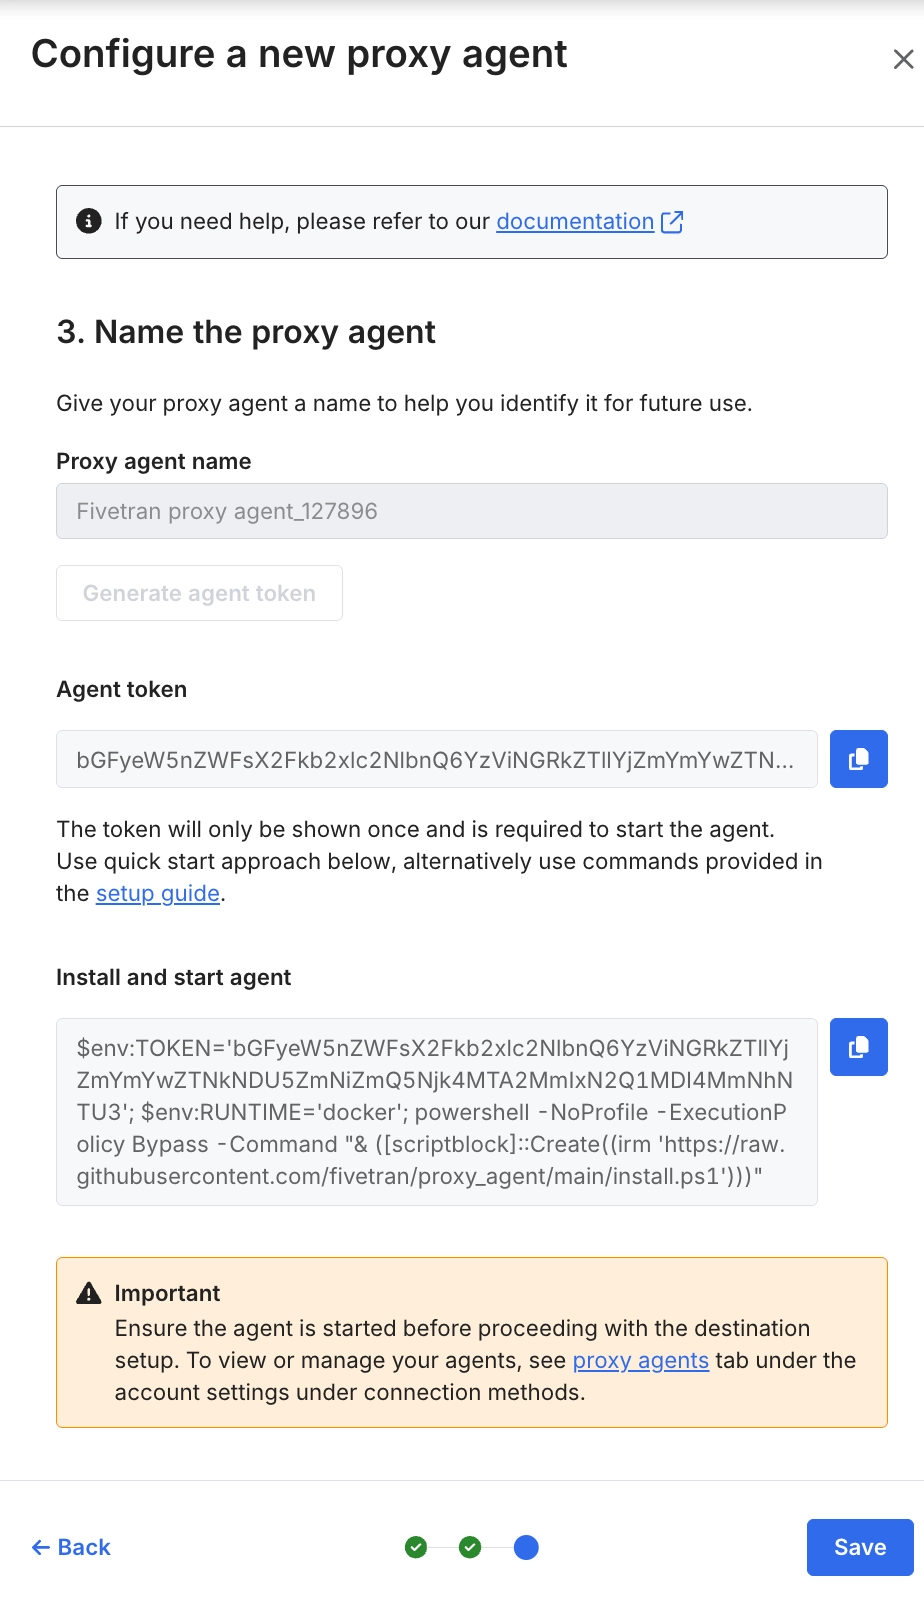
Click Save.
Confirm that the new Proxy Agent is selected in the Proxy agents drop-down menu.
You must install and start the Proxy Agent before completing the database connection setup. To view or manage your Proxy Agents, go to the Proxy Agents tab in your account settings under Connection Methods.
(Optional) Configure Windows proxy settings
Configure the Proxy Agent host and Docker to use your network proxy during installation.
Perform this step if the installation commands and Docker must use a proxy server (for example, Squid) to reach the required installation endpoints. These settings don't configure the Proxy Agent's runtime connections to Fivetran. To route those connections through your network proxy, also complete Configure Proxy Agent on Windows to use proxy server after installation. If you are not using a proxy server, skip to Install Proxy Agent on Windows.
Expand for instructions
Configure local Windows environment
Configure a proxy for the PowerShell session so the installation commands and management scripts can reach required services through your proxy server.
Log in to your Proxy Agent host machine as a member of the local Administrators group.
Open PowerShell as an administrator and set the default proxy for the current session:
[System.Net.WebRequest]::DefaultWebProxy = New-Object System.Net.WebProxy('http://<proxy_host>:<proxy_port>', $true)- We recommend using the Fully Qualified Domain Name (FQDN) or IP address of the proxy host.
- The second argument (
$true) bypasses the proxy for local addresses.
Verify that PowerShell can reach the required endpoints through the proxy:
Invoke-WebRequest -Uri https://raw.githubusercontent.com/fivetran/proxy_agent/main/install.ps1 -UseBasicParsing | Select-Object StatusCodeThis setting applies only to the current PowerShell session. Run the installation commands in the rest of this procedure in the same session.
Configure Windows container runtime
Configure proxy settings for both the containers started through Docker CLI and Docker Engine. The Docker CLI configuration passes proxy environment variables to new containers, while the Docker service configuration allows Docker Engine to pull the Proxy Agent image through the proxy.
Complete the following in order:
These configuration files and variables belong to Docker, not the Fivetran Proxy Agent configuration file ($env:USERPROFILE\fivetran-proxy-agent\config\config.json).
Set proxy values for Docker CLI on Windows
Add the proxy configuration for the user that runs Docker commands. Docker CLI reads this from $env:USERPROFILE\.docker\config.json.
For example:
{
  "proxies": {
    "default": {
      "httpProxy": "http://<proxy_host>:<proxy_port>",
      "httpsProxy": "http://<proxy_host>:<proxy_port>",
      "noProxy": "localhost,127.0.0.1"
    }
  }
}
Update the Docker service configuration on Windows
In an elevated PowerShell session, set the proxy environment variables for the Docker service at the machine level:
[Environment]::SetEnvironmentVariable('HTTP_PROXY', 'http://<proxy_host>:<proxy_port>', 'Machine')
[Environment]::SetEnvironmentVariable('HTTPS_PROXY', 'http://<proxy_host>:<proxy_port>', 'Machine')
[Environment]::SetEnvironmentVariable('NO_PROXY', 'localhost,127.0.0.1', 'Machine')
Restart the Docker service to apply the change:
Restart-Service docker
Get-Service docker
Verify the settings. The output must show your proxy values in the
HTTP ProxyandHTTPS Proxyfields:docker info
Install Proxy Agent on Windows
You can install the Proxy Agent using one of the following methods:
- Automated installation (recommended): Install and start the Proxy Agent by running the installation command from the Fivetran dashboard.
- Alternative installation: Download the installation script and run it with your agent token.
Automated Windows installation (recommended)
Log in to your Proxy Agent host machine as a member of the local Administrators group.
Open PowerShell as an administrator and run the Install and start agent command from the Create Proxy Agent for Windows step.
When run interactively, the installation script prompts you to specify how much memory to allocate to the Proxy Agent container. Press Enter to use the default value of 5120 MB. For an unattended installation, set
$env:MEMORY_ALLOCATION_MBbefore you run the installation command.The installation command does the following:
- Validates your system against the prerequisites (Docker version, Docker container mode, CPU, RAM, disk space).
- Detects your Windows Server version and selects the matching Proxy Agent image.
- Exchanges your agent token with Fivetran to download your configuration file.
- Downloads the
proxy-agent-manager.ps1management script. - Pins the latest available Proxy Agent image tag for your Windows Server version.
- Starts the Proxy Agent container and waits for it to report healthy.
The installation command creates the Proxy Agent directories in the following structure:
$env:USERPROFILE\fivetran-proxy-agent\    --> Proxy Agent home directory
├── proxy-agent-manager.ps1               --> Management script
├── config\                               --> Configuration file location
│   └── config.json                       --> Proxy Agent configuration file and credentials
├── logs\                                 --> Log file location
├── settings.ps1                          --> Container memory allocation
└── version                               --> Pinned Proxy Agent image tag
The installation command sets your agent token in the current PowerShell session. After the installation completes, clear it:
Remove-Item Env:\TOKEN -ErrorAction SilentlyContinue
Alternative Windows installation
Expand for instructions
Log in to your Proxy Agent host machine as a member of the local Administrators group.
Open PowerShell as an administrator and download and unblock the Windows installation script:
Invoke-WebRequest -Uri https://raw.githubusercontent.com/fivetran/proxy_agent/main/install.ps1 -OutFile install.ps1 -UseBasicParsing
Unblock-File .\install.ps1
Set the runtime and agent token, then run the installation script. Replace
<agent_token>with the agent token from the Create Proxy Agent for Windows step.$env:RUNTIME = 'docker' $env:TOKEN = '<agent_token>' & .\install.ps1The installation script performs the same steps and creates the same directory structure as the automated installation.
- The installation script prompts for the memory to allocate to the Proxy Agent container (default: 5120 MB). To skip the prompt, set
$env:MEMORY_ALLOCATION_MBbefore you run the script. - To install to a custom directory, run
& .\install.ps1 -InstallDir C:\path\to\directory. If you use a custom directory, replace$env:USERPROFILE\fivetran-proxy-agentin the subsequent commands with your installation directory.
- The installation script prompts for the memory to allocate to the Proxy Agent container (default: 5120 MB). To skip the prompt, set
After the installation completes, clear the agent token from the current PowerShell session:
Remove-Item Env:\TOKEN -ErrorAction SilentlyContinue
(Optional) Configure Proxy Agent on Windows to use proxy server
Complete this step only if the Proxy Agent itself needs to forward traffic through the same intermediate network proxy you configured in Configure Windows proxy settings to reach the Proxy Broker and Proxy Server. That earlier step routes only the installation process and Docker through the proxy; this step additionally configures the running Proxy Agent to use it.
Open
$env:USERPROFILE\fivetran-proxy-agent\config\config.json.Add the
proxy_hostandproxy_portfields:Do not include
http://orhttps://in theproxy_hostvalue.{ "proxy_host": "<proxy_host>", "proxy_port": <proxy_port> }Restart the Proxy Agent to apply the change:
& "$env:USERPROFILE\fivetran-proxy-agent\proxy-agent-manager.ps1" restart
Verify Windows Proxy Agent status
Verify the Proxy Agent is running by doing any of the following:
- Run
docker ps -aand look for a container namedproxy-agent-<agent-id>with a(healthy)status. - In PowerShell, run
& "$env:USERPROFILE\fivetran-proxy-agent\proxy-agent-manager.ps1" status. - In your Fivetran dashboard, go to Account Settings > Connection Methods > Proxy Agents and verify the Proxy Agent status.
Manage Proxy Agent on Windows
Use proxy-agent-manager.ps1 from your Proxy Agent home directory to manage the Proxy Agent after installation.
Start the Proxy Agent container:
& "$env:USERPROFILE\fivetran-proxy-agent\proxy-agent-manager.ps1" startStop the Proxy Agent container:
& "$env:USERPROFILE\fivetran-proxy-agent\proxy-agent-manager.ps1" stopRestart the Proxy Agent container:
& "$env:USERPROFILE\fivetran-proxy-agent\proxy-agent-manager.ps1" restartShow the current container status:
& "$env:USERPROFILE\fivetran-proxy-agent\proxy-agent-manager.ps1" statusStream the Proxy Agent logs:
& "$env:USERPROFILE\fivetran-proxy-agent\proxy-agent-manager.ps1" logsUpgrade Proxy Agent to the latest available version:
& "$env:USERPROFILE\fivetran-proxy-agent\proxy-agent-manager.ps1" upgradeThis command checks for the latest available version for your Windows Server version, replaces the running container with minimal downtime, and automatically rolls back to the previous version if the upgrade fails.
Troubleshoot Proxy Agent on Windows
Docker daemon isn't accessible: Confirm that the Docker service is running by running Get-Service docker. If it is stopped, run Start-Service docker. Confirm that you are running PowerShell as a member of the local Administrators group. For more information, see Windows user requirements.
Docker isn't running Windows containers: The installer requires Docker to run Windows containers. Run docker info --format '{{.OSType}}' and confirm that the command returns windows.
Unsupported Windows Server version: The installer supports Windows Server 2019, Windows Server 2022, and Windows Server 2025. Use the -WindowsVersion ltsc2019, -WindowsVersion ltsc2022, or -WindowsVersion ltsc2025 option only when the host is known to support that image. The option doesn't check whether the image is compatible with the host.
Proxy Agent isn't available after a reboot: Confirm that the Docker service starts automatically by running (Get-Service docker).StartType. If the command doesn't return Automatic, run Set-Service -Name docker -StartupType Automatic in an elevated PowerShell session.