Creating an Oracle location with Active Data Guard
Question
How to create an Oracle location with Active Data Guard?
Environment
- HVR 6
- Oracle
Answer
This guide describes the step-by-step instructions for creating an Oracle location with Active Data Guard in HVR. In more advanced Oracle environments, additional features such as Real Application Clusters (RAC), Automatic Storage Management (ASM), Pluggable Databases (PDB), and Transparent Data Encryption (TDE) may also be used. While the steps in this guide focus on a comprehensive scenario involving all these options, your configuration may vary depending on which Oracle features are enabled in your setup.
Perform the following steps to create a new Oracle location using the Create New Location dialog in the HVR web user interface.
Before creating an Oracle location, ensure that you have created a database user with appropriate grants. For more information, see the following sections:
- Oracle Requirements
- Capture From Oracle ASM
- Capture From Oracle Data Guard
- Capture From Oracle TDE
- Capture From Oracle Pluggable Database
Select Location Type
Navigate to the Locations page in the HVR web UI.
Click Add Locations.
Select Create New Location.
Select Oracle from the list of location types.
Specify the location name and optionally the description of the location on the left-side pane of the Create New Location page.
Restrictions applied to location names
The following restrictions are applied to location names:
Location name cannot exceed 12 characters.
Location name can only start with alphabetic or underscore, followed by alphanumeric character or underscore.
Only lowercase is permitted. If Caps Lock is on, it will not allow you to type in this field.
Location name must not begin with a number.
Examples of valid location names: _1234abcd, _abcd1234, abcd_1234, abcd1234_, _abcd1234_
Select Agent Connection
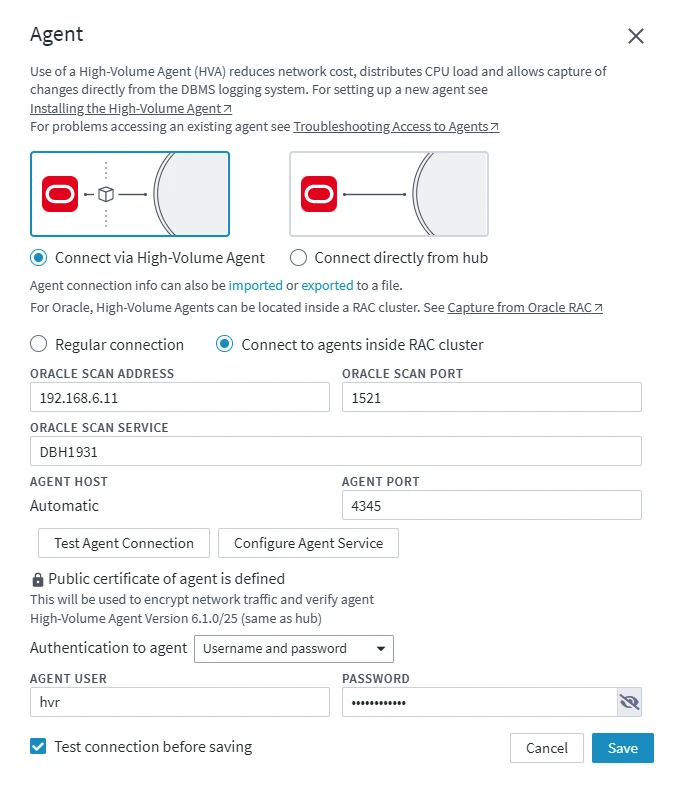
In this step, you need to specify the method for connecting from the HVR Hub to your Oracle source database and the connection parameters for the Oracle RAC server.
For connecting to the Oracle RAC server, you must connect via the HVR Agent. For more information, see Capture from Oracle RAC.
Select Connect via HVR Agent.
Select Connect to agents inside RAC cluster to specify the connection details for the Oracle RAC cluster.
Enter either the Oracle SCAN name or IP address in ORACLE SCAN ADDRESS.
Enter the port number used for the Oracle SCAN service in ORACLE SCAN PORT.
Enter the Oracle SCAN service name in ORACLE SCAN SERVICE.
Enter the TCP/IP port number of the HVR Agent listener service on the RAC nodes in AGENT PORT.
Select Username and Password or Anonymous connection in the Authentication to Agent. For more information about HVR agent user authentication, see User Authentication.
If Username and password is selected:
Enter the operating system username for the RAC nodes where the HVR Agent listener service is running in AGENT USER.
Enter the password for the operating system user account in AGENT PASSWORD.
The values enabled/displayed in the Authentication to Agent field depend on the current agent service configuration.
- Anonymous connection is enabled only if the agent authentication mode is set to Anonymous connections only or Allow both anonymous connections and ones with an agent user.
- Username and password is enabled only if the agent authentication mode is set to All connections require an agent user or Allow both anonymous connections and ones with an agent user.
- Kerberos is enabled only if the agent authentication mode is set to All connections require an agent user or Allow both anonymous connections and ones with an agent user and an agent user with Kerberos authentication is configured.
Click Test Agent Connection to verify connection to the agent.
Click Confirm Connection Method.

Configure Location Connection
In this step, you need to specify the connection parameters required to establish a connection between HVR and the Oracle source database. For more information about the Oracle connection parameters, see Location Connection for Oracle.
Following are the connection parameters for the Oracle PDB on Data Guard standby database. For more information, see Capture From Oracle Pluggable Database.
Enter the path for ORACLE_HOME.
Choose either of the following:
Select Local connect to database and enter/select the unique identifier for the Oracle source database in SID. Connects to the Oracle database using a local connection.
Select Oracle TNS and enter the TNS connection string in ORACLE TNS. Connects to the Oracle database using the TNS protocol.
Enter the PDB username and password for connecting HVR to the Oracle database in USER and PASSWORD respectively.
Click Confirm Connection Details.
Configure Capture
In this step, you need to specify the various capture parameters to define the behavior and performance of the capture process on the location. For more information about each parameter you are configuring in this step, click the link displayed under that parameter.
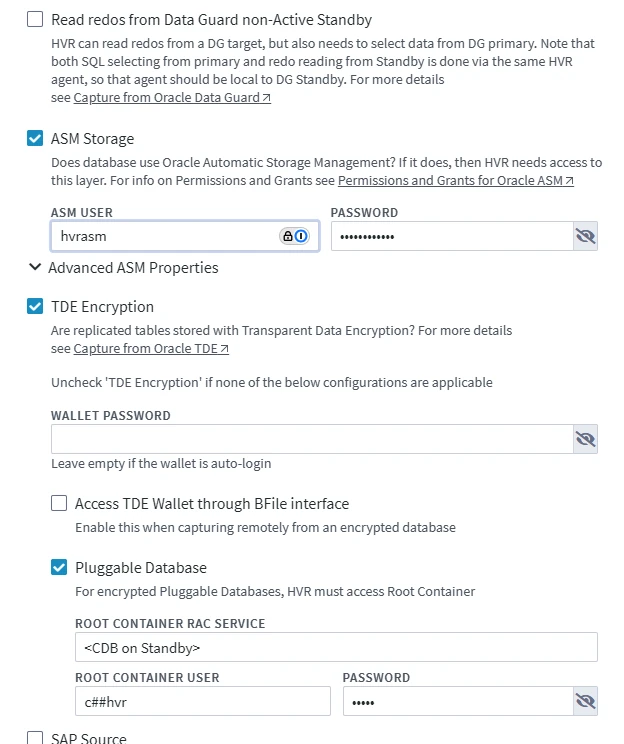
Do not select the Read redos from Data Guard non-Active Standby option, as this setup is intended for Active Data Guard.
Select Direct Redo Access under Capture Method.
Select ASM Storage to specify the Oracle ASM connection parameters. For more information, see Capture From Oracle ASM.
Enter the username and password for the ASM storage in ASM USER and ASM PASSWORD respectively.
(Optional) Click Advanced ASM Properties and specify the TNS connection string and Oracle_Home path for the ASM storage in ASM TNS and ASM ORACLE_HOME respectively.
Select TDE Encryption if the tables on Oracle source database are stored with Transparent Data Encryption (TDE). For more information, see Capture From Oracle TDE.
Select Pluggable Database to specify the CDB connection parameters.
Enter the TNS connection string for the container database in ROOT CONTAINER RAC SERVICE.
Enter the username and password for the container database in ROOT CONTAINER USER and PASSWORD.
The container database user must be a CDB common user with the default prefix c## (e.g., c##hvr).
Click Confirm Capture/Integrate.

Add Location to Channel
To skip this step, unselect the Add This Location to a Channel option. In this case, the location will not be added to any of the existing channels.
Select a channel from the drop-down list under the CHANNEL field.
Select a source location group (e.g. SOURCE) to add the location to. Alternatively, create a new location group for the location. For more information about location groups, see page Location.
Click Confirm Channel Membership to add the location to the selected channel.
Click Save Location.
Alternatively, you can click Save and Create Another to complete the location creation and open a new Create New Location dialog to create another location.
The newly added location(s) will be displayed in the Locations page.
Additional Notes
Do not select the option Supplemental Logging when performing Activate Replication (or run hvractivate with option -ol), as we only connect to the Active Data Guard standby database.
Since there is no connection to the Active Data Guard primary database, you must manually enable supplemental logging on the primary database for the primary key column and all other columns in the replicated tables.