Notifications
Learn how to manage your email notifications in your Fivetran dashboard.
Overview
In Fivetran, a notification is an automatically-generated email. It quickly informs you about important activity in your Fivetran account, like connection failures and any other types of errors, so that you can resolve any potential issues as soon as possible. You can customize notification settings on the Notifications page to only receive the notifications that you want.
Your notification settings are unique to your user, so changing them does not affect the settings for other users on your shared account.
There are three categories of notifications:
Disable all notifications
Notifications are enabled in your account by default to inform you about your account's activity. If you don't want to receive any notifications, you can disable them by setting the toggle in the top right corner of the Notifications page to OFF.
Check notification email
We send notifications to the email address that you use to log in to your Fivetran dashboard. You can see this email address at the top of the page.
Connection notifications
Manage notifications about your Connections on the Connections tab. Which connection notifications you receive depends on your user role and connector type. We send you notifications in the following situations:
- MAR estimate available: During a connection's trial, we notify all users who subscribe to that connection when its MAR and usage estimate are ready. Learn more in our MAR and usage estimate documentation.
- Connection trial ended: We notify all users who subscribe to a connection when its 14-day trial ends. Learn more in our Connection Trial documentation.
- New error: If your connection breaks and we know the problem and potential resolution steps, we generate an Error in your dashboard that tells you how to resolve the problem. We then send you a notification with details about the Error and what you must do to resolve it. If your connection needs to be reconnected, we send an Error notification after the second sync failure because the first failure is often caused by transient connection issues. If the destination associated with your connection needs to be reconnected, we send one Error notification per destination after the first sync failure.
- Failed syncs: If your connection breaks, and we do not know why, we do not generate an Error in your dashboard. Instead, we send you a notification about the broken connection. After a connection is broken without an Error for 48 hours, Fivetran automatically escalates the issue to our support and engineering teams. Our team may email you to troubleshoot the issue. Since these emails are generated in our support portal, your notification preferences do not apply to them.
- New source data (optional): If you subscribed to schema change notifications, we send you a notification when we detect a new data object in the source. Learn more in our Schema Change settings documentation.
We do not send New Data Detected notification emails for connectors that don't support data blocking or column hashing due to limitations in how we track schema changes.
- Sync delays: If your connection is enrolled in delay notifications, we send you a notification when your connection's sync is delayed. When determining whether a connection is delayed, we consider the average duration of its syncs over a rolling 14-day period, its sync frequency, and your specified delay notification setting. Sync delays can occur for a variety of reasons, such as a larger-than-usual data set to sync or the connection reaching the source API rate limit. We also send you a notification when the connection's sync delay ends, which means the sync successfully completed.
You can control a connection's sync delay notification settings on its Setup tab. When you change the delay notification setting while your connection has notifications disabled, you will be prompted to Activate the notifications.
The Active Notification Subscriptions section lists of all connections that you receive notifications for. You can search for a specific connection using the search bar or filter the list by source and/or destination.
Add notifications
To add notifications for a connection, click the + Add button.
The Add a notification subscription window lists the transformations that you have access to but that you do not currently receive notifications for. You can search for a transformation using the search bar or filter the list by destination. You can select multiple transformations at once. After you select the transformations you want to receive notifications for, click Apply changes.
Remove notifications
To remove notifications for a connection, select the checkbox next to the connection, then click Remove selected.
Manage notification settings
To manage your notification auto-subscription settings, click the gear icon.
A drop-down menu opens showing your auto-subscription options. Choose one of the following auto-subscription options based on your notification preferences:
| Preference | Auto-subscription Option | Notes |
|---|---|---|
| I want notifications for all new connections. | All new connections | |
| I want notifications for new connections - but only for a certain destination/destinations. | All new connections to some destinations | When you select this option, you'll be taken to a pop-up window where you can select which destination(s) you want to receive connection notifications for. |
| I only want notifications for my own connections. | Only connections that I create | This option is enabled by default. |
| I do not want notifications for any connection. | Do not auto-subscribe me. |
Changes to your auto-subscription settings are not retroactive. By default, new users are not subscribed to existing connections. For example, if you choose to receive notifications for all new connections on June 1, you won't be subscribed to notifications for a connection created on May 31. If you want to receive notifications for existing connections, add notifications for your chosen connections.
You can also enable or disable alert reminder emails. These emails, whose subject lines always begin with "Reminder:", notify you when your connection has an unresolved Error or delay.
By default, alert reminder emails are disabled to avoid cluttering your inbox.
You can use the clean up tool to retroactively apply your auto-subscription settings to the connections that have different notification subscriptions. For example, if your auto-subscription setting is "Only connections that I create" and you're currently subscribed to a connection you didn't create, that subscription would be removed. Similarly, if you weren't subscribed to a connection that you created, then a subscription would be added for that connection.
To clean up your auto-subscription settings, do the following:
- At the top of the auto-subscription drop-down menu, click Clean up.
- In the Subscription cleanup window, review the list of connections that don't have your current auto-subscription settings.
- Click Apply changes to update their settings.
Transformation notifications
Manage notifications about your transformations for dbt Core on the Transformations tab. If your transformation fails, we generate an Error in your dashboard that tells you how to resolve the problem and send you a notification with details about that Error.
In the Active Notification Subscriptions section, you'll see a list of all transformations that you currently receive notifications for. You can search for a transformation using the search bar or filter the list by destination.
Add notifications
To add notifications for a transformation, click the + Add button.
The Add a notification subscription window lists the transformations that you have access to but that you do not currently receive notifications for. You can search for a transformation using the search bar or filter the list by destination. You can select multiple transformations at once. Once you've selected the transformation(s) you want to receive notifications for, click Apply changes.
Remove notifications
To remove notifications for a connection, select the checkbox next to the connection, then click Remove selected.
Manage notification settings
To manage your notification auto-subscription settings, click the gear icon.
A drop-down menu opens showing your auto-subscription options. Choose one of the following auto-subscription options based on your notification preferences:
| Preference | Auto-subscription Option | Notes |
|---|---|---|
| I want notifications for all new transformations. | All new transformations | This option is enabled by default. |
| I want notifications for new transformations - but only for a certain destination/destinations. | All new transformations to some destinations | When you select this option, you'll be taken to a pop-up window where you can select which destination(s) you want to receive transformations notifications for. |
| I do not want notifications for any transformations. | Do not auto-subscribe me |
Changes to your auto-subscription settings are not retroactive. By default, users are not subscribed to existing transformations. For example, if you choose to receive notifications for all new transformations on June 1, you won't be subscribed to notifications for a transformation created on May 31. If you want to receive notifications for existing transformations, add notifications for your chosen transformations.
Use the clean up tool to retroactively apply your auto-subscription settings to the transformations that have different notification subscriptions:
- At the top of the drop-down menu, click Clean up.
- In the Subscription cleanup window, review the list of transformations that don't have your current auto-subscription settings.
- Click Apply changes to update their settings.
Account notifications
Manage notifications about your account activities on the Account tab. The Account notifications page looks different based on your user permissions and which deployment models you use.
Use the toggles to enable or disable the following account notifications:
- Monthly spend warning: Receive a notification when you exceed your monthly spend threshold. You can change this threshold on the Billing tab. You need an Account Administrator or Account Billing role to receive this notification.
- Low spend warning (enabled by default): Receive a notification 45 days before your spend balance runs out. You need an Account Administrator or Account Billing role to receive this notification.
- System Outages (enabled by default): Receive a notification when there is a general Fivetran user interface outage. System outage notifications don't include incidents related to specific components, such as individual connections or destinations. In addition, you can't subscribe non-Fivetran users to these notifications on the Account tab. However, you can enable notifications for specific components and subscribe non-Fivetran users to receive outage notifications on the Fivetran Status Page. See How Can I Subscribe to Fivetran Status Updates? to learn more.
- Failed Webhooks (if you have webhooks set up): Receive a notification when webhook events fail to be sent.
Manage notifications for other users and email recipients
This feature is only available to users with the Account Administrator role or a custom role with permissions to manage users and view connections and transformations. Learn more about user roles in our role-based access control documentation.
You can set up and manage notifications for:
- Another user on your Fivetran account.
- A non-Fivetran email address, such as a mailing list or third-party email.
- At the top of the Notifications page, click Switch Recipient.
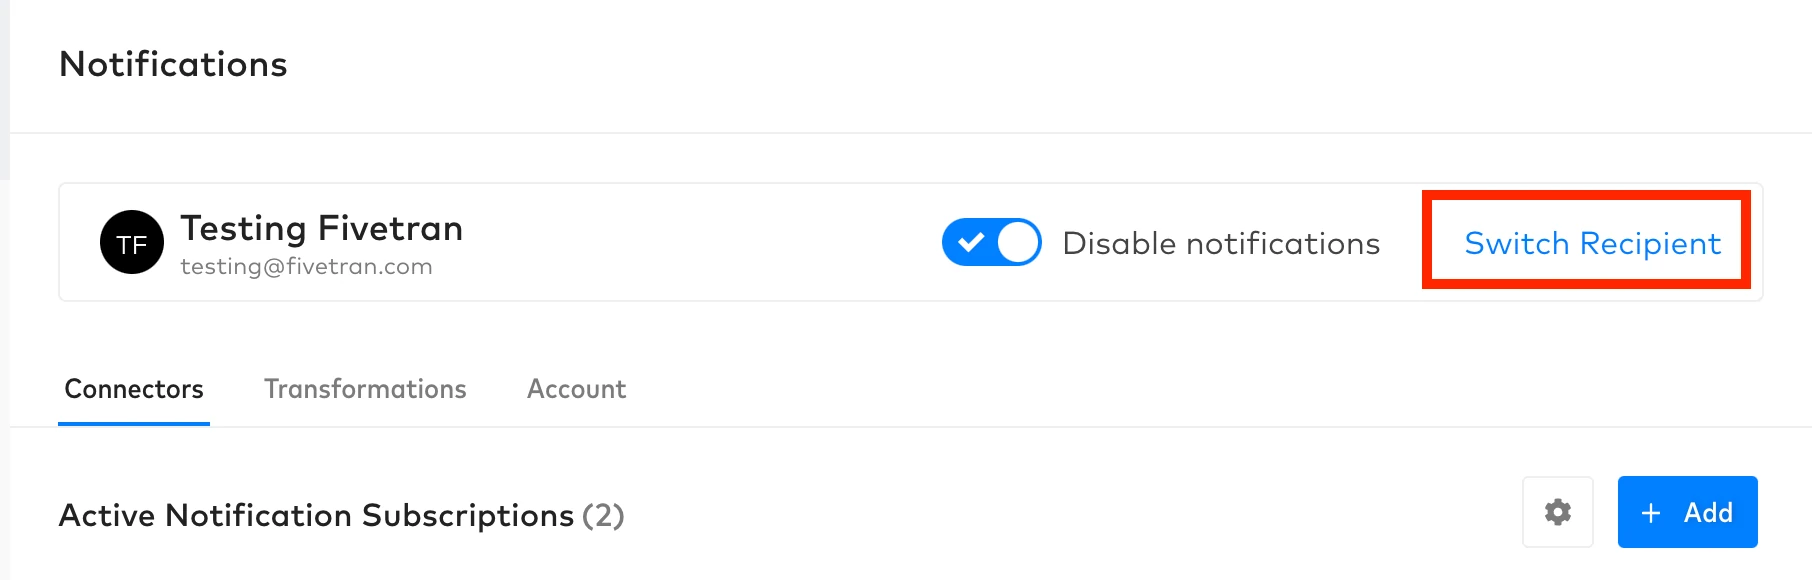
- In the recipient list, either select an existing recipient or enter a non-Fivetran email address, such as a mailing list.
- If you entered a non-Fivetran email address, click Create to add it as a recipient.
- Configure the recipient's notification settings as needed.
By default, new recipients aren't subscribed to any notifications. Click Add to subscribe them.
- To return to your own notification settings, click Back to your notifications.
Send notifications to third-party systems
You can set up your Fivetran notifications to send to the following third-party systems (among others):
Follow the instructions for your system below.
Slack
Creating a channel email address is the simplest way to send Fivetran notifications to Slack. Learn about other methods in Slack's Send emails to Slack documentation.
- In Slack, go to the channel that you want to send Fivetran notifications to.
- Follow Slack's Create an email address for a channel or DM instructions to create an email address for the channel.
- Follow our Manage notifications for other users and email recipients instructions to send notifications to this email address.
Microsoft Teams
- In Teams, go to the channel that you want to send Fivetran notifications to.
- Follow Microsoft's Send an email to a channel instructions to find the channel email address.
- Follow our Manage notifications for other users and email recipients instructions to send notifications to this email address.
Opsgenie
- Follow Opsgenie's Integrate your email with Opsgenie instructions to create an email address for your Fivetran notifications.
- Follow our Manage notifications for other users and email recipients instructions to send notifications to this email address.
PagerDuty
- Follow PagerDuty's Email Integration Guide to create an email address for your Fivetran notifications.
- Follow our Manage notifications for other users and email recipients instructions to send notifications to this email address.
ServiceNow
- In ServiceNow, go to the channel that you want to send Fivetran notifications to. The channel type must be Email.
- Follow ServiceNow's Create a flow with an inbound email trigger instructions to find the channel email address.
- Follow our Manage notifications for other users and email recipients instructions to send notifications to this email address.