Managed Data Lake Service Setup Guide
Follow our setup guide to connect your data lake to Fivetran. The setup process varies based on the storage provider you want to use for your data lake.
Expand the following sections for the setup instructions applicable to the storage provider of your choice.
Setup instructions for AWS
Setup instructions for AWS
For a visual walkthrough, watch the Set Up AWS Data Lake video tutorial.
Prerequisites
To connect your AWS data lake to Fivetran, you need the following:
An AWS account with a single resource group per AWS Region.
An Amazon S3 bucket. For optimal performance, we recommend creating the bucket in the same Region as your data lake's data processing location to improve upload and download speeds. For more information about creating an Amazon S3 bucket, see AWS documentation.
You can use a Versioning-enabled bucket to prevent accidental data loss. However, bucket Versioning may incur additional costs. For more information about the Versioning costs, see the How am I charged for using Versioning section in the Amazon S3 FAQs.
If your S3 bucket has a firewall enabled and your Fivetran instance is not in the same region, create a firewall rule that allows the Fivetran's IPs to access the bucket.
Make sure your S3 bucket name or the prefix path where you want to load your data does not contain any of these special characters - ['#', '%', '^', '{', '}', '[', ']', '"', '?', '|', '', ' '];
Find External ID
- Log in to your Fivetran account.
- Go to the Destinations page and click Add destination.
- Enter a Destination name of your choice and then click Add.
- Click Set up for S3 Data Lake.
- Make a note of the value in the External ID field. This is an automatically-generated ID that is unique to your Fivetran account and remains unchanged, even if you close and re-open the setup form. You will need the ID to create an IAM role for Fivetran.
To streamline the setup process, we recommend keeping the browser tab open while configuring the destination.
Create IAM policy for S3 bucket
Log in to the Amazon IAM console.
Go to Policies and click Create Policy.
Go to the JSON tab.
Paste the following policy into the JSON editor:
{
    "Version": "2012-10-17",
    "Statement": [
        {
        "Sid": "AllowListBucketOfASpecificPrefix",
        "Effect": "Allow",
        "Action": [
            "s3:ListBucket"
        ],
        "Resource": [
            "arn:aws:s3:::{your-bucket-name}"
        ],
        "Condition": {
            "StringLike": {
                "s3:prefix": [
                    "{prefix_path}/*"
                 ]
             }
          }
        },
        {
        "Sid": "AllowAllObjectActionsInSpecificPrefix",
        "Effect": "Allow",
        "Action": [
            "s3:DeleteObjectTagging",
            "s3:ReplicateObject",
            "s3:PutObject",
            "s3:GetObjectAcl",
            "s3:GetObject",
            "s3:GetObjectTagging",
            "s3:DeleteObjectVersion",
            "s3:PutObjectTagging",
            "s3:DeleteObject",
            "s3:PutObjectAcl"
        ],
        "Resource": [
            "arn:aws:s3:::{your-bucket-name}/{prefix_path}/*"
        ]
        }
    ]
}
Update the policy values:
Replace all instances of
{your-bucket-name}with the name of your S3 bucketReplace all instances of
{prefix_path}with the prefix path where you want Fivetran to load your data- If you do not specify a prefix path, the policy grants access to the entire S3 bucket.
- If you set
s3:prefixto["*"], the policy grants access to all prefixes in the bucket. To restrict access to a specific prefix path, sets3:prefixto["{prefix_path}/*"].
If the bucket uses server-side encryption with AWS Key Management Service (SSE-KMS), add the following statement to the policy:
{
      "Sid": "DenyObjectsThatAreNotSSEKMSWithSpecificKey",
      "Effect": "Deny",
      "Action": [
          "s3:PutObject"
      ],
      "Resource": "arn:aws:s3:::{your-bucket-name}/{prefix_path}/*",
      "Condition": {
          "ArnNotEqualsIfExists": {
              "s3:x-amz-server-side-encryption-aws-kms-key-id": "{kms-key-id}"
          }
      }
}
If you added the SSE-KMS statement, replace
{kms-key-id}with the KMS key ID for the bucket.Click Next.
Enter the Policy name.
Click Create policy.
(Optional) Set up catalogs
- Perform this step only if you want to integrate AWS Glue or Databricks Unity Catalog to manage your Apache Iceberg™ and Delta Lake tables, respectively. By default, we use the Fivetran Catalog to manage your Iceberg tables. For more information about catalogs, see our Catalogs documentation.
- You cannot edit catalog integrations after the first successful sync into your data lake.
Setup instructions for AWS Glue
Prerequisites
To integrate AWS Glue with your data lake, you need access to AWS Glue Data Catalog in the same AWS Region as your S3 bucket.
AWS allows multiple groups within the same Region. However, all groups in a given region share the same AWS Glue database. Therefore, you must avoid having the same schema-table combination across multiple groups within the same Region, as it could lead to conflicts in AWS Glue database and potential sync failures.
Setup instructions
Perform the following steps to create an IAM policy for AWS Glue Data Catalog:
On the Amazon IAM console, go to Policies and click Create Policy.
Go to the JSON tab.
Depending on your access requirements, copy one of the following policies and paste it in the JSON editor:
To grant access to all your AWS Glue databases and their tables, copy and use the following policy:
{
    "Version": "2012-10-17",
    "Statement": [
        {
          "Sid": "SetupFormTest",
          "Effect": "Allow",
          "Action": [
              "glue:DeleteDatabase"
           ],
           "Resource": [
               "arn:aws:glue:{your-catalog-region}:{your-account-id}:database/fivetran*",
               "arn:aws:glue:{your-catalog-region}:{your-account-id}:catalog",
               "arn:aws:glue:{your-catalog-region}:{your-account-id}:table/fivetran*/*",
               "arn:aws:glue:{your-catalog-region}:{your-account-id}:userDefinedFunction/fivetran*/*"
           ]
       },
       {
          "Sid": "AllConnectors",
          "Effect": "Allow",
          "Action": [
              "glue:GetDatabase",
              "glue:UpdateDatabase",
              "glue:CreateTable",
              "glue:GetTables",
              "glue:CreateDatabase",
              "glue:UpdateTable",
              "glue:BatchDeleteTable",
              "glue:DeleteTable",
              "glue:GetTable"
           ],
           "Resource": [
               "arn:aws:glue:{your-catalog-region}:{your-account-id}:*"
           ]
       }
    ]
}
To restrict access to specific AWS Glue databases, copy and use the following policy.
  {
      "Version": "2012-10-17",
      "Statement": [
          {
              "Sid": "SetupFormTest",
              "Effect": "Allow",
              "Action": [
                  "glue:GetDatabase",
                  "glue:UpdateDatabase",
                  "glue:DeleteDatabase",
                  "glue:CreateTable",
                  "glue:GetTables",
                  "glue:CreateDatabase",
                  "glue:UpdateTable",
                  "glue:BatchDeleteTable",
                  "glue:DeleteTable",
                  "glue:GetTable"
              ],
              "Resource": [
                  "arn:aws:glue:{your-catalog-region}:{your-account-id}:database/fivetran*",
                  "arn:aws:glue:{your-catalog-region}:{your-account-id}:catalog",
                  "arn:aws:glue:{your-catalog-region}:{your-account-id}:table/fivetran*/*",
                  "arn:aws:glue:{your-catalog-region}:{your-account-id}:userDefinedFunction/fivetran*/*"
              ]
          },
          {
              "Sid": "AllConnectors",
              "Effect": "Allow",
              "Action": [
                  "glue:GetDatabase",
                  "glue:UpdateDatabase",
                  "glue:CreateTable",
                  "glue:CreateDatabase",
                  "glue:UpdateTable",
                  "glue:DeleteTable",
                  "glue:BatchDeleteTable",
                  "glue:GetTable",
                  "glue:GetTables"
              ],
              "Resource": [
                  "arn:aws:glue:{your-catalog-region}:{your-account-id}:database/{schema_name}",
                  "arn:aws:glue:{your-catalog-region}:{your-account-id}:catalog",
                  "arn:aws:glue:{your-catalog-region}:{your-account-id}:table/{schema_name}/*"
              ]
          }
       ]
      }
- We need the
DeleteDatabasepermission only to perform the setup tests. - Whenever you add a new connector to your data lake, update the policy with the new connector's details under the
Sid:AllConnectorsidentifier.
In the policy you pasted in the JSON editor, replace
{your-catalog-region}with the Region of your S3 bucket and{your-account-id}with your AWS account ID.If you copied the policy that restricts access to specific Glue databases, replace
{schema_name}with your connector's schema name.Click Next.
Enter the Policy name.
Click Create policy.
Setup instructions for Databricks Unity Catalog
To create and manage your Delta Lake tables in Unity Catalog, you have two options:
- Automatic schema migration by Fivetran (recommended): Fivetran automatically creates and maintains your tables in Databricks without affecting sync performance
- Manual table management: You create and manage the tables manually in Databricks
Expand one of the following sections based on how you want to manage your tables in Databricks:
Setup instructions for automatic schema migration by Fivetran
Prerequisites
To configure automatic schema migration, you need the following:
- A Databricks account.
- Unity Catalog enabled in your Databricks workspace
- A SQL warehouse. Legacy deployments can continue to use Databricks clusters with Databricks Runtime v7.0 or above.
Configure Unity Catalog
Skip this step if your Unity Catalog is already configured in Databricks.
Create workspace
Login to the Databricks account console as an account admin.
Create a workspace by following the instructions in Databricks documentation.
Create metastore and attach workspace
Create a metastore and attach your workspace by following the instructions in Databricks documentation.
Enable Unity Catalog for workspace
Enable Unity Catalog for your workspace by following the instructions in Databricks documentation.
Configure external data storage
Skip this step if your external data storage is already configured in Databricks.
Create storage credentials
Create your storage credentials by following the instructions in Databricks documentation.
Create external location
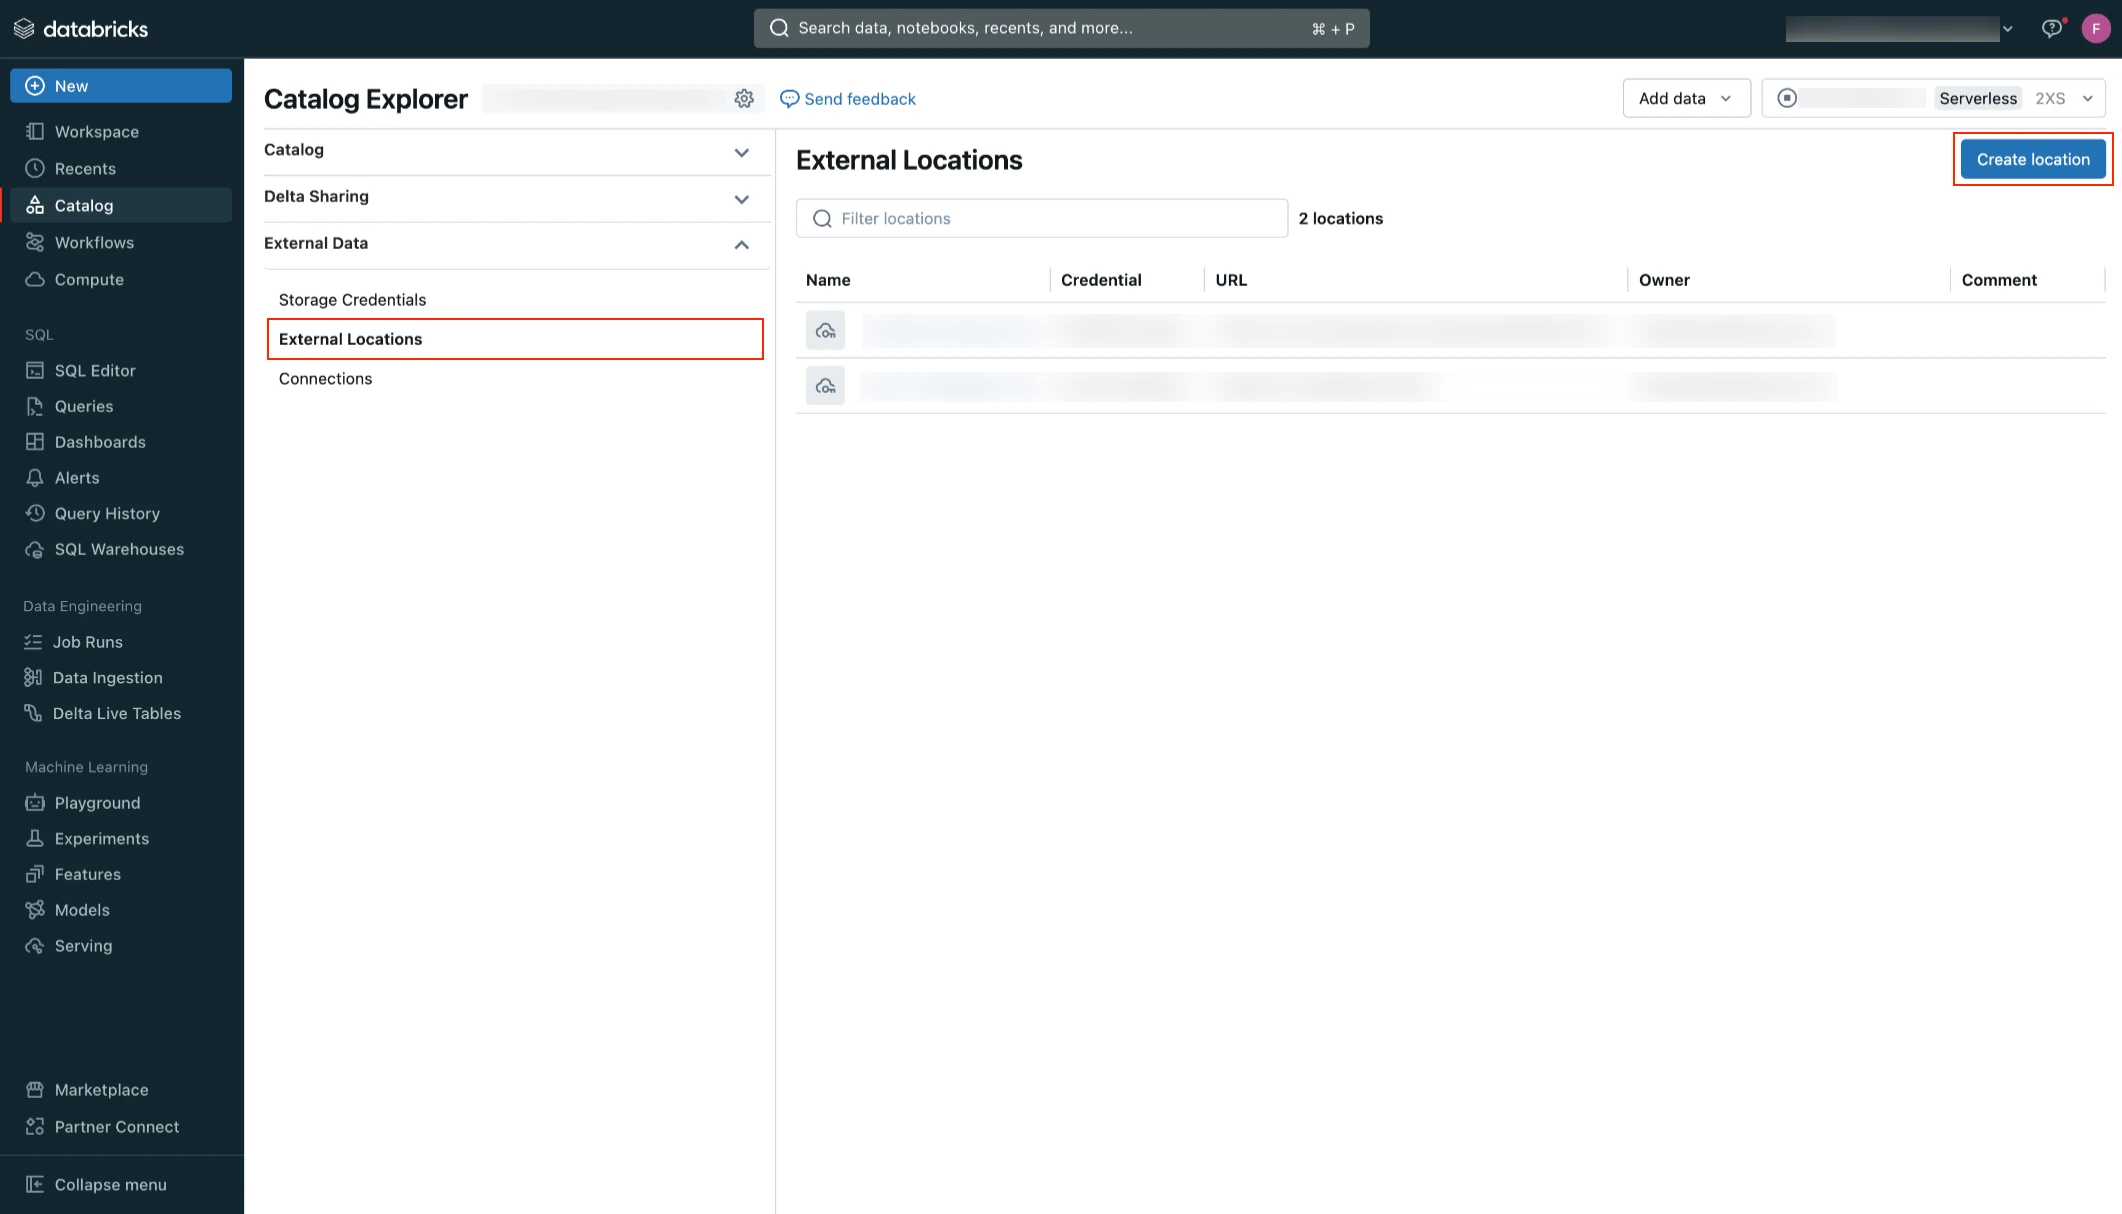
Log in to your Databricks workspace.
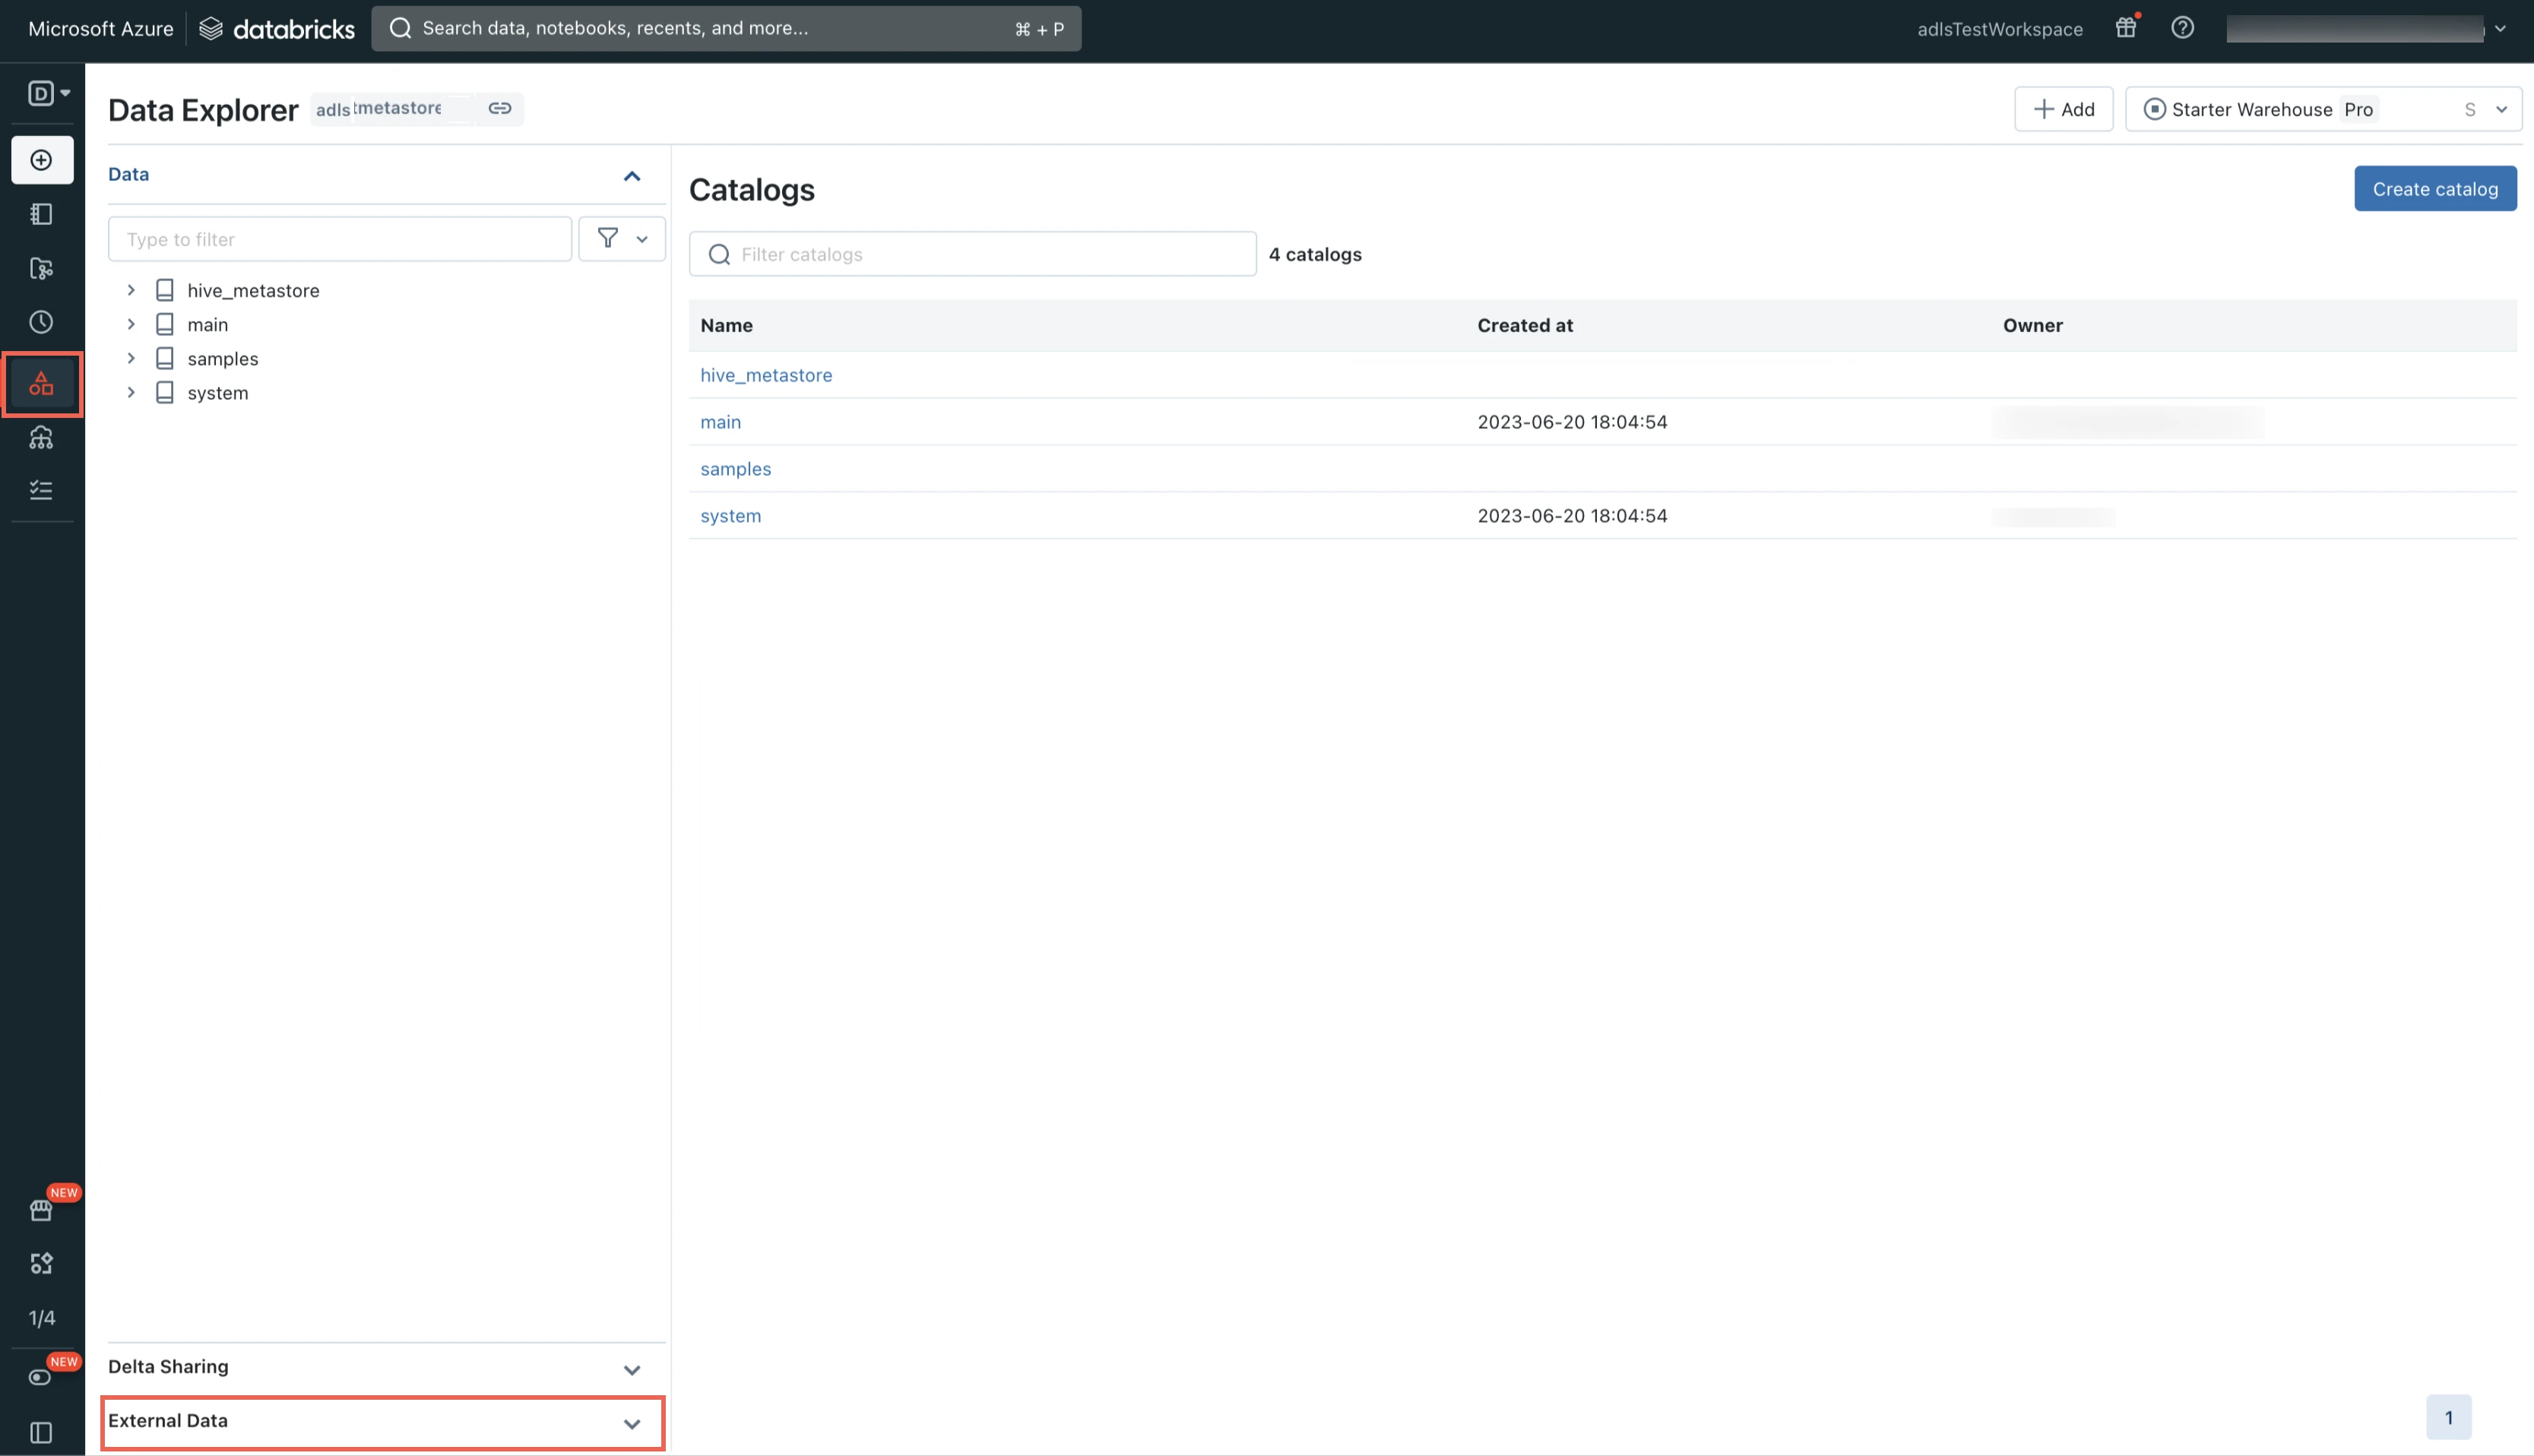
Go to Catalog > External Data.

Click External Locations.

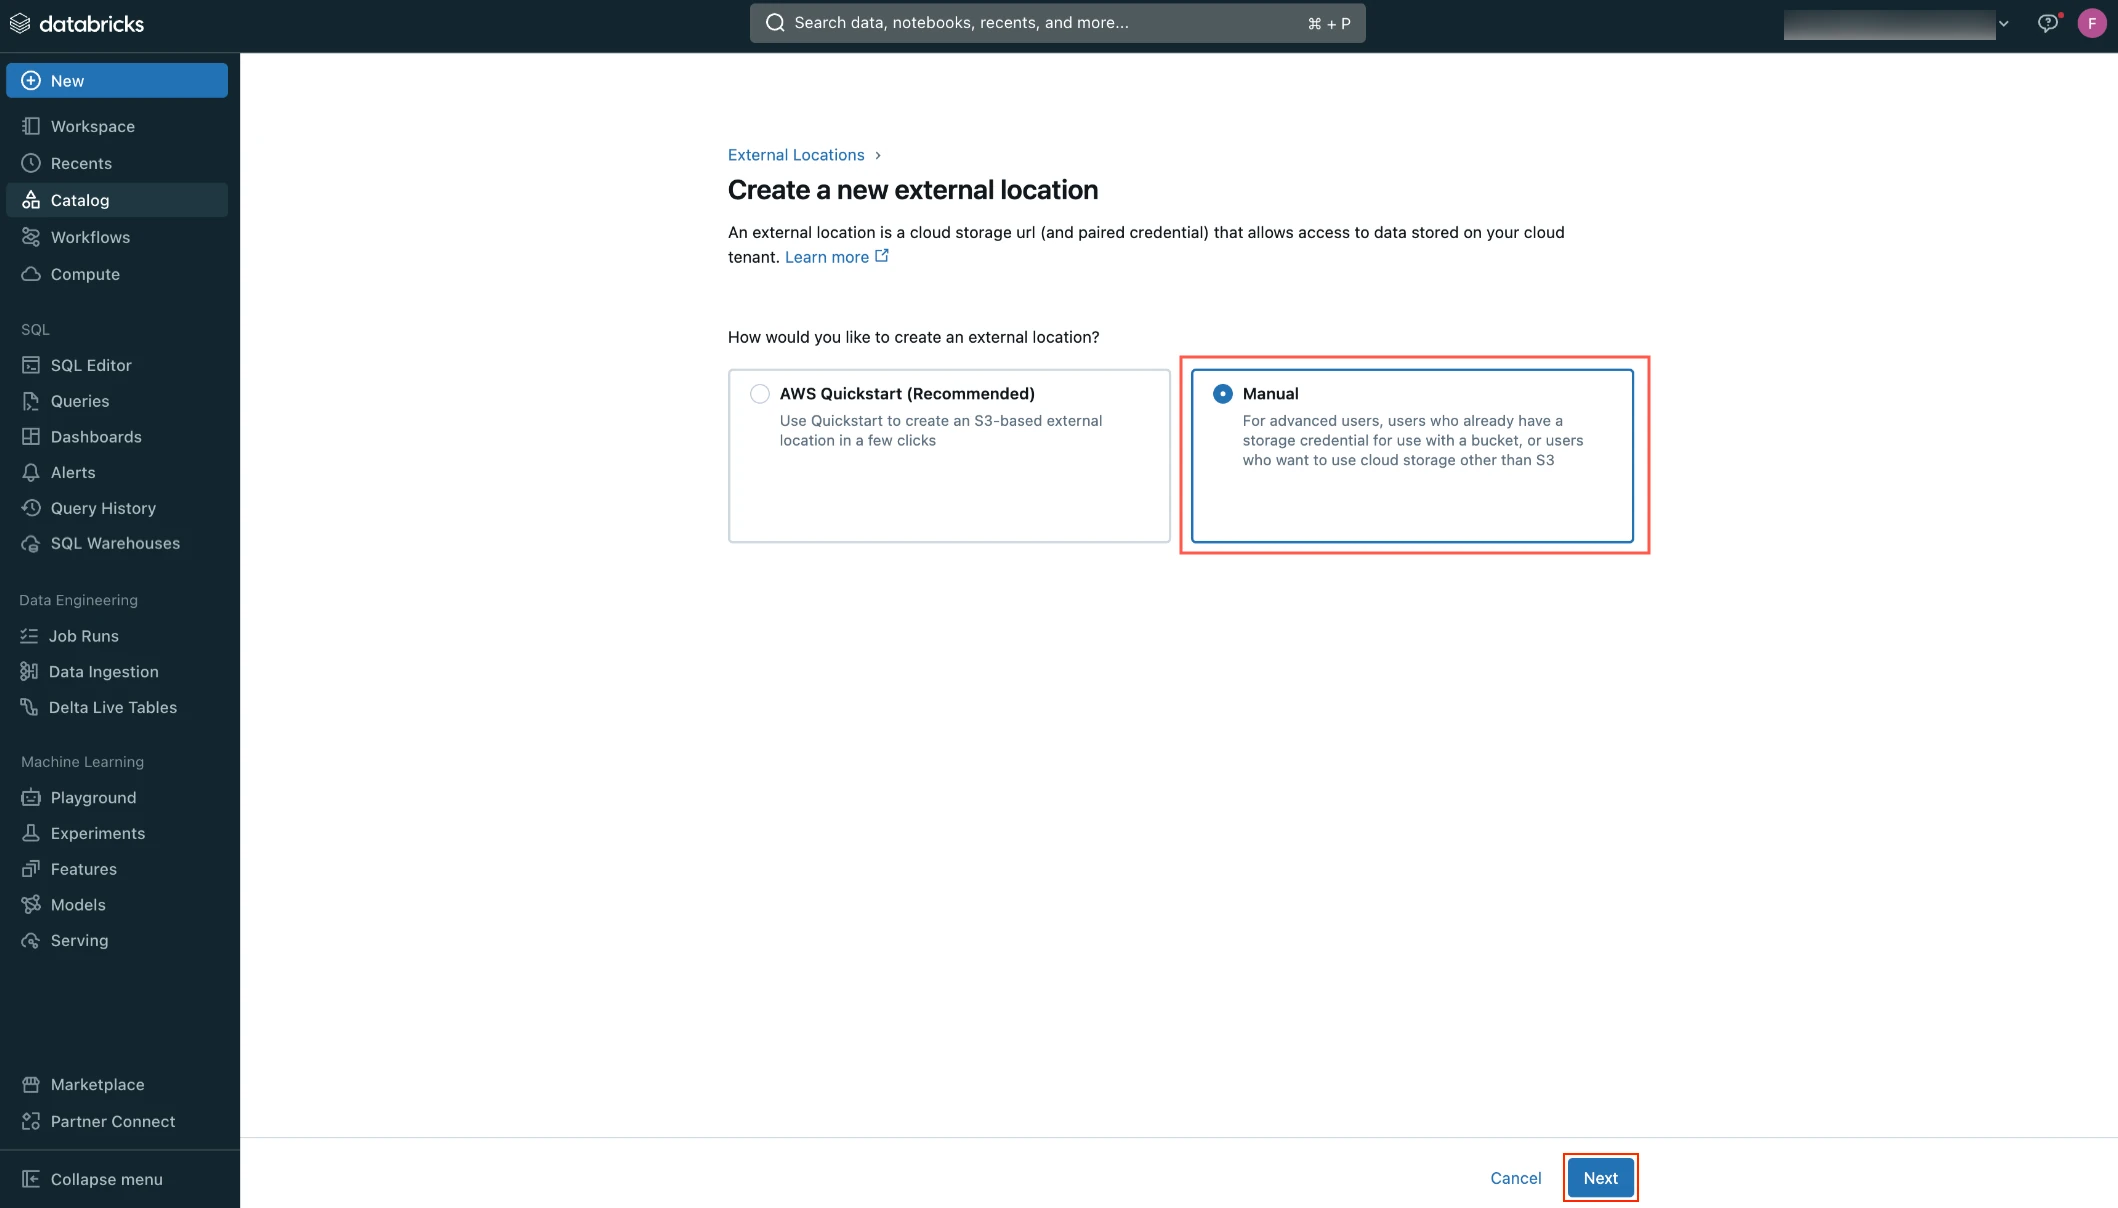
Click Create location.
Select Manual and then click Next.

Enter the External location name.
In the Storage credential drop-down menu, select the credential you created.
In the URL field, enter the path to your S3 bucket.
Click Create.
Connect SQL warehouse or Databricks cluster
You can either use a Databricks SQL warehouse or Databricks cluster with Fivetran.
Connect SQL warehouse (recommended)
In the Databricks console, go to SQL > SQL warehouses > Create SQL warehouse. If you want to select an existing SQL warehouse, skip to step 5 in this section.
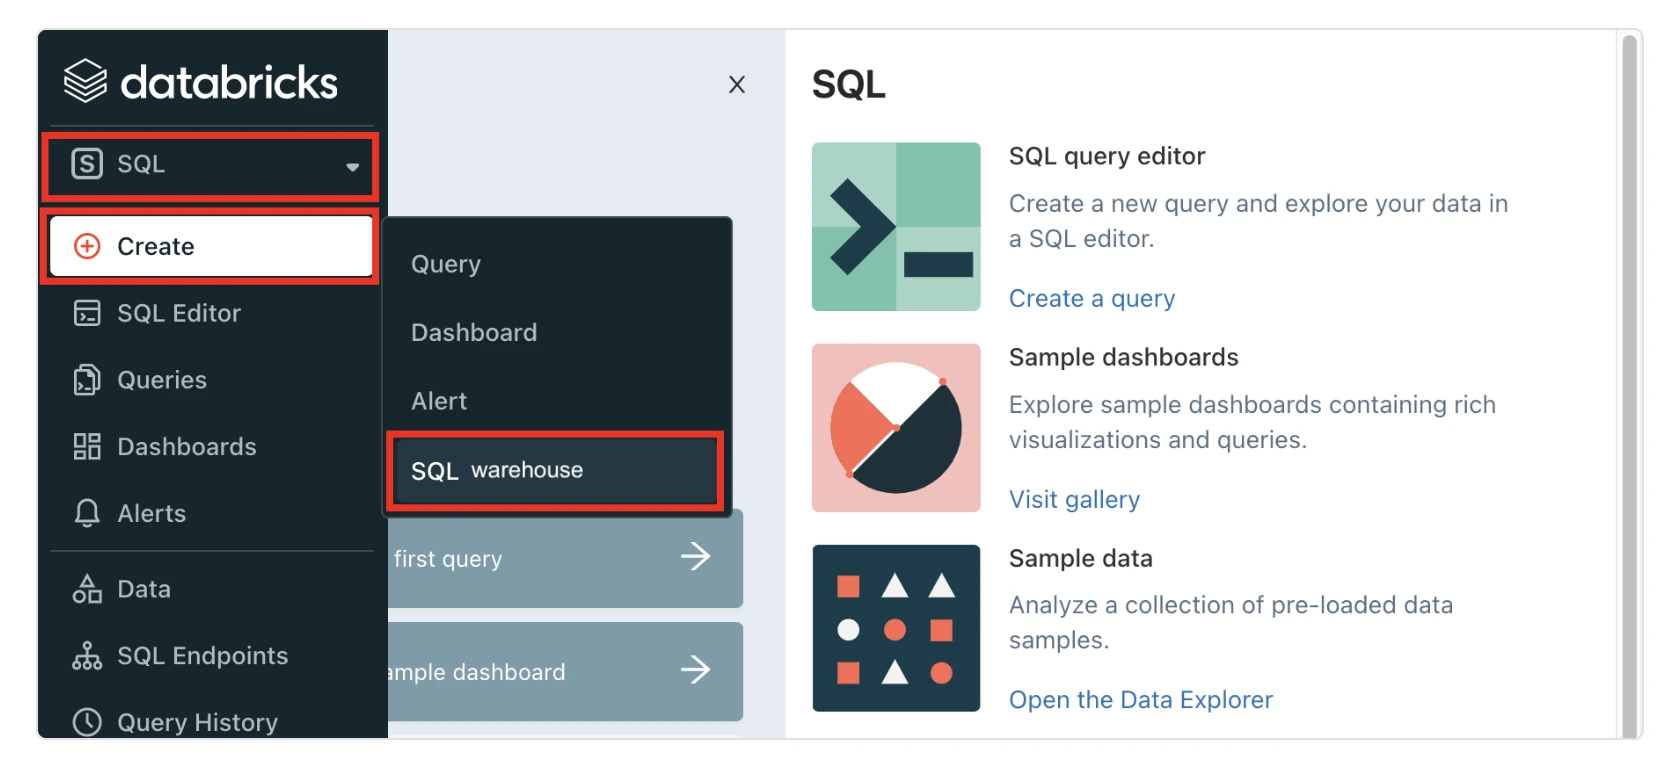
In the New SQL warehouse window, enter a Name for your warehouse.
Choose your Cluster Size and configure the other warehouse options.
Click Create.

Go to the Connection details tab.
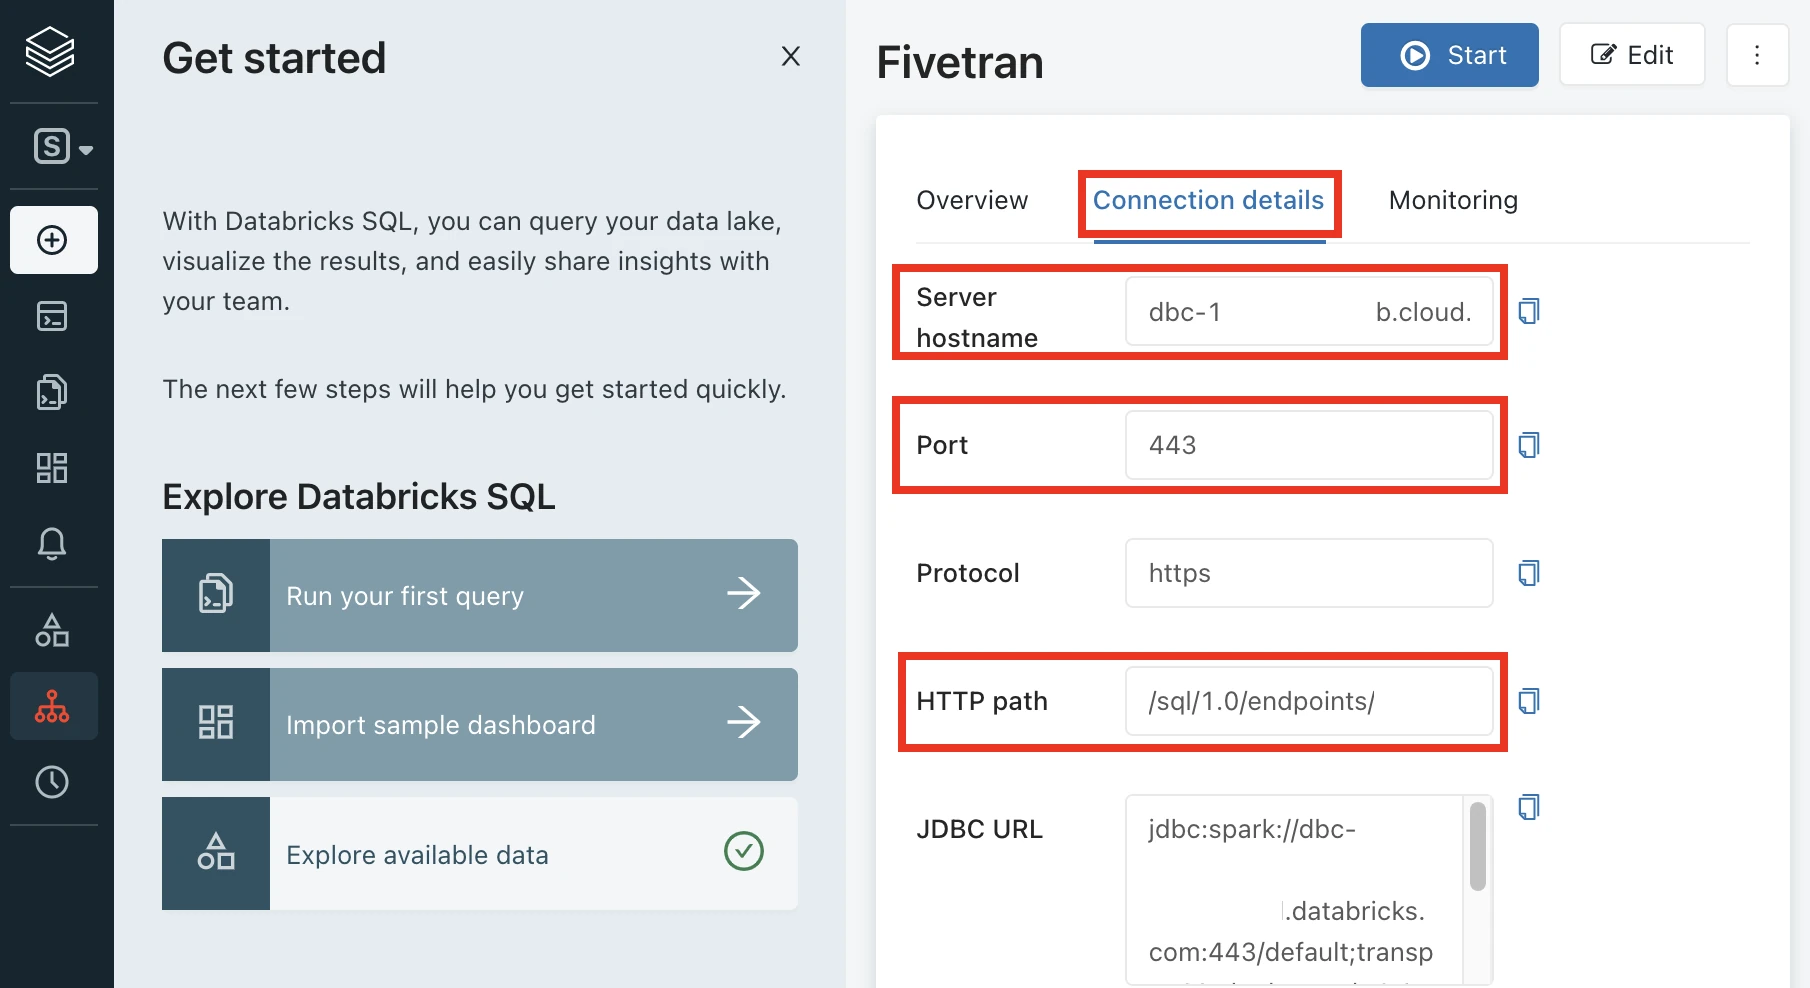
Make a note of the following values. You will need them to configure Fivetran.
- Server Hostname
- Port
- HTTP Path
Connect Databricks cluster
Log in to your Databricks workspace.
In the Databricks console, go to Data Engineering > Cluster > Create Cluster.
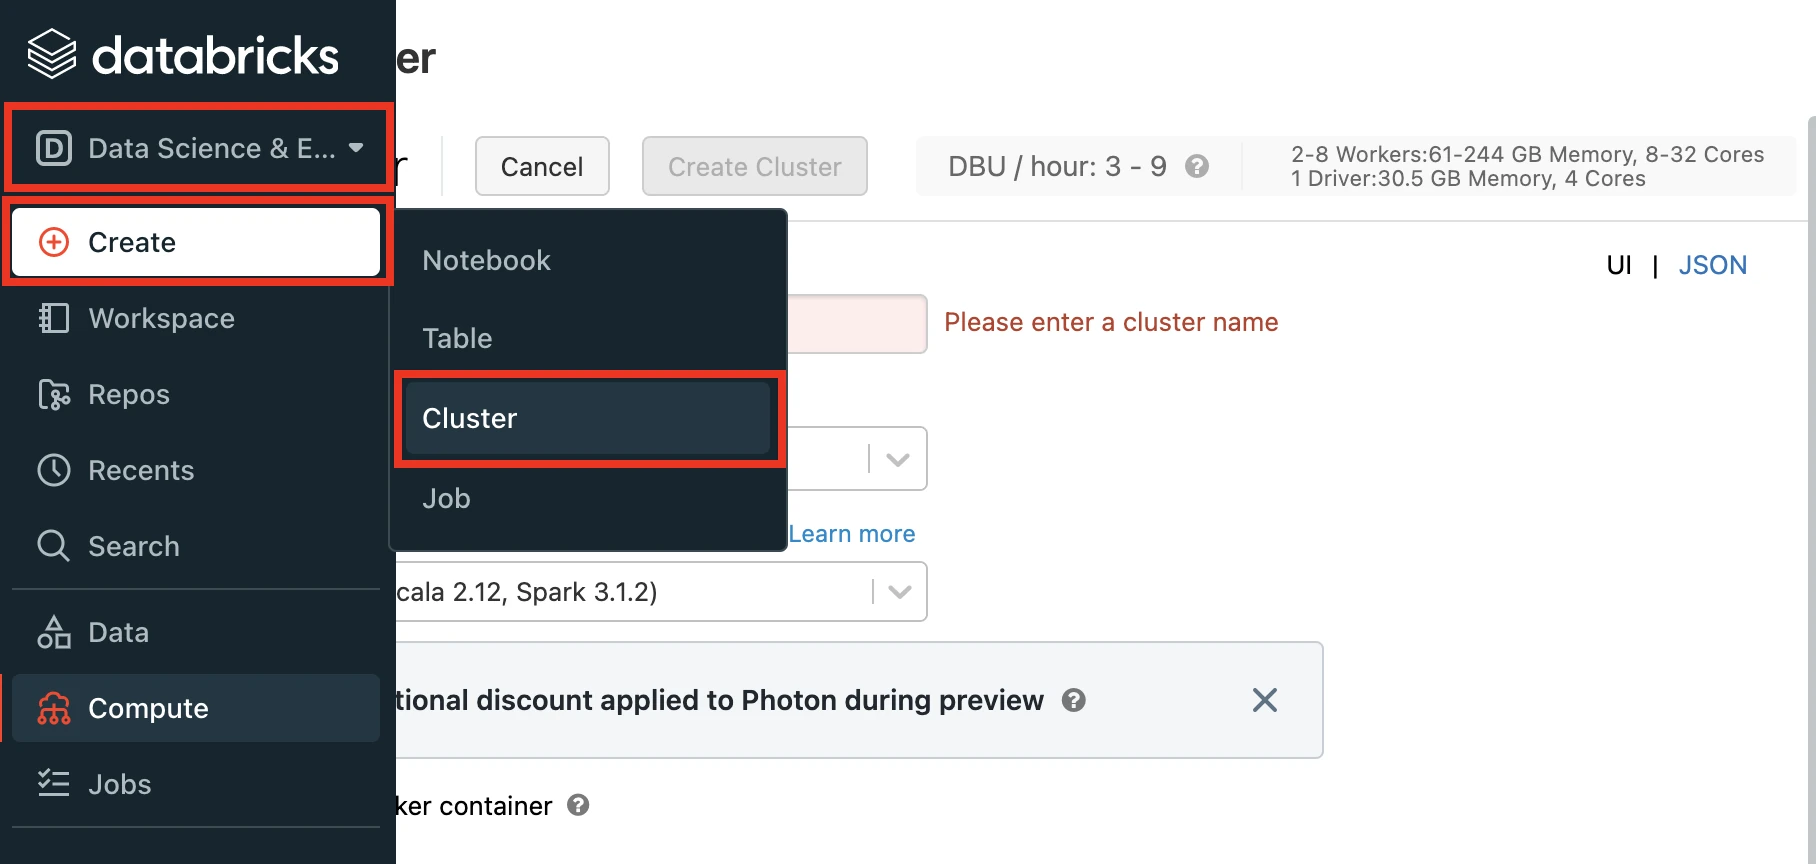
Enter a Cluster name of your choice.
Set the Databricks Runtime Version to the latest LTS release.
Make sure you choose v7.3 or above.
Select the Cluster mode.
Set the Databricks Runtime Version to 7.3 or above (recommended version: 10.4).
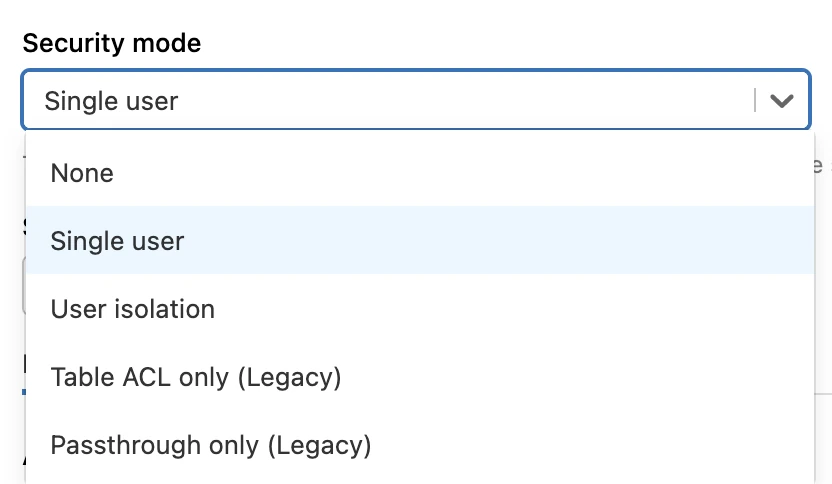
In the Advanced Options window, in the Security mode drop-down menu, select either Single user or User isolation.
In the Advanced Options section, select Spark.
If your Databricks Runtime Version is older than v9.1, copy the following code and paste in the Spark config field:
spark.hadoop.fs.s3a.impl shaded.databricks.org.apache.hadoop.fs.s3a.S3AFileSystem
spark.hadoop.fs.s3n.impl shaded.databricks.org.apache.hadoop.fs.s3a.S3AFileSystem
spark.hadoop.fs.s3n.impl.disable.cache true
spark.hadoop.fs.s3.impl.disable.cache true
spark.hadoop.fs.s3a.impl.disable.cache true
spark.hadoop.fs.s3.impl shaded.databricks.org.apache.hadoop.fs.s3a.S3AFileSystem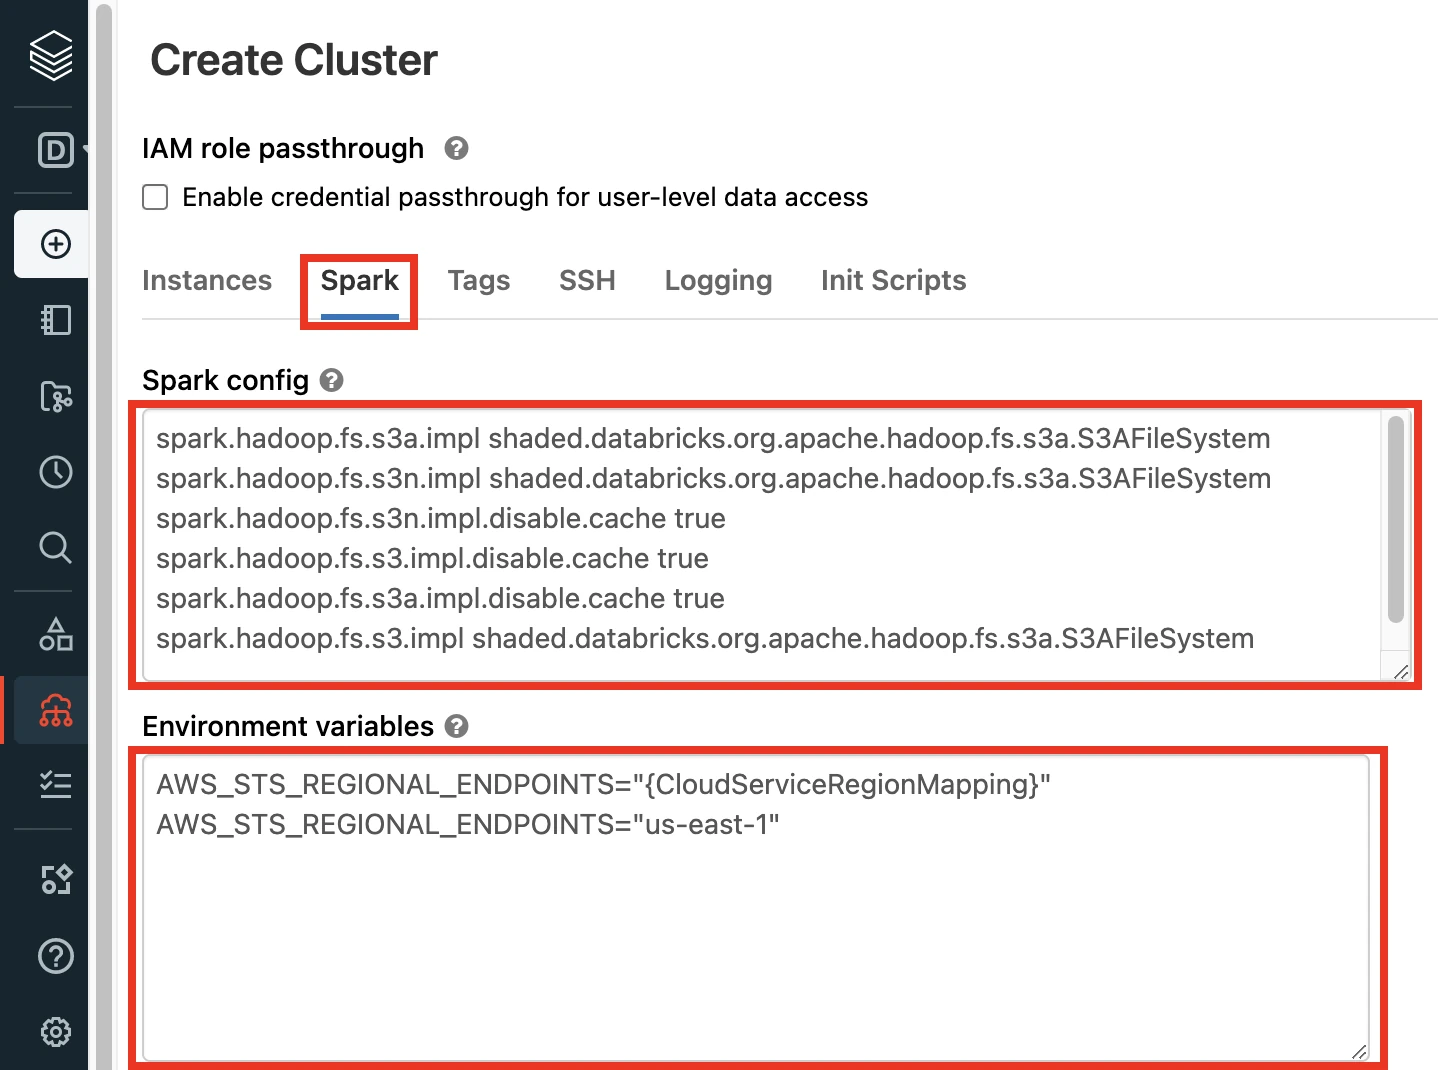
Click Create Cluster.
In the Advanced Options window, select JDBC/ODBC.
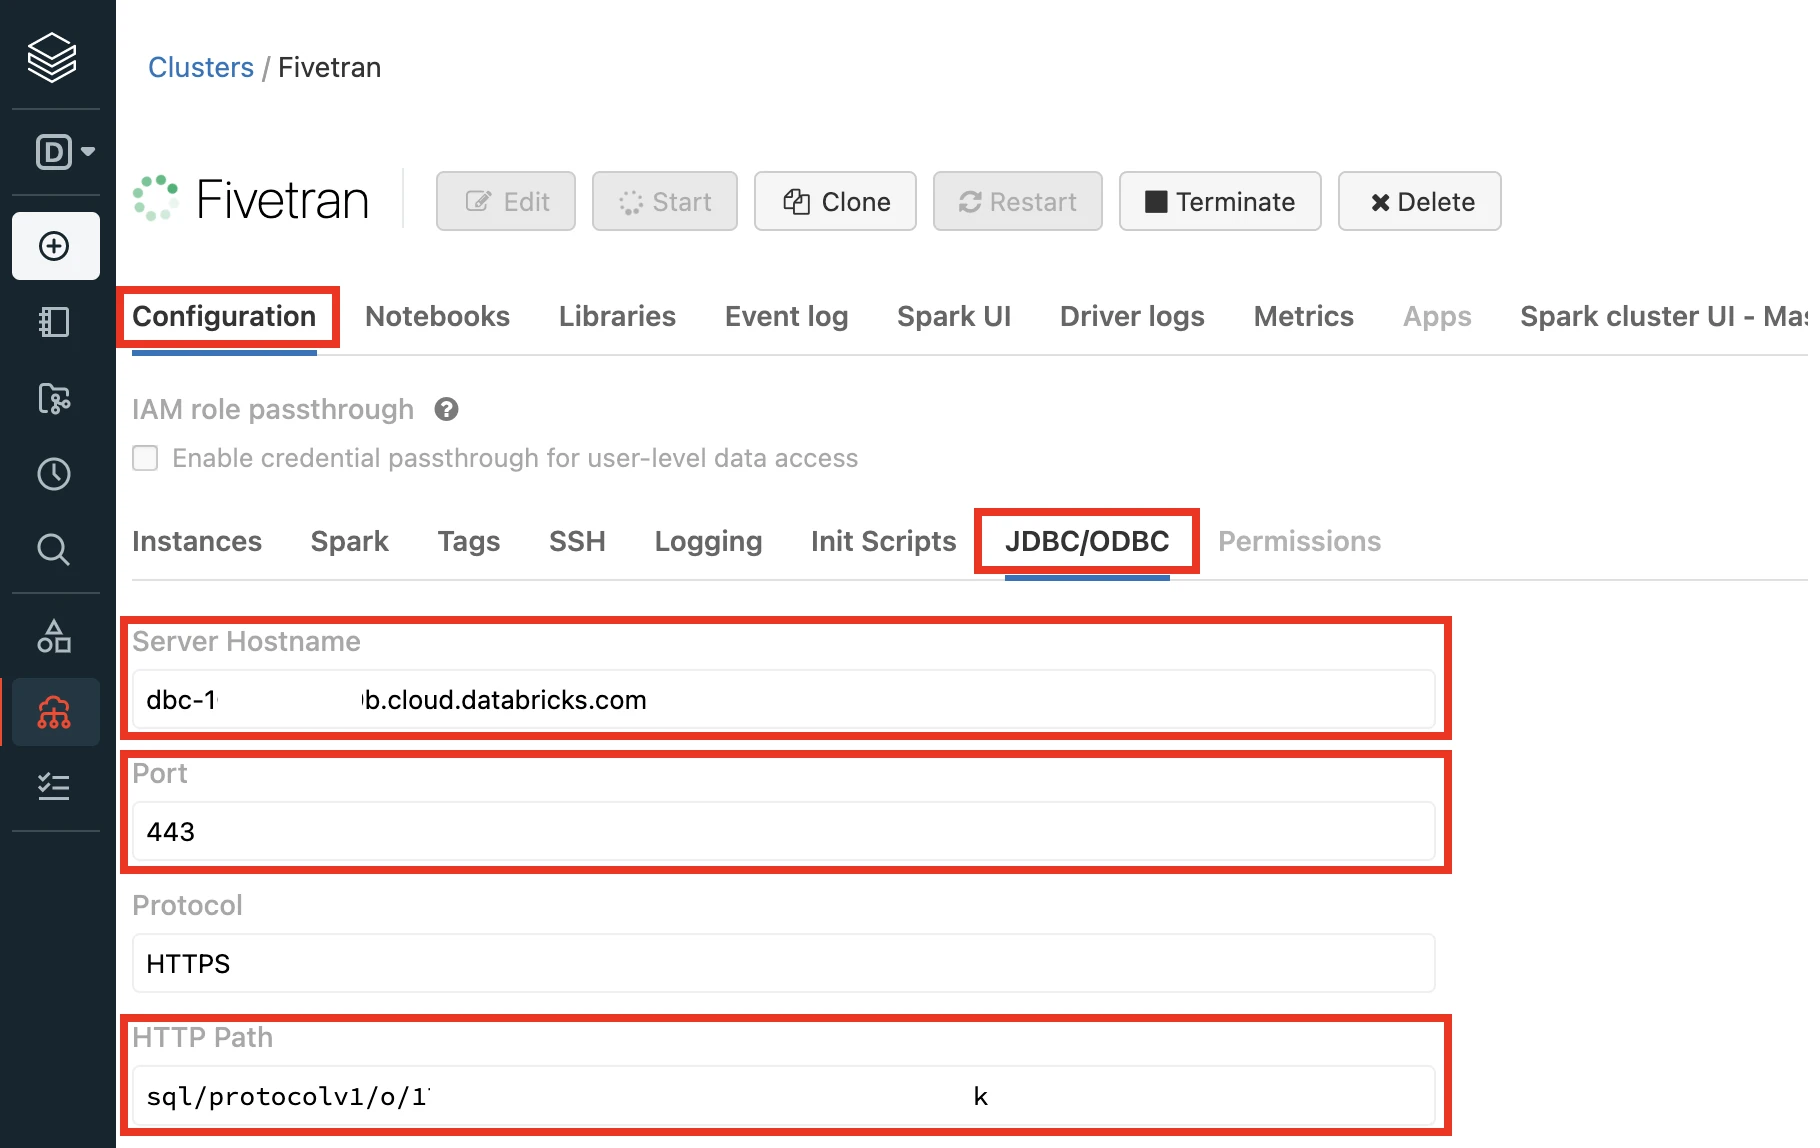
Make a note of the following values. You will need them to configure Fivetran.
- Server Hostname
- Port
- HTTP Path
Choose authentication type
You can use one of the following authentication types for Fivetran to connect to Databricks:
Databricks personal access token authentication
To use the Databricks personal access token authentication type, create a personal access token by following the instructions in Databricks documentation.
Assign the following catalog privileges to the user or service principal you want to use to create your access token:
- CREATE SCHEMA
- CREATE TABLE
- MODIFY
- REFRESH
- SELECT
- USE CATALOG
- USE SCHEMA
To create external tables in a Unity Catalog-managed external location, assign the following privileges to the user or service principal you want to use to create your access token:
- On the external location:
- CREATE EXTERNAL TABLE
- READ FILES
- WRITE FILES
- On the storage credentials:
- CREATE EXTERNAL TABLE
- READ FILES
- WRITE FILES
- On the external location:
When you grant a privilege on the catalog, it is automatically granted to all current and future schemas in the catalog. Similarly, the privileges that you grant on a schema are inherited by all current and future tables in the schema.
OAuth machine-to-machine (M2M) authentication
To use the OAuth machine-to-machine (M2M) authentication type, create your OAuth client ID and secret by following the instructions in Databricks documentation.
Setup instructions for manual table management
Create workspace
Create a Databricks workspace.
Create Unity Catalog metastore
Create a metastore and assign a workspace to it.
Enable Unity Catalog for workspace
Enable Unity Catalog for your workspace.
Configure external data storage
Log in to your Databricks workspace.
Go to Catalog > External Data.
Click External Locations.
Click Create location.
Select Manual and then click Next.
Enter the External location name.
In the Storage credential drop-down menu, select the credential you created.
In the URL field, enter the path to your S3 bucket.
Click Create.
Create notebook
Create a notebook by following the instructions in Databricks documentation.
You can create the notebook in any folder within your workspace.
Create external tables
To create an external table, execute the following SQL query from the notebook you created:
CREATE TABLE <catalog>.<schema>.<table>
USING delta
OPTIONS (
path 's3://<bucketName>/<path-to-table>'
)
In the SQL query, replace the following placeholder values with your actual values:
| Placeholder Value | Actual Value |
|---|---|
<catalog> | Name of the catalog where you want to create the external table. |
<schema> | Name of your Unity Catalog schema. |
<table> | Name you want to assign to your table in Unity Catalog. |
<bucketName> | Name of your S3 bucket. |
<path-to-table> | Path to the table within your S3 bucket. |
You can use the decode(unhex(<column_name>), 'UTF-8') clause in your query to fetch the decoded values in BINARY columns.
Create IAM role
In the Amazon IAM console, go to Roles and click Create role.
Choose AWS account as the Trusted entity type and select Another AWS account.

In the Account ID field, enter Fivetran's account ID,
834469178297.Select the Require external ID checkbox, and then enter the External ID you found.
Click Next.
Select the checkbox for the IAM policy you created for your S3 bucket.
If you configured AWS Glue Data Catalog for your Iceberg tables, select the IAM policy you created for the Glue catalog.
Click Next.
Enter the Role name and click Create role.
In the Roles page, select the role you created.
Make a note of the ARN. You will need it to configure Fivetran.
If the bucket uses server-side encryption with AWS Key Management Service (SSE-KMS) and a customer-managed KMS key, add the following statement to the IAM role policy attached to the Fivetran IAM role to allow use of the key:
{ "Sid": "AllowUseOfCustomerManagedKmsKey", "Effect": "Allow", "Action": [ "kms:GenerateDataKey", "kms:Decrypt", "kms:DescribeKey" ], "Resource": "{kms-key-id}" }- Replace
{kms-key-id}with the ARN of your customer-managed KMS key. - If the bucket uses SSE-KMS with a customer-managed KMS key, a bucket policy alone is not sufficient. You must also grant the Fivetran IAM role permission to use the KMS key. Without these permissions, destination setup or sync can fail with errors such as
kms:GenerateDataKey not authorized.
- Replace
If the bucket uses server-side encryption with AWS Key Management Service (SSE-KMS) and a customer-managed KMS key, verify whether the KMS key policy allows the Fivetran IAM role to use the key.
i. Log in to the AWS Management Console.
ii. Go to Key Management Service (KMS) > Customer managed keys.
iii. Select your KMS key.
iv. If the key policy does not already grant the Fivetran IAM role access, add the following statement:
{
  "Sid": "AllowFivetranRoleToUseKey",
  "Effect": "Allow",
  "Principal": {
    "AWS": "arn:aws:iam::{account-id}:role/{role-name}"
  },
  "Action": [
    "kms:GenerateDataKey",
    "kms:Decrypt",
    "kms:DescribeKey"
  ],
  "Resource": "*"
}
If the KMS key uses the default key policy, updating the IAM role policy is often sufficient. You must also update the KMS key policy if the key policy restricts access to specific principals or if you use a cross-account KMS key. If the KMS key policy does not allow the Fivetran IAM role to use the key, destination setup or sync can fail.
v. Click Save changes.
(Optional) Configure IAM policy for AWS Lake Formation
This step is mandatory if AWS Lake Formation is enabled for your S3 bucket. You can skip this step if AWS Lake Formation is not enabled for your bucket.
Go to the AWS Lake Formation console.
On the navigation menu, go to Permissions > Data locations.
Click Grant.
Choose My account.
In the IAM users and roles drop-down menu, select the IAM role you created for your bucket.
In the Storage locations field, enter the prefix of your S3 bucket where you want to store your data.
Click Grant.
Complete Fivetran configuration
Log in to your Fivetran account.
Go to the Destinations page and click Add destination.
Enter a Destination name of your choice and then click Add.
Click Set up for S3 Data Lake.
In the Storage Provider drop-down menu, select AWS.
Enter your S3 Bucket name.
You cannot change the bucket name after you save the setup form.
In the Fivetran Role ARN field, enter the ARN you found.
In the S3 Prefix Path field, enter the prefix path within your S3 bucket where you want Fivetran to store your data. Fivetran will automatically create this prefix path in your bucket.
- You cannot change the prefix path after you save the setup form.
- The prefix path must not start or end with a forward slash (/).
Enter your S3 Bucket Region.
(Optional) To integrate AWS Glue with your data lake, set the Update AWS Glue Catalog toggle to ON.
You cannot change this setting after you save the setup form.
Choose your Connection Method:
- Connect directly: Fivetran automatically uses an AWS gateway endpoint when the AWS Region of your S3 bucket and the Fivetran data processing location are the same. This keeps traffic within the AWS network. If the regions differ, Fivetran sends data over the public internet using a fixed set of IP addresses.
- Connect via private networking: Choose this option only if the AWS Region of your S3 bucket and the Fivetran data processing location are the same. During setup, Fivetran runs an additional setup test (S3 Private Link Test) to confirm that both locations match.
The Connect via private networking option is only available for Business Critical accounts.
(Optional) To enable automatic schema migration of Delta Lake tables to Unity Catalog, set the Update Databricks Unity Catalog toggle to ON and do the following:
i. Choose the Databricks Connection Method.
ii. Enter the following details of your Databricks account:
- Catalog name
- Server Hostname
- Port number
- HTTP Path
iii. Select the Authentication Type you configured.
iv. If you selected PERSONAL ACCESS TOKEN as the Authentication Type, enter the Personal Access Token you created.
v. If you selected OAUTH 2.0 as the Authentication Type, enter the OAuth 2.0 Client ID and OAuth 2.0 Secret you created.
In the Snapshot Retention Period drop-down menu, select how long you want us to retain your table snapshots.
- We perform regular table maintenance operations to delete the table snapshots that are older than the retention period you select in this field. You can select Retain All Snapshots to disable the deletion of table snapshots.
- Make sure your bucket does not have an S3 Lifecycle configuration that deletes the files before the specified snapshot retention period.
Choose your Data processing location.
Choose the AWS Region where you want to run the Fivetran services.
- By default, the Fivetran processing cloud provider is AWS.
- For optimal performance, we recommend choosing the AWS Region where your S3 bucket is located.
Choose your Time zone.
Click Save & Test.
Fivetran tests and validates the data lake connection. On successful completion of the setup tests, you can sync your data using Fivetran connectors to your AWS data lake.
In addition, Fivetran automatically configures a Fivetran Platform Connector to transfer the connection logs and account metadata to a schema in this data lake. The Fivetran Platform Connector enables you to monitor your connections, track your usage, and audit changes. The Fivetran Platform Connector sends all these details at the destination level.
If you are an Account Administrator, you can manually add the Fivetran Platform Connector on an account level so that it syncs all the metadata and logs for all the destinations in your account to a single destination. If an account-level Fivetran Platform Connector is already configured in a destination in your Fivetran account, then we don't add destination-level Fivetran Platform Connectors to the new destinations you create.
Setup tests
Fivetran performs the following AWS data lake connection tests:
- The Input Validation test ensures prefix path and storage name don't have invalid characters.
- The S3 Read and Write Access test checks access to your S3 bucket and validates the resources specified in your IAM policy.
- The Glue Access test checks access to AWS Glue Data Catalog and validates the IAM policy resources. This test runs only if you set the Update AWS Glue Catalog toggle to ON.
- The Bucket Region test Ensures that the specified S3 Bucket Region is valid.
- The S3 Private Link test checks whether AWS Region of your S3 bucket and the Fivetran data processing location are the same. We run this test only if you choose to connect through a private network.
- The Validate Permissions test checks if the Databricks credentials have the necessary permissions to CREATE, ALTER, or DROP tables in the database. This test runs only if you choose to automate the schema migration to Databricks.
The tests may take a couple of minutes to complete.
Setup instructions for ADLS
Setup instructions for ADLS
For a visual walkthrough, watch the Set Up Azure Data Lake Storage video tutorial.
Prerequisites
To connect ADLS to Fivetran, you need the following:
An ADLS Gen2 account with Administrator permissions
An ADLS Gen2 container, make sure your container name or the prefix path where you want to load your data does not contain any of these special characters - ['#', '%', '^', '{', '}', '[', ']', '"', '?', '|', '', ' '];
Permissions to create an Azure service principal
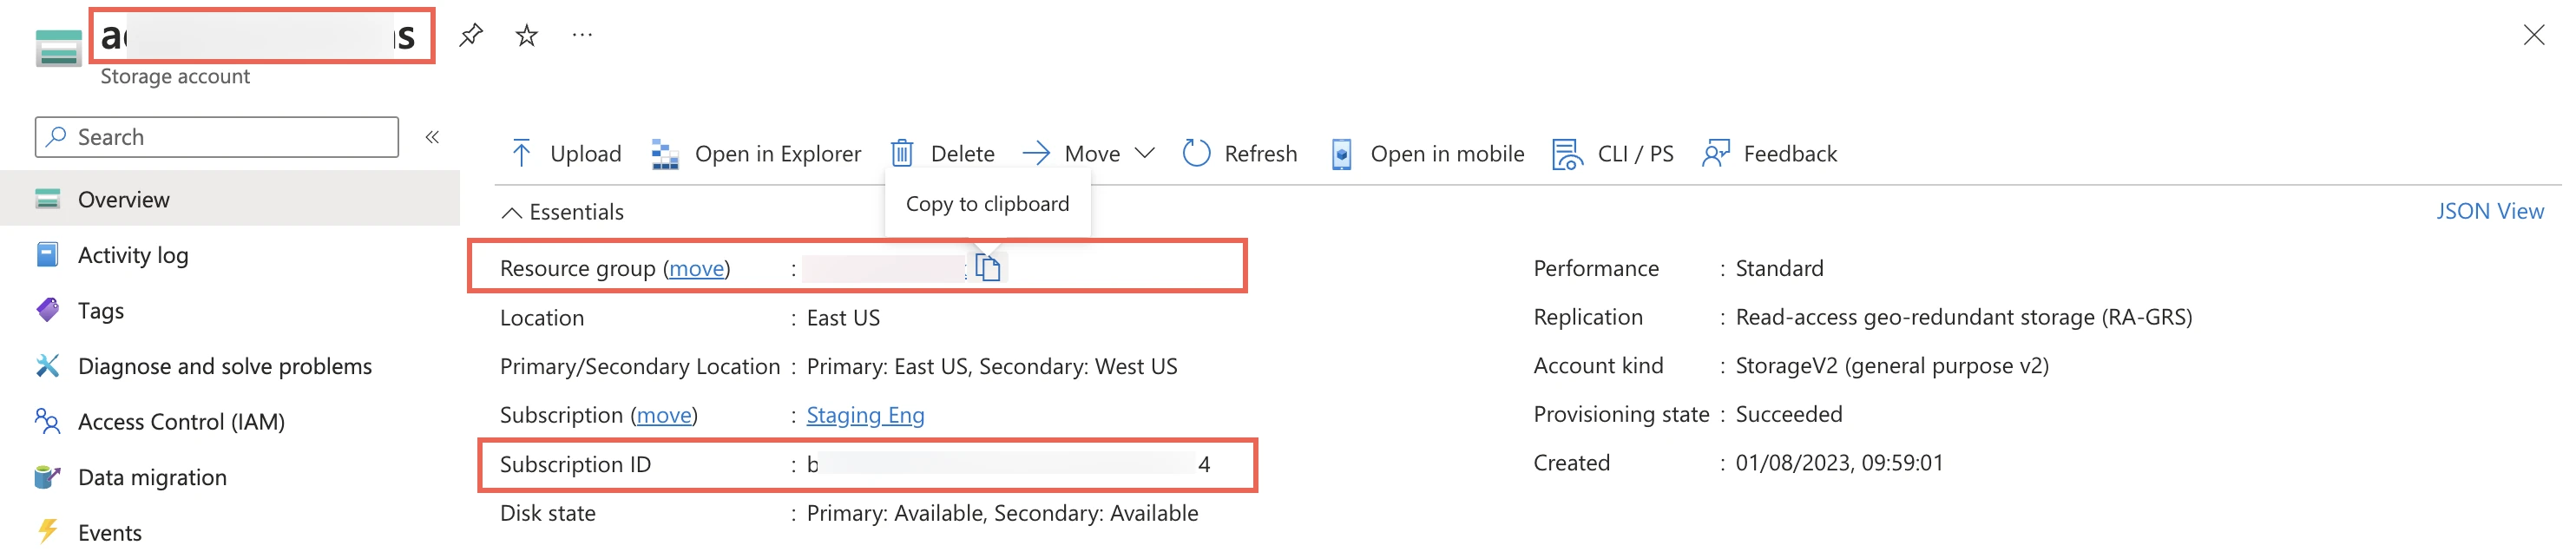
Create storage account
Log in to the Azure portal.
Create a storage account by following the instructions in Microsoft documentation.
- When creating the storage account, ensure that the Enable hierarchical namespace is selected in the Advanced tab of the Create storage account page.
- If you have a firewall enabled and your Fivetran instance is not in the same region as your Azure storage account, create a firewall rule to allow access to Fivetran's IPs.
- If you have a firewall enabled and your Fivetran instance is in the same region as your Azure storage account, configure virtual network rules and add Fivetran’s internal virtual private network subnets to the list of allowed virtual networks. For more information, see Microsoft documentation.
- Since the subnet in the virtual network belongs to another Microsoft Entra tenant (Fivetran), you must use a fully qualified subnet ID. For more information, see Microsoft documentation
- To obtain the list of region-specific fully qualified subnet IDs, contact our support team.
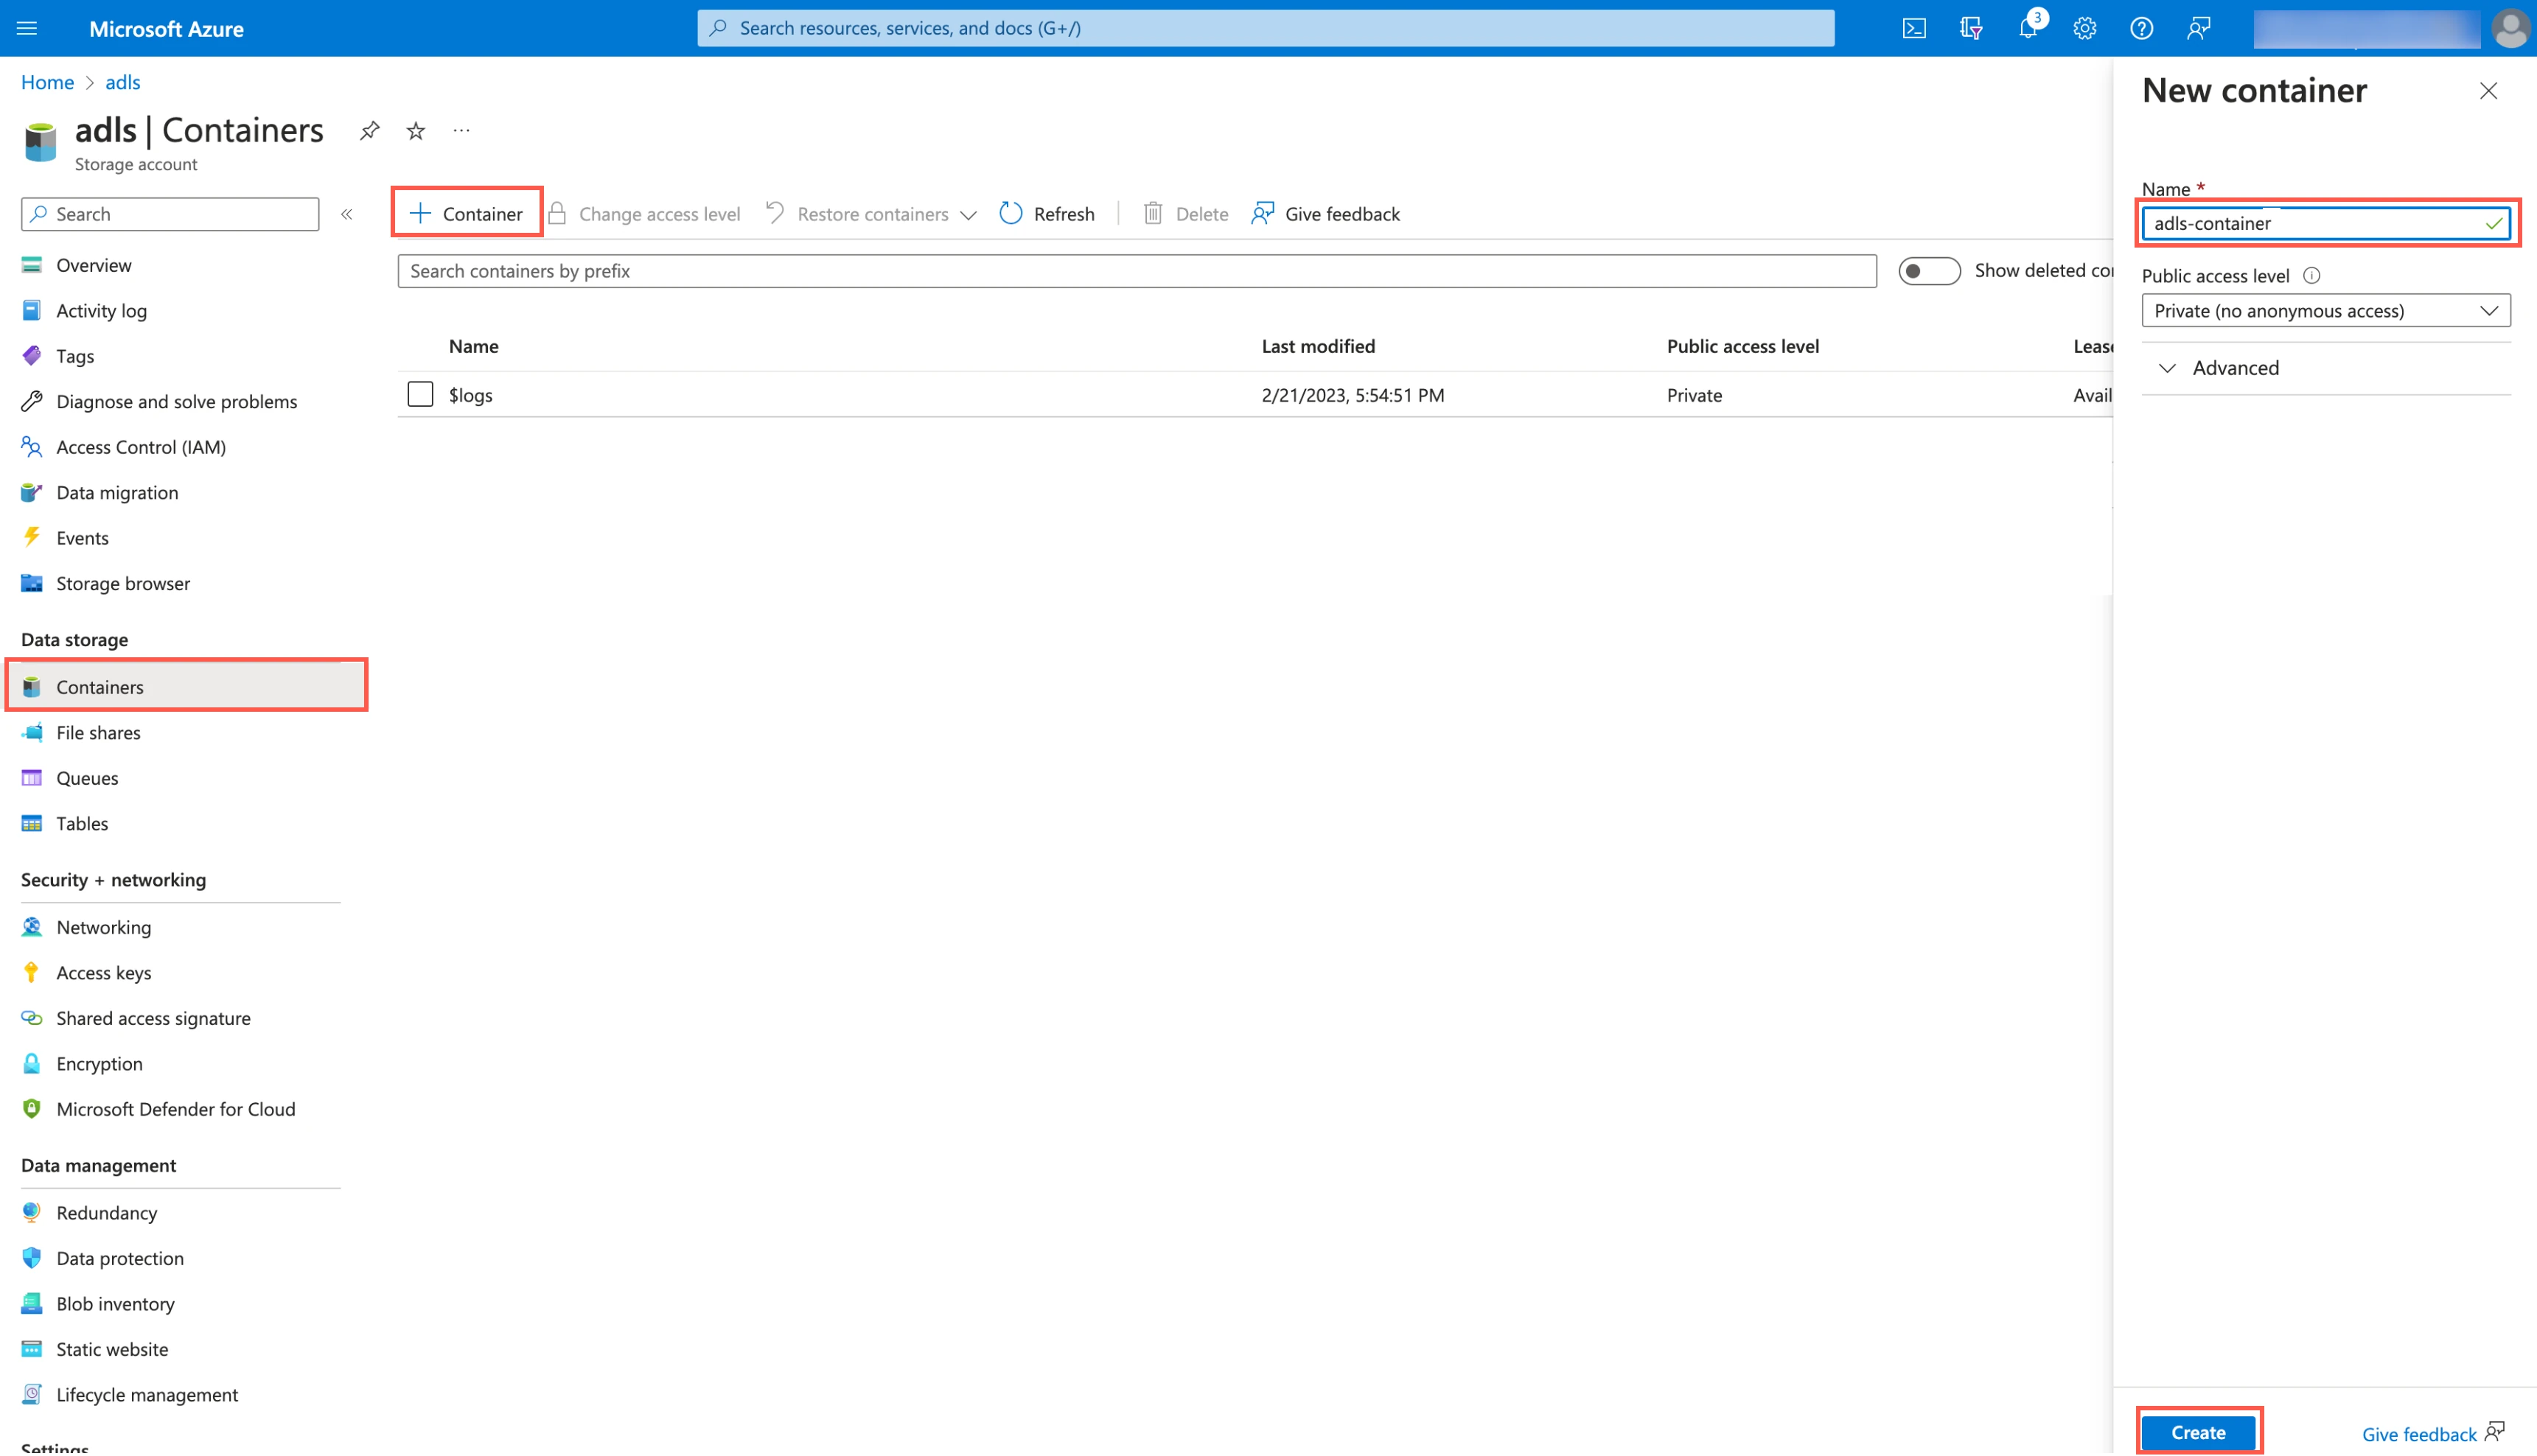
Create ADLS container
Go to the storage account you created.
On the navigation menu, go to Containers and click + Container.
In the New container pane, enter a Name for your container and make a note of it. You will need it to configure Fivetran.
In the Public access level drop-down menu, select an access level for the container.
Click Create.
Register an application and add a service principal
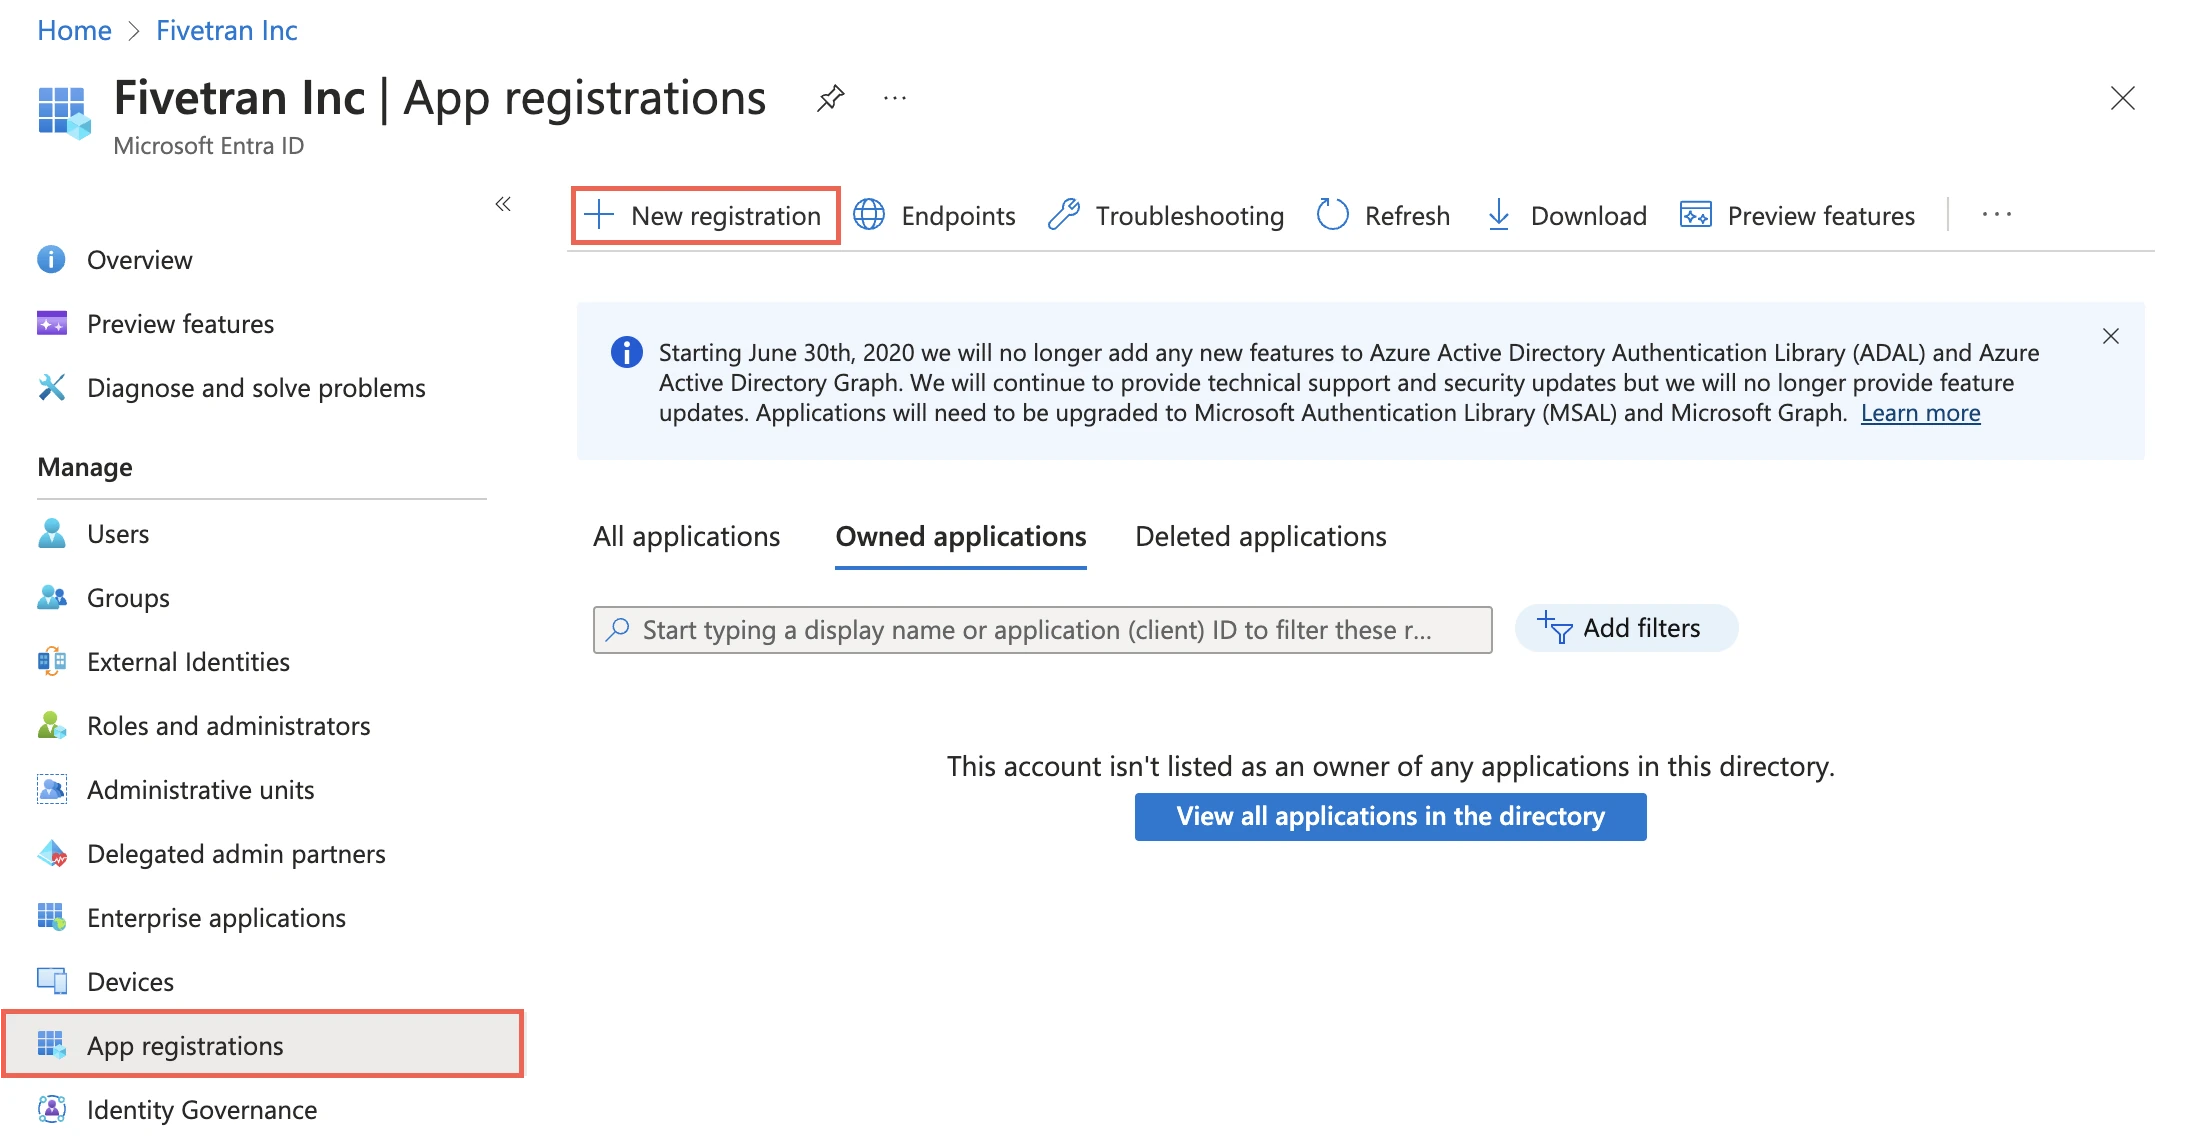
On the navigation menu, select Microsoft Entra ID (formerly Azure Active Directory).
Go to App registrations and click + New registration.
Enter a Name for the application.
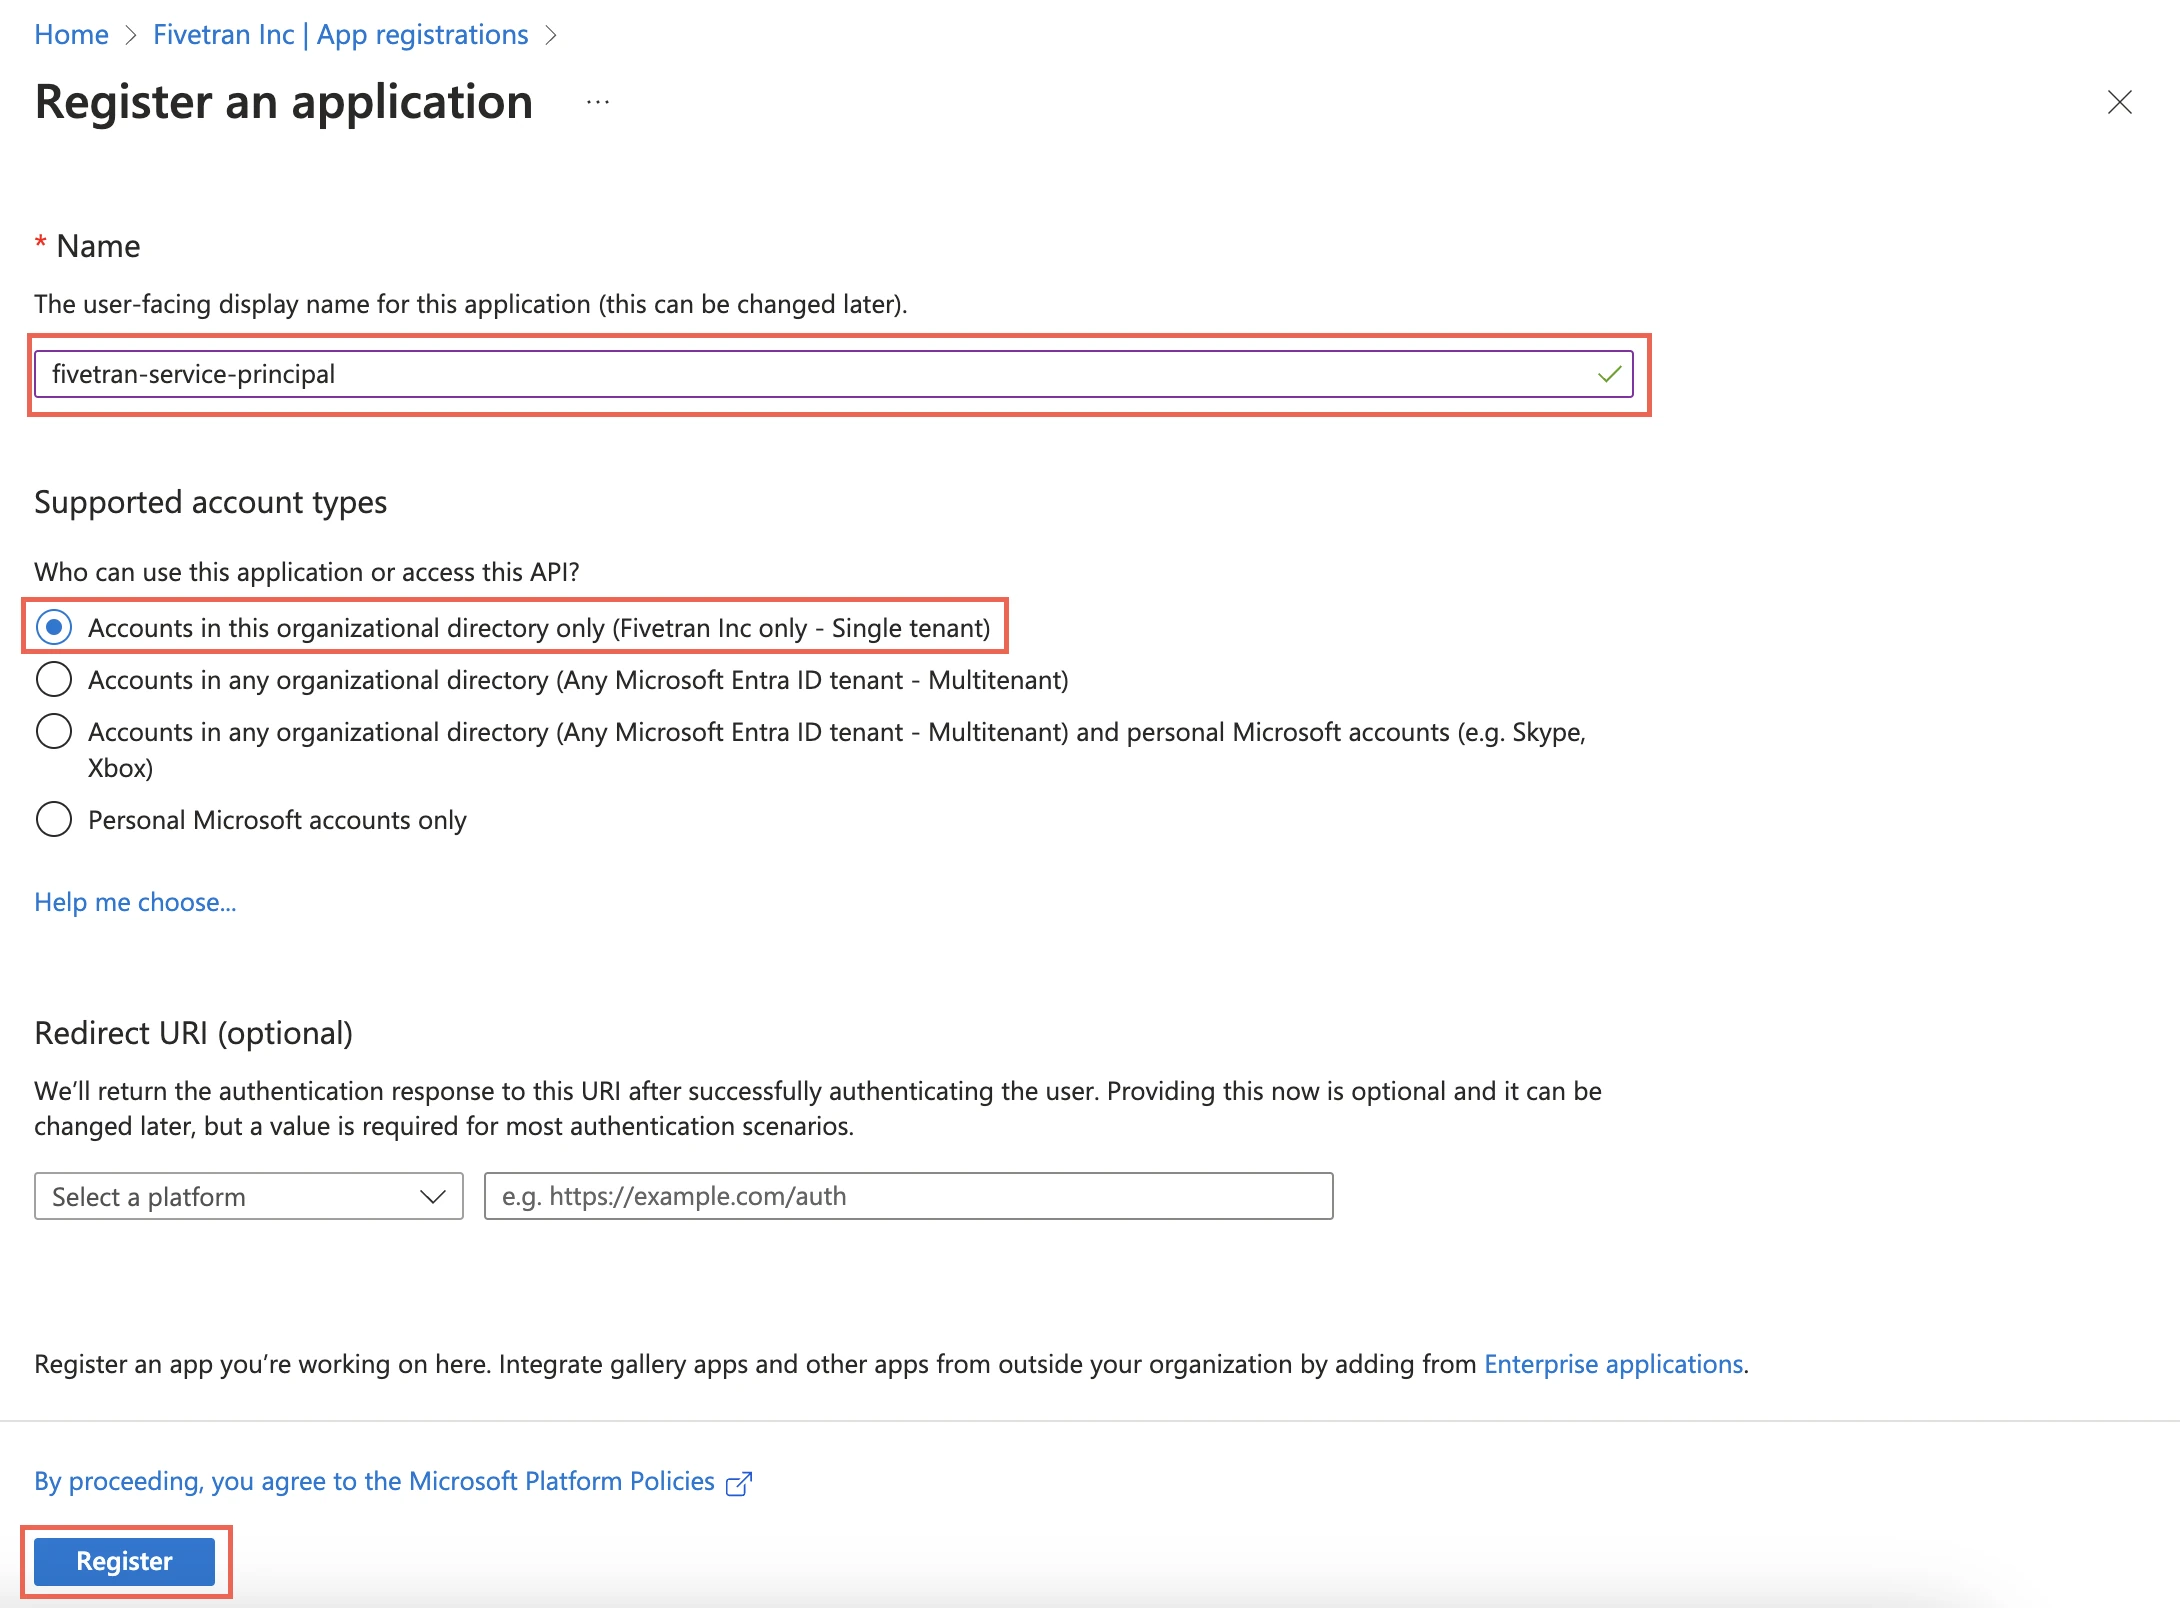
In the Supported account types section, select Accounts in this organizational directory only and click Register.
Make a note of the Application (client) ID and Directory (tenant) ID. You will need them to configure Fivetran.

Create client secret
Select the application you registered.
On the navigation menu, go to Certificates & secrets and click + New client secret.
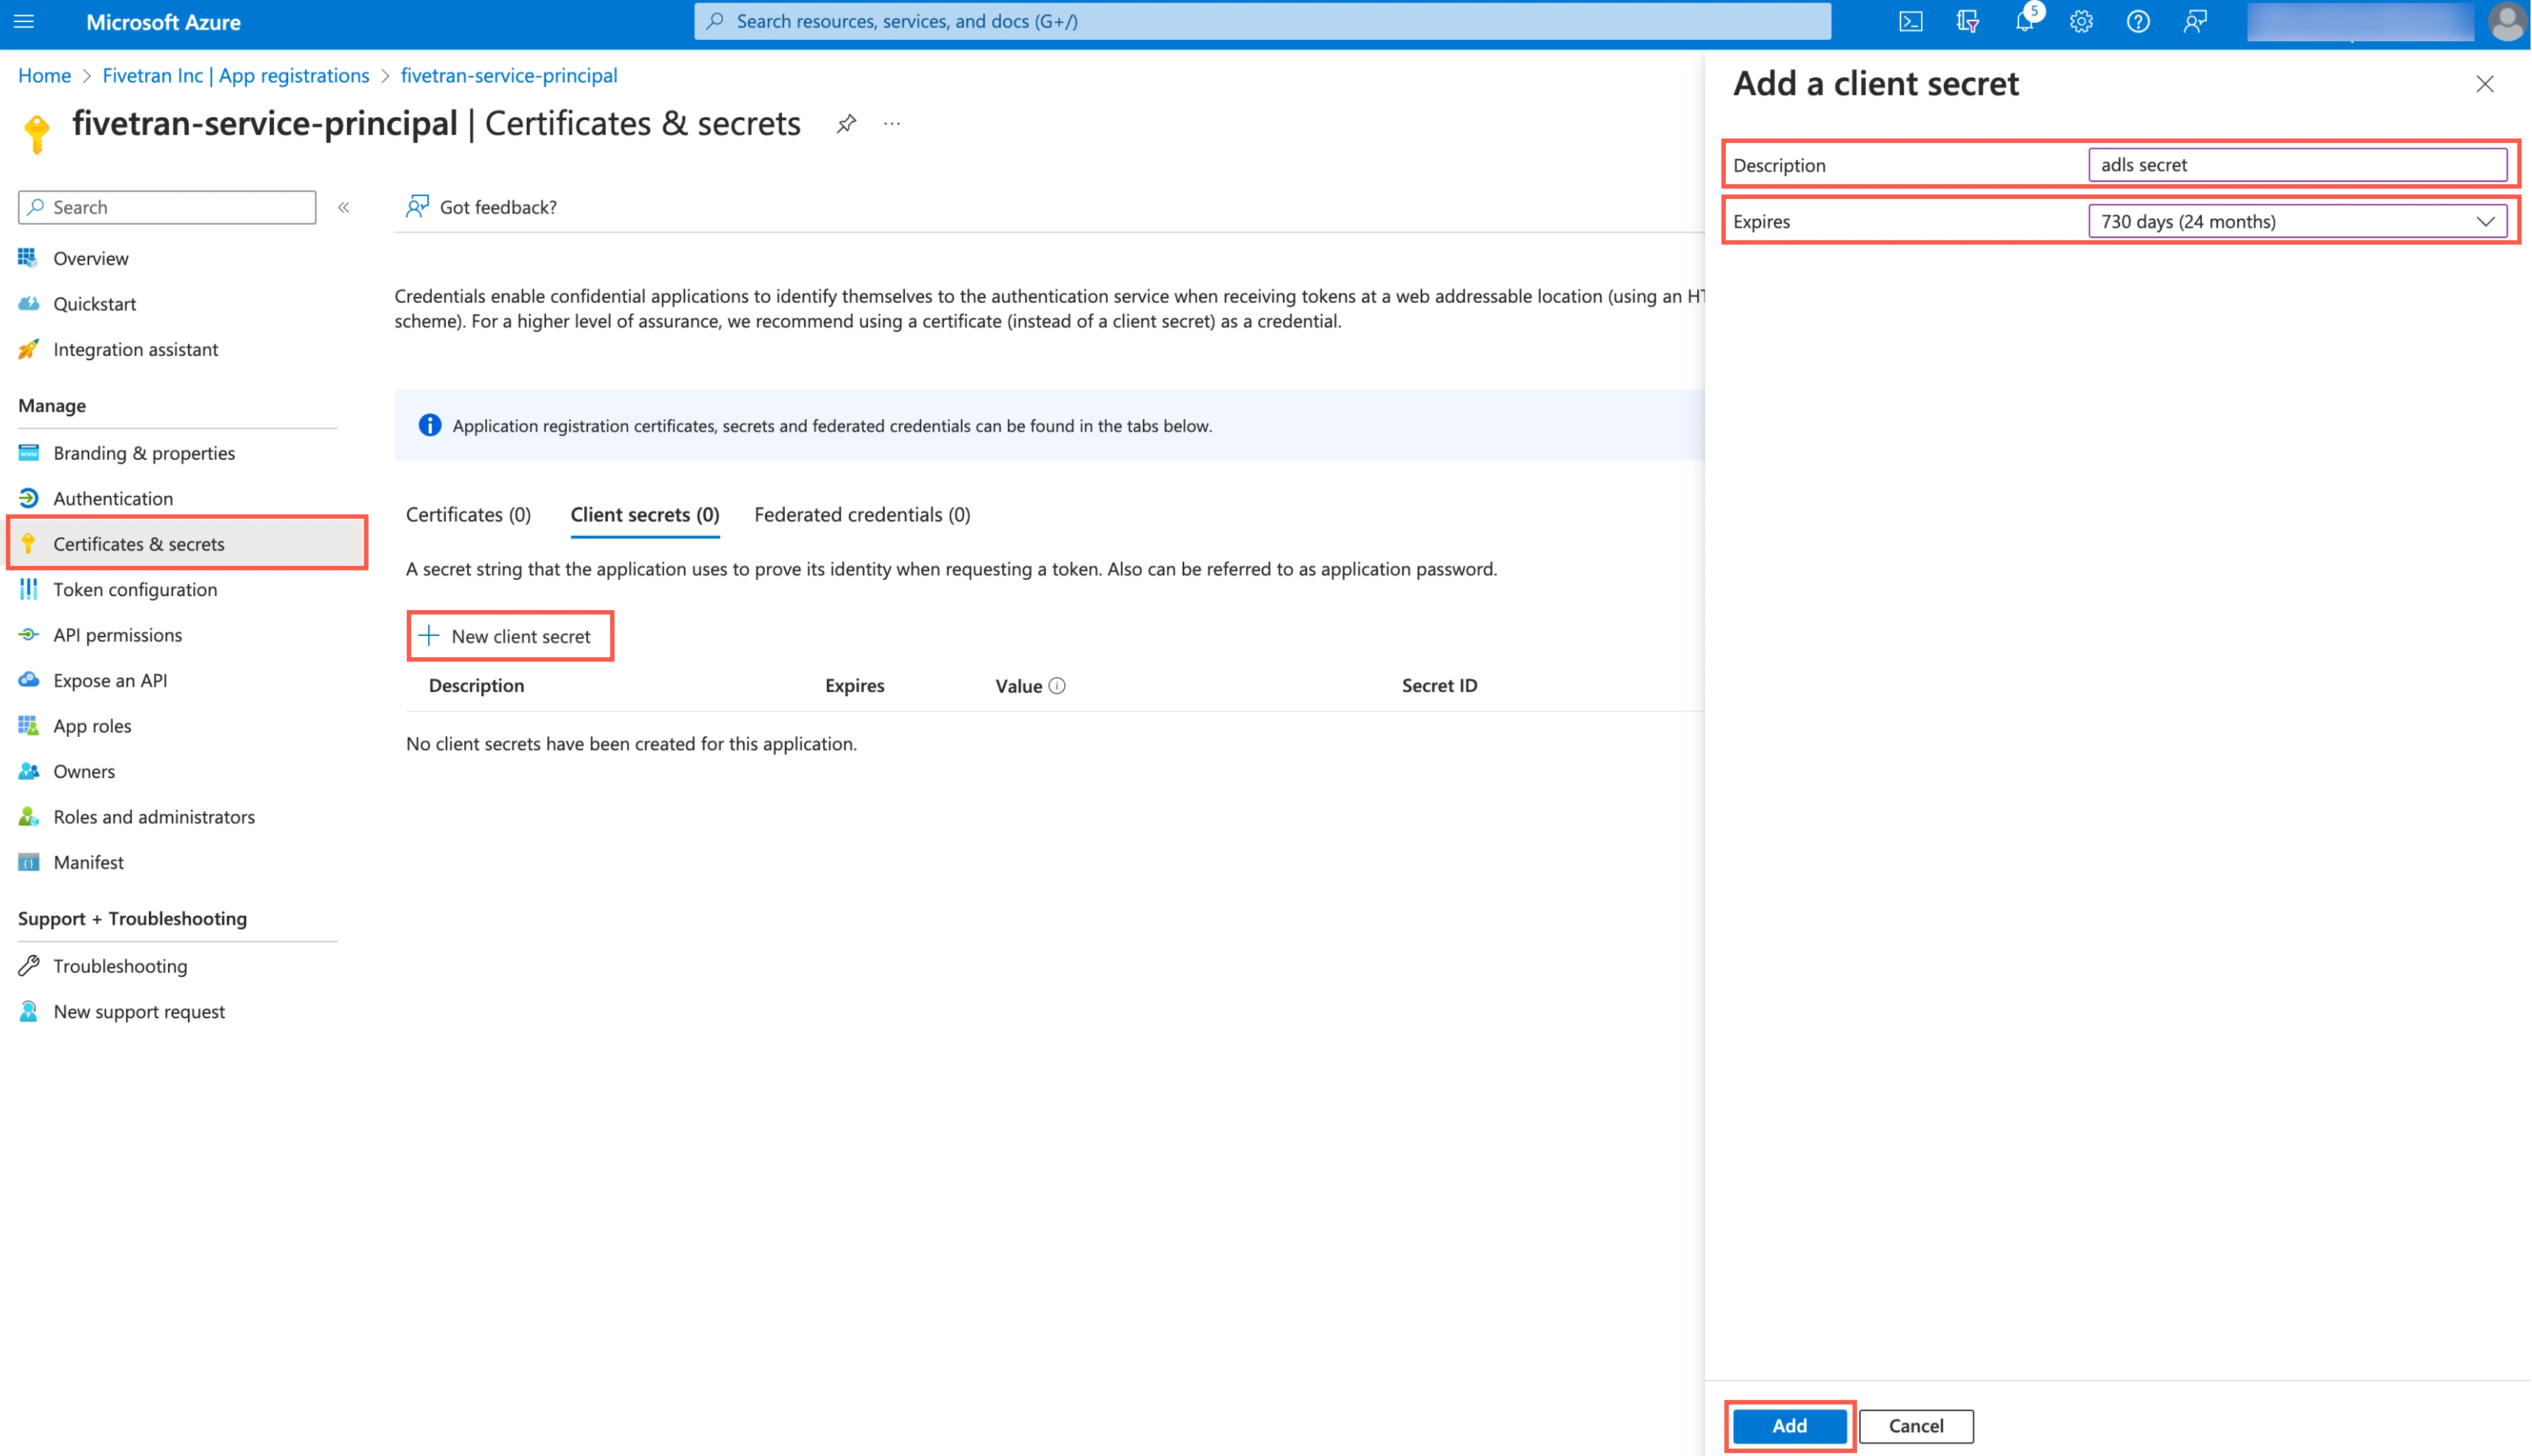
Enter a Description for your client secret.
In the Expires drop-down menu, select an expiry period for the client secret.
Click Add.
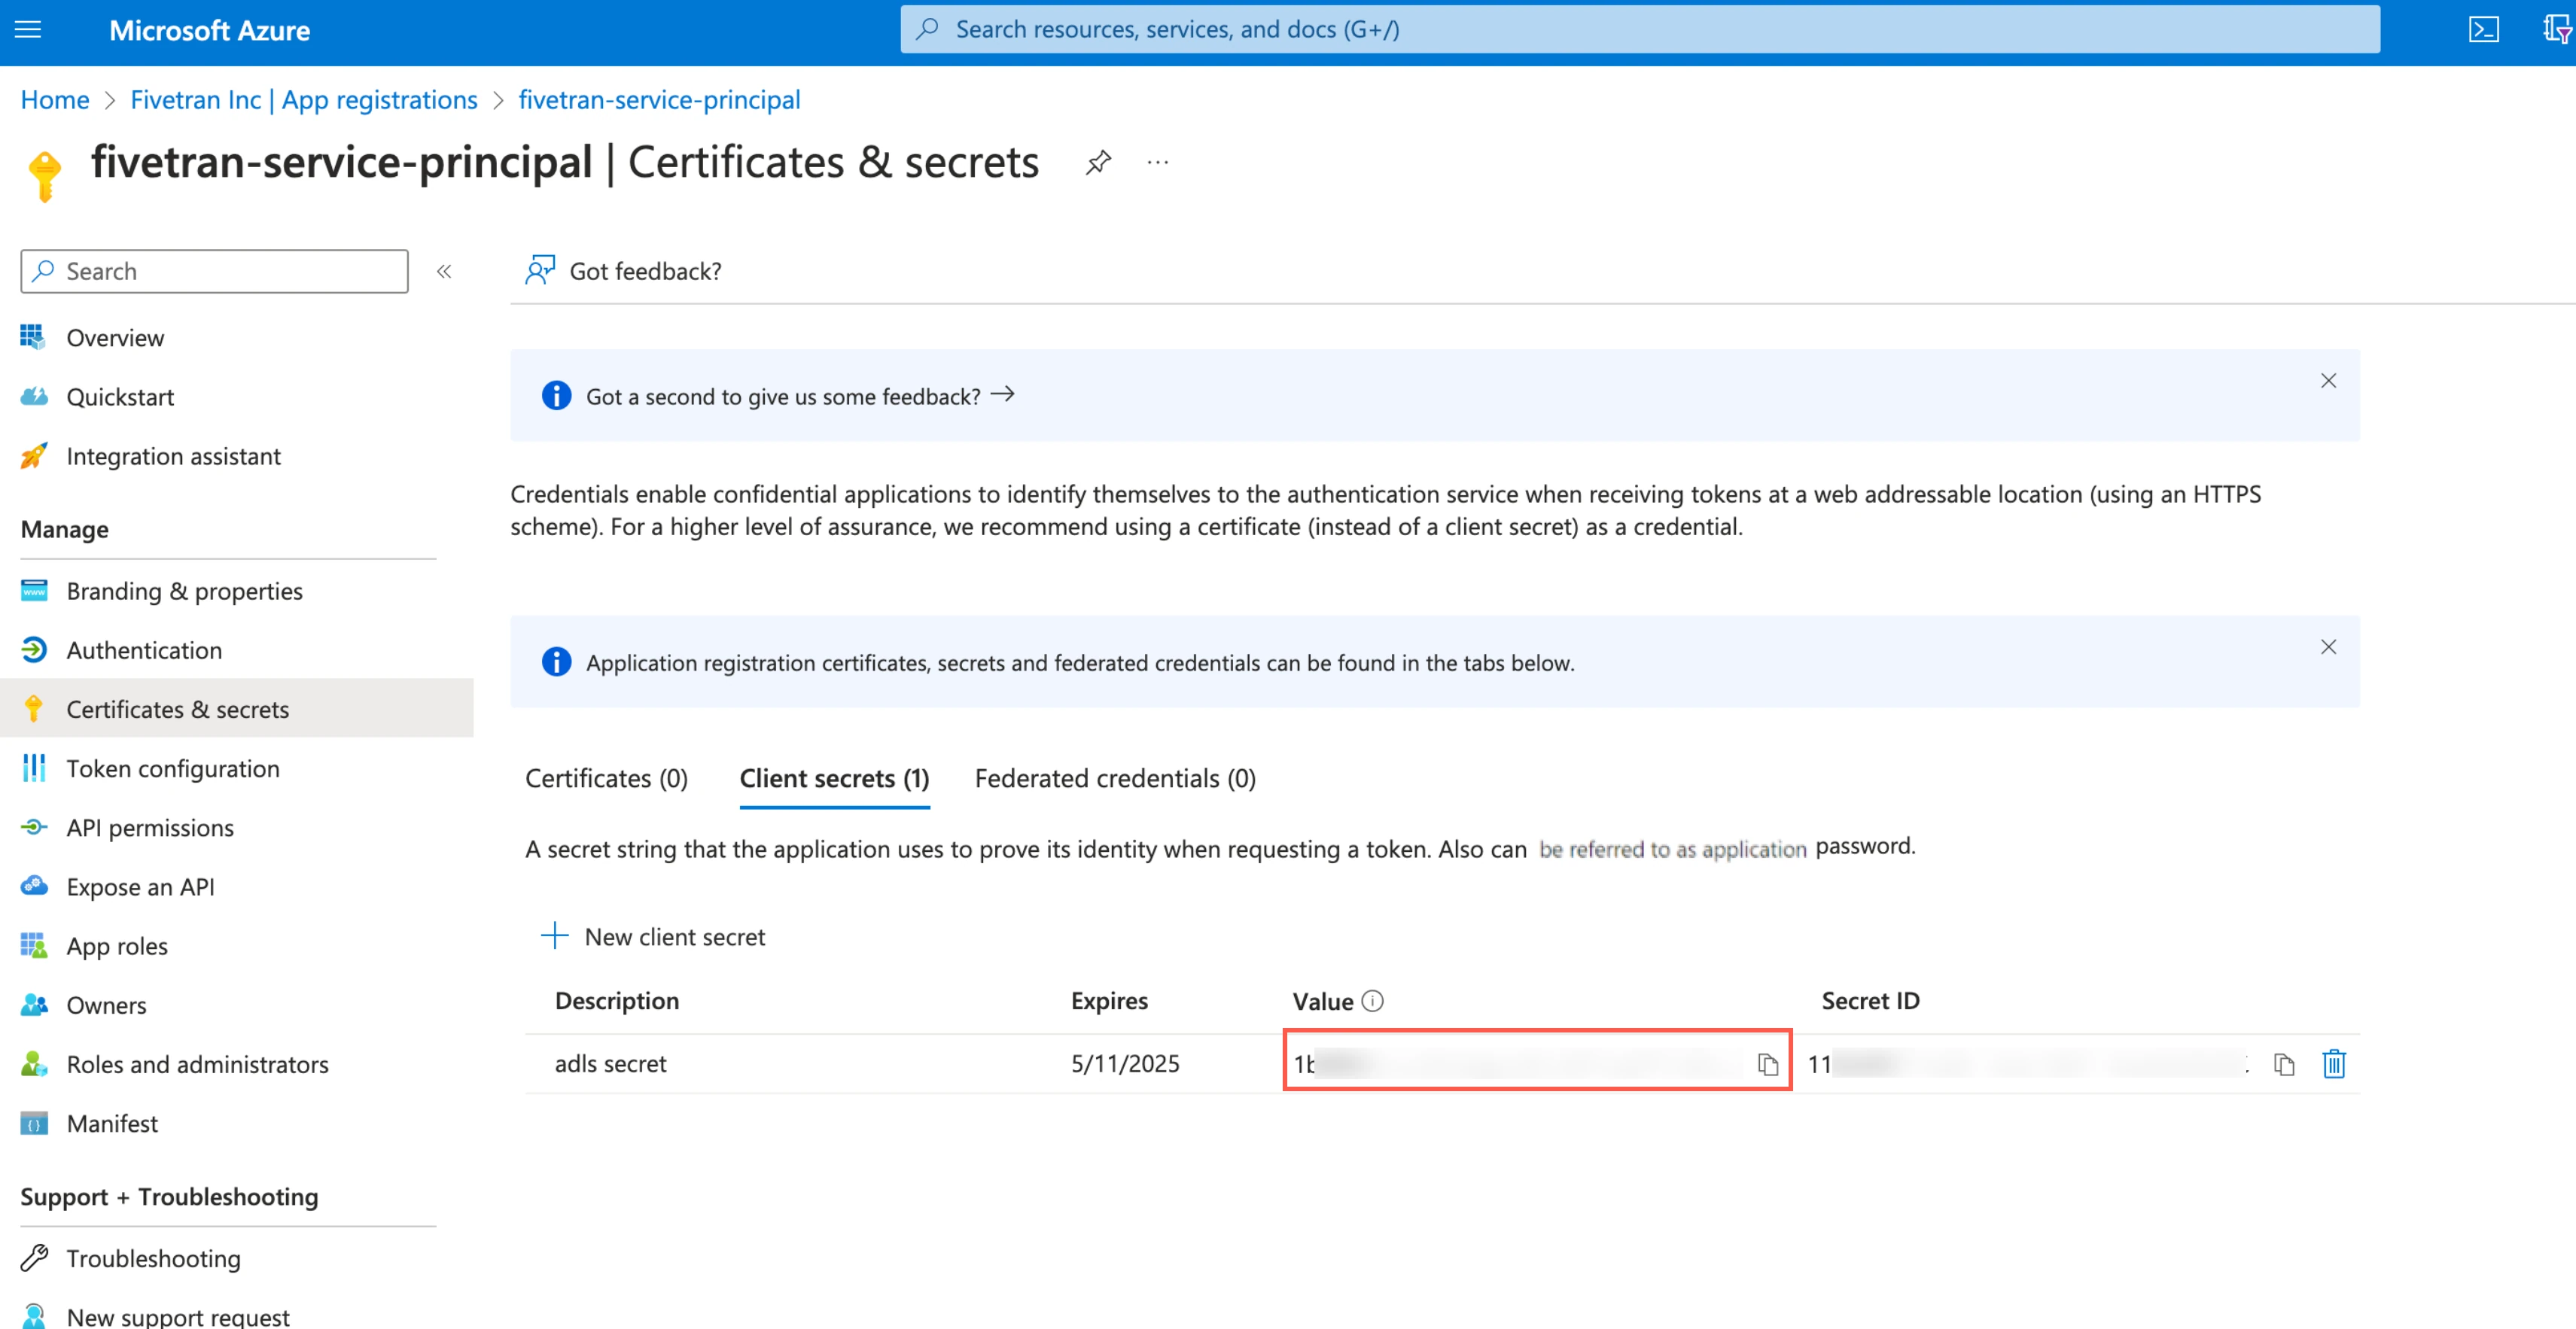
Make a note of the client secret. You will need it to configure Fivetran.
Assign role to storage account
You must assign the Storage Blob Delegator role at the storage account level because the service principal issues a User Delegation SAS token. We need the token to access the container and it is scoped specifically to that container.
Go to the storage account you created.
On the navigation menu, click Access Control (IAM).
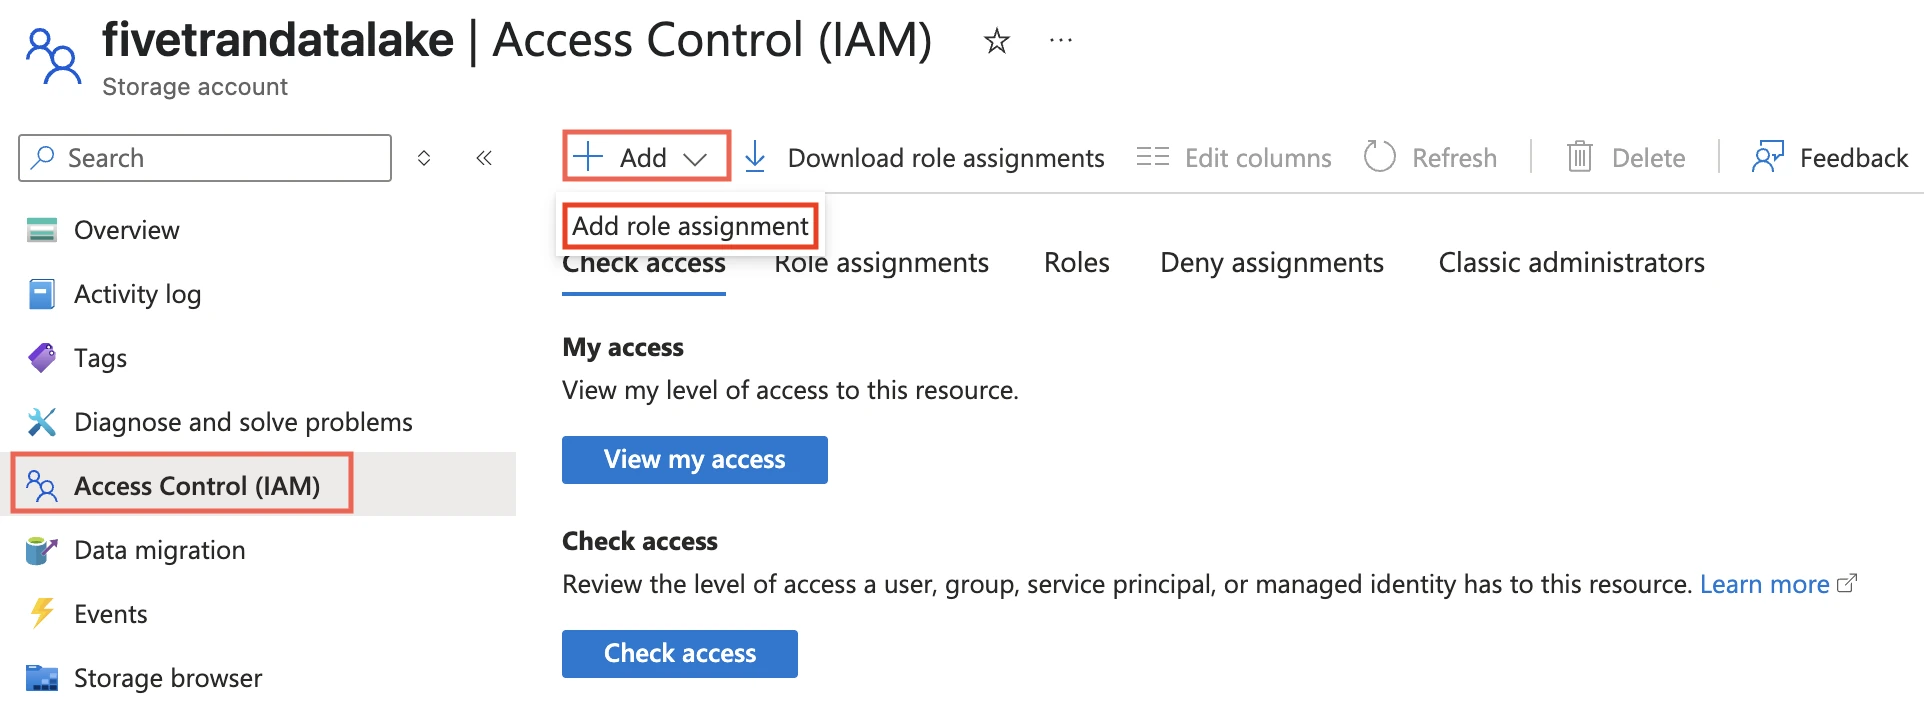
Click Add and select Add role assignment.
In the Role tab, select Storage Blob Delegator and click Next.
In the Members tab, select User, group, or service principal.
Click + Select members.
In the Select members pane, select the service principal you added and then click Select.
Click Review + assign.
Assign role to container
Go to the container you created and select Access Control (IAM).

Click Add and then select Add role assignments.
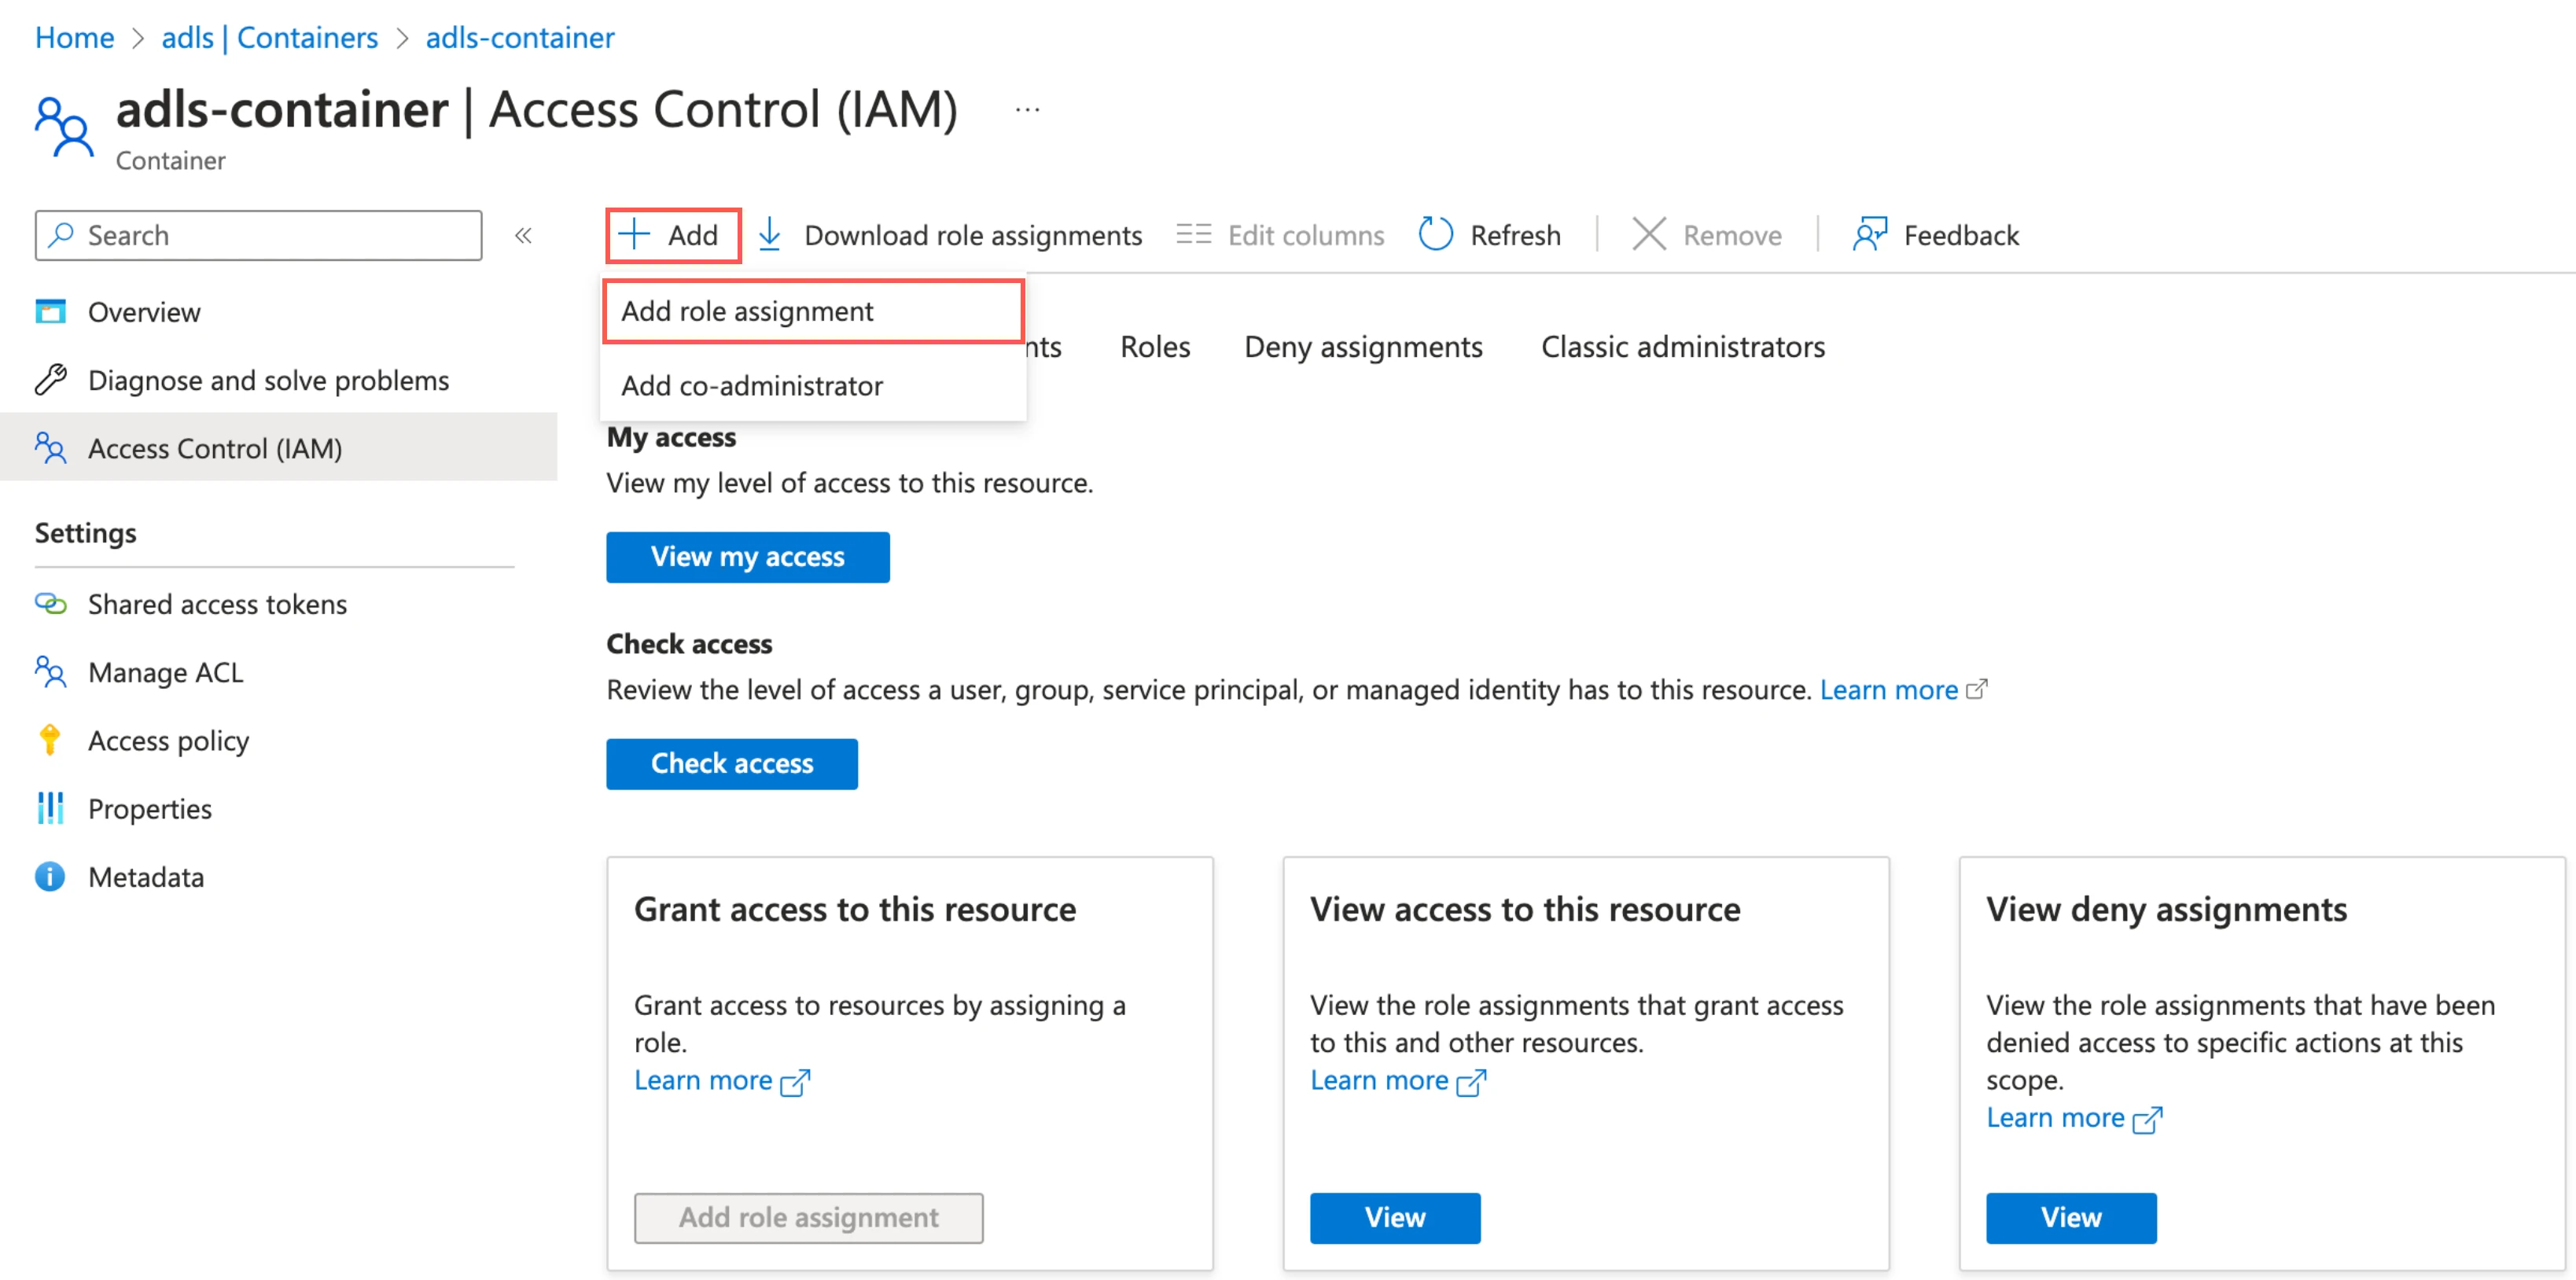
In the Role tab, select Storage Blob Data Contributor and click Next.
In the Member tab, select User, group, or service principal.
Click + Select members.
In the Select members pane, select the service principal you added and then click Select.
Click Review + assign.
(Optional) Set up Unity Catalog
Perform this step only if you want to integrate Databricks Unity Catalog to manage your Delta Lake tables. By default, we use the Fivetran Catalog to manage your Iceberg tables. For more information about catalogs, see our Catalogs documentation.
To create and manage your Delta Lake tables in Unity Catalog, you have two options:
- Automatic schema migration by Fivetran (recommended): Fivetran automatically creates and maintains your tables in Databricks without affecting sync performance
- Manual table management: You create and manage the tables manually in Databricks
Expand one of the following sections based on how you want to manage your tables in Databricks:
Setup instructions for automatic schema migration by Fivetran
To configure automatic schema migration, you need the following:
- A Databricks account.
- Unity Catalog enabled in your Databricks workspace
- A SQL warehouse. Legacy deployments can continue to use Databricks clusters with Databricks Runtime v7.0 or above.
Configure Unity Catalog
Skip this step if your Unity Catalog is already configured in Databricks.
Create storage account
You can use an Azure Blob Storage account or Azure Data Lake Storage Gen2 storage account for Unity Catalog.
Depending on the type of storage account you want to use, do one of the following:
Create an Azure Blob Storage account by following the instructions in Microsoft documentation.
Create an Azure Data Lake Storage Gen2 storage account by following the instructions in Microsoft documentation.
Create container
Depending on your storage account type, do one of the following:
Create a container in Azure Blob storage by following the instructions in Microsoft documentation.
Create a container in ADLS Gen2 storage by following the instructions in Microsoft documentation.
Configure managed identity for Unity Catalog
Perform this step only if you want to access the metastore using a managed identity.
You can configure Unity Catalog (Preview) to use an Azure managed identity to access storage containers.
To configure a managed identity for Unity Catalog, follow the instructions in Databricks documentation.
Create workspace
Log in to the Azure portal.
Create a workspace by following the instructions in Microsoft documentation.
Create metastore and attach workspace
Create a metastore and attach your workspace by following the instructions in Microsoft documentation.
Enable Unity Catalog for workspace
Enable Unity Catalog for your workspace by following the instructions in Microsoft documentation.
Configure external data storage
Skip this step if your external data storage is already configured in Databricks.
Create storage credentials
Log in to your Databricks workspace.
Go to Data Explorer > External Data.

Select Storage Credentials.

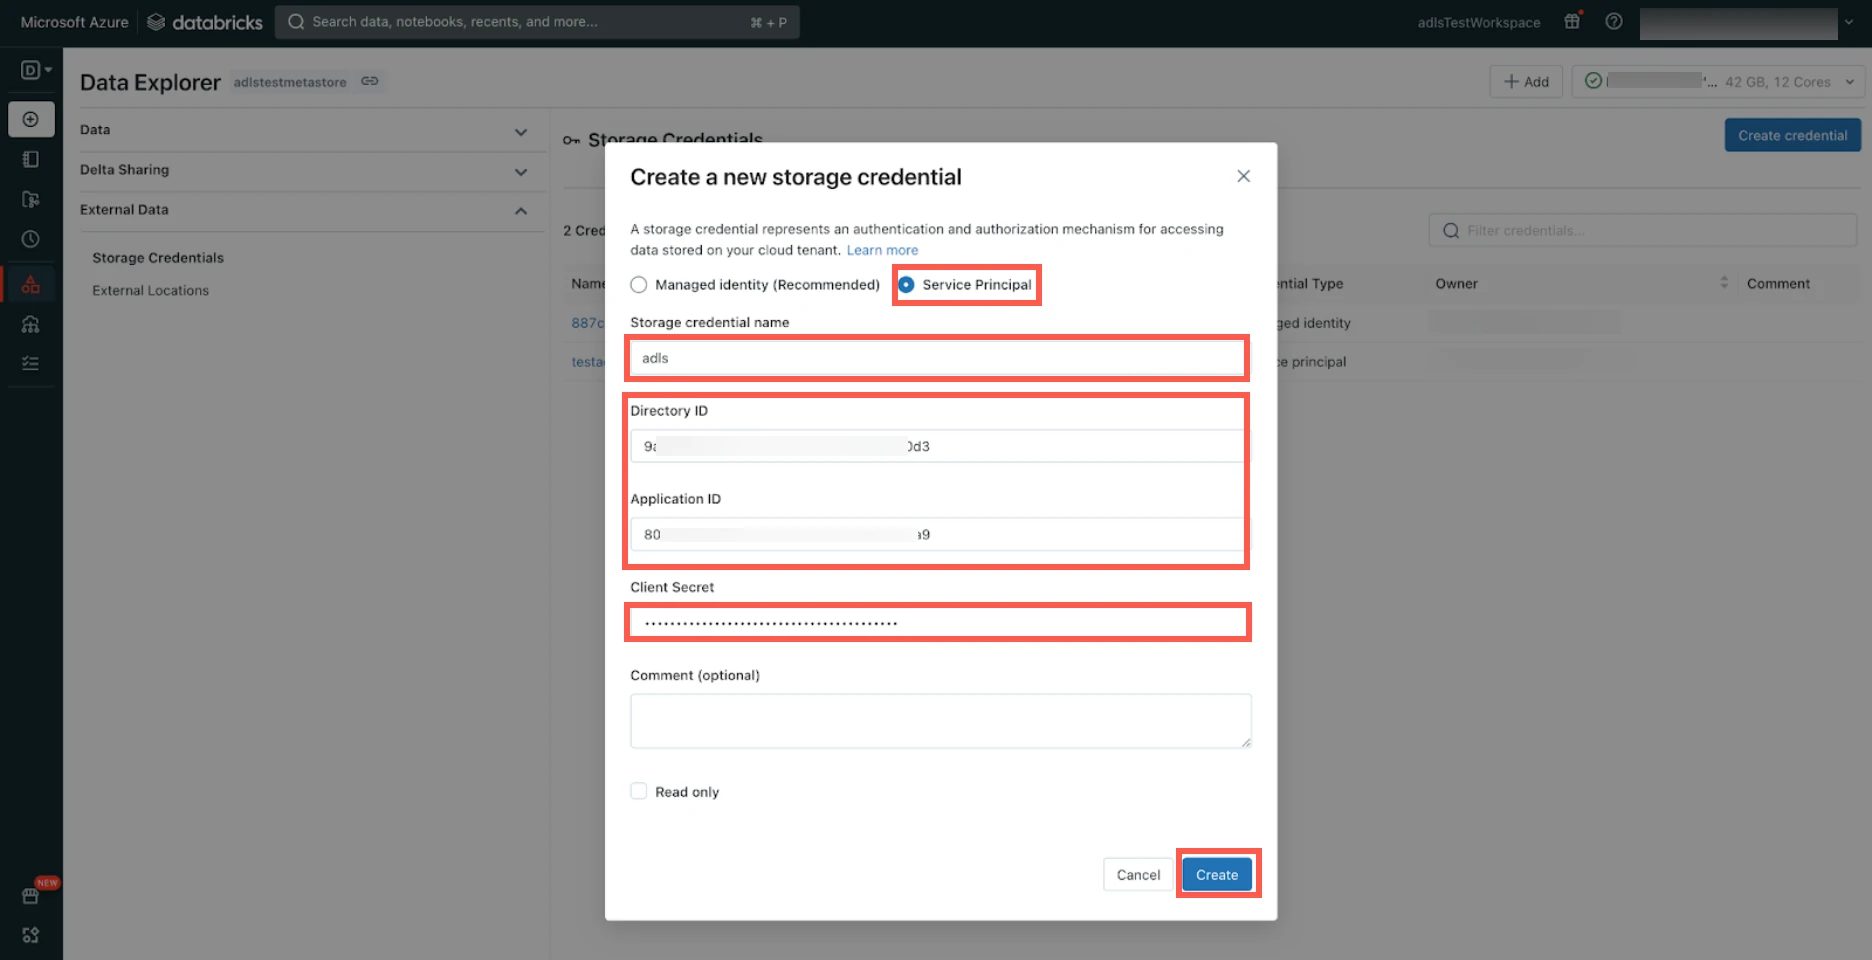
Click Add and then select Add a storage credential.
Select Service Principal.
Enter the Storage credential name of your choice.
Enter the Directory ID and Application ID of the service principal you created.
Enter the Client Secret you created.
Click Create.
You can also configure Unity Catalog to use an Azure managed identity for authenticating your storage account.
Create external location
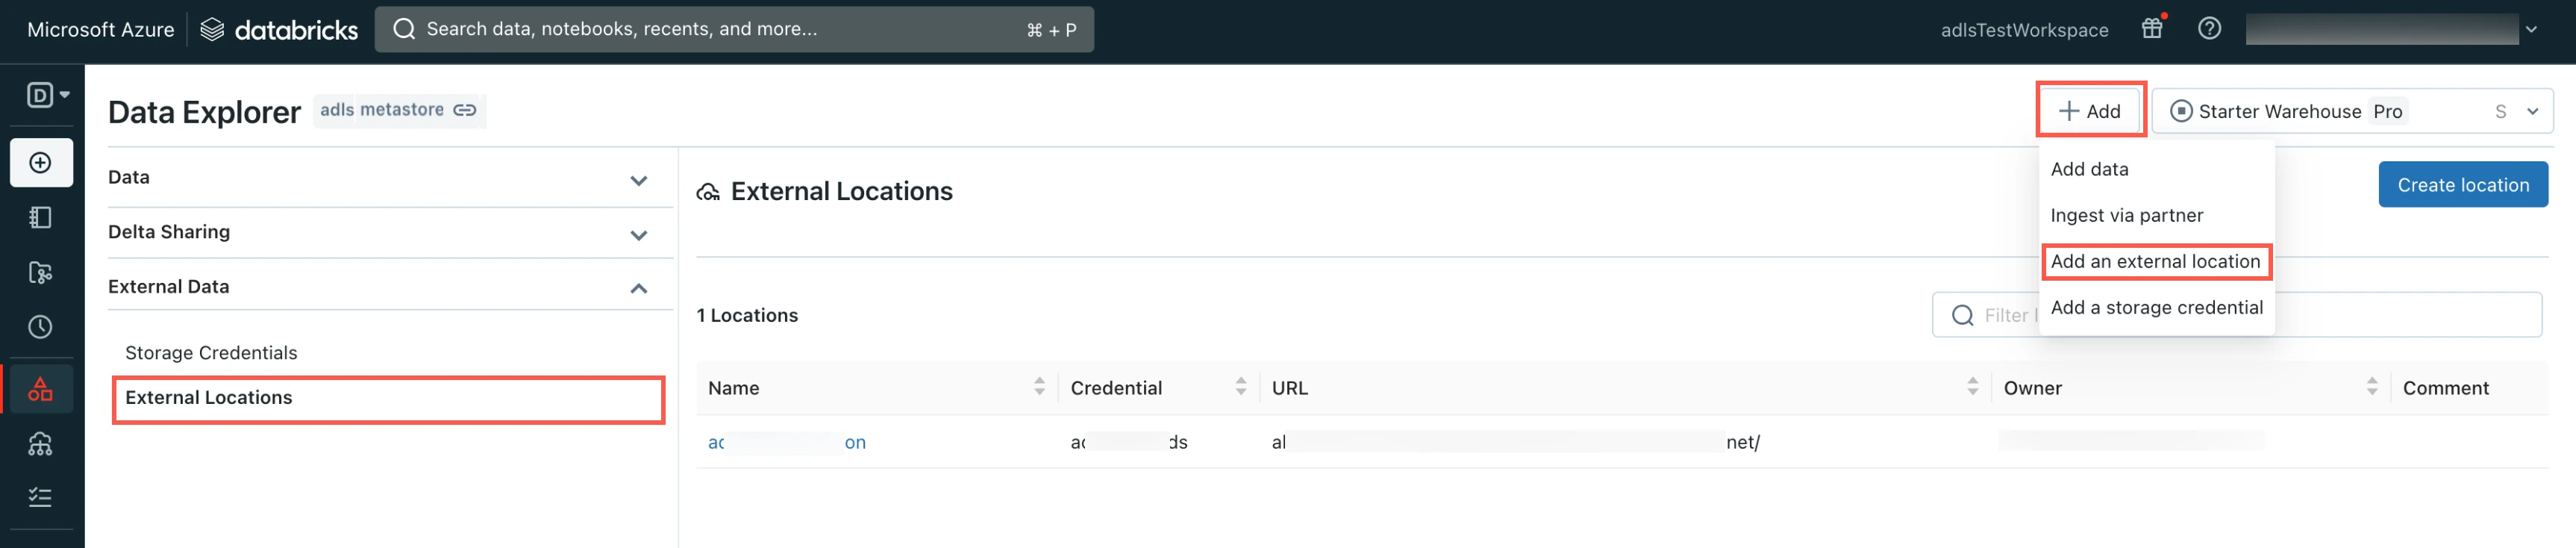
Go to the Data Explorer page.
In the Data Explorer page, select External Locations.

Click Add and then select Add an external location.
Enter the External location name.
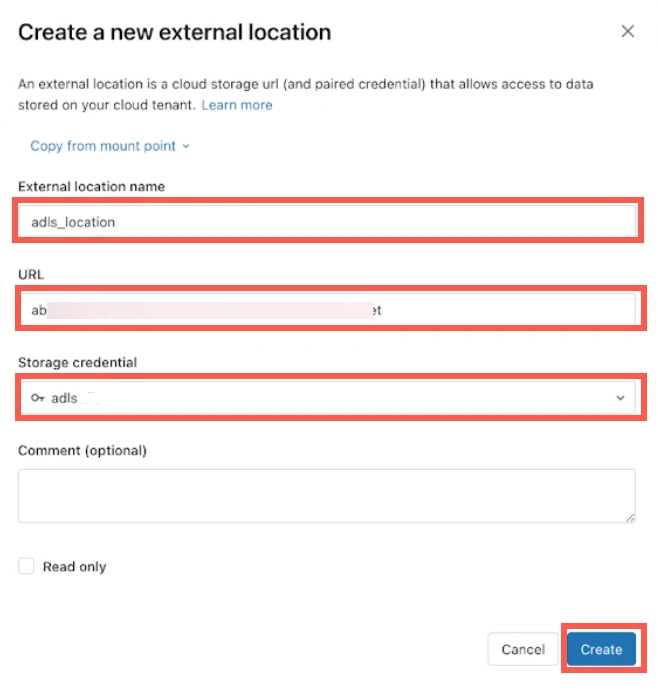
Enter your ADLS account URL.
Select the Storage credential you created in the Create storage credentials step.
Click Create.
Connect SQL warehouse or Databricks cluster
You can either use a Databricks SQL warehouse or Databricks cluster with Fivetran.
Connect SQL warehouse
Log in to your Databricks workspace.
In the Databricks console, go to SQL > Create > SQL Warehouse.
In the New SQL warehouse window, enter a Name for your warehouse.
Choose your Cluster Size and configure the other warehouse options.
We recommend that you start with the 2X-Small cluster size and scale up according to your workload demands.
Choose your warehouse Type:
- Serverless
- Pro
- Classic
The Serverless option appears only if serverless is enabled in your account. For more information about warehouse types, see Databricks documentation.
In the Advanced options section, set the Unity Catalog toggle to ON and set the Channel to Preview.
Click Create.
Go to the Connection details tab.
Make a note of the following values. You will need them to configure Fivetran.
- Server Hostname
- Port
- HTTP Path
Connect Databricks cluster
Log in to your Databricks workspace
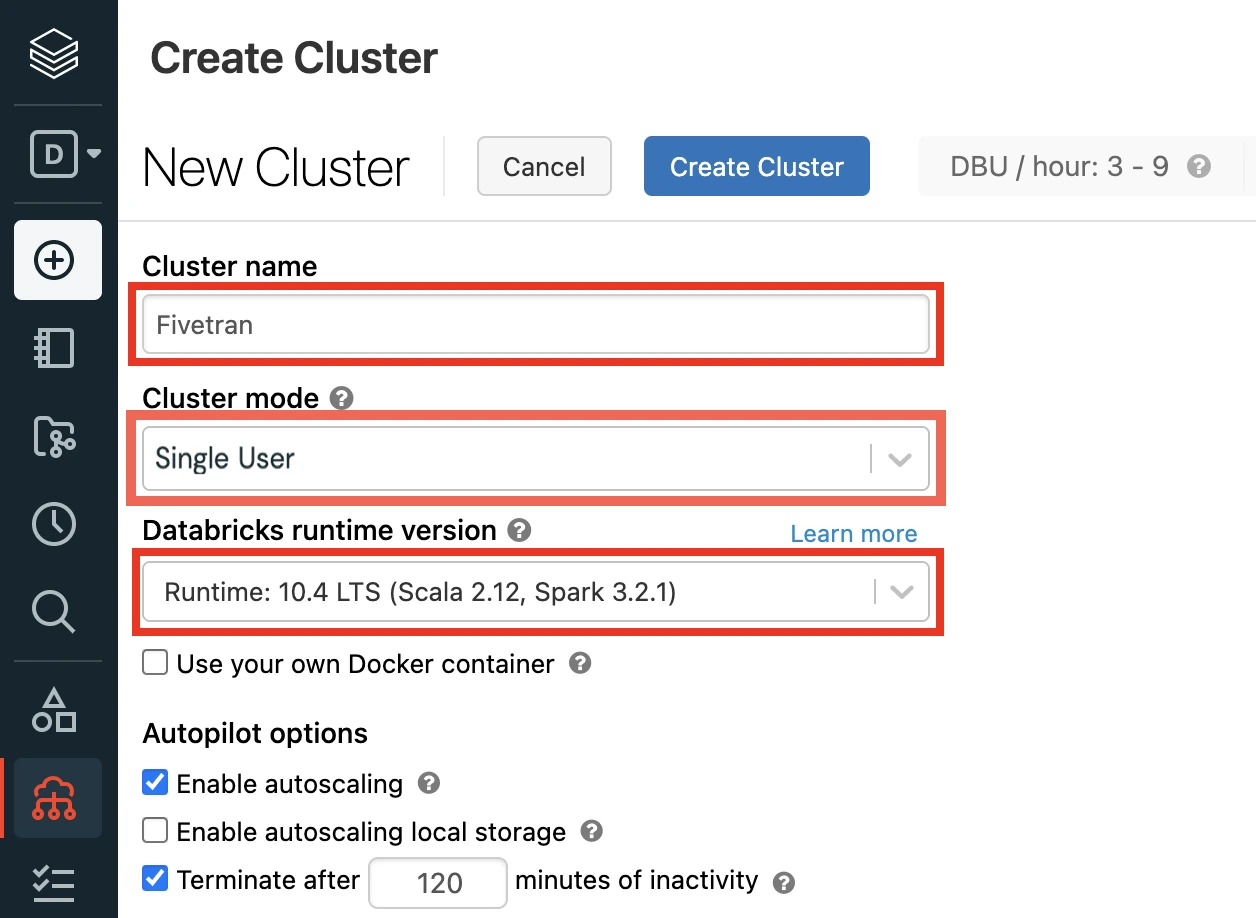
In the Databricks console, go to Data Science & Engineering > Create > Cluster.
Enter a Cluster name of your choice.
Set the Databricks Runtime Version to the latest LTS release.
Make sure you choose v7.3 or above.
Select the Cluster mode.
For more information about cluster modes, see Databricks documentation.
Set the Databricks Runtime Version to 7.3 or above (recommended version: 10.4).
In the Advanced Options window, in the Security mode drop-down menu, select either Single user or User isolation.
Click Create Cluster.
In the Advanced Options window, select JDBC/ODBC.
Make a note of the following values. You will need them to configure Fivetran.
- Server Hostname
- Port
- HTTP Path
Choose authentication type
You can use one of the following authentication types for Fivetran to connect to Databricks:
Databricks personal access token authentication
To use the Databricks personal access token authentication type, create a personal access token by following the instructions in Databricks documentation.
Assign the following catalog privileges to the user or service principal you want to use to create your access token:
- CREATE SCHEMA
- CREATE TABLE
- MODIFY
- REFRESH
- SELECT
- USE CATALOG
- USE SCHEMA
To create external tables in a Unity Catalog-managed external location, assign the following privileges to the user or service principal you want to use to create your access token:
- On the external location:
- CREATE EXTERNAL TABLE
- READ FILES
- WRITE FILES
- On the storage credentials:
- CREATE EXTERNAL TABLE
- READ FILES
- WRITE FILES
- On the external location:
When you grant a privilege on the catalog, it is automatically granted to all current and future schemas in the catalog. Similarly, the privileges that you grant on a schema are inherited by all current and future tables in the schema.
OAuth machine-to-machine (M2M) authentication
To use the OAuth machine-to-machine (M2M) authentication type, create your OAuth client ID and secret by following the instructions in Databricks documentation.
Setup instructions for manual table management
Create workspace
Login to the Azure portal.
Create a workspace by following the instructions in Databricks documentation.
Create Unity Catalog metastore
Create a metastore and assign a workspace to it by following the instructions in Databricks documentation.
Enable Unity Catalog for workspace
Enable Unity Catalog for your workspace by following the instructions in Databricks documentation.
Configure external data storage
Create storage credentials
Log in to your Databricks workspace.
Go to Data Explorer > External Data.
Select Storage Credentials.

Click Add and then select Add a storage credential.
Select Service Principal.
Enter the Storage credential name of your choice.
Enter the Directory ID and Application ID of the service principal you created for your data lake.
Enter the Client Secret you created for your data lake.
Click Create.
You can also configure Unity Catalog to use an Azure managed identity for authenticating your storage account.
Create external location
In the Data Explorer page, select External Locations.
Click Add and then select Add an external location.
Enter the External location name.
Enter your ADLS account URL.
Select the Storage credential you created in the Create storage credentials step.
Click Create.
Create notebook
Create a notebook by following the instructions in Databricks documentation.
You can create the notebook in any folder within your workspace.
Create external tables
To create an external table, execute the following SQL query from the notebook you created:
CREATE TABLE <catalog>.<schema>.<table>
USING delta
OPTIONS (
path 'abfss://<containerName>@<storageAccountName>.dfs.core.windows.net/<path-to-table>'
)
In the SQL query, replace the following placeholder values with your values:
| Placeholder Value | Actual Value |
|---|---|
<catalog> | Name of the catalog that contains the table. |
<schema> | Table schema name. |
<table_name> | Table name. |
<storageAccountName> | Your ADLS account name. |
<containerName> | Your ADLS container name. |
<path-to-table> | Path to the table within the ADLS container. |
You can use the decode(unhex(<column_name>), 'UTF-8') clause in your query to fetch the decoded values in BINARY columns.
(Optional) Set up OneLake
Perform this step only if you want to create OneLake shortcuts automatically for tables in the Fivetran Catalog. The Fivetran Catalog will manage your Iceberg tables, and they will be accessible as shortcuts from OneLake and Fabric. For more information about catalogs, see our Catalogs documentation.
Prerequisites
To connect OneLake to Fivetran, you need a Microsoft Fabric account.
Create service principal and client secret
Similar to steps 3 and 4, you must set up the service principal and client secret for OneLake access. You should assign the permissions listed below only when setting up a new service principal. Existing service principals already have these permissions.
Assign Storage Blob Delegator to the service principal at the storage account level as you did in the step 5 above.
Assign Storage Blob Data Reader to the service principal at the container level as you did in the step 6 above.
Create workspace
Log in to your Microsoft Fabric account.
Click the Settings icon and select Admin portal.
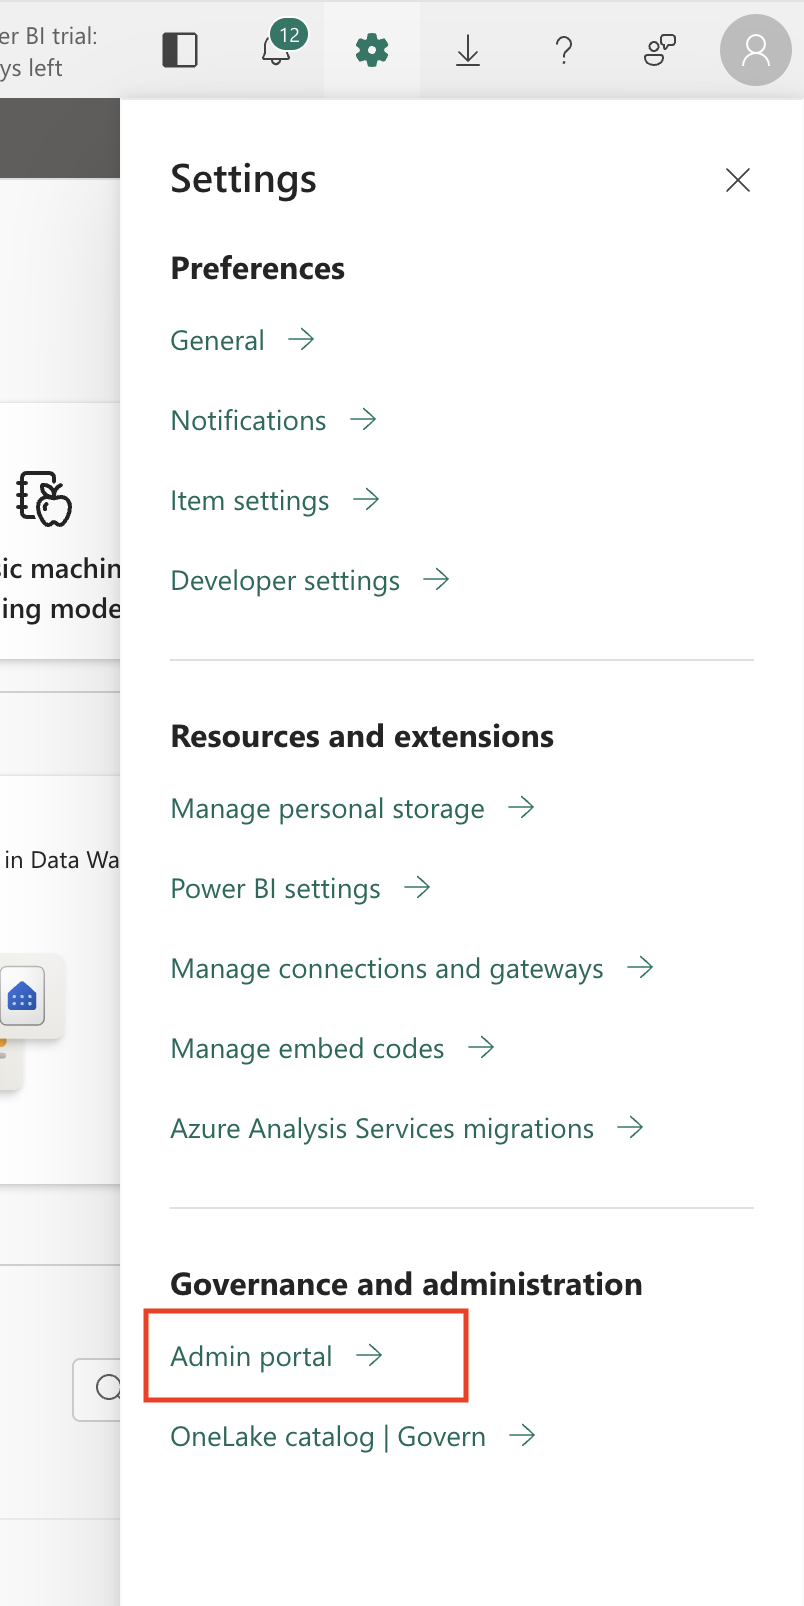
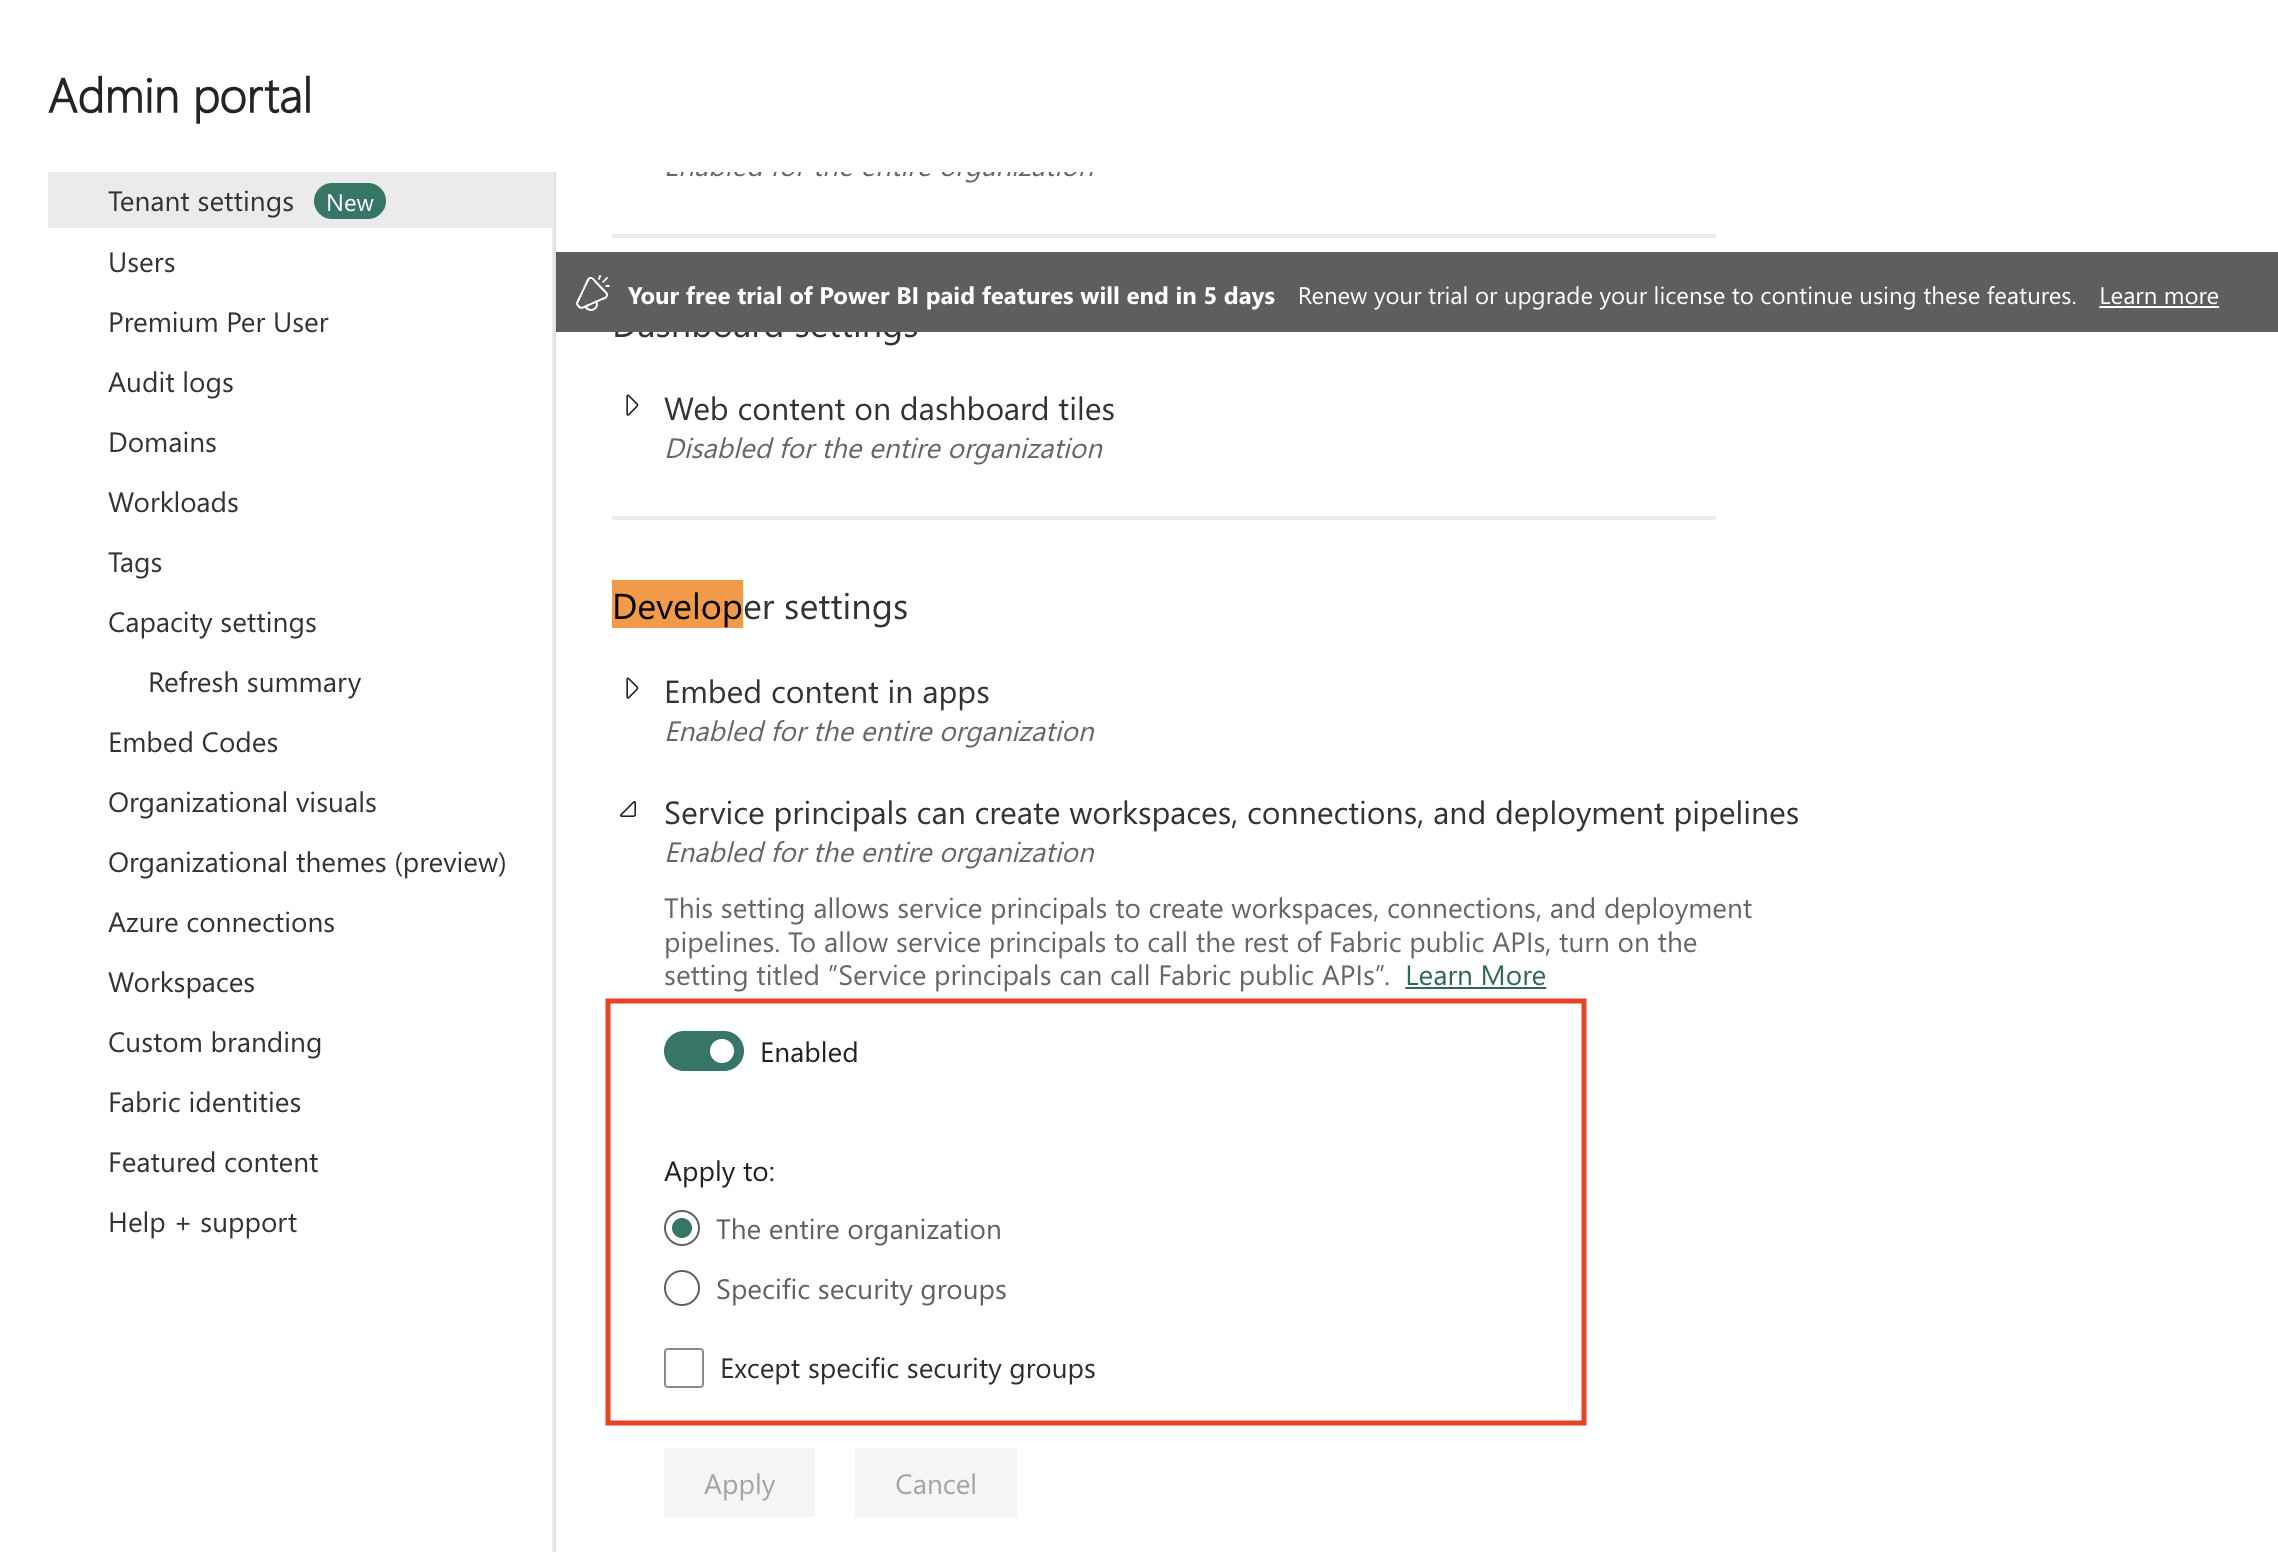
On the navigation menu, select Tenant settings.
In the Developer settings section, set the Service principals can create workspaces, connections and deployment pipelines toggle to Enabled. You can apply this setting to the entire organization, or you can create a security group in the Azure portal, add the service principal you created for OneLake to it, and then specify that security group here to limit access.
Set the Service principals can call Fabric public APIs toggle to Enabled. You can apply this setting either to the entire organization or to the security group that has the OneLake service principal you created.

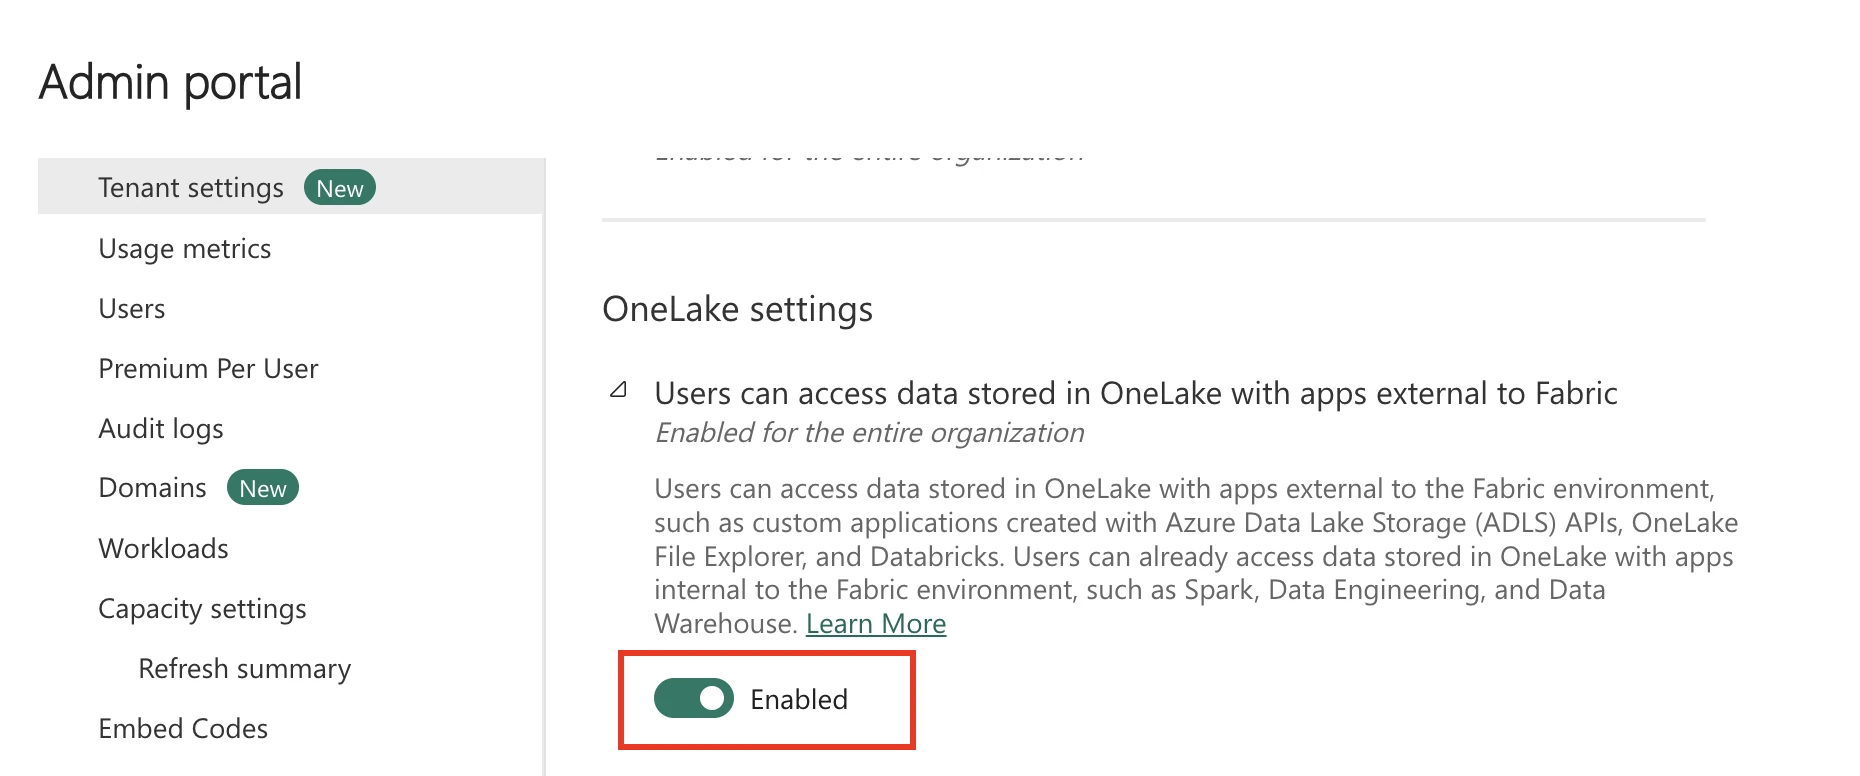
In the OneLake settings section, set the Users can access data stored in OneLake with apps external to Fabric toggle to Enabled.
On the navigation menu, click Workspaces and then click + New workspace.
Enter a Name for the workspace.
Click Apply.
Add service principal to workspace
Select the workspace you created and then click Manage Access.

Click + Add people or groups.
Specify the name of the service principal you created for OneLake above.
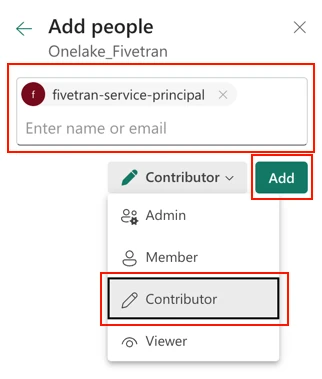
In the drop-down menu, select Contributor.
Click Add.
Create lakehouse
On the navigation menu, click New item.
In the Store data section, click Lakehouse.
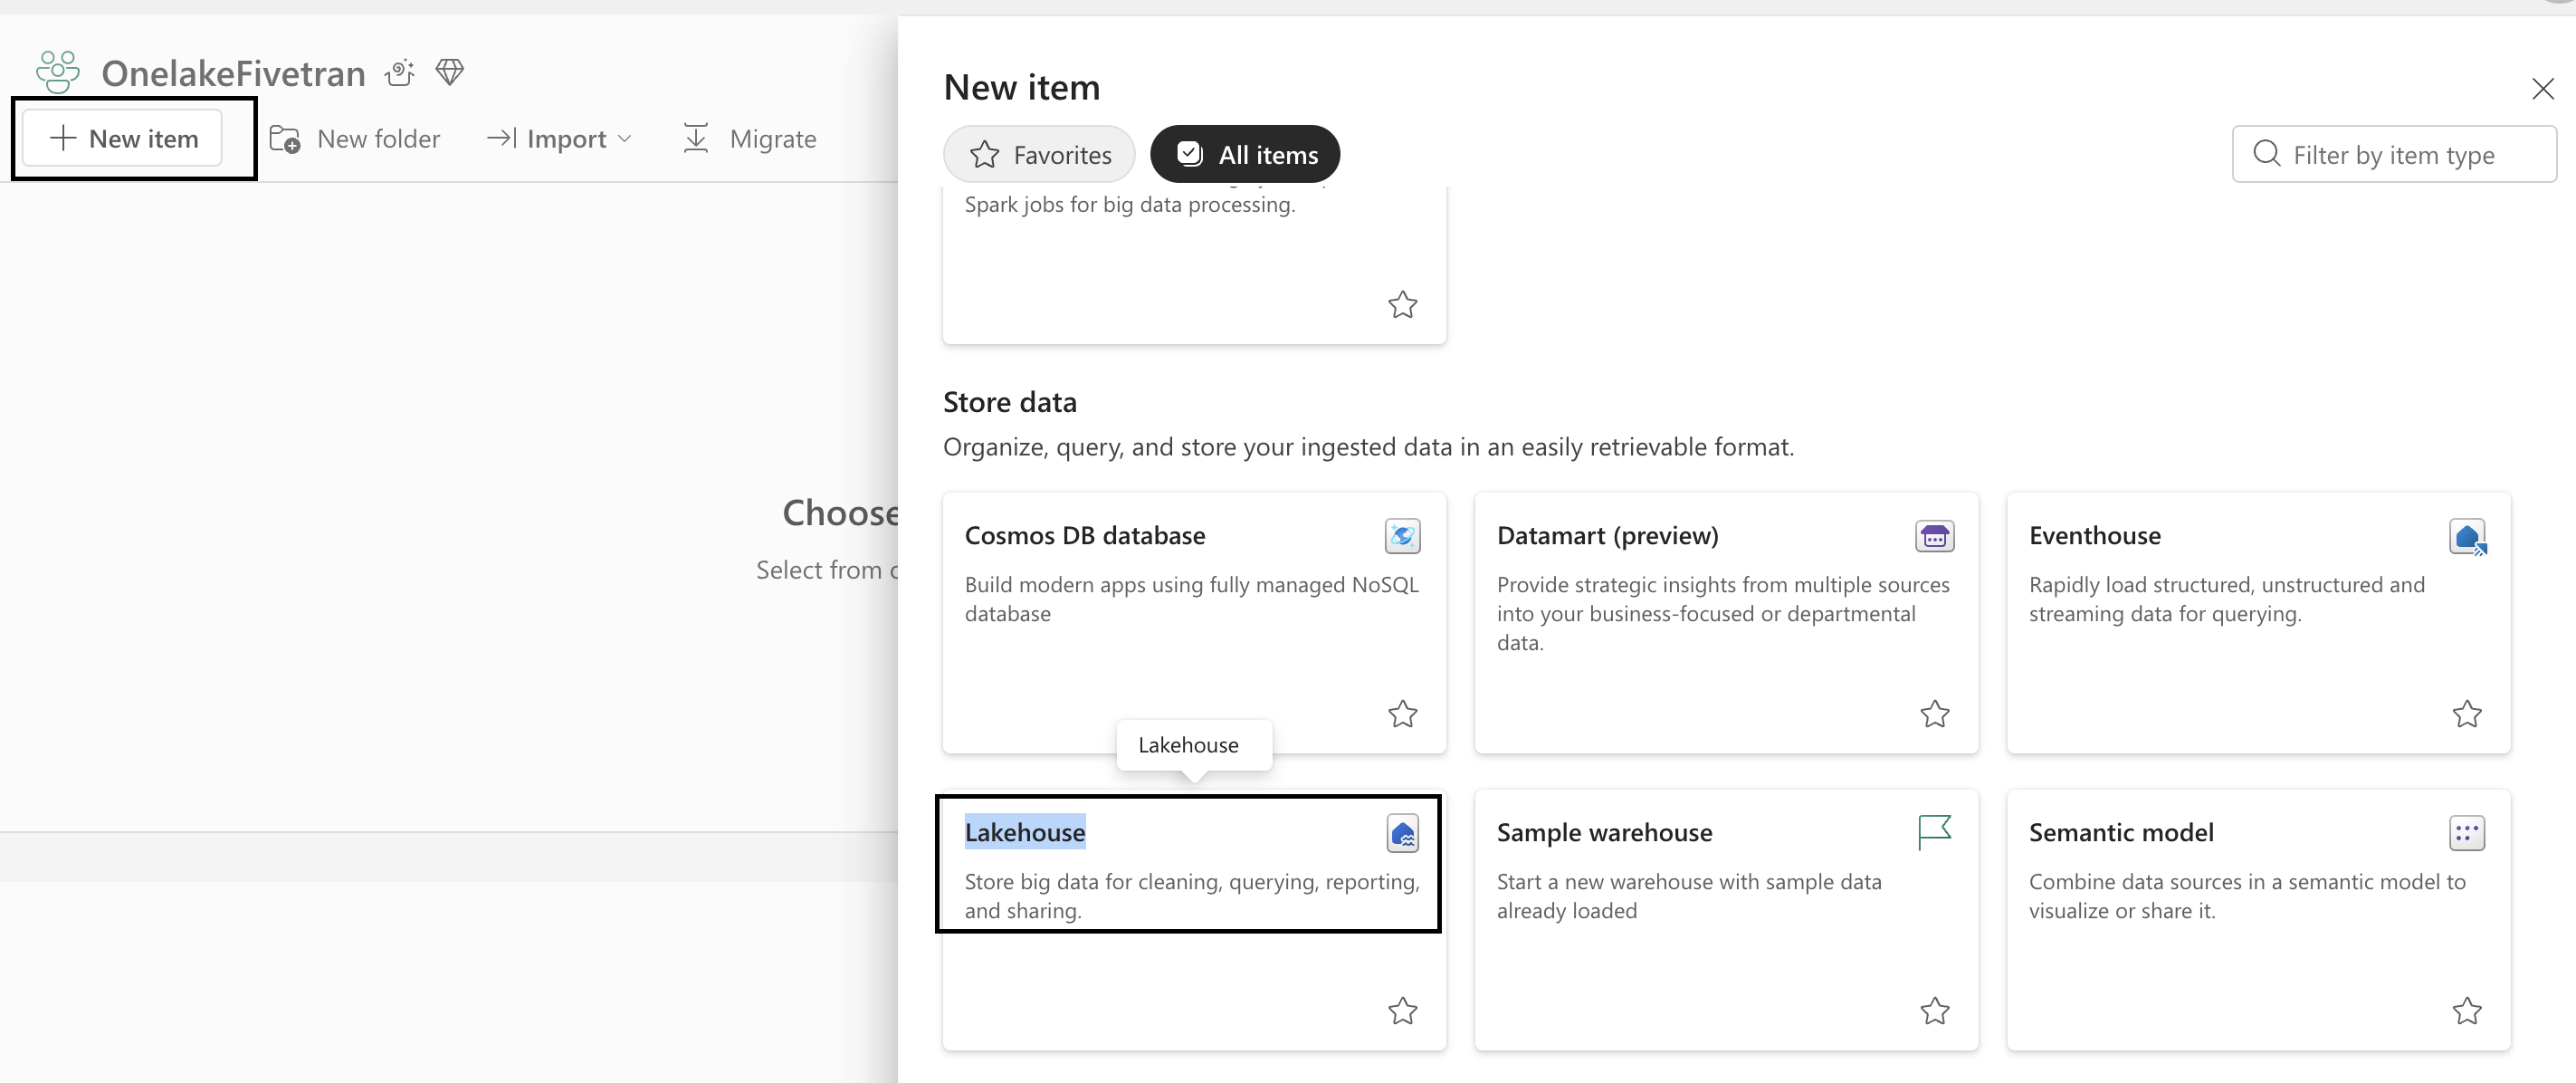
Enter a unique Name for your lakehouse and click Create.
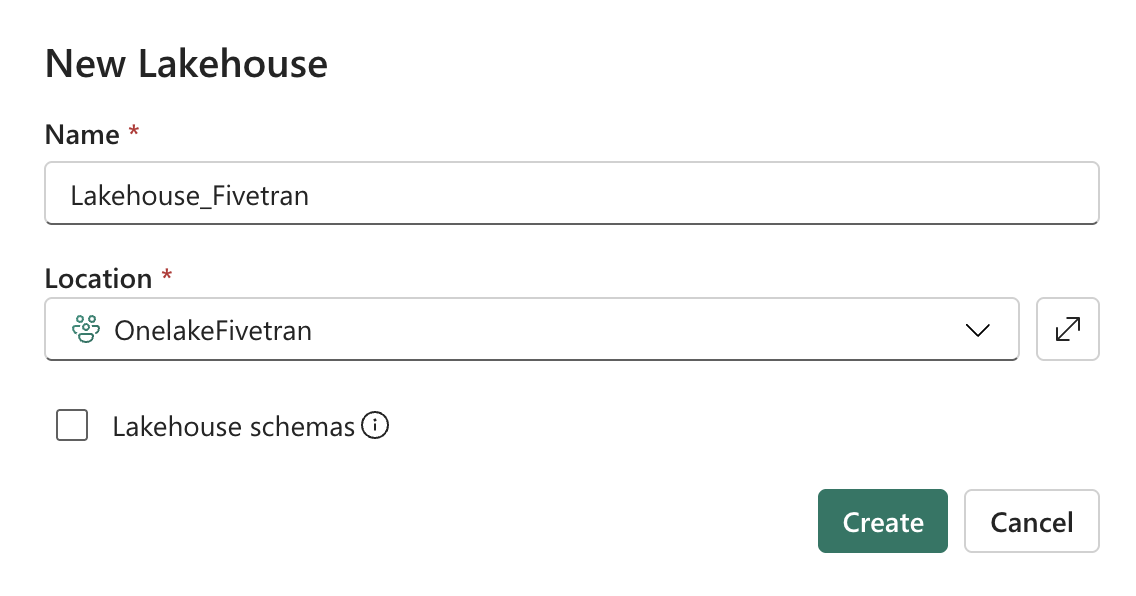
Deselect the Lakehouse Schemas checkbox. We do not support Lakehouse schemas.
Find your workspace GUID and lakehouse GUID from your OneLake URL. For example, if your URL is
https://app.fabric.microsoft.com/groups/8abcd51a-b101-41ee-a51a-56abf5abf7fd/lakehouses/c3f2db7-4d70-45ab-b824-69389a4babcd?experience=data-engineering, then your workspace GUID is8abcd51a-b101-41ee-a51a-56abf5abf7fdand your lakehouse GUID isc3f2db7-4d70-45fe-b824-69389e4babcd.Make a note of the workspace GUID and lakehouse GUID. You will need them to configure Fivetran.
Enable Fabric access when public networking is disabled
If public networking is disabled on your storage account, you can Set up a Trusted Workspace in Azure to connect Fabric to your storage account.
To do this, perform the following steps mentioned in this Microsoft document:
Create a Workspace identity.
Grant the Fabric Workspace Identity Access to the Storage Account.
Enable Trusted Workspace Access.
Deploying the ARM Template.
(Optional) Configure Azure private networking
- You must have a Business Critical plan to use Azure Private Networking.
- If your storage account has private endpoints configured, you must use Azure private endpoints to connect Fivetran to your container. To verify, go to your storage account in the Azure portal and check the Networking section for any listed private endpoints. We recommend following our instructions in this step to create your private endpoint correctly.
Azure private endpoints allows Virtual Networks (VNets) and Azure-hosted or on-premises services securely without exposing traffic to the public internet. Azure private endpoints offer a more secure connection method than a direct public connection.
Prerequisites
To set up Azure private endpoints, you need a Fivetran instance configured to run in Azure.
Setup instructions
Go to the storage account you created.
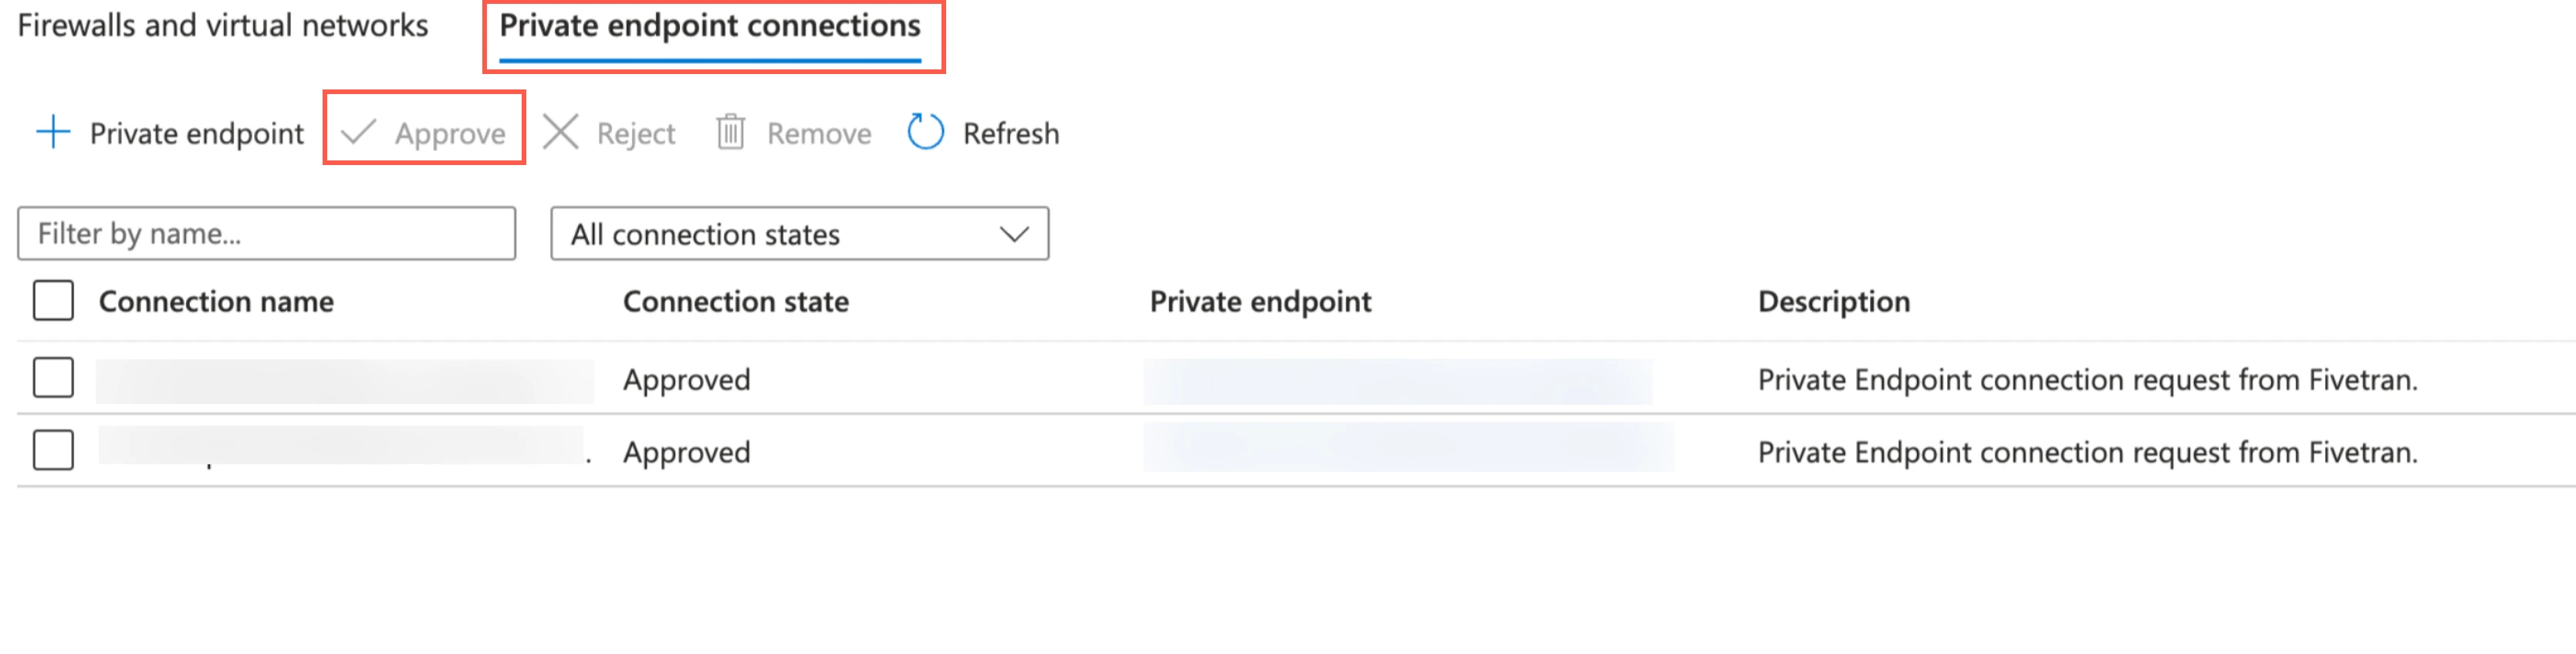
On the navigation menu, click Settings > Endpoints.
Make a note of the Storage account resource ID and provide it to your Fivetran account manager.
We set up a private endpoint connection for both the
blobanddfsendpoints since Azure storage uses different private endpoints for different operations. For more information, see Microsoft's documentation to understand how Azure Storage uses private endpoints.Once your account manager confirms that the setup was successful, verify and approve both the endpoint connection requests from Fivetran. Fivetran then completes the private endpoint setup for your data lake.
Complete Fivetran configuration
Log in to your Fivetran account.
Go to the Destinations page and click Add destination.
Enter a Destination name of your choice and then click Add.
Click Set up for Azure Data Lake Storage.
In the Storage Provider drop-down menu, select Azure Data Lake Storage.
Enter the Storage Account Name.
You cannot change the storage account name after you save the setup form.
Enter the Container Name you found.
You cannot change the container name after you save the setup form.
In the Prefix Path, enter the virtual folder path (blob name prefix) within your ADLS container where you want Fivetran to store your data. Fivetran will automatically create this folder path in your container.
You cannot change the prefix path after you save the setup form.
Enter the Tenant ID and Client ID you found.
In the Secret Value field, enter the client secret you found.
Choose your Connection Method:
- Connect directly
- Connect via private networking
The Connect via networking option is only available for Business Critical accounts.
(Optional) To enable automatic schema migration of Delta Lake tables to Unity Catalog, set the Update Databricks Unity Catalog toggle to ON and do the following
i. Choose the Databricks Connection Method.
ii. Enter the following details of your Databricks account:
- Catalog name
- Server Hostname
- Port number
- HTTP Path
iii. Select the Authentication Type you configured.
iv. If you selected PERSONAL ACCESS TOKEN as the Authentication Type, enter the Personal Access Token you created.
v. If you selected OAUTH 2.0 as the Authentication Type, enter the OAuth 2.0 Client ID and OAuth 2.0 Secret you created.
(Optional) To enable shortcut creation in OneLake, set the Create shortcuts for your table in OneLake toggle to ON and enter the following details of your OneLake account:
- Workspace GUID
- Lakehouse GUID
- OneLake Authentication Type Only use Workspace Identity as authentication type if you have set up trusted workspace.
- Tenant ID
- Client ID
- Secret Value
After you save the setup form, you can't change the Create shortcuts for your table in OneLake toggle. If you save it OFF, you can't enable it later. If you save it ON, you can only update the Secret Value.
In the Snapshot Retention Period drop-down menu, select how long you want us to retain your table snapshots.
We perform regular table maintenance operations to delete the table snapshots that are older than the retention period you select in this field. You can select Retain All Snapshots to disable the deletion of table snapshots.
Choose your Data processing location.
All Fivetran pricing plans allow you to select a data processing location.
Choose the Azure Region where you want to run the Fivetran services.
- The Azure Region drop-down menu is available only for Business Critical accounts.
- We recommend selecting the same Azure Region as your storage account. This configuration provides the following benefits:
- Improved performance
- Reduced data egress charges (egress rates vary by region, geography, and cloud storage provider)
- Network traffic automatically uses Azure Virtual Network Service Endpoints
- The default Fivetran processing cloud provider for ADLS data lakes is Azure.
Choose your Time zone.
Click Save & Test.
Fivetran tests and validates the data lake connection. On successful completion of the setup tests, you can sync your data using Fivetran connectors to your data lake.
In addition, Fivetran automatically configures a Fivetran Platform Connector to transfer the connection logs and account metadata to a schema in this data lake. The Fivetran Platform Connector enables you to monitor your connections, track your usage, and audit changes. The Fivetran Platform Connector sends all these details at the destination level.
If you are an Account Administrator, you can manually add the Fivetran Platform Connector on an account level so that it syncs all the metadata and logs for all the destinations in your account to a single destination. If an account-level Fivetran Platform Connector is already configured in a destination in your Fivetran account, then we don't add destination-level Fivetran Platform Connectors to the new destinations you create.
Setup tests
Fivetran performs the following ADLS connection tests:
- The Input Validation test ensures prefix path and storage name don't have invalid characters.
- The Storage Blob Delegator test checks whether the service principal has the Storage Blob Delegator role assigned at the storage account level.
- The Read and Write Access test verifies access to your ADLS Gen2 container and validates the ADLS credentials provided in the setup form.
- The ADLS Private Link test validates if you have approved the private endpoint connection requests from Fivetran. We perform this test only if you have opted to connect through private networking.
- The Validate Permissions test Checks whether the Databricks credentials have the necessary READ/WRITE permissions to CREATE, ALTER, or DROP tables in the database. This test runs only if you opt to automate schema migration for Delta Lake tables in Databricks.
Setup instructions for GCS
Setup instructions for GCS
For a visual walkthrough, watch the Set Up Google Cloud Storage Data Lake video tutorial.
Prerequisites
To connect your GCS data lake to Fivetran, you need:
- a Google Cloud account with access to the Google Cloud console
- a Google Cloud project
resourcemanager.projects.setIamPolicypermission for the project to configure IAM roles and access controls
Find Fivetran service account name
Log in to your Fivetran account.
Go to the Destinations page and click Add destination.
Enter a Destination name of your choice and then click Add.
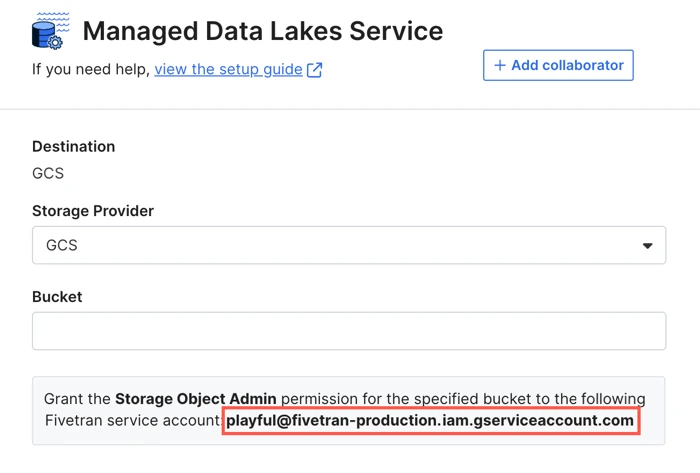
Click Set up for Google Cloud Storage.
In the Storage Provider drop-down menu, select GCS.
Make a note of the Fivetran service account name. You will need it to create your Cloud Storage bucket and set up your BigLake metastore.
Create Google Cloud Storage bucket
- Create a bucket in your Google Cloud project by following the instructions in Google Cloud documentation. Make sure your GCS bucket name and the prefix path where you want to load your data does not contain any of these special characters - ['#', '%', '^', '{', '}', '[', ']', '"', '?', '|', '', ' '];
- Make a note of the bucket name. You will need it to configure Fivetran.
- Grant the
Storage Object Adminrole for the bucket to the Fivetran service account you found.
(Optional) Set up BigLake metastore
Perform this step only if you want to integrate BigLake metastore to manage your Iceberg tables. By default, we use the Fivetran Catalog to manage your Iceberg tables. For more information about catalogs, see our Catalogs documentation.
Log in to the Google Cloud console.
Select your project.
Make note of your Project ID. You will need it to configure Fivetran.
Grant the Fivetran service account the required IAM permissions using either one of the following options:
Option 1: Use a built-in role for quick setup
Use this option for a quick setup without fine-grained access control.
- On the navigation menu, go to IAM & Admin > IAM.
- In the View by principals tab, click Grant access.
- In the Add principals field, enter the Fivetran service account name you found.
- In the Assign roles drop-down menu, select BigQuery Admin or BigQuery Data Editor.
- Click Save.
Option 2: Create a custom role for a least privilege setup
Use this option to follow the principle of least privilege by creating a custom role with only the permissions required by Fivetran.
Create custom role
- On the Navigation menu, go to IAM & Admin > Roles.
- Click + Create custom role.
- In the Title field, enter
Fivetran BigLake Admin. - Click + Add permissions and add the following permissions:
biglake.catalogs.getbiglake.databases.createbiglake.databases.getbiglake.databases.updatebiglake.tables.createbiglake.tables.getbiglake.tables.updatebigquery.datasets.create
- Click Create.
Assign custom role
On the navigation menu, go to IAM & Admin > IAM.
In the View by principals tab, click Grant access.
In the Add principals field, enter the Fivetran service account name you found.
In the Assign roles drop-down menu, select the
Fivetran BigLake Adminrole you created.(Optional) To restrict which BigQuery datasets Fivetran can access, click + Add IAM condition and enter the following condition expression:
resource.name.extract('/datasets/{name}').startsWith('fivetran_') ||
resource.name.extract('/datasets/{name}').startsWith('<dataset>')
Replace
<dataset>with the name of your dataset prefix. The first clause covers all datasets Fivetran creates by default (prefixed withfivetran_). The second clause allows you to include any additional dataset prefixes specific to your setup.IAM conditions on the
bigquery.datasets.createpermission are evaluated against the resource name of the dataset being created. Omit the condition if you want Fivetran to be able to create datasets without restriction.Click Save.
Complete Fivetran configuration
In the Fivetran dashboard, go to the destination setup form.
Enter your Google Cloud Storage Bucket name.
In the GCS Prefix Path field, enter the prefix of your Cloud Storage bucket where you want Fivetran to store your data. Fivetran will automatically create this prefix path in your bucket.
You cannot change the prefix path after you save the setup form.
(Optional) To integrate BigLake metastore with your data lake, set the Update BigLake Metastore toggle to ON and do the following:
i. Enter the Google Cloud Project ID you found.
ii. In the GCS Bucket Region drop-down menu, select the region where your bucket is hosted.
In the Snapshot Retention Period drop-down menu, select how long you want us to retain your table snapshots.
We perform regular table maintenance operations to delete the table snapshots that are older than the retention period you select in this field. You can select Retain All Snapshots to disable the deletion of table snapshots.
Choose your Data processing location.
All Fivetran pricing plans allow you to select a data processing location.
Choose the GCP Region where you want to run the Fivetran services.
- The GCP Region drop-down menu is available only for Business Critical accounts.
- We recommend selecting the same GCP Region as your storage account. This configuration provides the following benefits:
- Improved performance
- Reduced data egress charges (egress rates vary by region, geography, and cloud storage provider)
- Network traffic automatically uses Private Google Access
- The default Fivetran processing cloud provider for GCS data lakes is GCP.
Choose your Time zone.
Click Save & Test.
Fivetran tests and validates the data lake connection. On successful completion of the setup tests, you can sync your data using Fivetran connectors to your data lake.
In addition, Fivetran automatically configures a Fivetran Platform Connector to transfer the connection logs and account metadata to a schema in this data lake. The Fivetran Platform Connector enables you to monitor your connections, track your usage, and audit changes. The Fivetran Platform Connector sends all these details at the destination level.
If you are an Account Administrator, you can manually add the Fivetran Platform Connector on an account level so that it syncs all the metadata and logs for all the destinations in your account to a single destination. If an account-level Fivetran Platform Connector is already configured in a destination in your Fivetran account, then we don't add destination-level Fivetran Platform Connectors to the new destinations you create.
Setup tests
Fivetran performs the following GCS connection tests:
- The Input Validation test ensures prefix path and storage name don't have invalid characters.
- The GCS Read and Write Access test verifies access to your Cloud Storage bucket.
- The BigLake Metastore Access test verifies access to the BigLake metastore you want to integrate with your data lake. We perform this test only if you set the Update BigLake Metastore toggle to ON.
Legal notices
Apache Iceberg is a trademark of the Apache Software Foundation.