Managed Data Lake Service
Managed Data Lake Service provides a flexible way to use a Fivetran-managed data lake as the destination for your data. With Managed Data Lake Service, your data remains in your cloud storage account (Google Cloud Storage, AWS S3, or Azure Data Lake Storage), while Fivetran organizes, structures, and maintains it in open table formats.
Open formats and a structured layout prevent vendor lock-in and keep your data accessible across a wide range of tools and query engines. This approach gives you a structured, well-governed data lake without the operational overhead. It also creates a scalable foundation for downstream analytics, AI, BI, and other data workflows. Compatible engines can query the same data directly, which helps you avoid the cost and complexity of duplicating or re-ingesting data across systems.
Supported storage providers
Managed Data Lake Service supports data lakes built using the following storage providers:
Overview
Fivetran ingests data from your source systems, processes it through the Fivetran pipeline, and writes it to cloud object storage using open table formats. Your storage bucket serves as the underlying storage layer, while we manage the table structure, metadata, catalogs, and maintenance operations.
Metadata catalogs make the data lake tables discoverable and queryable across supported engines. By default, Fivetran manages metadata through the Fivetran Catalog. The Fivetran Catalog provides a catalog service for Apache Iceberg™ tables. It is based on the open-source Iceberg REST protocol and is offered as a managed implementation of Apache Polaris™. which is accessible to any Iceberg REST Catalog client. You can also configure Managed Data Lake Service to use another supported catalog service. For more information about the catalogs we support and how catalogs work with the service, see our Catalogs documentation.
This architecture gives you the flexibility of cloud object storage with the usability of managed tables. You retain control of the underlying storage, while Fivetran handles the metadata and maintenance required to keep the data reliable and ready for use.
Fivetran also performs ongoing table maintenance to keep your data lake reliable and performant over time. For more information, see the Table maintenance operations section of this page.
Architecture
Managed Data Lake Service uses a consistent architecture across supported cloud providers. The following diagrams show the Managed Data Lake Service architecture for each supported cloud storage provider. Each diagram applies to Amazon S3 (AWS), Azure Data Lake Storage (ADLS), or Google Cloud Storage (GCS) and shows the cloud-native catalog integration for that provider. Fivetran also supports optional catalog integrations across all cloud storage providers, including Databricks Unity Catalog and Snowflake catalog-linked databases.
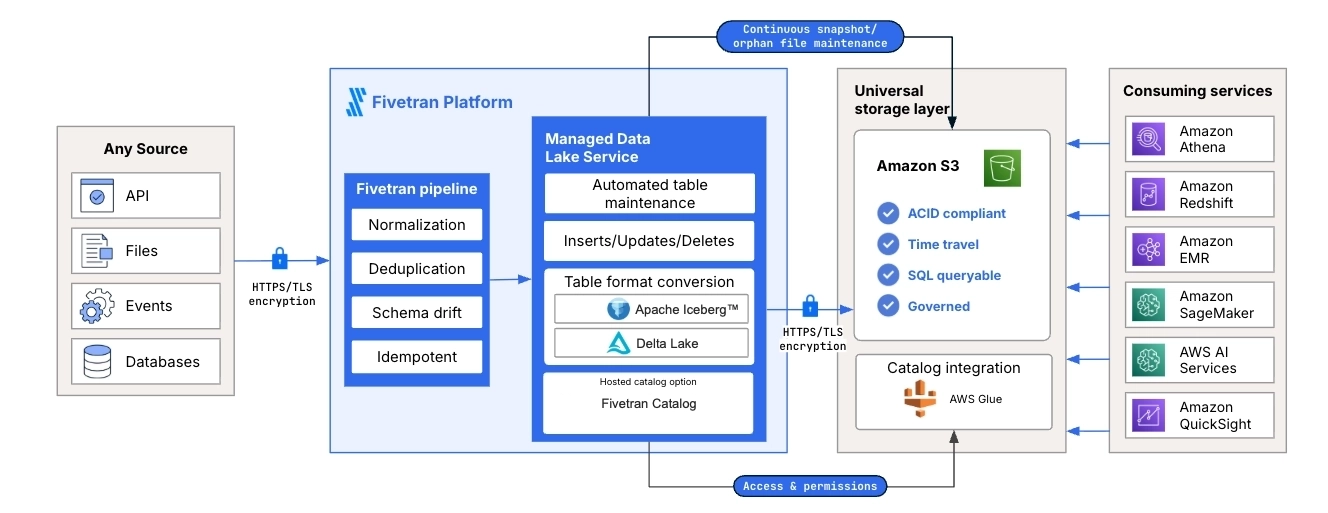
AWS
The following diagram shows how Managed Data Lake Service operates on AWS. Fivetran ingests data from supported sources, processes the data through the Fivetran pipeline, and stores the data in Amazon S3 as managed lake tables. The diagram also shows AWS Glue as the cloud-native catalog integration and shows how downstream services can use the data for querying, analytics, machine learning, and further processing.
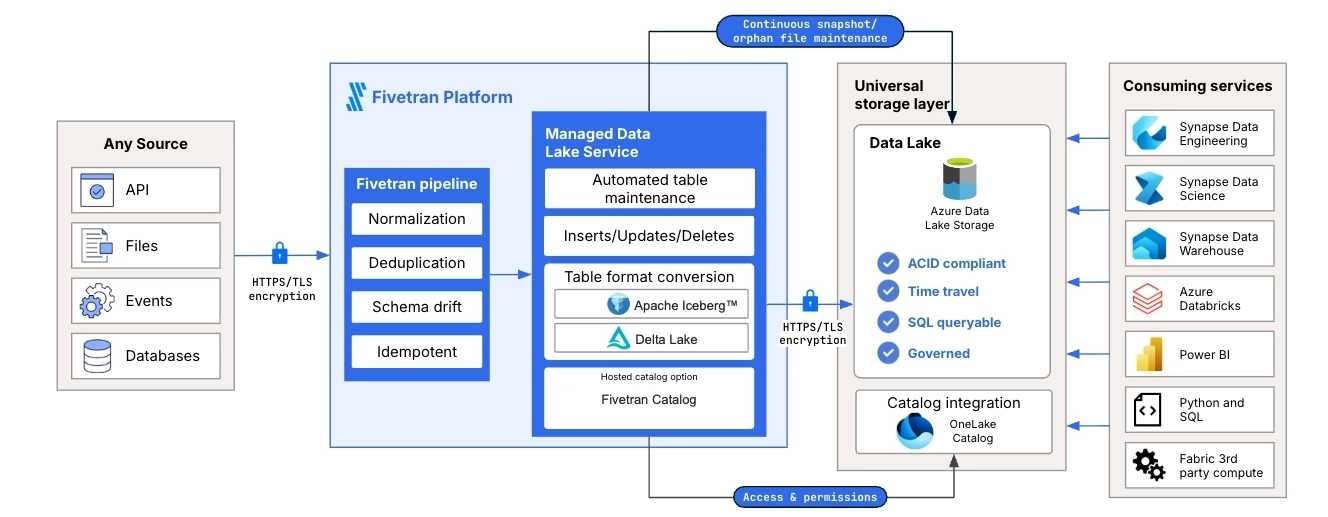
ADLS
The following diagram shows how Managed Data Lake Service operates on ADLS. Fivetran ingests data from supported sources, processes the data through the Fivetran pipeline, and stores the data in Azure Data Lake Storage as managed lake tables. The diagram also shows OneLake Catalog as the cloud-native catalog integration and shows how downstream services, such as Synapse, Azure Databricks, and Power BI, can use the data.
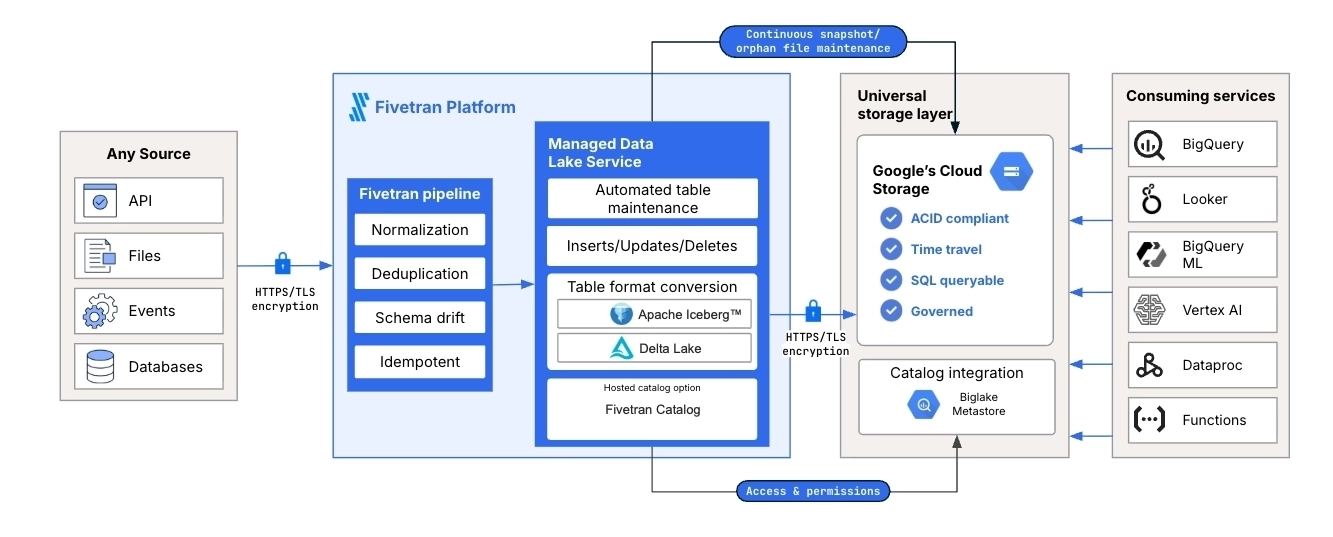
GCS
The following diagram shows how Managed Data Lake Service operates on GCS. Fivetran ingests data from supported sources, processes the data through the Fivetran pipeline, and stores the data in Google Cloud Storage as managed lake tables. The diagram also shows BigLake Metastore as the cloud-native catalog integration and shows how downstream services, such as BigQuery, Looker, Vertex AI, and Dataproc, can use the data.
Supported query engines
You can use various query engines to retrieve data from your data lake. The following table provides examples of query engines you can use for each data lake:
| Query Engine | AWS | ADLS | GCS |
|---|---|---|---|
| Amazon Athena | |||
| Apache Spark | |||
| Azure Synapse Analytics | |||
| Bauplan | |||
| BigQuery | |||
| Databricks | |||
| DuckDB | |||
| Dremio | |||
| Redshift | |||
| Snowflake | |||
| Starburst Galaxy |
For more information about the query engines you can use, see Apache Iceberg and Delta Lake documentation. If you fail to retrieve your data using the query engine of your choice, contact our support team.
Data and table formats
Fivetran organizes your data in a structured format within the data lake. We convert your source data into Parquet files within the Fivetran pipeline and store them in designated tables in your data lake. We support Delta Lake and Iceberg table formats for managing these tables in the data lake.
Delta table protocol versions supported by Fivetran
Fivetran supports Delta tables with the following protocol versions:
- minReaderVersion: 1
- minWriterVersion: 2
Fivetran does not support Delta tables that use higher protocol versions.
Recommended Workaround
Avoid enabling Delta Lake features that exceed the supported reader and writer versions of the table protocol. If a table already uses unsupported versions, recreate the table with compatible versions or publish the data to a consumer-safe Delta table that meets the supported protocol requirements.
Do not access the Parquet files directly from your data lake. Instead, always use the table metadata to read or query the data.
Storage directory
We store your data in the <root>/<prefix_path>/<schema_name>/<table_name> directory of your data lake.
Table maintenance operations
To maintain an efficient, optimized data storage environment, Fivetran performs regular maintenance on your data lake tables. These operations are designed to manage storage consumption and enhance query performance for your data lake.
The maintenance operations we perform are as follows:
- Deletion of old snapshots and removed files: We delete table snapshots that are older than the configured Snapshot Retention Period. However, we always retain at least the last 2 snapshots of each table, even if they fall outside the retention period. For Delta tables, we also retain the last 2 checkpoints before deleting older snapshots. In addition to removing outdated snapshots, we delete files that are no longer referenced in the latest table snapshots but were referenced in older ones. These unreferenced files contribute to your storage provider costs. We identify files that exceed the snapshot retention period and delete them. This cleanup process runs once daily.
- Deletion of Delta delete markers: For Delta tables, we retain delete markers for up to 7 days or for the configured Snapshot Retention Period, whichever is lower. We delete markers that exceed this retention period.
- Deletion of previous versions of metadata files: In addition to the current version, we retain 3 previous versions of the metadata files and delete all the prior versions.
- Staging and deletion of orphan files: Orphan files are created in your storage because of unsuccessful operations within your data pipeline. These files are no longer referenced in any table metadata and contribute to your storage provider subscription costs. We identify orphan files and move them to a separate folder named
orphansinside the table directory every alternate Saturday. Orphan data files are moved to theorphans/datafolder, and orphan metadata files are moved to theorphans/metadatafolder. In each subsequent run, we permanently delete from storage the orphan files that were moved during the previous run.
Do not modify or delete the orphans folder or its contents under any circumstances. Deleting or modifying the folder or its contents can permanently damage your tables. Fivetran manages this folder through automated maintenance operations.
To ensure that every table is queryable, we recommend against deleting any metadata files, as such deletions can corrupt the Iceberg tables.
Column statistics
Fivetran updates two column-level statistics, minimum value and maximum value, for your data lake tables. We update column-level statistics to enhance query performance and optimize storage in your data lake.
- If the table contains 200 or fewer columns, we update the statistics for all the columns.
- If the table contains more than 200 columns, we update the statistics for the
_fivetran_syncedcolumn and all primary keys. If history mode is enabled for the table, we also update the statistics for the_fivetran_active,_fivetran_end, and_fivetran_startcolumns.
Reserved column names
The Iceberg table format does not allow columns with the following names:
_deleted_file_partition_pos_spec_idfile_pathposrow
To avoid conflicts with reserved column names, Fivetran prefixes the column names with a hash symbol (#) before writing them to Iceberg tables.
For more information about Iceberg's reserved field names, see Iceberg documentation.
Source name handling rules
If you configure your connection to preserve source names for schemas, tables, and columns, we apply the following rules when syncing the data into your data lake:
- If a non-primary key column name contains invalid characters (anything other than
a–z,0–9, and_) in its name or matches a reserved keyword, we exclude the column from the sync and display a Warning in the Fivetran dashboard. - If a primary key column name contains invalid characters or matches a reserved keyword, the sync fails, and Fivetran generates an Error in the dashboard.
- If a schema or table name contains invalid characters, we exclude it from the sync and display a Warning in the dashboard.
Type transformation and mapping
The data types in your data lake follow Fivetran's standard data type storage.
We use the following data type conversions:
| FIVETRAN DATA TYPE | DESTINATION DATA TYPE (ICEBERG TABLE FORMAT) | DESTINATION DATA TYPE (DELTA LAKE TABLE FORMAT) | Notes |
|---|---|---|---|
| BOOLEAN | BOOLEAN | BOOLEAN | |
| INT | INTEGER | INTEGER | |
| LONG | LONG | LONG | |
| BIGDECIMAL | DECIMAL(p, s), DOUBLE, or STRING | DECIMAL(p, s), DOUBLE, or STRING |
|
| FLOAT | FLOAT | FLOAT | |
| DOUBLE | DOUBLE | DOUBLE | |
| LOCALDATE | DATE | DATE | |
| INSTANT | TIMESTAMPTZ | TIMESTAMP | |
| LOCALDATETIME | TIMESTAMP | TIMESTAMP | |
| STRING | STRING | STRING | |
| BINARY | BINARY | BINARY | |
| SHORT | INTEGER | INTEGER | |
| JSON | STRING | STRING | |
| XML | STRING | STRING |
Supported deployment models
We support the SaaS Deployment model for the destination.
Networking
Managed Data Lake Service supports two connectivity options between Fivetran and your object storage, Direct Connection and Private Networking. You select the connection type in the setup form.
Direct connection
When you select Direct Connection, Fivetran transfers data to your storage location over the public internet.
If your Fivetran data processing region and storage account region are the same, Fivetran uses private networking by default.
Network data transfer charges apply only when the Fivetran data processing region and storage account region differ.
Private networking
When you select Private Networking, Fivetran routes traffic to your cloud storage over your cloud service provider’s internal network. This setup avoids public internet routing and does not expose traffic through public IP addresses.
Each cloud service provider uses a different term for this capability, but all options ensure that data transfer occurs within the provider’s internal network.
When you choose Private Networking in the setup form, Fivetran runs a setup test to verify that the data processing region and storage account region are colocated.
For more information about your cloud service provider’s networking capabilities, see:
| Cloud Service Provider | Connectivity Method |
|---|---|
| AWS | Gateway Endpoints for Amazon S3 |
| Azure | Virtual Network Service Endpoints |
| GCP | Private Google Access |
- Azure also supports Azure Private Link, an additional private networking option. Azure Private Link for Managed Data Lake Service is not self-service. To enable it for your account, contact our support team.
- Azure charges approximately $0.01 per hour per endpoint, in addition to data processing fees. For more information, see Azure Private Link pricing.
For an overview of all connection options for destinations, see our Destination Connection Options documentation.
Setup guide
Follow our step-by-step Managed Data Lake Service setup guide to connect your data lake with Fivetran.
Limitations
Common limitations for all storage providers
Fivetran does not support position deletes for Iceberg tables. To avoid errors, we recommend that you avoid running any query that generates position deletes.
Fivetran does not support the Change Data Feed feature for Delta tables. You must not enable Change Data Feed for the Delta tables that Fivetran creates in your data lake.
Managed Data Lake Service does not support Transformations.
Limitations for AWS data lakes
Fivetran does not support the following storage tiers due to their long retrieval times (ranging from a few minutes to 48 hours):
- S3 Glacier Flexible Retrieval
- S3 Glacier Deep Archive
- S3 Intelligent-Tiering Archive Access tier
- S3 Intelligent-Tiering Deep Archive Access tier
AWS Glue Catalog supports only one table per combination of schema and table names within a Region. Consequently, using multiple Fivetran Platform Connectors with the same Glue Catalog across different AWS data lakes can cause conflicts and result in various integration issues. To avoid such conflicts, we recommend configuring Fivetran Platform Connectors with distinct schema names for each AWS data lake.
Limitations for Azure data lakes
Fivetran creates DECIMAL columns with maximum precision and scale (38, 10).
Spark SQL pool queries cannot read the maximum values of DOUBLE and FLOAT data types.
Fivetran does not support
archive access tierbecause its retrieval time can extend to several hours.Spark SQL pool queries truncate the TIMESTAMP values to seconds. To query any table using a TIMESTAMP column, you can use the
unixtime(unix_timestamp(<col_name>, 'yyyy-MM-dd HH:mm:ss.SSS'),'yyyy-MM-dd HH:mm:ss.ms')clause in your queries to get the accurate values, including milliseconds and microseconds.
Legal notices
Apache Iceberg and Apache Polaris are trademarks of the Apache Software Foundation.