
Amazon RDS for SQL Server Setup Guide
Follow these instructions to replicate your Amazon RDS for SQL Server database to your destination using Fivetran.
Prerequisites
To connect your Amazon RDS for SQL Server database to Fivetran, you need:
- SQL Server 2012 - 2025
- TLS 1.2 or higher is required. SQL Server 2016 and later versions support TLS 1.2 natively. If your SQL Server instance is version 2012 or 2014, ensure it has the required Microsoft updates to support TLS 1.2. Your host operating system and client/server TLS configuration must also support TLS 1.2 or higher.
- An AWS account with access to the Amazon RDS for SQL Server database instance
- Network administrative access or assistance from a network administrator to configure the instance's VPC security group
- Database administrative access or assistance from a database administrator to create the Fivetran user, grant permissions, and configure your update method
- Your database host's IP (for example,
1.2.3.4) or domain (your.server.com) - Your database's port (usually
1433) - Your database name
- Additional requirements depending on the connection method you choose (for example, SSH, Private Link, Proxy Agent)
- If you want to connect to a read replica using change data capture (CDC): access to the primary database to enable CDC. To use change tracking (CT), connect Fivetran to the primary database instead of a read replica.
(Optional, Private Preview only) To manage credentials outside of Fivetran, you need an External Secret Manager configured for your account before starting setup.
We do not support single-user mode.
Setup instructions
Choose connection method
If you're using Hybrid Deployment, skip this step. Hybrid Deployment manages its own secure connection to your database.
Decide on your preferred method for connecting Fivetran to your Amazon RDS for SQL Server database, and then configure the necessary settings for that method. This connector supports the following connection methods:
Connect directly
Fivetran connects directly to your Amazon RDS for SQL Server database. This is the simplest connection method to set up, requiring minimal configuration.
To connect directly, do the following:
Enable TLS on your Amazon RDS for SQL Server database. For more information, see Using SSL/TLS to encrypt a connection to a DB instance running Microsoft SQL Server in the AWS documentation.
We require TLS 1.2 or higher. SQL Server 2016 and later versions support TLS 1.2 natively. If your SQL Server instance is version 2012 or 2014, ensure it has the required Microsoft updates to support TLS 1.2. Your host operating system and client/server TLS configuration must also support TLS 1.2 or higher.
Configure your VPC security group to allow incoming connections to your SQL Server host and port, usually
1433, from Fivetran IPs for your database's region. For detailed instructions, see Enable access.
Connect using SSH
Fivetran connects to a separate server in your network that provides an SSH tunnel to your Amazon RDS for SQL Server database. You must connect through SSH if your database is in an inaccessible subnet.
To connect using an SSH tunnel, configure an SSH tunnel between Fivetran and your Amazon RDS for SQL Server database. For more information, see our SSH connection setup documentation.
Connect using AWS PrivateLink
You must have a Business Critical plan to use AWS PrivateLink.
AWS PrivateLink lets VPCs and AWS-hosted or on-premises services communicate with one another without exposing traffic to the public internet. PrivateLink is the most secure connection method. Learn more in AWS PrivateLink documentation.
Follow our AWS PrivateLink setup guide to configure PrivateLink for your database.
Connect using Proxy Agent
Fivetran connects to your database through the Proxy Agent, providing secure communication between Fivetran processes and your database host. The Proxy Agent is installed in your network and creates an outbound network connection to the Fivetran-managed SaaS.
To learn more about the Proxy Agent, how to install it, and how to configure it, see our Proxy Agent documentation.
Enable access
Complete the access configuration steps on the database instance that Fivetran will connect to, either the read replica or the primary.
Configure the instance's VPC security group to allow Fivetran to connect. If your organization also uses custom VPC network ACLs, make sure they allow the same traffic that you allowed in the security group. For more information, see the AWS VPC network ACLs documentation.
These instructions apply when you connect directly, through an SSH tunnel, or through Proxy Agent. If you use AWS PrivateLink, follow the AWS PrivateLink setup guide instead.
Configure security group
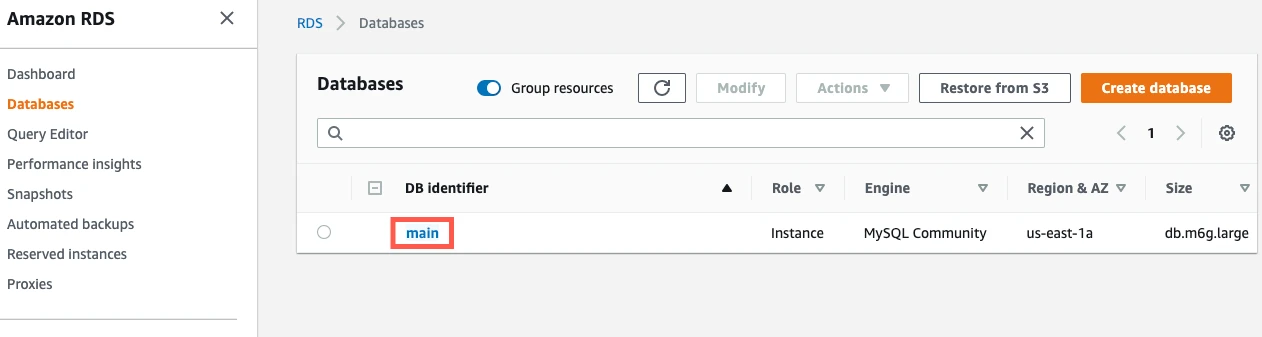
In your RDS dashboard, go to Databases and click your SQL Server database instance to display its details.
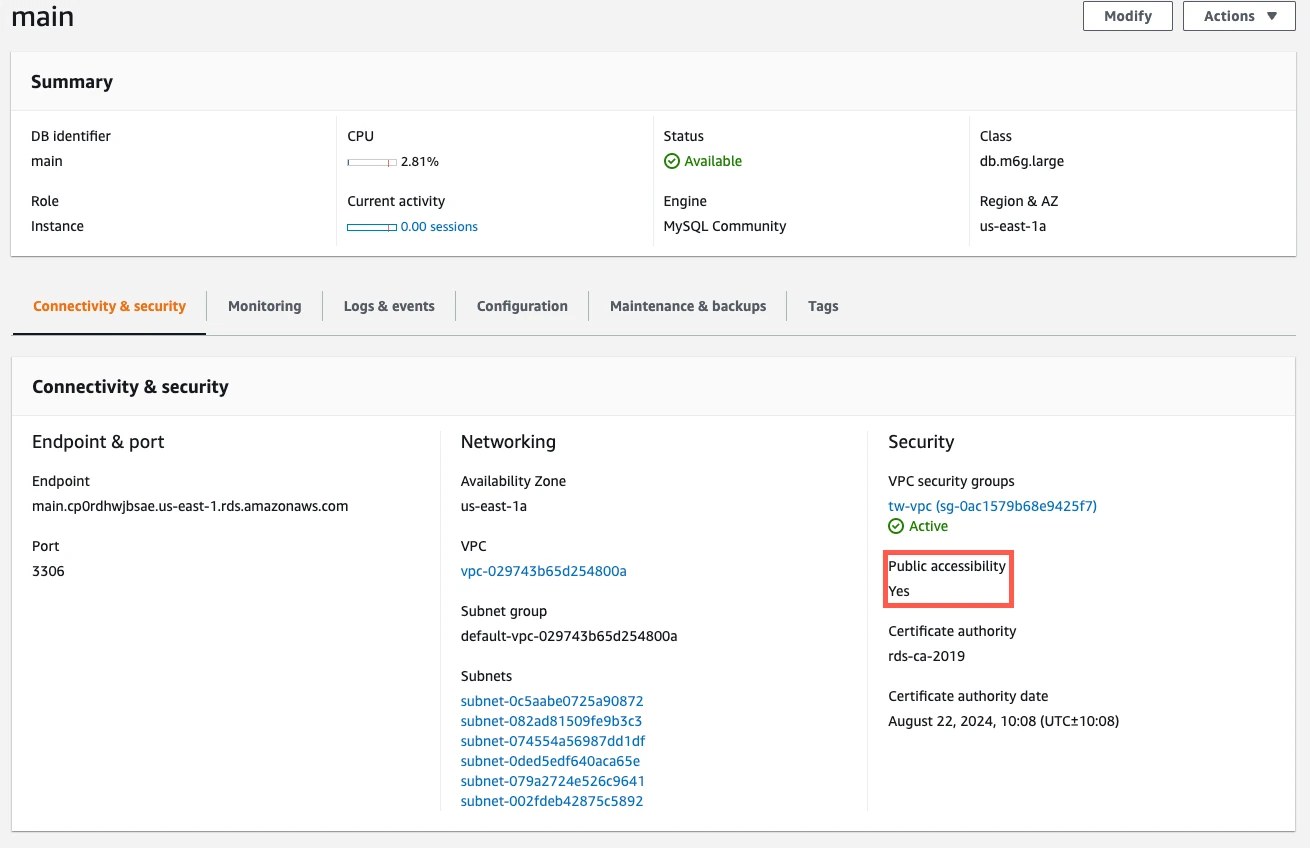
On the Connectivity & security tab, verify that the Public accessibility value is Yes if you choose to connect directly. You don't have to make your database publicly accessible if you choose to connect using an SSH tunnel, Proxy Agent, or AWS PrivateLink.
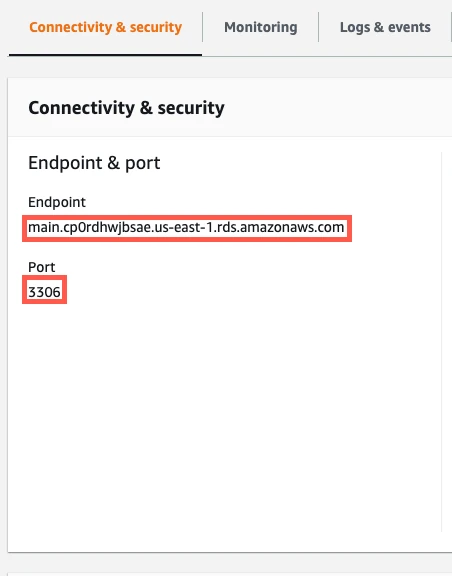
Make a note of the instance's Endpoint hostname and Port number. You will need them to configure Fivetran.
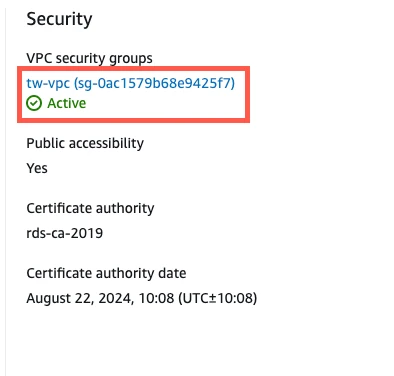
Click the VPC security groups link to the database instance's Security Groups.
In the Security Groups panel, select the Inbound rules tab.
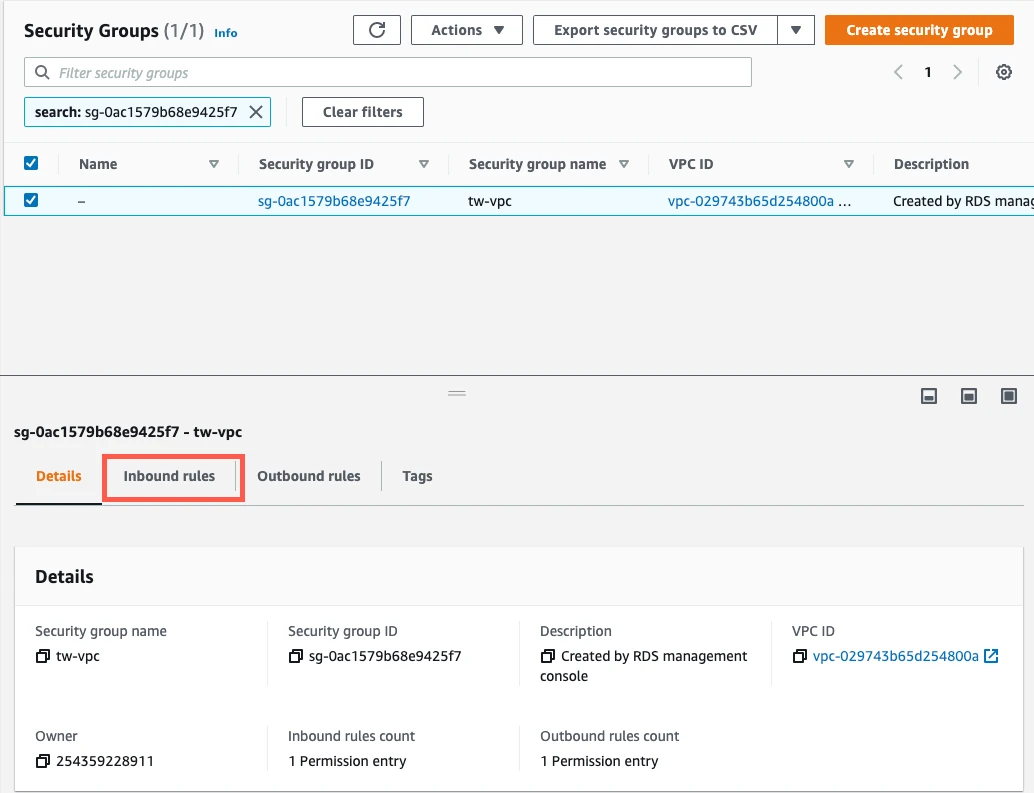
Click Edit inbound rules.
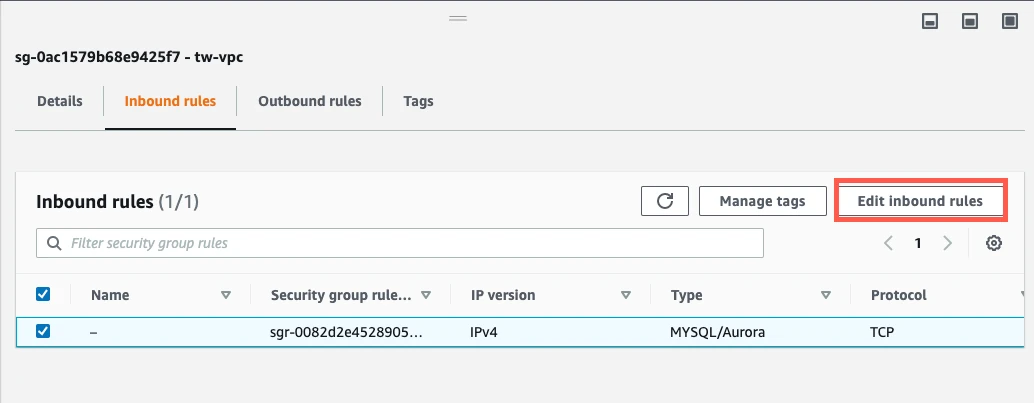
Click Add rule. This creates a new Custom TCP rule at the bottom of the list, with blank fields for Port range and Source IP address.
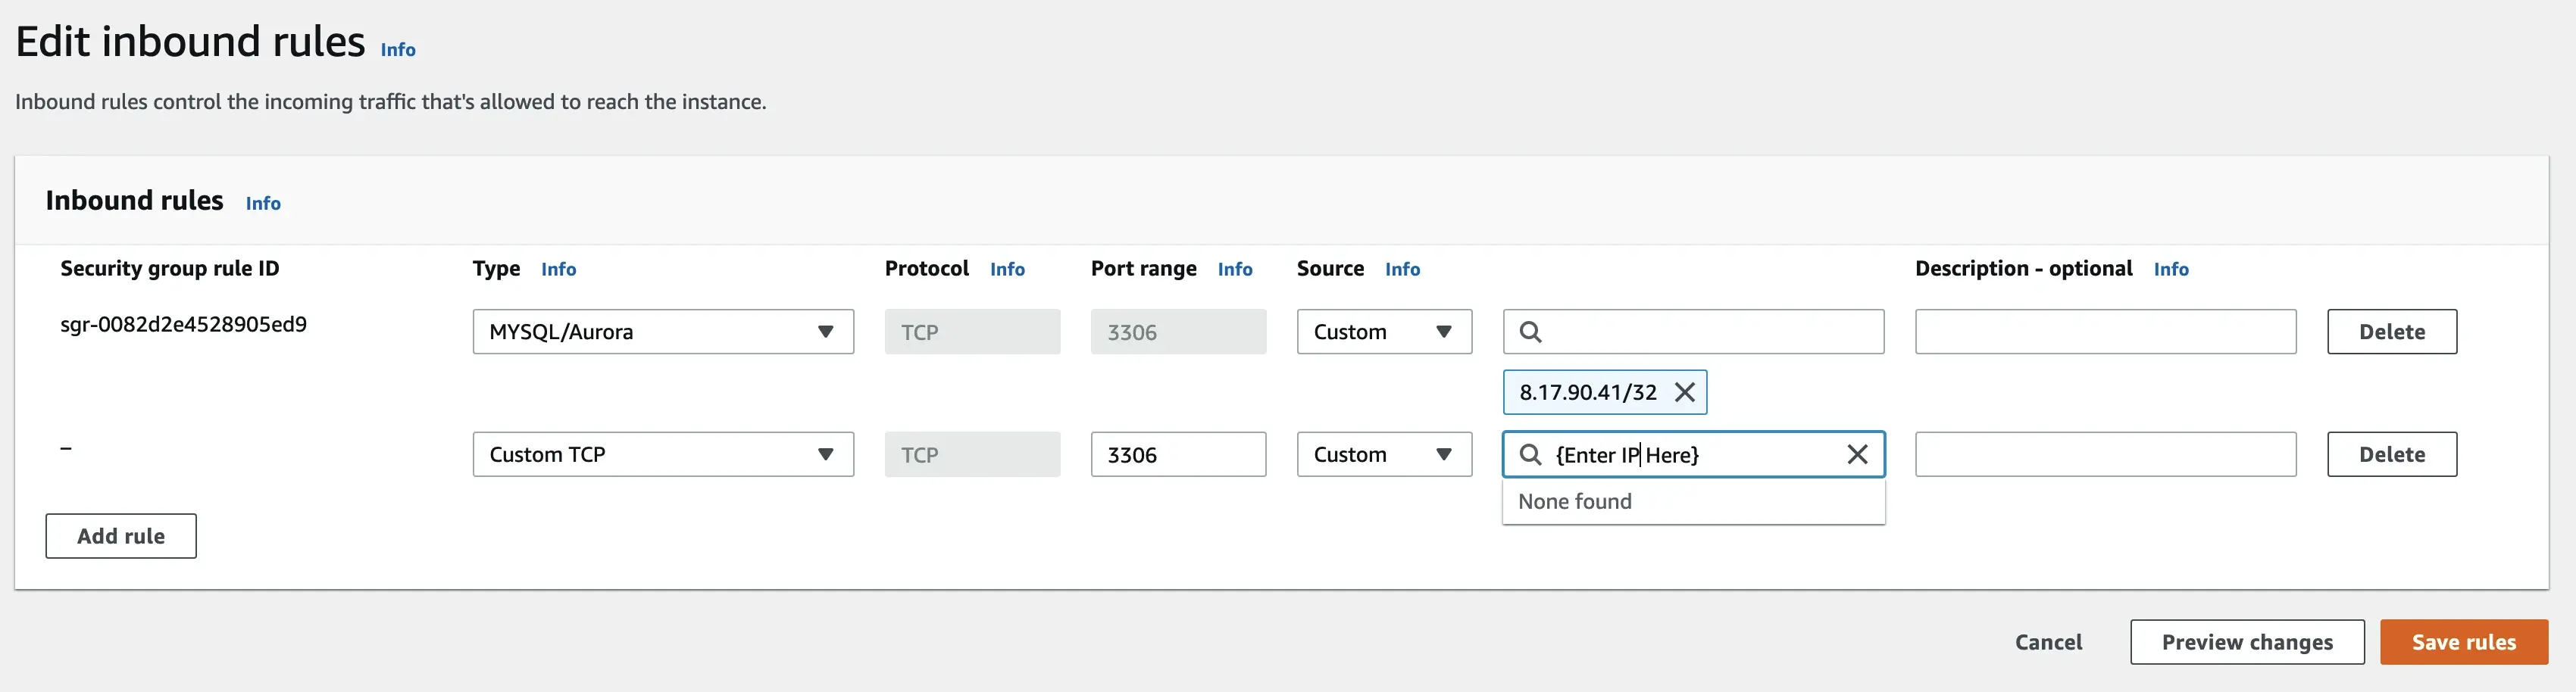
Enter your Port range and Source IP address values.
- In the Port range field, enter your instance's port number that you noted earlier in this section (usually it is
1433). - In the Source field, select Custom and enter Fivetran IPs if you're connecting directly,
{your-ssh-tunnel-server-ip-address}/32if you're connecting through an SSH tunnel, or{your-proxy-agent-host-ip-address}/32if you're connecting through Proxy Agent.
- In the Port range field, enter your instance's port number that you noted earlier in this section (usually it is
Click Save rules.
Create user
Create a database user for Fivetran's exclusive use.
Connect to your SQL Server database as an administrator user.
Run the following SQL statements to create a user for Fivetran. Replace
<database>with the name of your database,<username>with the username of your choice, and<password>with a password of your choice:USE [master]; CREATE LOGIN <username> WITH PASSWORD = '<password>'; USE [<database>]; CREATE USER <username> FOR LOGIN <username>;
Grant read-only access
Grant the Fivetran user read-only access to the data you want to sync. Choose the most appropriate SELECT grant scope:
Database-level access: Grants access to all objects in a database.
GRANT SELECT ON DATABASE::<database> TO <username>;Schema-level access: Grants access to all current and future tables in a schema.
GRANT SELECT ON SCHEMA::<schema> TO <username>;Table-level access: Grants access only to specific tables.
GRANT SELECT ON [<schema>].[<table>] TO <username>;If you grant table-level access, newly created tables aren't accessible automatically. Grant
SELECTon each new table you want Fivetran to sync.Column-level access: Grants access only to specific columns in a table.
GRANT SELECT ON [<schema>].[<table>] ([<column_1>], [<column_2>], ...) TO <username>;If you grant column-level access, newly added columns aren't accessible automatically. Rerun the command with the additional columns.
After granting SELECT access, grant VIEW DEFINITION permission to the same principal so we can read column default definitions during schema changes. We need this access to detect and backfill new columns with deterministic default values. If the Fivetran user already has equivalent access through other permissions, you do not need an additional VIEW DEFINITION grant.
GRANT VIEW DEFINITION ON DATABASE::<database> TO <username>;
You can also grant VIEW DEFINITION on a specific schema or table if you want to scope it more narrowly.
For SQL Server for Linux, if you're using change tracking with history mode enabled, you can grant the following permission to improve performance and reduce delays:
USE [master]; GRANT VIEW SERVER STATE TO <username>;
This grants the Fivetran user access to server state information, minimizing the dependency on checkpoint timing and reducing update delays. For more information, see Sync Delays with SQL Server for Linux Using Change Tracking with History Mode Enabled.
Enable incremental updates
For incremental updates, choose an update method. These update methods let Fivetran copy only the rows that have changed since the last data sync so we don't have to copy the whole table every time. Learn more in our updating data documentation.
Read changes using CT or CDC mechanisms
Use this update method if you want Fivetran to read new, modified, or deleted data using SQL Server-native change capture mechanisms: change tracking (CT), change data capture (CDC), or both. You don't need to enable both CT and CDC for every table.
Fivetran chooses the mechanism to use for each table based on your SQL Server configuration:
- If a table has only CT enabled, Fivetran uses CT.
- If a table has only CDC enabled, Fivetran uses CDC.
- If a table has both CT and CDC enabled, Fivetran uses CDC.
- If a table has neither CT nor CDC enabled, the table appears in Fivetran but is disabled until you enable CT or CDC.
Use the following instructions to enable CT, CDC, or both based on the tables you want to sync.
You cannot enable CT or CDC on a read replica. If you enable CDC on your primary database, it applies to your read replica. However, if you enable CT on your primary database, Fivetran can't read CT data from the read replica. To use CT, connect Fivetran to the primary database.
Enable change tracking
Enable change tracking at the database level:
ALTER DATABASE [<database>]
SET CHANGE_TRACKING = ON
(CHANGE_RETENTION = 7 DAYS, AUTO_CLEANUP = ON);
While we recommend seven days of change retention, you can set your retention period as low as one day. However, a shorter retention period increases the risk that your logs will expire in between syncs, triggering an automatic full source re-sync.
Enable CT for each table you want to integrate:
ALTER TABLE [<schema>].[<table>] ENABLE CHANGE_TRACKING;Grant the Fivetran user
VIEW CHANGE TRACKINGpermission for each of the tables that have change tracking enabled:GRANT VIEW CHANGE TRACKING ON [<schema>].[<table>] TO <username>;
Enable change data capture
Enable change data capture at the database level:
EXEC msdb.dbo.rds_cdc_enable_db [<database>];Enable CDC for each table you want to integrate:
EXEC sys.sp_cdc_enable_table
@source_schema = [<schema>],
@source_name   = [<table>],
@role_name     = [<username>],
@supports_net_changes = 0;
Fivetran only supports tables with a single CDC capture instance. Our syncs only include tables and columns that are present in a CDC instance. If you add new tables or columns, you must create a new CDC instance that includes them and delete the old instance.
When @supports_net_changes is set to 1, an additional non-clustered index is created on the change table. Because this index needs to be maintained, enabling net changes can degrade CDC performance.
Automatically enable CT or CDC for schema changes (optional)
By default, when you create a new table in your database, you must manually enable CT or CDC for that table before we can sync it. Additionally, if you add a new column to an existing CDC-enabled table, you must manually recreate the CDC capture instance before we can sync the column.
If you want Fivetran to automatically enable CT or CDC for newly created tables and to update CDC capture instances when a new column is added, install the following stored procedures on your database. If your connector contains only CT-enabled tables, then any subsequent new tables will be CT-enabled. If your connector has a mixture of CT- and CDC-enabled tables or contains CDC-enabled tables only, then we will enable CDC over CT by default.
Install the following script on your database. Before running the script, replace
<database>with your database name.If you have configured your connector to Allow columns, you can exclude the
[dbo].[sp_ft_enable_cdc]and[dbo].[sp_ft_enable_change_tracking]stored procedures. If you have configured your connector to Block All, you can exclude all the following stored procedures.USE [<database>]; /****** Object: StoredProcedure [dbo].[sp_ft_enable_cdc] Script Date: 1/17/2024 11:12:55 PM ******/ SET ANSI_NULLS ON GO SET QUOTED_IDENTIFIER ON GO CREATE OR ALTER PROCEDURE [dbo].[sp_ft_enable_cdc] @TableList NVARCHAR(MAX), @FivetranUser NVARCHAR(MAX) WITH EXECUTE AS OWNER -- Change to an appropriate sysadmin user AS BEGIN SET NOCOUNT ON; -- Table to store tables with results CREATE TABLE #ResultTables (TableName NVARCHAR(MAX), Result NVARCHAR(MAX)); -- Enable CDC for each table DECLARE @TableName NVARCHAR(MAX); DECLARE @SqlStatement NVARCHAR(MAX); WHILE LEN(@TableList) > 0 BEGIN -- Get the first table in the list SET @TableName = NULL; SET @TableName = SUBSTRING(@TableList, 1, CHARINDEX(',', @TableList + ',') - 1); -- Remove the processed table from the list SET @TableList = STUFF(@TableList, 1, LEN(@TableName) + 1, ''); -- Build and execute the SQL statement to enable CDC for the table SET @SqlStatement = ' BEGIN TRY EXEC sys.sp_cdc_enable_table @source_schema = ''' + PARSENAME(@TableName, 2) + ''', @source_name = ''' + PARSENAME(@TableName, 1) + ''', @role_name = ''' + @FivetranUser + ''', @supports_net_changes = 0; INSERT INTO #ResultTables (TableName, Result) VALUES (''' + @TableName + ''', ''Success''); END TRY BEGIN CATCH PRINT ERROR_MESSAGE(); INSERT INTO #ResultTables (TableName, Result) VALUES (''' + @TableName + ''', ERROR_MESSAGE()); END CATCH '; -- Execute the dynamic SQL statement EXEC sp_executesql @SqlStatement; END -- Return the list of tables with results SELECT * FROM #ResultTables; -- Drop the temporary table DROP TABLE #ResultTables; END; GO /****** Object: StoredProcedure [dbo].[sp_ft_enable_change_tracking] Script Date: 1/17/2024 11:10:45 PM ******/ SET ANSI_NULLS ON GO SET QUOTED_IDENTIFIER ON GO CREATE OR ALTER PROCEDURE [dbo].[sp_ft_enable_change_tracking] @TableList NVARCHAR(MAX), @FivetranUser NVARCHAR(MAX) WITH EXECUTE AS OWNER -- Change to an appropriate sysadmin user AS BEGIN SET NOCOUNT ON; -- Table to store tables with results CREATE TABLE #ResultTables (TableName NVARCHAR(MAX), Result NVARCHAR(MAX)); -- Enable change tracking for each table DECLARE @TableName NVARCHAR(MAX); DECLARE @SqlStatement NVARCHAR(MAX); WHILE LEN(@TableList) > 0 BEGIN -- Get the first table in the list SET @TableName = NULL; SET @TableName = SUBSTRING(@TableList, 1, CHARINDEX(',', @TableList + ',') - 1); -- Remove the processed table from the list SET @TableList = STUFF(@TableList, 1, LEN(@TableName) + 1, ''); -- Build and execute the SQL statement to enable change tracking SET @SqlStatement = ' BEGIN TRY ALTER TABLE ' + @TableName + ' ENABLE CHANGE_TRACKING; GRANT VIEW CHANGE TRACKING ON ' + @TableName + ' TO ' + @FivetranUser + '; INSERT INTO #ResultTables (TableName, Result) VALUES (''' + @TableName + ''', ''Success''); END TRY BEGIN CATCH PRINT ERROR_MESSAGE(); INSERT INTO #ResultTables (TableName, Result) VALUES (''' + @TableName + ''', ERROR_MESSAGE()); END CATCH '; -- Execute the dynamic SQL statement EXEC sp_executesql @SqlStatement; END -- Return the list of tables with results SELECT * FROM #ResultTables; -- Drop the temporary table DROP TABLE #ResultTables; END; GO /****** Object: StoredProcedure [dbo].[sp_ft_get_tables_with_ddl_changes] Script Date: 1/30/2024 9:10:47 PM ******/ SET ANSI_NULLS ON GO SET QUOTED_IDENTIFIER ON GO CREATE OR ALTER PROCEDURE [dbo].[sp_ft_get_tables_with_ddl_changes] @TableList NVARCHAR(MAX), @ddlTime DATETIME = NULL -- New parameter for ddlTime WITH EXECUTE AS OWNER -- Change to an appropriate sysadmin user AS BEGIN SET NOCOUNT ON; -- Declare a table variable to store the results DECLARE @ChangedTables TABLE ( TableName NVARCHAR(MAX), DdlTime DATETIME ); -- Split the comma-separated list into a table variable DECLARE @TableNames TABLE ( TableName NVARCHAR(MAX) ); INSERT INTO @TableNames (TableName) SELECT value FROM STRING_SPLIT(@TableList, ','); -- Check for DDL changes in cdc.ddl_history INSERT INTO @ChangedTables (TableName, DdlTime) SELECT tn.TableName, MAX(dh.ddl_time) AS LatestDdlTime FROM cdc.ddl_history dh INNER JOIN @TableNames tn ON CONCAT(OBJECT_SCHEMA_NAME(dh.source_object_id), '.', OBJECT_NAME(dh.source_object_id)) = tn.TableName WHERE @ddlTime IS NULL OR dh.ddl_time >= @ddlTime GROUP BY tn.TableName; -- Return the list of tables with the latest DDL changes SELECT TableName, DdlTime FROM @ChangedTables; END; GO /****** Object: StoredProcedure [dbo].[sp_ft_update_cdc] Script Date: 1/31/2024 1:19:40 AM ******/ SET ANSI_NULLS ON GO SET QUOTED_IDENTIFIER ON GO CREATE OR ALTER PROCEDURE [dbo].[sp_ft_update_cdc] @TableName NVARCHAR(MAX), @FivetranUser NVARCHAR(MAX), @CaptureInstance NVARCHAR(MAX), @CapturedColumnList NVARCHAR(MAX) WITH EXECUTE AS OWNER AS BEGIN SET NOCOUNT ON; -- Table to store tables with results CREATE TABLE #ResultTables (TableName NVARCHAR(MAX), Result NVARCHAR(MAX)); DECLARE @SourceSchema NVARCHAR(MAX); DECLARE @SourceName NVARCHAR(MAX); BEGIN TRY -- Assign values to variables for PARSENAME function SET @SourceSchema = PARSENAME(@TableName, 2); SET @SourceName = PARSENAME(@TableName, 1); -- Step 1: Disable the current CDC instance EXEC sys.sp_cdc_disable_table @source_schema = @SourceSchema, @source_name = @SourceName, @capture_instance = @CaptureInstance; -- Step 2: Create a new CDC instance EXEC sys.sp_cdc_enable_table @source_schema = @SourceSchema, @source_name = @SourceName, @role_name = @FivetranUser, @capture_instance = @CaptureInstance, @captured_column_list = @CapturedColumnList, @supports_net_changes = 0; -- Insert the result into the #ResultTables table INSERT INTO #ResultTables (TableName, Result) VALUES (@TableName, 'Success'); END TRY BEGIN CATCH PRINT ERROR_MESSAGE(); -- Insert the error message into the #ResultTables table INSERT INTO #ResultTables (TableName, Result) VALUES (@TableName, ERROR_MESSAGE()); END CATCH; -- Return the list of tables with results SELECT * FROM #ResultTables; -- Drop the temporary table DROP TABLE #ResultTables; END; GOGrant the Fivetran user execute permission.
USE [<database>];
GRANT EXECUTE ON dbo.sp_ft_enable_cdc TO <username>;
GRANT EXECUTE ON dbo.sp_ft_enable_change_tracking TO <username>;
GRANT EXECUTE ON dbo.sp_ft_get_tables_with_ddl_changes TO <username>;
GRANT EXECUTE ON dbo.sp_ft_update_cdc TO <username>;
Detect changes using Fivetran Teleport Sync
You don't need to do any additional configuration to use Fivetran Teleport Sync.
Finish Fivetran configuration
In your connection setup form, enter a Destination schema prefix. This is used as the connection name and cannot be modified once the connection is created.
In the Destination names field, choose the naming convention you want Fivetran to use for the schemas, tables, and columns in your destination:
- Source naming: Preserves the original schema, table, and column names from the source system in your destination, and ignores the Destination schema prefix specified in the setup form. However, when multiple connections share the same source schema name (for example,
public), Fivetran stores their tables in the same destination schema. Tables with duplicate names may lead to overwrites and data inconsistencies. Be sure to use unique table names across connections that write to the same schema. - Fivetran naming: Standardizes the schema, table, and column names in your destination according to the Fivetran naming conventions.
If you want to modify your selection, make sure you do it before you start the initial sync.
Depending on your selection, we will either prefix the connection name to each replicated schema or use the source schema names instead.
- Source naming: Preserves the original schema, table, and column names from the source system in your destination, and ignores the Destination schema prefix specified in the setup form. However, when multiple connections share the same source schema name (for example,
In the Host field, enter your database instance's endpoint hostname that you noted from the RDS dashboard.
In the Port field, enter your database instance's port number that you noted from the RDS dashboard. The port is usually
1433.In the User field, enter the Fivetran-specific user that you created in the Create user step.
In the Password field, enter the password for the Fivetran-specific user.
In the Database field, enter the name of your database (for example,
your_database).(Hybrid Deployment only) If your destination is configured for Hybrid Deployment, the Hybrid Deployment Agent associated with your destination is pre-selected for the connection. To assign a different agent, click Replace agent, select the agent you want to use, and click Use Agent.
(Not applicable to Hybrid Deployment) From the Connection method drop-down menu, select how Fivetran connects to your database and enter the required information:
Connect directly
Connect via an SSH tunnel
- Make a note of the Public Key and add it to the
authorized_keysfile while configuring the SSH tunnel. - In the SSH Host field, enter the hostname or IP address of the SSH server. Do not use a load balancer IP address or hostname.
- In the SSH Port field, enter the port used by the SSH server.
- In the SSH User field, enter the username of the SSH user.
- If you enabled TLS on your database in the Choose connection method step, keep the Require TLS through Tunnel toggle turned ON.
- Make a note of the Public Key and add it to the
Connect via Private Networking
- Fivetran enables TLS for private networking connections by default. To disable it, turn the Require TLS when using Private Networking toggle OFF.
Connect via Proxy Agent
- Select an existing agent from the Proxy agents drop-down list or click + Configure a new proxy agent to set up a new agent.
- If you enabled TLS on your database in the Choose connection method step, keep the Require TLS when using Proxy Agent toggle turned ON.
(Optional for Hybrid Deployment) If you want to use a TLS connection between your Hybrid Deployment Agent and Fivetran cloud, set the Require TLS toggle to ON.
Before you set this toggle to ON, follow Microsoft setup instructions to enable TLS on your database. We require TLS 1.2 or higher. We do not support TLS 1.0 or TLS 1.1. SQL Server 2016 and later versions support TLS 1.2 natively. If your SQL Server instance is version 2012 or 2014, ensure it has the required Microsoft updates to support TLS 1.2. Your host operating system and client/server TLS configuration must also support TLS 1.2 or higher.
In the Update Method section, select one of the following options:
- Read changes using CT or CDC mechanisms
- Detect Changes via Fivetran Teleport Sync
Click Save & Test. Fivetran tests and validates our connection to your SQL Server database. Upon successful completion of the setup tests, you can sync your data using Fivetran.
Setup tests
Fivetran performs the following tests to ensure that we can connect to your Amazon RDS for SQL Server database and that it is properly configured:
- The Connecting to SSH tunnel test validates the SSH tunnel details you provided in the setup form. It then checks that we can connect to your database using the SSH tunnel. We skip this test if you aren't connecting using SSH.
- The Checking Host connectivity test checks that we can reach your database host and port.
- The Connecting to database test checks that we can access your database. When TLS certificate validation is required, this test also validates the certificate.
- The Validating replication config test verifies that your database has CDC or CT enabled. We skip this test if you're using Fivetran Teleport Sync.
The tests may take a few minutes to finish running.