Amazon Kinesis Firehose Setup Guide
Follow our setup guide to connect Amazon Kinesis Firehose to Fivetran.
Prerequisites
To connect Amazon Kinesis Firehose to Fivetran, you need:
- An Amazon Kinesis Firehose delivery stream outputting to an S3 bucket
- An S3 bucket containing JSON files with supported encodings
- An AWS account with the ability to grant Fivetran permission to read from that S3 bucket
Setup instructions
Find External ID
In the connection setup form, find the automatically-generated External ID and make a note of it. You will need it to configure AWS to connect with Fivetran.
The automatically-generated External ID is tied to your account. If you close and re-open the setup form, the ID will remain the same. You may wish to keep the tab open in the background while you configure your source for convenience, but closing it is also OK.
Create IAM policy
For encrypted buckets, follow the instructions in AWS's documentation to modify the AWS KMS key's policy to grant Fivetran permissions to download files from your encrypted bucket.
Log in to your Amazon IAM console.
On the navigation menu, click Policies, and then click Create Policy.

In the Specify permissions page, go to the JSON tab.

Copy the following policy and paste it into the visual editor and replace
{your-bucket-name}with the name of your S3 bucket.{ "Version": "2012-10-17", "Statement": [ { "Effect": "Allow", "Action": [ "s3:GetBucketLocation", "s3:GetObject", "s3:ListBucket" ], "Resource": [ "arn:aws:s3:::{your-bucket-name}/*", "arn:aws:s3:::{your-bucket-name}" ] } ] }Click Next.
(Optional) If you use a customer-managed KMS key, add the following policy to the Action section of the IAM policy to provide read access to the encrypted files.
     "Action": [
         "kms:Decrypt",
         "kms:GenerateDataKey"
     ]
In the Review and create page, enter your Policy name.
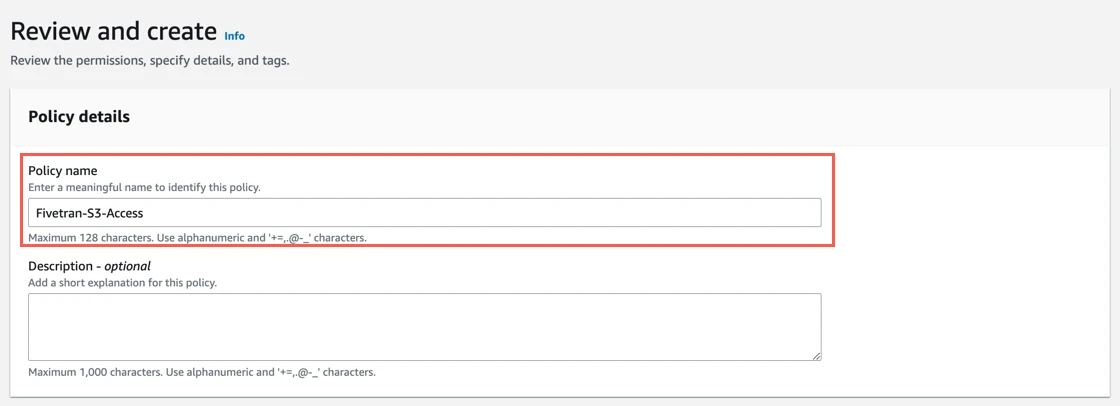
(Optional) In the Add tags section, add custom tags to associate with your bucket.
Click Create policy.
Create IAM role
On the navigation menu, click Roles, and then click Create role.

Select AWS account, and then select Another AWS account.
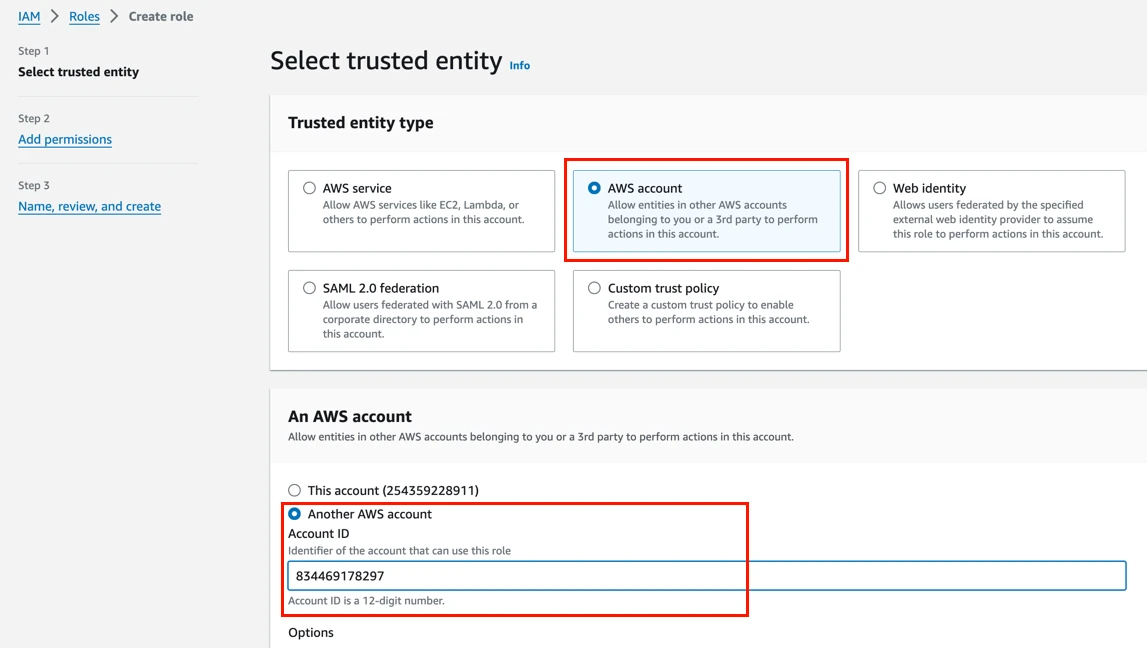
In the Account ID field, enter Fivetran’s AWS VPC Account ID,
834469178297.Select the Require external ID checkbox and enter the External ID you found in Step 1, then click Next.

In the Add permissions step, select the policy you created in Step 2, then click Next.
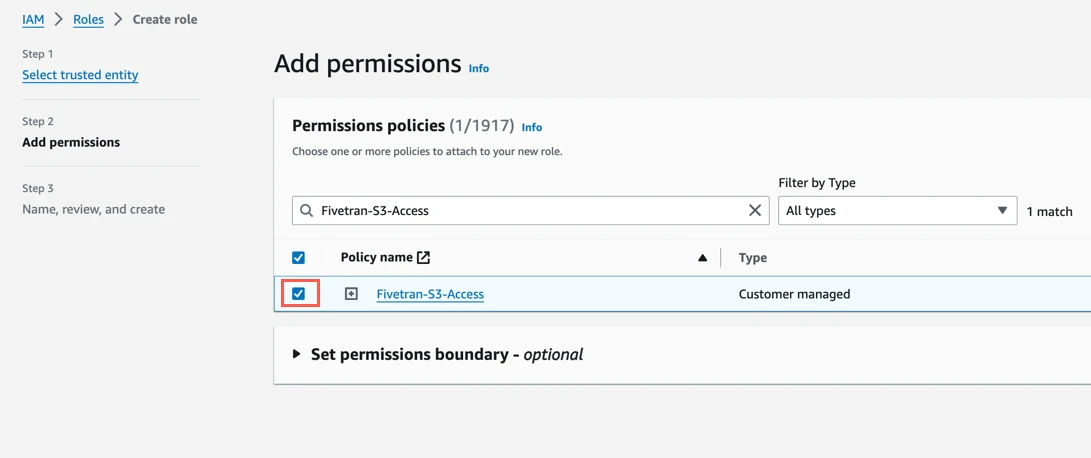
In the Name, review, and create step, enter a name for the role.
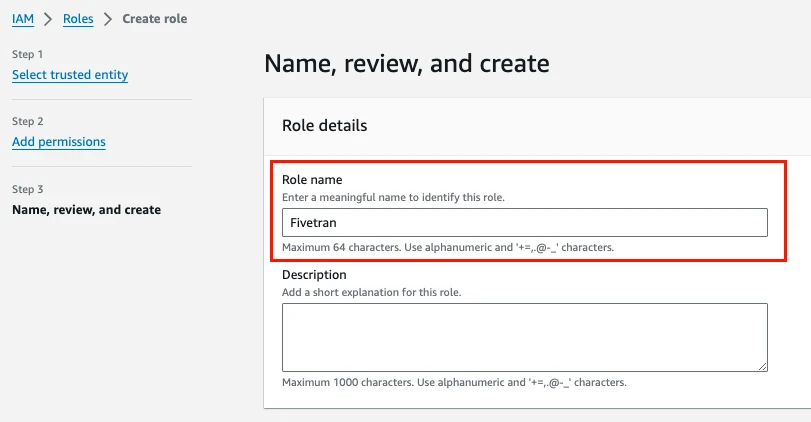
Click Create Role.
In the Roles page, select the role you created.
Make a note of the ARN. You will need it to configure Fivetran.

If you want to re-use an existing IAM role created for Fivetran account, you need to edit the trust policy for the same role. You can then add another external ID to the JSON policy or copy the following policy and paste it in your JSON tab:
   {
       "Version": "2012-10-17",
       "Statement": [
           {
               "Effect": "Allow",
               "Principal": {
                   "AWS" : "arn:aws:iam::834469178297:user/gcp_donkey"
               },
               "Action": "sts:AssumeRole",
               "Condition": {
                   "StringEquals": {
                       "sts:ExternalId": [
                           "external-id-1",
                           "external-id-2"
                       ]
                   }
               }
           }
       ]
   }
If your Kinesis stream output is JSON, skip to Step 6 to finish your connection setup.
(Optional) Set permissions
You can specify permissions for the Role ARN that you designate for Fivetran. Giving selective permissions to this role will allow Fivetran to only sync what it has permissions to see.
Create AWS Lambda function
If your Kinesis stream output is plain text or comma-separated values, you must convert it into JSON before writing it to your S3 bucket. Do this by sending your Kinesis stream to an AWS Lambda, which will transform the data into JSON and stream it into your S3 bucket.
Log in to your Amazon Lambda console.
On the navigation menu, click Functions, and then click Create function.

Select Author from scratch.

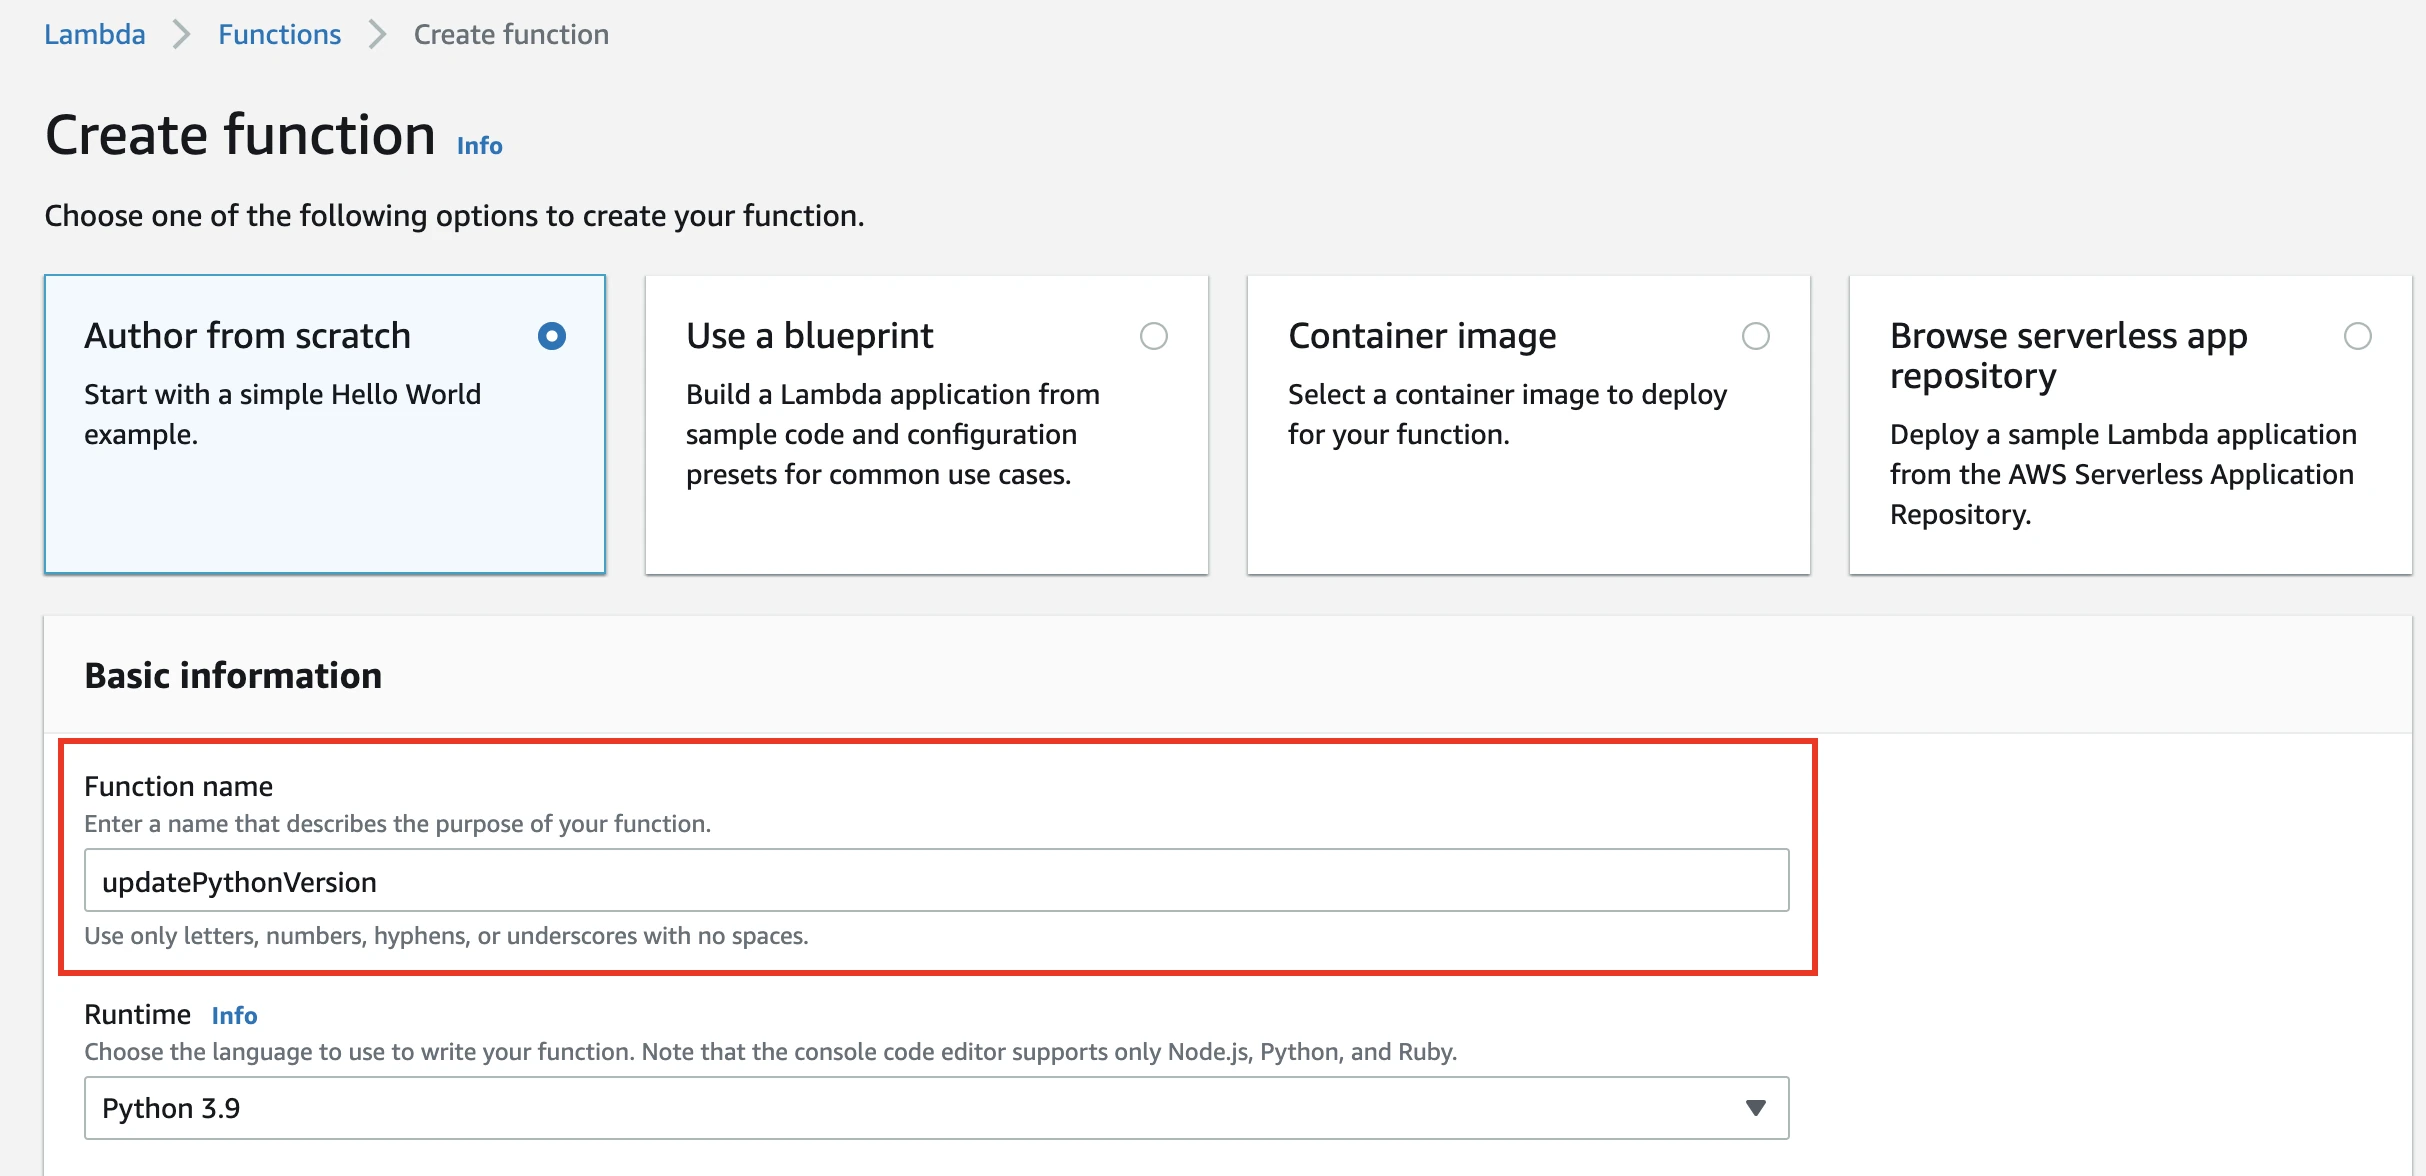
Enter a name for your function. Set the runtime to Python 3.9.
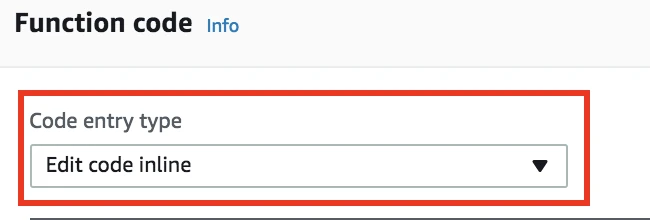
Set the Code entry type to Edit code inline.
Modify the following example Lambda function as needed and paste it in the box. This function matches the records in the incoming stream to a regular expression. On match, it parses the JSON record, filters out "sector" pairs, includes a timestamp, and passes the record back into the stream for delivery.
from __future__ import print_function

import base64
import json
import re
import datetime

parser = '{\"ticker_symbol\"\:\"[A-Z]+\"\,\"sector\"\:"[A-Z]+\"\,\"change\"\:[-.0-9]+\,\"price\"\:[-.0-9]+\}'

def lambda_handler(event, context):
    output = []

    for record in event['records']:
        data = base64.b64decode(record['data'])
        matchJson = re.match(parser, data, re.I)

        if (matchJson):
            serialized_data = json.loads(data)
            # Filters out 'sector' and its value from the record
            serialized_data.pop('sector')

            # Adds a timestamp to the record
            serialized_data['timestamp'] = datetime.datetime.now().strftime("%Y-%m-%d %H:%M:%S")
            deserialized_data = json.dumps(serialized_data)

            # Logs result
            print(deserialized_data)

            output_record = {
                'recordId': record['recordId'],
                'result': 'Ok',
                'data': base64.b64encode(deserialized_data)
            }
            output.append(output_record)
        else:
            # Failed event. Log the error and pass record on intact
            output_record = {
                'recordID': record['recordId'],
                'result': 'ProcessingFailed',
                'data': record['data']
            }
            print ('Data does not match pattern: ' + parser)

            output.append(output_record)

    return {'records': output}
Set the Handler to "lambda_function.lambda_handler".
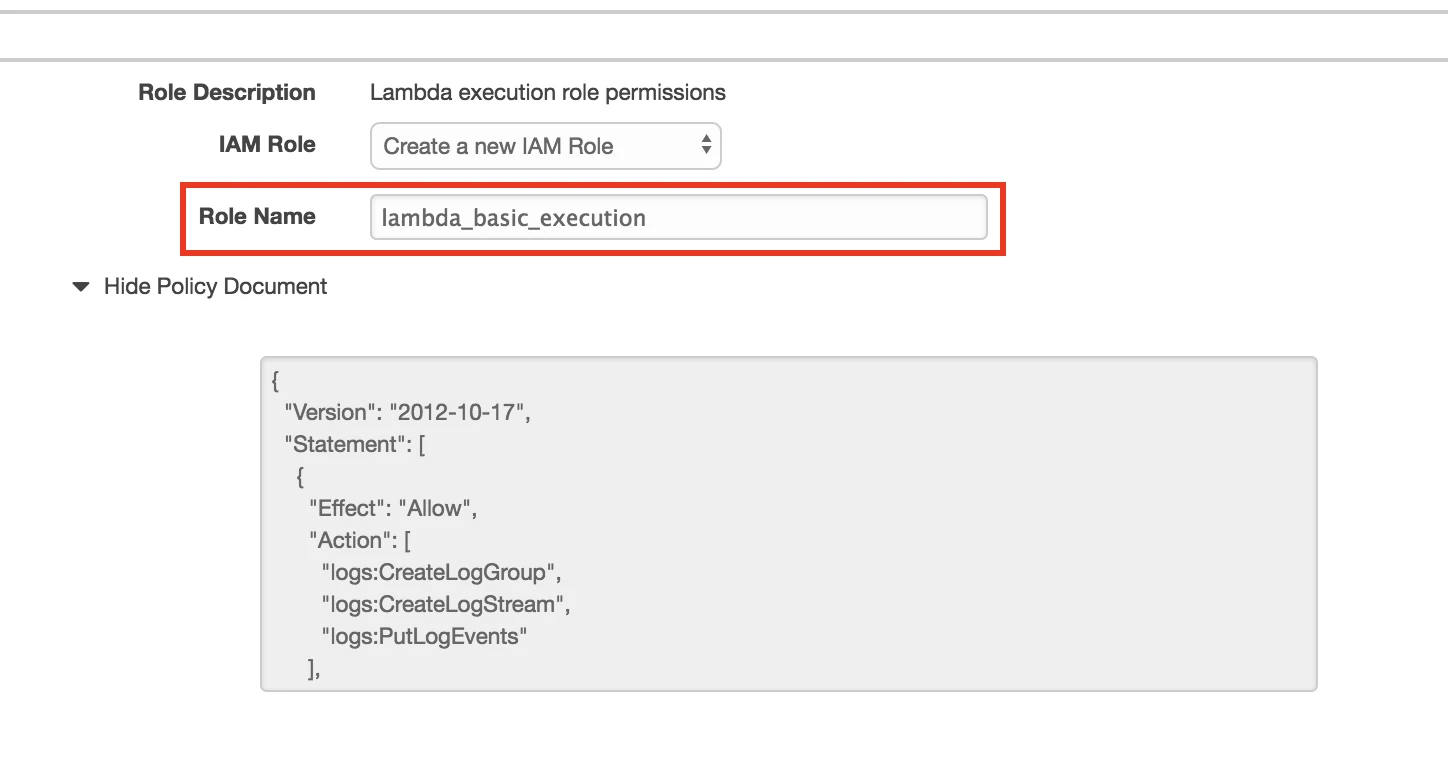
Click Create a custom role.

Give your IAM role a name, use the default policy document, and select Allow.
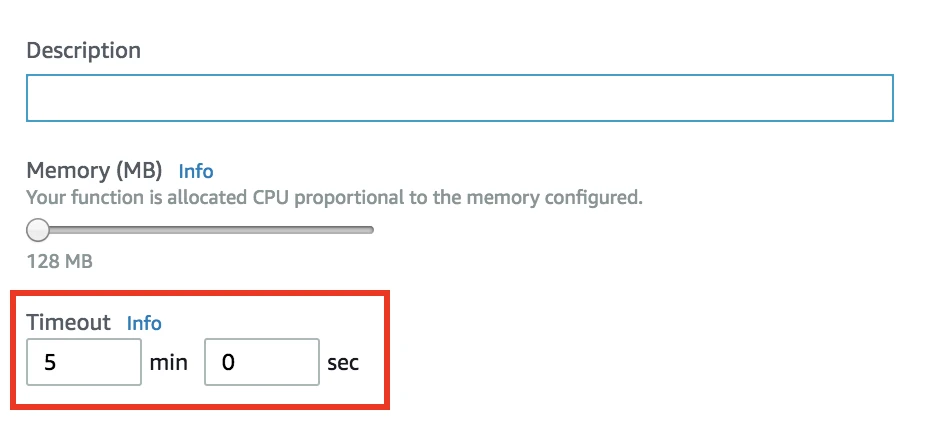
Under Advanced Settings, change the Timeout to 5 minutes.
Click Next.
Configure Kinesis delivery stream
Next, configure your Kinesis Firehose delivery stream to work with your Lambda function.
Log in to your Amazon Kinesis Firehose console.
Click Create Delivery Stream.
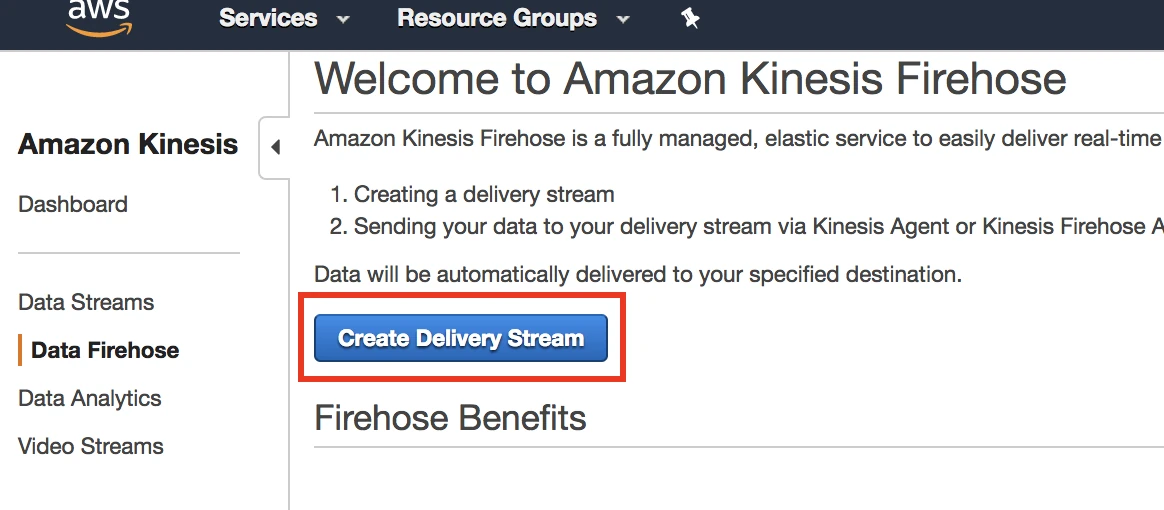
Give your stream a name.

Click Next.
Set the Record transformation to Enabled. Select either the Lambda function you created in Step 3 or your own custom function.

Click Next.
Choose Amazon S3 as your destination.
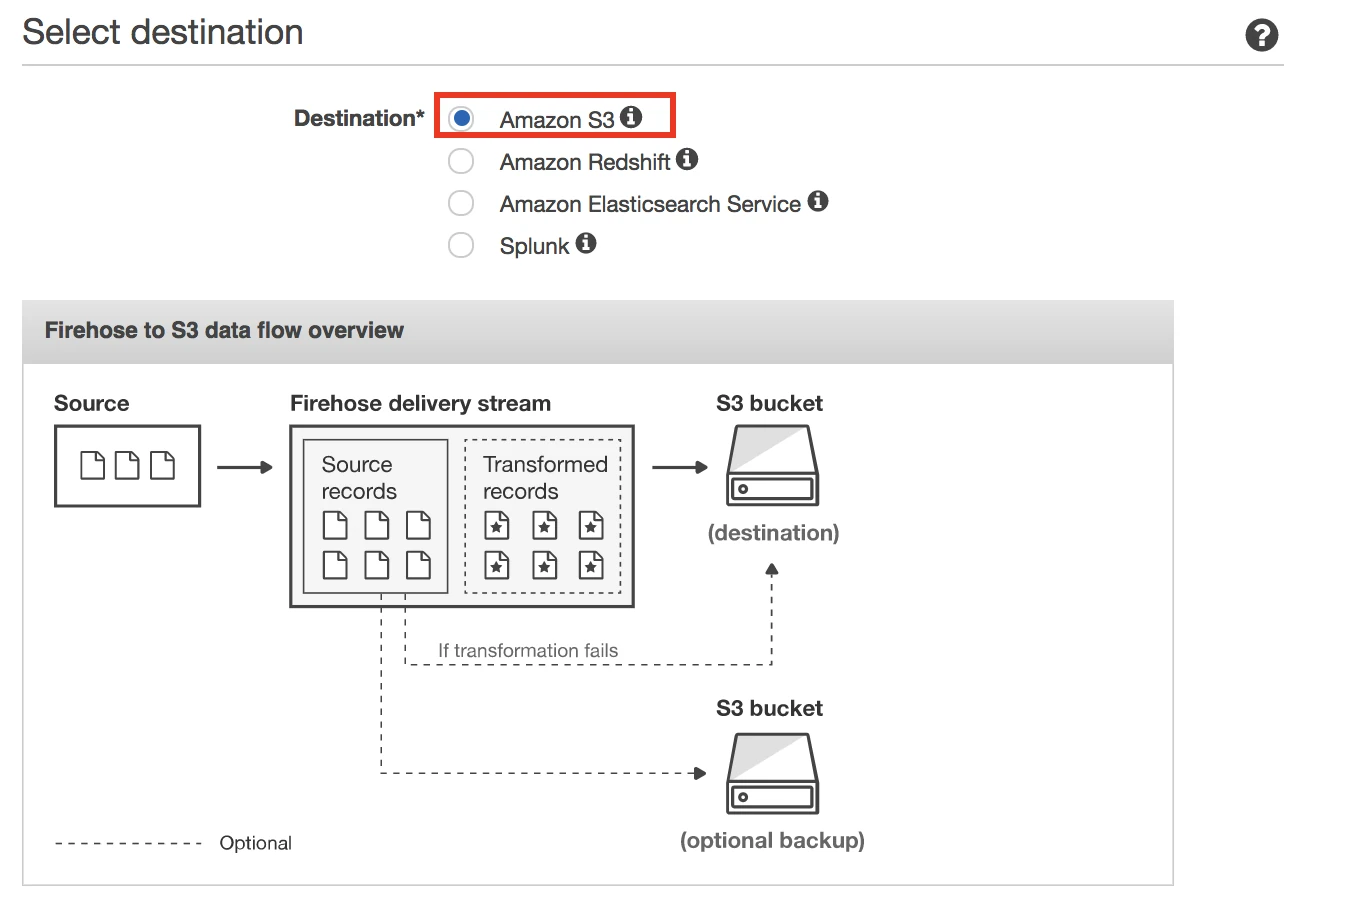
Enter your S3 bucket and specify a prefix if you'd like.

Click Next.
Set the S3 buffer conditions and Compression and encryption as desired.
Amazon Kinesis Data Firehose allows you to compress your data before delivering it to your Amazon S3 bucket. It currently supports data compression in GZIP, Zip, Snappy, and Hadoop-Compatible Snappy formats. The compressed files can significantly improve your connection performance during data ingestion.
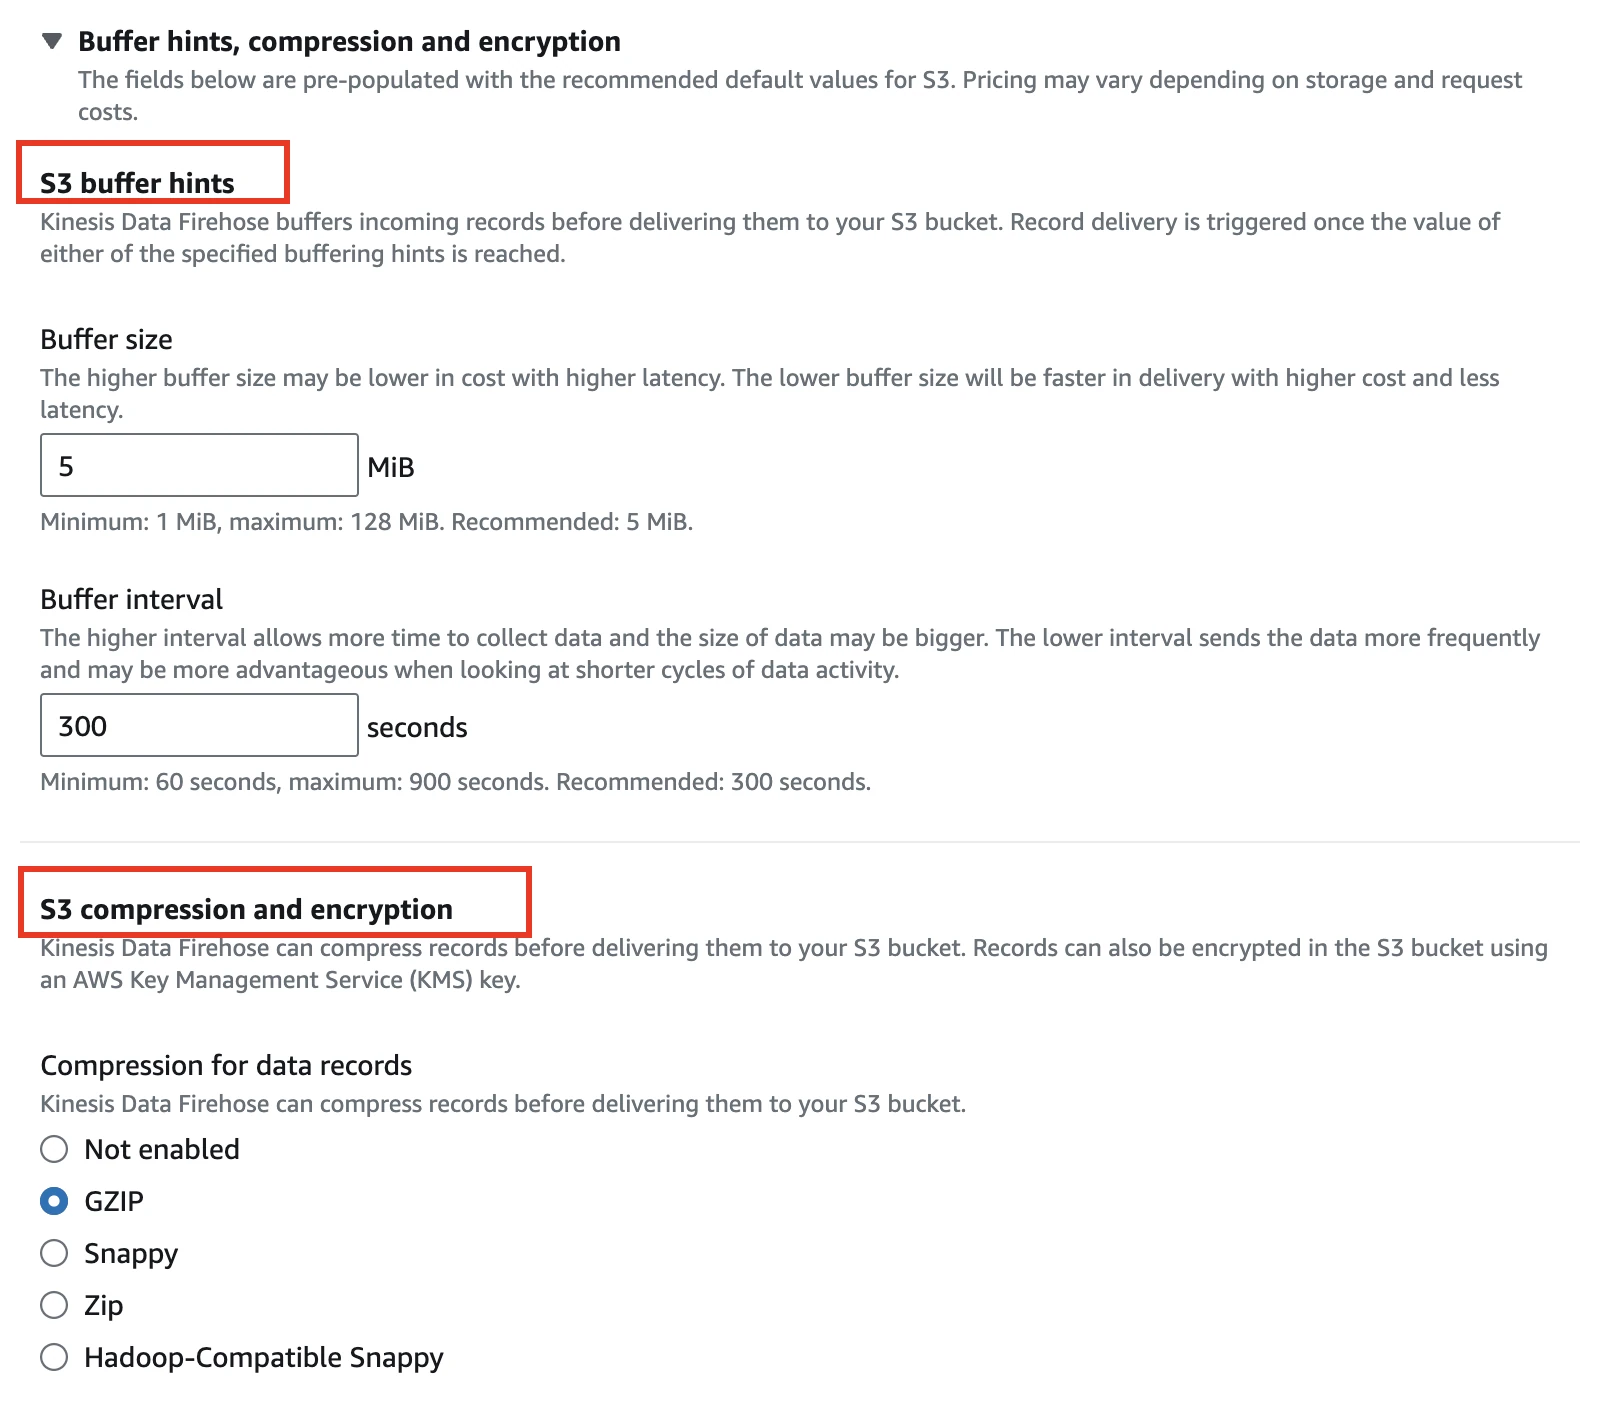
Under IAM role, click Create new, or Choose.

In the IAM role drop-down menu, select Create a new IAM Role. Enter a name for your IAM role. Use the default policy document.
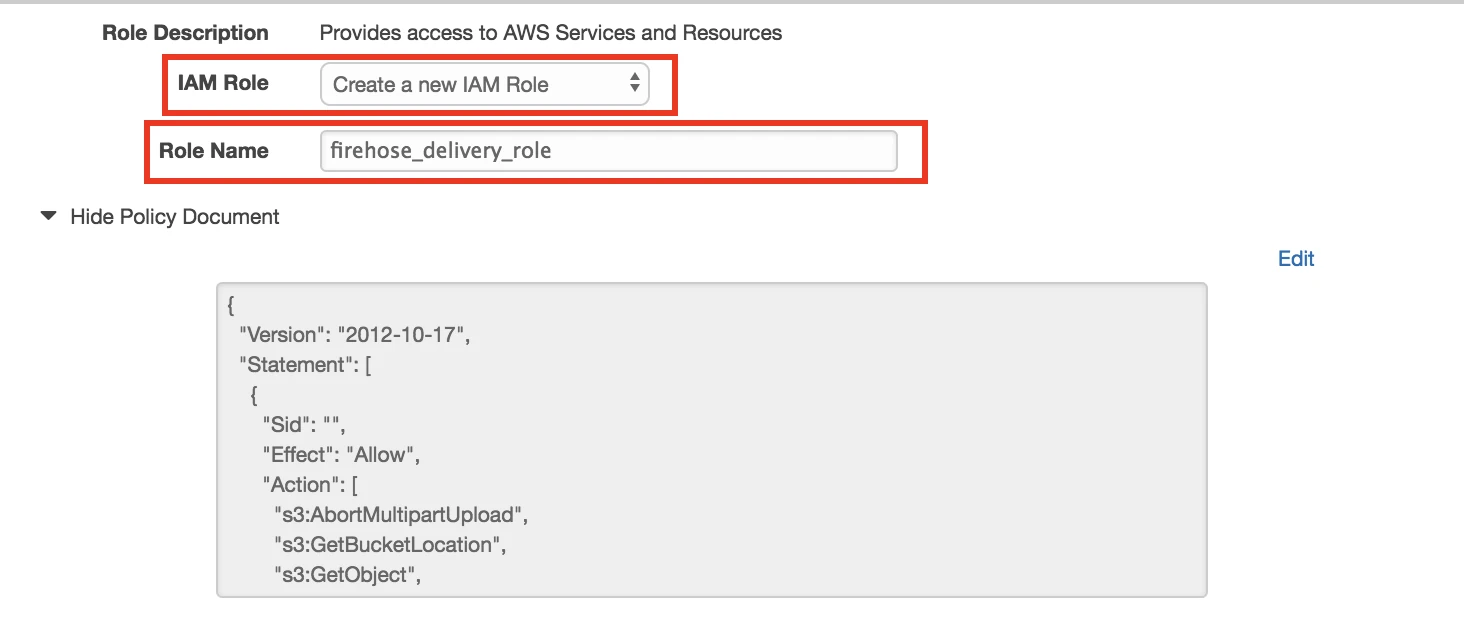
Click Allow.
When returned to the Firehose console, click Next.

Review your configuration details and select Create delivery stream.
If you selected the Lambda provided above when setting up your delivery stream, send test data by clicking Start sending demo data on your Firehose dashboard.

The demo data will be transformed by the Lambda function, appearing in your designated S3 bucket in the following form:
{"timestamp": "2017-07-20 21:55:05", "price": 27.75, "ticker_symbol": "ABC", "change":--0.02}
If you would like to learn more about Lambda functions for Firehose, see AWS' tutorial. For additional help setting up Firehose delivery streams, see AWS' delivery stream documentation.
Finish Fivetran configuration
In the connection setup form, enter your chosen Destination schema name.
Enter your chosen Destination table name.
In the Destination schema names field, choose the naming convention you want Fivetran to use for the schemas, tables, and columns in your destination:
- Fivetran naming: Standardizes the schema, table, and column names in your destination according to the Fivetran naming conventions.
- Source naming: Preserves the original schema, table, and column names from the source system in your destination.
If you want to modify your selection, make sure you do it before you start the initial sync.
Enter your S3 Bucket name.
In the Fivetran Role ARN field, enter the ARN you found in Step 3.
(Optional) Enter the Folder Path. The folder path is used to specify a portion of the bucket where you'd like Fivetran to look for files. Any files under the specified folder and all of its nested sub-folders will be examined for files we can upload. If no prefix is supplied, we'll look through the entire bucket for files to sync.
(Optional) In the JSON Delivery Mode drop-down menu, choose how Fivetran should handle your JSON data.
- If you select Packed, we load all your JSON data to the
_datacolumn without flattening it. - If you select Unpacked, we flatten one level of columns and infer their data types.
- If you select Packed, we load all your JSON data to the
Click Save & Test. Fivetran will take it from here and sync your Kinesis Firehose data.
Fivetran tests and validates the Kinesis Firehose connection. On successful completion of the setup tests, you can sync your Kinesis Firehose data to your destination.
Setup tests
Fivetran performs the following Kinesis Firehose connection tests:
The Validating Bucket Name test validates the bucket name you specified in the setup form and checks the bucket name to ensure that it does not contain any prefix or folder path characters.
The Connecting to Bucket test validates the connection and checks the accessibility of your S3 bucket.
The Validating External ID test validates if the external ID you specified in the setup form is correctly assigned.
The Finding Matching Files test checks if the connection can successfully retrieve a minimum of one and a maximum of ten sample files based on the configuration you specified in the setup form.
The tests may take a couple of minutes to complete.