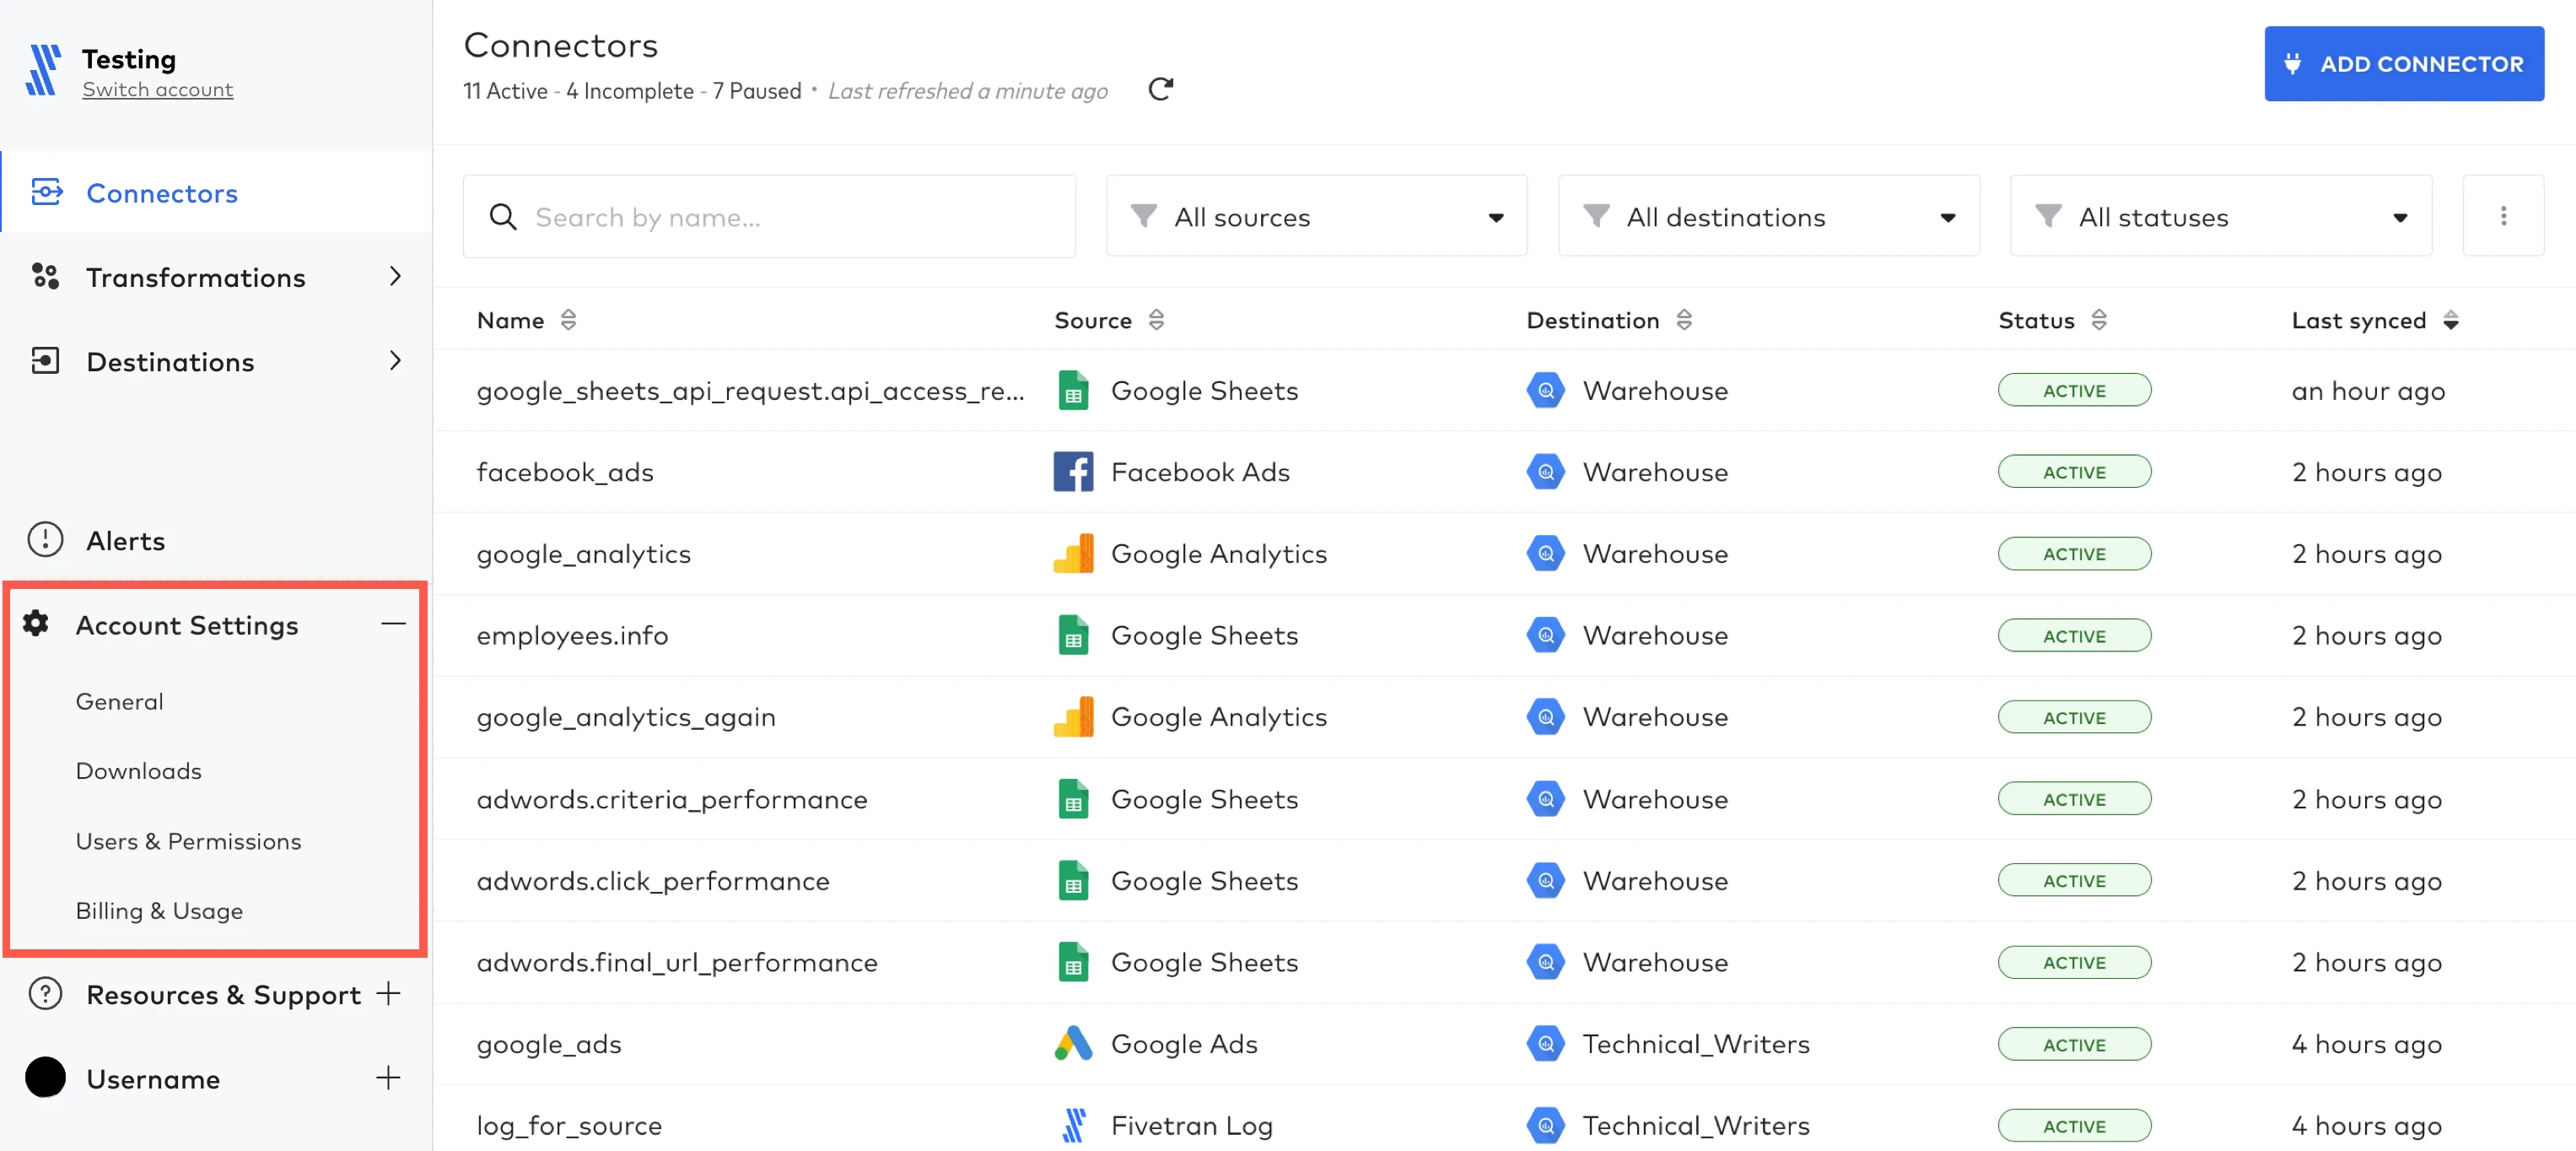
Account Settings
Manage your account in the Account Settings section, a subsection of the Fivetran dashboard where you can manage administrative aspects of your account. Only specific roles in our role-based access control model can manage accounts.
If you have a Free, Standard, Enterprise, or Business Critical account, you can also manage your Fivetran account using our REST API. See our REST API documentation for details.
Navigate account settings
The exact set of permissions depends on your user role and your Fivetran plan.
The Account Settings section is organized into pages, where you can manage the following aspects of your Fivetran account:
| Tab | Management Action |
|---|---|
| General | Includes Account Settings and Powered by Fivetran tabs. |
| Account Settings | View and edit the account name and security configuration. View and manage validated certificates and keys. |
| Powered by Fivetran | Customize your brand look across the Powered by Fivetran setup flow. |
| Connection Methods | View all connection methods (only Private Networking and Proxy Agent) associated with your account. |
| Hybrid Deployment Agents | Manage the Hybrid Deployment Agents associated with your account. |
| System Keys | Manage system API keys. |
| External logging | Manage account-level external logging services. |
| External Secret Managers | Manage External Secret Managers. |
| Downloads | Download the latest HVA builds. |
| Users & Permissions | Includes the Users, Roles, and Teams tabs. |
| Teams | Create, view, edit, and delete teams and team member roles. Add and delete team members. Assign and unassign team members the Team Manager role. |
| Users | Create, view, edit, and delete users and their roles in the account, destinations, and for connections. |
| Roles | View standard roles. Create, view, edit, and delete custom roles. |
| Billing & Usage | Includes the Billing and Usage tabs. |
| Billing | View and edit the account billing details, monitor consumption, or change your plan selection. |
| Usage | View the account usage, MAR (monthly active rows), and MMR (monthly model runs) details. |
| Usage Estimator | View the estimates of your account spending. |
To access your account settings, go to your Fivetran dashboard and find Account Settings in the left menu.
Switch account
To change to a different user profile, click Switch account under your account name in the top left corner.
General
On the General page, you can change the account security configuration and the account name.
You need to have the Account Administrator role or a custom role with the Settings:Edit account permission to manage Account Settings.
Authentication Settings
Restrict authentication type for account users in the Authentication Settings section of the General page.
Select the authentication type. Available options are:
No restrictions (users can choose to log in using Google OAuth or SAML)
Google OAuth
SAML (for the list of supported providers, read our SSO documentation).
Select the amount of time a dashboard session can remain inactive before timeout. Select a pre-set amount that ranges between 15 minutes to 2 weeks. The default browser session timeout is 1 day (24 hours). When the browser window is closed, your session times out automatically regardless of the settings.
The browser session timeout feature is only available for customers using the Enterprise or Business Critical pricing plan.
Switch the Enable SAML authentication toggle to ON to enable SAML.
If you want to use Just-In-Time (JIT) user provisioning, keep Enable user provisioning ON.
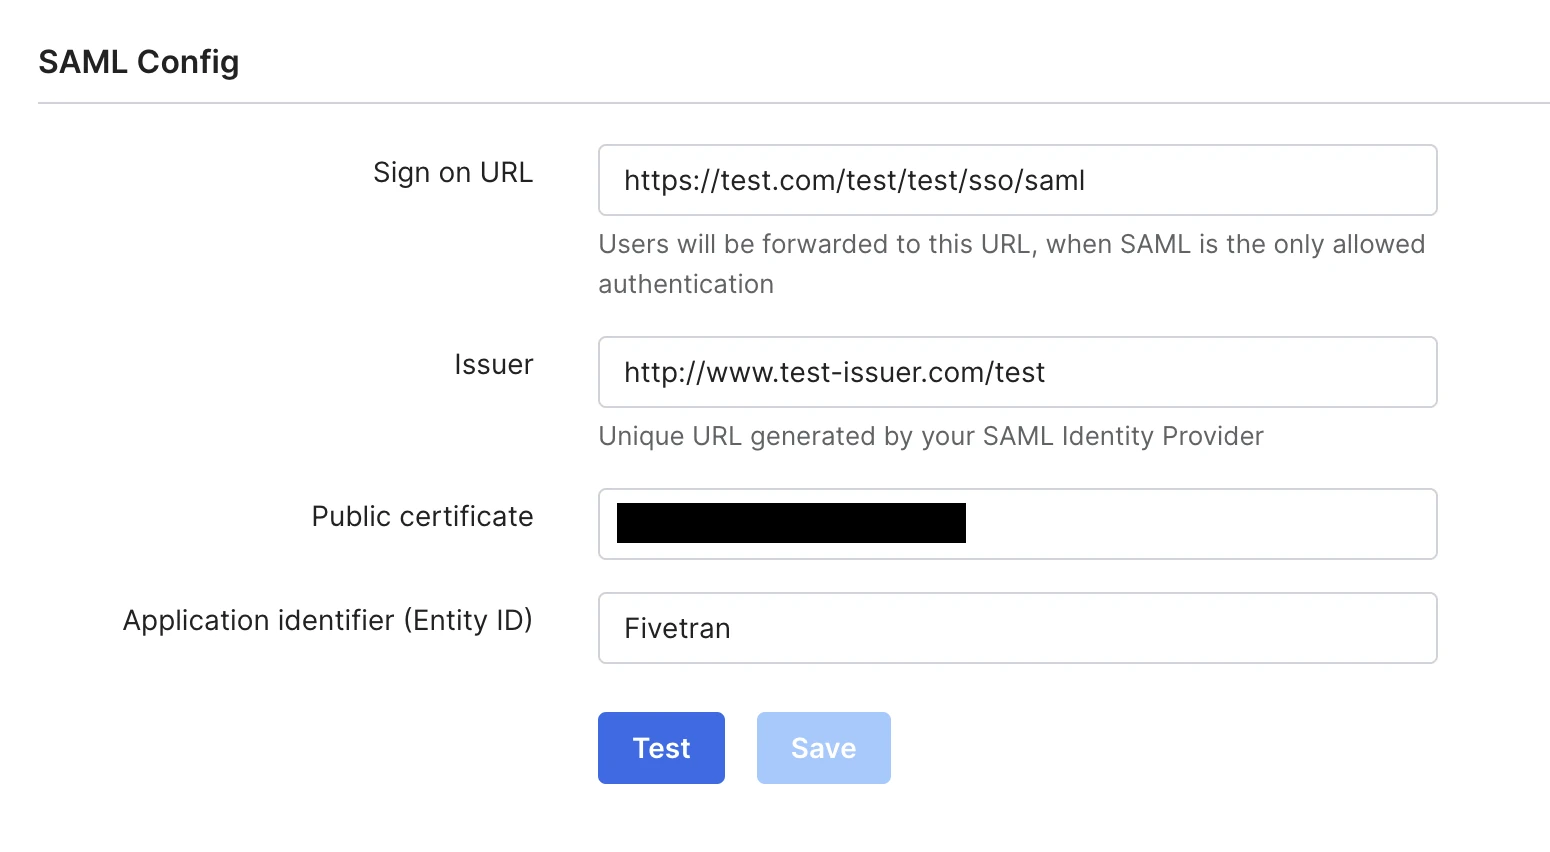
SAML Config
Configure SAML login in the SAML Config section of the General page.
To configure SSO with SAML, follow these steps:
Set the Sign on URL field value to the one provided by your SAML identity provider.
Specify the Issuer, copying the issuer value from your SAML identity provider.
Copy and paste your SAML identity provider's public certificate to the Public certificate field. Your public certificate should not include leading and trailing labels such as
-----BEGIN CERTIFICATE-----and-----END CERTIFICATE-----. Copy and paste only the value between these labels.
See our Single Sign-On documentation for details on how single sign-on works in Fivetran.
SAML Just-In-Time (JIT) User Provisioning
Fivetran supports JIT User Provisioning. This feature helps automate the user account creation. If both Enable SAML authentication and Enable user provisioning settings are on, Fivetran will perform the following actions on each successful SAML sign-on:
- If the user with the specified email address does not exist, Fivetran will create a new user with the email address, first name and last name as specified in the SAML assertion received from the Identity Provider.
- If the user exists, but their first name or last name have changed, Fivetran will update these fields with the new values.
If Enable user provisioning is OFF and the user with the specified email address does not exist, a sign-on attempt using SAML will throw an error.
Fivetran's Role-Based Access Model determines the permissions of a user. The new user is created with no permissions if System for Cross-domain Identity Management (SCIM) is not enabled in Fivetran for user provisioning. If SCIM is not set up, then a Fivetran user with the Users: Manage permission needs to grant this user the relevant role with the corresponding permissions on the Users tab. If SCIM is set up on the Fivetran account, then you can use the associated services provisioning feature to automatically grant permissions to your users.
Change the account name
To change the account name, follow these steps:
- At the top of the page, enter a new name in the Name field.
- Click Save.
Validated Certificates & Keys
The Validated Certificates & Keys section lists all TLS certificates and SSH host fingerprints that users on your account have validated when setting up connections or destinations.
When Fivetran connects to a source or destination that uses a self-signed TLS certificate or an SSH tunnel, we prompt you to confirm the server certificate or host key fingerprint before the connection can proceed. We store this one-time confirmation at the account level and use it automatically for all subsequent syncs.
For details on viewing, understanding, and revoking validated items, see Validated Certificates & Keys.
Users & Permissions
The Users & Permissions page provides functionalities for you to manage your teams, users, and user roles.
To manage user permissions for Activations, go to the Activations Settings > Members page instead.
Teams
On the Teams tab, you can:
- View a list of teams in your account.
- Add teams to your account.
- Delete teams from your account.
- View and edit team properties such as name and description.
- View the permission summary of a particular team.
- View and assign roles for teams:
- Account roles
- Destination role for every accessible destination
- Role for every connection in every accessible destination
- View and manage users in your account as team members.
- Assign and unassign team members the team manager role.
View team list
The teams list displays the Name, Account role, Manager, and number of Members for each team.
View team details
To get team details, click on the team in the team list. The Team Details page has the following tabs:
Team overview - displays the team name, description, team's account role, manag.ers, members, and a flattened permission summary for the team. This tab allows you to do the following:
- Edit team details such as name, description, and team's account role.
- View All destinations on the Destinations tab and connections on the Connections tab, which allow you to manage destination and connection permissions for the team, respectively.
- View All team members and team managers on the Members tab, which allows you to manage team members and assign and unassign the team manager role.
- Add members to the team.
Destinations - displays the list of accessible destinations with their Name and Type, as well as team's Destination permission, and the Permission source (either inherited from the team's account role or Manually edited). This tab allows you to Add members to the team, set the team's Destination permission for each destination, and navigate to each destination's Details page. You can search and sort the destination list by destination name and filter and sort it by destination type and permissions.
Connections - displays the list of accessible connections with their Connection name and Source type, assigned Destination, as well as team's Connection permission, and the Permission source (either inherited from the team's account role or Manually edited). This tab allows you to Add members to the team, set the team's Connection permission for each connection, and navigate to each connection's Details page. You can search and sort the connection list by connection name and filter it by source type, destination, and permissions, and sort it by connection name, source type, destination, and permissions.
Members - displays the list of members of the team, with their Name, Email, the member's Account role in the team, and the toggle defining whether the member is Manager. From this tab, you can Add members to the team, Remove user from the team, set the Manager permissions for the user, navigate to each member's User Overview page. You can search and sort the member list by member name and email and sort it by member name, email, account role, and team manager assignment.
Add team
To add a team:
- On the Team List page, click + Add Team. The Create Team page opens.
- Enter the Team name.
- Set the Account role for the team. The permission summary changes according to your selection.
- Enter a Description.
- Click Create team.
Delete team
To delete an existing team:
- On the Team List page, click the team. The Team Overview page opens.
- Click Edit team.
- Click Delete Team
- Type "DELETE" in the confirmation popup window.
- Click Delete Team.
View team member list
To view the team member list:
- On the Team List page, click a team in the team list. The Team Overview page opens.
- Click the Members tab.
- The team member list on the Members tab appears. You can view the team members' Name, Email, and Account Role, and whether the user has the Manager role.
Add users to team
To add users to a team:
- On either of the Team Overview, Destinations, Connections, or Members tab, click +Add members. The Add Members page opens.
- Search for the users you want to invite to the team and check the box beside their name to select them. Repeat this step for each user you want to add.
- Click Add to team.
You can only invite users within your Fivetran account.
From the Add Members page, you can also +Add new users to your account. In that case, the Team is already pre-selected.
Assign and unassign users the Team Manager role
Team Managers have the following permissions in their teams:
- Edit and delete their teams.
- Add and delete team members.
- Assign team members the Team Manager role.
A user who is a part of the team and not a team manager is classified as a team member. Team members have no permissions to modify or delete the team.
To assign the Team Manager role to a team member, go to the Members tab and set the Manager toggle to ON for every relevant team member.
To unassign the Team Manager role, set the Manager toggle to OFF.
Only Team Managers and Account Administrators can assign and unassign the Team Manager role.
Remove user from team
To remove a user from a team:
- On the Members tab, click the more options menu in the relevant user's entry.
- Click Remove user.
- In the confirmation popup window, click Remove.
Assign the team roles
You can assign either a standard role that has the same or wider set of permissions than the team's account role, or any custom role to the team.
To assign the team roles in destinations:
- On the Destinations tab of the Team Details page, select the relevant role from the Destination Permission drop-down menu for the relevant destination.
- Repeat the previous role selection step for every relevant destination.
To assign the team roles for connections:
- On the Connections tab of the Team Details page, select the relevant role from the Connection Permission drop-down menu for the relevant connection.
- Repeat the previous role selection step for every relevant connection.
When a user creates a connection or destination, they automatically are assigned the Manage Connection or Manage Destination role, respectively. Users can only set the role for connections or modify connections for which they have the Manage Connection role. Similarly, users can only set the role for destinations or modify destinations for which they have the Manage Destination role.
Reset team roles
You can reset a standard role that has the same or narrower set of permissions than the team's account role, or any custom role for the team.
- To unassign a team role in the destination:
- Go to the Destinations tab.
- Click X in the Destination Permission menu for the relevant destination. Now, the destination permission is inherited from the account role set for the team.
- To unassign a team role for the connection:
- Go to the Connections tab.
- Click X in the Connection Permission menu for the relevant connection. Now, the connection permission is inherited from the account role for the team.
Edit team
To change a team's details:
- On the Team Overview page, click Edit team.
- Enter a new Team Name.
- Select a new Account role.
- Enter a new Description.
- Click Save.
Users
On the Users tab, you can:
- View the list of users who are members of your account and their permissions.
- Add users to your account.
- Remove users from your account.
- Set account roles to users in the account.
- Set destination roles to users for specific destinations within your account.
- Set connection permissions to users for each connection in each accessible destination.
- Add users to and remove users from teams as team members and team managers.
View user list
The user list displays the Name, Email, Assigned account role, and Team of each user.
From the User List page, you can also add users to team by clicking Add to team.
View user details
To view the User Details page, click on the user in the user list. The User Details page has the following tabs:
User overview - displays the user's name, email address, account role, team membership, and a flattened permission summary. This tab allows you to do the following:
- Edit user details such as first and last name, email address, and user's account role.
- Add to teams or Edit team memberships.
- View All destinations on the Destinations tab and connection on the Connections tab, which allow you to manage user's permissions for individual destinations and connection, respectively.
- View user's transformation permissions.
Destinations - displays the list of accessible destinations with their Name and Type, as well as the user's Destination permission, and the Permission source (either inherited from the user's account role or Manually edited). This tab allows you to set the user's Destination permission for each destination and navigate to each destination's Details page. You can search, filter, and sort the destination list by destination name, destination type, and role.
Connections - displays the list of accessible connections with their Connection name and Source type, assigned Destination, as well as the user's Connection permission, and the Permission Source (either inherited from the user's account role or Manually edited). This tab allows you to set the user's Connection permission for each connection and navigate to each connection's Details page. You can search, filter, and sort the connection list by connection name, source type, destination, and role.
Teams - displays the list of teams the user is a member of, with their Name, the user's Account role in the team, name of the Manager, and number of Members. From this tab, you can Edit team membership of the user and navigate to each team's Team Overview page. You can search and sort the team list by team name and filter and sort it by account role and manager, as well as sort it by number of members.
Add or remove users
To add a user:
- On the User List page, click + Add User.
- Enter the First Name.
- Enter the Last Name.
- Enter the Email.
- Select the Account Role.
- Select the Team.
- Click Add User.
The user will get an invitation email to sign up for a Fivetran account.
To remove an existing user:
- On the User List page, click the more options menu to the right of the user's name.
- Click Delete user.
- In the confirmation popup window, click Delete to delete the user from account.
If you don't have Account Administrator role, you can still add users to a specific destination.
Re-send invitation
To re-send an invitation for a user:
- Click the more options menu icon to the right of the user's name.
- Click Resend invite.
Assign roles to a user
You assign a user an account role when you add a user. Later, you can assign a different account role to the user. Depending on the set account role and intended permissions, you may also need to assign the user separate destination permissions and connection permissions. You can assign one role for each destination in your account and one role for each connection in the available destination.
You can assign either a standard role that has the same or wider set of permissions than the user's account role, or any custom role to the user.
To assign the user roles in destinations:
- On the Destinations tab of the User Details page, select a role from the Destination Permission drop-down menu for the relevant destination.
- Repeat the previous role selection step for every relevant destination.
To assign and unassign the team roles for connection:
- On the Connections tab of the User Details page, select a role from the Connection Permission drop-down menu for the relevant connection.
- Repeat the previous role selection step for every relevant connection.
Reset user roles
You can reset a standard role that has the same or narrower set of permissions than the user's account role, or any custom role for the user.
- To reset a user role in a destination:
- Go to the Destinations tab.
- Click X in the Destination Permission menu for the relevant destination. Now, the destination permission is inherited from the account role set for the user.
- To reset a user role for a connection:
- Go to the Connections tab.
- Click X in the Connection Permission menu for the relevant connection. Now, the connection permission is inherited from the account role set for the user.
Edit team memberships
To edit user's team memberships in multiple teams at once:
- On the Teams tab, click Edit team memberships or Add user to team.
- Select the relevant teams' checkboxes to add the user to the teams or unselect the checkboxes to remove the user from the teams.
- Set the relevant teams' Manager toggles to ON to assign the user the Team Manager role. Set the toggles to OFF to unassign the Team Manager role.
- Click Save.
Roles
You must have an Enterprise or Business Critical plan to create and manage custom user roles.
If you want a user to have access to all destinations, set the Account role based on the permissions you want that user to have. If you want a user to have access to a specific destination and its connections, we recommend setting a destination-level role for that destination.
On the Roles tab, you can view the list of roles defined for your account, the access areas, and the number of users who are assigned each role.
You can also create, update, and delete custom roles.
Create a custom role
To add a new custom role, do the following:
Click +Add Role at the top right of the page.
Specify Role Name.
Enter a Description.
Since the description text is displayed as a hint when you hover over the role, we suggest that you enter a detailed description for the new custom role that includes all of its accessible resources and set permissions.
Enable or disable access to various resources using the toggles, then define their specific resource area permissions by selecting the relevant permissions from the drop-down menus:
Account level-permissions
Destination level-permissions
Connection access area with its specific access options:
- All - select this option to enable access to all connector types
- Selected - select this option to enable access to only certain connector types. Use the search to find connector types and check the box to enable access
- None - select this option to disable access to connections
The connection permissions are applied to all connector types that are accessible to the custom role.
Click Save to save.
Update a custom role
To edit a custom role, do the following:
- In the user role list on the Roles tab of your Fivetran dashboard, click the pencil icon on the right of the relevant role row.
- Define the new values and settings of the custom role properties.
- Click Save to save the changes.
Delete a custom role
To delete a custom role, do the following:
- In the user role list on the Roles tab , click the trash can icon on the right in the relevant role row.
- If the role you are deleting has any assigned users, a warning displays in the top right corner of your dashboard, prompting you to assign those users new roles.
- On the Users tab of your Fivetran dashboard, assign a new role to the users with the custom role you want to delete.
- On the Roles tab, make sure the role you are deleting has 0 users, and click the trash can icon.
- In the confirmation popup window, click Delete to permanently make this change.
Billing & Usage
Billing
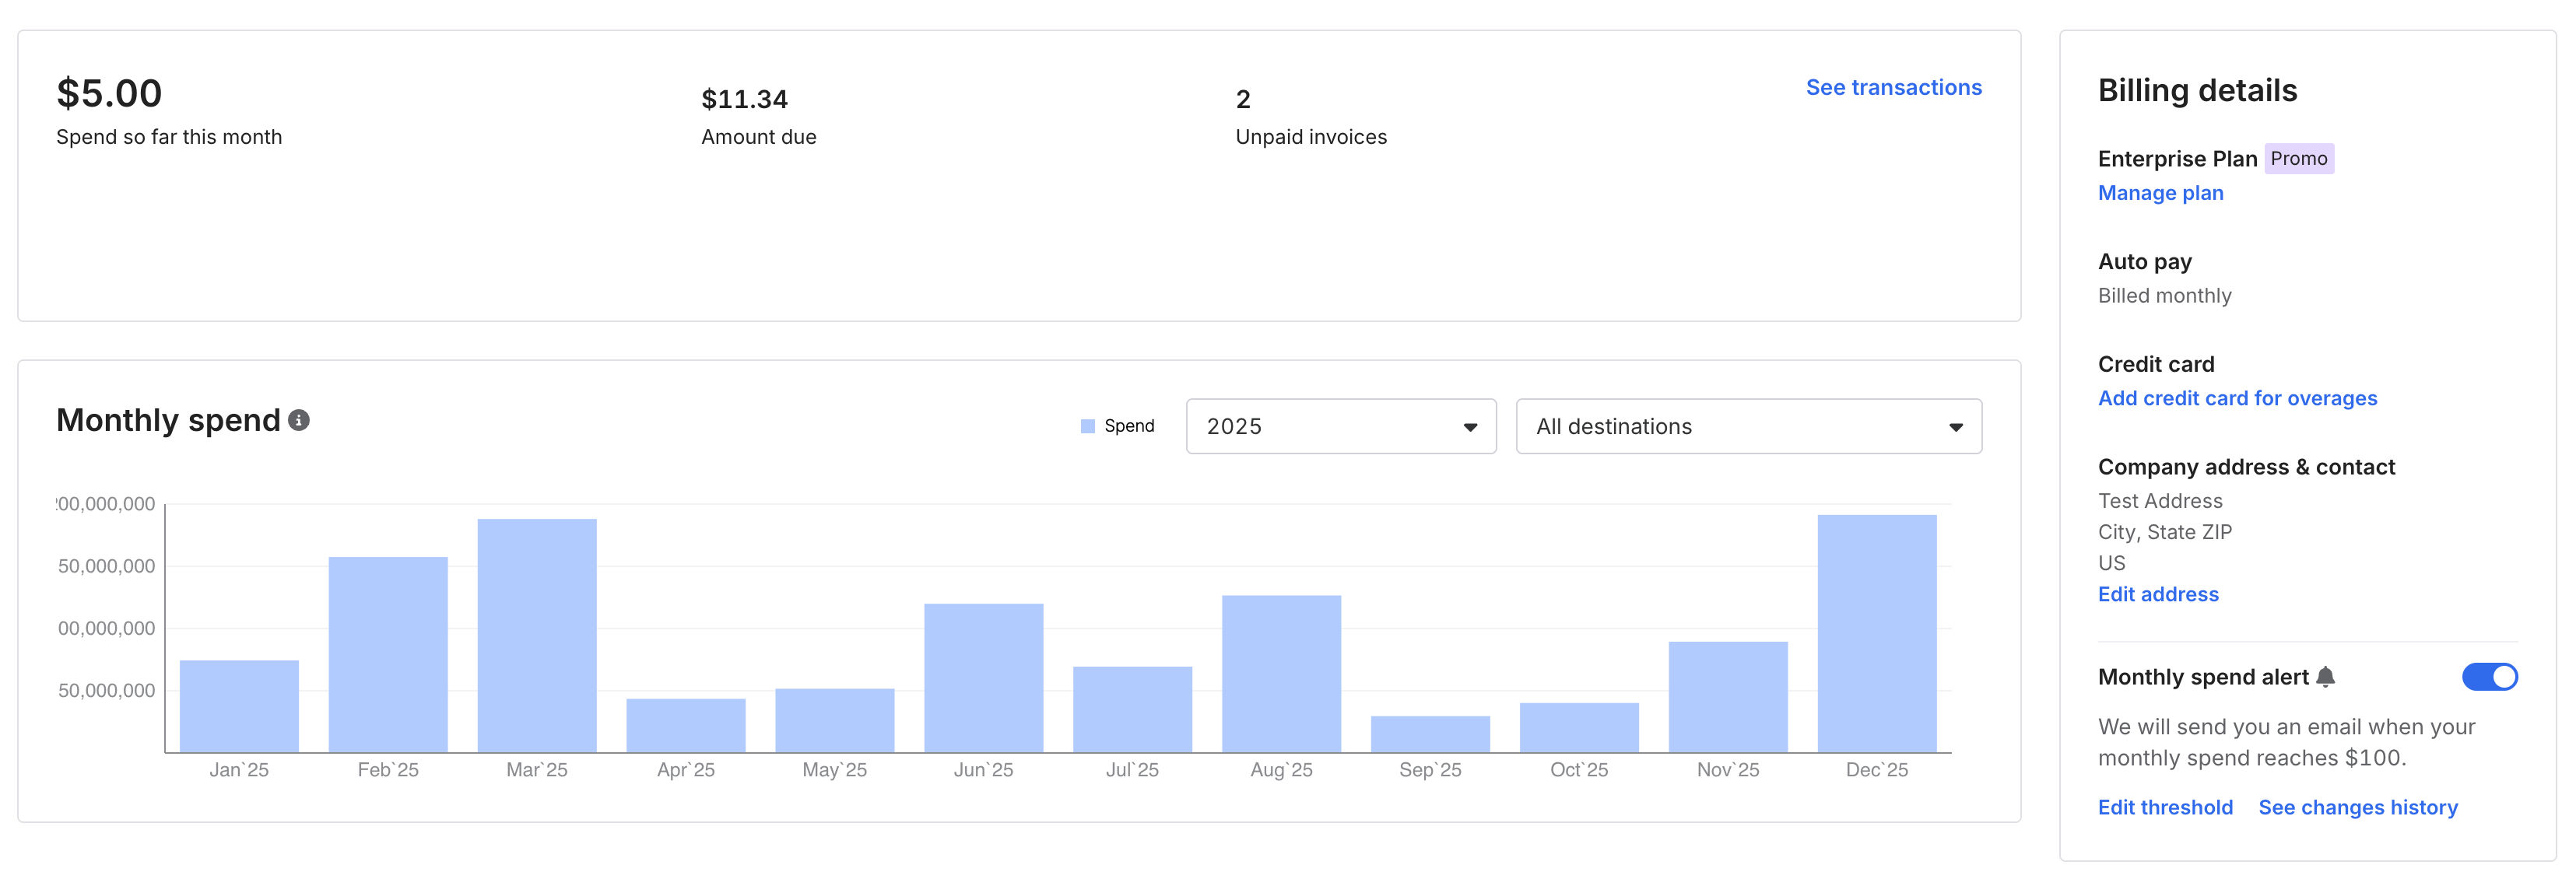
The Billing tab displays your current and past monthly spend details. You can also view and change your plan and payment details.
Fivetran users with the following roles can access the Billing tab:
- Account Administrator
- Account Billing
Consumption monitor
The consumption section in the top left corner of the Billing tab looks different based on whether you have an annual subscription, purchased Fivetran online, or purchased Fivetran through a partner marketplace.
Annual subscription
The Subscription period graph shows how much time is left in your subscription. The Spend tracker graph shows your consumption.
If you're consuming your spend balance at a higher rate than anticipated, you'll see a You may need to add to your spend balance message.
To connect to our Sales team, click Talk to Sales.
Online purchasing
In the consumption section, you can see details about your monthly spend.
Online plans automatically renew monthly, and you are auto-charged through your credit card each month.
To see more detailed usage information, click See usage.
Partner marketplace
In the consumption section, you can see details about your monthly spend.
To see more detailed usage information, click See usage.
Migrated Census account
Once you migrate your Census account to Fivetran, your billing information is displayed on the Billing page. However, if you are still on a Census pricing plan, you'll continue to see your billing information in the Settings > Organization Settings > Billing page of the Activations tab until you move to a Fivetran pricing plan.
Your plan details may take up to 24 hours after you initiated the migration to populate in the Billing tab.
View past usage
The Monthly spend bar chart shows your monthly spend. By default, the chart displays data for the current year and all destinations. To see data for past years or filter by a specific destination, use the drop-down menus in the chart’s top right.
Billing details
On the right, under Billing details, you can view and manage:
- Your billing plan
- Billing period
- Partner marketplace information (for accounts provisioned through a partner marketplace only)
- Credit card details
- Company address and contact information
- Monthly spend notifications
Change billing plan
If you are on a monthly subscription or the Free plan, you can change your plan anytime. Click Manage plan (or Upgrade to a plan, if you are on the Free plan) to open the plan comparison page and follow the instructions on the page.
If you purchased Fivetran through a partner marketplace, click the Visit marketplace link to change your plan.
Cancel plan
If you purchased Fivetran online, you can cancel your plan from the Billing tab. Under Billing details, click Manage plan, and then click Cancel plan at the bottom of the page.
Cancellation can take up to 10 minutes to be effective and show on your dashboard.
Add or change credit card details
Depending on whether you have already added credit card details or not, you can:
- Add a credit card for overages
- Change credit card
Online plans automatically renew monthly, and you are auto-charged through your credit card each month.
Add or change billing address
If your company address and contact information is missing, your invoices may be incomplete. Select Add company address to enter your details.
Review this information periodically and keep it up-to-date. If anything is outdated, click Edit address to update your company address and contact.
Configure usage alerts
You need an Account Administrator or Account Billing role to receive usage alerts.
Use the Monthly spend alert toggle to configure usage alerts. Set the toggle to ON, and enter a monthly spend threshold. When your spend within a month reaches this threshold, we send you an email notification. To adjust the threshold, click Edit threshold and enter a new spend threshold for your account.
There is no minimum spend threshold. The maximum spend threshold is your spend balance total.
Use See changes history to view the previous spend thresholds that have been set and adjusted.
These notifications can also be toggled in the Notifications page.
Billing history
The Billing history section lists your past transactions from newest to oldest. It includes:
- Date - When the transaction occurred or was posted.
- Transaction - The type of transaction. There are six types of transactions:
- Adjustment - Corrections applied to past usage.
- Contract (annual contracts only) - Shows when you’ve purchased an annual committed spend plan and the total value of the contract. This amount is added to your committed spend balance.
- Credit conversion (annual contracts only) - Applies only if you transitioned from a legacy credit-based pricing model. In this case, the remaining credits were converted into committed spend, resulting in an increase in your committed spend balance.
- Expired (annual contracts only) - If your contract period ends and you haven’t used your full committed spend, the remaining balance expires. This line item shows the expired amount.
See Contracted Spend Rollover for more information.
- Plan change - A plan change transaction type indicates a change in your pricing plan. There is no amount associated with this transaction. See our Plan Conversions documentation to learn more about the rules associated with plan changes.
- Usage - Your usage for a specific month. If you’re on an annual contract, this is the amount deducted from your committed spend. If you are on a month-to-month billing plan, this amount is charged.
- Amount - The value associated with the transaction.
- Committed spend left - The remaining balance from your prepaid contract (if you’re on an annual plan).
- Amount charged - The pre-tax billed amount tied to the transaction.
- Statements - The invoice number for reference and payment. Follow the link to open the invoice for further details.
To learn more, see our Billing History and Transactions FAQs.
Promotions
Promotions allow you to try a specific set of features for a limited time for no additional cost. If you have Account Administrator or Account Billing permissions, you can enroll in a promotion directly in your Fivetran dashboard.
Promotions are available for pricing plans. With a promotion, you can access a specific plan for no additional cost for twenty-eight days.
Promotions are only available for users with Free and Standard plans. If you have a Free plan, you can access the features that are available in a Standard plan. If you have a Standard plan, you can access the features that are available in an Enterprise plan.
Enroll in a promotion
When on a qualified pricing plan, you can access promotions through the following features in the dashboard:
- Database connectors
- REST API access
- SSH tunnels
- Improved sync times
- External log monitoring
- Custom user roles
- Cloud service providers
- SLA for data delivery
These features have a prompt next to them that reads Unlock this feature. Learn more or Unlock source. Learn more.
Find a feature on your dashboard with a Learn more prompt.
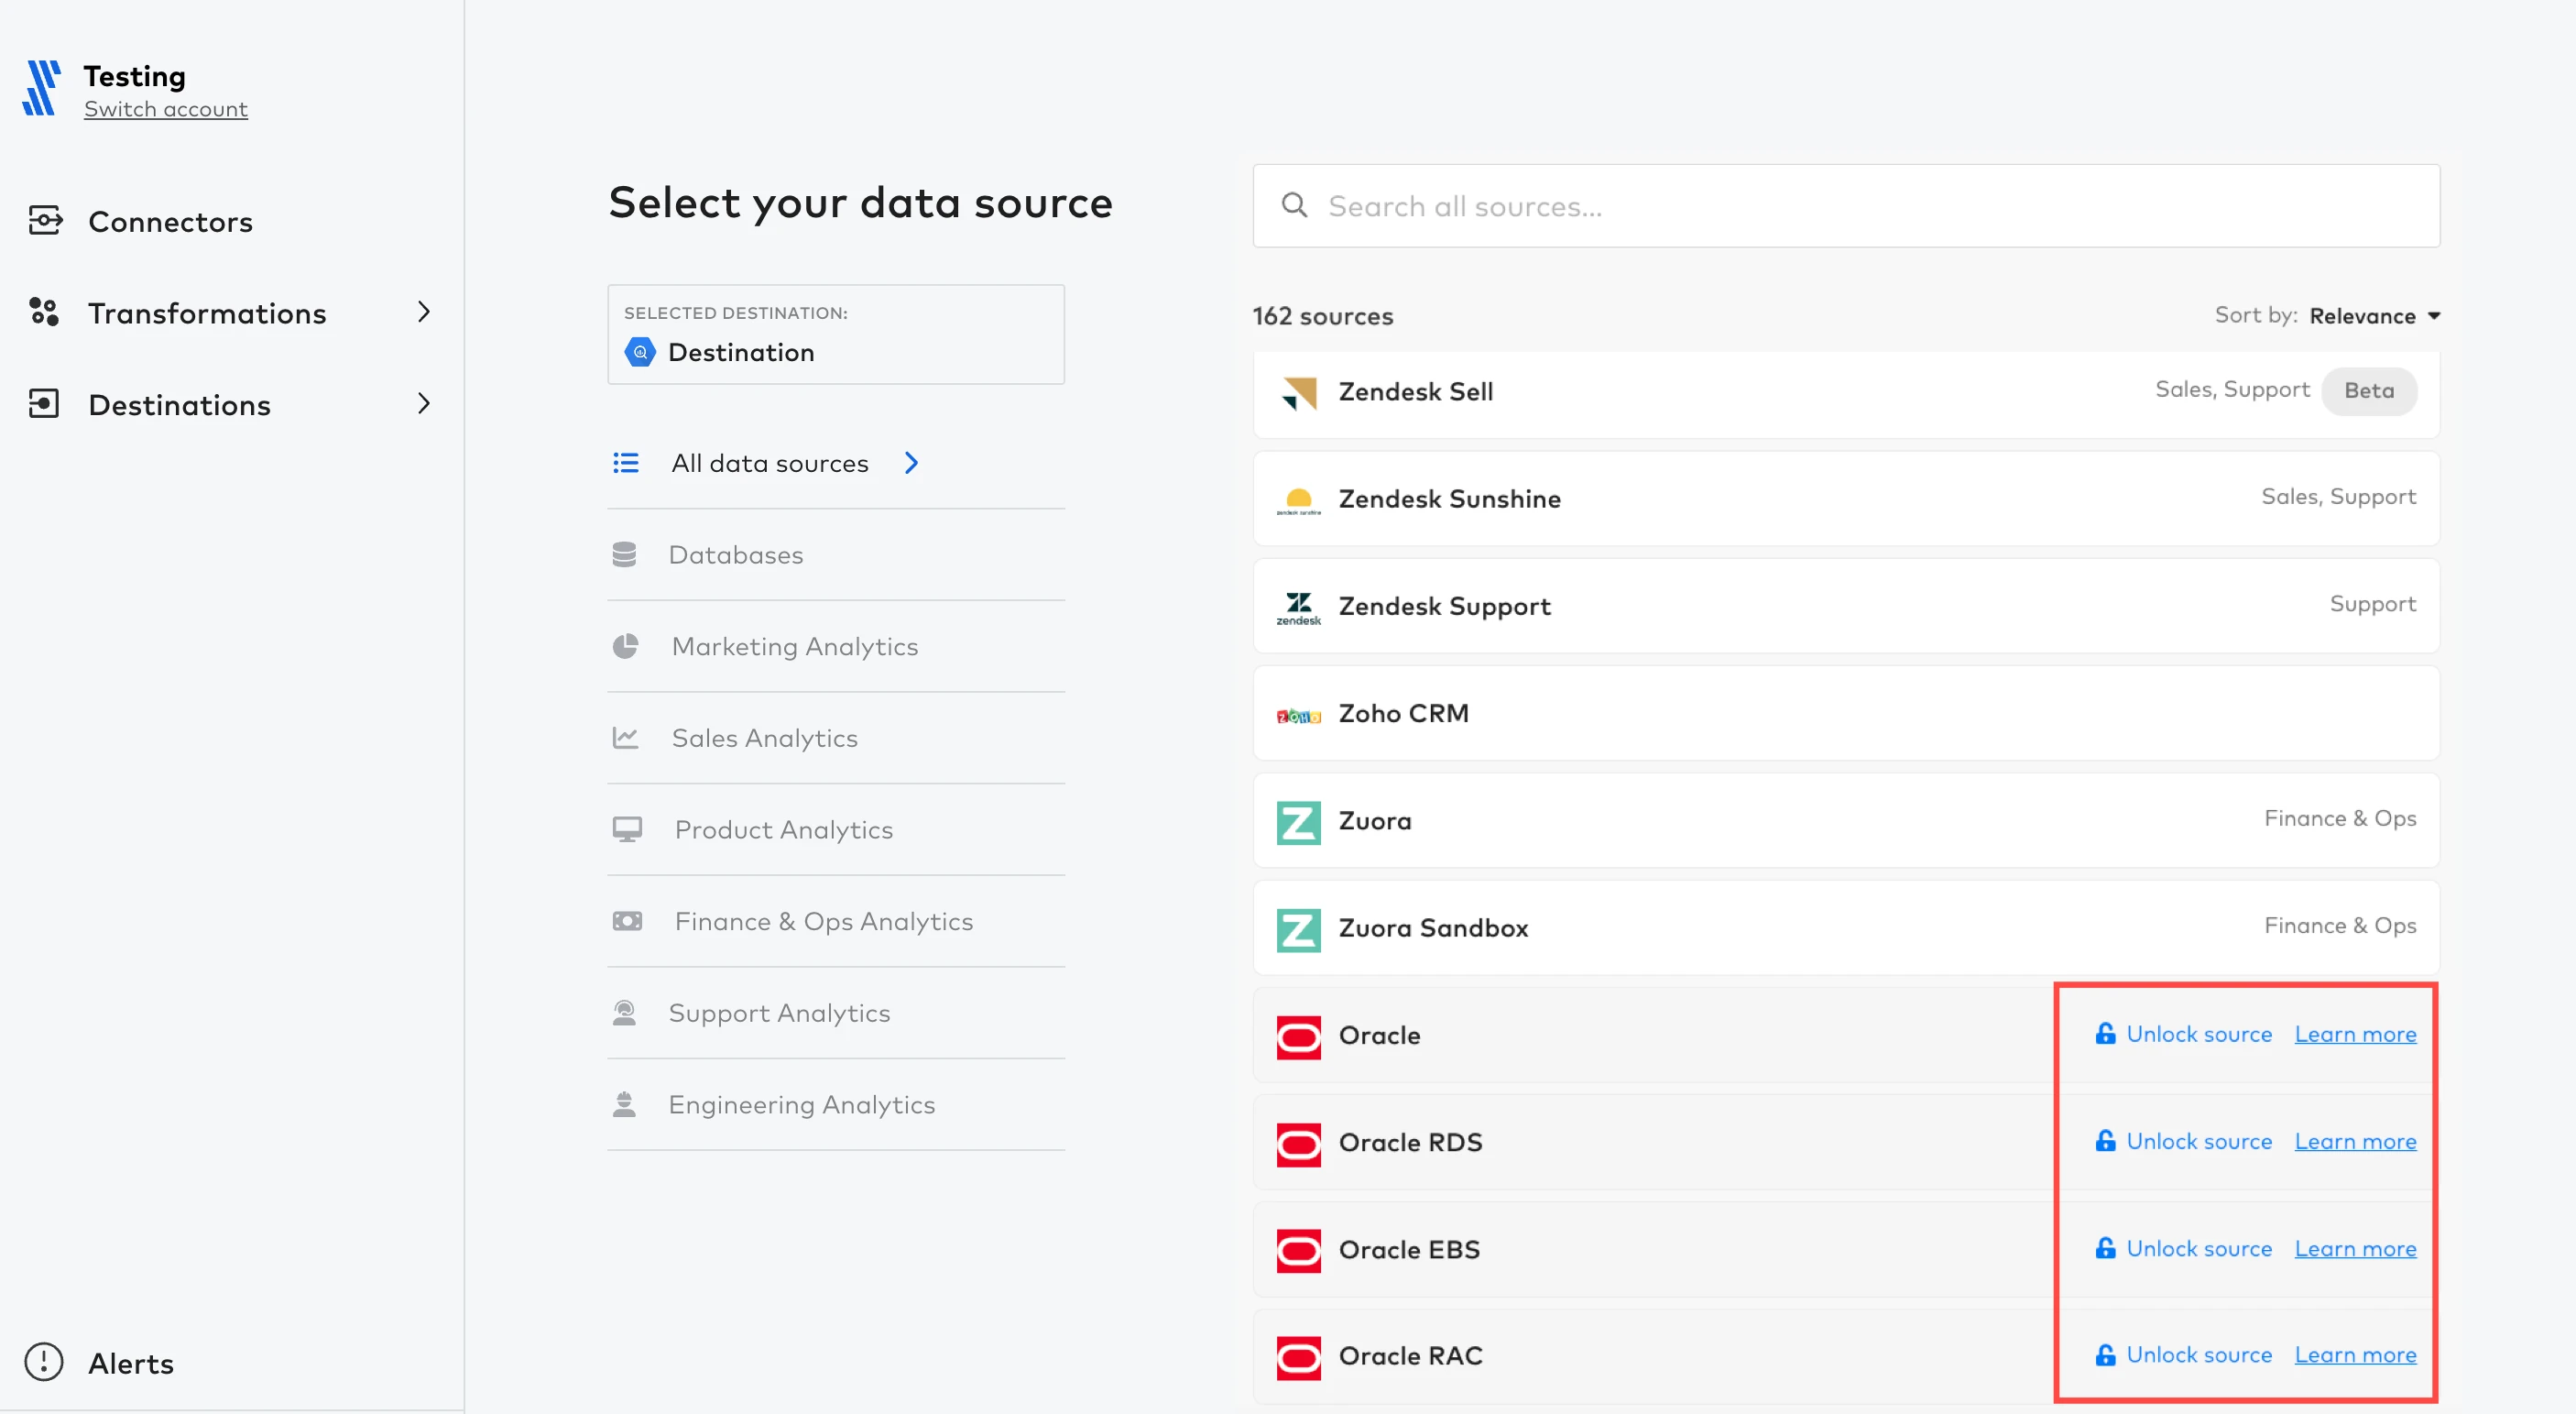
Click on the Learn more prompt. A pop-up window appears that describes the promotion.
In the pop-up window, click Try now to enroll in the promotion or Remind me to set a reminder.
When you select Remind me, an email request is sent to the Account Administrator. The email request describes the available promotion and links the Account Administrator to the Billing tab to sign up.
If you do not have Account Administrator or Account Billing permissions, you can send a promotion enablement request to a user with Account Administrator or Account Billing permissions.
Monitor a promotion
When you enroll in a promotion, you can see an overview of all the new features and benefits in your dashboard.
On the Billing tab, under Promotions, you can track the number of days remaining in your promotion. Click View connections to get a list of connections that are tied to a promotion.
Plans
Refer to the Plans tab to get a straightforward breakdown of each plan's features. Click Select plan to switch to another plan, if available. Follow the instructions to complete the process.
Usage
The Usage tab displays monthly connection and transformation usage information for your account. Fivetran users with the following roles can access the Usage tab:
- Account Administrator
- Account Billing
Connections
The Connections tab displays monthly usage data for your connections.
The Filter connection drop-down menus let you filter usage data by connection type and destination:
- The connections drop-down menu lets you filter usage between All connection types, Fivetran cloud, and HVR.
- The destinations drop-down menu lets you filter usage between All destinations or any particular destination in your account.
The Monthly spend section displays the amount of Paid MAR that you've consumed in the current month. The month drop-down menu lets you filter usage by selecting the Current month option or any past month since account creation.
Use the Export CSV option to export usage data of all connections and destinations for a specified date range.
The Connection usage & spend section displays your paid and free MAR for each connection. It also provides insight into changes in MAR usage expressed in percentages. This metric is a comparison of this month's paid MAR to the paid MAR from the equivalent period last month. Click View to get table-level usage data on a specific connection.
Your free MAR may change over the course of the month as we process the primary keys that we use to calculate paid MAR.
Activations
The Activations tab displays monthly usage data for your activations.
If you migrated your account from Census, activation usage details may take up to 24 hours to appear in the Usage tab.
The Monthly spend section displays the amount of paid MAR that you've consumed in the current month. The month drop-down menu lets you filter usage by selecting the Current month option or any past month since account creation.
The Activation usage & spend section displays your paid and free MAR for each activation. It also provides insight into changes in MAR usage expressed in percentages. This metric is a comparison of this month's paid MAR to the paid MAR from the equivalent period last month. Click View sync(s) to get sync-level usage data on a specific activation.
Transformations
The Transformation tab displays monthly usage data for your transformations. Here, you can see your transformation usage breakdown by day, the jobs run, and the associated usage for each job.
The Monthly overview section displays how much of your free monthly usage you have consumed so far in the month. It also displays the number of paid model runs and the associated costs (if any).
You can filter usage by Month, Destination, Transformation, and Run Type (Free or Metered).
Downloads
This section applies only to High-Volume Agent (HVA) and HVR downloads. For more information, see our documentation.