Epic Clarity Setup Guide Private Preview
Follow these instructions to replicate your Epic Clarity data to your destination using Fivetran.
Prerequisites
To set up your Epic Clarity connection, you need an Epic Clarity application that runs on a SQL Server database.
Setup instructions
Do not perform the Choose connection method step if you want to use Hybrid Deployment for your data pipeline.
Choose connection method
First, decide whether to connect your generic SQL Server database directly, using an SSH tunnel, using AWS PrivateLink, using Azure PrivateLink, or using Proxy Agent.
Connect directly (TLS required)
You must have TLS enabled on your database to connect directly to Fivetran. Follow Microsoft's TLS setup instructions to enable TLS on your database.
Fivetran connects directly to your database instance. To connect directly, configure your firewall and/or other access control systems to allow incoming connections to your SQL Server host and port (usually 1433) from Fivetran's IPs for your database's region. How you do this will vary based on how your SQL Server database is hosted (cloud platform, on-premises, etc.)
When connecting to a named instance, provide your SQL Server host and instance name as the Host value (in the format <host>\<instance_name>) in your connection setup form. If the SQL Server Browser service is active on your database, you can use port 1433 as the Port value if you want Fivetran to dynamically retrieve the port number of your named instance using this service. Otherwise, use the named instance port as the Port value.
Connect using SSH (TLS optional)
Fivetran connects to a separate server in your network that provides an SSH tunnel to your database. You must connect through SSH if your database is in an inaccessible subnet.
To connect using SSH, do the following:
In your connection setup form, select Connect via an SSH tunnel to expose Fivetran's public SSH key. Copy the key by clicking the blue clipboard icon.
Add the public key to the
authorized_keysfile of your SSH server. The key must be all on one line, so make sure that you don't introduce any line breaks when cutting and pasting.If you want Fivetran to tunnel SSH over TLS, follow Microsoft's TLS setup instructions to enable TLS on your database. Even though TLS is optional, TLS 1.0 is never supported. This is because the server will attempt to encrypt the authentication traffic with an obsolete TLS version, and Fivetran will refuse any TLS 1.0 connection, as it has been deprecated by the IETF.
You can only connect to named instances through an SSH tunnel if you specify your SQL Server host as the Host value and the named instance port as the Port value in your connection setup form.
Connect using AWS PrivateLink
You must have a Business Critical plan to use AWS PrivateLink.
AWS PrivateLink allows VPCs and AWS-hosted or on-premises services to communicate with one another without exposing traffic to the public internet. PrivateLink is the most secure connection method. Learn more in AWS’ PrivateLink documentation.
Follow our AWS PrivateLink setup guide to configure PrivateLink for your database.
Connect using Azure Private Link
You must have a Business Critical plan to use Azure Private Link.
Azure Private Link allows Virtual Networks (VNets) and Azure-hosted or on-premises services to communicate with one another without exposing traffic to the public internet. Learn more in Microsoft's Azure Private Link documentation.
Follow our Azure PrivateLink setup guide to configure Private Link for your database.
Connect using Proxy Agent
Fivetran connects to your database through the Proxy Agent, providing secure communication between Fivetran processes and your database host. The Proxy Agent is installed in your network and creates an outbound network connection to the Fivetran-managed SaaS.
To learn more about the Proxy Agent, how to install it, and how to configure it, see our Proxy Agent documentation.
TLS is required for direct connections and optional for SSH connections. If you don't know your TLS version, do the following to check your version:
Fivetran does not support TLS 1.0. Both direct connections and SSH connections will fail with TLS 1.0 enabled.
Expand for instructions
- Navigate to the
runmenu. - Run
regedit. - Check the following registry values:
- For TLS 1.1:
HKEY_LOCAL_MACHINE\SYSTEM\CurrentControlSet\Control\SecurityProviders\SCHANNEL\Protocols\TLS 1.1\Client\DisabledByDefaultmust be set to0HKEY_LOCAL_MACHINE\SYSTEM\CurrentControlSet\Control\SecurityProviders\SCHANNEL\Protocols\TLS 1.1\Client\Enabledmust be set to1
- For TLS 1.2:
HKEY_LOCAL_MACHINE\SYSTEM\CurrentControlSet\Control\SecurityProviders\SCHANNEL\Protocols\TLS 1.2\Client\DisabledByDefaultmust be set to0HKEY_LOCAL_MACHINE\SYSTEM\CurrentControlSet\Control\SecurityProviders\SCHANNEL\Protocols\TLS 1.2\Client\Enabledmust be set to1
- For TLS 1.1:
Allow TCP/IP protocol
Verify that your database server is configured to allow TCP/IP connections. If your database instance does not have TCP/IP protocol enabled, follow the instructions below.
Enable TCP/IP protocol
Open SQL Server Configuration Manager.
In the tree pane, click SQL Server Network Configuration to expand it.

Click Protocols for YourInstanceName. If you specified the default instance during installation, the instance name will be MSSQLSERVER.
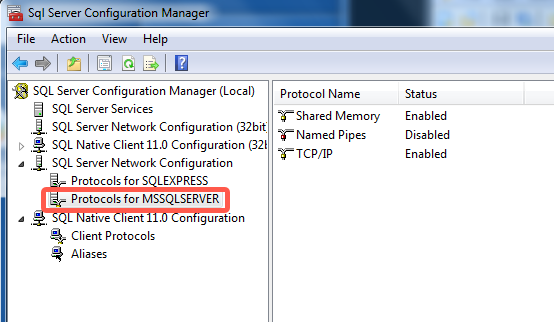
In the Status column, verify that TCP/IP is Enabled.
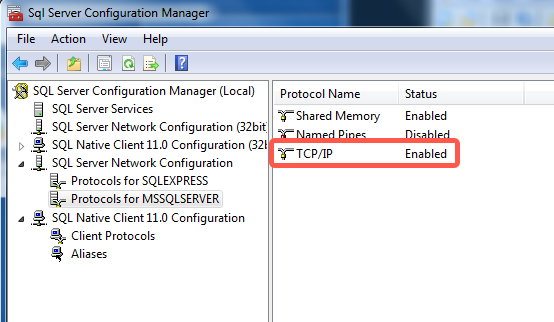
If Disabled appears, right-click TCP/IP, then click Enable.
Right-click TCP/IP, then select Properties.
Go to the IP Addresses tab and scroll all the way down.
In the IPAll section, enter your database's port number (usually
1433) for the TCP Port, then click Apply.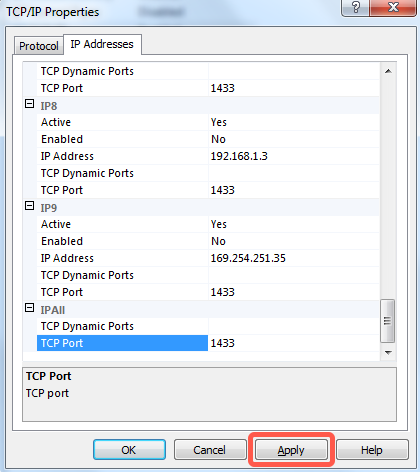
Click OK in the warning dialog box that pops up.

Click OK in the TCP/IP Properties dialog box.
In the tree pane, click SQL Native Client Configuration to expand it, then click Client Protocols.
In the right-hand column, verify that Enabled appears next to TCP/IP.
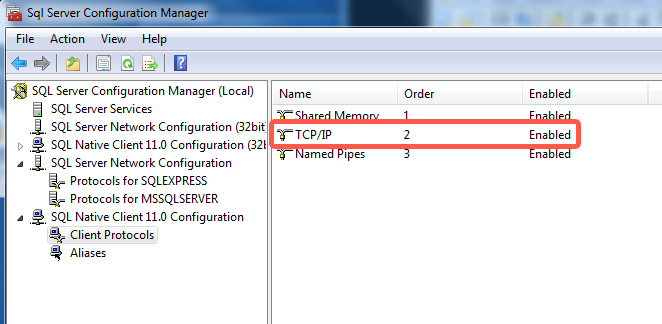
If Disabled appears, right-click TCP/IP, then click Enable.
Right-click TCP/IP, then select Properties.
Verify that the Default Port is
1433and that Yes appears next to Enabled.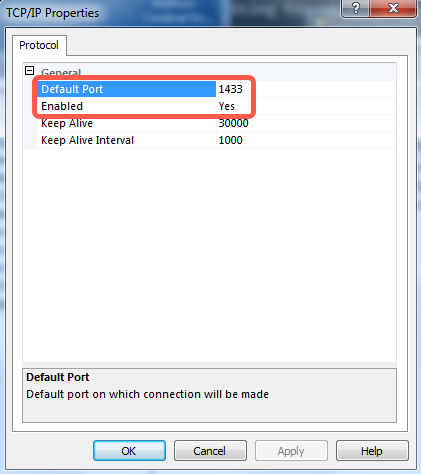
Click OK to exit the TCP/IP Properties dialog box.
In the tree pane, click SQL Server Services.
In the right pane, right-click SQL Server (YourInstanceName), then click Restart.
Create user
Create a database user for Fivetran's exclusive use. The Fivetran user must be a SQL database user, not an Active Directory user.
Connect to your SQL Server database as an Admin user.
Create a user for Fivetran by executing the following SQL commands. Replace
<database>with the name of your database,<username>with the username of your choice, and<password>with a password of your choice.USE [<database>]; CREATE LOGIN <username> WITH PASSWORD = '<password>'; CREATE USER <username> FOR LOGIN <username>;
Grant user permissions
Grant the Fivetran user SELECT permission for the databases, schemas, tables, or specific columns you want Fivetran to sync.
You can grant access to everything in a given database:
GRANT SELECT on DATABASE::<database> to <username>;or all tables in a given schema:
GRANT SELECT on SCHEMA::<schema> to <username>;or a specific table:
GRANT SELECT ON [<schema>].[<table>] TO <username>;or a set of specific columns in a table:
GRANT SELECT ON [<schema>].[<table>] ([<column 1>], [<column 2>], ...) TO <username>;(Optional) For SQL Server for Linux, if you are using Change Tracking with history mode enabled, to improve performance and reduce delays, you may want to grant the necessary permissions to the Fivetran user by running the following command:
USE [master]; GRANT VIEW SERVER STATE TO <username>;This grants the Fivetran user access to server state information, minimizing the dependency on checkpoint timing and reducing update delays. See the Sync Delays with SQL Server for Linux Using Change Tracking with History Mode Enabled troubleshooting page for details.
Enable incremental updates
Fivetran performs incremental updates of any new or modified data from your source database. We use one of the following incremental update mechanisms:
These mechanisms let Fivetran copy only the rows that have changed since the last data sync, so we don't have to copy the whole table every time. Learn more in our Updating data documentation.
Follow the instructions to set up your chosen incremental update mechanism.
Standard sync
If you enable the supplemental table that helps track your base table, we automatically detect that table and sync via standard sync. For example, to replicate data from your Epic Clarity database using Fivetran, enable CSA tables for the base tables you intend to sync.
Fivetran Teleport Sync
You do not need to do any additional configuration to use Fivetran Teleport Sync.
Finish Fivetran configuration
In your connection setup form, enter a destination schema prefix. This prefix applies to each replicated schema and cannot be changed once your connection is created.
In the Host field, enter your database host's IP (for example,
1.2.3.4) or domain (for example,your.server.com).Enter your database instance's port number. The port number is usually
1433.Enter the Fivetran-specific user that you created in Step 3.
Enter the password for the Fivetran-specific user that you created in Step 3.
Enter the name of your database (for example,
your_database).(Hybrid Deployment only) If your destination is configured for Hybrid Deployment, the Hybrid Deployment Agent associated with your destination is pre-selected in the Select an existing agent drop-down menu. To use a different agent, select the agent of your choice, and then select the same agent for your destination
(Not applicable to Hybrid Deployment) Choose your connection method. If you selected Connect via an SSH tunnel, provide the following information:
- SSH hostname (do not use a load balancer's IP address/hostname)
- SSH port
- SSH user
- If you enabled TLS on your database in Step 1, make sure to keep the Require TLS through Tunnel toggle turned ON.
(Optional for Hybrid Deployment) If you want to use a TLS connection between your Hybrid Deployment Agent and Fivetran cloud, set the Require TLS toggle to ON.
Before you set this toggle to ON, follow Microsoft's setup instructions to enable TLS on your database. We do not support TLS 1.0.
Click Save & Test. Fivetran tests and validates our connection to your Epic Clarity database. Upon successful completion of the setup tests, you can sync your data using Fivetran.
Setup tests
Fivetran performs the following tests to ensure that we can connect to your Epic Clarity database and that it is properly configured:
- The Connecting to SSH Tunnel Test validates the SSH tunnel details you provided in the setup form. It then checks that we can connect to your database using the SSH Tunnel. (We skip this test if you aren't connecting using SSH.)
- The Connecting to Host Test validates the database credentials you provided in the setup form. It then verifies that the database host is not private and checks that we can connect to the host.
- The Validating Certificate Test generates a pop-up window where you must choose which certificate you want Fivetran to use. It then validates that certificate and checks that we can connect to your database using TLS. (We skip this test if you selected an indirect connection method and then disabled the Require TLS through Tunnel toggle.)
- The Connecting to Database Test checks that we can access your database.
- The Checking Access to Schema Test checks that we have the correct permissions to access the schemas in your database. It then verifies that your database contains at least one table.
The tests may take a few minutes to finish running.
Related articles
description Connector Overview