High-Volume Agent Oracle Setup Guide
Follow the instructions listed here to replicate your Oracle database to your destination using Fivetran.
The Fivetran connection setup form lets you specify essential information for creating an Oracle connection, such as database credentials, connection method, High-Volume Agent (HVA) connection credentials, and other database-specific parameters. You need to set up your infrastructure, including network and database configurations, to obtain the parameter values required for this setup form.
Before entering details into the setup form, you must perform the following configurations:
- Ensure the prerequisites are in place
- Install and configure HVA
- Configure your network
- Configure database access and permissions:
For detailed instructions, refer to the relevant sections below.
Prerequisites
To connect your Oracle database to Fivetran using the High-Volume Agent (HVA), you need:
A Fivetran account with an Enterprise or Business Critical plan
Oracle 11g R2 and above
Your database host IP address:
- If you are using Oracle RAC, either a VIP (Application Virtual IP) or a node's public IP
- This IP address must be accessible from Fivetran either directly or through an SSH tunnel
Your database port (usually
1521)Connection string for the HVA to use to connect to your database:
- For Single Instance, specify Oracle SID
- If you are using Oracle RAC or Multitenant (pluggable databases), specify a Service Name
- If you are using Service Name, it must have an entry in your local
tnsnames.ora
High-Volume Agent (HVA) installed on the host where your Oracle database is running or on a separate host that has access to the database. If you install HVA on a host that is different from the Oracle database host, you must also install the Oracle Database Client on that host.
The HVA IP address and port number (usually
4343)Supplemental logging enabled in your database
Database in the ARCHIVELOG mode
HVA installation and configuration
This section guides you through the process of installing the HVA, as well as configuring and starting the HVA. You will find information on compatibility checks, disk space requirements, and system permissions necessary for installation. Additionally, you will learn how to integrate the HVA into your system's startup to ensure it runs automatically upon boot.
HVA requirements
Before proceeding with the HVA installation, ensure that you have the following prerequisites in place:
Compatibility: Verify that the HVA version is compatible with your operating system and DBMS. Refer to the COMPATIBILITY section in the relevant release notes on the Downloads page of your Fivetran dashboard.
Sufficient disk space: Ensure that the machine where you want to install the HVA has ample disk space. We recommend a minimum of 10 GB of available disk space.
HVA installation:
Download the HVA installation file from the Downloads page of your Fivetran dashboard. Select the installation file for your database server's operating system.
You must install the HVA on the host where your Oracle database is running or on a host that has access to the database. If you install HVA on a host that is different from the Oracle database host, you must also install the Oracle Database Client on that host.
Oracle RAC: You have the following installation options:
- Install the agent on a shared storage system that is visible in all nodes. For example, ACFS file system. We recommend this approach.
- Install the agent on one node. This does not provide High-Availability (HA) if the node goes down.
- Install the agent on all the nodes within the Oracle RAC.
Oracle Active Data Guard: Install the agent on your standby nodes.
System permissions: The HVA requires permission to read Oracle's redo and archive files at the operating system-level. You can achieve this in one of the following ways:
- Install and run the agent under the database owner user account (for example,
oracle). - Install and run the agent under a different user account (for example,
fivetran_user) that is a member of Oracle's default operating system group. Typically, this group is eitheroinstallordbaon Unix-based systems andora_dbaon Windows.
- Install and run the agent under the database owner user account (for example,
Install HVA
Depending on your database server's operating system, follow the instructions below to install the HVA.
Install HVA on Linux
Create folder structure:
i. As the
rootuser, create the HVA installation directory (for example,/opt/fivetran) and set the appropriate owner (for example,oracle) and group (for example,oinstall) for it.mkdir /opt/fivetran chown -R oracle:oinstall /opt/fivetranIf you are using Oracle RAC with shared storage (for example, ACFS), ensure that the
/opt/fivetranfolder is created on the shared storage and mounted on all nodes in the cluster. If you are not using the shared storage, the/opt/fivetranfolder must be created on all nodes in the cluster.ii. In the
/opt/fivetrandirectory, create three key subdirectorieshvr_home,hvr_config, andhvr_tmp:mkdir -p /opt/fivetran/hvr_home mkdir -p -m 01775 /opt/fivetran/hvr_config/etc /opt/fivetran/hvr_tmpConfigure environment:
If using Oracle RAC, ensure this step is performed on all nodes in the cluster.
i. Configure the
HVR_HOME,HVR_CONFIG, andHVR_TMPenvironment variables to point to the relevant HVA installation subdirectories:HVR_HOME=/opt/fivetran/hvr_home HVR_CONFIG=/opt/fivetran/hvr_config HVR_TMP=/opt/fivetran/hvr_tmpii. Add the
$HVR_HOME/binexecutable directory path to the environment variablePATH:export PATH=$PATH:$HVR_HOME/biniii. Add the environment variables and the executable directory path into the startup file (for example,
.profileor.bash_profile):export HVR_HOME=/opt/fivetran/hvr_home export HVR_CONFIG=/opt/fivetran/hvr_config export HVR_TMP=/opt/fivetran/hvr_tmp export PATH=$PATH:$HVR_HOME/binInstall agent:
If you are using Oracle RAC with the
/opt/fivetranfolder created on shared storage, you need to perform this step only once. If you are not using shared storage, you must repeat this step for all nodes in the cluster.Navigate into the
$HVR_HOMElocation and extract the contents of the HVA installation file (for example,fivetran-6.1.0_26-hub_and_agent-linux_glibc2.12-x64-64bit_ga_patch.tar.gz):cd $HVR_HOME tar xzf /tmp/fivetran-6.1.0_26-hub_and_agent-linux_glibc2.12-x64-64bit_ga_patch.tar.gzOnce complete, the agent and all required components are installed into the
$HVR_HOMElocation (/opt/fivetran/hvr_home).
Install HVA on Unix
Create folder structure:
i. Create the HVA installation base directory (for example,
/opt/fivetran) and set the appropriate owner, group, and permissions on it by running the following command as userroot:mkdir /opt/fivetran chown -R oracle:oinstall /opt/fivetranIf you are using Oracle RAC with shared storage (for example, ACFS), ensure that the
/opt/fivetranfolder is created on the shared storage and mounted on all the nodes in the cluster. If you are not using shared storage, the/opt/fivetranfolder must be created on all the nodes in the cluster.ii. Within the
/opt/fivetrandirectory, create three key subdirectories:hvr_home,hvr_config, andhvr_tmp:mkdir -p /opt/fivetran/hvr_home mkdir -p -m 01775 /opt/fivetran/hvr_config /opt/fivetran/hvr_tmpConfigure environment:
If you are using Oracle RAC, make sure you perform this step on all the nodes in the cluster.
i. Configure the environment variables
HVR_HOME,HVR_CONFIG, andHVR_TMP:export HVR_HOME=/opt/fivetran/hvr_home export HVR_CONFIG=/opt/fivetran/hvr_config export HVR_TMP=/opt/fivetran/hvr_tmpii. Add the
$HVR_HOME/binexecutable directory path to the environment variablePATH:export PATH=$PATH:$HVR_HOME/biniii. Add the HVR environment variables and the executable directory path to the startup file (for example,
.profileor.bash_profile):export HVR_HOME=/opt/fivetran/hvr_home export HVR_CONFIG=/opt/fivetran/hvr_config export HVR_TMP=/opt/fivetran/hvr_tmp export PATH=$PATH:$HVR_HOME/binInstall agent:
If you are using Oracle RAC with the
/opt/fivetranfolder created on shared storage, you must perform this step only once. If you are not using shared storage, you must perform this step for all nodes in the cluster.Go to the
$HVR_HOMElocation and extract the installer file to install HVA and all the other required components:cd $HVR_HOME gzip -dc /tmp/hvr-*-agent_only-*.tar.gz | tar xf -
The size of the installer is less than 150 MB. After you install HVA, you can delete the installer file as you no longer need them.
Install HVA on Windows using ZIP file
The HVA installation file for Windows is available in the .exe and .zip formats. The compressed file (.zip) distribution is normally used as an alternative for the Windows executable based (.exe) distribution. The steps to install the HVA are also different for both formats.
Create folder structure:
As the Administrator user, create an HVA installation directory (for example,
C:\hvr) with three subdirectorieshvr_home,hvr_config, andhvr_tmp:mkdir C:\hvr\hvr_home mkdir C:\hvr\hvr_config mkdir C:\hvr\hvr_tmpConfigure environment:
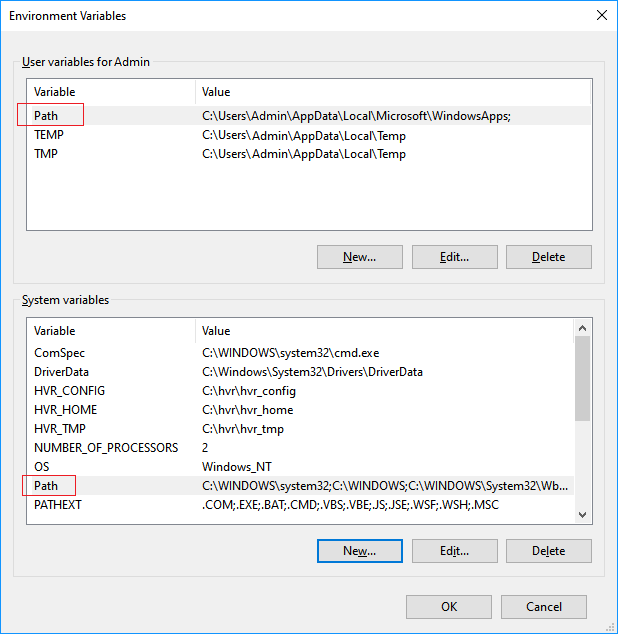
Configure the
HVR_HOME,HVR_CONFIG, andHVR_TMPenvironment variables, each pointing to the relevant HVA installation directorieshvr_home,hvr_config, andhvr_temp:The following instructions assume that the directories are created inside the
C:\hvrdirectory. Use your installation directory if it differs fromC:\hvr.i. Navigate to Control Panel ▶ System and Security ▶ System ▶ Advanced system settings.
ii. Under the Advanced tab, click Environment Variables....
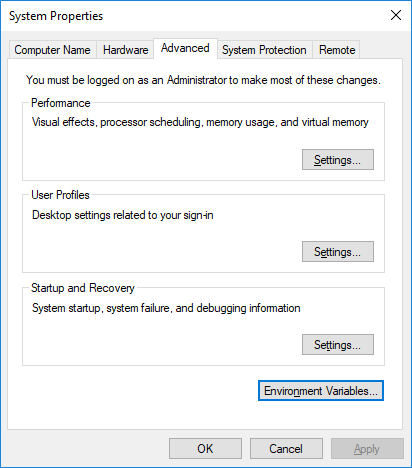
iii. In the System variables or User Variables for user_name section, click New.
iv. Enter Variable name (e.g,
HVR_HOME) and Variable value (e.g,C:\hvr\hvr_home).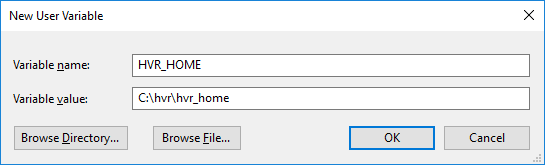
v. Click OK. Repeat the above steps iii and iv for environment variables
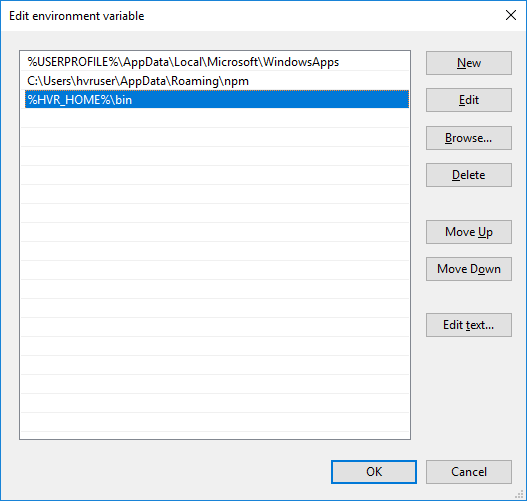
HVR_CONFIGandHVR_TMP.Add the HVR executable directory path to the environment variable
Path:i. In the System variables or User Variables for user_name section, from the list of variables, select Path and click Edit....
ii. In the Edit environment variable dialog, click New and enter the path for the HVA executable. Click OK.
Install HVA:
Navigate to the
$HVR_HOMEdirectory (C:\hvr\hvr_home) and extract the contents of the downloaded.zipfile.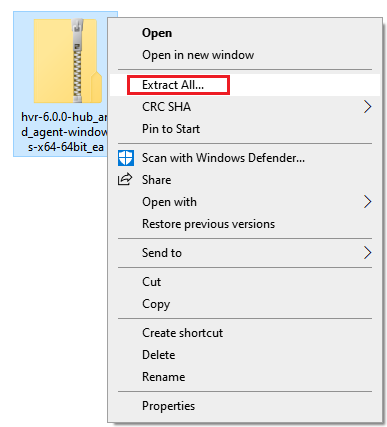
Once completed, the HVA and all required components are installed into the
$HVR_HOMEdirectory (C:\hvr\hvr_home).
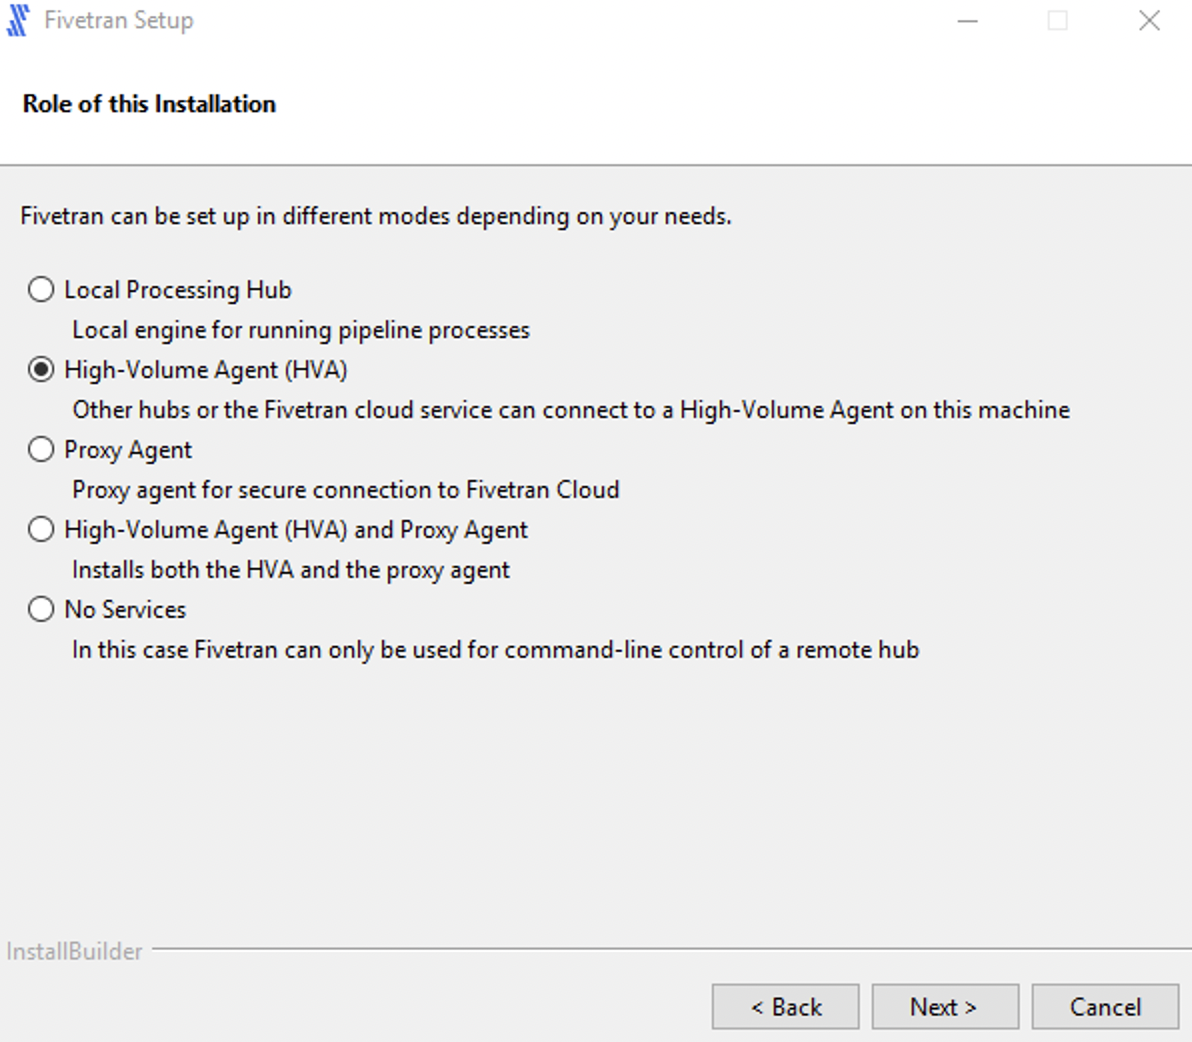
Install HVA on Windows using EXE file
The HVA installation file for Windows is available in the .exe and .zip formats. The compressed file (.zip) distribution is normally used as an alternative for the Windows executable based (.exe) distribution. The steps to install the HVA are also different for both formats.
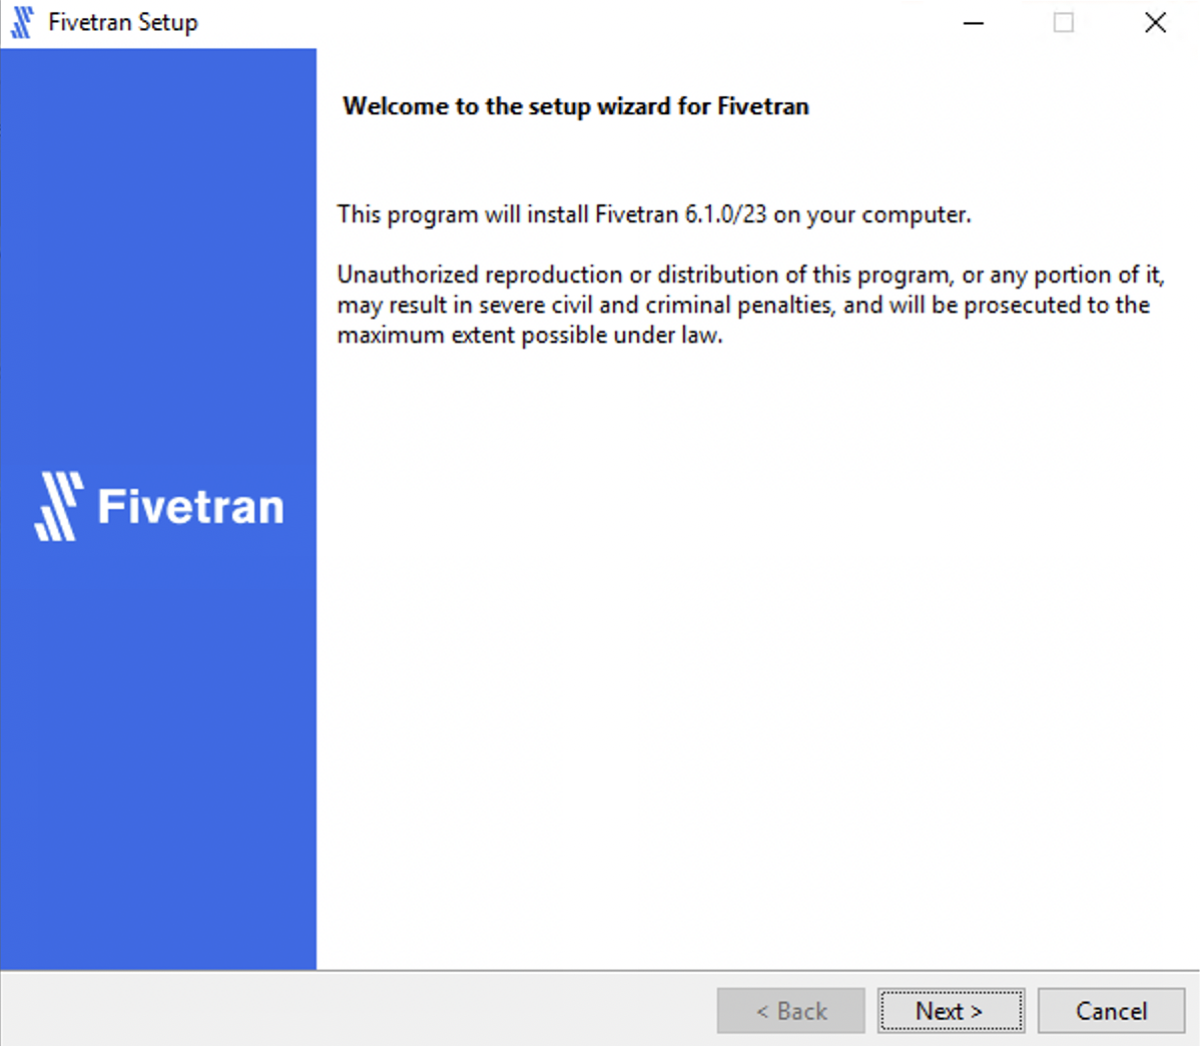
Run the downloaded
.exefile (for example,hvr-6.1.0_10-hub_and_agent-windows-x64-64bit_ga_patch-setup.exe).In the setup wizard dialog, click Next.
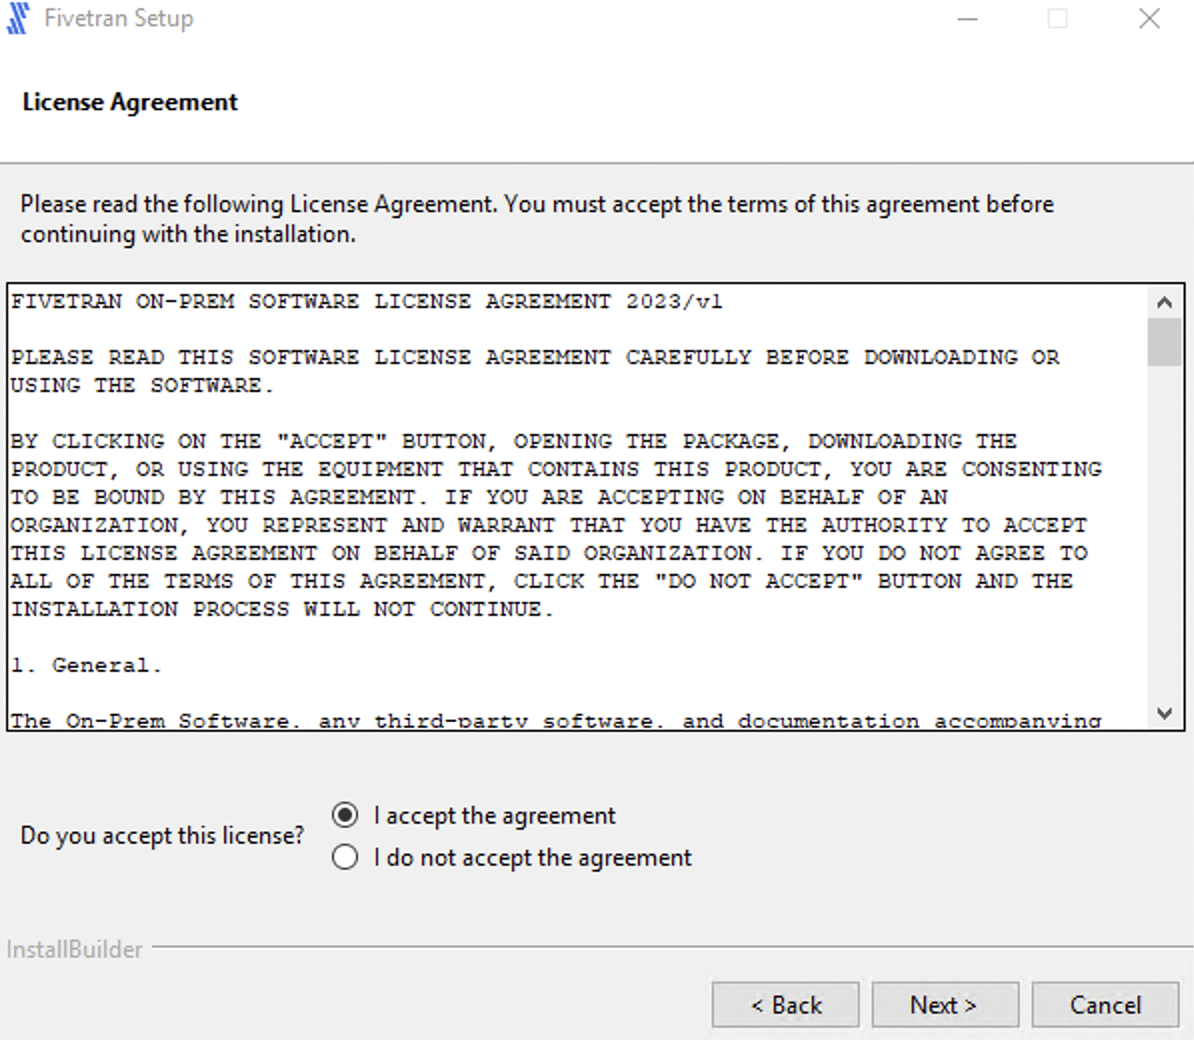
Read the License Agreement, select I accept the agreement and then click Next.
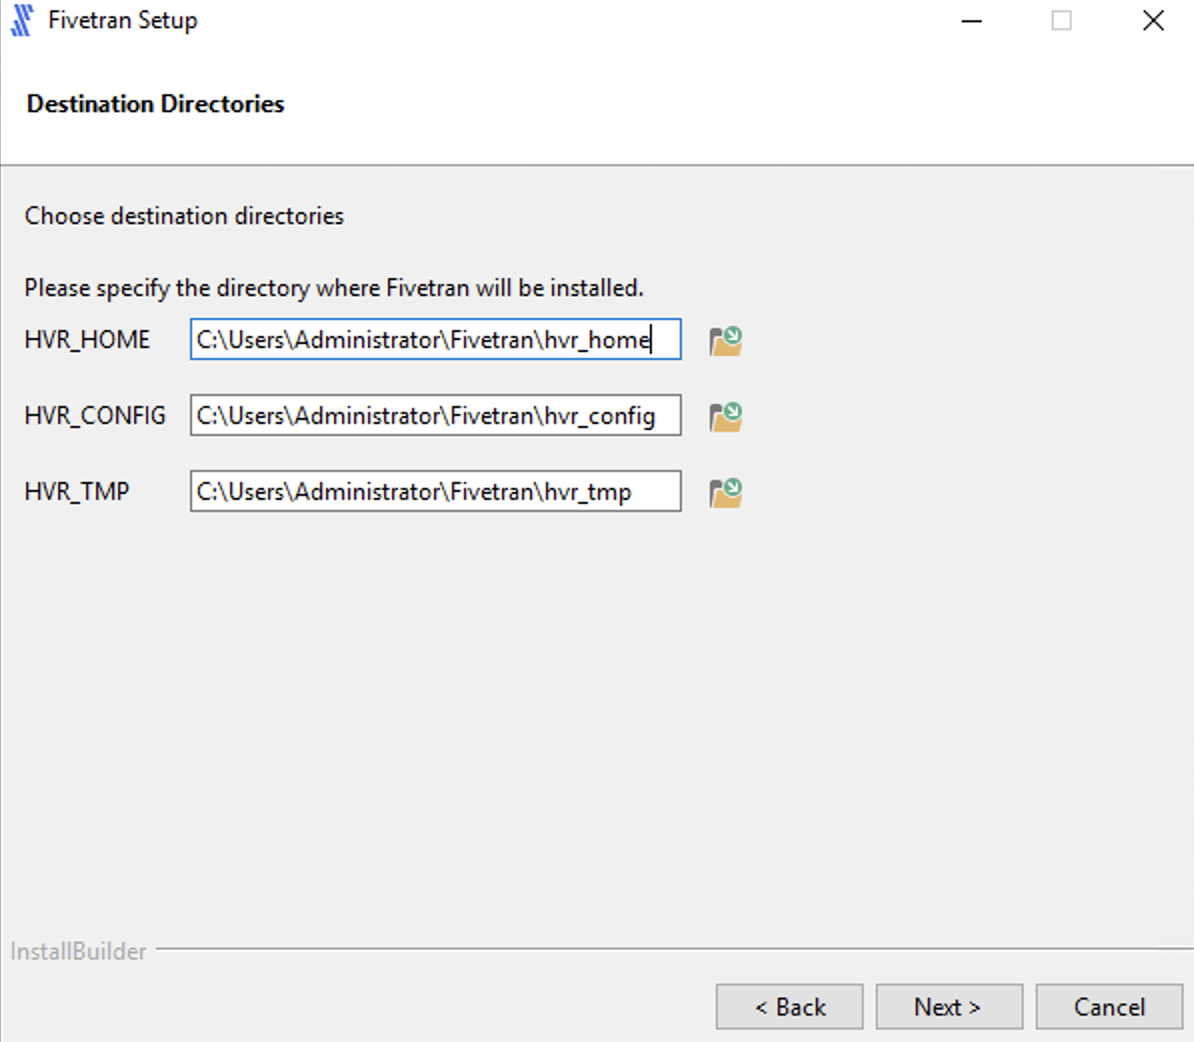
Specify the HVA installation directories and click Next.
Click Next to create a program folder for the HVA.

Select High-Volume Agent (HVA) and click Next.
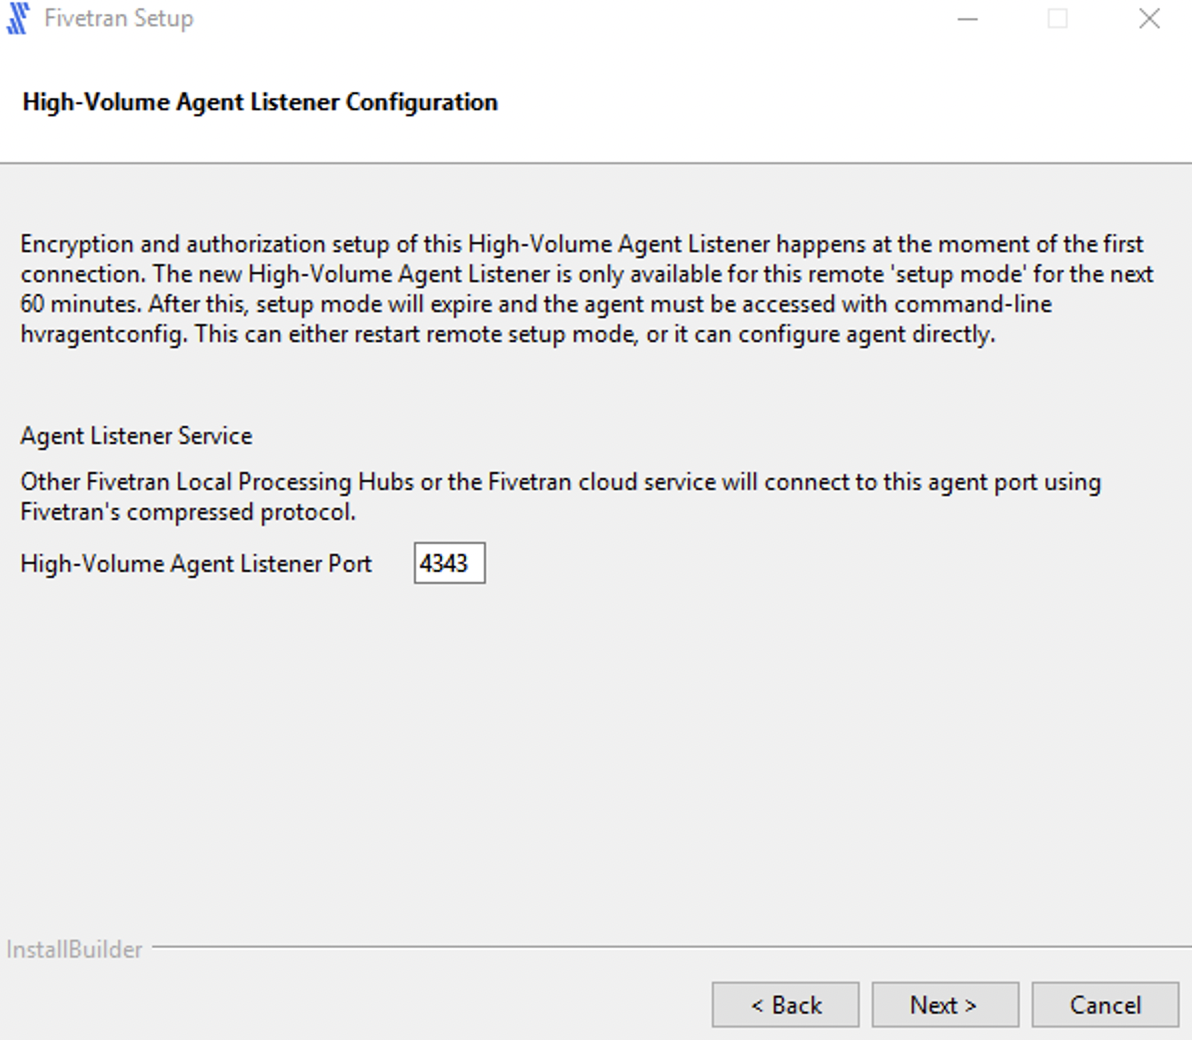
Enter a value for Agent Listener Port and click Next.
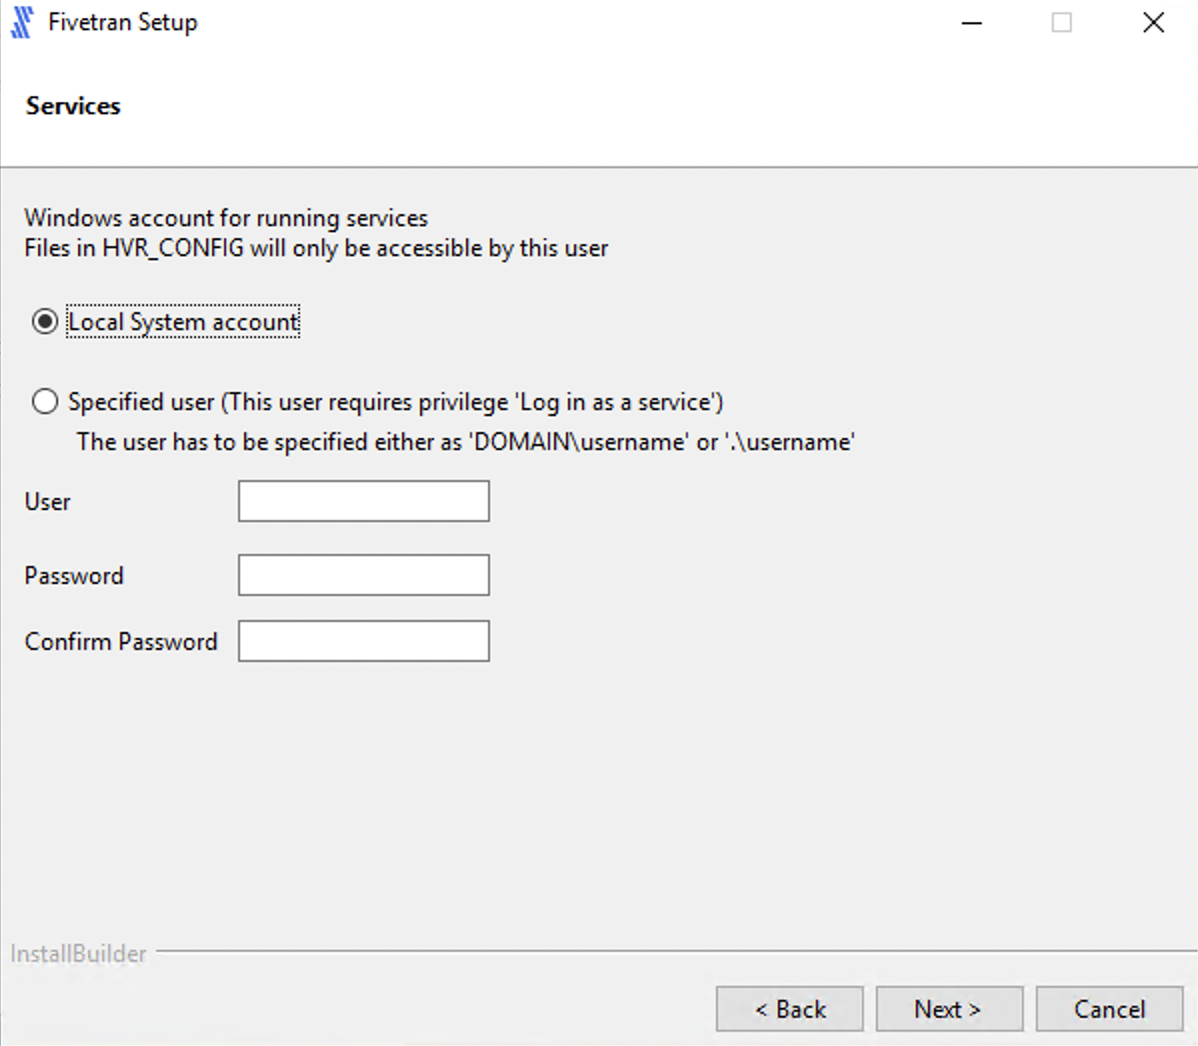
Select the user account to run the HVA service.
If you select Specified user, enter the values for User, Password, Confirm Password and click Next.
For user with Windows authentication (if applicable), specify your Active Directory domain and username in the format
<domain>\<username>.
If you select Local System account, click Next.
Select Add HVR_HOME, HVR_CONFIG, and HVR_TMP (if required) and click Next.
This is to set the environment variables
HVR_HOME,HVR_CONFIG, andHVR_TMPin your operating system. These variables point to the corresponding directories created in step 4 above.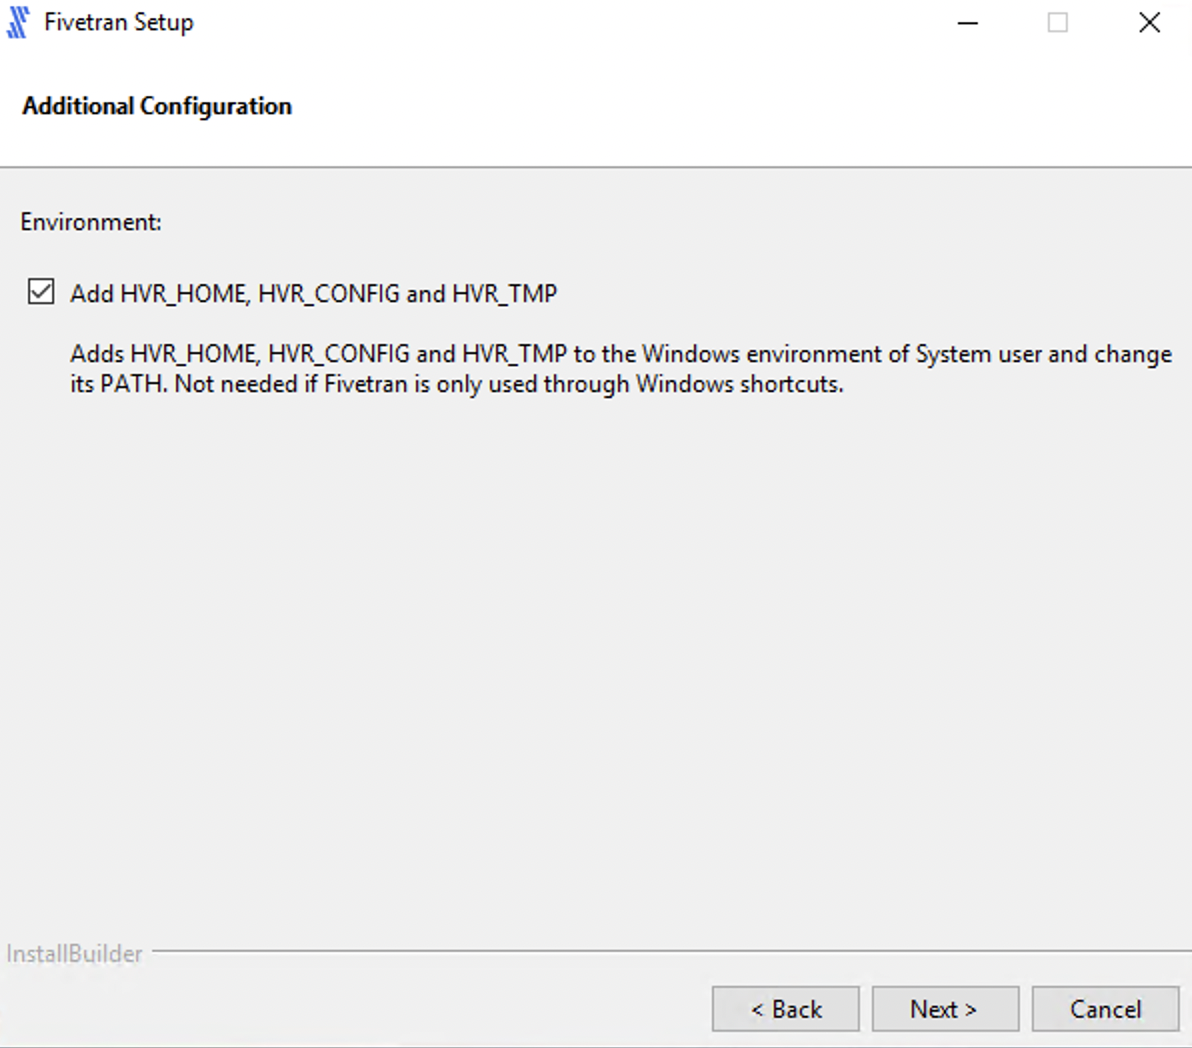
Click Next to initiate the installation.
Click Finish to start the HVA service.
Once the installation is complete, the HVA and all required components are installed into the
$HVR_HOMEdirectory (C:\hvr\hvr_home).
Configure HVA
Follow the instructions below to configure the HVA:
Create an HVA user to set up your Fivetran connector. Enter and confirm the password when prompted.
The password must be at least 10 characters long and must not contain any special characters.
hvragentuserconfig -c <username>Make a note of the username and password. You will need them to configure your connector in the Fivetran dashboard.
Run the following command to disable the setup mode:
hvragentconfig Setup_Mode_Timed_Until=Run the following command to extract the HVA public certificate:
hvragentconfig Agent_Server_Public_CertificateSave the output value of the
Agent_Server_Public_Certificate. You will need it to configure your connector in the Fivetran dashboard.
Start HVA
Perform the following steps as the user who runs the HVA.
To start the agent, use the hvragentlistener command. Follow the instructions for the operating system of your database server:
In Unix and Linux, add flag
-dfollowed by the port number that you want to run on. In the example, the default port is4343:hvragentlistener -d 4343In Windows, add flag
-acsfollowed by the port number that you want to run on. In the example, the default port is4343:hvragentlistener -acs 4343
We highly recommend configuring Oracle RAC to use shared storage. The preferred setup involves running the agent as a cluster resource on only one node at a time. Alternatively, you can run the agent on a single node in the cluster. If that node fails, you will need to start the agent on another node in the cluster.
Add HVA to system autostart
After completing the initial HVA setup, you must add the agent to your system’s startup and shutdown procedures.
Add HVA to system autostart on Linux
On Linux, there are two key options:
For Oracle non-RAC, add agent to systemd
Expand for instructions
To configure systemd, perform the following steps as user
root:Create a service file called
agentListener.servicein the/etc/systemd/systemdirectory. TheagentListener.serviceshould contain the following:Change the
User=<your_linux_username>field to the Linux user that installed the HVA.[Unit] Description=Fivetran Agent Listener [Service] # The process start-up type 'forking' allows this service to spawn new processes Type=forking Environment="HVR_HOME=/opt/fivetran/hvr_home" Environment="HVR_CONFIG=/opt/fivetran/hvr_config" Environment="HVR_TMP=/opt/fivetran/hvr_tmp" # The user that owns HVR_HOME, HVR_CONFIG, etc. User=<your_linux_username> ExecStart=/opt/fivetran/hvr_home/bin/hvragentlistener -d 4343 # Restart this service after a crash Restart=always # The number of seconds to wait before attempting a restart RestartSec=5s [Install] WantedBy=multi-user.targetTo enable and start the service, execute the following commands:
sudo systemctl enable agentListener.service
sudo systemctl start agentListener.service
To verify whether the service is active, execute the following command:
sudo systemctl status agentListener.service
The output should show
active (running)in green.For Oracle RAC, add agent as a cluster resource
Expand for instructions
If you are using Oracle RAC, review the Oracle ASM Configuration section.
To add the High-Volume Agent to an Oracle RAC cluster as a cluster resource, follow the steps below.
In the examples provided, we use the following naming:
- Virtual IP Name:
fivetran-vip - Oracle RAC node names:
racnode1andracnode2 - Installation path for agent software:
/opt/fivetran - Owner of the agent software: the Oracle software owner, referred to as
oracle
Step 1: Create a Virtual IP
The Virtual IP (VIP) is designated for exclusive use by the High-Volume Agent. This IP will will only be active on one node at a time within the cluster, ideally on the node where the agent listener is running, using a shared storage system such as an ACFS file system.
Commands to create the Virtual IP:
To create the Virtual IP, perform the following commands as
rootuser:The IP address
10.1.1.159is an example. You must use an IP address from your Oracle RAC public network subnet.appvipcfg create -network=1 -ip=10.1.1.159 -vipname=fivetran-vip -user=root crsctl setperm resource fivetran-vip -u user:oracle:r-x crsctl setperm resource fivetran-vip -u user:grid:r-x crsctl start resource fivetran-vip -n racnode1Step 2: Agent Action Script
To add the agent as a resource in Oracle Clusterware, use an action script.
Example of the action script
  #!/bin/bash
  #
  # Description:
  #  A sample Fivetran High-Volume Agent action script
  #
  # set following to ensure oraenv is picked up from /usr/local/bin
  # set -x

  export PATH=/usr/local/bin:$PATH

  # set Fivetran-specific environment
  export HVR_HOME=/opt/fivetran/hvr_home
  export HVR_CONFIG=/opt/fivetran/hvr_config
  export HVR_TMP=/opt/fivetran/hvr_tmp
  export FTAGENT_BASE=/opt/fivetran

  # update agent port if different
  export AGENT_PORT=4343


  ###########
  # Function to set the oracle environment
  # Note that it is making use of /etc/oratab
  # Your database must be listed on all nodes in the cluster
  ###########
  set_env ()
  {
    export ORAENV_ASK=NO
    export ORACLE_SID=$1
    . oraenv >> /dev/null
    export ORAENV_ASK=YES
  }


  ###########
  # Helper function to rename logfiles to keep clean history
  ###########
  rename_log () {
    utcdate=`date -u +"%Y-%m-%dT%H.%M.%SZ"`
    if [ -f $HVR_CONFIG/logs/hvragentlistener${AGENT_PORT}.log ]; then
      mv $HVR_CONFIG/logs/hvragentlistener${AGENT_PORT}.log $HVR_CONFIG/logs/hvragentlistener${AGENT_PORT}.log.${utcdate}
    fi
  }


  ###########
  ## Main
  ###########

  # This is logged to CRSD agent log file
  echo "`date` Action script '$_CRS_ACTION_SCRIPT' for resource [$_CRS_NAME] called for action $1"

  # Note that you must update the value for the current_host below to match your environment.
  # in the setup below the rac node 1 is called "racnode1"
  current_host=`hostname -s`
  if [ "$current_host" == "racnode1" ]; then
    set_env DEV1
  else
    set_env DEV2
  fi


  cd $HVR_HOME/bin


  case "$1" in
       'start')
             NUM=`ps -ef | grep hvragentlistener | egrep -v 'grep|action-script|resource' | wc -l`
             if [ $NUM != 0 ]; then
               echo "Agent still running, stop first"
           RET=1
         else
               rename_log
               ./hvragentlistener -d ${AGENT_PORT}
               RET=0
               echo "Start fivetran agent (hvragentlistener) resource with return code $RET"
             fi
       ;;

       'stop')
             NUM=`ps -ef | grep hvragentlistener | egrep -v 'grep|action-script|resource' | wc -l`
             if [ $NUM = 0 ]; then
               ## do a cleanup of pid
               ./hvragentlistener -k $AGENT_PORT >> $FTAGENT_BASE/ftagent.out 2>&1
           rename_log
               RET=0
             else
               ## now stop the agent
               ./hvragentlistener -k $AGENT_PORT >> $FTAGENT_BASE/ftagent.out 2>&1
               rename_log
               NUM=`ps -ef | grep hvragentlistener | grep -v grep | wc -l`
               if [ $NUM = 0 ]; then
                 RET=0
               else
                 RET=1
               fi
             fi
             echo "Stop fivetran agent (hvragentlistener) resource with return code $RET"
       ;;

       'check')
             NUM=`ps -ef | grep hvragentlistener | egrep -v 'grep|action-script|resource' | wc -l`
             if [ $NUM = 0 ]; then
               ## return code 1 for check means OFFLINE
               RET=1
             else
               ## return code 0 for check means ONLINE
               RET=0
             fi
             echo "Running check fivetran agent (hvragentlistener) resource with return code $RET"
       ;;

       'clean')
             for c1 in `ps -ef|grep hvragentlistener |egrep -v 'grep|action-script|resource'| awk '{print $2}'` ;
             do
               echo "...force kill fivetran agent (hvragentlistener) pid $c1"
               kill -9 $c1
             done
             ## do some cleanup
             ./hvragentlistener -k $AGENT_PORT >> $FTAGENT_BASE/ftagent.out 2>&1
             rename_log
             RET=0
             echo "Running clean fivetran agent (hvragentlistener) resource with return code $RET"
       ;;
  esac

  if [ $RET -eq 0 ]; then
    exit 0
  else
    exit 1
  fi
Step 3: Create cluster resource
Once the action script is in place, use it to create the cluster resource. Store the script in a shared location accessible to all nodes (we recommend using ACFS), for example
/opt/fivetran/hvr_config/action-script.scr.The cluster resource created will support the agent and is configured to depend on the VIP created in Step 1 above. If this VIP moves between nodes, the agent will automatically move with it.
Command to run as the grid user:
crsctl add resource ftagent -type cluster_resource \
-attr "ACTION_SCRIPT=/opt/fivetran/hvr_config/action-script.scr, RESTART_ATTEMPTS=3, START_TIMEOUT=60, STOP_TIMEOUT=60, CHECK_INTERVAL=10, \
START_DEPENDENCIES='hard(fivetran-vip) pullup(fivetran-vip)', STOP_DEPENDENCIES='hard(fivetran-vip)', \
ACL='owner:oracle:rwx,pgrp:oinstall:rwx,other::r--', PLACEMENT='favored', HOSTING_MEMBERS='racnode1 racnode2'"
Step 4: Start and stop cluster resource
To effectively manage cluster resources, see the Oracle Clusterware Administration and Deployment Guide.
Commands to monitor and control the agent:
crsctl status resource ftagent
crsctl start resource ftagent -n <rac-node> -f
crsctl stop resource ftagent -f
The following command relocates the Virtual IP (
fivetran-vip) to another node in the cluster. This will also stop the agent and move it along with the Virtual IP:crsctl relocate resource fivetran-vip -n <rac-node> -fThe following command moves the Virtual IP from
racnode1toracnode2:root@rac1 ~ : crsctl relocate resource fivetran-vip -n racnode2 -f CRS-2673: Attempting to stop 'ftagent' on 'racnode1' CRS-2677: Stop of 'ftagent' on 'racnode1' succeeded CRS-2673: Attempting to stop 'fivetran-vip' on 'racnode1' CRS-2677: Stop of 'fivetran-vip' on 'racnode1' succeeded CRS-2672: Attempting to start 'fivetran-vip' on 'racnode2' CRS-2676: Start of 'fivetran-vip' on 'racnode2' succeeded CRS-2672: Attempting to start 'ftagent' on 'racnode2' CRS-2676: Start of 'ftagent' on 'racnode2' succeeded- Virtual IP Name:
Add HVA to system autostart on Solaris
INFO: In Solaris 10 and higher, the
/etc/inetd.conffile has been replaced by SMF manifests. All inetd services are now configured/controlled under the SMF.
To configure the SMF service, perform the following steps as user root:
In the
/etc/servicesfile, add the following line specifying the name (for example,hva) and the TCP/IP port number of the agent:hva 4343/tcpCreate a temporary file (for example,
/tmp/inet.hvr) containing the following inetd.conf-style entry for the agent:Option
-Edefines the environment variables.hva stream tcp nowait oracle /opt/fivetran/hvr_home/bin/hvragent hvragent -EHVR_HOME=/opt/fivetran/hvr_home -EHVR_CONFIG=/opt/fivetran/hvr_config -EHVR_TMP=/opt/fivetran/hvr_tmpThe user must be set to the user (for example,
oracle) under which the HVA is installed/running. The service name (for example,hva) specified in this temporary file must match with the name specified (step #1) in the/etc/servicesfile. The above configuration should be defined in a single line (without manual line break).Import the temporary file (for example,
/tmp/inet.hvr) into System Management Facility (SMF) using theinetconvcommand.For example:
inetconv -i /tmp/inet.hvrEnable the service using the
inetadmcommand.For example:
inetadm -e svc:/network/hvr/tcp:defaultRefresh the service using the
svcadmcommand:svcadm refresh inetd
Add HVA to system autostart on Unix (AIX)
To configure the inetd service, perform the following steps as user root:
In the
/etc/servicesfile, add the following line specifying the name (for example,hva) and the TCP/IP port number of the agent:hva 4343/tcpAdd the following line to the
/etc/inetd.conffile:Option
-Edefines the environment variables.hva stream tcp nowait oracle /opt/fivetran/hvr_home/bin/hvragent hvragent -EHVR_HOME=/opt/fivetran/hvr_home -EHVR_CONFIG=/opt/fivetran/hvr_config -EHVR_TMP=/opt/fivetran/hvr_tmpThe user must be set to the user (for example,
oracle) under which the agent is installed/running. The service name (for example,hva) specified in theinetd.conffile must match with the name specified (step #1) in the/etc/servicesfile. The above configuration should be defined in a single line (without manual line break).Reload or restart the
inetdservice to apply the changes. For information about restarting theinetdservice, refer to the operating system documentation.
Network connection
This section outlines the methods available for connecting Fivetran to your Oracle database.
Choose connection method
Decide on your preferred method for connecting Fivetran to your Oracle database, and then configure the necessary settings for that method.
Connect directly

Your database version must be 12.2 or above to connect directly. If your database version is 12.1 or below, connect using SSH.
Fivetran connects directly to the High-Volume Agent installed on the database host. All communication between Fivetran and the HVA is encrypted. The HVA has a direct connection to your Oracle database.
To connect directly, configure your firewall and/or other access control systems to allow incoming connections to your Oracle database host where the agent is installed. Restrict access to the database port (usually 1521) and the agent port (usually 4343) from Fivetran's IPs for your database's region. How you do this varies based on how your Oracle database is hosted, whether on a cloud platform, on-premises, or otherwise.
Connect using SSH

Fivetran connects to your database through an SSH tunnel, providing secure communication between Fivetran processes and your database host. This connection method can be used when direct access to your database port isn’t possible or if you require a more secure connection. It allows Fivetran to securely access your database while maintaining your network’s integrity.
Once the SSH tunnel is configured, Fivetran connects to the SSH server using the specified SSH host, port, and user credentials. The SSH server then forwards the connection to the database host through HVA, which listens on a specific port (default 4343). The SSH server must be configured to accept connections from the Fivetran's IP.
You may need to configure your firewall or any relevant access control systems to allow incoming connections to your Oracle database port (usually port 1521) from the IP address of your SSH tunnel server.
To connect using SSH, follow our SSH connection setup instructions.
To connect using reverse SSH, follow our Reverse SSH connection setup instructions.
If you want Fivetran to tunnel SSH over TLS, you must first enable TLS on your database.
Connect using private networking
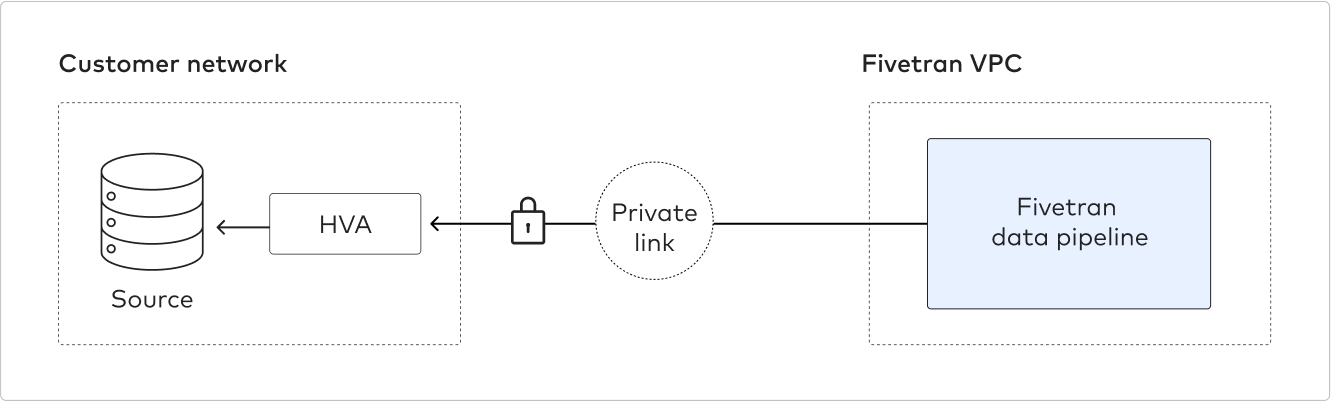
You must have a Business Critical plan to use private networking.
Private networking enables communication between private networks and services without exposing traffic to the public internet. Private networking is the most secure connection method.
We support the following providers:
- AWS PrivateLink – used for VPCs and AWS-hosted or on-premises services. See our AWS PrivateLink setup guide for details.
- Azure PrivateLink – used for Virtual Networks (VNets) and Azure-hosted or on-premises services. See our Azure PrivateLink setup guide for details.
- Google Cloud Private Service Connect – used for VPCs and Google-hosted or on-premises services. See our Google Cloud Private Service Connect setup guide for details.
Connect using Proxy Agent

Fivetran connects to the HVA through the Proxy Agent, providing secure communication between Fivetran processes and your database host. The Fivetran Proxy Agent should be installed in your network to create an outbound connection to Fivetran's cloud. To connect using Proxy Agent, follow our Proxy Agent documentation.
Database access and configuration
This section provides instructions for creating a dedicated database user for Fivetran and configuring the necessary user permissions. It also includes steps to configure ARCHIVELOG mode, enable block checksums and enable supplemental logging.
Create user and grant read-only access
This section guides you through creating a dedicated user for Fivetran in your Oracle database and granting read-only access to the user. Separate instructions are provided for standalone databases and multitenant container databases.
Check the following important considerations before proceeding:
- Minimum database sessions: The Fivetran database user requires a minimum of eight concurrent database sessions. By default, Oracle allows unlimited sessions per user. If you wish to limit the number of concurrent sessions for the Fivetran user, ensure it is set to at least eight.
- Case-sensitive usernames: Oracle usernames are case-sensitive. For example,
fivetranis a different user thanFIVETRAN. - Multitenant container databases: Usernames in multitenant container databases must begin with
C##as they are considered common users.
Instructions for standalone database
Connect to your Oracle database as an Admin user.
Create a user for Fivetran's exclusive use and grant the user permission to connect to your database. Replace
<username>and<password>with a username and password of your choice:CREATE USER <username> IDENTIFIED BY <password>; GRANT CREATE SESSION TO <username>;Ensure the Fivetran user has the appropriate number of sessions available. You must have at least 15 sessions if the profile name of the Fivetran user is set to DEFAULT. Otherwise, you must have at least 5 sessions.
i. Verify the profile name associated with your Fivetran user by executing the following command:
SELECT USERNAME, PROFILE FROM DBA_USERS WHERE USERNAME='<username>'ii. Note the profile name from the query results.
iii. If the Fivetran user's profile is
DEFAULT, set the session limit to at least 15 sessions:ALTER PROFILE DEFAULT LIMIT SESSIONS_PER_USER 15;iv. If the user has a different profile, replace
DEFAULTin the command above with the actual profile name obtained from the query. Adjust the session limit according to your specific requirements, ensuring a minimum of 5 sessions for non-default profiles.Grant read-only access permissions on the specific schema and table you want to sync:
Oracle databases default to storing all object names, such as table names and column names, in uppercase. If you wish to use mixed case or maintain the case sensitivity of your identifiers, you must enclose the names in double quotes. This applies to any SQL identifiers, including table names, column names, and other database object names.
 GRANT SELECT ON "<schemaA>"."<tableA>" TO <username>;
 GRANT SELECT ON "<schemaA>"."<tableB>" TO <username>;
 GRANT SELECT ON "<schemaB>"."<tableC>" TO <username>;
Alternatively, grant access to all tables.
GRANT SELECT ANY TABLE TO <username>;
Instructions for multitenant container database
Connect to your Oracle database as an admin user.
Create a common user at the container level. Create the user with the container as the active session and grant the following permissions:
 ALTER SESSION SET CONTAINER=CDB$ROOT;
 CREATE USER <username> IDENTIFIED BY <password> CONTAINER=ALL;
 GRANT CREATE SESSION, ALTER SESSION, SET CONTAINER TO <username> CONTAINER=ALL;
 ALTER USER <username> SET CONTAINER_DATA=ALL CONTAINER=CURRENT;
Ensure your Fivetran user has at least 15 sessions per user in both a constant database and a pluggable database. Run the following command at the container level and the pluggable level to check the parameter:
 col username for a12
 col profile for a19
 col limit for a12
 set lines 299
 select a.username,b.PROFILE,b.RESOURCE_NAME,b.limit from dba_users a , dba_profiles b where a.profile=b.profile
 and b.RESOURCE_NAME='SESSIONS_PER_USER' and a.username='<username>';
Switch to the desired pluggable database (
<PDB>) and grant read-only access permissions on the specific schema and table you want to sync.Oracle databases default to storing all object names, such as table names and column names, in uppercase. If you wish to use mixed case or maintain the case sensitivity of your identifiers, you must enclose the names in double quotes.
ALTER SESSION SET CONTAINER=<PDB>;GRANT SELECT ON "<schemaA>"."<tableA>" TO <username>; GRANT SELECT ON "<schemaA>"."<tableB>" TO <username>; GRANT SELECT ON "<schemaB>"."<tableC>" TO <username>;Alternatively, you can grant access to all tables.
GRANT SELECT ANY TABLE TO <username>;
Configure incremental sync
This section covers the configuration needed to keep your data up-to-date after the initial data sync, including access to system views and permissions needed for the log-based capture methods Direct Capture and Archive Log Only.
Create a temporary table in either the standalone or pluggable database and grant read/write access to the Fivetran user:
If you are using Active Data Guard and connecting to a standby instance, create the
HVR_SYS_TABLEon the primary (active) database to ensure it is replicated to the standby instance.CREATE GLOBAL TEMPORARY TABLE <username_default_schema>.HVR_SYS_TABLE (TABLE_NAME VARCHAR(128), TABLE_OWNER VARCHAR(128)); GRANT SELECT, INSERT, UPDATE, DELETE ON <username_default_schema>.HVR_SYS_TABLE TO <username>;HVA uses the temporary table
HVR_SYS_TABLEto improve query performance during replication. Since this is a temporary table, there is no database logging on this table, and no data remains after the session ends. Storage for this table is allocated in the temporary tablespace.Grant the Fivetran user permission to select any dictionary. We need to read the data dictionaries in Oracle's SYS schema to run incremental sync. Follow the instructions below for your database type:
For standalone databases:
GRANT SELECT ANY DICTIONARY TO <username>;For multitenant container databases:
GRANT SELECT ANY DICTIONARY TO <username> CONTAINER=ALL;
In Oracle 12, you must grant the Fivetran user explicit select privileges on the
sys.user$andsys.enc$tables to replicate the following encrypted columns:GRANT SELECT ON sys.user$ TO <username> ;GRANT SELECT ON sys.enc$ TO <username> ;
Alternatively, you may grant the read access of the following views individually.
Click for detailed instructions
{% note %} Use the `GRANT SELECT ONTO ` format for standalone databases and `GRANT SELECT TO CONTAINER=ALL` for multitenant container databases. {% /note %} GRANT SELECT ON DBA_SYS_PRIVS TO <username>; GRANT SELECT ON DBA_TAB_PRIVS TO <username>; GRANT SELECT ON DBA_EXTENTS TO <username>; GRANT SELECT ON DBA_TABLESPACES TO <username>; GRANT SELECT ON DBA_SEGMENTS TO <username>; GRANT SELECT ON ALL_CONSTRAINTS TO <username>; GRANT SELECT ON ALL_CONS_COLUMNS TO <username>; GRANT SELECT ON ALL_ENCRYPTED_COLUMNS TO <username>; GRANT SELECT ON ALL_INDEXES TO <username>; GRANT SELECT ON ALL_IND_COLUMNS TO <username>; GRANT SELECT ON ALL_LOBS TO <username>; GRANT SELECT ON ALL_LOG_GROUPS TO <username>; GRANT SELECT ON ALL_OBJECTS TO <username>; GRANT SELECT ON ALL_TABLES TO <username>; GRANT SELECT ON ALL_TAB_COLS TO <username>; GRANT SELECT ON COL$ TO <username>; GRANT SELECT ON DBA_OBJECTS TO <username>; GRANT SELECT ON ECOL$ TO <username>; GRANT SELECT ON ENC$ TO <username>; GRANT SELECT ON INDPART$ TO <username>; GRANT SELECT ON OBJ$ TO <username>; GRANT SELECT ON TABPART$ TO <username>; GRANT SELECT ON TABSUBPART$ TO <username>; GRANT SELECT ON USER$ TO <username>; GRANT SELECT ON V_$ARCHIVED_LOG TO <username>; GRANT SELECT ON V_$ARCHIVE_DEST TO <username>; GRANT SELECT ON V_$DATABASE TO <username>; GRANT SELECT ON V_$DATABASE_INCARNATION TO <username>; GRANT SELECT ON V_$DNFS_FILES TO <username>; GRANT SELECT ON V_$ENCRYPTION_WALLET TO <username>; GRANT SELECT ON V_$LOCKED_OBJECT TO <username>; GRANT SELECT ON V_$LOG TO <username>; GRANT SELECT ON V_$LOGFILE TO <username>; GRANT SELECT ON V_$NLS_PARAMETERS TO <username>; GRANT SELECT ON V_$PARAMETER TO <username>; GRANT SELECT ON V_$PDBS TO <username>; GRANT SELECT ON V_$SYSTEM_PARAMETER TO <username>; GRANT SELECT ON V_$TRANSACTION TO <username>; GRANT SELECT ON V_$SESSION TO <username>;(Optional) To optimize connection performance, consider granting access to the following additional system tables:
For standalone databases:
GRANT SELECT ON DBA_FREE_SPACE TO <username>;
GRANT SELECT ON SYS.V_$TEMPFILE TO <username>;
GRANT SELECT ON SYS.V_$DATAFILE TO <username>;
For multitenant container databases:
Execute the following command before granting access.
ALTER SESSION SET CONTAINER=CDB$ROOT;GRANT SELECT ON DBA_FREE_SPACE TO <username>; GRANT SELECT ON SYS.V_$LOG TO <username>; GRANT SELECT ON SYS.V_$TEMPFILE TO <username>; GRANT SELECT ON SYS.V_$DATAFILE TO <username>;
Configure ARCHIVELOG mode
It is required to have your Oracle database in the ARCHIVELOG mode. This mode is typically the default for most production systems because it enables online backups and point-in-time recovery. Additionally, having the database in the ARCHIVELOG mode ensures that Fivetran can access all the required redo information. To enable ARCHIVELOG mode, the Oracle instance must be briefly taken offline, and the database must be restarted. If your database is not already in ARCHIVELOG mode, see Oracle's archived redo log files documentation.
We recommend that you keep at least 24 hours' worth of archive logs available.
Enable the ARCHIVELOG mode, if not enabled yet.
For single instance databases:
shutdown immediate;
startup mount;
alter database archivelog;
alter database open;
For Oracle RAC:
Steps to enable ARCHIVELOG mode in Oracle RAC
i. Shut down all database instances:
srvctl stop database -d <db_unique_name>ii. Start the database in mount mode:
srvctl start database -d <db_unique_name> -o mountiii. Enable archive logging:
sqlplus / as sysdba
sql> alter database archivelog;
sql> alter system set LOG_ARCHIVE_DEST_1='LOCATION=<SHARED_LOCATION>' scope=SPFILE;
sql> EXIT;
If you are using Oracle RAC,
<SHARED_LOCATION>is a specific ASM disk group, for example, +FRA.iv. Stop the database:
srvctl stop database -d <db_unique_name>v. Restart all database instances:
srvctl start database -d <db_unique_name>vi. Verify that archiving is enabled:
sql> archive log list;The database host configured in the connection must have access to the archived logs of all other nodes in the cluster.
Configure Oracle RMAN to retain backups and archive logs for at least 24 hours. We recommend that you retain data for seven days.
To sync your data, Fivetran must have a minimum of 3 hours' worth of log data to analyze. You cannot finish setting up your connection until 3 hours after you configure RMAN to retain archive logs.
RMAN> CONFIGURE RETENTION POLICY TO RECOVERY WINDOW OF 7 DAYS;(Recommended) Set the
DB_RECOVERY_FILE_DEST_SIZEparameter to a value that matches your available disk space, because expired and obsolete log and backup files can quickly fill your disk. For more information, see Oracle's DB_RECOVERY_FILE_DEST_SIZE documentation.
Enable block checksums
Oracle uses the DB_BLOCK_CHECKSUM parameter to control block validation behavior. We recommend setting this parameter to TYPICAL or FULL to ensure data integrity during replication.
TYPICAL: Enables checksum calculation during data block writes and validation during reads. This setting offers strong corruption detection with minimal performance overhead.FULL: Performs all checks included inTYPICAL, plus additional logical consistency checks during validation. Use this setting for environments that require maximum data protection.TRUE: Equivalent toTYPICAL. Included for backward compatibility.
To set the parameter, run the following command:
ALTER SYSTEM SET DB_BLOCK_CHECKSUM = <TYPICAL/FULL/TRUE>;
Enable supplemental logging
The HVA requires the Oracle supplemental logging feature to be enabled on tables it replicates. Without this feature, Oracle logs only the columns that are changed. The agent, however, needs additional data (for example, key columns) to generate a full update statement for the target destination.
Oracle supplemental logging can be set at both the database level and for specific tables.
To enable supplemental logging, use the following SQL commands:
Enable database-level minimal supplemental logging:
ALTER DATABASE ADD SUPPLEMENTAL LOG DATA;Enable additional table-level supplemental logging depending on the table type:
For a table with a primary key, enable primary key supplemental logging:
ALTER TABLE "<schema>"."<table>" ADD SUPPLEMENTAL LOG DATA (PRIMARY KEY) COLUMNS;For a table without a primary key or unique index, or for a table with any type of compression enabled (regardless of whether they have a primary key and/or unique indexes), enable logging for all columns:
ALTER TABLE "<schema>"."<table>" ADD SUPPLEMENTAL LOG DATA (ALL) COLUMNS;Enabling supplemental logging for all table columns ensures that any row change captures the values of all columns. This method allows the replication process to identify changes based on the entire row's data, which is especially beneficial for tables without a primary key.
For tables without a primary key, any update operation may incur additional MAR if it causes row movement. Oracle generates three log events for row movement —
UPDATE(to an existing row),DELETE(of the row from its current partition), andINSERT(of the row into a new partition). Fivetran counts these as two MAR.For a table without a primary key but with a unique index, enable conditional supplemental logging:
ALTER TABLE "<schema>"."<table>" ADD SUPPLEMENTAL LOG GROUP "<group_name>" ("<column_name>", ...) ALWAYS;This command creates a user-defined supplemental log group for specific column(s) within a table, offering a precise control over which column changes are logged. When using a unique index, ensure each table has its own unique log group.
Check supplemental logging status
To check the status of supplemental logging at database-level:
SELECT supplemental_log_data_min, supplemental_log_data_pk, supplemental_log_data_all FROM v$database;
To check the status of supplemental logging at table level:
SELECT log_group_type FROM all_log_groups WHERE table_name='<schema>.<table>';
Disable supplemental logging
To disable supplemental logging at database-level:
ALTER DATABASE DROP SUPPLEMENTAL LOG DATA;
To disable supplemental logging at table level:
For a table with a primary key:
ALTER TABLE "<schema>"."<table>" DROP SUPPLEMENTAL LOG DATA (PRIMARY KEY) COLUMNS;For a table without a primary key or unique index:
ALTER TABLE "<schema>"."<table>" DROP SUPPLEMENTAL LOG DATA (ALL) COLUMNS;For a table without a primary key but with a unique index:
ALTER TABLE "<schema>"."<table>" DROP SUPPLEMENTAL LOG GROUP "<group_name>";
Connect to Oracle ASM (optional)
If your Oracle database uses ASM (Automatic Storage Management), follow these steps to complete the configuration.
Steps to connect HVA to Oracle ASM
Connect to the ASM instance using the
SYSaccount withSYSASMrole.Create a new ASM user and grant the
SYSASMprivilege to this user:CREATE USER <asm_user> IDENTIFIED by <asm_user_password>; GRANT SYSASM TO <asm_user>;Grant the following privileges to the Fivetran user. These permissions allow Fivetran to query the status of ASM diskgroups and client information:
GRANT SELECT ON sys.v_$asm_diskgroup_stat TO <username>;
GRANT SELECT ON sys.v_$asm_client TO <username>;
Connect to Oracle ASM in RAC (optional)
If you are using Oracle RAC configuration, we recommend configuring HVA to run as a cluster resource.
Steps to connect HVA to ASM instances in Oracle RAC
To enable direct access to ASM, HVA requires a TNS entry to connect to the ASM instance using a bequeath connection. You need to create a TNSNAMES.ora entry for each ASM instance on every cluster node.
In an Oracle RAC setup, ASM is managed by Oracle Grid Infrastructure (Clusterware). The Grid Infrastructure has its own TNSNAMES.ORA file, located in the Grid Infrastructure Oracle Home ($GRID_HOME/network/admin/), distinct from the database Oracle Home ($DB_HOME/network/admin/). To avoid connection issues, add the TNS entry for the ASM instance (FASM in the below example) to the TNSNAMES.ORA file in both the Grid Infrastructure home and the database home.
For example, on a two-node Oracle RAC with +ASM1 on node 1 and +ASM2 on node 2, add the following entry in both locations:
TNS Entry Example on Node 1:
FASM =
   (DESCRIPTION =
      (ADDRESS = (PROTOCOL = BEQ)
      (PROGRAM = /u01/app/19.0.0/grid/bin/oracle)
      (ARGV0 = oracle+ASM1)
      (ARGS = '(DESCRIPTION=(LOCAL=YES)(ADDRESS=(PROTOCOL=BEQ)))')
      (ENVS = 'ORACLE_HOME=/u01/app/19.0.0/grid,ORACLE_SID=+ASM1'))
      (CONNECT_DATA =
         (SERVICE_NAME = +ASM)
         (INSTANCE_NAME = +ASM1)
      )
   )
TNS Entry Example on Node 2:
FASM =
   (DESCRIPTION =
      (ADDRESS = (PROTOCOL = BEQ)
      (PROGRAM = /u01/app/19.0.0/grid/bin/oracle)
      (ARGV0 = oracle+ASM2)
      (ARGS = '(DESCRIPTION=(LOCAL=YES)(ADDRESS=(PROTOCOL=BEQ)))')
      (ENVS = 'ORACLE_HOME=/u01/app/19.0.0/grid,ORACLE_SID=+ASM2'))
      (CONNECT_DATA =
         (SERVICE_NAME = +ASM)
         (INSTANCE_NAME = +ASM2)
      )
   )
When entering ASM instance details in the connection setup form, use the ASM TNS value as 'FASM'.
Ensure that the TNSNAMES.ORA entry is consistent across all required Oracle homes ($GRID_HOME and $DB_HOME) to avoid potential connection errors when HVA attempts to access the ASM instance.
Finish Fivetran configuration
This section outlines the steps to configure the HVA connection in the using the connection setup form within the Fivetran dashboard.
Configure connection in Fivetran dashboard
In the connection setup form, enter a Destination schema prefix of your choice. This prefix applies to each replicated schema and cannot be changed once your connection is created.
In the Host field, enter the following information:
- If you are using a single instance database, specify the hostname or IP address of your database. Set the value to
localhostif the HVA and the database are on the same server. - If you are using Oracle RAC, specify an Application Virtual IP (VIP) address associated with the HVA.
The VIP address must be part of the cluster configuration and will move between nodes in case of node failure or restarts. This provides you with the option to run the agent on a specific node in the cluster. For this approach, we recommend using shared storage for the HVA.
- If you are using Active Data Guard, enter the IP address where your standby database is running.
- If you are using a single instance database, specify the hostname or IP address of your database. Set the value to
Enter the Port number your database server listens on for incoming connections. The default port number is
1521.Enter the Fivetran-specific User you created.
In Oracle, usernames are case-sensitive. Make sure to enter the exact username.
Enter the Password for the Fivetran-specific user you created.
Enter your database's SID or Service Name.
- If you are using Oracle RAC, enter a Service Name. You can create the Service Name using the Oracle
srvctlcommand on RAC. For example,srvctl add service -db DEV -service FSRVC -preferred DEV1. For more details on using thesrvctlcommand and services, refer to Oracle Documentation.
- If you are using Oracle RAC, enter a Service Name. You can create the Service Name using the Oracle
(Multitenant container databases only) Enter your database's PDB Name.
- If you are using Oracle RAC, you can specify the Service Name that points to your pluggable database.
Enter the database's TNS or SID for the agent to use.
TNS is required for pluggable databases and RAC. TNS should be in the form of
<hostname>:<port>/<Service>or<SID>.(Hybrid Deployment only) If your destination is configured for Hybrid Deployment, the Hybrid Deployment Agent associated with your destination is pre-selected in the Select an existing agent drop-down menu. To use a different agent, select the agent of your choice, and then select the same agent for your destination.
(Not applicable to Hybrid Deployment) Select your chosen Connection Method.
If you selected Connect via an SSH tunnel (this option is applicable for both standard SSH connections and reverse SSH connections), copy or make a note of the Public Key and add it to the
authorized_keysfile while configuring the SSH tunnel, and provide the following information:- SSH Host: Enter the hostname or IP address of your SSH server. Do not use a load balancer's IP address/hostname.
- SSH Port: Enter the port number of your SSH server. The default port number is
22. - SSH User: Enter the username for SSH access.
If you selected Connect via proxy agent, choose the necessary proxy agent from the Proxy agents drop-down list (if available) or configure a new proxy agent.
(TDE-encrypted database only) Set the Using TDE Encryption toggle to ON.
(Optional) Enter TDE Wallet Password if your database is configured with Password-Based keystore. Leave the field blank if your database is configured with Auto-Login keystore.
(Optional) If the database is using Oracle RAC, set the Using Oracle RAC? toggle to ON and provide the following information:
- ASM User: Enter the username for accessing the Oracle ASM.
- ASM Password: Enter the password associated with the ASM user account.
- ASM Oracle Home (optional): Specify the directory path where the Oracle ASM software is installed on your system. This is only required if the ASM instance is not using the default installation path.
- ASM TNS (optional): Enter the Transparent Network Substrate (TNS) entry that corresponds to your ASM configuration. This should be used if you need to specify network details for connecting to the ASM instance.
(Optional) If the database is using ASM, set the Using ASM? toggle to ON and provide the following information:
- ASM User: Enter the username for accessing the Oracle ASM.
- ASM Password: Enter the password associated with the ASM user account.
- ASM Oracle Home (optional): Specify the directory path where the Oracle ASM software is installed on your system. This is only required if the ASM instance is not using the default installation path.
- ASM TNS (optional): Enter the Transparent Network Substrate (TNS) entry that corresponds to your ASM configuration. This should be used if you need to specify network details for connecting to the ASM instance.
(Optional) Set the Use archive log only mode toggle to ON if you want to use the Archive Log Only capture method. Enter the following details:
Archive Log Path: Enter the directory path containing the archived log files on the machine where HVA is installed.
Archive Log Format (optional): Specify the filename format (template) of the archived log files stored in the directory specified by the Archive Log Path field. Fivetran will only read the archived log files that match the specified format, or the Oracle's initialization parameter LOG_ARCHIVE_FORMAT if no format is specified. Use the following variables for your filename format.
Click to view file format variables
%d- match numbers (zero or more decimal digits). Numbers matched using this variable are ignored.%ror%R- resetlogs ID%sor%S- log sequence number%tor%T- thread number%zor%Z- match alphanumeric characters. Characters matched using this variable are ignored.
Wildcard character
*is not supported.
In the Agent Host field, enter the HVA's hostname or IP address depending on the connection method you have chosen and your database configuration.
- Connection method:
- Direct: Enter the database hostname or IP address.
- SSH: Enter the hostname or private IP address within your internal network, accessible by Fivetran through the SSH tunnel. For reverse SSH, set the value to
localhost. - Private networking: Enter the hostname or private IP address within your VPC, accessible by Fivetran through a private endpoint.
- Proxy Agent: Enter the hostname or private IP address within your internal network, accessible through the Proxy Agent. Use
localhostif the Proxy Agent and HVA are installed on the same host.
- Oracle RAC:
- For Oracle RAC where the High-Volume Agent is configured on a node, the HVA's IP address is the Virtual IP (VIP) of the RAC node where the agent is running.
- For Oracle RAC where the High-Volume Agent is configured as a cluster resource on a shared storage system, the HVA's IP address is the Virtual IP (VIP) created and dedicated to the agent.
Ensure that your Firewall/Security Group allows the Fivetran's IPs for your database's region.
- Connection method:
In the Agent Port field, enter the HVA's port number. The default port number is
4343. For reverse SSH, use the value of<SSH_HIGH_PORT>(Linux) or Source port (Windows).In the Agent User ID field, enter the name of the HVA user you created.
In the Agent User Password, enter the password of the HVA user you created.
In the Agent Public Cert, enter the HVA's Server Public Certificate you obtained.
In the Oracle Home field, enter the directory path where your Oracle database is installed.
(Not applicable to Hybrid Deployment) Copy the Fivetran's IP addresses (or CIDR) that you must safelist in your firewall.
Click Save & Test. Fivetran tests and validates our connection to your Oracle database. Upon successful completion of the setup tests, you can sync your data using Fivetran.
Setup tests
Fivetran performs the following tests to ensure that we can connect to your Oracle database and that it is properly configured:
- The Connecting to SSH tunnel test validates the SSH tunnel details you provided in the setup form. It then checks that we can connect to your database using the SSH tunnel. We skip this test if you are not connecting using an SSH tunnel.
- The Validating agent setup test verifies that we can connect to the HVA and whether it operates correctly.
- The Validating certificate test generates a pop-up window where you must choose which certificate you want Fivetran to use. It then validates the certificate and checks that we can connect to your database using TLS. We skip this test if you are not connecting directly.
- The Connecting to host test validates the database credentials you provided in the setup form. It then verifies that the database host is not private and checks that we can connect to the host.
- The Validating access to PDB test verifies if we have access to your pluggable database. We skip this test if your database is not a multitenant container database.
- The Validating database version test verifies your database version. The test succeeds if:
- your database version is 12.2 or above or
- your database version is 12.1 or below, and you are connecting using an SSH tunnel.
- The Validating system view permission test verifies if we have permissions to access the
DBA_EXTENTS,DBA_TABLESPACES, andDBA_SEGMENTSsystem views. - The Access to database-level supplemental logging test checks if supplemental logging is enabled on your database. If supplemental logging is disabled, the test passes but generates a warning message in your dashboard.
- The Validating permissions to run log reader test checks that the Fivetran user has permission to run Direct Capture.
- The Oracle DB accessibility test checks if the HVA has access to the source database.
- The Oracle DB log reading test checks if the HVA can access the database log files.
The tests may take a few minutes to finish running.
Related articles
description Connector Overview
account_tree Schema Information
settings API Connection Configuration