Hybrid Deployment with Podman Setup Guide
Follow our setup guide to set up the Hybrid Deployment model with Podman.
Prerequisites
To use Hybrid Deployment with Podman, you need a server or virtual machine (VM) in your local environment that meets the requirements described in the following sections.
Software requirements
- A modern and up-to-date Linux distribution
- Podman (v4.6.1 or above) container runtime
- (Recommended) An encrypted file system to secure your files and directories
- We recommend running Podman in rootless mode for improved security. Before doing so, make sure the user’s
$HOMEdirectory has at least 50 GB of free disk space. For setup instructions, see our Troubleshooting documentation. - If you are using Amazon Linux 2023, we recommend using Docker instead of Podman.
- We do not support Hybrid Deployment on Amazon Elastic Container Service (Amazon ECS).
Linux user requirements
You need a non-root Linux user to run the containers (for example, fivetran). The user must have the permissions necessary to run Podman.
System requirements
CPU architecture requirements
A system with a native x86_64 (AMD64) CPU architecture.
Hybrid Deployment does not support the following:
- ARM64 architectures, including Apple Silicon
- ARM-based systems, including configurations that use x86_64 emulation or translation layers
Compute, memory, and storage requirements
The compute (CPU), memory (RAM), and storage requirements for your environment depend on the number of concurrent pipeline processes and the volume of data to sync. Before reviewing the table below, see our Sizing guidelines for detailed guidance on how to estimate resources based on connection type and deployment scale.
The following table provides the minimum CPU and RAM requirements, along with estimated storage requirements, based on the number of concurrent connections running on the same host:
| Deployment Size | Number of Connections | vCPUs (x86-64) | RAM | Estimated Disk Space |
|---|---|---|---|---|
| Small | 1-2 | 8 | 32 GB | More than 50 GB |
| Medium | 2-6 | 8-16 | 32 GB | More than 300 GB |
| Large | 6-12 | 16-24 | 64 GB | More than 500 GB |
If you want to use more than 12 connections, we recommend distributing the load across multiple Medium or Large deployments.
The default memory allocation for the pipeline processing jobs is 4 GB, where the Java heap size uses 70% of the total allocated memory. However, you can increase the memory allocation based on your requirements. For connections with complex schemas and large datasets, we recommend allocating 8 GB. To increase the memory allocation, modify the value of the container_memory_limit_gigabytes agent configuration parameter.
Network requirements
In addition to connecting to your source and destination, Hybrid Deployment requires outbound access to the following Fivetran services and supporting infrastructure:
- mTLS connection to the Fivetran Orchestration Service
- Host:
ldp.orchestrator.fivetran.com - IP addresses:
35.188.225.82,136.107.81.248/29, and34.143.64.0/29
- Host:
- HTTPS with a secure token to the Fivetran Public API
- Host:
api.fivetran.com - IP addresses:
35.236.237.87,136.107.81.248/29, and34.143.64.0/29
- Host:
- gRPC to the Fivetran Orchestration Gateway
- Host:
hdt.orchestrator.fivetran.com - IP addresses:
136.107.81.248/29and34.143.64.0/29
- Host:
- Google Artifact Registry
- Host:
us-docker.pkg.dev - To determine the applicable IP range, run
nslookup us-docker.pkg.devfrom your Hybrid Deployment machine and use the returned IP address to identify the corresponding IP range through ICANN
- Host:
- GitHub repository hosting the automated installation script
- Host:
raw.githubusercontent.com/fivetran/hybrid_deployment - To determine the applicable IP range, run
nslookup raw.githubusercontent.comfrom your Hybrid Deployment machine and use the returned IP address to identify the corresponding IP range through ICANN
- Host:
- Fivetran Platform Connector logs
- Host:
storage.googleapis.com/fivetran-metrics-log-sr
- Host:
- Unless specified otherwise, all HTTPS-based outbound connections use port
443. - If your firewall supports domain-based allowlisting, Fivetran recommends allowing hostnames instead of IP ranges wherever possible.
Setup instructions
Create agent
Log in to your Fivetran account.
Go to the Destinations page and click Add destination.
Select your destination type.
Enter a Destination name of your choice.
Click Add.
In the destination setup form, choose Hybrid Deployment as your deployment model.
Click Select Hybrid Deployment Agent.
Click Create new agent.
Read the Fivetran On-Prem Software License Addendum, and select the I have read and agree to the terms of the License Addendum and the Software Specific Requirements checkbox.
Click Next.
Choose Podman as the deployment type.
Click Next.
Enter an Agent name and click Generate agent token.
Make a note of the agent token and installation command. You will need the agent token for manual installation and the installation command for automated installation of the agent.
Each Hybrid Deployment Agent has a unique token and installation command.

Click Save.
(Optional) Configure proxy settings for local environment and container runtime
Expand to see the instructions
Configure local Linux environment
Log in to your local machine using the Fivetran user.
Go to the
/etc/profile.d/directory and add a new file namedproxy.sh.In the
proxy.shfile, set appropriate values for the following system-wide environment variables:http_proxy: Specifies the proxy server to use for HTTP requests.https_proxy: Specifies the proxy server to use for HTTPS requests.no_proxy: Excludes specific domains or IPs from using the proxy.
For example:
export http_proxy="http://my-squid-proxy.example.com:3128" export https_proxy="http://my-squid-proxy.example.com:3128" export no_proxy="localhost,127.0.0.1"- We recommend using the Fully Qualified Domain Name (FQDN) or IP address of the proxy host.
- The
no_proxyvalue can include a custom list of exclusions. In most environments, this includeslocalhost,127.0.0.1. - If the host is in an AWS environment, make sure the
no_proxyvariable includes the instance metadata address169.254.169.254.
Configure container runtime
Podman primarily operates in rootless mode, meaning it runs under a regular user account without needing root privileges. To ensure Podman uses the appropriate proxy settings when pulling images or running containers, you must configure both the podman.service and podman.socket user-level systemd units.
Update Podman service configuration
Open the override file (
~/.config/systemd/user/podman.service.d/override.conf) for the Podman service.systemctl --user edit podman.serviceAdd the environment variables to the
[Service]section. For example:[Service] Environment="HTTP_PROXY=http://my-squid-proxy.example.com:3128" Environment="HTTPS_PROXY=http://my-squid-proxy.example.com:3128" Environment="NO_PROXY=localhost,127.0.0.1"
Update Podman socket configuration
Open the override file for the Podman socket.
systemctl --user edit podman.socketAdd the environment variables to the
[Service]section. For example:[Service] Environment="HTTP_PROXY=http://my-squid-proxy.example.com:3128" Environment="HTTPS_PROXY=http://my-squid-proxy.example.com:3128" Environment="NO_PROXY=localhost,127.0.0.1"
Reload and restart Podman services
After updating the configuration, reload the systemd manager and restart the Podman services to apply the changes.
systemctl --user daemon-reexec
systemctl --user daemon-reload
systemctl --user restart podman.service
systemctl --user restart podman.socket
Install agent
You can install the agent using one of the following methods:
- Automated installation (recommended): Install and start the agent by running a single command.
- Manual installation: Create the agent directories and
config.jsonfile, and then start the agent manually.
Automated installation
Log in to your local machine using the Fivetran user.
Open a terminal and run the installation command Fivetran generated for your agent.
Example:
Before you run the command, you must set the value of
TOKENto your agent token and the value ofRUNTIMEtopodman.TOKEN="YOUR_TOKEN_HERE" RUNTIME=podman bash -c "$(curl -sL "https://raw.githubusercontent.com/fivetran/hybrid_deployment/main/install.sh")"The installation command does the following:
- Creates the agent directories in
$HOME/fivetranusing the install.sh script. - Creates the default
config.jsonfile with the agent token. - Starts the agent container image with the container runtime you selected.
The installation command creates the agent directories in the following structure:
$HOME/fivetran --> Agent home directory ├── hdagent.sh --> Helper script to start/stop the agent container ├── conf --> Configuration file location │ └── config.json --> Default configuration file ├── data --> Persistent storage used during data pipeline processing │ └── _samples --> Hashed source sample files used during active row calculations ├── logs --> Log file location └── tmp --> Local temporary storage used during data pipeline processing- Creates the agent directories in
Manual installation
Expand for instructions
Configure local environment for agent
Log in to your local machine using the Fivetran user.
Run the following commands to create the agent directories:
mkdir -p $HOME/fivetran
cd $HOME/fivetran
mkdir -p data conf logs tmp
These commands create the agent directories in the following structure:
$HOME/fivetran        --> Agent home directory
      ├── conf        --> Configuration file location
      ├── data        --> Persistent storage used during data pipeline processing
      ├── logs        --> Log file location
      └── tmp         --> Local temporary storage used during data pipeline processing
Create a configuration file,
config.json, in$HOME/fivetran/confdirectory.In the
config.jsonfile, add the agent token Fivetran generated for your agent.{ "token": "YOUR_AGENT_TOKEN" }- We recommend that you add the agent token to the
config.jsonfile. However, you can skip this step and use the token as an environment variable when starting the agent container. - By default, you do not have to add any additional configuration values to the
config.jsonfile. However, you can add additional values to theconfig.jsonfile based on your requirements. For more information about the configuration parameters, see our Agent Configuration Parameters documentation.
- We recommend that you add the agent token to the
Start agent
Log in to your local machine using the Fivetran user.
Go to the base folder you created.
Create a Podman network and start the container.
#!/bin/bash

# Config file is expected in the conf/ sub folder
CONFIG_FILE=conf/config.json

# Token will be extracted from config file
TOKEN=$(grep -o '"token": *"[^"]*"' "$CONFIG_FILE" | sed 's/.*"token": *"\([^"]*\)".*/\1/')

# Extract controller id from token
CONTROLLER_ID=$(echo $TOKEN | base64 -d | cut -f1 -d":")

# Podman socket
XDG_RUNTIME_DIR=/run/user/$(id -u)
SOCKET=$XDG_RUNTIME_DIR/podman/podman.sock

# Create podman network for agent container
podman network create -d bridge fivetran_ldp > /dev/null 2>&1

# Start agent container
podman run \
 -d \
 --restart "on-failure:3" \
 --pull "always" \
 --security-opt label=disable \
 --label fivetran=ldp \
 --label ldp_process_id=default-controller-process-id \
 --label ldp_controller_id=$CONTROLLER_ID \
 --name controller \
 --network fivetran_ldp \
 --env HOST_USER_HOME_DIR=$HOME \
 --env CONTAINER_ENV_TYPE="podman" \
 -v $HOME/fivetran/conf:/conf \
 -v $HOME/fivetran/logs:/logs \
 -v $SOCKET:/run/user/1000/podman/podman.sock \
 us-docker.pkg.dev/prod-eng-fivetran-ldp/public-docker-us/ldp-agent:production -f /conf/config.json
- You can find your agent token in
conf/config.json. - If you are running Podman in rootless mode, set the
SOCKETvalue to reflect the rootless socket.
Stop agent
The following script identifies the agent container, and then stops and removes it:
#!/bin/bash
CONTAINER_ID=$(podman ps -a -q -f name="^/controller" -f label=fivetran=ldp)
podman stop $CONTAINER_ID
podman rm $CONTAINER_ID
podman network rm fivetran_ldp
(Optional) Configure proxy settings for agent
Expand to see the instructions
Open the
config.jsonfile for the Hybrid Deployment Agent.Add the necessary proxy environment variables you specified for your local environment. For example:
...
"http_proxy": "http://my-squid-proxy.example.com:3128",
"https_proxy": "http://my-squid-proxy.example.com:3128",
"no_proxy": "localhost,127.0.0.1",
...
Restart the agent to apply the new settings.
./hdagent.sh stop
./hdagent.sh start
Verify agent status
Verify the agent status by doing any of the following:
Run
podman ps -ato verify whether the agent container is running.Review the agent container logs.
On the Fivetran dashboard, go to Account Settings > General > Hybrid Deployment Agents and verify the agent status.
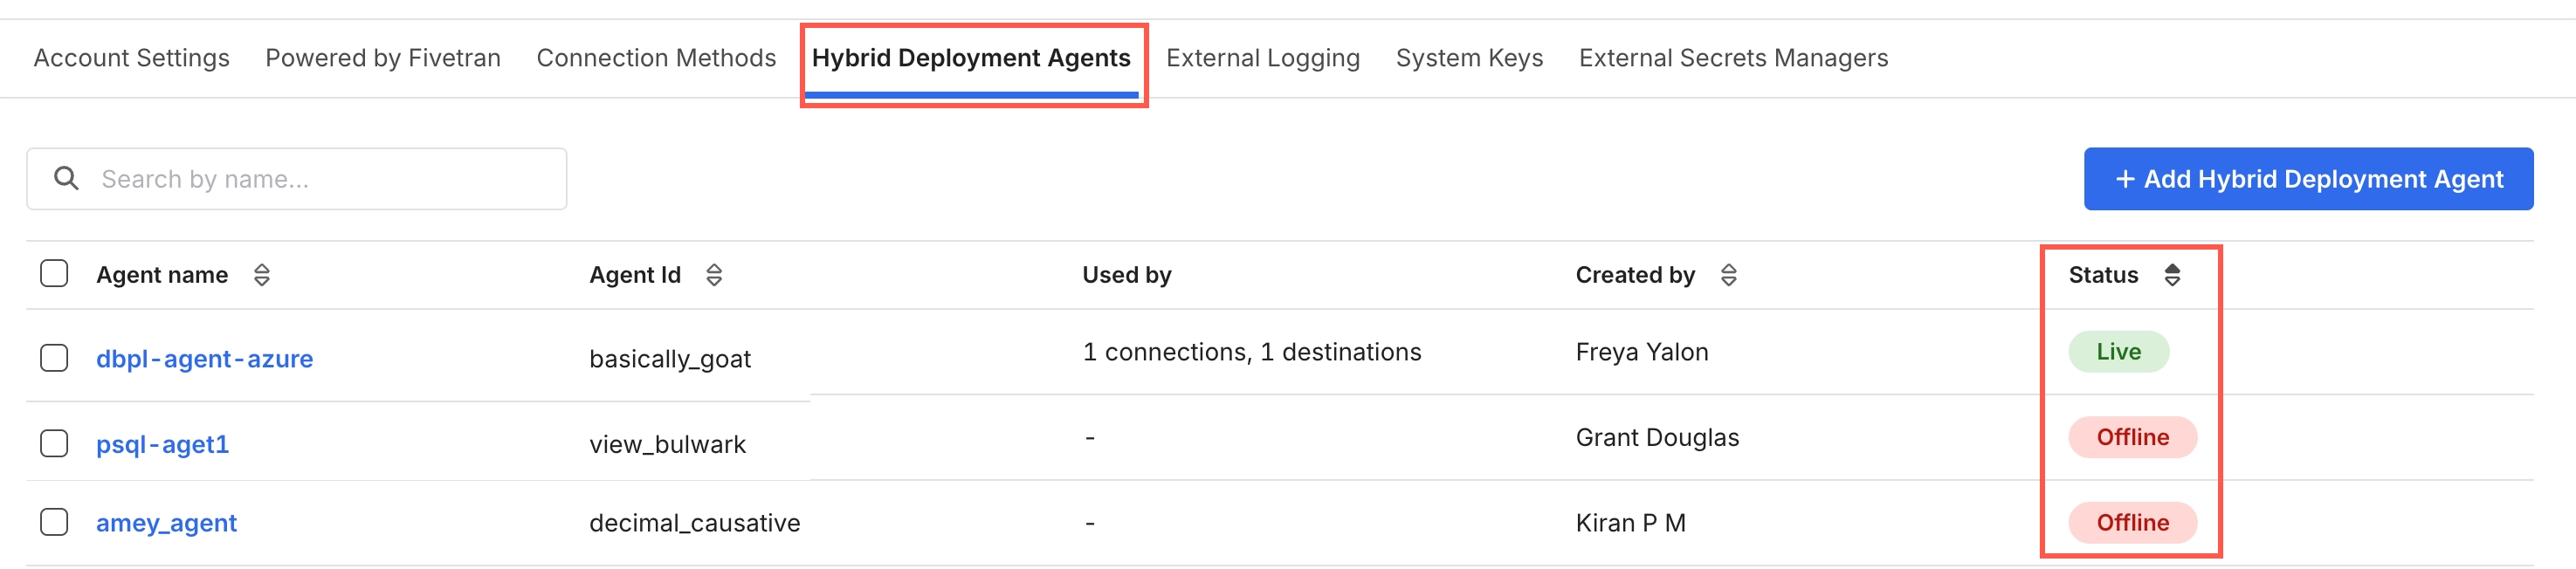
You can view and manage all the agents associated with your Fivetran account on the Fivetran dashboard (Account Settings > General > Hybrid Deployment Agents).