High-Volume Agent SAP ECC on Oracle with NetWeaver Setup Guide Beta
Follow these instructions to replicate data from SAP ECC on Oracle database to your destination using High-Volume Agent (HVA) Oracle connector.
Prerequisites
To connect your Oracle database to Fivetran using HVA, you need:
- A Fivetran account with an Enterprise or Business Critical plan
- Oracle 11g R2 or above
- SAP NetWeaver 7.5 or above
- Unicode compliance enabled for your SAP system
- The IP address of your database host
- For Oracle RAC environment, you need an Application Virtual IP (VIP) or the public IP of a node
- High-Volume Agent installed on your Oracle database host
- Supplemental logging enabled in your database
- ARCHIVELOG mode enabled for your database
- A SAP Communication user with the permissions specified in the SAP NetWeaver user section
Setup instructions
Install HVA
This section provides detailed instructions on how to install HVA and outlines the necessary requirements. The steps below cover both Oracle non-RAC and Oracle RAC configurations.
HVA requirements
Before proceeding with the HVA installation, ensure that you have the following prerequisites in place:
Compatibility: Verify that the HVA version is compatible with your operating system and DBMS. Refer to the COMPATIBILITY section in the relevant release notes on the Downloads page of your Fivetran dashboard.
Sufficient disk space: Ensure that the machine where you want to install the HVA has ample disk space. We recommend a minimum of 10 GB of available disk space.
HVA installation: Download the HVA installation file from the Downloads page of your Fivetran dashboard. Select the installation file for your database server's operating system.
IMPORTANT: You must install HVA on the host where your Oracle database is running, or on a host that has access to the database.
System permissions: HVA needs permission to read Oracle's redo and archive files at the operating system-level. This can be achieved in one of the following ways:
- Install and run the agent under the database owner user account (for example,
oracle). - Install and run the agent under a different user (for example,
fivetran_user) that must be a member of Oracle's default operating system group. Typically, this is eitheroinstallordbaon Unix-based systems andora_dbaon Windows.
- Install and run the agent under the database owner user account (for example,
Steps to install HVA on Linux
Create folder structure:
i. As the
rootuser, create the HVA installation directory (for example,/opt/fivetran) and set the appropriate owner (for example,oracle) and group (for example,oinstall) for it.mkdir /opt/fivetran chown -R oracle:oinstall /opt/fivetranNOTE: If you are using Oracle RAC with shared storage (for example, ACFS), ensure that the
/opt/fivetranfolder is created on the shared storage and mounted on all nodes in the cluster. If you are not using the shared storage, the/opt/fivetranfolder must be created on all nodes in the cluster.ii. In the
/opt/fivetrandirectory, create three key subdirectorieshvr_home,hvr_config, andhvr_tmp:mkdir -p /opt/fivetran/hvr_home mkdir -p -m 01775 /opt/fivetran/hvr_config/etc /opt/fivetran/hvr_tmpConfigure environment:
NOTE: If using Oracle RAC, ensure this step is performed on all nodes in the cluster.
i. Configure the
HVR_HOME,HVR_CONFIG, andHVR_TMPenvironment variables to point to the relevant HVA installation subdirectories:HVR_HOME=/opt/fivetran/hvr_home HVR_CONFIG=/opt/fivetran/hvr_config HVR_TMP=/opt/fivetran/hvr_tmpii. Add the
$HVR_HOME/binexecutable directory path to the environment variablePATH:export PATH=$PATH:$HVR_HOME/biniii. Add the environment variables and the executable directory path into the startup file (for example,
.profileor.bash_profile):export HVR_HOME=/opt/fivetran/hvr_home export HVR_CONFIG=/opt/fivetran/hvr_config export HVR_TMP=/opt/fivetran/hvr_tmp export PATH=$PATH:$HVR_HOME/binInstall agent:
NOTE: If you are using Oracle RAC with the
/opt/fivetranfolder created on shared storage, you need to perform this step only once. If you are not using shared storage, you must repeat this step for all nodes in the cluster.Navigate into the
$HVR_HOMElocation and extract the contents of the HVA installation file (for example,fivetran-6.1.0_26-hub_and_agent-linux_glibc2.12-x64-64bit_ga_patch.tar.gz):cd $HVR_HOME tar xzf /tmp/fivetran-6.1.0_26-hub_and_agent-linux_glibc2.12-x64-64bit_ga_patch.tar.gzOnce complete, the agent and all required components are installed into the
$HVR_HOMElocation (/opt/fivetran/hvr_home).
Configure HVA
Follow the instructions below to configure the HVA:
Create an HVA user to set up your Fivetran connector. In the following example, we use
hva_user:NOTE: The minimum password length for the user must be 10 characters and not contain special characters.
hvragentuserconfig -c hva_user
Password for 'hva_user': <enter a password>
Retype password:  <confirm the password>
Make a note of the username and password. You will need them to configure your connector in the Fivetran dashboard.
Run the following command to disable the setup mode:
hvragentconfig Setup_Mode_Timed_Until=Run the following command to extract the HVA public certificate:
hvragentconfig Agent_Server_Public_CertificateSave the output value of the
Agent_Server_Public_Certificate. You will need it to configure your connector in the Fivetran dashboard.
Start HVA
Perform the following steps as the user who runs HVA.
To start the agent, you need to run the hvragentlistener command with the -d flag followed by the port number that you want to run on. In the example, the default port is 4343.
hvragentlistener -d 4343
NOTE: For Oracle RAC, configuration using shared storage is highly recommended. Running the agent as a cluster resource and only on one node at a time is the preferred setup. If you do not want to follow this approach, you can run the agent only on one of the nodes in the cluster. If this node fails, you will need to start the agent on one of the other nodes in the cluster.
Choose connection method
Decide how you want to connect Fivetran to your SAP system:
Connect directly
Fivetran connects directly to the High-Volume Agent installed on the database host. All communication between Fivetran and the agent is encrypted. The agent has a direct connection to your Oracle database.
To connect directly, configure your firewall and/or other access control systems to allow incoming connections to your Oracle database host where the agent is installed. Restrict access to the database port (usually 1521) and the agent port (usually 4343) from Fivetran's IPs for your database's region. How you do this varies based on how your Oracle database is hosted, whether on a cloud platform, on-premises, or otherwise.

Connect via SSH
Fivetran connects to a separate server in your network that provides an SSH tunnel to your database host, or cluster running Oracle RAC. You must connect through SSH if your database is in an inaccessible subnet. To connect using SSH, follow our SSH connection instructions.

NOTE: If you want to use Reverse SSH Tunnel, contact our support team for the additional setup steps.
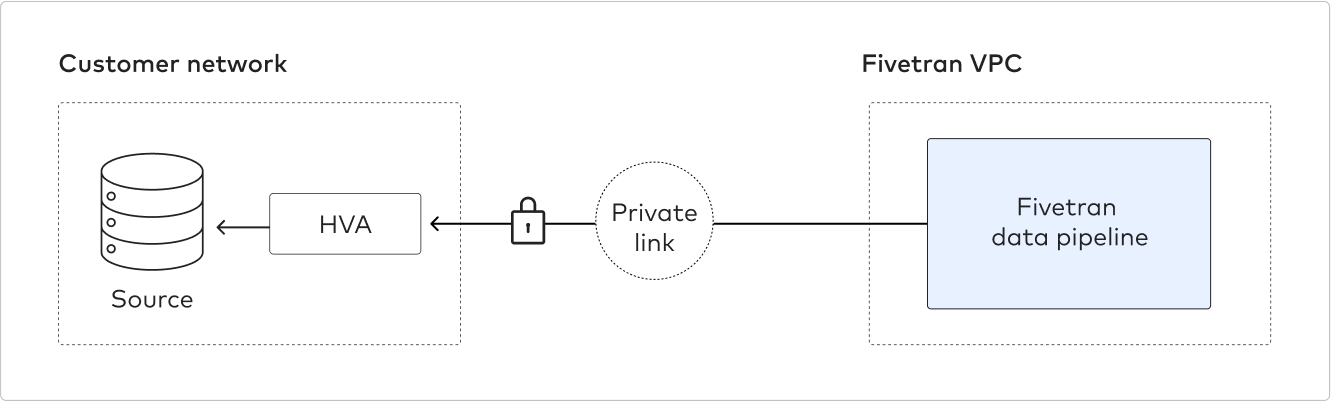
Connect using private networking
IMPORTANT: You must have a Business Critical plan to use private networking.
Private networking enables communication between private networks and services without exposing traffic to the public internet. Private networking is the most secure connection method. We support the following providers:
- AWS PrivateLink – used for VPCs and AWS-hosted or on-premises services. See our AWS PrivateLink setup guide for details.
- Azure PrivateLink – used for Virtual Networks (VNets) and Azure-hosted or on-premises services. See our Azure PrivateLink setup guide for details.
- Google Cloud Private Service Connect – used for VPCs and Google-hosted or on-premises services. See our Google Cloud Private Service Connect setup guide for details.
Connect using Proxy Agent
Fivetran connects to the HVA through the Proxy Agent, providing secure communication between Fivetran processes and your database host. The Proxy Agent is installed in the customer's network and creates an outbound network connection to the Fivetran's cloud. To connect using Proxy Agent, follow our Proxy Agent documentation.

Install NetWeaver RFC SDK libraries
Fivetran requires NetWeaver RFC SDK version 7.50.8 or above installed on the machine from where HVA connects to the SAP NetWeaver.
Go to the SAP software download page.
Download and extract the Unicode SAP NetWeaver RFC SDK libraries that are specific to your operating system.
Copy the following files from the
/libdirectory (available in the extracted path) to a directory of your choice:OPERATING SYSTEM LIBRARIES Linux 64 bit libicudata.so.xx
libicudecnumber.so
libicui18n.so.xx
libicuuc.so.xx
libsapnwrfc.so
libsapucum.soWindows 64 bit icudtxx.dll
icuinxx.dll
icuucxx.dll
libsapucum.dll
libicudecnumber.dll
sapnwrfc.dllNOTE: xx in the library names can vary depending on the library versions.
For Linux, set the read, write, and execute permissions for each NetWeaver RFC library file.
Import Fivetran transports
Import the transports containing Fivetran's ABAP functions. Use your company's default method to import the transports provided.
NOTE: While importing you may need to use the Ignore Invalid Component Version option to suppress import errors.
The transport files are available in the HVR_HOME/dbms/netweaver directory. For information about the latest transports files, refer to the readme.txt file in the same directory.
Configure Fivetran AppConnect in SAP
Fivetran's AppConnect has a number of configuration parameters that can be used to tune and optimize data extraction. You can access these parameters using the following SAP transaction: /N/HVR/CONFIG.
In most cases, you can retain the default values set for these parameters. When you want to make a change, trigger a change mode and save the new values into the ACTIVE variant.
| PARAMETER | DESCRIPTION |
|---|---|
Max wasted iterations | Stop SAP listener process after X failed attempts to read data. |
Max wait, microseconds | Delay for SAP listener process in between GET requests. |
Memory tunnel size, byte | How much shared memory buffer in SAP is used. |
Max wait background, microsec | Stop retrieval process after X micro seconds. |
Max wait foreground, microsec | Stop retrieval process after X micro seconds. |
Max size uncompressed, byte | Maximum data package size. |
Evaluate max size for strings | Calculate string length for dynamic data types. |
DB Connection Name | Secondary database connection name to be used in case you do not want to use the standard SAP database connection. This is not the same connection used to deploy HANA views. |
Application server | Name of the dedicated application server. It is mandatory to set this parameter. You must set it to the same server where HVA logs on to allow in-memory data transfer. The current version of AppConnect does not support SAP load balancing. You can set this value to NONE. You should only use it when instructed by Fivetran support. |
Logging | Activate/deactivate job logging. Available options are:
|
SAP NetWeaver user
NOTE: HVA connects through the application layer and inherits the database authorisations of the standard SAP database user. You can manage table-level authorisations using the SAP authorisation object
S_TABU_SQL.
Fivetran's AppConnect requires a Communication user with the following permissions:
RFC access to standard SAP functions to establish connection:
AUTHORIZATION OBJECT AUTHORIZATION FIELD AUTHORIZATION VALUE S_RFC RFC_TYPE FUGR RFC_NAME BTCH
RFC1
SDIFRUNTIMEAUTHORIZATION OBJECT AUTHORIZATION FIELD AUTHORIZATION VALUE S_RFC RFC_TYPE FUNC RFC_NAME RFCPING RFC access to the HVR function group:
AUTHORIZATION OBJECT AUTHORIZATION FIELD AUTHORIZATION VALUE S_RFC RFC_TYPE FUGR RFC_NAME /HVR/SAPAPPCONNECT Authorization required for batch process administration to schedule background jobs:
AUTHORIZATION OBJECT AUTHORIZATION FIELD AUTHORIZATION VALUE S_RFC RFC_TYPE FUGR RFC_NAME S_BTCH_JOB AUTHORIZATION OBJECT AUTHORIZATION FIELD AUTHORIZATION VALUE S_BTCH_ADM BTCADMIN Y AUTHORIZATION OBJECT AUTHORIZATION FIELD AUTHORIZATION VALUE S_BTCH_JOB JOBACTION RELE JOBGROUP * Data access authorizations:
The S_TABU_SQL authorization object can be used to manage access rights for every data table in the SAP database.
To grant full access, apply the following settings:AUTHORIZATION OBJECT AUTHORIZATION FIELD AUTHORIZATION VALUE S_TABU_SQL ACTVT 33 DBSID * TABOWNER standard DB schema(SAPABAP1) TABLE * Alternatively, to restrict access and grant permissions only to specific data tables that you want to synchronize, apply the following settings:
AUTHORIZATION OBJECT AUTHORIZATION FIELD AUTHORIZATION VALUE S_TABU_SQL ACTVT 33 DBSID * TABOWNER standard DB schema(SAPABAP1) TABLE Target table name NOTE: When granting permissions only to specific data tables, the authorization object S_TABU_SQL must be added to user profile.
Additionally, when granting permissions only to specific data tables, Fivetran requires access to certain standard SAP tables; you must grant access rights to these tables:
AUTHORIZATION OBJECT AUTHORIZATION FIELD AUTHORIZATION VALUE S_TABU_SQL ACTVT 33 DBSID * TABOWNER * TABLE CLIENTSIDE_ENCRYPTION_COLUMN_K
CS_ALL_COLUMNS
CS_COLUMNS_
CS_CONCAT_ATTRIBUTES_
CS_TABLES_
DUAL
DUMMY
HAS_NEEDED_SYSTEM_PRIV
HAS_NEEDED_SYSTEM_PRIV_INCL_SY
INDEX_COLUMNS
M_CONNECTIONS
M_DATABASE
NUMA_NODE_PREFERENCE_
P_DATATYPES_
P_GRANTEDPRIVS_
P_INDEXES_
P_MASK_EXPRESSION_
P_OBJTYPES_
P_PRINCIPALS_
P_PROCEDURES_
P_SCHEMAS_
P_USERS_
RS_COLUMNS_
RS_TABLES_
SERIES_DATA_
TABLES
TABLE_COLUMNS
VIRTUAL_COLUMNS_
VIRTUAL_TABLES_
_SYS_CS_TABLE_COLUMNS
_SYS_GRANTED_OBJECTS
_SYS_GRANTEE_OIDS
_SYS_RS_TABLE_COLUMNS
_SYS_SCHEMAS_WITH_PRIVILEGES_O
_SYS_VIRTUAL_TABLE_COLUMNS
:BF0000
ALL_OBJECTS
CDEF$
CON$
DBA_OBJECTS
DEFERRED_STG$
DEPENDENCY$
IND$
I_COBJ#
I_CON2
I_DEFERRED_STG1
I_DEPENDENCY1
I_FILE#_BLOCK#
I_IND1
I_LINK1
I_OBJ#
I_OBJ1
I_OBJ2
I_OBJ4
I_OBJ5
I_OBJAUTH1
I_OLAP_CUBES$
I_SUM$_1
I_TABCOMPART$
I_TABPART_OBJ$
I_TABSUBPART$_OBJ$
I_TRIGGER2
I_TS#
I_USER#
I_USER1
I_USER2
OBJ$
SEG$
SUM$
TAB$
TABCOMPART$
TABPART$
TABSUBPART$
TRIGGER$
TS$
USER$
USER_EDITIONING$
X$CON
X$DNFS_FILES
X$KCCAL
X$KCCDI
X$KCCDI2
X$KCCFN
X$KCCIC
X$KCCLE
X$KCCRT*
X$KGLCURSOR_CHILD
X$KQLFXPL*
X$KRSTDEST
X$KSLED*
X$KSLWT
X$KSPPCV
X$KSPPI
X$KSPPSV
X$KSUSE*
X$KTADM
X$KTCXB
X$KZEKMENCWAL
X$KZSPR
X$KZSRO
X$VERSION
VW*AUTHORIZATION OBJECT AUTHORIZATION FIELD AUTHORIZATION VALUE S_TABU_SQL ACTVT 33 DBSID * TABOWNER standard DB schema(SAPABAP1) TABLE /HVR/BACKUP_CONFIGURATION
/HVR/LOG_PARTITIONS
/HVR/SERVICE_LOG_POSITIONS
/HVR/TABLE_COLUMNS
/HVR/TABLE_VIRTUAL_FILES
DD02L*
DD02T*
DD03L*
DD04L*
DD06T*
DD08L*
DD09L*
DD16S
DDNTF
DDNTT*
HVR_IS_ARCHBLK
HVR_STIN_ARCBLK
TADIR*
Configure ARCHIVELOG mode
It is required to have your Oracle database in the ARCHIVELOG mode. This is normally the default for most production systems as it allows online backups and point-in-time recovery. However, to ensure Fivetran has access to all the required redo information, having the database in the ARCHIVELOG mode is required.
In addition, we also recommend that you keep at least 24 hours' worth of archive logs available.
The following section provides an overview of how the archive logging can be enabled. We also recommend that you review the Oracle documentation.
If the ARCHIVELOG mode is not enabled on your database, enable the ARCHIVELOG mode.
IMPORTANT: If your database is not in the ARCHIVELOG mode, you must restart the database to place it in the ARCHIVELOG mode.
If using single instance database:
NOTE: Enabling the ARCHIVELOG mode requires the Oracle instance to be briefly taken offline. To learn more, see Oracle's archived redo log file documentation.
shutdown immediate;
startup mount;
alter database archivelog;
alter database open;
Configure Oracle RMAN to retain backups and archive logs for at least 24 hours. We recommend you retain data for seven days.
IMPORTANT: To sync your data, Fivetran must have a minimum of 3 hours' worth of log data to analyze. You cannot finish setting up your connector until 3 hours after you configure RMAN to retain archive logs.
RMAN> CONFIGURE RETENTION POLICY TO RECOVERY WINDOW OF 7 DAYS;(Recommended) Set the
DB_RECOVERY_FILE_DEST_SIZEparameter to a value that matches your available disk space, because expired and obsolete log and backup files can quickly fill your disk. For more information, see Oracle's DB_RECOVERY_FILE_DEST_SIZE documentation.
Supplemental logging
The HVA requires the Oracle supplemental logging feature to be enabled on tables it replicates. Without this feature, Oracle logs only the columns that are changed. The agent, however, needs additional data (for example, key columns) to generate a full update statement for the target destination.
Oracle supplemental logging can be set at both the database level and for specific tables.
To enable supplemental logging, use the following SQL commands:
Enable database-level minimal supplemental logging:
ALTER DATABASE ADD SUPPLEMENTAL LOG DATA;Enable additional table-level supplemental logging depending on the table type:
For a table with a primary key, enable primary key supplemental logging:
ALTER TABLE "<schema>"."<table>" ADD SUPPLEMENTAL LOG DATA (PRIMARY KEY) COLUMNS;For a table without a primary key or unique index, or for a table with any type of compression enabled (regardless of whether they have a primary key and/or unique indexes), enable logging for all columns:
ALTER TABLE "<schema>"."<table>" ADD SUPPLEMENTAL LOG DATA (ALL) COLUMNS;NOTE: Enabling supplemental logging for all table columns ensures that any row change captures the values of all columns. This method allows the replication process to identify changes based on the entire row's data, which is especially beneficial for tables without a primary key.
NOTE: For tables without a primary key, any update operation may incur additional MAR if it causes row movement. Oracle generates three log events for row movement —
UPDATE(to an existing row),DELETE(of the row from its current partition), andINSERT(of the row into a new partition). Fivetran counts these as two MAR.For a table without a primary key but with a unique index, enable conditional supplemental logging:
ALTER TABLE "<schema>"."<table>" ADD SUPPLEMENTAL LOG GROUP "<group_name>" ("<column_name>", ...) ALWAYS;NOTE: This command creates a user-defined supplemental log group for specific column(s) within a table, offering a precise control over which column changes are logged.
Check supplemental logging status
To check the status of supplemental logging at database-level:
SELECT supplemental_log_data_min, supplemental_log_data_pk, supplemental_log_data_all FROM v$database;
To check the status of supplemental logging at table-level:
SELECT log_group_type FROM all_log_groups WHERE table_name='<schema>.<table>';
Disable supplemental logging
To disable supplemental logging at database-level:
ALTER DATABASE DROP SUPPLEMENTAL LOG DATA;
To disable supplemental logging at table-level:
For a table with a primary key:
ALTER TABLE "<schema>"."<table>" DROP SUPPLEMENTAL LOG DATA (PRIMARY KEY) COLUMNS;For a table without a primary key or unique index:
ALTER TABLE "<schema>"."<table>" DROP SUPPLEMENTAL LOG DATA (ALL) COLUMNS;For a table without a primary key but with a unique index:
ALTER TABLE "<schema>"."<table>" DROP SUPPLEMENTAL LOG GROUP "<group_name>";
Configure Direct Capture
To enable Direct Capture, create a temporary table and grant read/write access to the SAP database user:
CREATE GLOBAL TEMPORARY TABLE HVR_SYS_TABLE (TABLE_NAME VARCHAR(128), TABLE_OWNER VARCHAR(128));
GRANT SELECT, INSERT, UPDATE, DELETE ON HVR_SYS_TABLE TO <database_user>;
NOTE: HVA uses the temporary table to make its queries more efficient during replication. Since this is a temporary table, there is no database logging on this table, and no rows remain at the end of the session. Storage for this table goes into the temporary tablespace.
Advanced configuration
Autostart
After completing the initial HVA setup, you must add the agent to your system’s startup and shutdown procedures.
Add HVA to system autostart on Linux
On Linux, there are two key options:
For Oracle non-RAC, add agent to systemd
Expand for instructions
To configure systemd, perform the following steps as user
root:Create a service file called
agentListener.servicein the/etc/systemd/systemdirectory. TheagentListener.serviceshould contain the following:NOTE: Change the
User=hva_userfield to the Linux user that installed the HVA.[Unit] Description=Fivetran Agent Listener [Service] # The process start-up type 'forking' allows this service to spawn new processes Type=forking Environment="HVR_HOME=/opt/fivetran/hvr_home" Environment="HVR_CONFIG=/opt/fivetran/hvr_config" Environment="HVR_TMP=/opt/fivetran/hvr_tmp" # The user that owns HVR_HOME, HVR_CONFIG, etc. User=hva_user ExecStart=/opt/fivetran/hvr_home/bin/hvragentlistener -d 4343 # Restart this service after a crash Restart=always # The number of seconds to wait before attempting a restart RestartSec=5s [Install] WantedBy=multi-user.targetTo enable and start the service, execute the following commands:
sudo systemctl enable agentListener.service
sudo systemctl start agentListener.service
To verify whether the service is active, execute the following command:
sudo systemctl status agentListener.service
The output should show
active (running)in green.For Oracle RAC, add agent as a cluster resource
Expand for instructions
If you are using Oracle RAC, review the Oracle ASM Configuration section.
To add the High-Volume Agent to an Oracle RAC cluster as a cluster resource, follow the steps below.
In the examples provided, we use the following naming:
- Virtual IP Name:
fivetran-vip - Oracle RAC node names:
racnode1andracnode2 - Installation path for agent software:
/opt/fivetran - Owner of the agent software: the Oracle software owner, referred to as
oracle
Step 1: Create a Virtual IP
The Virtual IP (VIP) is designated for exclusive use by the High-Volume Agent. This IP will will only be active on one node at a time within the cluster, ideally on the node where the agent listener is running, using a shared storage system such as an ACFS file system.
Commands to create the Virtual IP:
NOTE: The IP address
10.1.1.159is an example. You must use an IP address from your Oracle RAC public network subnet.appvipcfg create -network=1 -ip=10.1.1.159 -vipname=fivetran-vip -user=root crsctl setperm resource fivetran-vip -u user:oracle:r-x crsctl setperm resource fivetran-vip -u user:grid:r-x crsctl start resource fivetran-vip -n racnode1Step 2: Agent Action Script
To add the agent as a resource in Oracle Clusterware, use an action script.
Example of the action script
  #!/bin/bash
  #
  # Description:
  #  A sample Fivetran High-Volume Agent action script
  #
  # set following to ensure oraenv is picked up from /usr/local/bin
  # set -x

  export PATH=/usr/local/bin:$PATH

  # set Fivetran-specific environment
  export HVR_HOME=/opt/fivetran/hvr_home
  export HVR_CONFIG=/opt/fivetran/hvr_config
  export HVR_TMP=/opt/fivetran/hvr_tmp
  export FTAGENT_BASE=/opt/fivetran

  # update agent port if different
  export AGENT_PORT=4343


  ###########
  # Function to set the oracle environment
  # Note that it is making use of /etc/oratab
  # Your database must be listed on all nodes in the cluster
  ###########
  set_env ()
  {
    export ORAENV_ASK=NO
    export ORACLE_SID=$1
    . oraenv >> /dev/null
    export ORAENV_ASK=YES
  }


  ###########
  # Helper function to rename logfiles to keep clean history
  ###########
  rename_log () {
    utcdate=`date -u +"%Y-%m-%dT%H.%M.%SZ"`
    if [ -f $HVR_CONFIG/logs/hvragentlistener${AGENT_PORT}.log ]; then
      mv $HVR_CONFIG/logs/hvragentlistener${AGENT_PORT}.log $HVR_CONFIG/logs/hvragentlistener${AGENT_PORT}.log.${utcdate}
    fi
  }


  ###########
  ## Main
  ###########

  # This is logged to CRSD agent log file
  echo "`date` Action script '$_CRS_ACTION_SCRIPT' for resource [$_CRS_NAME] called for action $1"

  # Note that you must update the value for the current_host below to match your environment.
  # in the setup below the rac node 1 is called "racnode1"
  current_host=`hostname -s`
  if [ "$current_host" == "racnode1" ]; then
    set_env DEV1
  else
    set_env DEV2
  fi


  cd $HVR_HOME/bin


  case "$1" in
       'start')
             NUM=`ps -ef | grep hvragentlistener | egrep -v 'grep|action-script|resource' | wc -l`
             if [ $NUM != 0 ]; then
               echo "Agent still running, stop first"
           RET=1
         else
               rename_log
               ./hvragentlistener -d ${AGENT_PORT}
               RET=0
               echo "Start fivetran agent (hvragentlistener) resource with return code $RET"
             fi
       ;;

       'stop')
             NUM=`ps -ef | grep hvragentlistener | egrep -v 'grep|action-script|resource' | wc -l`
             if [ $NUM = 0 ]; then
               ## do a cleanup of pid
               ./hvragentlistener -k $AGENT_PORT >> $FTAGENT_BASE/ftagent.out 2>&1
           rename_log
               RET=0
             else
               ## now stop the agent
               ./hvragentlistener -k $AGENT_PORT >> $FTAGENT_BASE/ftagent.out 2>&1
               rename_log
               NUM=`ps -ef | grep hvragentlistener | grep -v grep | wc -l`
               if [ $NUM = 0 ]; then
                 RET=0
               else
                 RET=1
               fi
             fi
             echo "Stop fivetran agent (hvragentlistener) resource with return code $RET"
       ;;

       'check')
             NUM=`ps -ef | grep hvragentlistener | egrep -v 'grep|action-script|resource' | wc -l`
             if [ $NUM = 0 ]; then
               ## return code 1 for check means OFFLINE
               RET=1
             else
               ## return code 0 for check means ONLINE
               RET=0
             fi
             echo "Running check fivetran agent (hvragentlistener) resource with return code $RET"
       ;;

       'clean')
             for c1 in `ps -ef|grep hvragentlistener |egrep -v 'grep|action-script|resource'| awk '{print $2}'` ;
             do
               echo "...force kill fivetran agent (hvragentlistener) pid $c1"
               kill -9 $c1
             done
             ## do some cleanup
             ./hvragentlistener -k $AGENT_PORT >> $FTAGENT_BASE/ftagent.out 2>&1
             rename_log
             RET=0
             echo "Running clean fivetran agent (hvragentlistener) resource with return code $RET"
       ;;
  esac

  if [ $RET -eq 0 ]; then
    exit 0
  else
    exit 1
  fi
Step 3: Create cluster resource
Once the action script is in place, use it to create the cluster resource. Store the script in a shared location accessible to all nodes (we recommend using ACFS), for example
/opt/fivetran/hvr_config/action-script.scr.The cluster resource created will support the agent and is configured to depend on the VIP created in Step 1 above. If this VIP moves between nodes, the agent will automatically move with it.
Command to run as the grid user:
crsctl add resource ftagent -type cluster_resource \
-attr "ACTION_SCRIPT=/opt/fivetran/hvr_config/action-script.scr, RESTART_ATTEMPTS=3, START_TIMEOUT=60, STOP_TIMEOUT=60, CHECK_INTERVAL=10, \
START_DEPENDENCIES='hard(fivetran-vip) pullup(fivetran-vip)', STOP_DEPENDENCIES='hard(fivetran-vip)', \
ACL='owner:oracle:rwx,pgrp:oinstall:rwx,other::r--', PLACEMENT='favored', HOSTING_MEMBERS='racnode1 racnode2'"
Step 4: Start and stop cluster resource
To effectively manage cluster resources, see the Oracle Clusterware Administration and Deployment Guide.
Commands to monitor and control the agent:
crsctl status resource ftagent
crsctl start resource ftagent -n <rac-node> -f
crsctl stop resource ftagent -f
The following command relocates the Virtual IP (
fivetran-vip) to another node in the cluster. This will also stop the agent and move it along with the Virtual IP:crsctl relocate resource fivetran-vip -n <rac-node> -fThe following command moves the Virtual IP from
racnode1toracnode2:root@rac1 ~ : crsctl relocate resource fivetran-vip -n racnode2 -f CRS-2673: Attempting to stop 'ftagent' on 'racnode1' CRS-2677: Stop of 'ftagent' on 'racnode1' succeeded CRS-2673: Attempting to stop 'fivetran-vip' on 'racnode1' CRS-2677: Stop of 'fivetran-vip' on 'racnode1' succeeded CRS-2672: Attempting to start 'fivetran-vip' on 'racnode2' CRS-2676: Start of 'fivetran-vip' on 'racnode2' succeeded CRS-2672: Attempting to start 'ftagent' on 'racnode2' CRS-2676: Start of 'ftagent' on 'racnode2' succeeded- Virtual IP Name:
Finish Fivetran configuration
In your connector setup form, enter a Destination schema prefix of your choice. This prefix applies to each replicated schema and cannot be changed once your connector is created.
In the Host field, enter the hostname or IP address of your database. This host must be accessible from Fivetran either directly or through an SSH tunnel, depending on your connection method.
Enter your Instance Number.
Enter the Client ID.
Enter the SAP NetWeaver User you created.
Enter the Password for the SAP NetWeaver user you created.
Enter the RFC SDK library files directory.
Choose your connection method:
If you selected Connect via an SSH tunnel, provide the following information:
- SSH Host: Enter the hostname or IP address of your SSH server. Do not use a load balancer's IP address/hostname.
- SSH Port: Enter the port number of your SSH server. The default port number is
22. - SSH User: Enter the username for SSH access.
If you selected Connect via proxy agent, choose the necessary proxy agent from the Proxy agents drop-down list (if available) or configure a new proxy agent.
(TDE-encrypted database only) If you want to use TDE encryption, set the Use TDE Encryption toggle to ON.
(Optional) Enter TDE Wallet Password if your database is configured with a Password-Based keystore. Leave the field blank if your database is configured with Auto-Login keystore.
In the Agent Host field, enter the HVA's hostname or IP address depending on the connection method you have chosen and your database configuration.
- Connection method:
- Direct: Enter the database hostname or IP address.
- SSH: Enter the hostname or private IP address within your internal network, accessible by Fivetran through the SSH tunnel.
- Private networking: Enter the hostname or private IP address within your VPC, accessible by Fivetran through a private endpoint.
- Proxy Agent: Enter the hostname or private IP address within your internal network, accessible through the Proxy Agent. Use
localhostif the Proxy Agent and HVA are installed on the same host.
- Oracle RAC:
- For Oracle RAC where the High-Volume Agent is configured on a node, the HVA's IP address is the Virtual IP (VIP) of the RAC node where the agent is running.
- For Oracle RAC where the High-Volume Agent is configured as a cluster resource on a shared storage system, the HVA's IP address is the Virtual IP (VIP) created and dedicated to the agent.
NOTE: Ensure that your Firewall/Security Group allows Fivetran's IPs for your database's region.
- Connection method:
In the Agent Port field, enter the HVA's port number. The default port number is
4343.In the Agent User ID field, enter the name of the HVA user you created.
In the Agent User Password, enter the password of the HVA user you created.
In the Agent Public Cert, enter the HVA's Server Public Certificate you obtained.
Click Save & Test. Fivetran tests and validates our connection to your Oracle database. Upon successful completion of the setup tests, you can sync your data using Fivetran.
Setup tests
Fivetran performs the following tests to ensure that we can connect to your generic Oracle database and that it is properly configured:
- The Connecting to SSH Tunnel Test validates the SSH tunnel details you provided in the setup form. It then checks that we can connect to your database using the SSH tunnel. (We skip this test if you aren't connecting using an SSH tunnel.)
- The Validating Certificate Test generates a pop-up window where you must choose which certificate you want Fivetran to use. It then validates that certificate and checks that we can connect to your database using TLS. (We skip this test if you are connecting directly.)
- The Validating Agent Setup Test checks that we can connect to the high-volume agent and whether it operates correctly.
- The Validating Archive Log Access Test checks that we can access your archive log.
NOTE: The tests may take a few minutes to finish running.
Related articles
description Connector Overview
account_tree Schema Information
settings API Connector Configuration