Working with Connector SDK
Need to get your connection up and running quickly?
Get free help to write and deploy your Connector SDK connections. Our Professional Services experts are available to provide guidance on setup, troubleshooting, and best practices. To get started, file a support ticket.
Save time nowFivetran Connector SDK
The Fivetran Connector SDK is available as a GitHub repository that provides examples that we recommend you consider and try out.
Follow the Connector SDK setup guide to start using the SDK. This page covers several topics that will enable you to successfully use the SDK to build your custom data pipelines.
If you're new to Python and running terminal commands, see our Connector SDK Beginner's Guide, which will guide you every step of the way while you're building your own custom Fivetran connector.
Also, see our Connector SDK tutorials section for step-by-step instructions in written and video format.
SDK runtime environment
The Connector SDK runtime environment executes your submitted Python script in an isolated environment. It installs the libraries listed in the requirements.txt file, and after installation, it runs the provided Python script.
Python version support
We support the following Python versions:
- 3.14
- 3.13
- 3.12
- 3.11
- 3.10
If you did not explicitly specify the version when running fivetran deploy using the optional --python or --python-version arguments, we use the latest supported version.
When explicitly specifying the version in the optional --python or --python-version arguments, you must use one of the above-mentioned Python versions. We do not support any other versions.
While patch versions are usually compatible, a specific patch version can be critical for any Python library your code depends on. The exact patch versions for 3.14, 3.13, 3.12, 3.11, and 3.10 are listed below:
- 3.14.0
- 3.13.7
- 3.12.11
- 3.11.13
- 3.10.18
The versions listed above are the most up-to-date stable versions of Python as of November 14, 2025. For details on Python version upgrades, see the Handling Python version upgrades and End of Life section.
Pre-installed DB drivers
We pre-install the msodbcsql17 and msodbcsql18 drivers for connecting to Microsoft SQL server. We also pre-install libpq5 and libpq-dev, which is required to support psycopg and psycopg2 respectively.
Pre-installed packages
We pre-install the fivetran_connector_sdk:latest and requests:2.32.5 package when running your code.
System resources
The environment running your code has:
- 1 GB of RAM
- Less than 0.5 vCPUs of an 8 Core N2 or equivalent machine
- The system operates on a 64-bit Linux (amd64) platform.
Our production infrastructure allows for some variation in resources available to your connections at any given moment, load balancing across multiple connections.
Working with requirements.txt file
Usually, your connector's code will need to import additional Python libraries. To ensure the correct libraries are installed before we run your code in Fivetran, you must include a standard pip requirements.txt file in the root directory of your connector project. In your requirements.txt file, you must list all the Python libraries your connector uses along with any required versions. The configuration example provides an example.
You can use PyPI and Git sources to install packages. For example:
pandas
git+https://github.com/oracle/python-oracledb.git@main#egg=oracledb
You can also quickly install all the needed libraries when setting up your environment using the following command:
pip install -r requirements.txt
fivetran_connector_sdk:latest and requests:2.32.4 is available when executing your code. Do not declare them in your requirements.txt to avoid dependency conflicts.
Working with configuration.json file
You can pass configuration values to your connector using a configuration.json file. This file is not uploaded with your code, and you shouldn't attempt to read from it directly. After deployment, the values are provided as dictionary arguments in the Update() and Schema() methods at runtime. See our configuration example to learn how to use configuration values. These values are securely stored and encrypted. For more details on encryption, see our Data Credential Encryption documentation.
Initial deployment steps
- Create a
configuration.jsonfile in your project’s root directory. - Use it for deployment.
- Delete it after deployment (we do not store this file, and it should not be added to your code repository).
After deployment, you can edit the configuration values in the dashboard.
Format of configuration.json
The file must contain valid JSON with key-value pairs, where the only allowed type of values is STRING:
{
  "key1": "value1",
  "key2": "value2"
}
Using configuration.json
You can pass configuration values by referencing the configuration file using either absolute or relative path:
--configuration /Users/john.doe/example/config.json
--configuration ../../configuration.json
To avoid storing sensitive information locally in your configuration.json file, you can set values to empty strings before deploying. You can manage the values after deployment in your Fivetran dashboard.
Managing configuration after deployment
Once deployed, you can edit configuration values in the setup form of your connection. The latest values — whether edited in the dashboard or redeployed with configuration.json — will be used in all syncs. Any new value in configuration.json (even an empty string) overwrites existing values.
Providing --configuration replaces any previous configuration. Omitting it keeps existing values.
Important notes
- Maximum 100 key-value pairs allowed.
- Only keys are visible in the Fivetran dashboard.
- Values are obfuscated for security.
- Configuration values are only available at runtime.
- Use this method to securely pass credentials like API keys.
- Please do not hardcode credentials in your Python code to follow best security practices. If you have already uploaded such code, rotate the credentials immediately.
Example commands
To test your code locally with configuration values specified in configuration.json:
fivetran debug --configuration configuration.json
To deploy your connector with configuration values specified in configuration.json and a particular Python version:
fivetran deploy --api-key <BASE_64_ENCODED_API_KEY> --destination <DESTINATION_NAME> --connection <CONNECTION_NAME> --configuration configuration.json --python 3.12
You can deploy the same connector.py, referencing a different configuration file and specifying a different name each time, to create multiple connections.
Deploying the same connector.py with a different configuration file under the same name just overwrites the configuration values in the existing connection.
Configuration in different environments
How you supply configuration to your connector depends on how you run it. The Connector SDK supports several common workflows.
Running with the Fivetran CLI
When you run your connector using the Fivetran CLI, you can pass any configuration file path using the --configuration flag. For example:
fivetran debug --configuration configuration.json
fivetran debug --configuration /Users/john.doe/example/config.json
fivetran debug --configuration ../../configuration.json
The path may be absolute or relative. In this mode, the configuration file itself is read and managed by Fivetran, and your connector receives configuration as a dictionary argument in the schema() and update() methods.
Running directly from an IDE (advanced)
When you launch your connector by clicking Run in an IDE (for example, PyCharm or VS Code), the script executes like a normal Python program and the if __name__ == "__main__": block runs.
Our examples load configuration.json from the project directory in this mode so that they work out of the box without any IDE-specific setup.
If you prefer to choose a different configuration file while debugging inside your IDE, you can optionally use Python’s built-in argparse module to accept a --config parameter. To use this pattern, replace the simple configuration loading inside your if __name__ == "__main__": block with the following:
import argparse
import json

if __name__ == "__main__":
    parser = argparse.ArgumentParser(description="Run the connector")
    parser.add_argument("--config", "-c", help="Path to a configuration file")
    args = parser.parse_args()

    if args.config:
        with open(args.config, "r") as f:
            configuration = json.load(f)
    else:
        with open("configuration.json", "r") as f:
            configuration = json.load(f)

    connector.debug(configuration=configuration)
Most IDEs provide a way to specify script arguments (for example, --config path/to/config.json) in their Run/Debug configuration dialogs. Refer to your IDE’s documentation for details.
This IDE-based workflow is optional and primarily useful for advanced users who rely on full debugging features such as breakpoints and stepping through code.
Configuration in production
In production, Fivetran manages configuration for you and passes it as a dictionary to your connector’s schema() and update() methods. The configuration.json file is not available in the production environment, and your code should read configuration only from the dictionaries provided to these methods.
Editing configuration values after deployment
Once you have deployed your connector, you can edit the configuration values in the dashboard by doing the following:
- Go to the Setup tab of your Connection Overview page.
- Click Edit Connection.
- Under Configuration(s), click on the relevant configuration parameter field you want to edit.
- Enter the Configuration Value.
- If you want to edit additional configuration parameters, repeat steps 3 and 4 for each parameter you want to edit.
- Click Save to apply all your changes.
Configuration options
This section covers the casting rules for configuration field values to the following data types:
- boolean
- list
- integer
- dict
Cast to boolean
For example, let's say you have a RESYNC_ON field in configuration.json with value "SUNDAY". You can use it as a boolean in your Python code as follows:
if configuration['RESYNC_ON'].lower() == datetime.now().strftime('%A').lower():
    ... do something ...
One more example, let's say you have a include_all field in configuration.json with value "TRUE". You can use it as a boolean in your Python code as follows:
if configuration[‘include_all’] == 'TRUE':
    ... do something ...
Cast to list
For example, let's say you have a COUNTRIES field in configuration.json with value "NAM,APAC,EMEA". You can use it as a list in your Python code as follows:
country_codes = configuration['COUNTRIES'].split(",")
... do something...
Cast to integer
For example, let's say you have an API_QUOTA field in configuration.json with value "12345". You can use it as an integer in your Python code as follows:
api_quota = int(configuration['API_QUOTA'])
...do something...
Cast to dict
For example, let's say you have a CURRENCIES field in configuration.json with value "[{\"From\": \"USD\",\"To\": \"EUR\"},{\"From\": \"USD\",\"To\": \"GBP\"}]". You can use it as a dict in your Python code as follows:
parsed_json = json.loads(configuration['CURRENCIES'])
...do something...
Working with state.json file
The state object is a crucial mechanism for maintaining sync progress and enabling incremental data synchronization. It allows your connector to save cursors, timestamps, and other progress indicators so that every sync can resume from where the previous one left off, rather than starting from the beginning.
Understanding State Management
Fivetran sends and receives state as a JSON string. When decoded in Python, the top-level value must be a JSON object (a dictionary). In your connector.py code, you:
- Deserialize state in
schema()andupdate()methods to retrieve previous sync progress - Serialize cursor values into the state object in
checkpoint()operations - Use state to determine what data has already been processed
State Structure and Examples
The state object should contain meaningful progress indicators. Here are common patterns:
Simple timestamp cursor
{
    "last_sync_timestamp": "2024-01-15T10:30:00Z"
}
Multiple table cursors
{
    "users_cursor": "2024-01-15T10:30:00Z",
    "orders_cursor": "2024-01-15T09:45:00Z",
    "products_cursor": "2024-01-15T11:15:00Z"
}
Complex state with pagination
{
    "company_cursor": "2024-08-14T02:01:00Z",
    "department_cursor": {
        "1": "2024-08-14T03:00:00Z",
        "2": "2024-08-14T06:00:00Z"
    },
    "page_offset": "eyJwYWdlIjoxMH0="
}
Implementing state in your connector
Basic state usage
def update(configuration: dict, state: dict):
    # Retrieve cursor from state, with fallback for first sync
    cursor = state.get('last_sync_timestamp', '1970-01-01T00:00:00Z')

    # Process data from cursor onwards
    for record in fetch_data_since(cursor):
        op.upsert(table="my_table", data=record)

    # Save progress with checkpoint
    op.checkpoint(state={
        "last_sync_timestamp": get_current_timestamp()
    })
Multi-Table state management
def update(configuration: dict, state: dict):
    # Initialize state for multiple tables
    cursors = {
        # Use a older date as the default, or set to your API's earliest supported date
        'users': state.get('users_cursor', '2000-01-01T00:00:00Z'),
        'orders': state.get('orders_cursor', '2000-01-01T00:00:00Z')
    }

    # Process each table
    for table_name, cursor in cursors.items():
        for record in fetch_table_data_since(table_name, cursor):
            op.upsert(table=table_name, data=record)

        # Update cursor for this table
        cursors[table_name] = get_current_timestamp()

    # Checkpoint all cursors
    op.checkpoint(state=cursors)
Local development with state
When running a connector locally with fivetran debug, a state.json file is created in <project_directory>/files/state.json. This file:
- Stores the current state during and between debug runs
- Can be manually edited to test different starting points
- Can be manually created to start debugging from a specific state
- Is automatically updated after each checkpoint operation
Example local state file
{
    "last_sync_timestamp": "2024-01-15T10:30:00Z",
    "processed_records": 1250
}
Production state management
For connectors deployed to Fivetran, you can manage state through either Fivetran dashboard or Fivetran REST API.
Fivetran dashboard
- Stores the current state during and between syncs
- State reset during full re-syncs
- State inspection in sync logs
REST API endpoints
- Retrieve Connection State - Get current state
- Update Connection State - Modify state for any reason, for example, table re-syncs
API Example: Partial re-sync
# Retrieve current state
curl -X GET "https://api.fivetran.com/v1/connections/{connection_id}/state" \
  -H "Authorization: Basic {api_key}"

# Update state to re-sync specific data
curl -X PATCH "https://api.fivetran.com/v1/connections/{connection_id}/state" \
  -H "Authorization: Basic {api_key}" \
  -H "Content-Type: application/json" \
  -d '{
    "state": {
      "users_cursor": "2024-01-01T00:00:00Z"
    }
  }'
Security considerations
Never store sensitive information in state such as:
- API tokens or passwords
- Encryption keys
- Personal identifiable information (PII)
State is not encrypted and may appear in logs during troubleshooting. Use configuration for sensitive parameters.
State size limits
State object size limit: 10 MB
If you exceed this limit, your connection will fail with an error. Monitor state size and optimize if necessary.
Debugging state issues
- Reset local state for debugging
fivetran reset
- Debug with specific state, to test out incremental sync
Note: Manually create files/state.json first, this will be automatically read in the debug command If you are creating state.json in any other location, pass it using --state state.json
fivetran debug
After the debug is complete, your state will be updated as per the checkpoints in your code
Common state problems
- State not persisting - Check checkpoint calls
- Incorrect resume point - Verify state structure
- State corruption - Use API to reset state
- Large state objects - Optimize state structure
Working with environment variables
When developing a connector, it is much more convenient to use environment variables for parameters you would otherwise have to enter repeatedly into the command line. We recommend using an environment variable called FIVETRAN_API_KEY for your Fivetran base 64 encoded api key to avoid having to find and copy it every time you deploy your connector. To use an environment variable, create an .env file in the root directory of your connector project. Your file should be in the following format:
FIVETRAN_API_KEY=<your 64 bit encoded Fivetran API key>
Load your .env file for use in your terminal by running the following command:
export $(grep -v '^#' .env | xargs)
Check that your environment variables are now available for use by running the following command:
echo $FIVETRAN_API_KEY
You should use configuration files for any configuration used within your connector.py code so that it will be available when the code is deployed and running in Fivetran and stored securely within Fivetran.
.env files are not deployed to Fivetran with the rest of your code.
To deploy your connector.py using an .env file to set a local environment variable for your FIVETRAN_API_KEY, use the following command:
fivetran deploy --destination <DESTINATION_NAME> --connection <CONNECTION_NAME>
You can also use .env files to set defaults for other parameters used in fivetran debug and fivetran deploy commands names, this can help you test and deploy your connectors quickly as well as efficiently switch between different connections.
Supported Environment Variables for setting command parameter defaults are:
FIVETRAN_API_KEY=<your 64-bit encoded Fivetran API key>
FIVETRAN_DESTINATION_NAME=<your destination name>
FIVETRAN_CONNECTION_NAME=<your connection name>
FIVETRAN_CONFIGURATION=<your configuration file's absolute or relative path with its extension; e.g., `config.json ~/Documents/config.json`>
FIVETRAN_PYTHON_VERSION=<the python version you will to use; e.g., `3.11`>
FIVETRAN_HD_AGENT_ID=<your non default HD agent ID>
- Make sure to include your
.envfiles in your.gitignorefile to ensure you don't accidentally check yourFIVETRAN_API_KEYinto your code repository. - To use a default set using an environment variable, do not include the parameter in your initial
fivetran deploycommand. Instead, press Enter when prompted with a default value. - You can use
$My_ENV_VARas a argument in thefivetran deployandfivetran debugcommands, and in follow-up prompts.
Referencing environment variables in your code
You can reference the following environment variables in your connector.py code using the os library. We expose the following environment variables to your code at runtime:
FIVETRAN_CONNECTION_ID: This variable stores the unique identifier for the connection. It lets you interact with the Fivetran REST API during a sync. For example, you can retrieve or update the connector's configuration dynamically during runtime conditions. Learn more in Fivetran REST API documentation. The value of this variable istest_idwhen running the connector locally usingfivetran debug.FIVETRAN_GROUP_ID: This variable stores the unique identifier for the group. The value of this variable istest_group_idwhen running the connector locally usingfivetran debug.FIVETRAN_CONNECTION_NAME: This variable stores the name of the connection. The value of this variable istest_connection_namewhen running the connector locally usingfivetran debug.FIVETRAN_DEPLOYMENT_MODEL: This variable stores the deployment model of the connector. It lets you implement environment-specific logic. For example, you can use mock data when running locally, while using optimized settings for production deployments. This approach improves both development efficiency and production reliability. The supported values are as follows:managed_cloud: This value is used for SaaS Deployment model.hybrid_cloud: This value is used for Hybrid Deployment model.local_debug: This value is used when running the connector locally usingfivetran debug.
For example, to access the environment variable FIVETRAN_CONNECTION_ID, you can reference it in your code as follows:
import os
connection_id = os.getenv('FIVETRAN_CONNECTION_ID')
print(f"Connection ID: {connection_id}")
Working with warehouse.db
Our testers support only basic operations. Functionalities like schema operations are not supported by fivetran debug. In case you see failures while using fivetran debug and your code has schema definition changes, use the fivetran reset command to reset the warehouse.db and state files:
fivetran reset
If the error persists, then most likely there is an error in your code.
Working with yield and child functions
To make building Connector SDK integrations as simple as possible, we have removed the need to use the Python generator pattern (yield) starting with Connector SDK version 2.0.0. This change is fully backward compatible, so your existing Connector SDK connections will continue to work without modification. We recommend that you start using the simpler code pattern for all new Connector SDK code and consider refactoring your existing connector code to improve readability and maintainability. To help you, we have created this Migration Guide.
The yield keyword in a generator function is a standard Python code pattern. The Fivetran Connector SDK uses it to efficiently deliver data to our core platform.
There are two ways that yield can be used with a child function. See the examples below.
Let's assume we have a child function:
def child_function(data):
   for item in data:
      yield item
You can call the function from update() in two ways:
Using
yield from:def update(data): yield from child_function(data)Using
yield: In this case, you need to iterate over the generation returned fromchild_function:def update(data): for item in child_function(data): yield item
Our pagination examples use the first approach.
Connecting to Duck DB
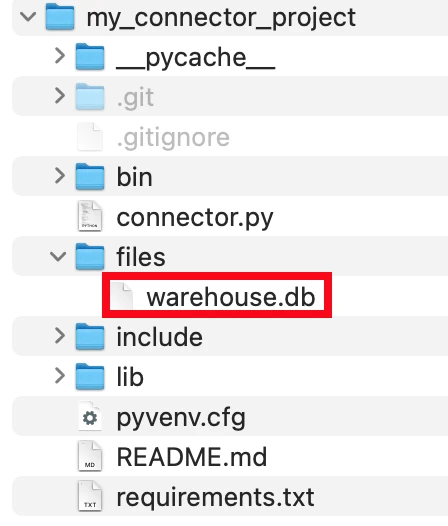
The Fivetran Local Tester saves the data sent to Fivetran by you connector code into a DuckDB warehouse.db file stored at the <project directory>/files/warehouse.db path:
Using Duck DB CLI
Run Duck DB CLI:
duckdb files/warehouse.dbOnce running, you can see the tables and their schema as well as query the warehouse with SQL:
.tables
.schema
SELECT * FROM default_schema.hello_world;
To stop Duck DB, run the following command:
.exit
Using Harlequin CLI
pip install harlequinRun Harlequin with your warehouse.db with:
harlequin "path/to/warehouse.db"Replace
path/to/warehouse.dbwith the path to yourwarehouse.dbfile.Once running, you can see the data catalog and their schema as well as query the warehouse with SQL:
SELECT * FROM tester.hello;Here is a sample screenshot of Harlequin connected to a
warehouse.dbfile: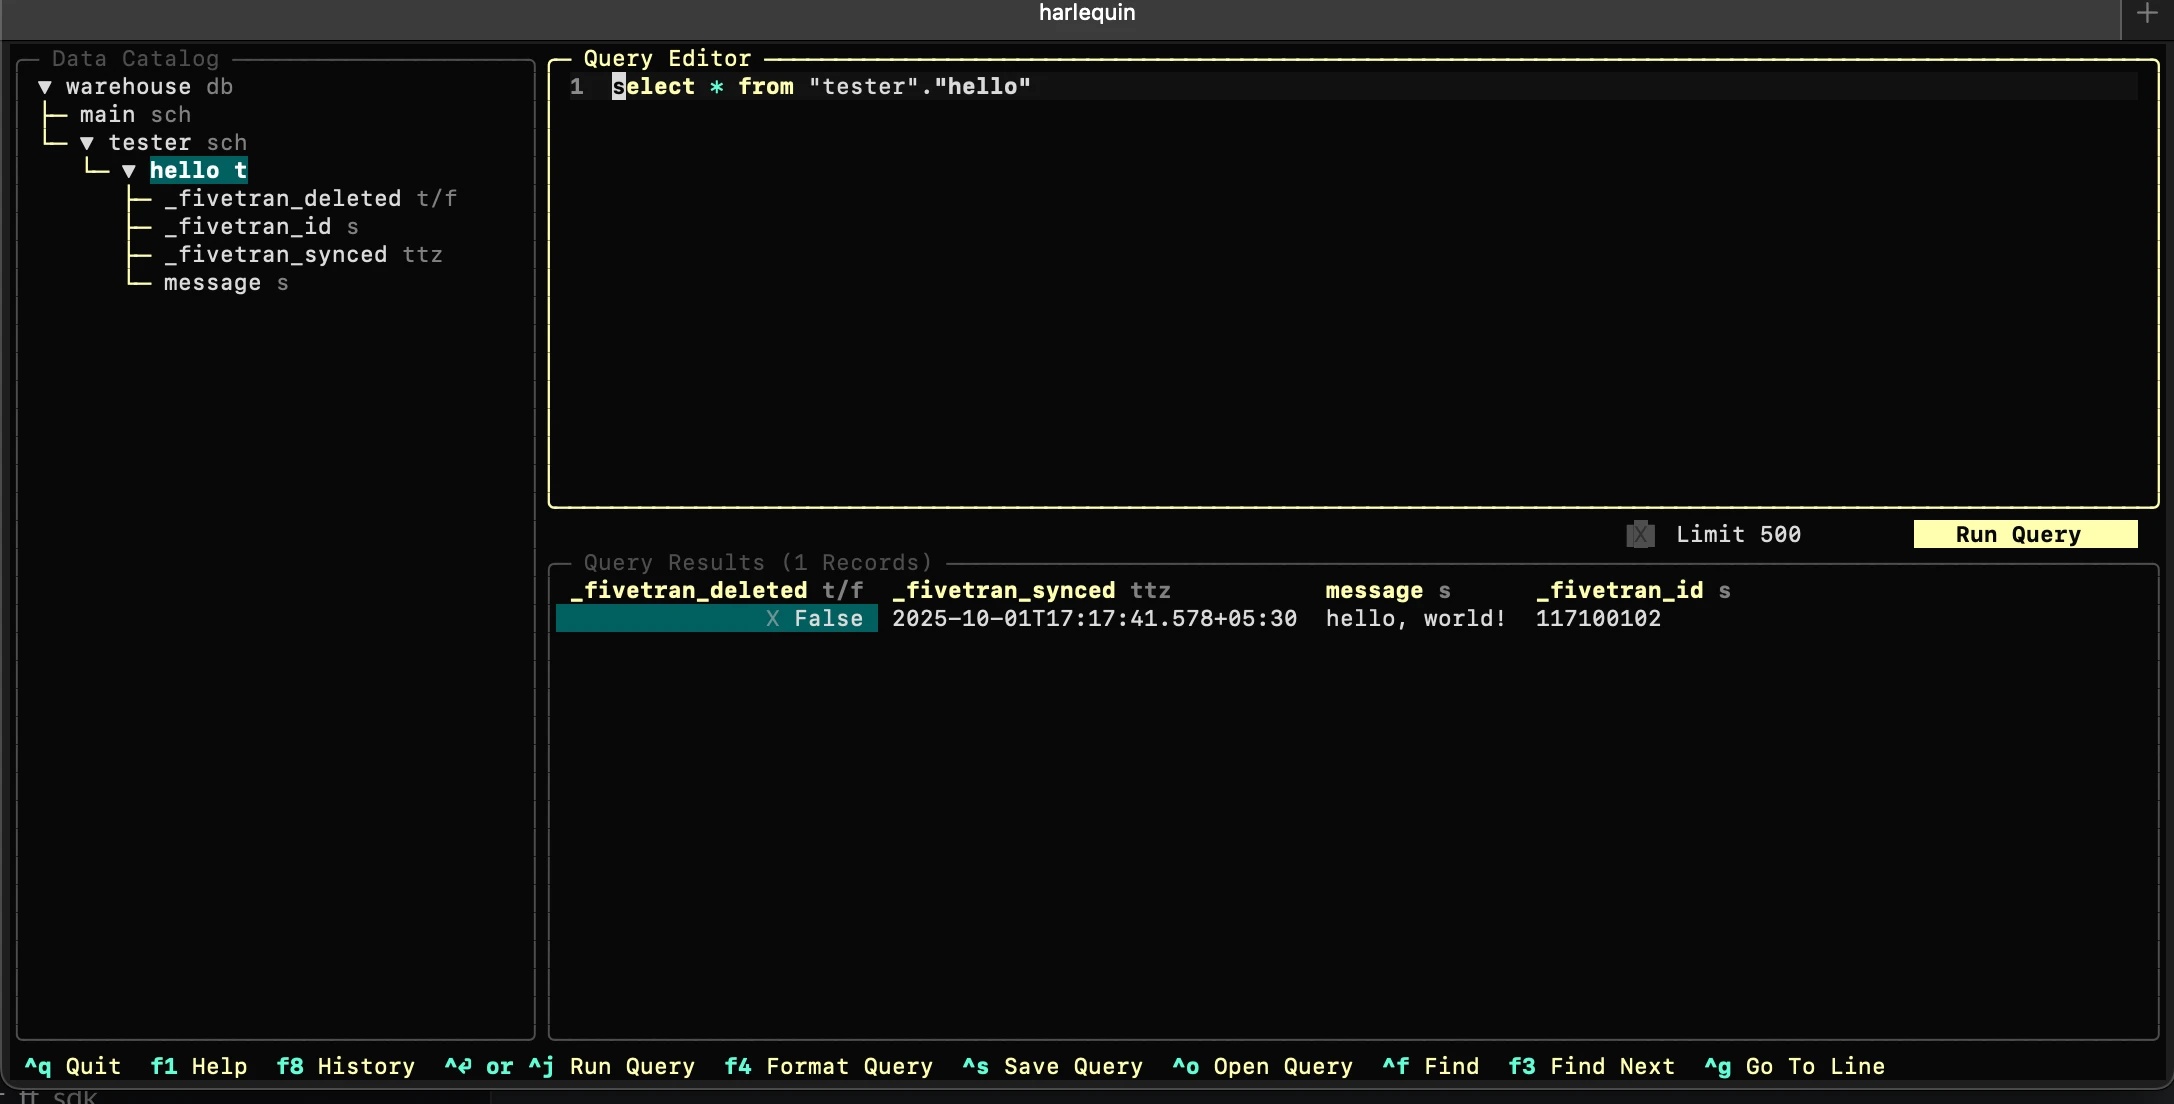
To stop Harlequin, run the following command:
Ctrl + q
Using DBeaver
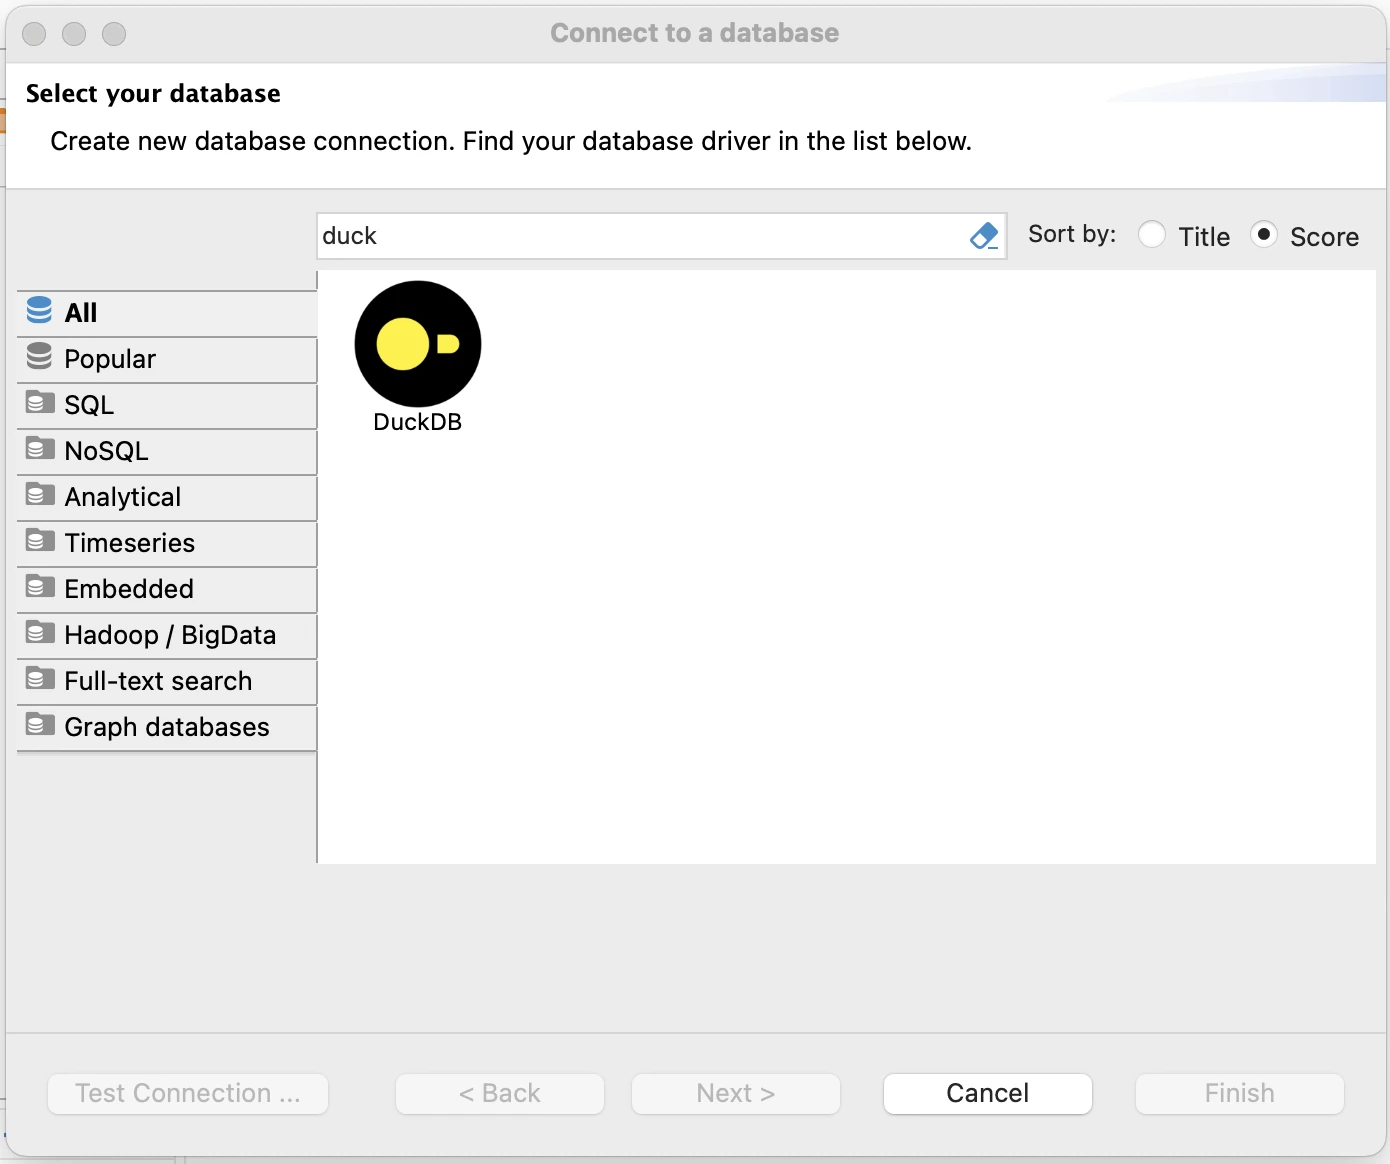
To connect to a database, in the DBeaver menu go to Database > New Database Connection and select DuckDB.
Click Open to navigate to and select the
warehouse.dbfile created by runningfivetran debug.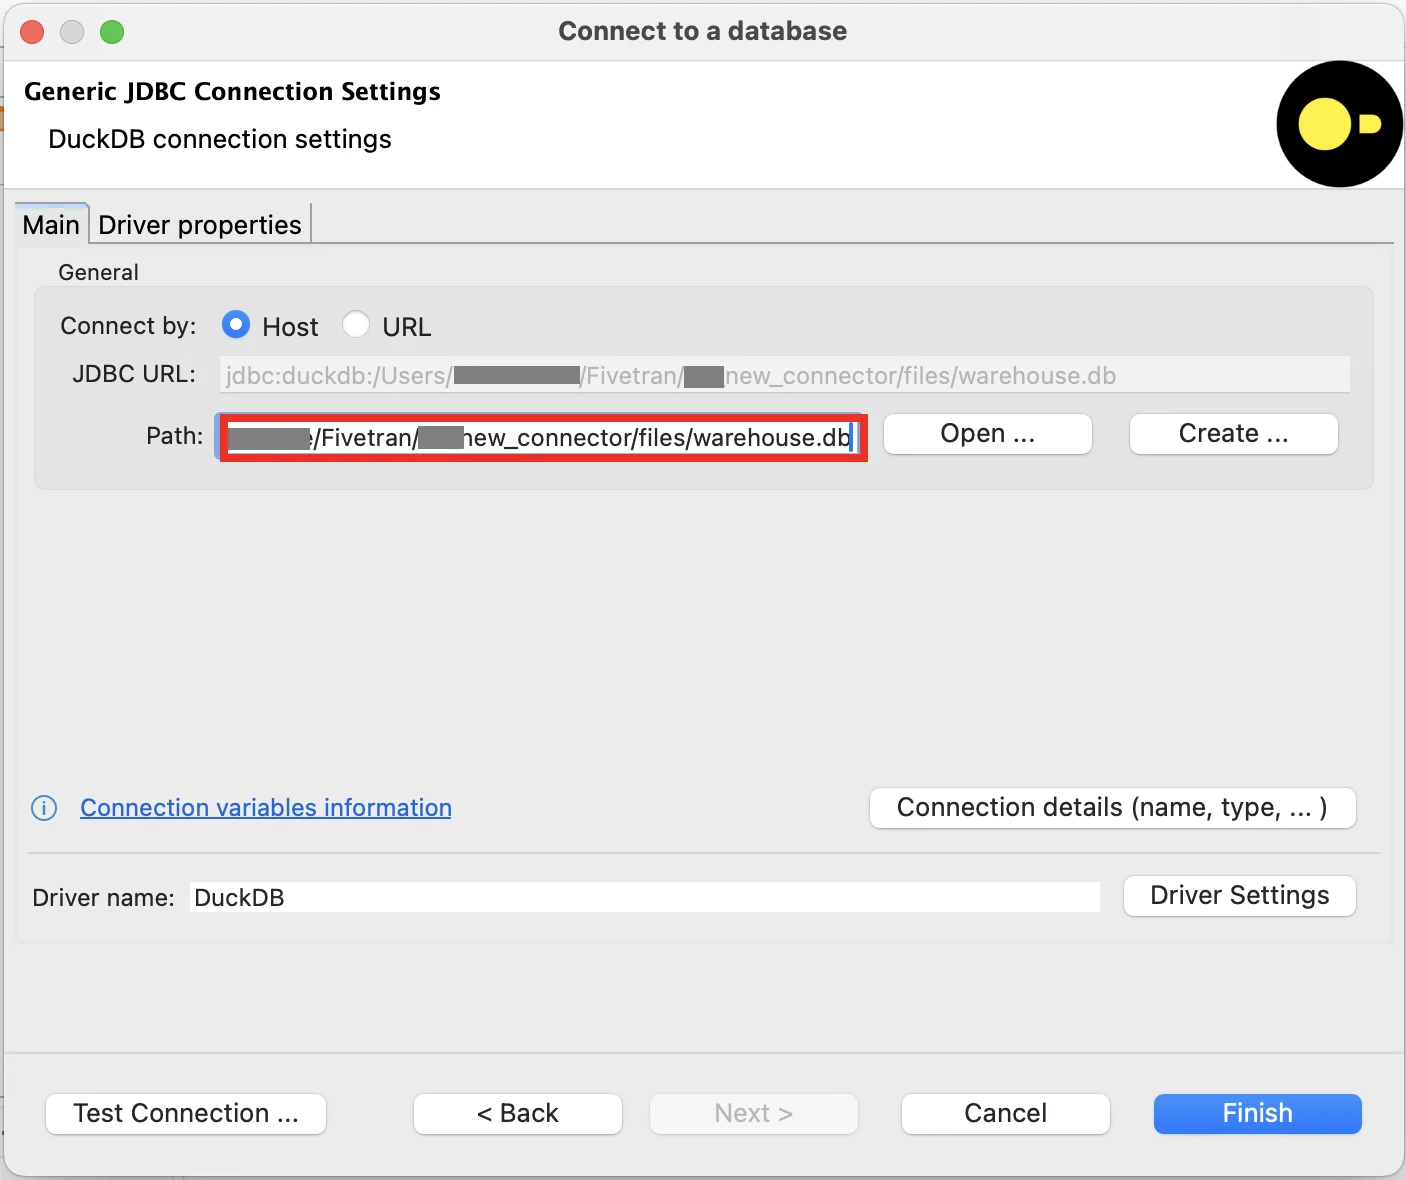
Click Connection details (name, type, ...) if you wish to provide a custom name to the connection.
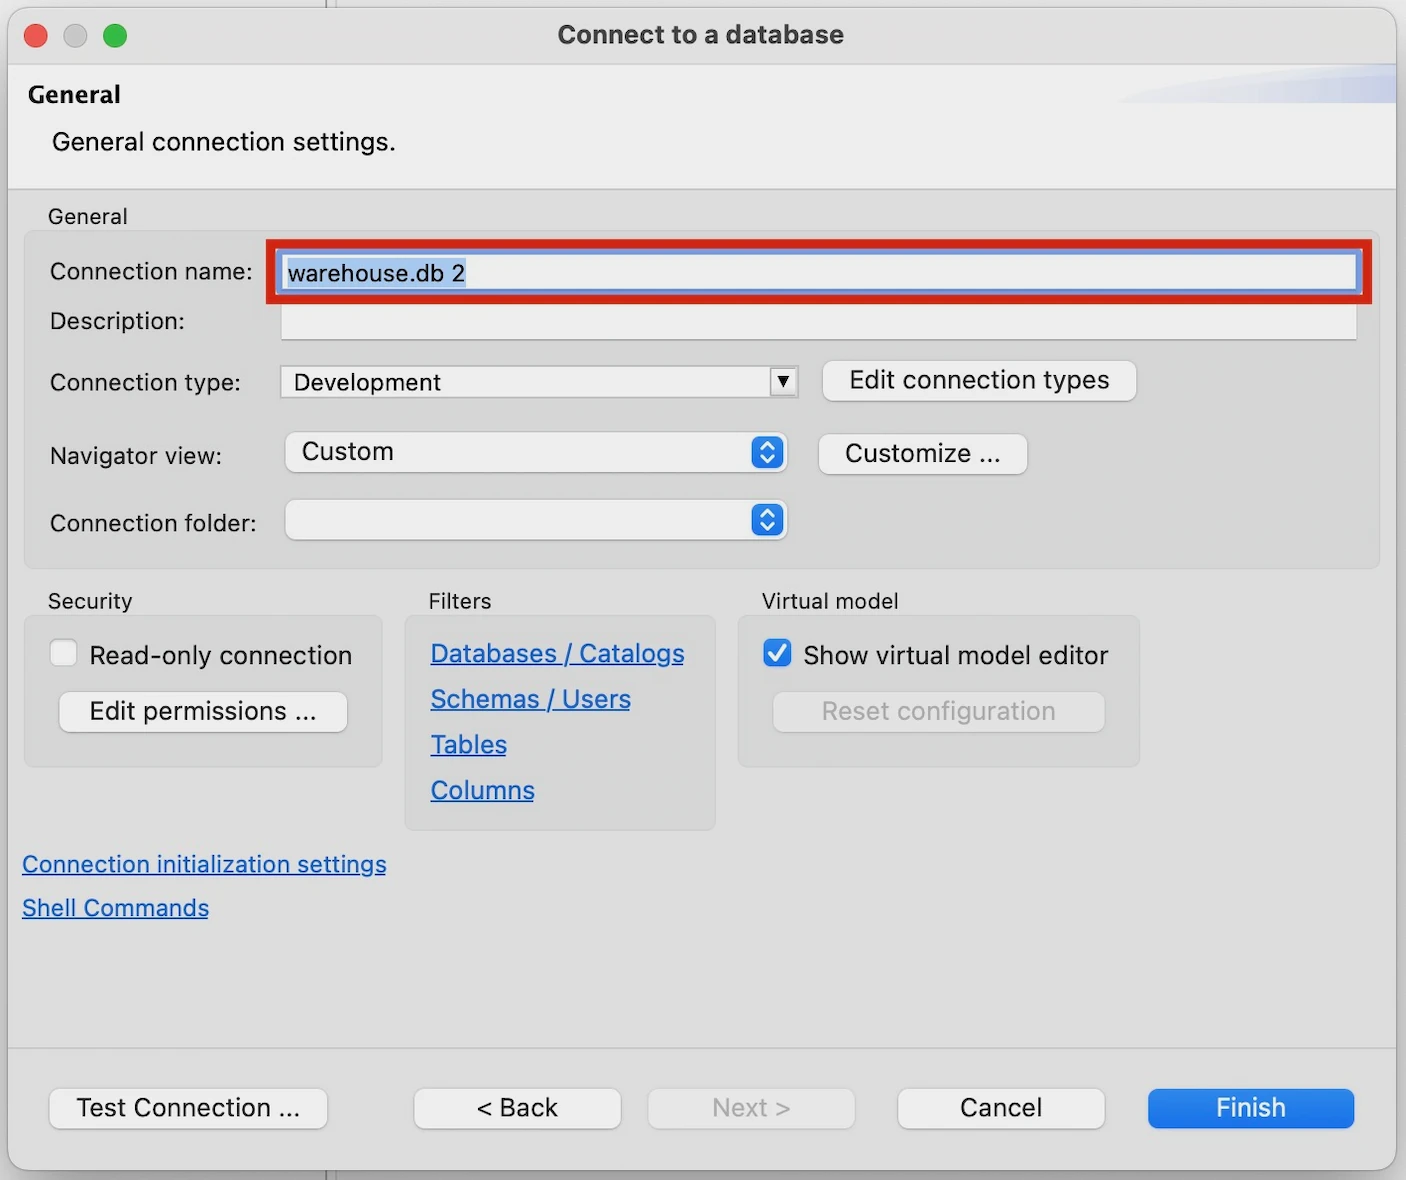
Dbeaver may need to download updated drivers, then should then show that it is connected to the local
warehouse.dbfile and enable you to explore it using regular SQL. Your tables will be located in thetesterschema of thewarehousecatalog.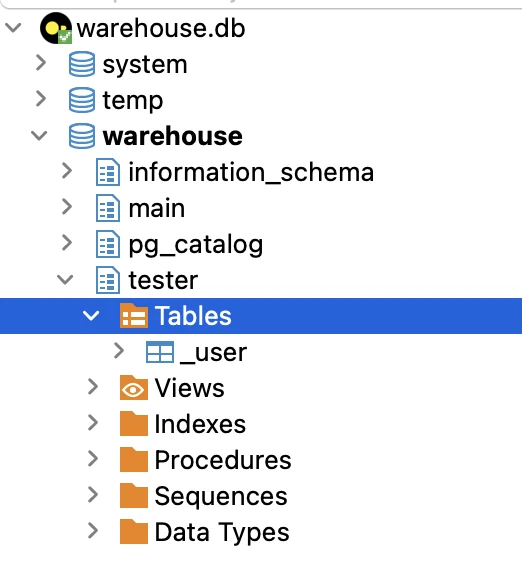
Rename an existing Dbeaver connection
If you want to rename an existing DBeaver connection, do the following:
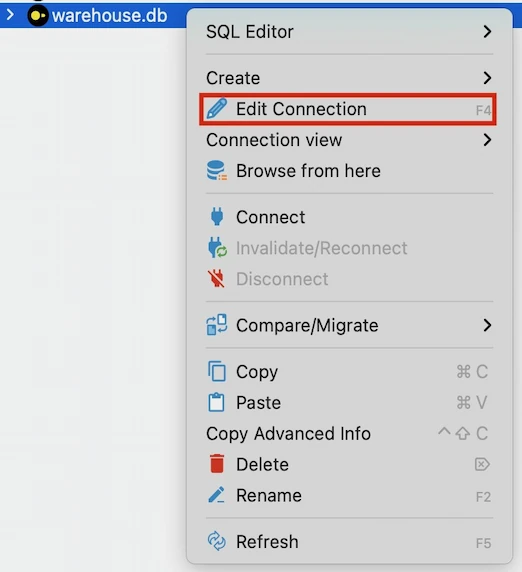
Right-click the existing connection.
Click Edit Connection.
Click General.
Enter a new name for the connection under Connection Name.
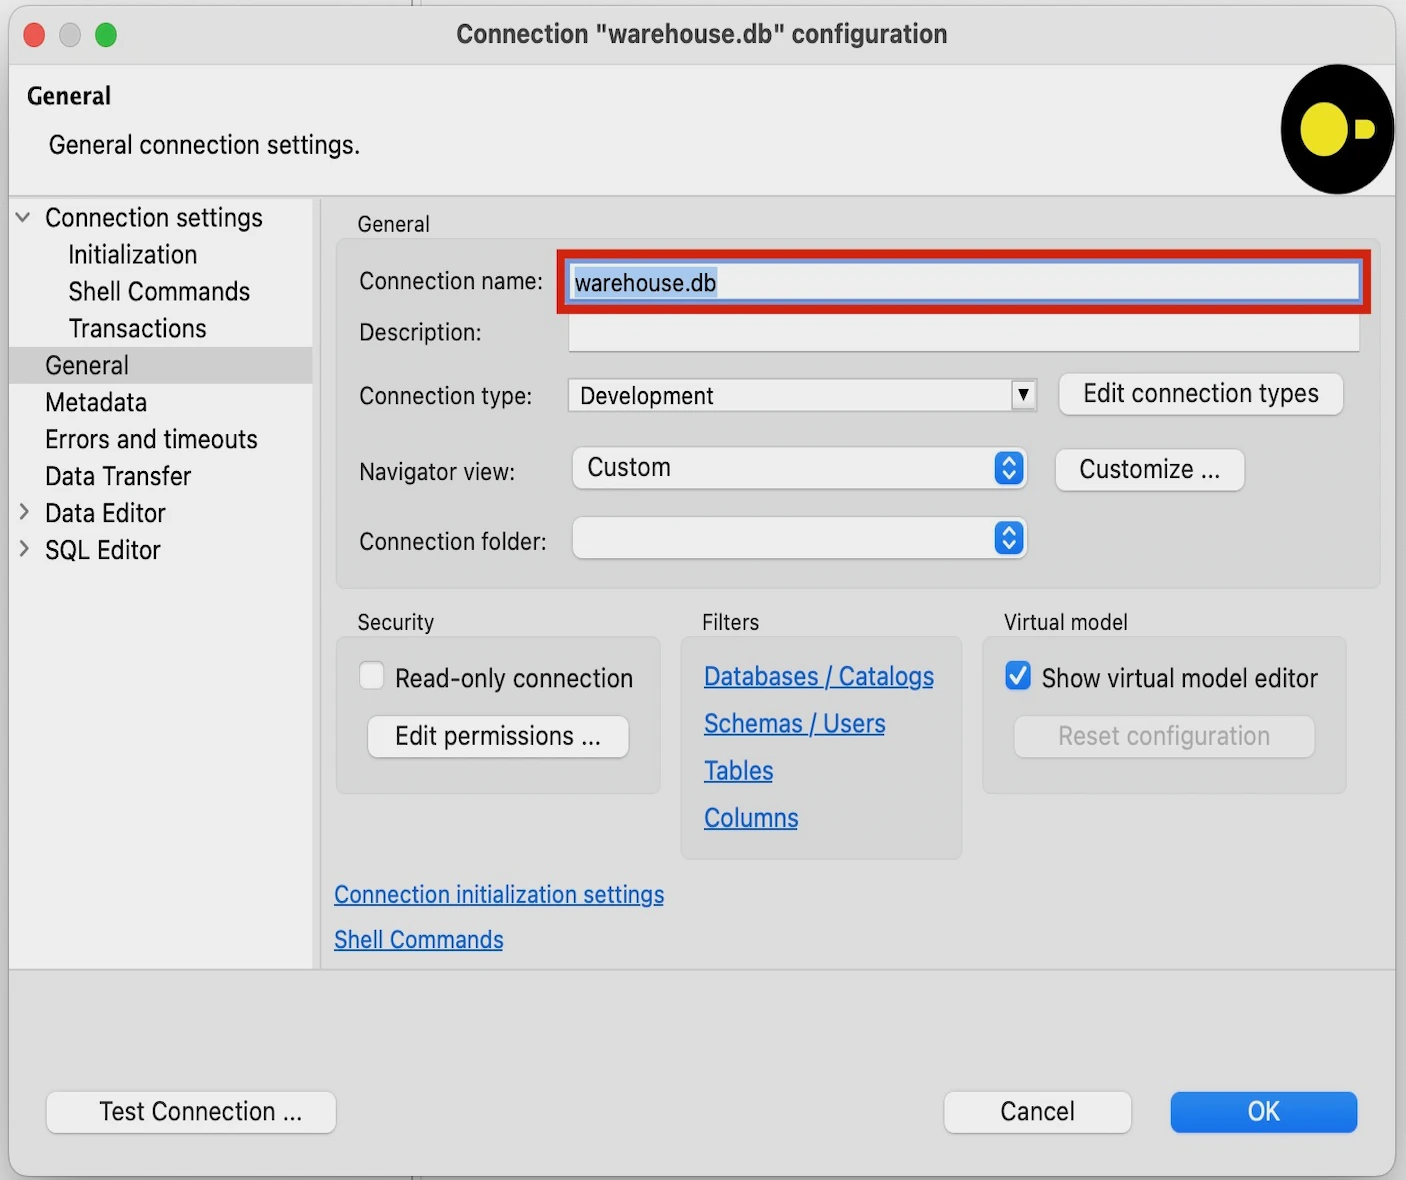
Click OK.
fivetran debug issue with open DBeaver connection
If you use fivetran debug while a connection is already open in DBeaver, the command doesn't work until the connection is closed. The command fails with the following error message:
IO Error: Could not set lock on file "/Users/john.smith/connector/files/warehouse.db": Conflicting lock is held in /Applications/DBeaver.app/Contents/MacOS/dbeaver (PID 28552) by user john.smith.
This occurs because DuckDB does not support concurrent connections to the same database file, as explained in their concurrency documentation. To resolve this issue, close the connection in DBeaver before running fivetran debug.
Connector SDK logs
You can access your Connector SDK connections' log events by:
- Navigating to the Connector SDK logs tab of your connection details page in the Fivetran dashboard.
- Using the Fivetran Platform Connector. Your connections' logs are available in the
CONNECTOR_SDK_LOGtable within the associated Fivetran destination. - Using external log services, previously configured for your destination.
Connector SDK logs provide in-depth event data, including timestamps, log levels, and messages. We prefix all Fivetran process logs with the Fivetran-Platform identifier, and logs from the fivetran-connector-sdk library are prefixed with the Fivetran-Connector-sdk identifier.
For more details, refer to Technical details - logging.
Connector SDK code download
You can now download the connector code for your Fivetran Connector SDK connections directly from your Fivetran dashboard.
To download your connector code:
- Go to your Connector SDK connection in the Fivetran dashboard
- Select the Setup tab.
- Click the Download Code button. This will download a ZIP file containing all of your connector code files.
The downloaded code does not contain configuration.json or state.json files.
Handling Python version upgrades and End of Life
We are constantly expanding the list of supported Python versions. If you need support for a particular version, submit a feature request.
Each year, the oldest minor version of Python reaches its End of Life (EOL). When Python.org stops supporting a particular minor version, we discontinue support for that version of Python as well. You are required to migrate to a newer minor version for your connections to work.
To help you take timely action, we show a warning on the connection dashboard 90 days prior to the EOL date. We also send email notifications about it. If you do not migrate to a newer version, your connections will stop working after the EOL date and you will see an error on your connection dashboard. In most cases, just updating the Python version from the CLI or the setup form should suffice. However, if anything breaks, you are required to fix the code and redeploy it. Additionally, we disallow creating new connections with a minor version of Python that is about to reach its End of Life 60 days prior to the EOL date.
If a new patch version is available, we will work on adding support for it at the earliest. Once supported, newly created connections are configured to use the latest patch version. We do not immediately remove support for an existing connection using an older patch that’s already uploaded and running. Instead, we will work with you to transition to an updated, supported Python patch version.