


At Fivetran, whenever we build a data connector for a SaaS application, we also design and build a normalized schema in order to make it easy for our customers to understand and leverage the underlying data models of the apps they use.
Designing a schema that delivers accurate, comprehensive data is painstaking and time-consuming. This process is partially repeated each time the underlying data model of an application changes. Our systematized workflow for designing schemas is the result of thousands of hours of ongoing work and learning. We take pride in sparing you this tedium and offering something that works with the push of a button.
The process by which we design schemas broadly consists of the following steps and best practices:
Database schema design steps
- Understand the purpose and major workflows of the application
- Use the underlying data model to draft an ERD
- Study the API
- Create draft tables using the API response
- Apply Fivetran naming convention to tables and fields
- Link and normalize the tables
- Review isolated tables and ensure all relations are represented
- Publish the ERD (entity-relationship diagram) and begin developing the connector
Entity-relationship diagrams are visual representations of schemas that illustrate interrelations between tables. Without the entity-relationship diagram, we do not know what the connector’s desired output is.
1. Understand the purpose and major workflows of the application
Before we can do anything else, we must understand what business logic the application actually performs. The world of cloud-based SaaS encompasses a range of business activities including recruiting, supply chain management, finance, retail, customer management, and more.
This is best accomplished by thoroughly reading the app documentation, speaking with its users of, and using it ourselves. Once we understand how users progress through the app and the precise business functions the app performs, we begin to see how the app represents the world.
2. Use the underlying data model to draft an ERD
Over the course of exploring the application, we can make note of, and start sketching out, what entities are present in the underlying data model, what attributes those entities have and how those entities relate to one another. A draft ERD (entity-relationship diagram) in progress might look like what’s below:
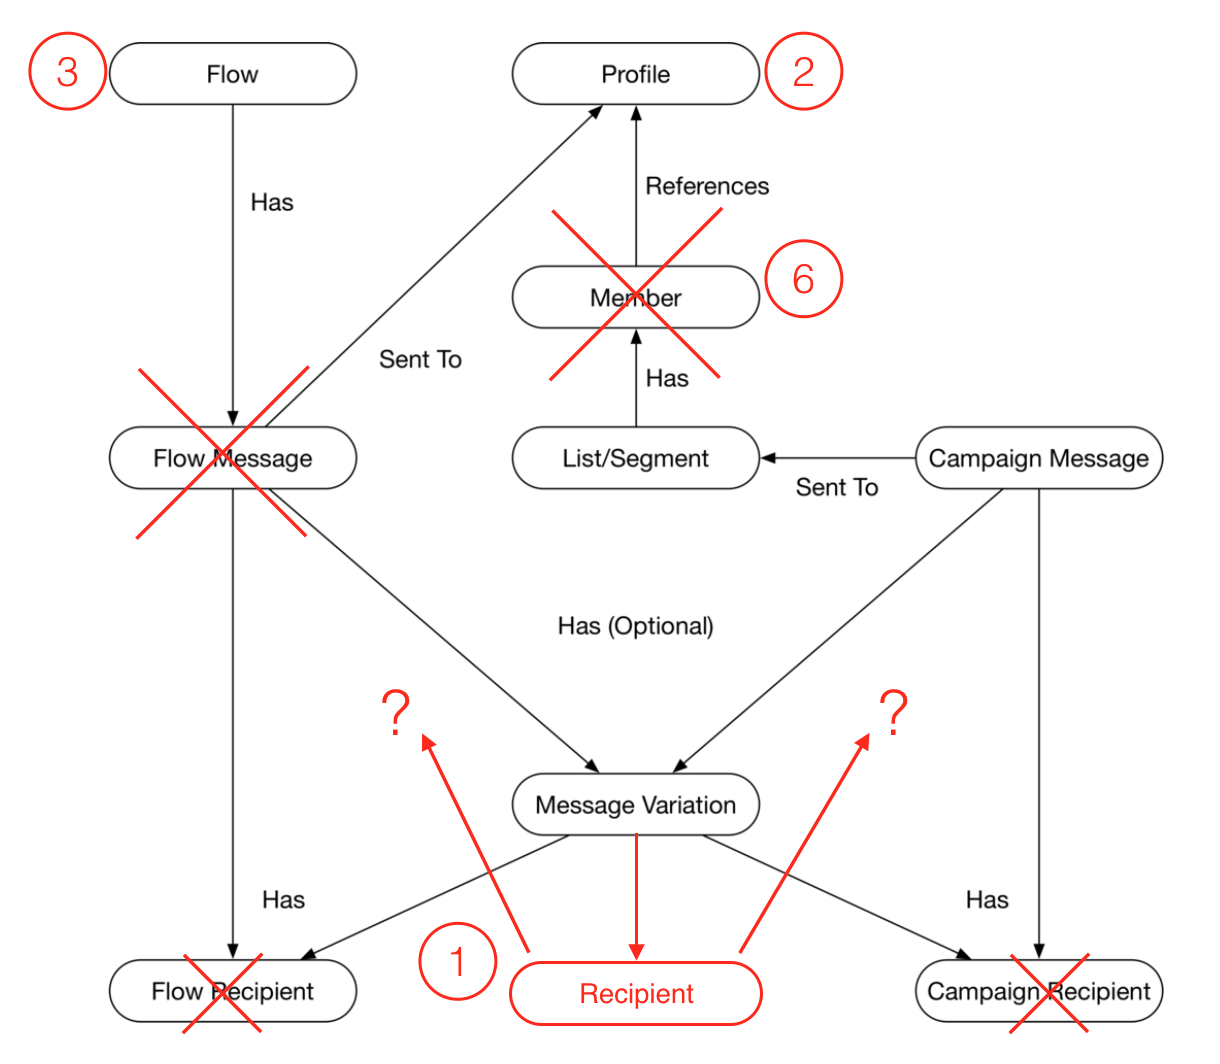
We will inevitably have to resolve various points of confusion in order to make sense of the data model.
3. Study the API
We now have some idea of how the application works and what its underlying data model looks like. The next step is to study the API in order to see how the entities in the data model can be accessed, both as one-time imports and as incremental updates.
We begin by studying the API documentation. However, not all documentation is up-to-date, accurate or comprehensive, so we may have to speak to the API (or app) developers. Once we understand the protocols for accessing the data, we start writing scripts to extract sampled responses from the API.
Data from API endpoints almost always arrives in some kind of non-tabular format such as JSON. To make sense of this sample of data, we will compare it against what we know about the actual behavior of the app.
4. Create draft tables using the API response
We need to start moving samples of data from the API endpoint to draft tables. JSON often contains nested objects, so the first order of business is to flatten every JSON object into parent tables and sub-tables. Both the API documentation and data samples from the API should provide examples of primary and foreign keys, allowing us to begin to piece together what tables there are and how they relate to one another.For sub-tables, however, you often need to do several tests to determine a reliable primary and foreign key relation.
The key to this step is to successfully import all of the data and identify all of the fields involved.
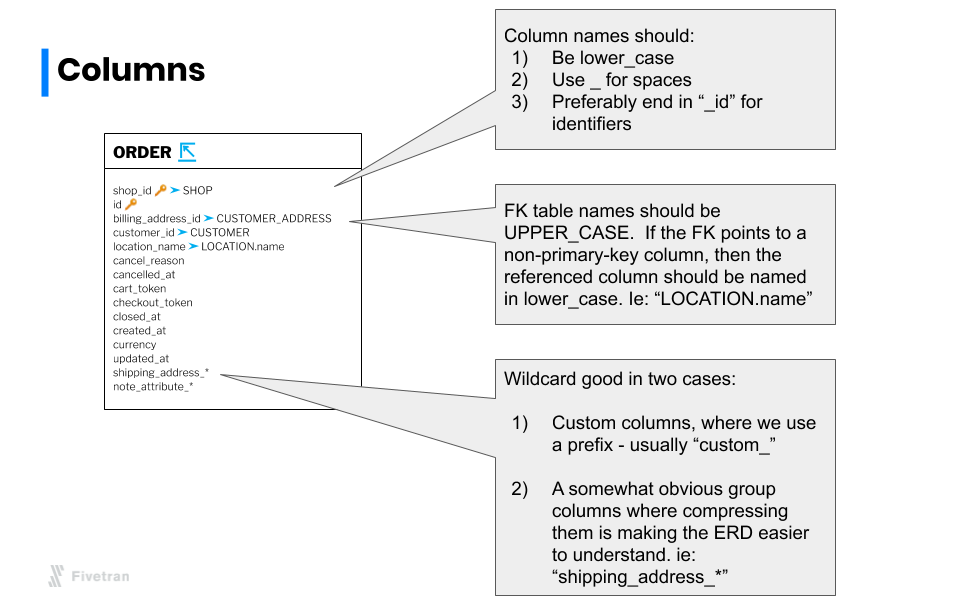
5. Apply naming convention to tables and fields
The Fivetran naming convention is meant to standardize capitalization, spacing, and identifiers to make it easier for analysts new to the schema to learn how to structure their queries. We apply the following rules:
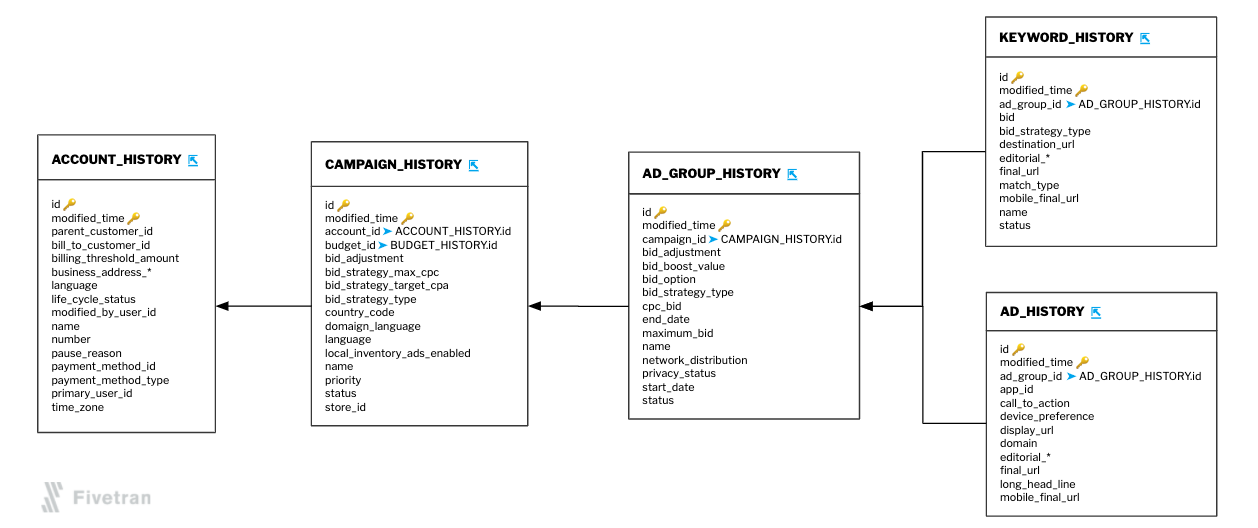
6. Link and normalize the tables
This is when we begin to sketch out the ERD in earnest. Once we have a set of tables in place, we link them together, visually arrange the tables in a way that is easily understood, and minimize the degree to which connections cross each other.
We observe the following guidelines when we lay out the ERD:
- Horizontal flows are generally easier to read than vertical ones.
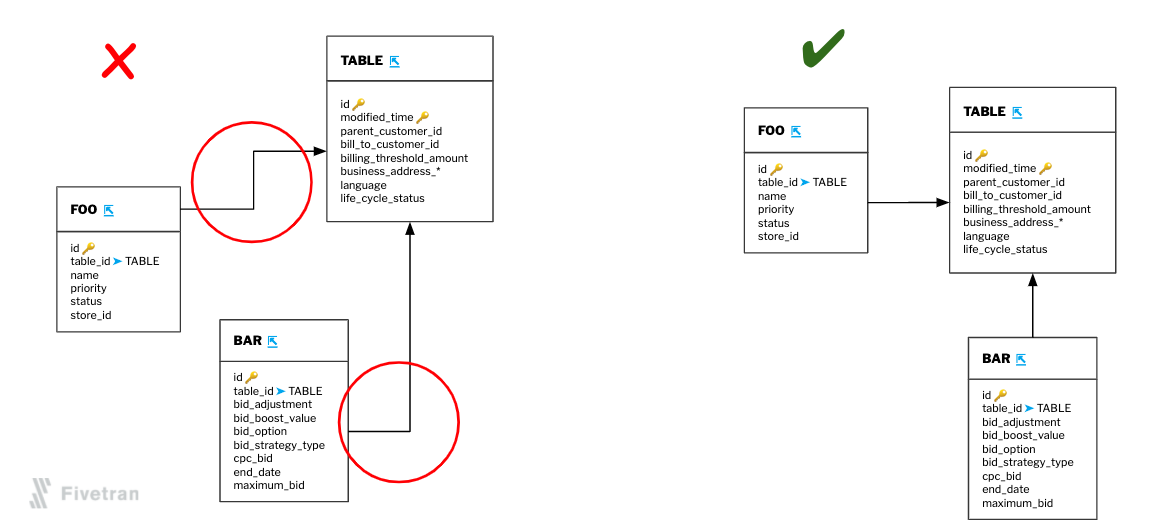
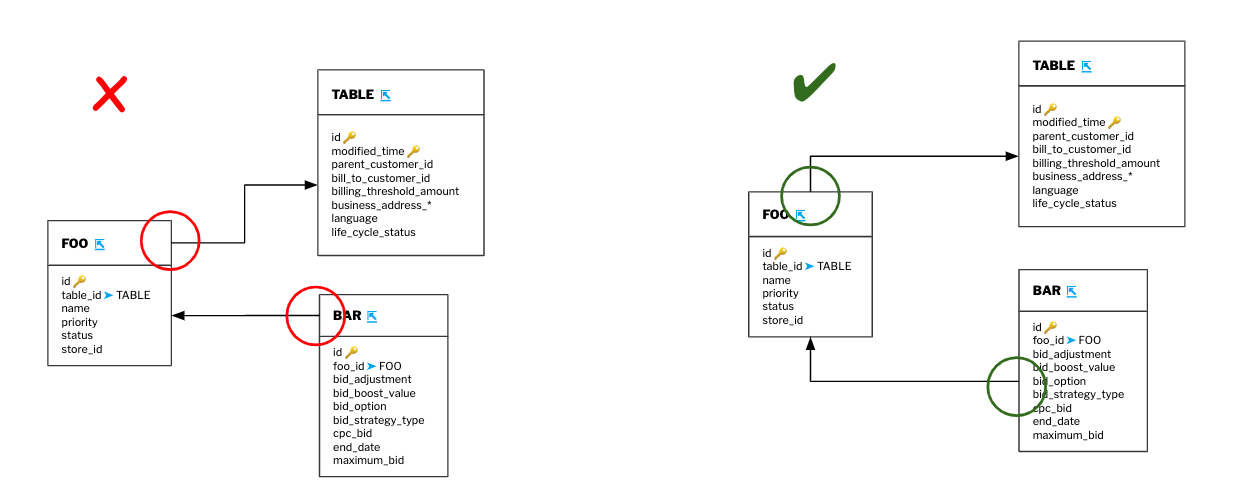
- Do not cross or combine arrows unless they share the same destination.

- Keep lines as straight as possible. The fewer angles, the better.
- Not every relationship needs to be explicitly represented, only the most important ones.
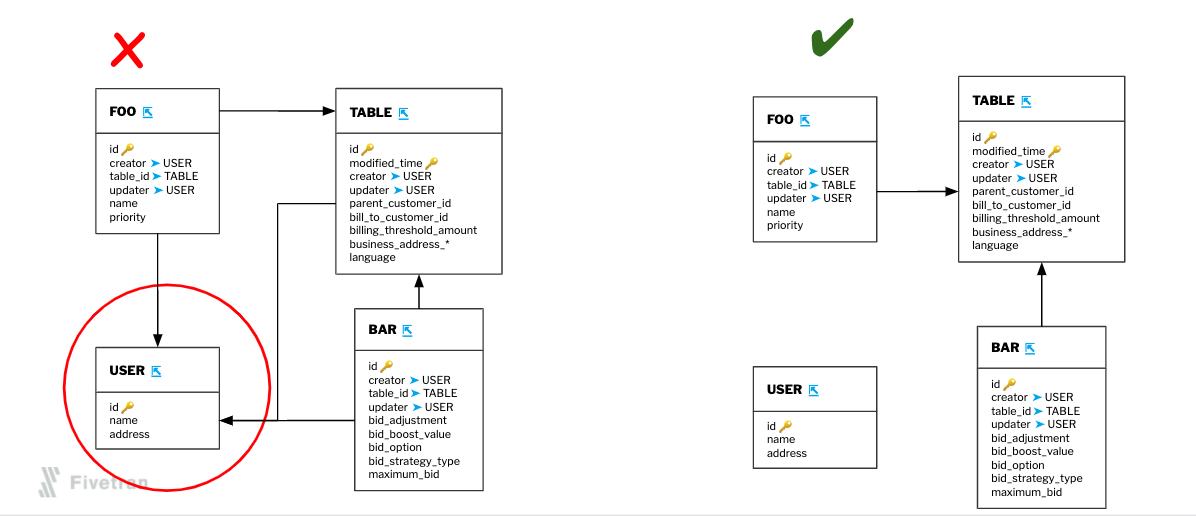
- It’s generally better to connect lines between the bodies of tables than from their labels.
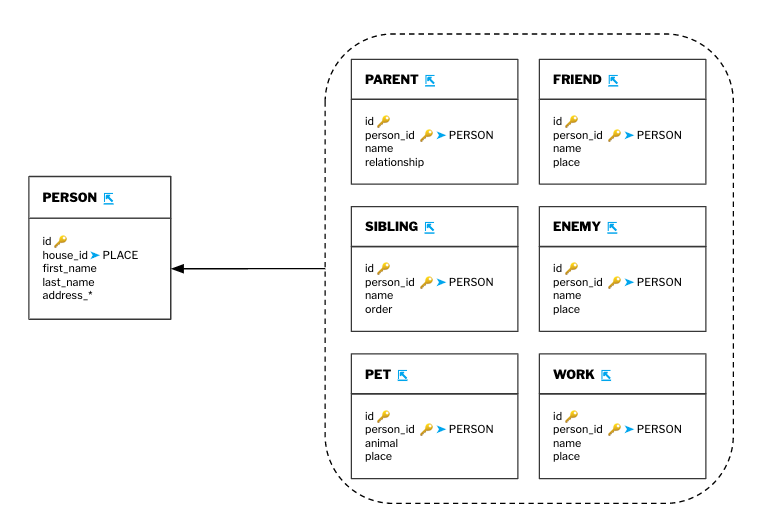
- Small tables that share the same foreign key relationships can be grouped together to reduce clutter
Normalization involves eliminating redundant, duplicate, and derived values so that the data is trimmed down to its most concise representation. This lowers the required bandwidth of data transfer and also allows for quicker, easier comprehension of the underlying data model of an app.
7. Review isolated tables and ensure all relations are represented
After linking the tables, we observe whether some tables are isolated or not. If any are, then there are some foreign keys that remain to be identified or connected and we must revisit what we have learned about the API and the app.
The goal here is to make sure that all features of the product are represented and appropriately connected with each other so that our customers can easily understand, join and query the data.
8. Publish the ERD (entity-relationship diagram) and begin developing the connector
Once the ERD is finalized and approved by our product team, we will have an idea of what the desired output for our connector looks like. This means we can actually start engineering the connector.
As you can see, in order to build a good SaaS app data connector, you must expend a great deal of upfront effort well before the first line of code is written. Once you overcome the obstacle of obscure or incomplete documentation and fully understand the data model underlying the app, you can begin to design an ERD. Since the ERD dictates the behavior of the connector, you can only start building the connector once it is complete.
To experience for yourself how Fivetran automates data integration, sign up for a free trial or get in touch with a product specialist.


