Database Connection Optionslink
There are several ways to connect Fivetran to your database:
- Directly by safelisting Fivetran's IP
- Using an SSH tunnel
- Using a reverse SSH tunnel
- Using AWS PrivateLink, Azure Private Link, or Google Cloud Private Service Connect (Business Critical only)
- Using a VPN tunnel
- Using Proxy Agent
Safelist Fivetran's IPlink
The fastest and easiest way to connect is to allow Fivetran's IP direct access to your database port. For more information about how to do this, visit the setup guide for your database.
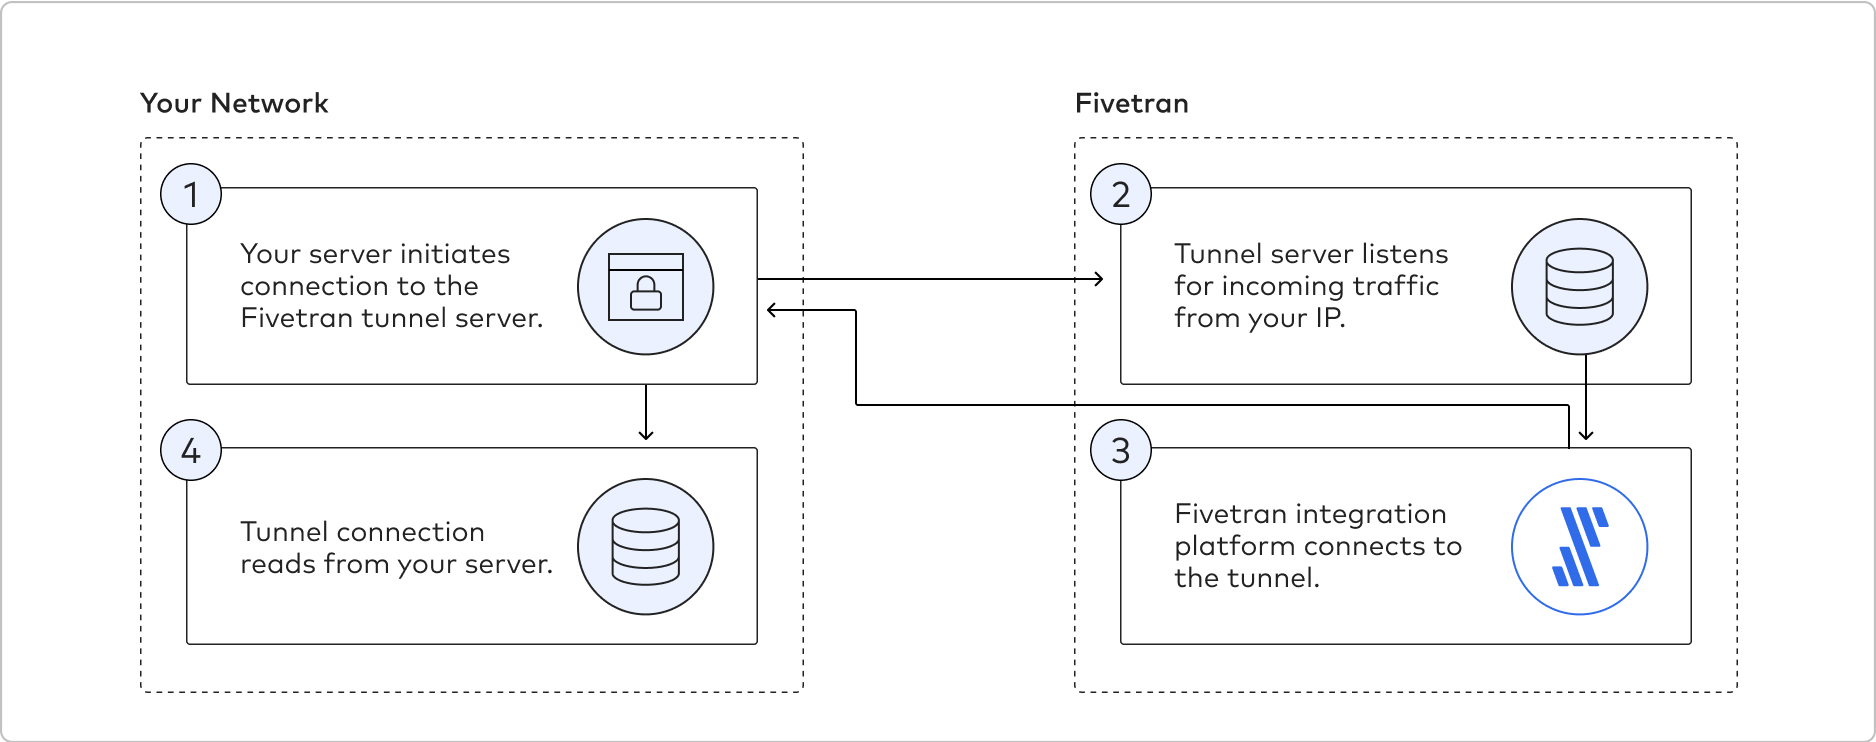
SSH Tunnellink
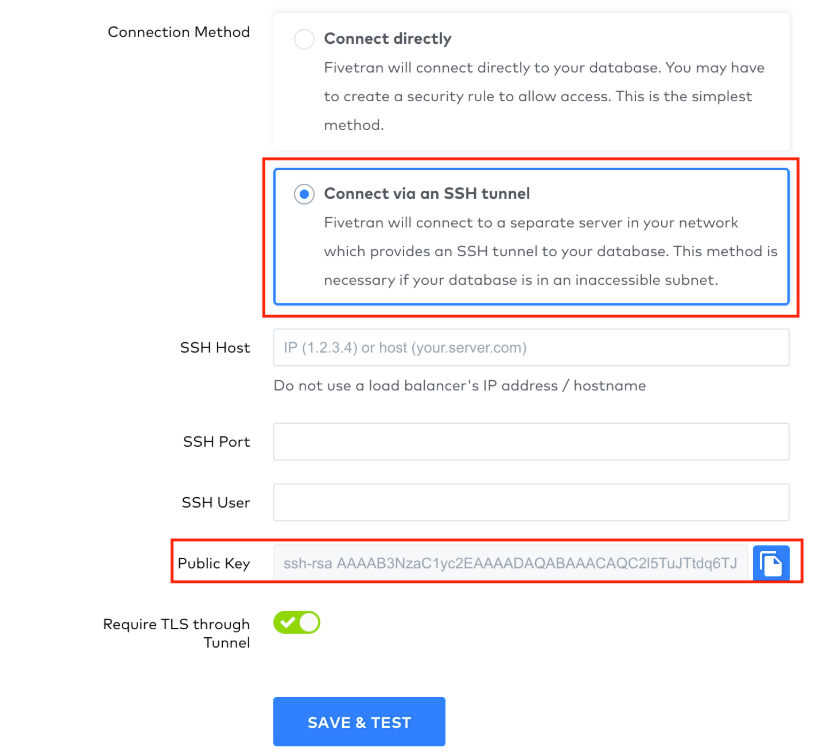
If it's not possible to provide direct access to your database port, you can connect to Fivetran using an SSH tunnel. You can also choose this connection method for an added layer of security. To connect using an SSH tunnel, you need to set up an SSH tunnel server that has access to your database port. The tunnel server's SSH port needs to be accessible from Fivetran's IP. You’ll also need to create an SSH user for Fivetran.
IMPORTANT: Fivetran generates a unique public SSH key for each destination. We support multiple connectors on a single SSH tunnel depending on the data volume and network bandwidth.
Follow the SSH tunnel setup instructions for your operating system.
Linuxlink
Create SSH userlink
Log in to your SSH tunnel host and run the following commands:
Create group
fivetran:sudo groupadd fivetranCreate user
fivetran:sudo useradd -m -g fivetran fivetranSwitch to the
fivetranuser:sudo su - fivetranCreate the
.sshdirectory:mkdir ~/.sshSet permissions:
chmod 700 ~/.sshChange to the
.sshdirectory:cd ~/.sshCreate the
authorized_keysfile:touch authorized_keysSet permissions:
chmod 600 authorized_keysUsing your favorite text editor, add the public SSH key from the database setup page in your Fivetran dashboard to the
authorized_keysfile. The key must be all on one line. Make sure that you don’t introduce any line breaks when cutting and pasting. The public SSH key is generated uniquely for each Fivetran destination.
IMPORTANT: The SHA-1 signature scheme has been deprecated from OpenSSH. As a result, Fivetran will attempt to connect using an SHA-2 RSA public key signature by default. If that does not work, then we will attempt to connect using an SHA-1 RSA public key signature. Fivetran supports SHA-2 connectivity with all OpenSSH server versions from 7.2 and later. For more details, refer to the OpenSSH documentation.
NOTE: If you encounter SSH connectivity errors even though your configuration is correct, it may be because your version of OpenSSH requires a connection using the SHA-1 signature scheme. You can use the following options to force enable the SHA-1 signature scheme:
To force an SHA-1 public key signature, you must modify your
sshd_configfile (in/etc/ssh) and add the following line:PubkeyAcceptedAlgorithms=+ssh-rsa,ssh-rsa-cert-v01@openssh.comTo force an SHA-1 host key, you must modify your
sshd_configfile (in/etc/ssh) and add the following line:HostKeyAlgorithms=+ssh-rsa,ssh-rsa-cert-v01@openssh.comChanging the host key will require you to validate the new fingerprint in your connector and destination after running a setup test. You should expect downtime for connectors within this group during the migration process.
RedHat version 9+ and AWS-hosted SSH servers may need this command if they continue to get an
Auth Failederror:sudo update-crypto-policies --set LEGACY.
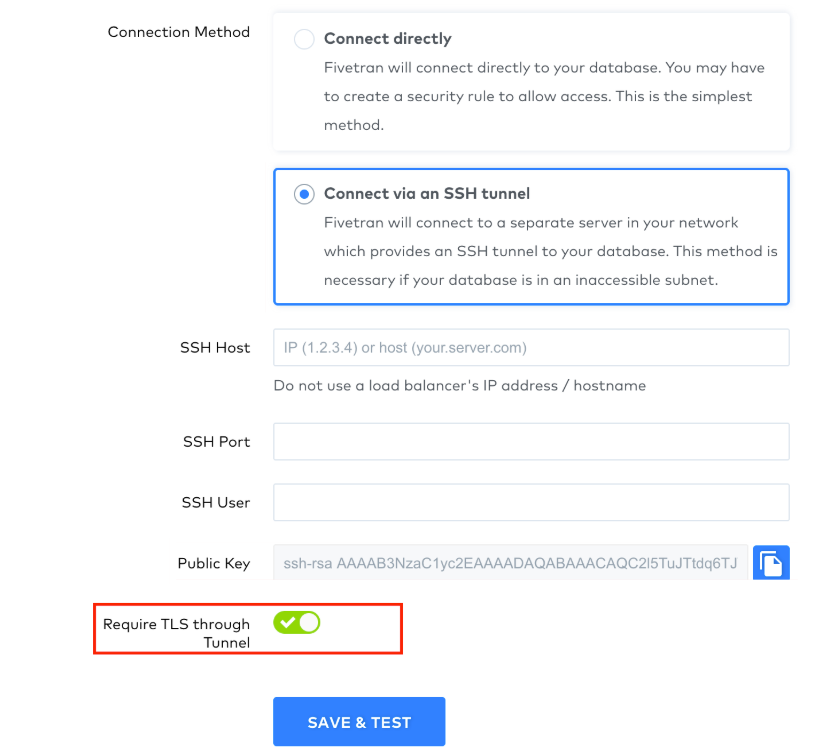
As an extra layer of security, Fivetran enables TLS on your SSH connection by default. We recommend that you keep TLS enabled unless you know it is safe to forgo it. To disable TLS, set the Require TLS through tunnel toggle to OFF.
IMPORTANT: If you set the Require TLS through tunnel toggle to OFF, Fivetran first attempts to connect over TLS inside the SSH tunnel. If this fails, Fivetran automatically retries the connection in clear text inside the SSH tunnel. You are responsible for configuring this option as per your corporate security policies.
Once the user is created, you'll need to allow port access.
Allow port accesslink
Make sure that port access is allowed from:
- Fivetran's IP to your tunnel server's SSH port
- Your SSH tunnel server to your source database port
If your SSH server and database happen to be in AWS, you can follow the instructions below to configure port access.
AWSlink
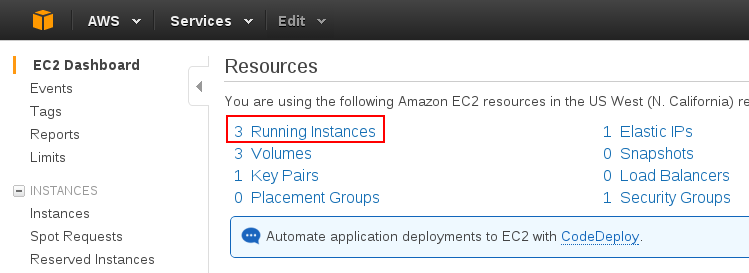
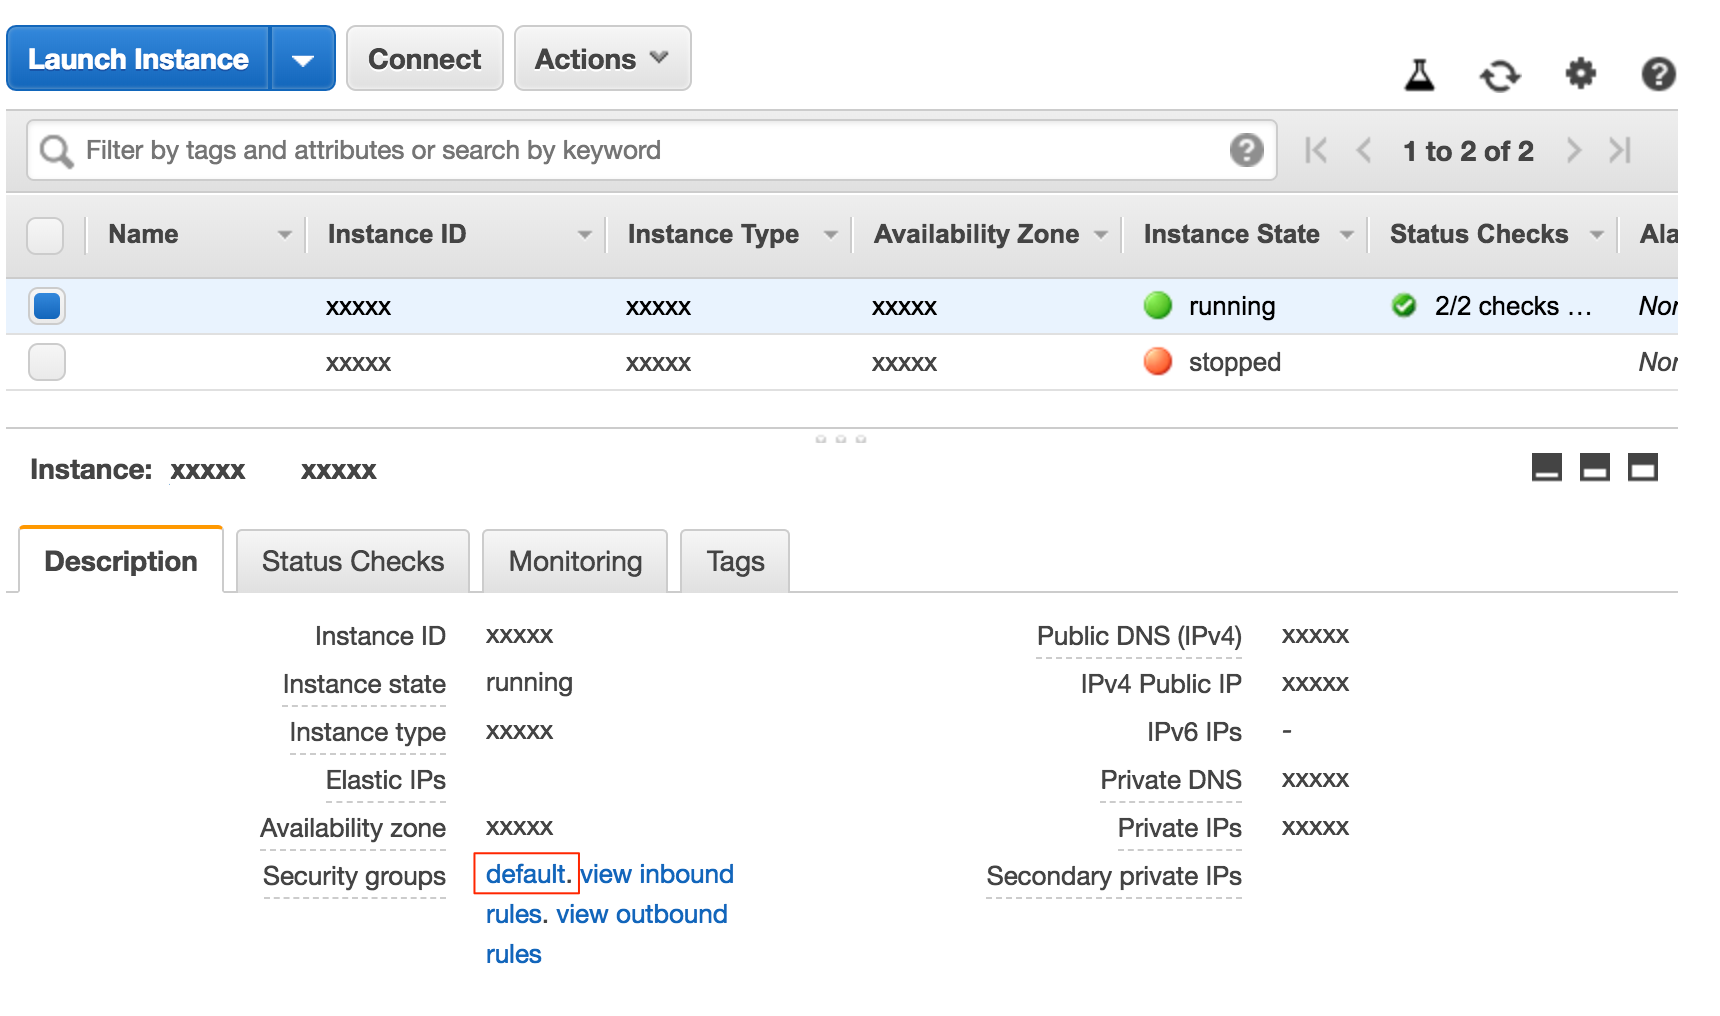
To configure an SSH server in AWS, open the EC2 console and select Running Instances:
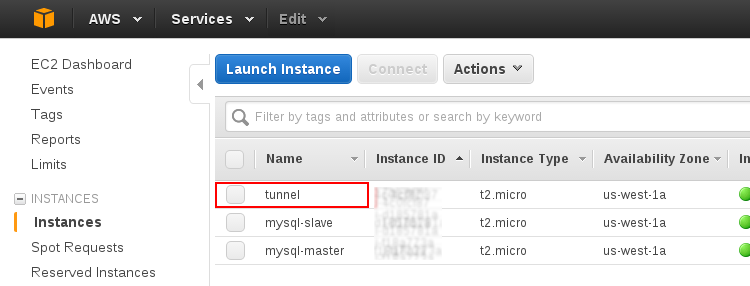
Select the instance you intend to use as an SSH tunnel:
Select the Security groups and then select default:
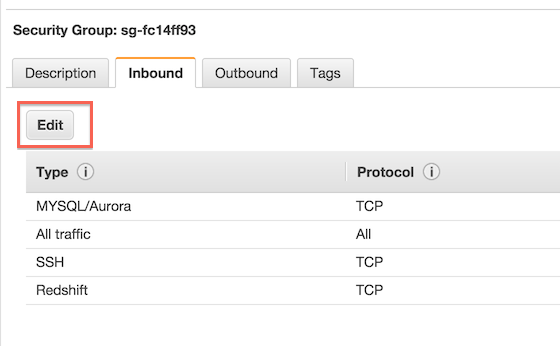
Select the Inbound tab.
Click Edit.
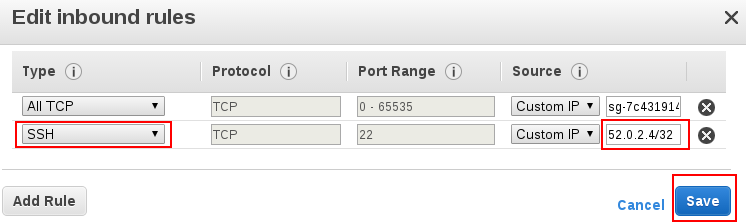
Fill in Fivetran's IP and your SSH port (do not use a load balancer).
For VPC or EC2 classic, add a security rule:

Select SSH, enter Fivetran's IP, and click Save:
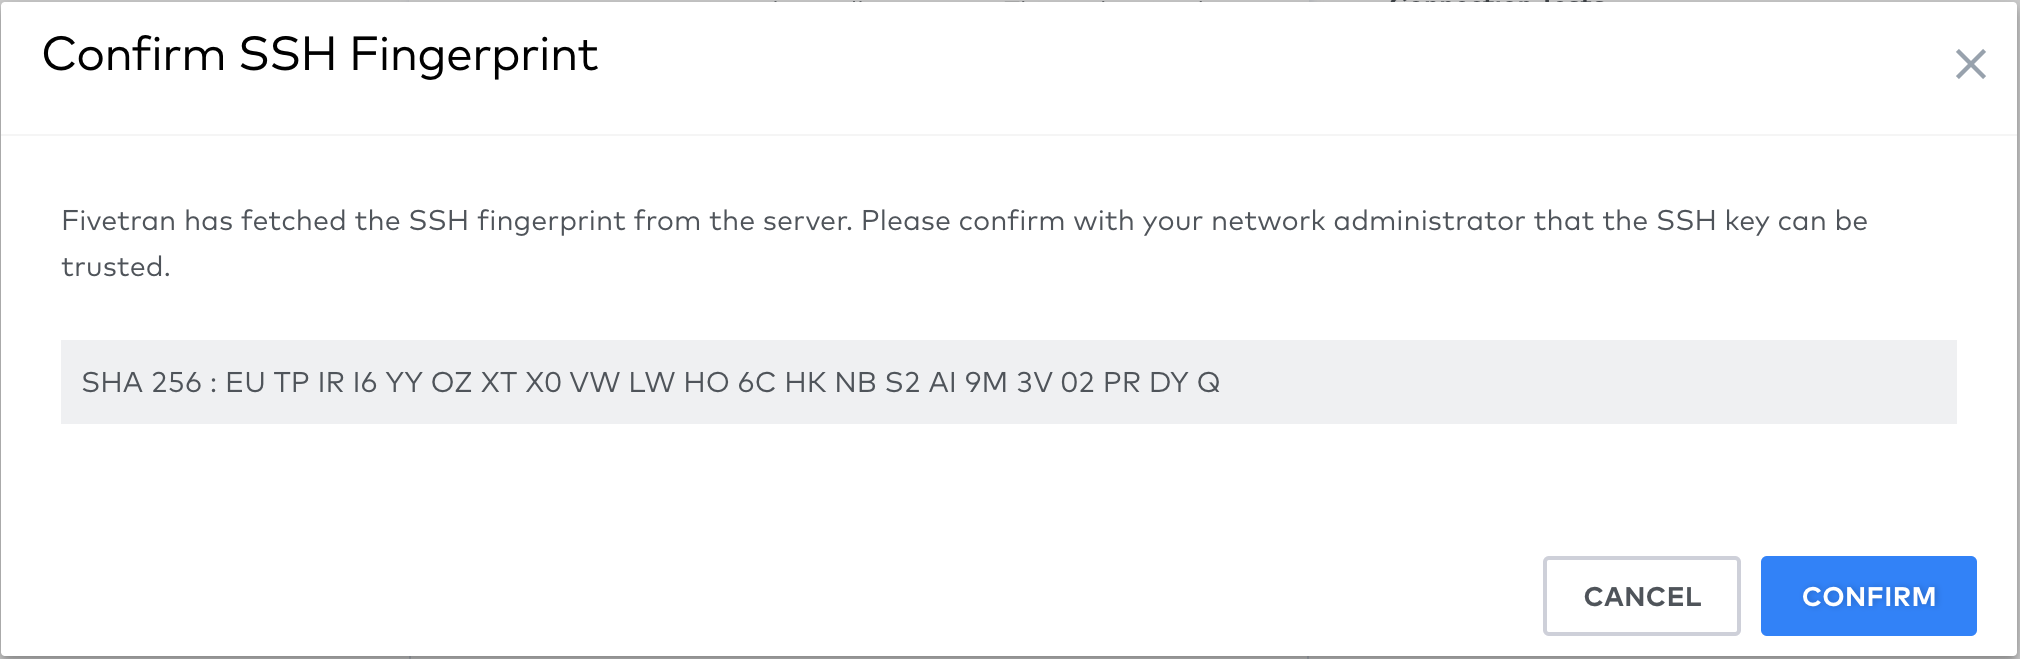
To complete setting up your database connector, follow the setup instructions for your specific database. You can confirm your server's SSH key by comparing the SHA 256 displayed when running the setup tests.
OpenSSHlink
Install OpenSSHlink
TIP: Learn more in Microsoft's OpenSSH for Windows overview documentation.
Install the sshd server.
Add-WindowsCapability -Online -Name OpenSSH.Server~~~~0.0.1.0Verify that the OpenSSH server is installed.
Get-WindowsCapability -Online | ? Name -like 'OpenSSH.Server*'NOTE: If OpenSSH is installed, you'll see the following message:
Name : OpenSSH.Server~~~~0.0.1.0

State : Installed
Set the firewall to allow inbound TCP connections on port 22.
New-NetFirewallRule -Name sshd -DisplayName 'OpenSSH Server (sshd)' -Enabled True -Direction Inbound -Protocol TCP -Action Allow -LocalPort 22Start both the sshd service and the ssh-agent.
Start-Service sshd
Set-Service -Name sshd -StartupType 'Automatic'
Start-Service ‘ssh-agent’
Set-Service -Name ‘ssh-agent’ -StartupType 'Automatic'
Create Fivetran user and grouplink
IMPORTANT: Windows does not allow a user and a group to have the same name.
Add a local Fivetran user.
net user fivetran <password> /add /comment:"User for establishing SSH connection to Fivetran service." /passwordchg:no /passwordreq:no /logonpasswordchg:noAdd a Fivetran group.
net localgroup fivetran-group /comment:"Group for establishing SSH connection to Fivetran service." /addIn Windows command prompt, switch to the SSH server directory.
cd C:\ProgramData\ssh\ && start notepad .\sshd_configAllow password authentication for the Fivetran user.
PasswordAuthentication yesAllow the Fivetran user to connect to the SSH server. Add the following line to the
sshd_configfile.AllowUsers fivetranIf your Windows build is 1809 or later, comment out the following lines in the
sshd_configfile:# Match Group administrators # AuthorizedKeysFile __PROGRAMDATA__/ssh/administrators_authorized_keysSave the
sshd_configfile.Restart the agent and the sshd service. If the following command fails, you can restart from the Task Manager (
Alt+Ctrl+Delete).Restart-Service ssh-agent; Restart-Service sshd
IMPORTANT: The SHA-1 signature scheme has been deprecated from OpenSSH. As a result, Fivetran will attempt to connect using an SHA-2 RSA public key signature by default. If that does not work, then we will attempt to connect using an SHA-1 RSA public key signature. Fivetran supports SHA-2 connectivity with all OpenSSH server versions from 7.2 and later. For more details, refer to the OpenSSH documentation.
NOTE: If you encounter SSH connectivity errors even though your configuration is correct, it may be because your version of OpenSSH requires a connection using the SHA-1 signature scheme. You can use the following options to force enable the SHA-1 signature scheme:
To force an SHA-1 public key signature, you must modify your
sshd_configfile (in/etc/ssh) and add the following line:PubkeyAcceptedAlgorithms=+ssh-rsa,ssh-rsa-cert-v01@openssh.comTo force an SHA-1 host key, you must modify your
sshd_configfile (in/etc/ssh) and add the following line:HostKeyAlgorithms=+ssh-rsa,ssh-rsa-cert-v01@openssh.comChanging the host key will require you to validate the new fingerprint in your connector and destination after running a setup test. You should expect downtime for connectors within this group during the migration process.
Set up clientlink
In your command line, go into the SSH server using Windows VM.
ssh fivetran@<Public IPv4 DNS>Enter your password.
Create an
.sshfolder in your home directory.mkdir .sshAdd an
authorized_keysfile.If your client is Windows PowerShell:
type nul > authorized_keys
echo <fivetran-ui-public-key> >> authorized_keys
icacls C:\Users\fivetran\.ssh\authorized_keys /inheritance:r
If your client is Linux:
touch authorized_keys
chmod 600 authorized_keys
echo <fivetran-ui-public-key> >> authorized_keys
If you're running PowerShell in elevated mode, your setup is complete. If you're not running PowerShell in elevated mode, follow the instructions below.
TIP: An elevated PowerShell prompt displays
Administrator: Windows PowerShellon the top of the prompt's border.
Finish setup (non-elevated PowerShell only)link
Allow public key authentication.
PubkeyAuthentication yesRemove password authentication.
PasswordAuthentication no
PermitEmptyPasswords no
Save the
sshd_configfile.Verify that inheritance has been disabled and remove
Administrator.
a. Right click on theauthorized_keysfile.
b. Select Properties.
c. Select the Security tab.
d. Select Advanced.
e. Verify that the bottom left reads Enable Inheritance, which means that inheritance is disabled.
f. RemoveAdministratorfrom the file security permissions.Restart the agent and the sshd service.
Restart-Service ssh-agent; Restart-Service sshd
Reverse SSH Tunnellink
You can also connect Fivetran to your database using a Reverse SSH Tunnel if you are unable to provide direct port access to your instance. Reverse SSH tunneling allows you to securely connect to a device located behind a firewall or NAT (Network Address Translation) from a remote location. With this method, the remote machine initiates the connection to the local machine, enabling remote access to services on the local machine.
Follow the Reverse SSH tunnel setup instructions for your operating system.
To set up a reverse SSH tunnel to connect to Fivetran, contact Fivetran's Technical Sales team and provide the following:
- The name of the Fivetran destination(s) where you want your reverse SSH tunnel to be set up
- Your SSH public key (see instructions below to learn how to generate)
- The public IP address (CIDR notation) of your SSH bastion host or proxy server
Linuxlink
To generate your SSH public key, do the following on your SSH host:
Generate an SSH key pair. Make a note of the key path - you will need it to complete your setup.
IMPORTANT: Do not enter a password for the key file. When prompted to provide a password, hit Enter instead.
ssh-keygenView the contents of the public key. Copy the public key and send it to Fivetran's Technical Sales team along with the Fivetran user's public key.
cat ~/.ssh/id_rsa.pub
Once we have finished the setup on our side, you will need the following information to complete your setup:
- Username
fivetranof the SSH tunnel user you created - Reverse SSH IP address (contact Fivetran Technical Sales to get this)
- SSH high port. It should be unique per connector instance and should not be a reserved port number (for instance, port
22is reserved for SSH connections and port443is reserved for HTTPS).TIP: For the SSH high port number, we recommend adding a single digit - usually
1- as a prefix to the source database port. For example, if you connect SQL Server, your database's default port is1433. Therefore, we recommend using port11433as the SSH high port for your first SQL Server connector, port11434for your second connector, and so on. - Internal IP address or name of the local database host machine
- Internal open port for communication with the database host
- File path to the private key on the SSH host machine (this is normally
id_rsa.pemor simplyid_rsa)
Use the values above to replace the placeholder variables in the following script, then run it on the SSH host in a single line:
TIP: To track the progress of this script, remove the
-fflag and add the-vflag to enable verbose logging. Without the flag, you will not see confirmation when the script finishes running successfully.
autossh -M 0 -f -N -R <SSH_HIGH_PORT>:<LOCAL_DB_MACHINE_NAME_OR_IP>:<LOCAL_DB_MACHINE_PORT> <FIVETRAN_SSH_USERNAME>@<FIVETRAN_SUPPLIED_IP> -g -i <PATH_TO_PRIVATE_KEY> -o ServerAliveInterval=10 -o ServerAliveCountMax=1 -o ExitOnForwardFailure=yes
If you use this autossh script again later for the same SSH high port, you need to terminate your original autossh script before proceeding.
After establishing a successful Reverse SSH connection, enter the following into the Fivetran setup form for your database:
| Field | Value | Description |
|---|---|---|
| Host | localhost | Allows your SSH host to handle port routing |
| Port | { SSH high port } | e.g., 13306. The port that your SSH host will translate |
| User | { Database user } | |
| Password | { Database user's password } | |
| Database | { Database name } | The name of the database you want to replicate |
| Connection Method | Connect via an SSH Tunnel | |
| SSH Host | { IP Address } | Supplied by Fivetran |
| SSH Port | 22 | |
| SSH User | fivetran |
All fields in { brackets } must be replaced with your own values.
PuTTYlink
NOTE: These instructions use PuTTY v0.78.
Generate private keylink
Launch PuTTYgen.
Under Actions, click Generate to generate a public/private key combination. The OpenSSH public key appears in the top box.
Make a note of your OpenSSH public key. Later, you will need to send this to the Fivetran technical representative who is helping you with setup.
Click Save private key. When you're prompted to save a .ppk file, save the file to your local computer.
TIP: Do not save the key with a passphrase.
Configure connectionlink
Launch PuTTY.
Configure your session (Category > Session).
- Host Name: Enter the SSH User and IP address of the SSH Host provided by the Fivetran team in the format
{ssh_user}@{ssh_host_ip}(for example,fivetran@35.230.100.17). - Port:
22 - Connection type: SSH
- Host Name: Enter the SSH User and IP address of the SSH Host provided by the Fivetran team in the format
In the Connection category, set the Seconds between keepalives value to
5.In the Connection > SSH category, check the Don’t start a shell or command at all box.
In the Connection > SSH > Auth > Credentials category, go to the Private key file for authentication field. Click Browse, then enter the private key (.ppk file) you created in the previous step.
In the Connection > SSH > TTY category, check the Don’t allocate a pseudo-terminal box.
In the Connection > SSH > Tunnels category, do the following:
- Check the Local ports accept connections from other hosts box.
- Check the Remote ports do the same box.
- Source port: Add the high port (for example,
55432). - Destination: Add your destination IP address and its corresponding port (for example,
localhost:5432for a server hosted on the same computer). - Select the Remote option.
- Select the Auto option.
- Click the Add button, which adds an entry to the Forwarded ports field.
Return to the Session category and do the following:
- In the Saved Sessions field, enter a name for this configuration (for example,
fivetran-outbound). - Click the Save button to add this configuration to the list to the left of the button.
- In the Saved Sessions field, enter a name for this configuration (for example,
NOTE: This tunnel setup will not be complete/working until the Fivetran team sets up SSH resources on our side.
AWS PrivateLinklink
AWS PrivateLink allows VPCs and AWS-hosted or on-premises services to communicate with one another without exposing traffic to the public internet. PrivateLink is the most secure connection method. Learn more in AWS’ PrivateLink documentation.
Fivetran uses PrivateLink to move your data securely between our system and your AWS-hosted or on-premises source. PrivateLink works differently depending on your source type:
- If your data source is hosted in AWS, Fivetran can connect to your source using a PrivateLink connection. We query and process the data from the source into our system.
- If your data source is hosted on-premises, Fivetran can use AWS Direct Connect to access your source data. AWS Direct Connect establishes a private network connection between your premises and an AWS VPC. We connect to that AWS VPC using a PrivateLink connection, then query and process the data from the source into our system. Learn more in AWS’ Direct Connect documentation.
You can also use AWS Private Link with multiple destinations. See a complete list in our Supported destinations documentation.
As an extra layer of security, Fivetran enables TLS on your PrivateLink connection by default. We recommend that you keep TLS enabled unless you know it is safe to forgo it. To disable TLS, set the Require TLS when using PrivateLink toggle to OFF.
IMPORTANT: If you set the Require TLS when using PrivateLink toggle to OFF, Fivetran first attempts to connect over TLS. If this fails, Fivetran automatically retries the connection in clear text. You are responsible for configuring this option according to your corporate security policies.
Prerequisiteslink
To set up AWS PrivateLink, you need:
- An AWS-hosted (EC2, RDS, or S3 only) or on-premises* source in one of our supported regions
* Your on-premises source must be one of our supported databases. See a complete list in our Databases documentation.
How you connect AWS PrivateLink to your source depends on whether your source is hosted in AWS or on-premises.
Postrequisiteslink
To use AWS PrivateLink, you must select AWS as a Cloud service provider in the Finish Fivetran configuration step of the relevant destination setup guide.
Setup instructions for AWS-hosted sourcelink
We support connecting to the following AWS-hosted sources using PrivateLink:
NOTE: Third-party managed database services, such as MongoDB Atlas, may not be supported. Contact your Fivetran account manager to confirm if your managed database service is supported.
| AWS Host | Supported Connectors |
|---|---|
| Amazon Aurora | MySQL PostgreSQL |
| Amazon EC2 | DocumentDB DynamoDB MariaDB MySQL MongoDB Oracle PostgreSQL SQL Server |
| Amazon RDS | MariaDB MySQL Oracle PostgreSQL SQL Server |
| Other | Amazon S3 AWS Lambda Salesforce |
NOTE: Amazon S3 does not require any configuration. If your S3 bucket is in the same region as your Fivetran account, your network traffic does not traverse the public Internet. The Amazon S3 Gateway Endpoints ensures that regional traffic stays within the AWS network.
You must have an AWS endpoint service configured for your source before you set up a PrivateLink connection with Fivetran. AWS endpoint services only work with network load balancers (NLB), so you must create an NLB inside your VPC if you do not already have one. The NLB receives requests from Fivetran and routes it to your source.
The following graphic illustrates how Fivetran connects to the customer database using AWS Private Link:
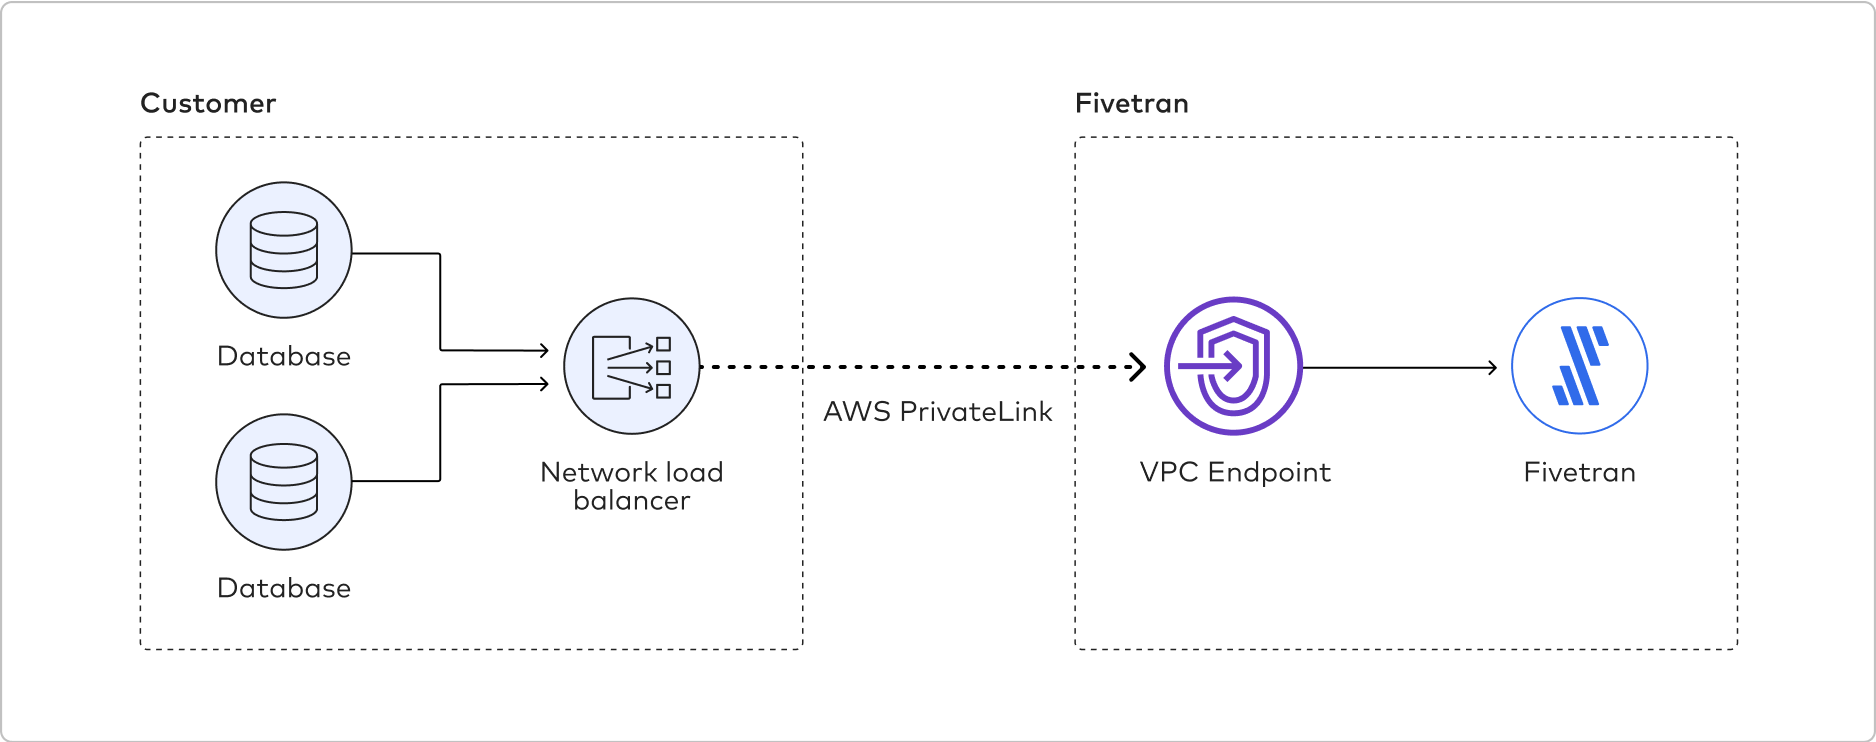
Since endpoint service configurations are out of Fivetran’s control, we recommend that you contact your AWS representatives for help setting up PrivateLink. However, we do provide the following high-level instructions based on how customers typically configure their data sources:
In your VPC, create an NLB for your data source and configure it for each subnet (availability zone) in which the service should be available. For help, see the Create an NLB section.
IMPORTANT: Skip this step if your data source is already running behind an NLB.
Create a VPC endpoint service configuration and specify your NLB.
IMPORTANT: Make sure that you are familiar with the endpoint service considerations and have met its prerequisites.
Safelist Fivetran’s AWS VPC Account ID (
arn:aws:iam::834469178297:root) to allow access to your VPC endpoint service. Send the service name (VPCe) to your Fivetran account manager. For example,com.amazonaws.vpce.<region_id>.vpce-svc-xxxxxxxxxxxxxxxxx.TIP: To learn how to safelist the Fivetran account ID, see AWS’ endpoint service permission documentation.
Send the host name of the service/source to your Fivetran account manager. Fivetran will finish the setup on our side.
To activate the connection, accept the interface endpoint connection request from Fivetran. By default, connection requests must be manually accepted. However, you can configure the acceptance settings for your endpoint service so that any connection requests are automatically accepted.
Create an NLBlink
On a single static IP service (EC2, non-RDS database, etc.)link
To create an NLB on a single static IP service, follow the instructions in AWS’ creating a network load balancer documentation. Either ensure that the NLB availability zones match the target availability zones or enable cross-zone load balancing.
On a dynamic IP service (Amazon Aurora database, RDS database, etc.)link
NLB can only route traffic to an EC2 instance, an IP address, or a Lambda function through target groups. Since Aurora and RDS databases don’t have a dedicated IP address or EC2 instance ID, there are two different ways to configure an NLB to route traffic to these databases - using a port forwarding instance or using the IP address (dynamic IP address) of the database. Follow the instructions below for your chosen method.
Using a port forwarding instance
You must deploy an EC2 instance that is configured to do port forwarding (accepting requests from the NLB and forwarding those requests to the RDS database). Here is a sample script that you can use to set up the EC2 port forwarding instance:
#!/bin/bash
PREVLOGFILE=/root/ip.txt # Note the below section of the code is important in the event of a server restart.
if test -f "$PREVLOGFILE"; then
  truncate -s 0 $PREVLOGFILE
  echo "State file $PREVLOGFILE has been emptied"
fi
python -m SimpleHTTPServer 801 & # NOTE: USE PORT 801 FOR <HEALTH_CHECKS> PARAMETER BELOW
echo 1 -> /proc/sys/net/ipv4/ip_forward
export RDS_ENDPOINT=<<PROSPECT RDS INSTANCE ENDPOINT>> #NOTE: DO NOT INCLUDE THE <<>> CHARACTERS, NO QUOTATION MARKS.
export RDS_PORT=<<PROSPECTS RDS INSTANCE PORT>> #NOTE: DO NOT INCLUDE THE <<>> CHARACTERS, NO QUOTATION MARKS.
iptables -t nat -A POSTROUTING -j MASQUERADE
while true
do
LOGFILE=/root/ip.txt
Current_IP=$(dig +short $RDS_ENDPOINT | tail -n1) #NOTE: THE "/ TAIL -n1" piece is critical to ensure only the IP address of the RDS instnce is picked.
if [ $LOGFILE = "" ] ; then
  iptables -I INPUT -i eth1 -s $Current_IP -j ACCEPT
  echo $Current_IP > $LOGFILE
else
  Old_IP=$(cat $LOGFILE)
  if [ "$Current_IP" = "$Old_IP" ] ; then
    echo "IP address has not changed ($Old_IP -> $Current_IP)"
  else
    iptables -t nat -D PREROUTING -p tcp --dport 80 -j DNAT --to-destination $Old_IP:$RDS_PORT
    iptables -t nat -A PREROUTING -p tcp --dport 80 -j DNAT --to-destination $Current_IP:$RDS_PORT
    sysctl net.ipv4.ip_forward=1
    iptables-save
    echo $Current_IP > $LOGFILE
    echo "IP address has changed ($Old_IP -> $Current_IP)"
  fi
fi
sleep 5
done
NOTE: If you are using Amazon Linux 2023, this doesn't support python2. You need to change the following part of Line 6 of the script above from:
python -m SimpleHTTPServer 801to:
python3 -m http.server 801Once you’ve finished setting up the port forwarding instance, configure the NLB listener and target group to route traffic to the portforwarder EC2 instance.
Using the dynamic IP address
Aurora and RDS databases provide an endpoint to access your database when you set them up. This endpoint resolves to an IP address. AWS doesn’t recommend using this IP address, since it can change without notice. To work around this limitation, you can deploy a lambda function to periodically check the IP address and update the NLB target group when it changes.
To use the IP address of the RDS or Aurora database in your NLB target group, do the following:
Run the
nslookupordigcommand with the domain name of RDS endpoint as the input to find the IP address:dig +short <YOUR_RDS_DNS_ENDPOINT>Set up your NLB target group with the IP address.
Deploy a lambda function to periodically perform
nslookupon the RDS endpoint to see if the IP address has changed and update the target group with the new IP address.
AWS PrivateLink (Optional)link
If you chose to use security groups with your NLB, you must allow Fivetran's internal CIDR range on Network ACLs and Security Groups:
| Fivetran VPC Network |
|---|
10.0.0.0/8 |
Setup instructions for on-premises sourcelink
Contact your account manager for help setting up PrivateLink for your on-premises source. Our team will help you set up AWS Direct Connect to an AWS VPC, which Fivetran can connect to using PrivateLink.
Setup instructions for self-service Fivetran accounts Private Previewlink
The self-service functionality is not available by default. Contact your Fivetran account manager to enable this functionality for you.
With self-service, you can enable AWS PrivateLink on the following sources:
Find connection service namelink
Log in to your AWS account.
Configure the NLB for each subnet (availability zone) where you want the service to be available.
Create a VPC endpoint service configuration and specify your NLB.
IMPORTANT: Make sure that you are familiar with the endpoint service considerations and you have met its prerequisites.
Safelist Fivetran’s AWS VPC Account ID (
arn:aws:iam::834469178297:root) to allow access to your VPC endpoint service.TIP: To learn how to safelist the Fivetran account ID, see AWS' documentation.
Make a note of your service name (VPCe) (for example,
com.amazonaws.vpce.<region_id>.vpce-svc-xxxxxxxxxxxxxxxxx). You will need it to configure Fivetran.
Configure PrivateLink connectionlink
In your connector setup form, select Connect via Private Networking in the Connection Method drop-down menu.
Click + Configure a new PrivateLink connection.
Enter a Name for your PrivateLink connection.
In the PrivateLink connection service name field, enter the service name you found in Step 1.
Click Create and save. Fivetran will raise a connection request in AWS.
NOTE: It might take up to 10 minutes for us to raise the connection request.
Accept connection requestlink
Go to your AWS account.
In the top left corner, click Services, then select VPC.
In the VPC dashboard, click Endpoint services.
Refresh the Endpoint services page to see the new connection request from Fivetran. The new connection request is in Pending acceptance state.
NOTE: It might take some time for the new connection request to appear on the list.
Select the new connection request.
Go the Endpoint connections tab.
In the Actions drop-down menu, select Accept endpoint connection request.
In the Accept endpoint connection request pop-up window, enter
acceptin the text box, then click Accept. The status of the request will change to Pending. After a few minutes, the status will change to Accepted and a Connection created message will appear in your source setup form.
Azure Private Linklink
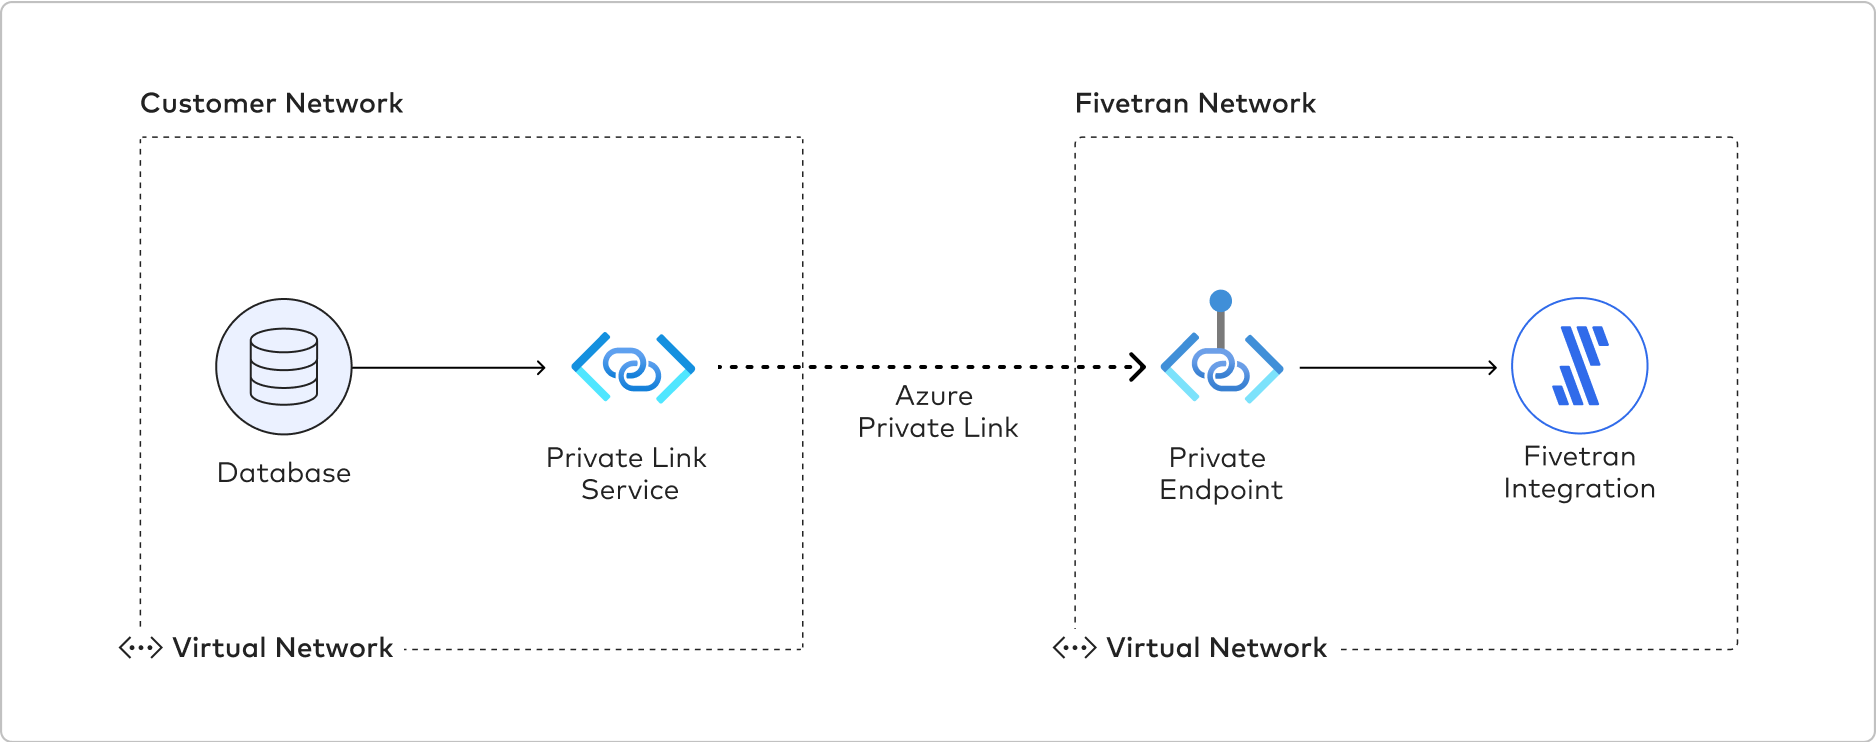
Azure Private Link allows Virtual Networks (VNets) and Azure-hosted or on-premises services to communicate with one another without exposing traffic to the public internet. Learn more in Microsoft's Azure Private Link documentation.
Fivetran uses Private Link to move your data securely between our system and your Azure-hosted, Azure Virtual Machine-hosted, or on-premises source. Private Link works differently depending on your source type:
- If your data source is hosted in Azure, Fivetran can connect to your source using a Private Link connection. We query and process the data from the source into our system.
- If your data source is hosted in an Azure Virtual Machine or on-premises, you can use Azure Private Link Service to connect Fivetran to your source. To use Azure Private Link Service, you must create an Azure Private Link Service with port forwarding VMs. The VMs relay the network traffic into your Azure VNet, which then connects to your source through Azure ExpressRoute or Azure VPN Gateway.
You can also use Azure Private Link with multiple destinations. See a complete list in our Supported destinations documentation.
As an extra layer of security, Fivetran enables TLS on your Private Link connection by default. We recommend that you keep TLS enabled unless you know it is safe to forgo it. To disable TLS, set the Require TLS when using PrivateLink toggle to OFF.
IMPORTANT: If you set the Require TLS when using Private Link toggle to OFF, Fivetran first attempts to connect over TLS. If this fails, Fivetran automatically retries the connection in clear text. You are responsible for configuring this option according to your corporate security policies.
Prerequisiteslink
To set up Azure Private Link, you need an Azure-hosted, Azure Virtual Machine-hosted, or on-premises source in one of our supported regions.
NOTE: Your on-premises source must be one of our supported databases. See a complete list in our Databases documentation.
How you connect Azure Private Link to your source depends on whether your source is hosted in Azure, in an Azure Virtual Machine, or on-premises.
Postrequisiteslink
To use Azure Private Link, you must select Azure as a Cloud service provider in the Finish Fivetran configuration step of the relevant destination setup guide.
Setup instructions for Azure-hosted sourceslink
We support connecting to the following Azure-hosted sources using Private Link:
- Azure Blob Storage
- Azure Cosmos DB
- Azure Functions
- Azure MariaDB
- Azure MySQL
- Azure PostgreSQL
- Azure SQL Database
- Azure SQL Managed Instance
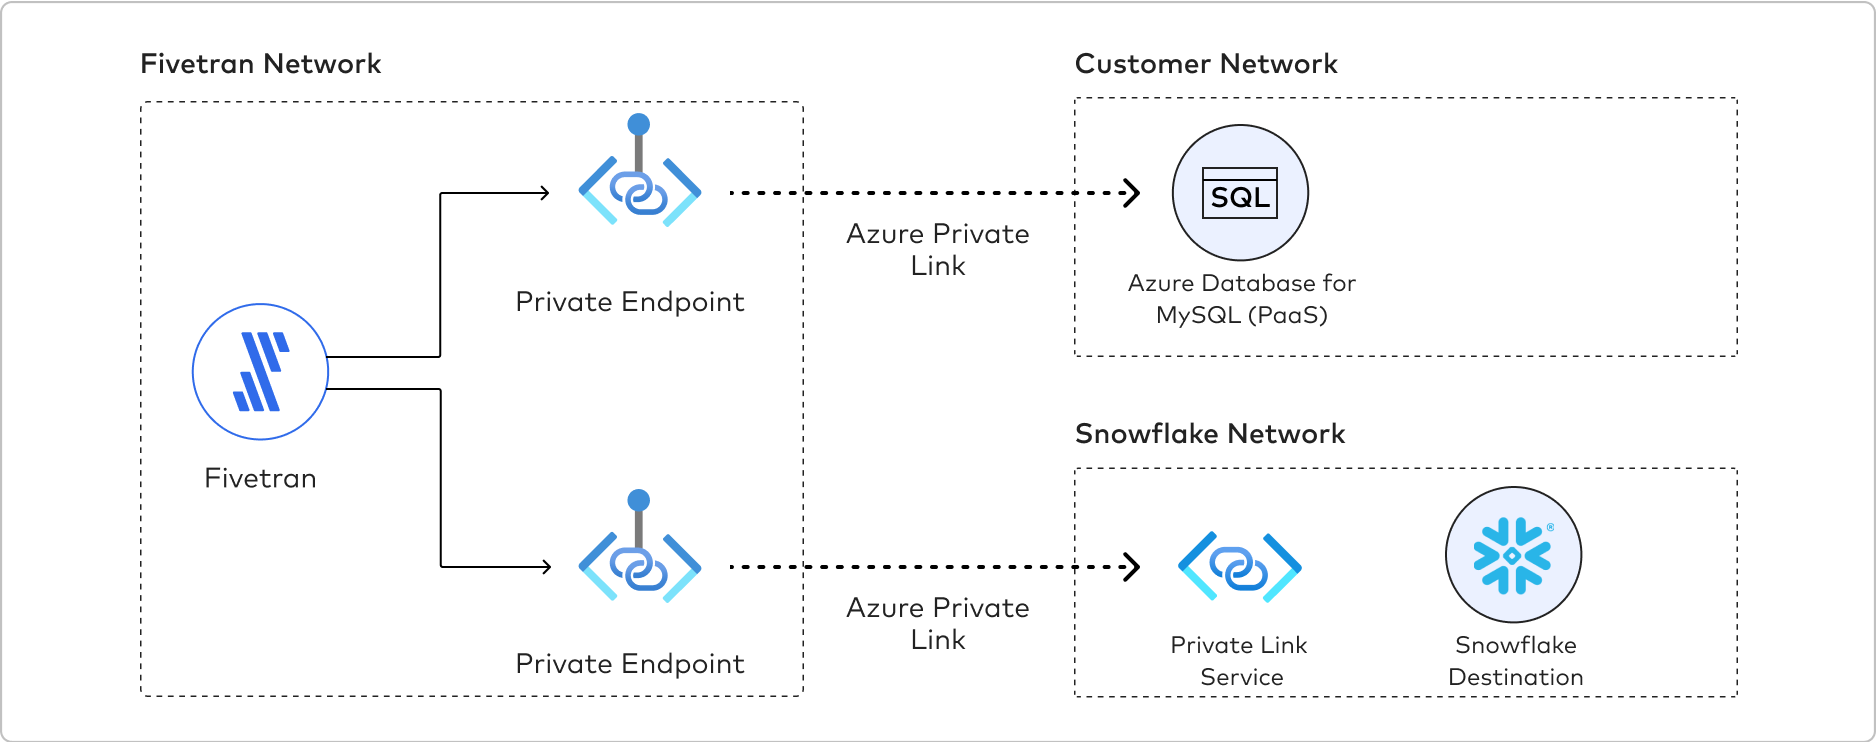
The following graphic illustrates how Azure Private Link establishes a connection between the Fivetran network and the customer network. Fivetran uses Private Endpoints to establish a Private Link with the Azure Database for MySQL and Snowflake.
To establish a Private Link connection, do the following:
- Verify that your Azure-hosted source supports Private Endpoint in Microsoft’s Private Endpoint documentation.
- Contact your Fivetran account manager and provide your Azure-hosted service’s fully-qualified resource ID, including the resource name and resource type of your Azure-hosted source.
- Wait to receive Private Endpoint request details from Fivetran. We create a Private Endpoint using your resource ID, type, and subresource. We then initiate a Private Link connection request as part of the Private Endpoint setup and share the details of that request with you.
- In the Azure Portal or CLI, verify and approve the Private Link connection request from Fivetran. Fivetran then finishes setting up Private Link for your Azure-hosted service on our side.
Setup instructions for Azure Virtual Machine-hosted or on-premises sourceslink
How you set up Private Link for your Azure Virtual Machine-hosted or on-premises source depends on whether or not your source already has an Azure Private Link Service.
If your source is already configured with a Private Link Service, follow the setup instructions for Azure-hosted sources to complete your Fivetran setup.
If you do not have a Private Link Service yet, you will need to configure one before establishing a Private Link connection by following the steps below:
NOTE:
- You must have a VNet with access to your sources.
- If you are configuring your on-premises sources and they aren't connected to Azure yet, either follow the instructions in the Azure ExpressRoute documentation (recommended) or Azure VPN Gateway documentation to connect them to Azure.
- Azure ExpressRoute provides a dedicated, high-bandwidth connection between the on-premise network and Azure, bypassing the public internet.
- Azure VPN Gateway establishes a secure, encrypted VPN tunnel over the public internet between the on-premise network and Azure.
- If you are configuring your Azure Virtual Machine-based sources, ensure that they are accessible from the VNet where the Private Link Service Load Balancer will be running.
- A single Azure Private Link Service can support one or multiple sources at the same time with different ports mapped to corresponding data source IP addresses. You will need to enter these ports in the Fivetran connector setup form.
- Inside the VNet, create a Standard Load Balancer with a NIC-based backend pool that has access to your data sources. Configure a health probe and a load balancer rule with the ports that your connectors will use. Learn how in Azure's Create a load balancer guide.
- Create a Private Link Service associated with the load balancer that you created in step 1. Learn how in Azure's Create a private link service guide.
- Create one or more Virtual Machines and place them in the backend pool of the load balancer you created in step 1.
- Enable IP forwarding on each of the backend Virtual Machine network interfaces. Learn how to enable IP forwarding in Azure's Enable IP forwarding documentation.
- For security purposes, ensure that no public IP addresses are configured for the Virtual Machines. Private Link connections use only private IP addresses.
- Log in into each Load Balancer-backend Virtual Machine and run the script below. The script configures Network Address Translation (NAT), which forwards network packets from SLB-backend Virtual Machines to your data sources. The script below configures a single port forwarding, but feel free to add additional sets of iptables
PREROUTINGandPOSTROUTINGrules for additional ports:
#!/bin/bash

# This script configures Network Address Translation to forward incoming packets
# from the Azure Standard Load Balancer to IP-based destinations and route them
# back. In this script, "destination" means a data source server that Fivetran connects to.

# local port where Load Balancer sends traffic to
SOURCE_PORT=<local_port>
# destination server inside internal network
DESTINATION_IP=<destination_server_ip_address>
DESTINATION_PORT=<destination_server_port>

# enable IP forwarding on host
echo 1 > /proc/sys/net/ipv4/ip_forward

# clear existing iptables rules and chains
iptables -F
iptables -t nat -F
iptables -X

# change the packet recipient from local to destination socket (host & port)
iptables -t nat -A PREROUTING -p tcp --dport ${SOURCE_PORT} -j DNAT --to-destination ${DESTINATION_IP}:${DESTINATION_PORT}

# change the source IP address from the LB NAT IP address to the IP of this LB-backend host
iptables -t nat -A POSTROUTING -p tcp -d ${DESTINATION_IP} --dport ${DESTINATION_PORT} -j SNAT --to-source $(hostname -i)
For additional help, read Microsoft’s Private Link Service documentation or contact your Fivetran account manager.
Setup instructions for self-service Fivetran accounts Private Previewlink
The self-service functionality is not available by default. Contact your Fivetran account manager to enable this functionality for you.
With self-service, you can enable Azure Private Link on the following sources:
Find resource IDlink
- Verify that your source supports Private Endpoint. For more information, see Microsoft’s documentation.
- Log in to the Azure portal and then go to your Azure-hosted service.
- Select your workspace and then go to Properties.
- Make a note of the Resource ID. You will need it to create the Private Link connection.
Configure Private Link connectionlink
In your connector setup form, select Connect via Private Networking in the Connection Method drop-down menu.
Click + Configure a new PrivateLink connection.
Enter a Name for your Private Link connection.
In the PrivateLink Resource ID field, enter the resource ID you found in Step 1.
In the PrivateLink Subresource name drop-down menu, select the subresource corresponding to your resource type. The following table lists the subresources corresponding to each resource type:
Resource Type Subresource Azure SQL Database sqlServerAzure Cosmos DB sqlClick Create and save. Fivetran will raise a connection request in Azure.
NOTE: It might take up to 10 minutes for us to raise the connection request.
Accept connection requestlink
- Go to your Azure account.
- Go to Private Link Center > Pending connections.
- Select the connection request from Fivetran, then click Approve.
- In the pop-up window, confirm that you want to approve the connection request. Once Azure processes the request, a Connection created will appear in your source setup form.
- Update your username to
<username>@dbname.
Google Cloud Private Service Connect Betalink
Google Cloud Private Service Connect allows VPCs and Google-hosted or on-premises services to communicate with one another without exposing traffic to the public internet. Learn more in Google Cloud's Private Service Connect documentation.
Fivetran uses Private Service Connect to move your data securely between our system and your Google Cloud-hosted sources.
You can also use Private Service Connect with multiple destinations. See a complete list in our Supported destinations documentation.
As an extra layer of security, Fivetran enables TLS on your Private Service Connect connection by default. We recommend that you keep TLS enabled unless you know it is safe to forgo it. To disable TLS, set the Require TLS when using Private Service Connect toggle to OFF.
IMPORTANT: If you set the Require TLS when using Private Service Connect toggle to OFF, Fivetran first attempts to connect over TLS. If this fails, Fivetran automatically retries the connection in clear text. You are responsible for configuring this option according to your corporate security policies.
Prerequisiteslink
To set up Google Cloud Private Service Connect, you need an GCP-hosted source* and Fivetran instance running in the same supported regions.
* Your source must be one of our supported databases. See a complete list in our Databases documentation.
Postrequisiteslink
To use Google Cloud Private Service Connect, you must select GCP as a Cloud service provider in the Finish Fivetran configuration step of the relevant destination setup guide.
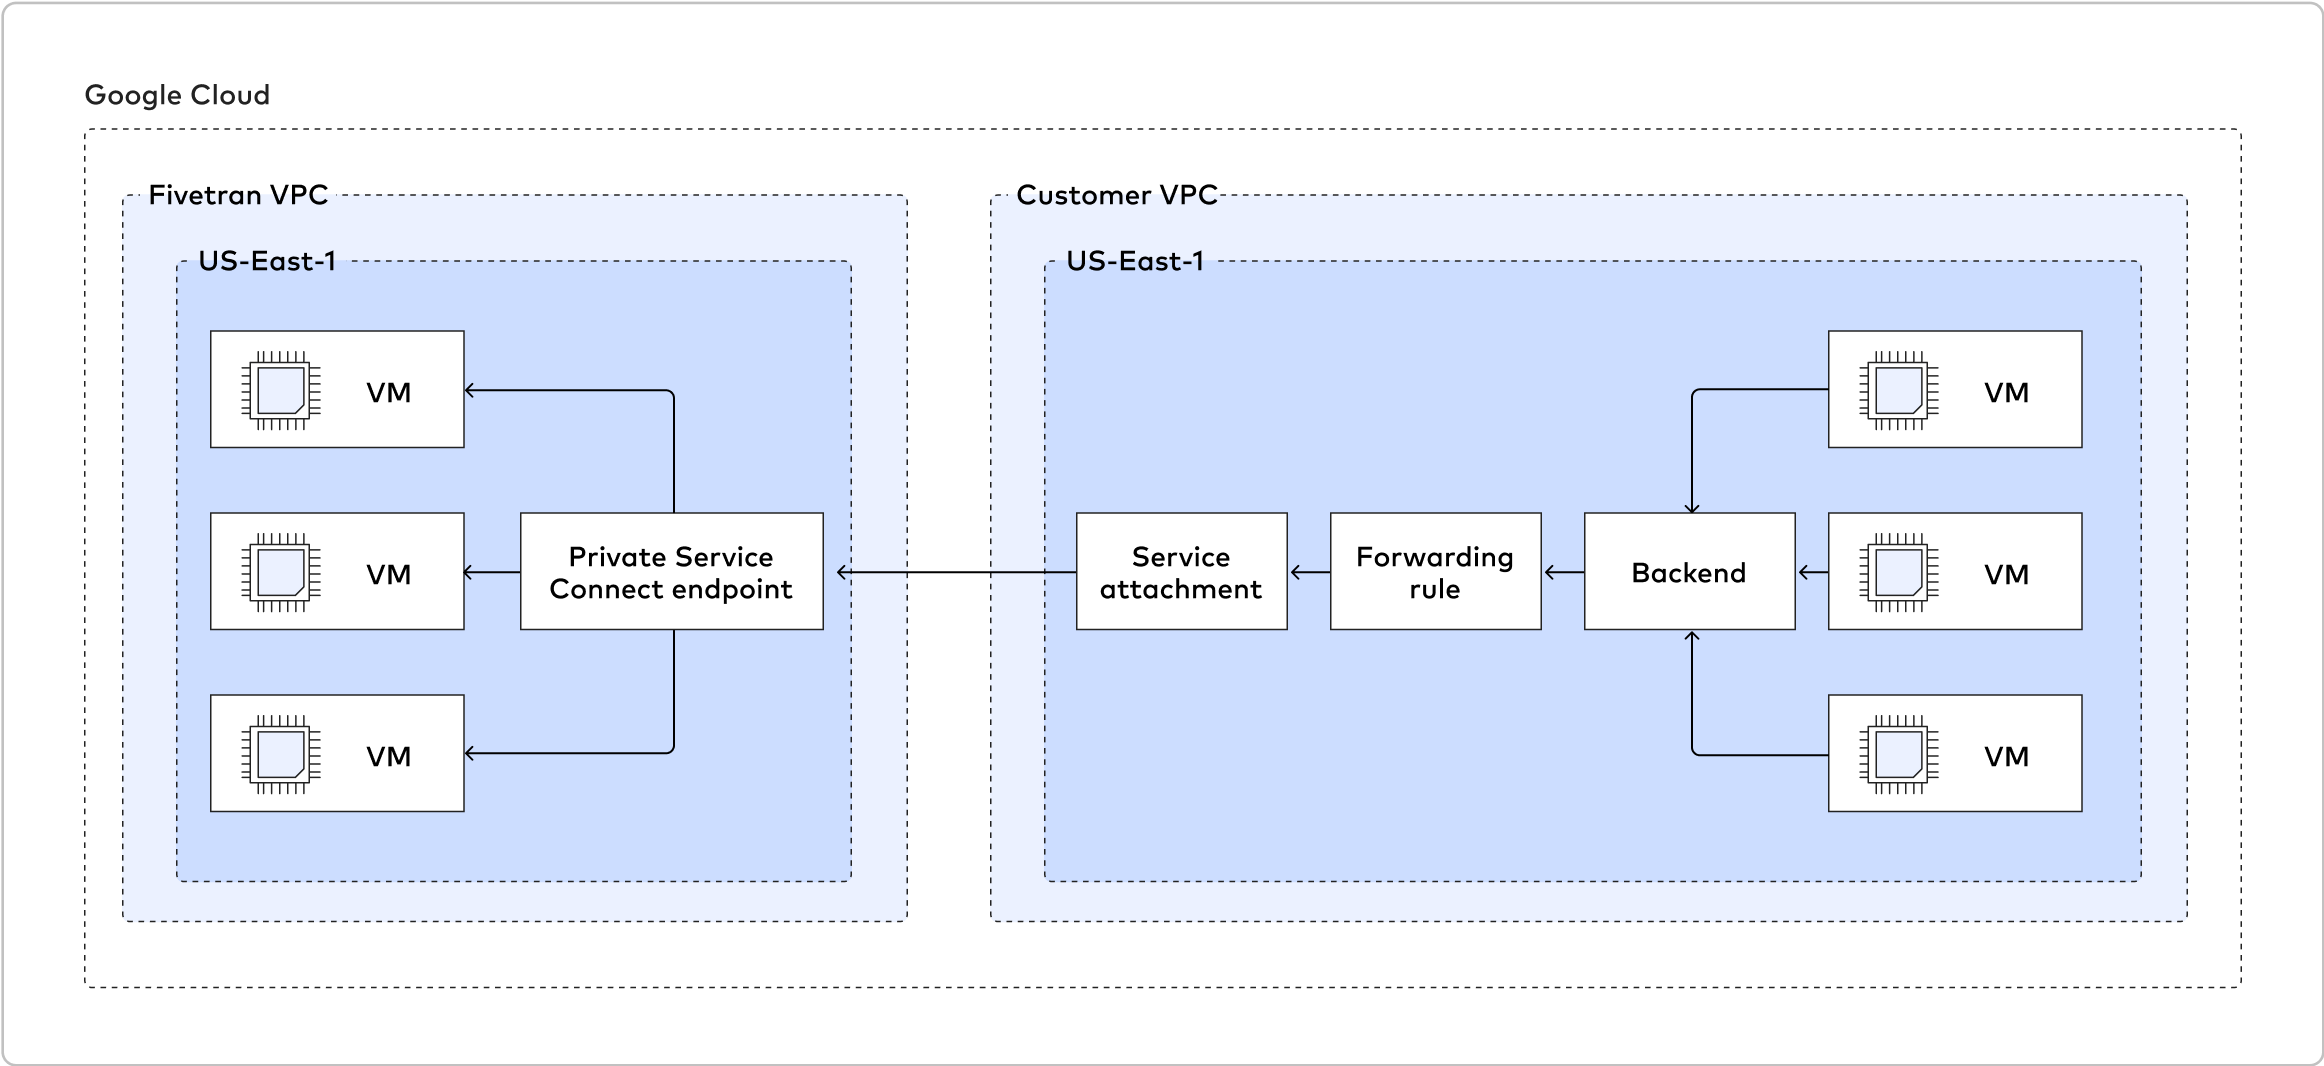
Setup instructions for Google Cloud Private Service Connectlink
We support connecting to any GCP-hosted resource as long as it's supported by Fivetran and exposed through a Private Service Connect producer.
In the following example, we publish a service that runs on a specific instance. However, there are several other ways to expose your service. To learn more, ask your administrators for help or read Google's Publish managed services using Private Service Connect documentation.
You'll need the following in Inputs for commands used in steps below:
<NETWORK>- the VPC network in which the exposed resource exists<SUBNET>- the subnetwork where the exposed resource exists<ILB_SUBNET>- the subnetwork used for allocation of internal load balancers addresses (forwarding rules)<PSC_NAT_SUBNET>- the subnetwork used for allocation IPs for each customer endpoint address<REGION>- the region where the exposed resource exists<ZONE>- the zone where the exposed resource exists<VM_NAME>- the VM on which the exposed resource runs<VM_IP>- the private IP on which the exposed resource is available<RESOURCE_PORT>- the port on which the exposed resource is available in a VM<NETWORK_ENDPOINT_GROUP>- the network endpoint group<HEALTH_CHECKS>- the port health checks<BACKEND_SERVICES>- the backend services<FORWARDING_RULE>- the forwarding rule<SERVICE_ATTACHMENT>- the service attachment
IMPORTANT: If you already have a regional internal load balancer for your resource, proceed to step 8 of this section.
Create a network endpoint group.
gcloud compute network-endpoint-groups create --network <NETWORK> --subnet <SUBNET> \
 --network-endpoint-type gce-vm-ip --zone <ZONE> <NETWORK_ENDPOINT_GROUP>
Add an instance with the running resource as an endpoint to the network endpoint group.
gcloud compute network-endpoint-groups update --zone <ZONE> <NETWORK_ENDPOINT_GROUP> \
 --add-endpoint='instance=<VM_NAME>
Create health checks to automatically enable and disable the instance. In this example, we use port checks.
gcloud compute health-checks create tcp --region <REGION> --check-interval=60s
 --port=<RESOURCE_PORT> <HEALTH_CHECKS>
Create backend services.
gcloud compute backend-services create --region=<REGION> --health-checks=<HEALTH_CHECKS> \
    --health-checks-region=<REGION> --load-balancing-scheme=INTERNAL <BACKEND_SERVICES>
Assign the network endpoint group you created as a backend.
gcloud compute backend-services add-backend <BACKEND_SERVICES> --network-endpoint-group=<NETWORK_ENDPOINT_GROUP> \
    --network-endpoint-group-zone=<ZONE>
(Optional) Allocate a subnetwork dedicated to forwarding rules.
cloud compute networks subnets create --network <_NETWORK_> --region <REGION>
    --range=10.0.X.0/24 <ILB_SUBNET>
Create a forwarding rule for the internal load balancer. It points to
<BACKEND_SERVICES>and allocates the IP address from<ILB_SUBNET>in<NETWORK>.gcloud compute forwarding-rules create --backend-service=<BACKEND_SERVICES> --region <REGION> \ --load-balancing-scheme=INTERNAL --ports=ALL --subnet=<ILB_SUBNET> --network=<NETWORK> <FORWARDING_RULE>Allocate a NAT subnetwork dedicated to creating endpoints for each connected customer.
cloud compute networks subnets create --network <NETWORK> --region <REGION> --range=10.0.X.0/24  \
 --purpose=PRIVATE_SERVICE_CONNECT <_PSC_NAT_SUBNET_>
Open traffic from the ILB and NAT networks to a VM or port using the corresponding ranges specified in previous steps.
gcloud compute firewall-rules create --direction=INGRESS --priority=1000 --network=<_NETWORK_> --action=ALLOW \
    --rules=tcp:_RESOURCE_PORT_ --source-ranges=10.0.X.0/24 --destination-ranges=<_VM_IP_>/32 db-demo-allow-psc-nats

gcloud compute firewall-rules create --direction=INGRESS --priority=1000 --network=<_NETWORK_> --action=ALLOW \
    --rules=tcp:_RESOURCE_PORT_ --source-ranges=10.0.X.0/24 --destination-ranges=<_VM_IP_>/32 db-demo-allow-ilb-nats
Create a service attachment and point it to the internal load balancer you created above (
FORWARDING_RULE) with manual accepting mode.gcloud compute service-attachments create --producer-forwarding-rule=<FORWARDING_RULE> --connection-preference=ACCEPT_MANUAL \ --region=<REGION> --description='Producer for my resource in region' --nat-subnets <_PSC_NAT_SUBNET_> <SERVICE_ATTACHMENT>Contact Fivetran to set up a Private Service Connect link on the Fivetran side. Fivetran will provide a
PSC_CONNECTION_ID, which allows you to identify which connections come from Fivetran before you approve them.
NOTE:
- If you want to auto-approve the Fivetran project, use the
--consumer-accept-list=fivetran_donkeys=2parameter for gcloud.- The instructions above use network endpoint groups, since it's easy to attach them to existing VMs. However, if a VM is already a part of the instance groups, you can use it directly as a backend services target.
- You can test a newly-created producer in another VPC by allocating an IP and creating a forwarding rule, as described in Google Cloud's Configure Private Service Connect Services documentation.
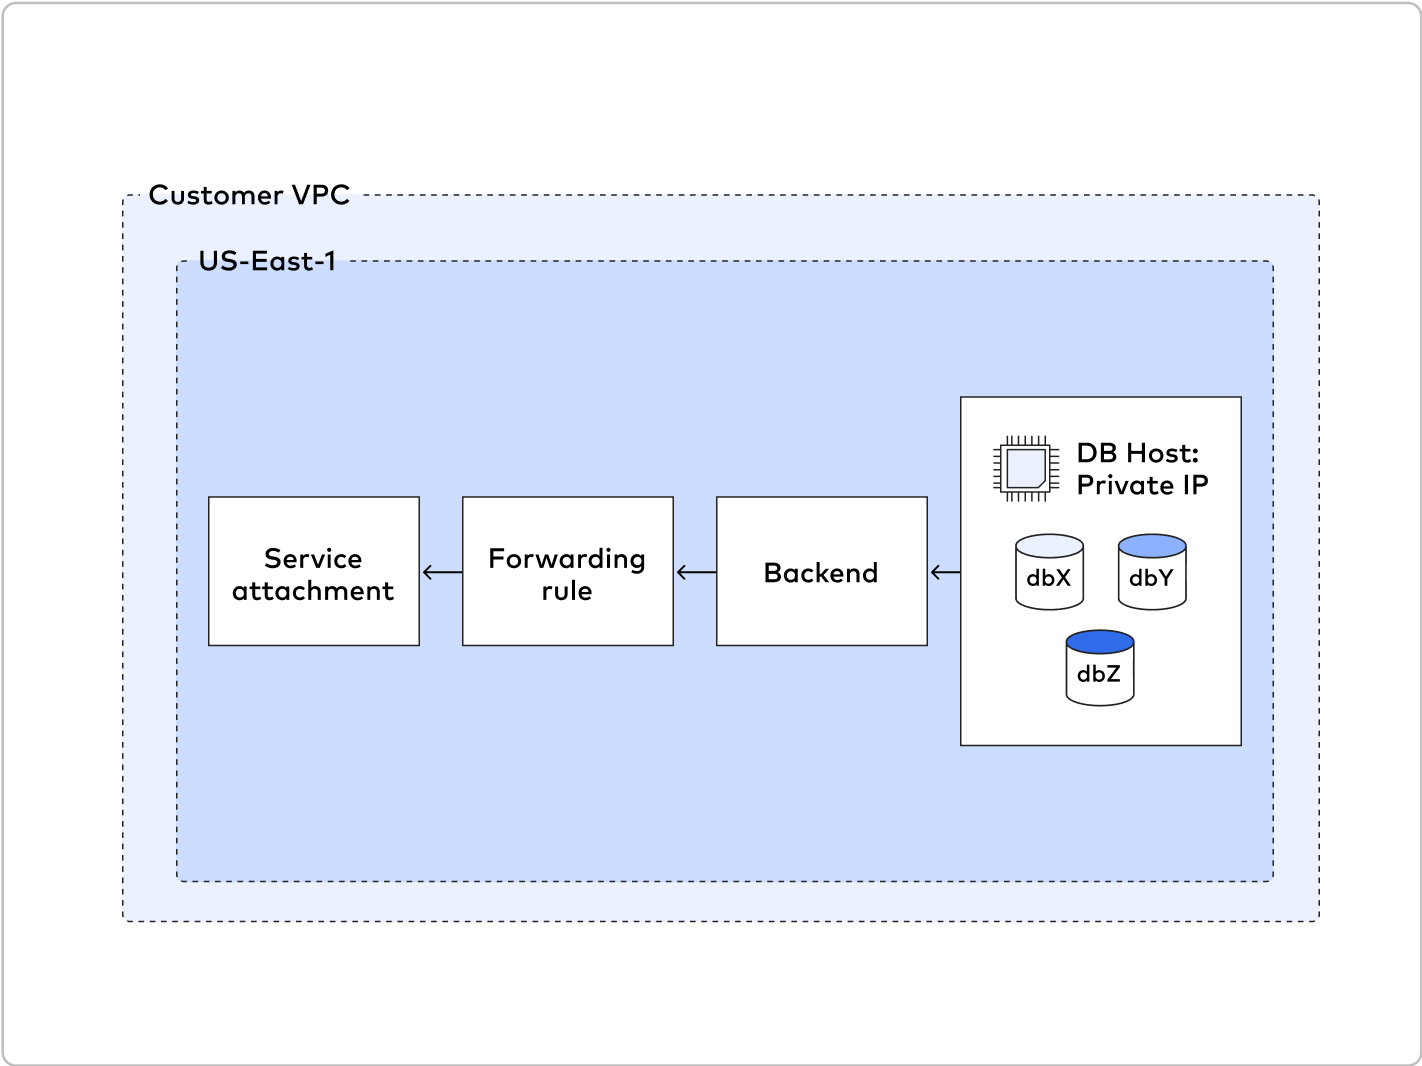
Setup instructions for CloudSQL resources exposed using private service accesslink
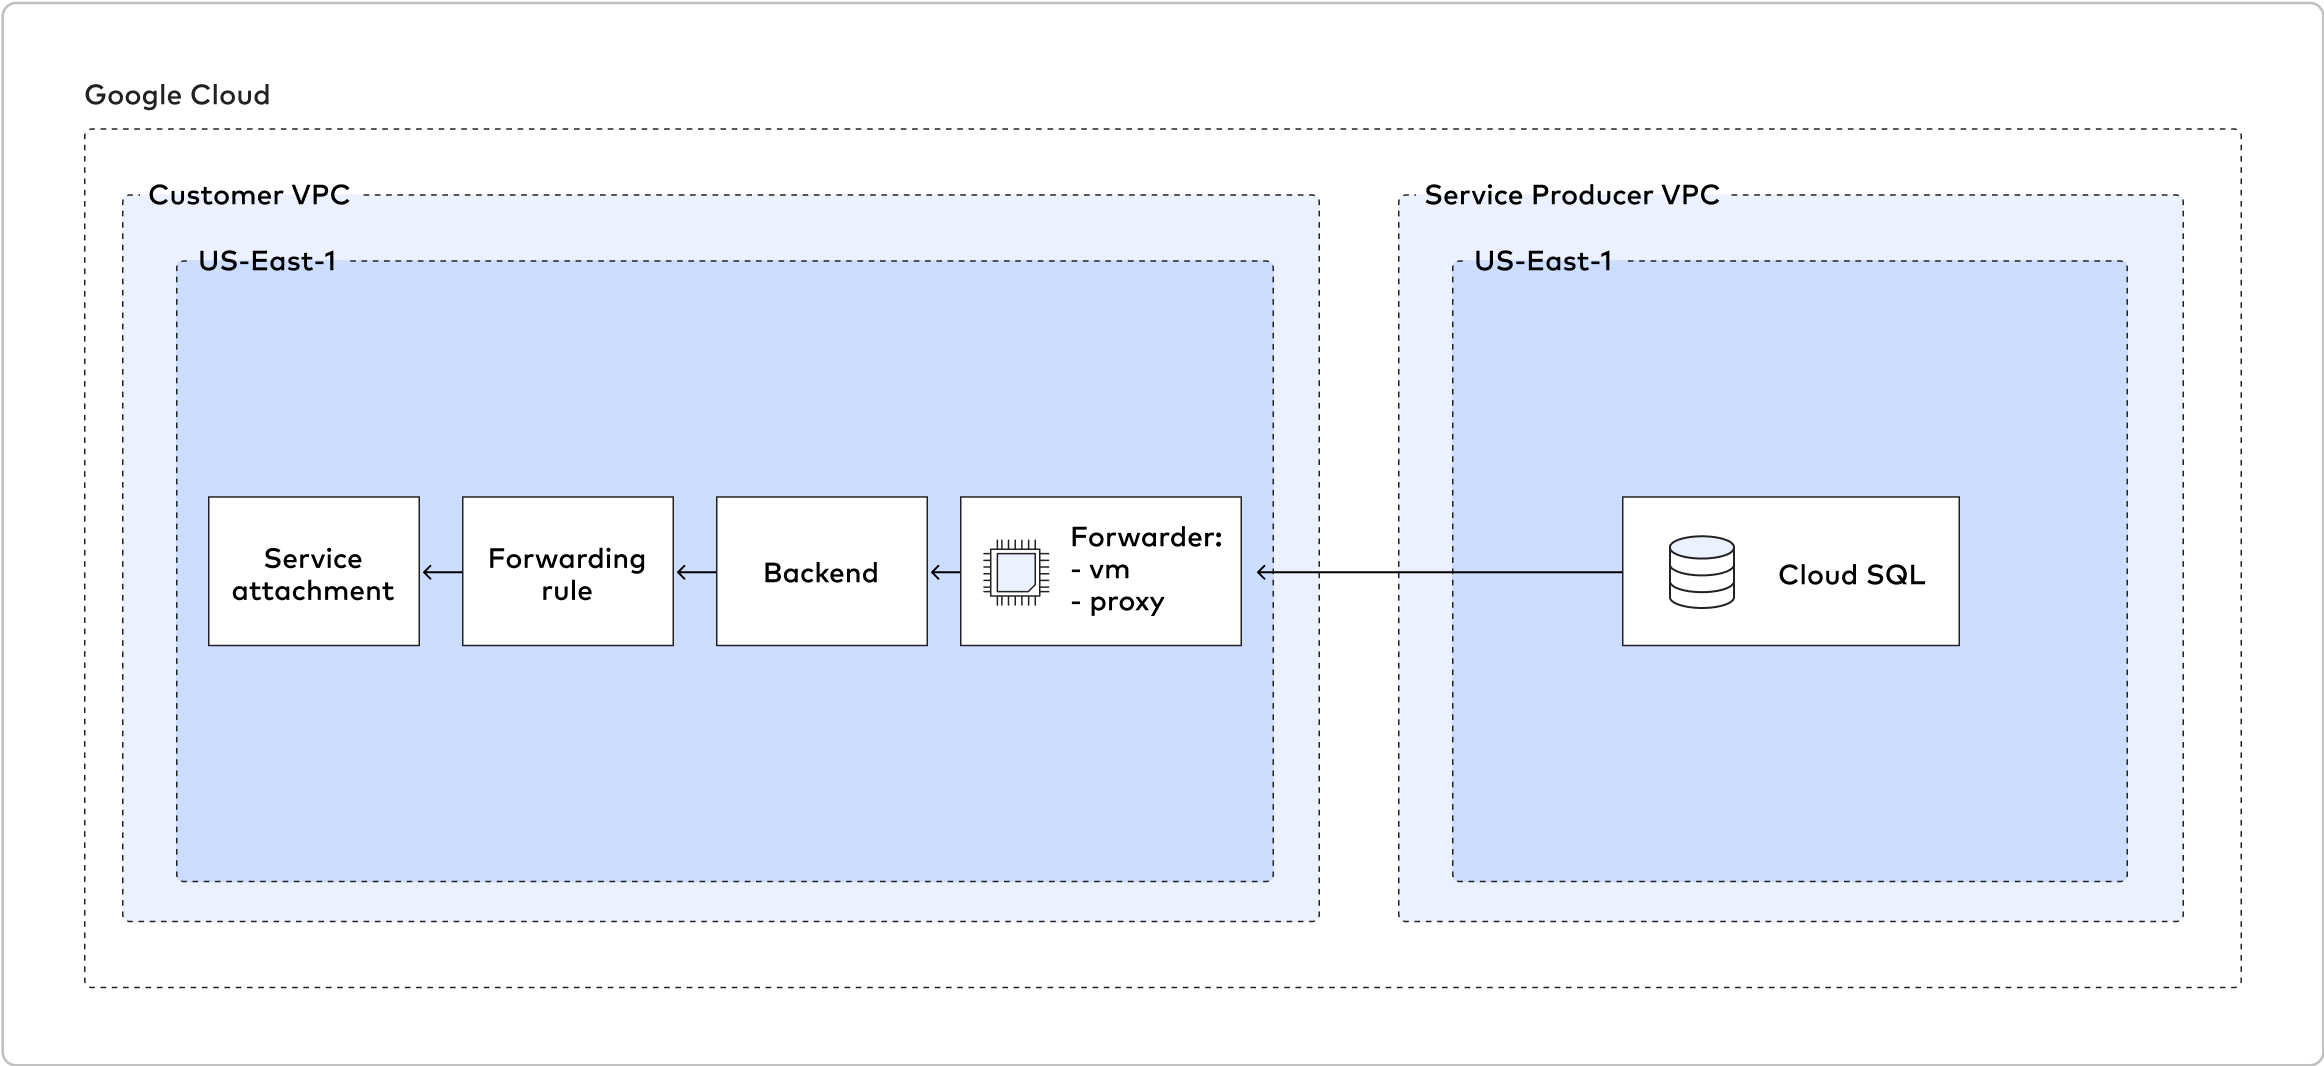
When setting up access for CloudSQL databases using private IP, you need an additional VM to act as a forwarding proxy. You can use your solution like HAProxy or iptables.
NOTE: If you use the following vm script, make sure to persist iptables rules and consider using instance groups instead of standalone VMs.
#!/bin/bash

# This script configures Network Address Translation to forward incoming packets
# from the Load Balancer to IP-based destinations and route them
# back. In this script, "destination" means a data source server that Fivetran connects to.

# local port where the Load Balancer sends traffic to
SOURCE_PORT=<local_port>
# destination server inside internal network
DESTINATION_IP=<destination_server_ip_address>
DESTINATION_PORT=<destination_server_port>

# enable IP forwarding on host
echo 1 > /proc/sys/net/ipv4/ip_forward

# clear existing iptables rules and chains
iptables -F
iptables -t nat -F
iptables -X

# change the packet recipient from local to destination socket (host & port)
iptables -t nat -A PREROUTING -p tcp --dport ${SOURCE_PORT} -j DNAT --to-destination ${DESTINATION_IP}:${DESTINATION_PORT}

# change the source IP address from the LB NAT IP address to the IP of this LB-backend host
iptables -t nat -A POSTROUTING -p tcp -d ${DESTINATION_IP} --dport ${DESTINATION_PORT} -j SNAT --to-source $(hostname -i)
Once you have the VMs properly set up, follow the standard setup instructions for Google Cloud Private Service Connect.
Setup instructions for on-premises sourcelink
To connect your on-premises source to Fivetran, you must first use Dedicated Interconnect to connect a VPC to your on-premises source, then use Private Service Connect to connect that VPC to Fivetran.
Follow the instructions in Google's Dedicated Interconnect provisioning overview to set up Dedicated Interconnect and use it to connect a VPC to your on-premises source.
When setting up access for on-premises databases using private IP, you need an additional VM to act as a forwarding proxy. You can use your solution like HAProxy or iptables.
NOTE: If you use the following vm script, make sure to persist iptables rules and consider using instance groups instead of standalone VMs.
#!/bin/bash

# This script configures Network Address Translation to forward incoming packets
# from the Load Balancer to IP-based destinations and route them
# back. In this script, "destination" means a data source server that Fivetran connects to.

# local port where the Load Balancer sends traffic to
SOURCE_PORT=<local_port>
# destination server inside internal network
DESTINATION_IP=<destination_server_ip_address>
DESTINATION_PORT=<destination_server_port>

# enable IP forwarding on host
echo 1 > /proc/sys/net/ipv4/ip_forward

# clear existing iptables rules and chains
iptables -F
iptables -t nat -F
iptables -X

# change the packet recipient from local to destination socket (host & port)
iptables -t nat -A PREROUTING -p tcp --dport ${SOURCE_PORT} -j DNAT --to-destination ${DESTINATION_IP}:${DESTINATION_PORT}

# change the source IP address from the LB NAT IP address to the IP of this LB-backend host
iptables -t nat -A POSTROUTING -p tcp -d ${DESTINATION_IP} --dport ${DESTINATION_PORT} -j SNAT --to-source $(hostname -i)
Once you have the VMs properly set up, follow the standard setup instructions for Google Cloud Private Service Connect.
VPN Tunnellink
A VPN (Virtual Private Network) tunnel is used primarily to establish a secure connection between your device and a remote server. It's often used to access the internet securely, hide your IP address, and encrypt your online activities.
A VPN can be used to secure all internet traffic from your device, meaning everything you do online goes through the VPN tunnel.
You need to subscribe to a VPN service and install their software or app. Once connected, all your internet traffic is routed through their servers.
To connect to Fivetran using a VPN tunnel, contact Fivetran's Technical Sales team for help setting up the tunnel.
NOTE: Fivetran connects from a Dynamic port to the one you specified in the setup form. When creating your inbound firewall rules for the VPN Tunnel, you have to specify only the destination port.
Proxy Agentlink
The Fivetran Proxy Agent replaces the need for other complicated networking options. Installed in a customer's network, it creates an outbound network connection to Fivetran Managed SaaS. This allows for secure communication between Fivetran processes and your database without opening an inbound port in your firewall and/or other access control systems. The Proxy Agent creates and maintains an outbound WebSocket connection to the Proxy Server in Fivetran’s environment using TLS 1.3 and communicates with the server over port 443.
You can use Proxy Agent with the following connectors:
- HVA Db2 for i
- HVA Oracle
- HVA SAP Business One
- HVA SAP ECC on Db2 for i
- HVA SAP ECC on HANA
- HVA SAP ECC on Oracle
- HVA SAP ECC on SQL Server
- HVA SAP S/4 HANA
- HVA SQL Server
- MariaDB
- MySQL
- Oracle
- PostgreSQL
- SQL Server
For the supported set of High-Volume Agent connectors, this connection method requires the installation of the Proxy Agent on the host with HVA or one that has access to HVA. See the sample system architecture with Proxy Agent and HVA below.
NOTE: One installation of the Proxy Agent can support multiple connections. We recommend a maximum of 10 connectors per Proxy Agent.
IMPORTANT: A Proxy Agent can only support connections from a single cloud region. For example, a Proxy Agent in Azure East US 2 could not service connections in GCP US East 4.

NOTE: The Capture Agent in this diagram represents the High-Volume Agent. For non-HVA connectors, the Source connects directly to the Proxy Agent.
Follow the instructions below to configure a connection through the Proxy Agent.
Generate Proxy Agent settingslink
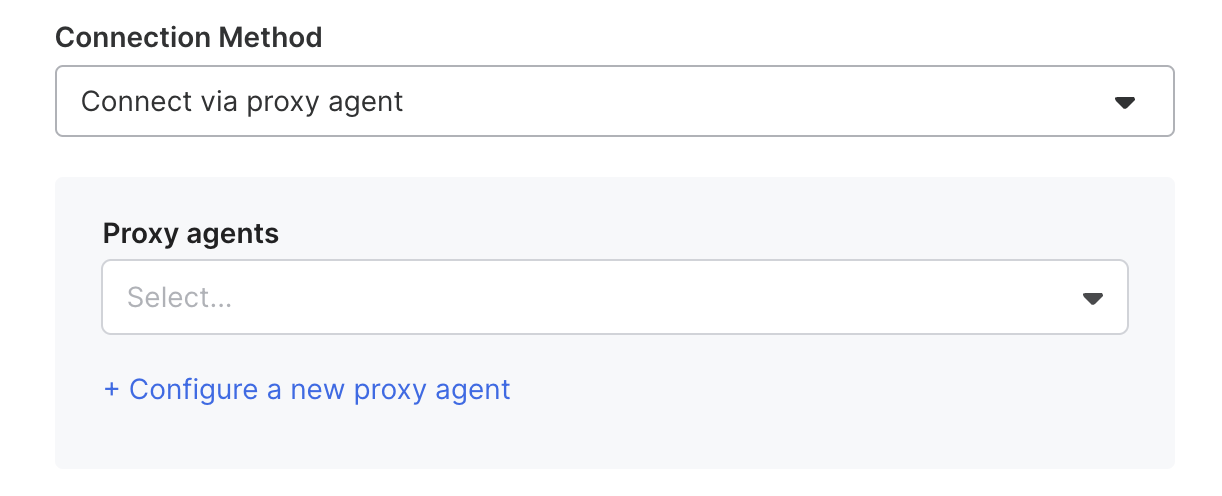
In your connector setup form, do the following:
In the Connection Method drop-down menu, select Connect via proxy agent.
Click Configure a new proxy agent.
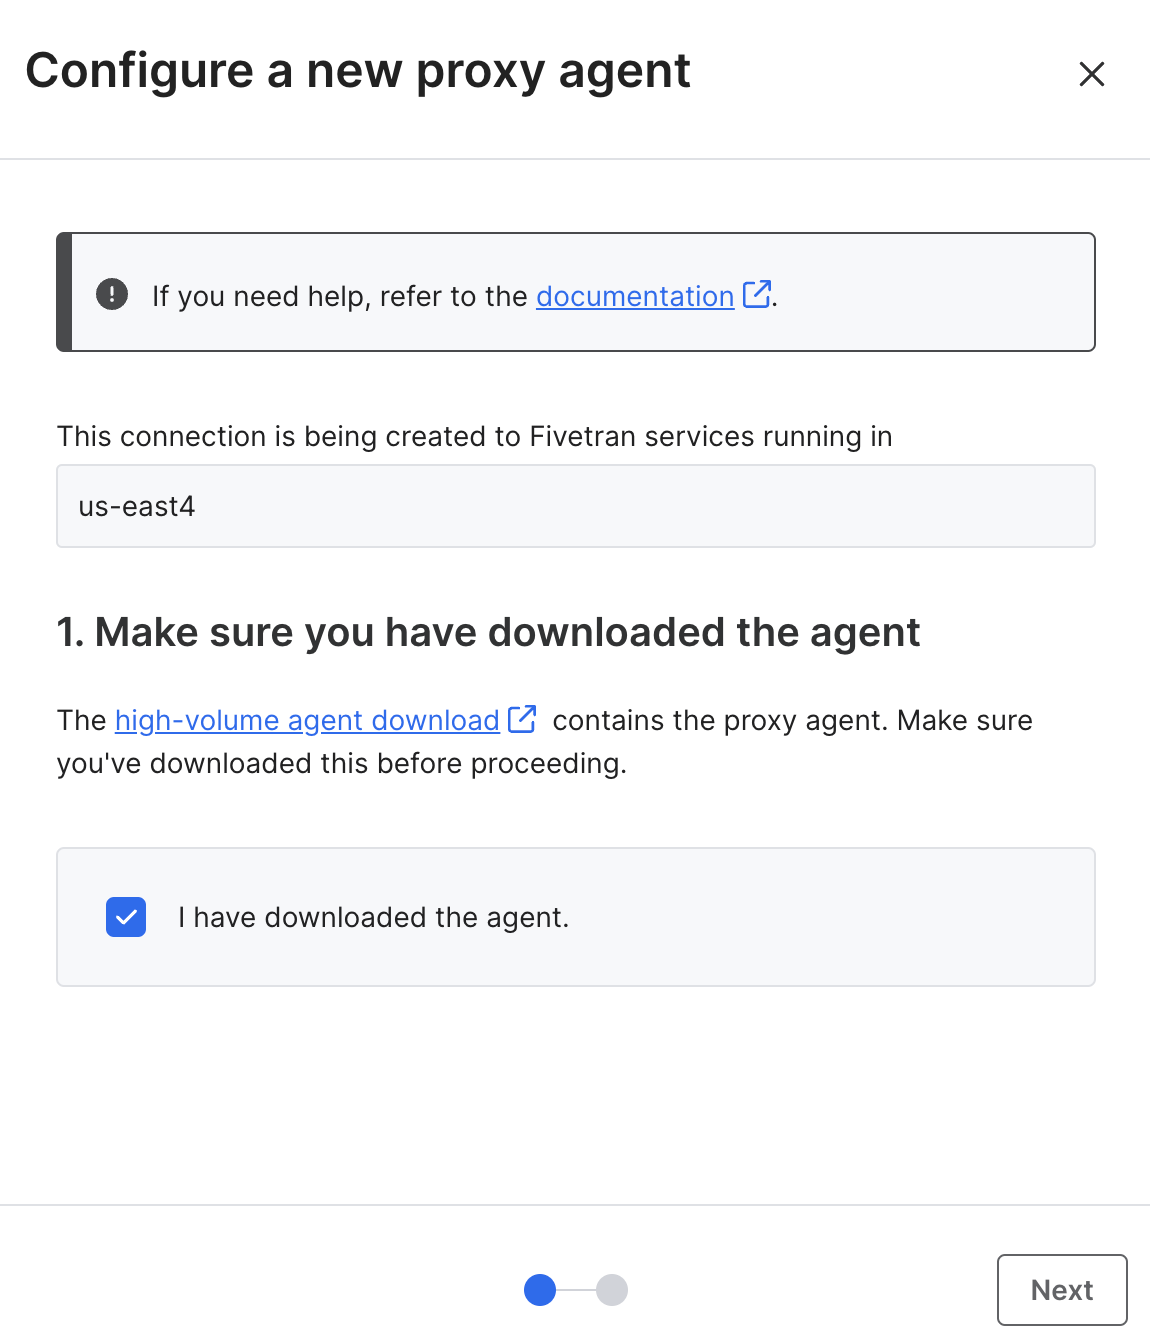
Proceed to the Configure a new proxy agent dialog.
Download High-Volume Agent if you have not already. Then, select the I've downloaded the agent checkbox and click Next.
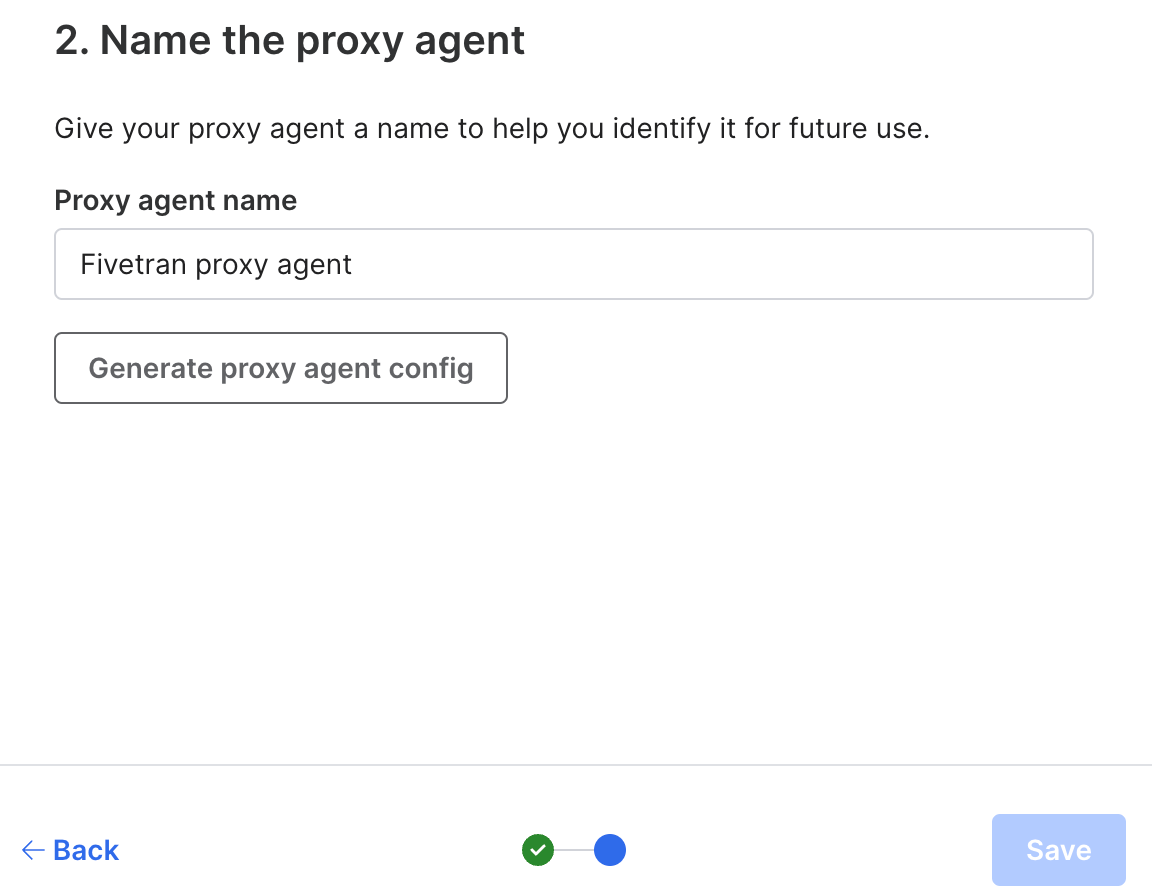
Enter a name for your proxy agent and click Generate proxy agent config to generate a proxy agent configuration file.
Download the generated proxy agent configuration file (
config.json) and save it in a location that is easy to access. You will need this file for the installation of the proxy agent.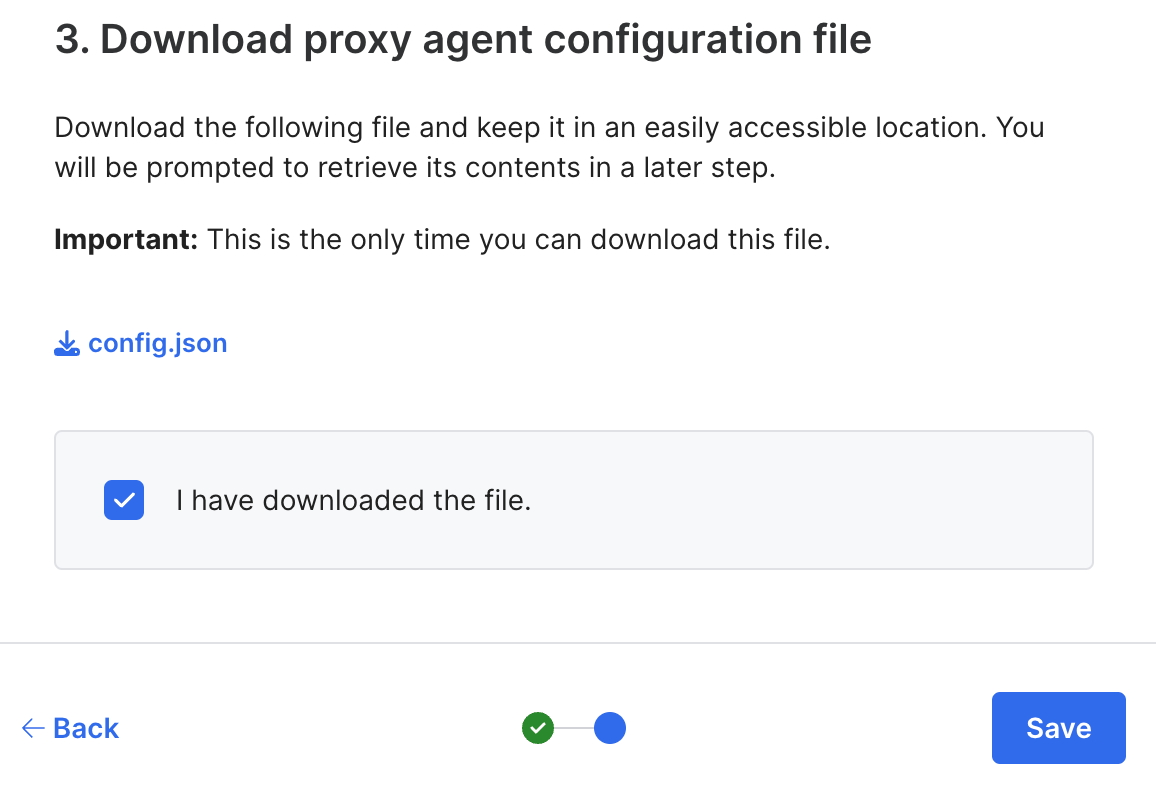
Select the I have downloaded the file checkbox and click Save to finalize the proxy agent configuration.
Install Proxy Agentlink
Follow the Proxy Agent installation instructions for your operating system.
Install Proxy Agent on Windows using EXE filelink
Expand for instructions
When installing the Proxy Agent as a service, the user who installs the Proxy Agent must have permission to manage Windows services. We recommend that you install the Proxy Agent as an Administrator user.
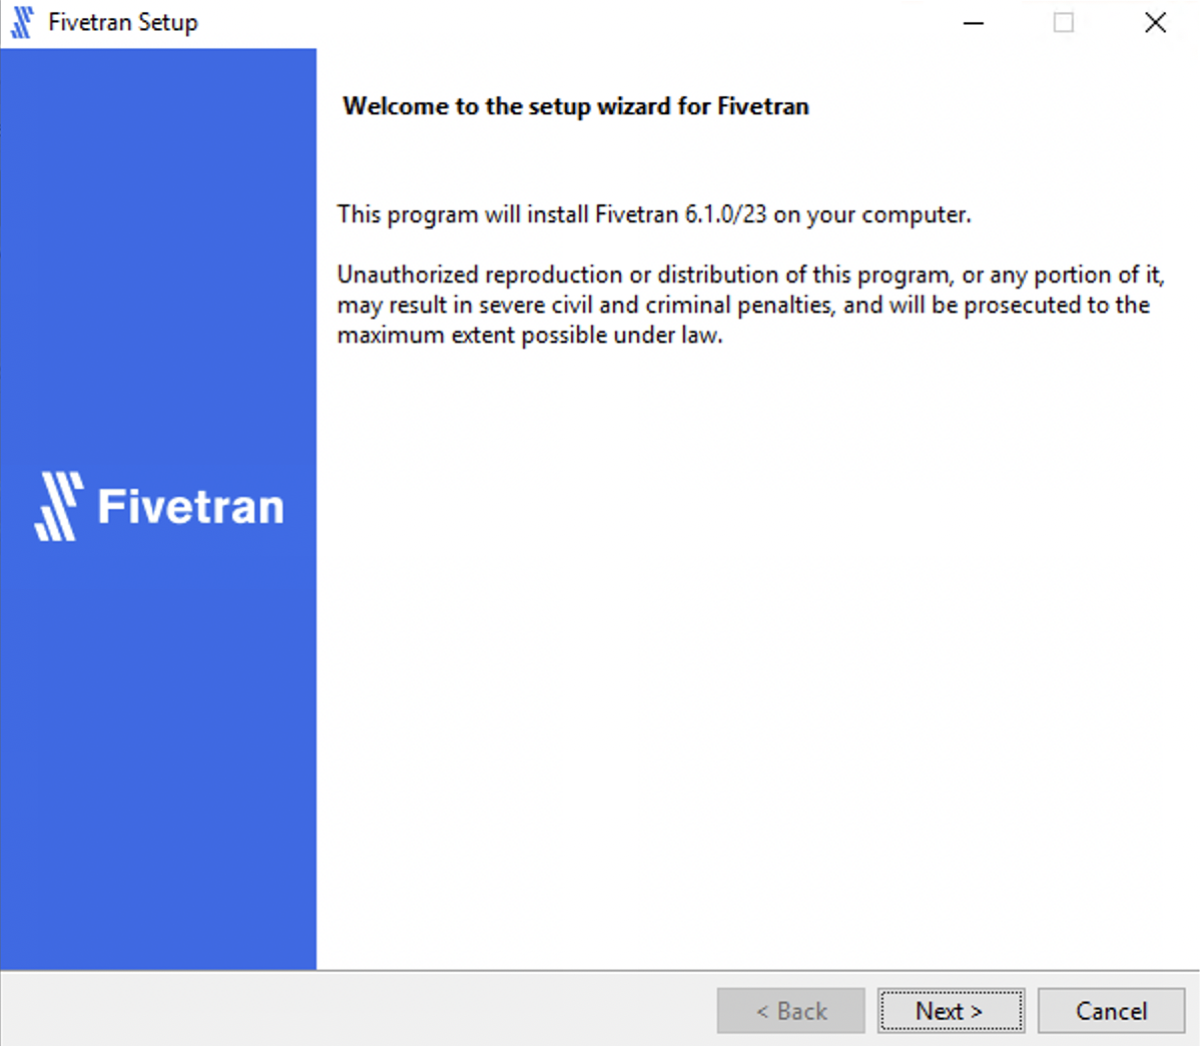
Run the downloaded
.exefile (e.g.fivetran-6.1.0_23-hub_and_agent-windows-x64-64bit_ga_patch-setup.exe).In the installation wizard dialog, click Next.
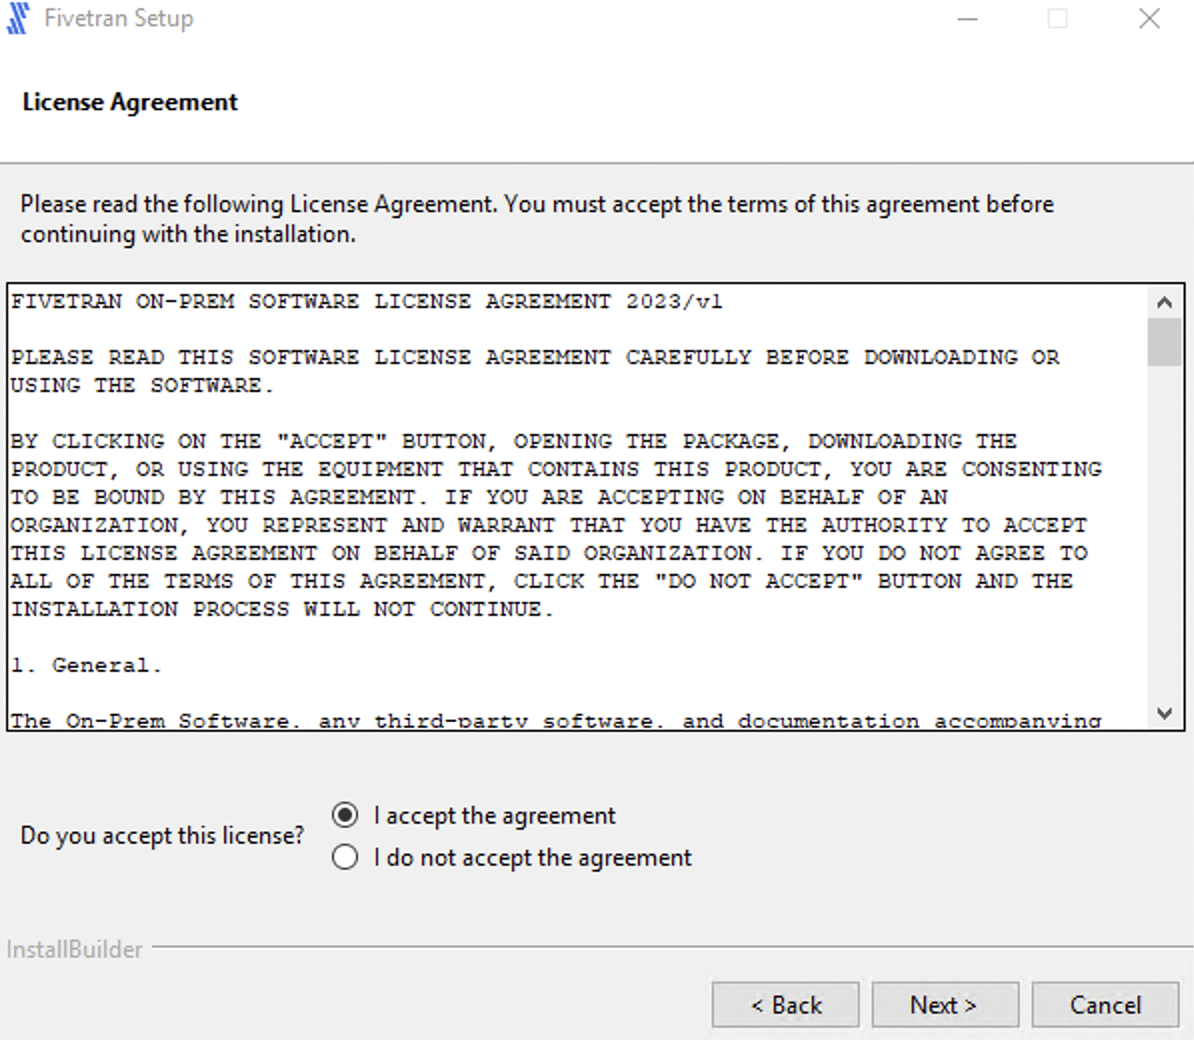
Read the License Agreement, select I accept the agreement and click Next.
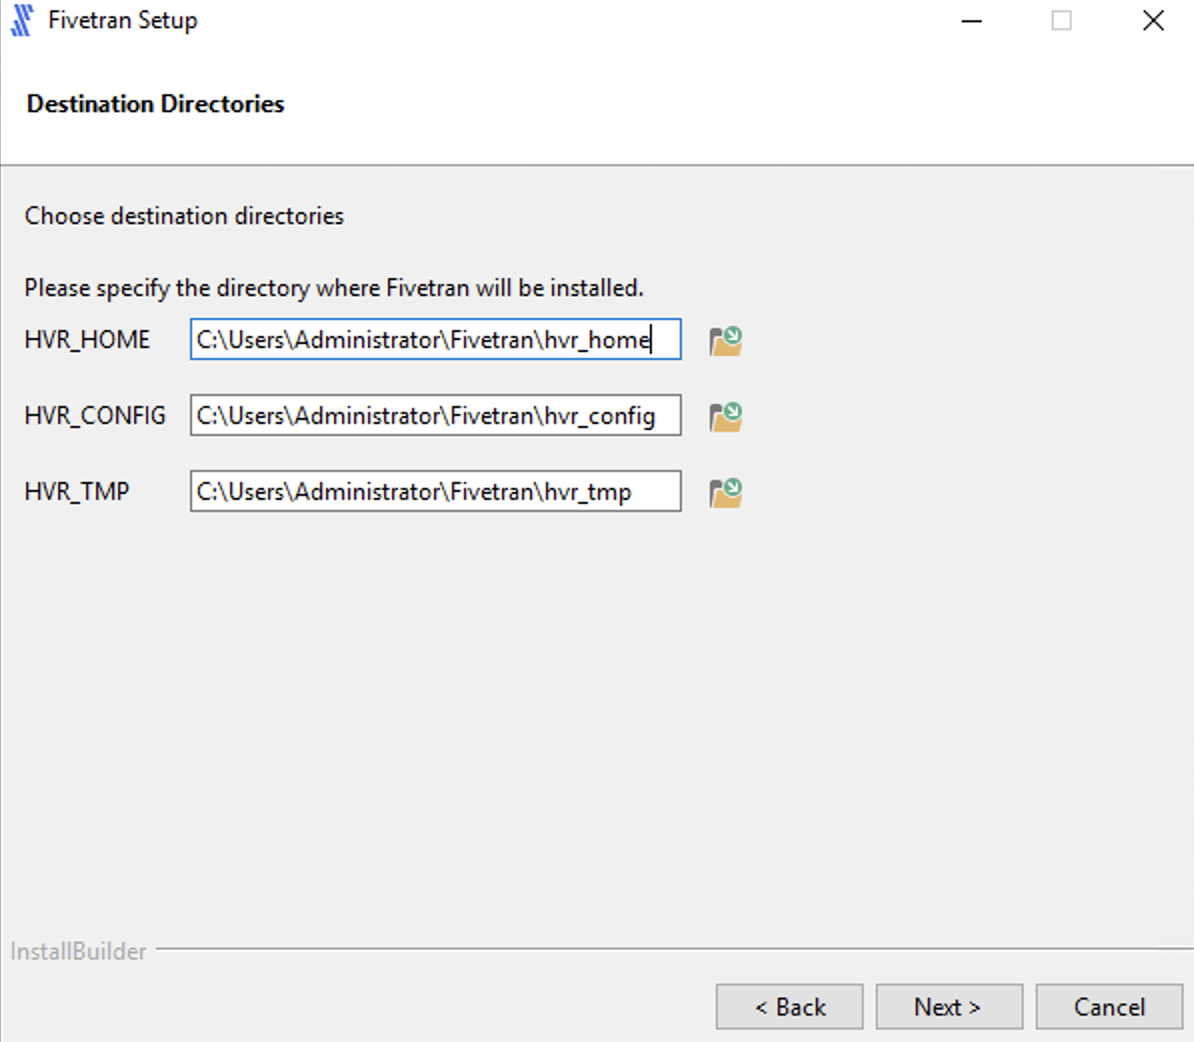
Specify the installation directories and click Next.
NOTE: If this is a first-time installation, the High-Volume Agent (HVA) and Proxy Agent can be installed in the same directory. Otherwise, you can either install the Proxy Agent in a different directory than the HVA or manually install the Proxy Agent using a ZIP file.
Specify the name for the program folder and click Next.

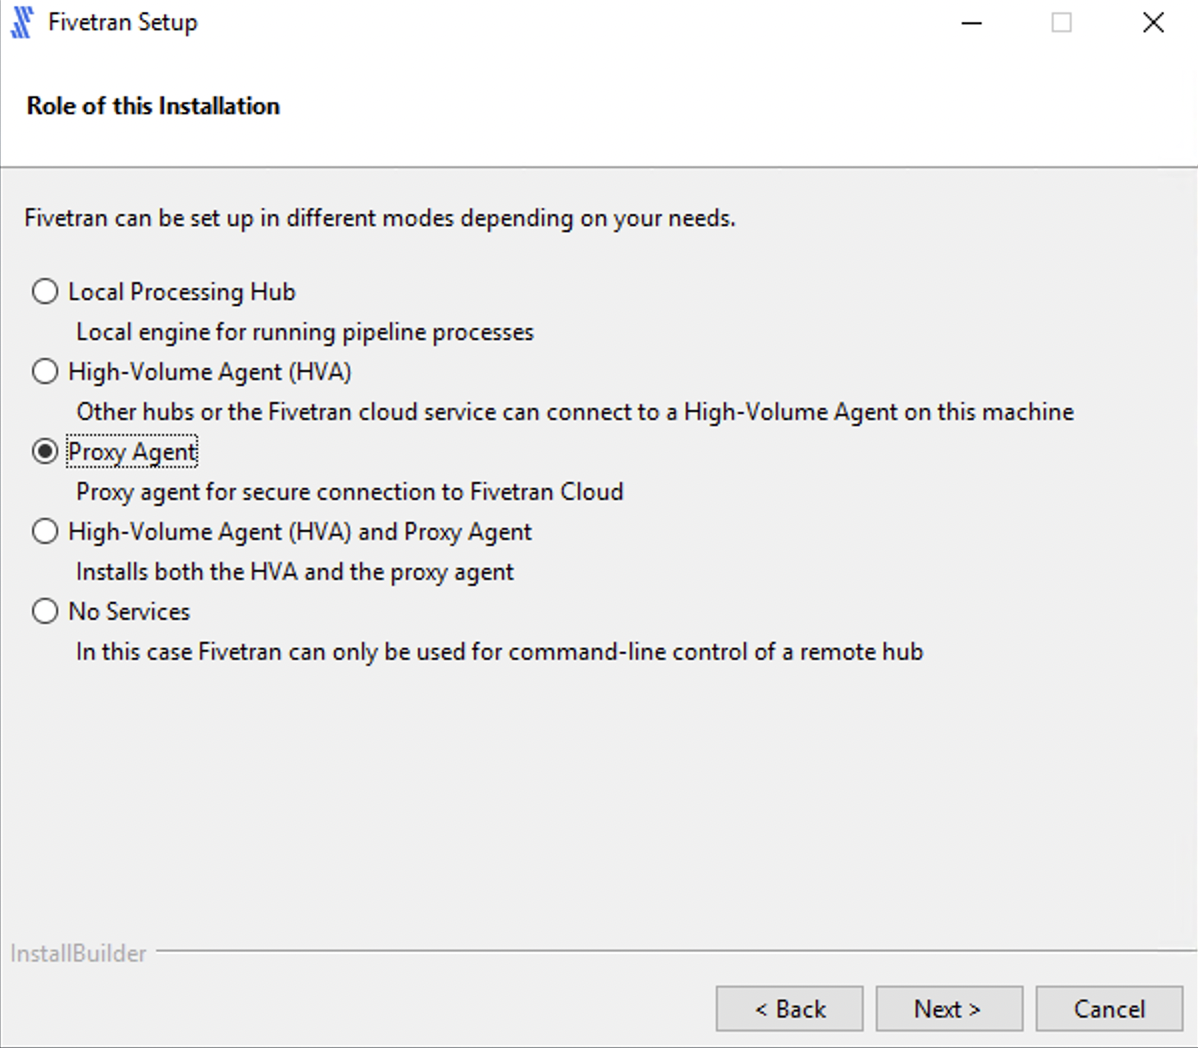
Select the role of the installation:
- Proxy Agent to install only the Proxy Agent or
- High-Volume Agent (HVA) and Proxy Agent to install both the Proxy Agent and HVA.
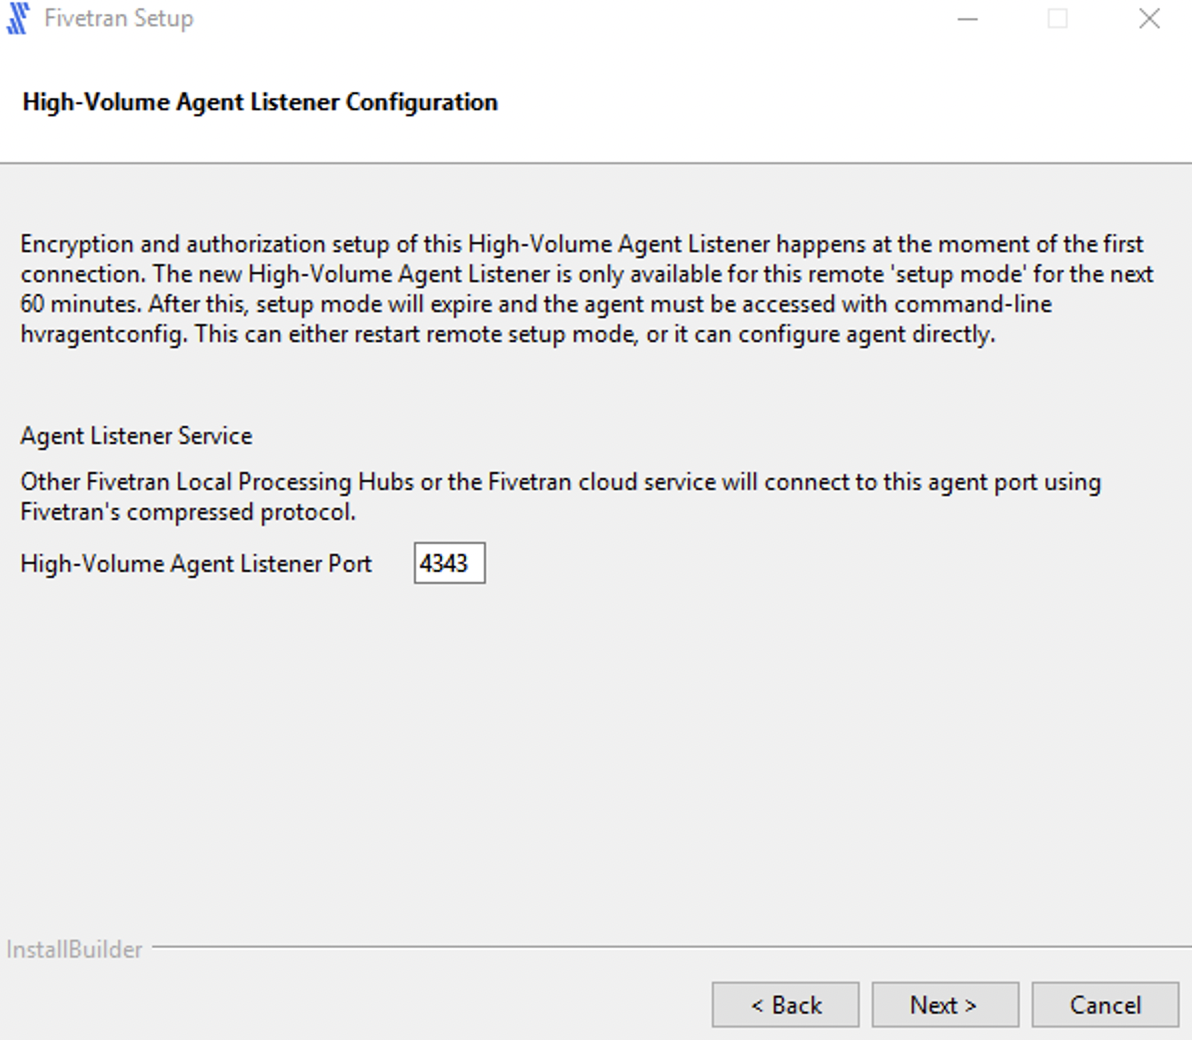
If you selected High-Volume Agent (HVA) and Proxy Agent in the previous step, enter value for the High-Volume Agent Listener Port and click Next.
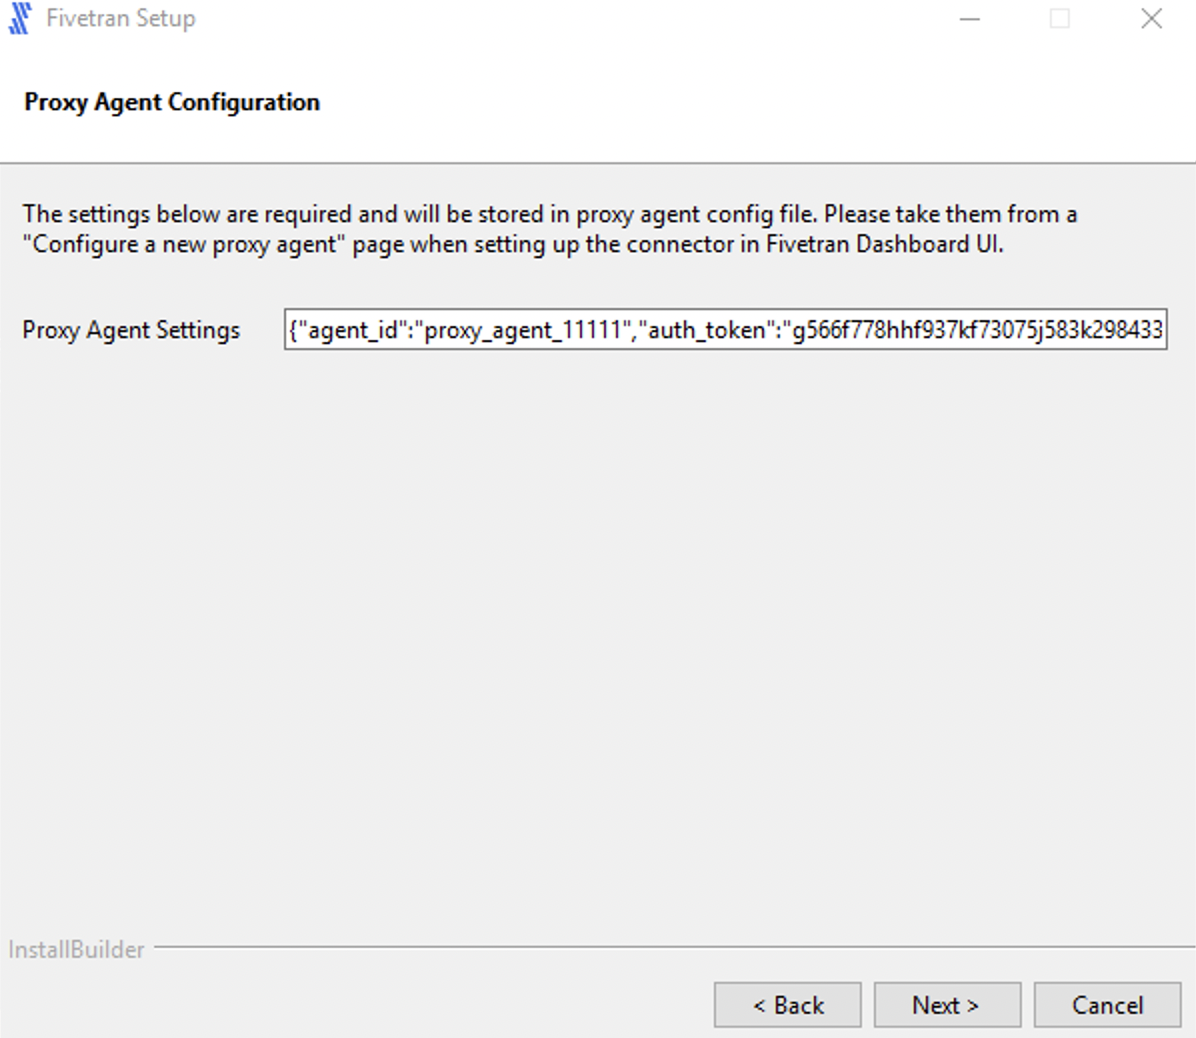
Paste the Proxy Agent settings generated in step 6 and click Next.
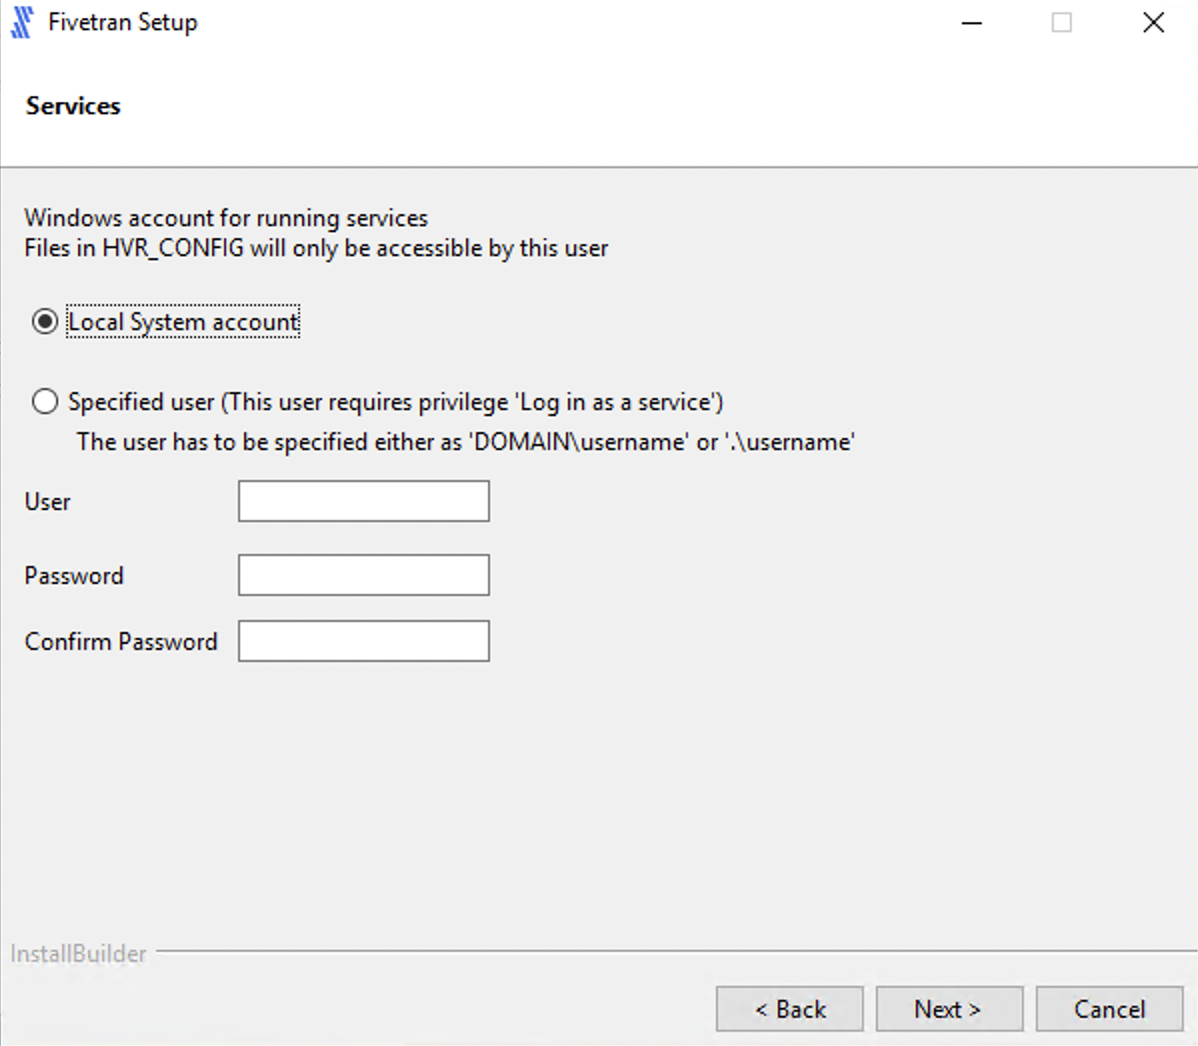
Select the user account for running the Proxy Agent service.
If Specified user is selected, enter values for User, Password, Confirm Password and click Next.

If Local System account is selected, click Next.
Select Add HVR_HOME, HVR_CONFIG, and HVR_TMP (if required) and click Next. If you are only installing the Proxy Agent, we recommend that you skip this step.
This is to set the environment variables
HVR_HOME,HVR_CONFIG, andHVR_TMPin your operating system. These variables point to the corresponding installation directories created in step 4 above.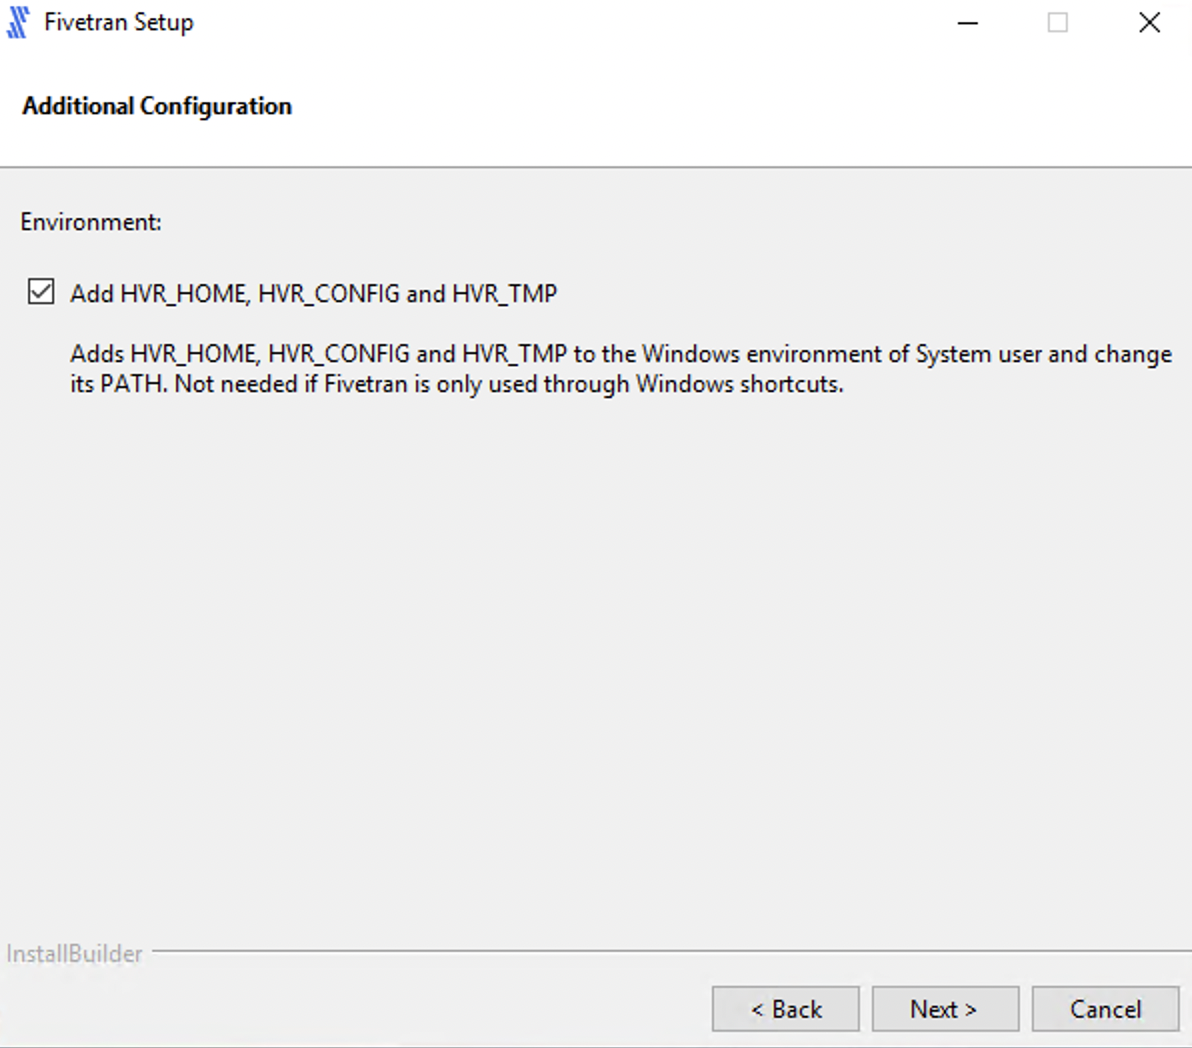
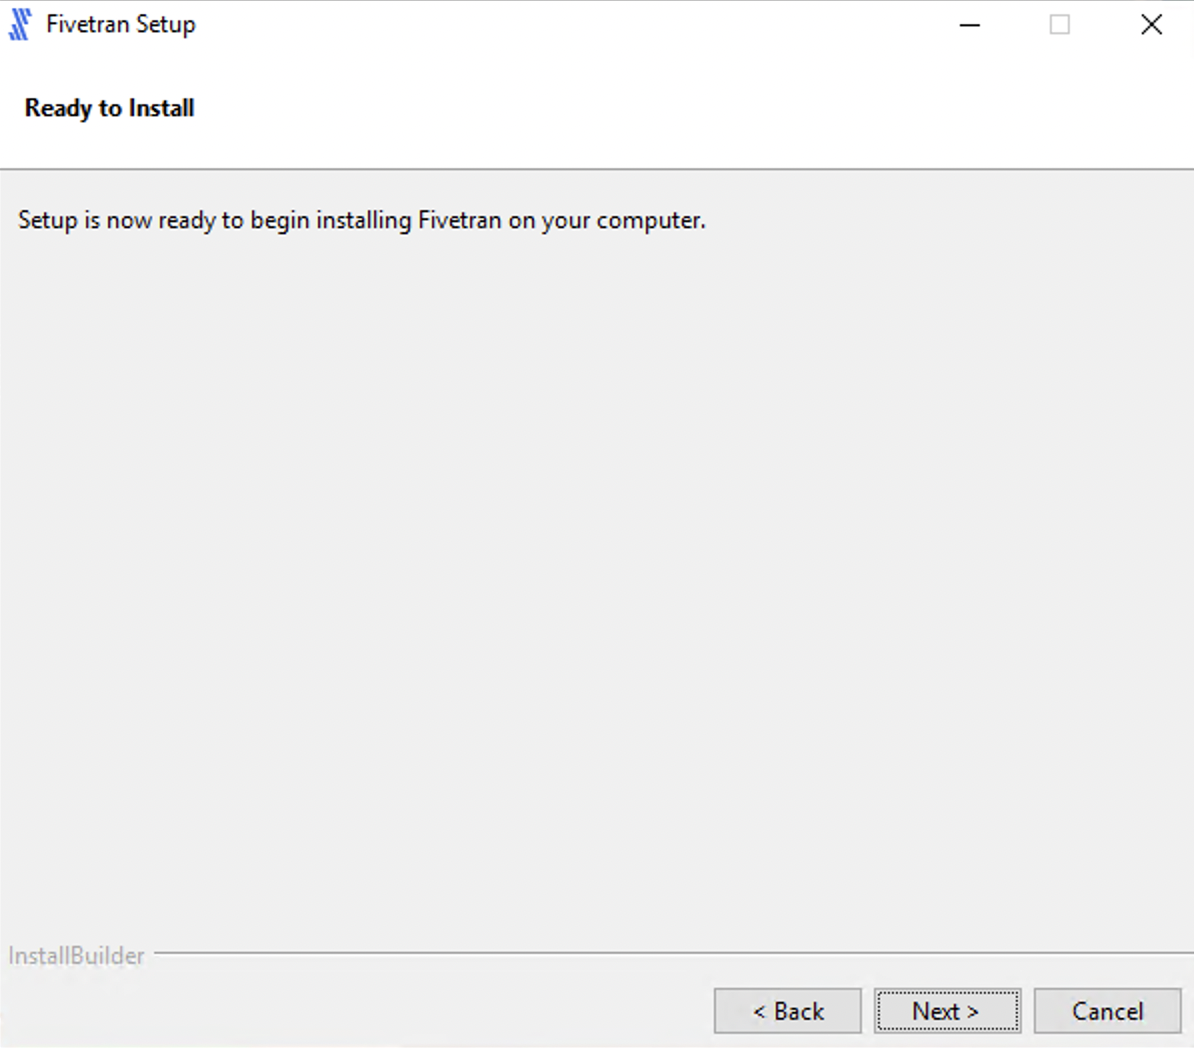
Click Next to initiate the installation.
NOTE: If you selected High-Volume Agent (HVA) and Proxy Agent in step 6, this will install both the Proxy Agent and High-Volume Agent under the same installation directory.
Click Finish to start the Proxy Agent. Once installed, the Proxy Agent service appears running in Windows Services.
NOTE: If you selected High-Volume Agent (HVA) and Proxy Agent in step 6, this will start both the Proxy Agent and High-Volume Agent services.
Install Proxy Agent on Windows using ZIP filelink
Expand for instructions
Perform the following steps in the user account that will be used for operating the Proxy Agent:
Configure the environment variables
HVR_HOME,HVR_CONFIG, andHVR_TMPfor your operating system using commandsetxorset. Each of these environment variables should be pointed to the installation directories -hvr_home,hvr_config, andhvr_tmp:Environment variables set using
setxcommand are available in the future command windows only and the environment variables set usingsetcommand are available in the current command window only.setx HVR_HOME C:\fivetran\hvr_home setx HVR_CONFIG C:\fivetran\hvr_config setx HVR_TMP C:\fivetran\hvr_tmpset HVR_HOME=C:\fivetran\hvr_home set HVR_CONFIG=C:\fivetran\hvr_config set HVR_TMP=C:\fivetran\hvr_tmpAlso, add the executable directory path (e.g
C:\fivetran\hvr_home\bin) to the environment variablePATH.setx PATH "%PATH%C:\fivetran\hvr_home\bin"set PATH=%PATH%;C:\fivetran\hvr_home\binAlternatively, environment variables can be configured using Windows GUI.
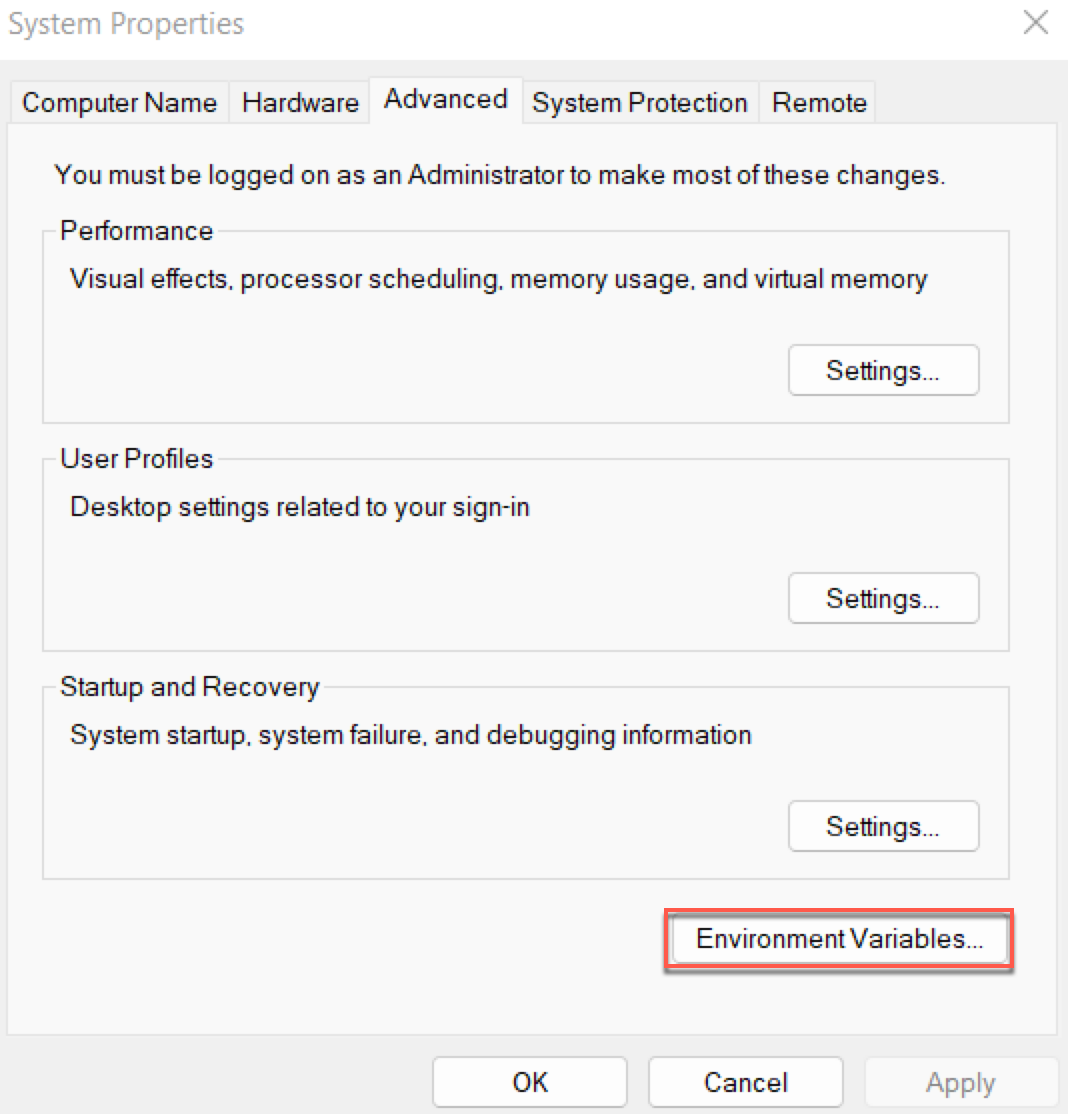
Navigate to Control Panel ▶ System and Security ▶ System ▶ Advanced system settings
Alternatively, use the command
sysdm.cplto open System Properties.In the Advanced tab, click Environment Variables...
In section System variables or User Variables for user_name, click New.
- Enter Variable name (e.g,
HVR_HOME) and Variable value (e.g,C:\fivetran\hvr_home).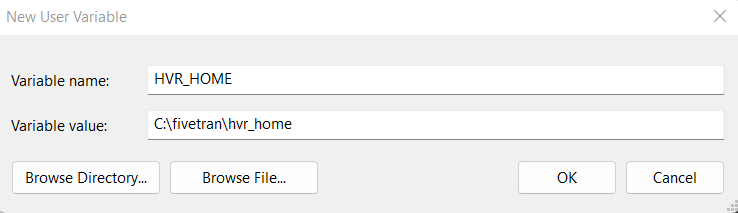
- Click OK.
- Repeated the above steps for each environment variable.
- Enter Variable name (e.g,
Add the executable directory path to the environment variable
Path.- In section System variables or User Variables for user_name, from the list of variables, select Path and click Edit....
- Click New and enter the path for the Proxy Agent executable.
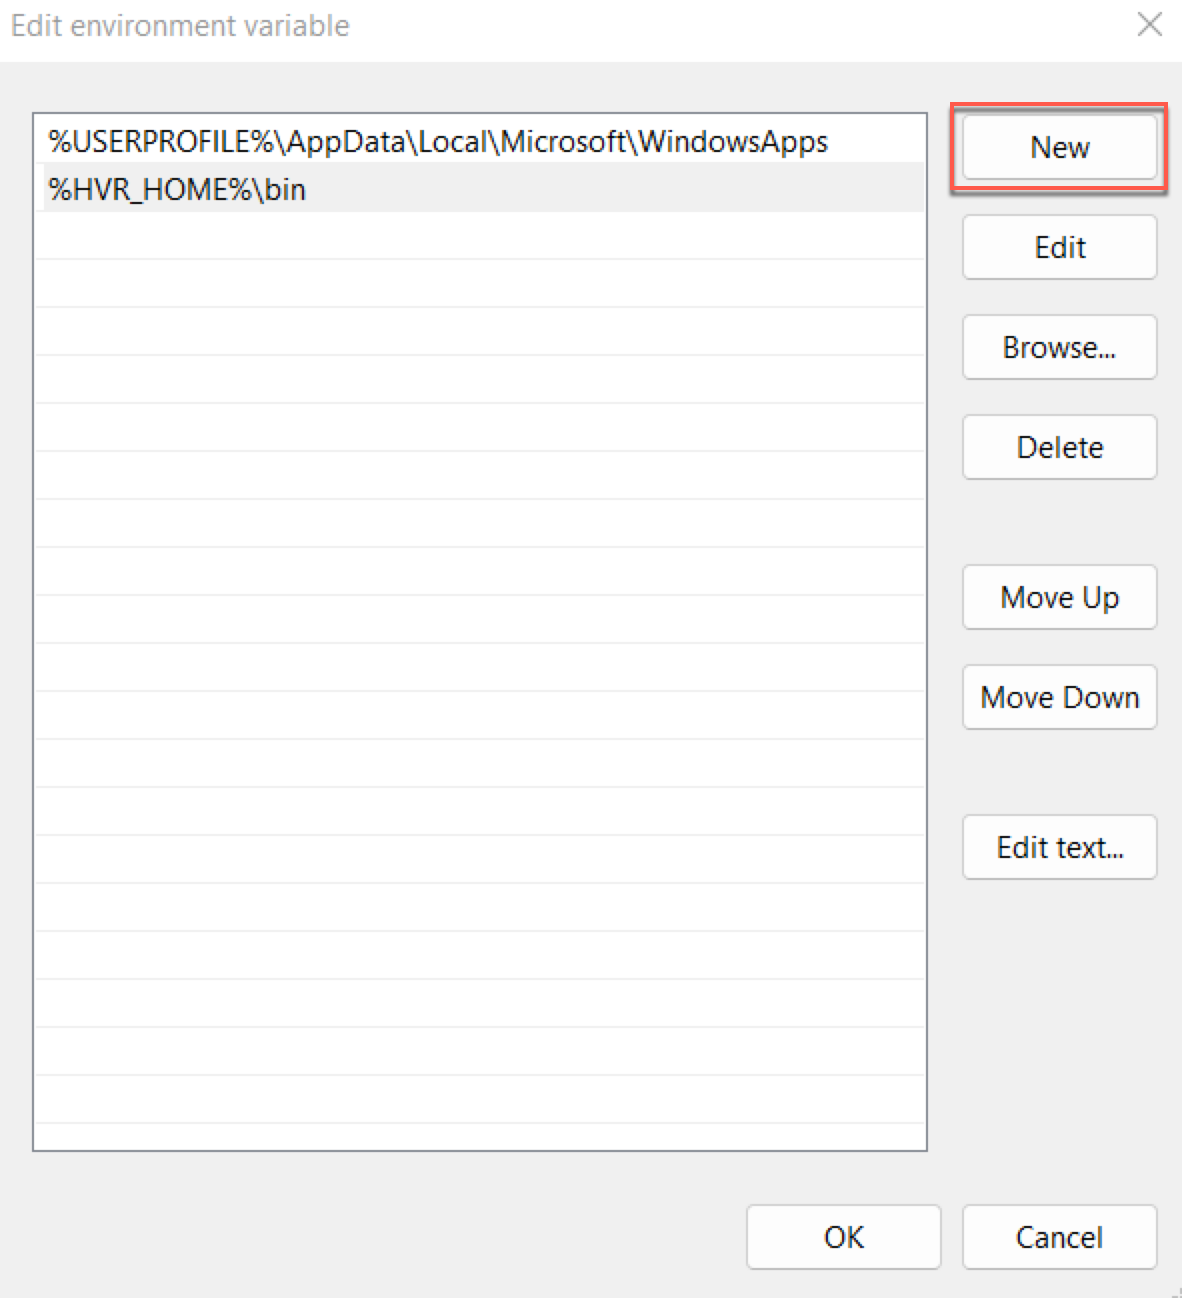
- Click OK.
Create the installation directory -
hvr_home(e.g.C:\fivetran\hvr_home):md %HVR_HOME%- Other directories (
hvr_configandhvr_tmp) will be created automatically as needed. hvr_homeis regarded a read-only directory.
- Other directories (
Uncompress (unzip) the installation file (e.g. fivetran-6.1.0_23-hub_and_agent-windows-x64-64bit_ga_patch.zip) into the
hvr_homedirectory:cd %HVR_HOME% C:\fivetran\hvr_home>tar -xf C:\Users\Admin\Downloads\fivetran-6.1.0_23-hub_and_agent-windows-x64-64bit_ga_patch.zipAlternatively, files can be uncompressed using the 'Extract All' option in Windows GUI.
Paste the Proxy Agent settings generated in Step 6 to the
proxyagent.conffile located in theHVR_CONFIG/proxydirectory.NOTE: If missing, create the file manually.
Run the following command to validate the Proxy Agent settings:
%HVR_HOME%/jre/bin/java -jar %HVR_HOME%/proxy/proxyagent.jar -v %HVR_CONFIG%/proxy/proxyagent.confCreate a
.batfile (e.g.install_and_run_proxy_service.bat) with the following contents.FOR /F "delims=" %%i IN ('CALL "%HVR_HOME%/bin/hvr" hvrhubserversvc -s') DO SET HvrHubServerSvcOutput=%%i REM We use a normalized HVR_CONFIG path hash to guarantee a unique service name SET HubConfigHash=%HvrHubServerSvcOutput:~13,8% REM In the CLI below use "DomainName\UserName" for --ServiceUser and specify --ServicePassword parameter if needed REM Adjust the other parameters as necessary REM Ensure to have unique service name (in //IS//<ServiceName>) and display name %HVR_HOME%/proxy/prunsrv.exe //IS//FivetranProxy_%HubConfigHash% ^ --StartParams "%HVR_CONFIG%/proxy/proxyagent.conf" ^ --ServiceUser "LocalSystem" ^ --DisplayName "Fivetran Proxy Agent [%HubConfigHash%]" ^ --Description "Fivetran Proxy Agent installed into %HVR_HOME%\proxy" ^ --Jvm "%HVR_HOME%/jre/bin/server/jvm.dll" ^ --JavaHome "%HVR_HOME%/jre" ^ --Classpath "%HVR_HOME%/proxy/proxyagent.jar" ^ --StartPath "%HVR_HOME%/proxy/" ^ --Startup=auto ^ --StartMode=jvm ^ --StartClass=com.fivetran.proxy.agent.ProxyAgent ^ --StartMethod=main ^ --StopMode=jvm ^ --StopClass=com.fivetran.proxy.agent.ProxyAgent ^ --StopMethod=stop ^ --JvmOptions "-XX:+HeapDumpOnOutOfMemoryError" ^ --StdOutput "%HVR_CONFIG%/proxy/logs/agent-out.log" ^ ++Environment "HVR_CONFIG=%HVR_CONFIG%" ^ ++Environment "HVR_HOME=%HVR_HOME%" ^ ++Environment "HVR_TMP=%HVR_TMP%" %HVR_HOME%/proxy/prunsrv.exe //ES//FivetranProxy_%HubConfigHash%Run the
.batfile to configure and start the Proxy Agent:install_and_run_proxy_service.bat
Install Proxy Agent on Linuxlink
Expand for instructions
Perform the following steps as the user that will be used for operating Proxy Agent:
The commands to set the environment variables depend on the shell you use to interface with the operating system. This procedure lists examples that can be used in Bourne Shell (sh) and KornShell (ksh).
Configure the environment variables
HVR_HOME,HVR_CONFIG, andHVR_TMPfor your operating system. Each of these environment variables should be pointed to the installation directories -hvr_home,hvr_config, andhvr_tmp.export HVR_HOME=/home/fivetran/hvr_home export HVR_CONFIG=/home/fivetran/hvr_config export HVR_TMP=/home/fivetran/hvr_tmpAlso, add the executable directory path to the environment variable
PATH.PATH=$PATH:$HVR_HOME/binAdd the environment and the executable directory path into the startup file (e.g.
.profile).export HVR_HOME=/home/fivetran/hvr_home export HVR_CONFIG=/home/fivetran/hvr_config export HVR_TMP=/home/fivetran/hvr_tmp export PATH=$PATH:$HVR_HOME/binCreate the installation directory -
hvr_homeusing the following commands:umask 022mkdir $HVR_HOMETIP:
umask 022is used so that the files and directories created in the following commands are readable by everyone (other Linux users and groups), but only writable by the owner. Other directories (HVR_CONFIGandHVR_TMP) will be created automatically as needed. TheHVR_HOMEdirectory is regarded as read-only.Uncompress the installation file (e.g.
fivetran-6.1.0_23-hub_and_agent-linux_glibc2.17-x64-64bit_ga.tar.gz) into theHVR_HOMEdirectory:cd $HVR_HOMEtar xzf /tmp/hvr-6.1.0_23-hub_and_agent-linux_glibc2.17-x64-64bit_ga.tar.gzOnce installed, the
jreandproxyfolders are created in yourHVR_HOMEdirectory.Create a new directory for the
proxyagent.conffile inhvr_config(/home/fivetran/hvr_config/proxy). Paste the Proxy Agent settings generated in step 6 to theproxyagent.conffile located in the newly created directory.Run the following command to verify if the Linux machine is ready for the setup. The output of the command should be
systemd.ps -p 1 -o comm=Update the
fivetran_proxy.servicefile in the/etc/systemd/systemdirectory with the correct path tojava.jar,proxyagent.jar, andproxyagent.conffiles.If missing, create the
fivetran_proxy.servicefile manually. The contents of the file should be as follows:[unit] Description=Fivetran Proxy Agent (# replace me) [Service] Type=simple ExecStart=/home/fivetran/hvr_home/jre/bin/java -jar /home/fivetran/hvr_home/proxy/proxyagent.jar /home/fivetran/hvr_config/proxy/proxyagent.conf # Restart this service to after a crash Restart=always # The number of seconds to wait before attempting a restart RestartSec=5s [Install] WantedBy=multi-user.targetExecute the following commands as the
rootuser to start the Proxy Agent service.a. Enable the service:
systemctl enable fivetran_proxy.serviceb. Start the service:
systemctl start fivetran_proxy.servicec. Verify the status of the service:
systemctl status fivetran_proxy.service
High-Volume Agent connection optionslink
There are several ways to connect Fivetran to your database using High-Volume Agent (HVA) connector. Select the configuration that best aligns with your specific networking environment and preferences. Detailed instructions for each connection option can be found in our HVA connection options documentation:
- Direct connection
- Private Link connection - AWS PrivateLink, Azure Private Link, or Google Cloud Private Service Connect
- SSH tunnel connection
- Reverse SSH tunnel connection
- VPN tunnel connection
- Proxy Agent connection